Embed a Chart Authenticated with Atlas App Services
On this page
Atlas App Services is a serverless platform that enables developers to quickly build applications without having to set up server infrastructure. App Services offers several authentication options, including Google OAuth, Facebook Login, and email/password. You can use the authentication mechanism from an app service to control data access for an embedded chart.
This tutorial shows you how to:
Enable authenticated embedding for a chart.
Use the Embedding SDK to embed a chart authenticated by a custom Atlas App Services provider.
Use your app service to control the data in your embedded chart.
Note
This tutorial does not cover creating an app service with authentication. See the Atlas App Services documentation for app creation tutorials.
Prerequisites
You must be an Atlas Project Owner to configure embedding authentication providers for your linked Charts instance.
You must have a chart which uses your app's backing database as its data source. For more information about creating a chart, see Build Charts.
Procedures
Enable Authenticated Embedding for a Chart
Enable authenticated embedding to generate a Charts Base URL and a chart ID. You will need your Charts Base URL and chart ID to display your chart on a web page.
Select a chart.
From the dashboard, click at the top-right of the chart to access its embedding information. Select Embed chart from the dropdown menu.
Note
If a chart is on a dashboard that has embedding enabled, the Embed Chart option is automatically enabled. Therefore, you can't select the Embed chart option for charts within dashboards that have embedding enabled.

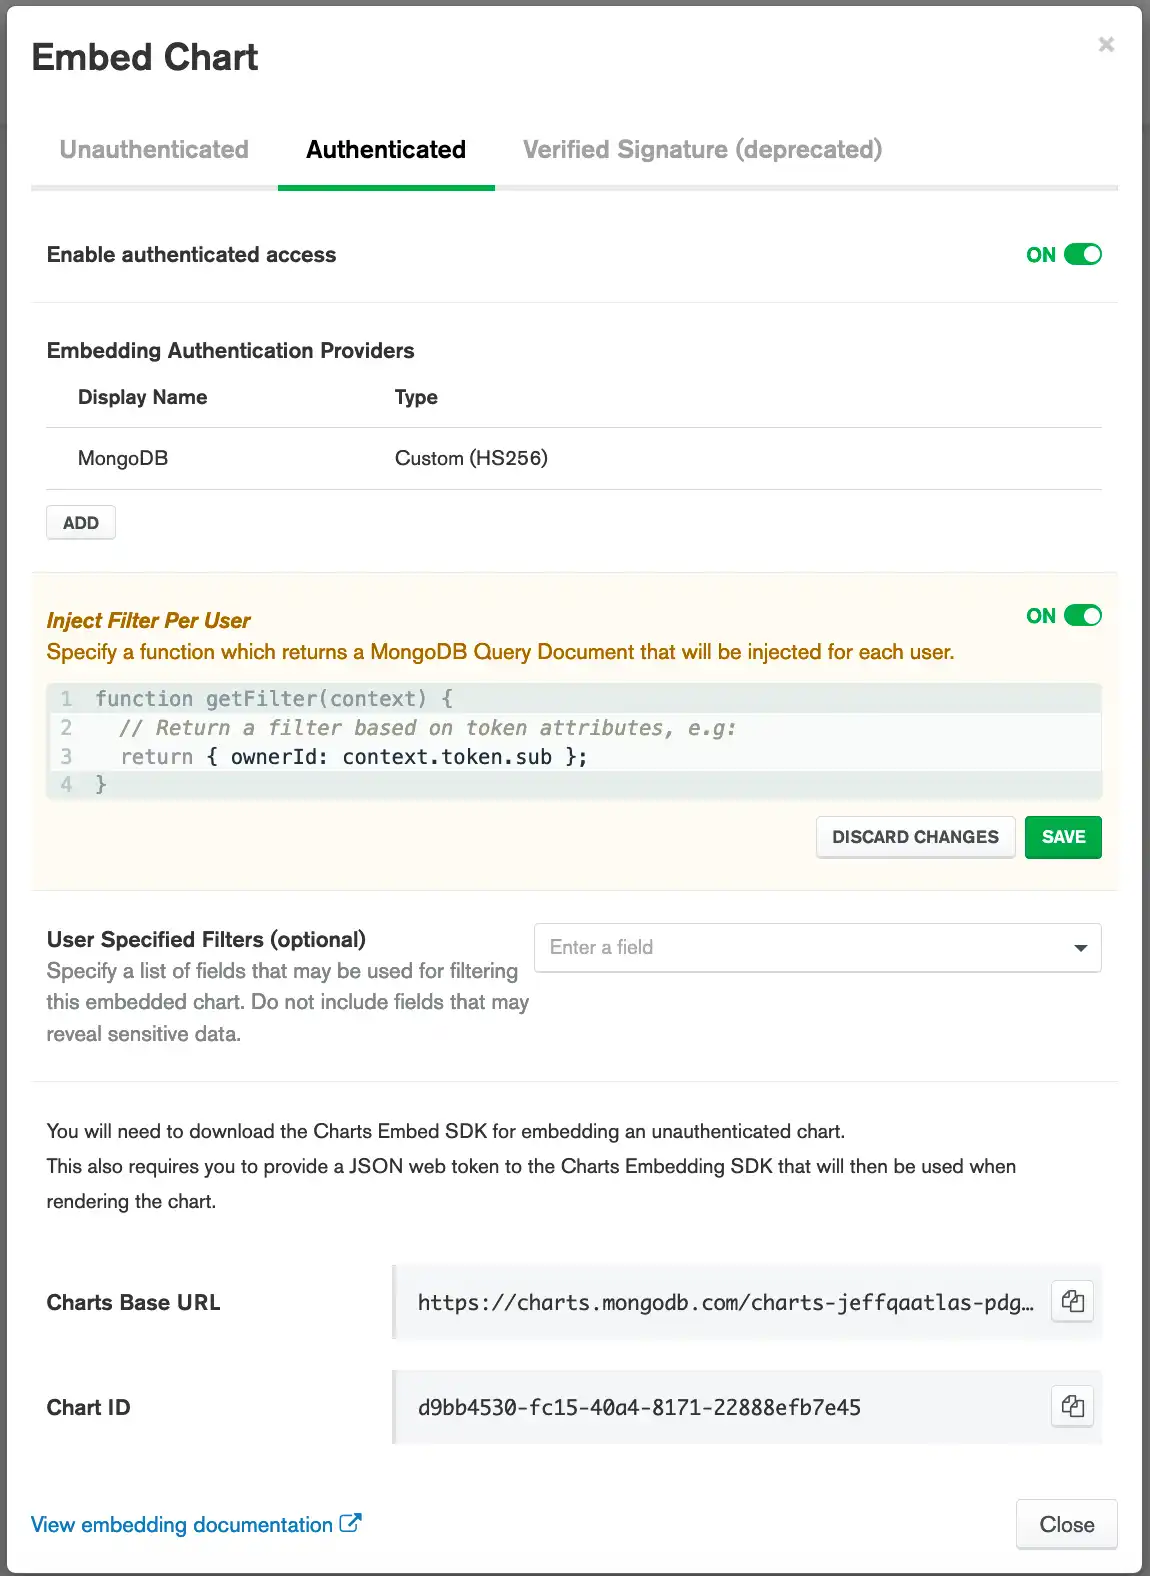
(Optional) Specify a filter function to inject per user.
You can specify a function to inject a MongoDB filter document for each user who views the chart. This is useful for rendering user-specific charts.
Example
The following filter function only renders data where the
ownerId field of a document matches the value of
the Embedding Authentication Provider's token's sub field:
function getFilter(context) { return { ownerId: context.token.sub }; }
Tip
See also:
To learn more about injecting filters per user, see Inject User-Specific Filters.
(Optional) Specify filterable fields for your chart.
Specify the fields on which chart viewers can filter data. By default, no fields are specified, meaning the chart cannot be filtered until you explicitly allow at least one field.
Tip
See also:
To learn more about filterable fields, see Specify Filterable Fields.
Configure Charts to use your Custom Atlas App Services Provider
Add the authentication provider.
From the Authentication providers section, click Add.
In the Name field, enter a descriptive name for the provider.
From the Provider list, select Atlas App Services.
From the Atlas Project list, select the Cloud project that contains your app service.
From the App ID list, select the app service to use for authentication.
Set toggle switch for using Atlas App Services rules for data access.
In addition to authenticating users for embedded chart access, you can perform fine-grained data access control with your app service service rules. Set the toggle switch to On if you want to enable rule enforcement.
When this option is enabled, any App Services rules defined on collections will be observed by Charts when retrieving chart data. You can use this feature to restrict access to the data shown on your chart, including showing different subsets of data to different users, depending on their role.
Note
This option assumes that the data source for this chart uses the same MongoDB database and collection as your app service.
Using this option may have a performance impact, so you should leave it off if you do not need to restrict data access based on App Services rules.
Create a Web App to Display Your Chart
If you already have an app in which to display your chart, you're ready to add an embedded chart. If not, proceed with the remaining steps to create a new app.
MongoDB offers a pre-built example app that shows how to use the Embedding SDK to display an embedded chart using App Services authentication.
Clone the GitHub repository and
follow the instructions in the Readme file to begin using the app.
You can run the app as-is, or you can customize it to use the chart you
created earlier.
Note
The example app assumes that your app service uses email/password authentication. If your app service uses another authentication mechanism, the example app will require additional customization.
Customize the Node.js App
All the lines you need to edit are marked with a comment containing
~REPLACE~.
Enter your Charts Base URL
Replace the existing Charts Base URL with the Base URL of the chart you want to display. Your Charts Base URL is visible in the embedding options modal window. See Embedding SDK for detailed instructions on enabling embedding for a chart.
const sdk = new ChartsEmbedSDK({ baseUrl: "https://charts-dev.mongodb.com/charts-test2-pebbp", // Optional: ~REPLACE~ with your Charts URL getUserToken: () => getRealmUserToken(client), });
Note the getRealmUserToken() function in the code snippet above, which
returns the JWT from the existing Atlas App Services authentication session.
getRealmUserToken() must be imported from the Embedding SDK, as you can
see in the import statement on line 2 of the example app:
import ChartsEmbedSDK, { getRealmUserToken } from "@mongodb-js/charts-embed-dom";
You can also include the Embedding SDK with inline Javascript in an HTML page, as shown in the following code snippet:
<script src="https://s3.amazonaws.com/stitch-sdks/js/bundles/4.6.0/stitch.js"></script> <script src="https://unpkg.com/@mongodb-js/charts-embed-dom"></script>
To use the getRealmUserToken() function in this scenario, import it
from the SDK:
ChartsEmbedSDK.getRealmUserToken()
Enter your chart ID
Replace the existing chart ID with the ID of the chart you want to display. Your chart ID is visible in the embedding options modal window. See Embedding SDK for detailed instructions on enabling embedding for a chart.
const chart = sdk.createChart({ chartId: "a2e775e6-f267-4c2c-a65d-fbf3fad4a4f2", // Optional: ~REPLACE~ with your Chart ID });
After you finish customizing the app, it's ready to run.