Overview
With MongoDB Atlas as your data platform, your operational focus can shift away from the mundane operational tasks and workflows required to build and maintain database infrastructure, allowing you to focus on helping engineers add value to the business. Instead of maintaining hardware and keeping up with operating system-level software patches, engineers can devote their time and energy to developing data models that meet the current and future requirements of your enterprise.
This document outlines some best practices for establishing and maintaining a successful MongoDB production deployment using MongoDB Atlas clusters.
For more Atlas best practices, see the Atlas Architecture Center.
Tip
To learn about sizing considerations, see Atlas Cluster Sizing and Tier Selection.
To learn more about resilience, see Build a Resilient Application with MongoDB Atlas.
To learn more about Continuous Cloud Backup. see Recover a Point In Time with Continuous Cloud Backup.
Roles and Responsibilities
MongoDB manages and operates the infrastructure required to provide a MongoDB Database Service to the customer. MongoDB's responsibilities include the following:
Manage the database clusters and underlying infrastructure, ensuring availability, stability, and performance of MongoDB, backed by a 99.995% Uptime Service Level Agreement (SLA) for clusters of size
M10and larger.Ensure the health of the underlying compute nodes. Make sure they are running, have network connectivity, and have all recommended OS-level patches to maintain the Uptime SLA.
Manage the MongoDB database configuration based on the customer's specific design choices made via the Atlas user interface or REST API.
Apply all MongoDB maintenance upgrades automatically to ensure the latest bug fixes to the product are in use.
Manage the security profile, including Role-Based Access Control, adding IP addresses to an IP access list, and peering to maximize cluster security per the customer's direction.
Provide backup and restore services.
The customer continues to develop and deploy applications which access MongoDB, without having to directly manage the underlying database resources and/or infrastructure.
Cluster Management
Important
Atlas doesn't support moving clusters from one project to another. Instead, perform a live migration.
MongoDB Atlas abstracts away database operations so that you can focus on high-value, high-level management decisions. You can manage access to your Atlas clusters with Atlas User Roles. You can apply these permissions only on the the organization level or the project level. So, you should carefully plan the hierarchy of your organizations and projects.
Tip
If you need to create more than the Atlas organization limit of 250 projects, create more organizations to store them. To learn more, see Atlas Organization and Project Limits.
To create a well-designed hierarchy of organizations and projects within Atlas, break your clusters into projects that make sense for your use cases. This allows for maximum enterprise efficiency with minimum operational friction.
Tip
Use Cross-Organization Billing to link multiple Atlas organizations and receive a single invoice for all of them. To learn more, see Cross-Organization Billing Use Cases.
The Organization Level
At the Organization level, you can implement security controls and create users which work across one or more Projects. Atlas billing occurs at the Organization level.
To efficiently control user access and privileges, you can group users into teams at the Organization level.
Important
Don't include sensitive information in your organization names.
The Project Level
Projects offer a security isolation and authorization boundary, so they are typically allocated by application team and application environment. For example, within two application teams there might be six projects: one for each team in the Development, Staging, and Production environments.
You can create project-level Atlas users and roles with appropriate access to the different production and development application environments.
Users with the
Project Read Onlyrole can access project-level monitoring and system health metadata without having access to any collection data or administrative operations.Users with the
Project Cluster Managerrole can scale clusters and perform other administrative operations, but have no data-level access.
Important
Features Unavailable in Flex Clusters
Flex Clusters don't support most of the following responsibilities. To learn more, see Flex Cluster Limitations.
Other project-level responsibilities include:
Configure termination protection to prevent users from accidentally deleting your cluster.
Implement optional enterprise security features, including:
Set up network access configuration, including:
Define appropriate database alerts via the Atlas interface or API and respond to any which require attention.
Integrate with external monitoring/alerting systems, such as DataDog and New Relic.
Important
Effective Wednesday, June 16th, 2021, New Relic no longer supports the plugin-based integration with MongoDB. We do not recommend that you sign up for the plugin-based integration.
To learn more, see the New Relic Plugin EOL Statement.
Important
Don't include sensitive information in your project names.
Cluster Naming Conventions
Choosing the right naming convention for your Atlas clusters is a good first step towards running a successful production environment. Once you've named a cluster you can't rename it, so it's important to get it right the first time. The following suggestions can make it easier to parse logs and differentiate clusters.
Use descriptive, lowercase names.
Avoid special characters.
Join words with hyphens or underscores. Avoid blank spaces between words.
Use a convention which makes it clear whether a cluster is for production, staging, or development purposes.
Don't include sensitive information in your cluster names.
Some examples of good cluster names:
prod-aws-websitestaging-gcp-internaldev-azure-analytics
Single Region and Multi-Region Clusters
High availability and cluster durability depend on a cluster's geographical deployment configuration. Clusters which are deployed within a single region are spread across availability zones within that region, so they can withstand partial region outages without an interruption of read or write availability.
You can optionally choose to spread your clusters across two or more regions for greater resilience and workload isolation.
The order of regions determines the priority order for the location of the primary node. Therefore, if you wish to direct database write operations to a particular region when that region is available, you should list that region first. The second region on the list should be the second choice for where writes should go if the first region is unavailable.
The following example from the Atlas Create a Cluster UI shows a multi-region cluster with electable nodes in three different regions, arranged by priority from highest to lowest:
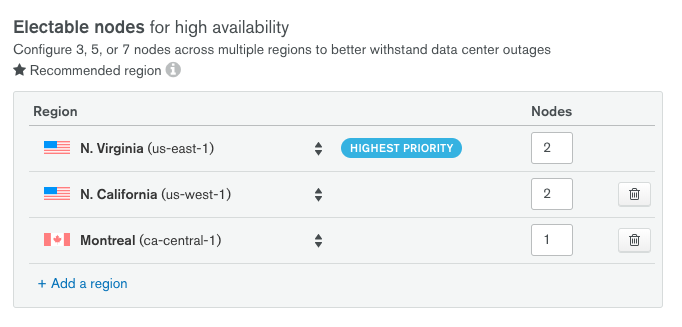
If the us-east-1 region becomes unavailable, a new primary will be elected in the us-west-1 region.
Note
Clusters must have an odd number of nodes to ensure primary electability. To learn more, see Replica Set Elections.
Deployment in Two Regions
Deploying a cluster to two regions ensures that a copy of your data will always be maintained in more than one region. However, a loss of the region which contains a majority of the nodes in the cluster will leave the second region in a read-only state until an administrator intervenes or the original region becomes available.
Deployment in Three or More Regions
Deploying a cluster to three or more regions ensures that the cluster can withstand a full region-level outage while maintaining read and write availability, provided the application layer is fault-tolerant.
If maintaining write operations in your preferred region at all times is a high priority, it is recommended to deploy the cluster so that at least two electable members are in at least two data centers within your preferred region.
Global Clusters
For the best database performance in a worldwide deployment, users can configure a global cluster which uses location-aware sharding to minimize read and write latency. Users with geographical storage requirements can also ensure that data is stored in a particular geographical area.
Sensitive Information
Don't provide sensitive information such as Personally Identifiable Information (PII) or Protected Health Information (PHI) for the following items:
Application Management
Application-level responsibilities include:
Schema design, including query and index optimization.
Cluster tier and topology selection. Choosing the appropriate cluster size and topology (replica set or sharded cluster), along with storage capacity and IOPS is crucial for optimal database performance.
Provisioning of non-production clusters. Production backups can be restored into non-production clusters with the Atlas UI or the API.
Capacity planning. Determining when additional computational capacity is needed, typically using the monitoring telemetry that Atlas provides. Additional capacity can be added with no application downtime, and you can optionally enable auto-scaling to respond automatically to spikes in usage.
Deciding when to implement a major database version upgrade.
Implementing and testing a backup and restoration plan.
Ensuring that applications gracefully handle cluster failover through testing.
Configuring data analytics services with tools such as BI Connector and Charts.
Scale Clusters
MongoDB Atlas offers two methods for scaling, vertical and horizontal.
Vertical scaling involves increasing a clusters storage capacity, computing power, and/or IOPS rate. Vertical scaling can be accomplished quickly and is useful for peak usage periods. Vertically scaling from Free clusters or Flex clusters requires a few minutes of downtime. Scaling between dedicated clusters (M10 and greater) happens without downtime.
When scaling vertically, M30 and higher clusters are recommended for production environments. You can use the following cluster tiers as production environments for low-traffic applications, but these tiers are recommended for development environments:
{+Flex clusters+}
M10andM20{+Dedicated clusters+}
Horizontal scaling involves implementing sharding or adding shards in an existing sharded cluster. Horizontal scaling requires careful planning and execution, and is part of a long-term growth strategy for M30+ clusters. You can also reduce the number of shards in a sharded cluster.
IMPORTANT: When you remove a shard in 8.0, Atlas uses the moveCollection command to move any unsharded collections in that shard to a remaining shard. All unsharded collections remain online during this process.
All sharded collections remain online and available during the shard removal process. You must turn on the balancer to drain the sharded collections from the removed shard.
Atlas moves any unsharded collections that can't be drained by
moveCollectioncommand by using the movePrimary command. To learn more about the limitations ofmoveCollection, see Restrictions.movePrimaryis an offline operation.For more information about shard removal, see Remove Shards from a Sharded Cluster.
Vertical and horizontal sharding can be combined in Atlas. For example, a sharded cluster can be vertically scaled up for a peak period, increasing the storage capacity and computing power of the individual sharded cluster members.
By default, Atlas vertically auto-scales cluster storage up to your configured cluster tier size limit.
You can configure Atlas to automatically scale your cluster tier and cluster storage capacity in response to increased cluster usage, allowing for a rapid, automated response to a need for greater storage computing power.
Manage Maintenance Windows
Atlas performs regular maintenance operations to ensure your clusters remain secure, stable, and up-to-date. By default, maintenance runs automatically in a rolling manner to preserve continuous availability. However, you can configure maintenance windows to gain more control over when these operations occur.
Maintenance windows are particularly useful for:
Aligning maintenance across environments: Defer maintenance by one or two weeks in some environments to test updates in development or staging before they reach production.
Controlling timing and notifications: Schedule maintenance during off-peak hours and receive advance notifications so you can plan accordingly.
Batching maintenance operations: Use the auto-defer feature to automatically consolidate multiple maintenance operations, reducing the total number of maintenance events your clusters experience.
Maintenance windows apply to Dedicated clusters (M10 and above) and are configured at the project level. To learn more about configuring maintenance windows and using features like auto-defer, see Configure Maintenance Window.
Multi-Tenancy
You can implement multi-tenancy with Atlas so that a single instance of an application serves multiple tenants. Your initial design decisions for a multi-tenant architecture can have unintended effects over time as requirements evolve or scaling expectations change. To learn more, see Build a Multi-Tenant Architecture.
Offload and Query Archived Data
As part of the data lifecycle, if you need to move cold data to a different storage tier, you can set up an Atlas Online Archive rule to move data based on a date or custom criteria. Once Atlas archives your infrequently accessed data, you have a unified view of your Atlas and Online Archive data through a read-only federated database instance.
Query Federated Data
You can use Atlas Data Federation to query data-in-place across diverse infrastructure or to move data between various systems. You can use the aggregation pipeline on data from multiple sources to extract insights from your data or to transform it for other purposes. For example, you can use $out to S3 and $out to Atlas to move data between storage tiers. You can also use $out to S3 to easily transform data from your Atlas cluster into JSON, BSON, CSV, TSV, Avro, Parquet, and ORC as well as land it in AWS S3 to feed downstream systems that need access.
Audit Temporary Database Users
Enabling auditing for all database users, including application service users, might severely affect cluster performance. If you need to audit the actions of a temporary database user, you can create a custom role targeted for auditing, create a temporary user with elevated privileges, and grant this user the custom role to audit their actions.
To audit the actions of a temporary database user:
Create a custom role for auditing.
Create a custom role targeted for auditing.
Enable database auditing.
To audit CRUD operations for the role you created, enable database auditing."
Create a temporary user.
To audit their actions, create a temporary user.
Assign the user the custom role you created for auditing. When you create the user, select the Save as temporary user option, then select the period of time you want the user to exist. When this period elapses, Atlas deletes the user.
Add a temporary IP access list entry.
Add a temporary IP access list entry to limit the temporary user's access to Atlas clusters.
When you create the IP access list entry for the temporary user, select the Save as temporary access list option, then select the period of time you want the access list entry to exist. When this period elapses, Atlas deletes the access list entry.
Download the logs.
To audit the actions of the temporary database user, download the logs.
Optional Monitoring & Logging Integrations
To learn more about monitoring and logging integrations available in Atlas, see Monitor Your Clusters.
Manage Cluster Data Volume
Atlas offers the following built-in tools to help you manage your cluster data volume:
Cluster auto-scaling automatically reacts to your application load and adjusts the cluster tier.
Online Archive automates the archival of infrequently accessed data.
Search Nodes scale independently and offload MongoDB Search and MongoDB Vector Search index storage from your cluster.
TTL indexes automatically remove documents from a time series collection to free up space.
In addition to these tools, see the cluster sizing guide to learn how to adjust your cluster's size up or down. You can also pause a cluster to save costs by temporarily shutting it down while preserving data for up to 30 days.
Support
Different tiers of support are available, including options for customers in development and for enterprise customers.
Possible support areas include:
Issues and concerns with the MongoDB clusters under management.
Performance-related inquiries.
Application-side and driver consultation.