You can configure your Atlas project to use an AWS IAM role for accessing your AWS KMS keys for Encryption at Rest. You can either use an existing role or create a new role when you enable Encryption at Rest for your project.
Note
The MongoDB Atlas Shared Responsibility Model defines the complementary duties of MongoDB and its customers in maintaining a secure and resilient data environment. Under this framework, MongoDB manages the security and operational integrity of the underlying platform, while customers are responsible for the configuration, management, and data policies of their specific deployments. For a detailed breakdown of ownership across security and operational excellence, see Shared Responsibility Model.
This page covers configuring customer key management on your Atlas project for role-based access. You can also set up AWS PrivateLink in your AWS KMS to ensure that all traffic between Atlas and your AWS KMS takes place over AWS's private network interfaces.
If you have not yet enabled Encryption at Rest for your new or existing Atlas project, follow the Enable Role-Based Access for Your Encryption Key for a Project procedure to enable Encryption at Rest for your Atlas project. If you have an Atlas project for which you have already enabled Encryption at Rest and configured credentials-based access to your encryption keys, follow the Switch to Role-Based Access for Your Encryption Key for a Project procedure to switch to role-based access to your encryption keys.
You must configure customer key management for the Atlas project before enabling it on clusters in that project.
Required Access
To configure customer key management, you must have Project Owner access to the project.
Users with Organization Owner access must add themselves to the project as a Project Owner.
Enable Customer-Managed Keys with AWS KMS
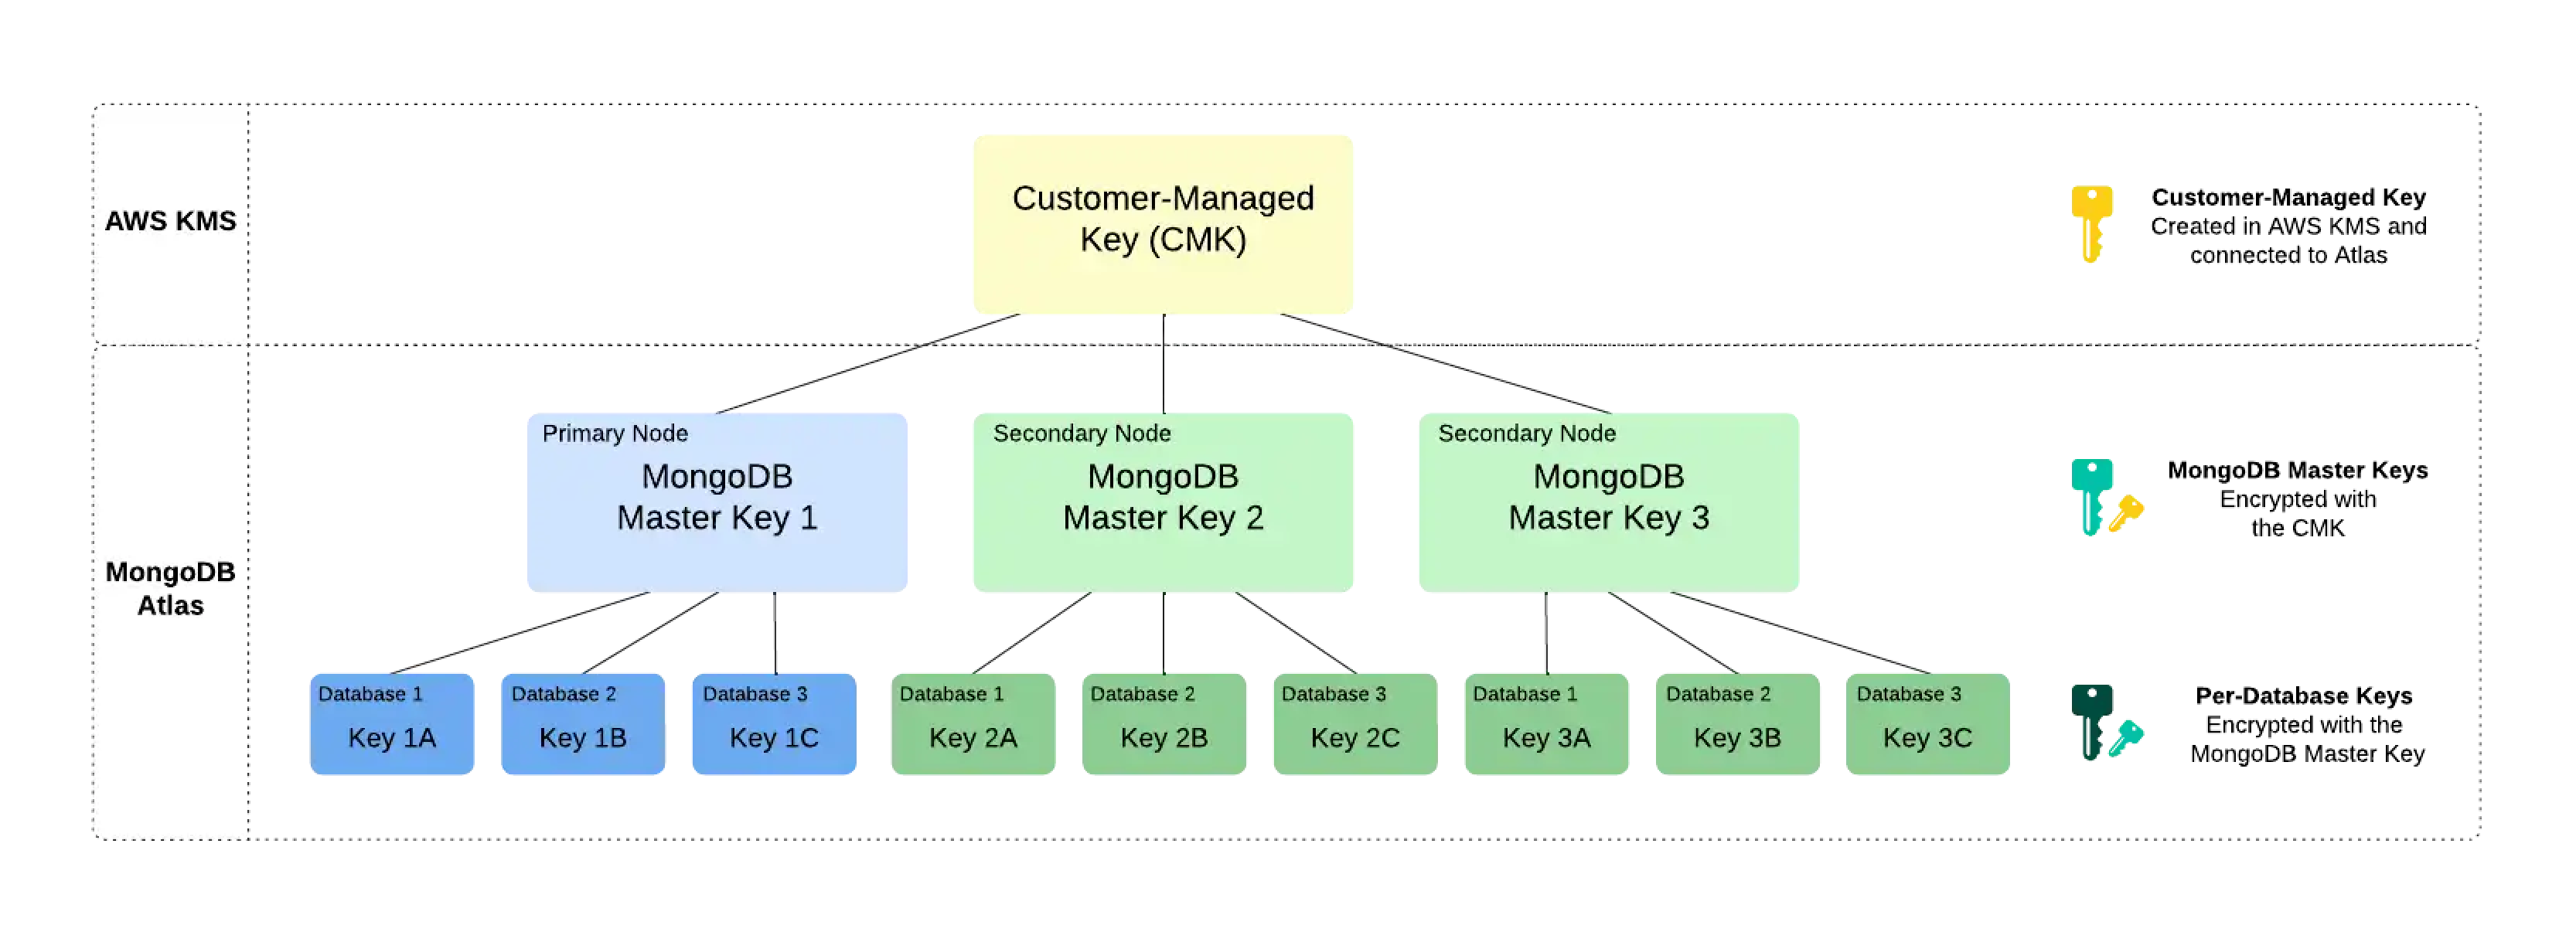
Customer key management in Atlas follows a process called envelope encryption. This process creates multiple layers of encryption by encrypting one key with another key. To enable customer key management, Atlas uses the following encryption keys:
Customer-Managed Key (CMK)Customer-managed keys are encryption keys that you create, own, and manage in AWS KMS. You create the CMK in AWS KMS and connect it to Atlas at the Project level. To learn more about the CMKs used in AWS KMS, see the AWS KMS Documentation.
Atlas uses this key only to encrypt the MongoDB Master Keys.
MongoDB Master KeyEach node in your Atlas cluster creates a MongoDB Master Key. MongoDB Master Keys are encryption keys that a MongoDB Server uses to encrypt the per-database encryption keys. Atlas saves an encrypted copy of the key locally.
This key is encrypted with the CMK and encrypts the per-database encryption keys.
Per-Database Encryption KeyEach node in your Atlas cluster also creates an encryption key per database in your cluster. Atlas uses these keys to read and write data via WiredTiger, which also encrypts and stores these keys.
This key is encrypted with the MongoDB Master Key.
Example
Consider the following encryption hierarchy for a three-node replica set. Atlas uses the CMK from AWS KMS to encrypt a unique MongoDB Master Key for each node in the cluster. Each node also contains three databases, each of which is encrypted with a unique per-database encryption key. When the cluster starts up, Atlas decrypts the MongoDB Master Key by using the CMK from AWS KMS and supplies this to the MongoDB Server.
Note
If you revoke Atlas's access to the CMK, Atlas shuts down the nodes in your cluster and you can't access your data until you restore access to the CMK.
Rotate your AWS Customer Master Key
Note
This feature is not available for any of the following deployments:
Free clusters
Flex clusters
To learn more, see Limits.
MongoDB Master Key - MongoDB Responsibility
When you use your own cloud provider KMS, Atlas automatically rotates MongoDB Master Keys at least every 90 days. Your key rotation will begin during a maintenance window, if you have one configured. Deferring maintenance (either manually or automatically) may cause the key to be rotated past the 90-day mark. Keys are rotated on a rolling basis and the process does not require the data to be rewritten.
Your AWS CMK - Your Responsibility
Atlas does not automatically rotate the AWS CMK used for AWS-provided Encryption at Rest.
As a best practice, Atlas creates an alert to remind you to rotate your AWS CMK every 90 days by default when you enable Encryption at Rest for an Atlas project. You can configure the time period of this alert.
You can rotate your AWS CMK yourself or configure your AWS KMS instance to automatically rotate your CMK. If you configure automatic AWS CMK rotation, the default time period for rotation is approximately 365 days.
If you have already set up an automatic CMK rotation in AWS and don't want to receive the Atlas alert to rotate your CMK every 90 days, you can modify the default alert period to be greater than 365 days or disable the alert.
This page explains how to create a new key and update the CMK ID in Atlas to rotate your Atlas project CMK. This method of key rotation supports more granular control of the rotation period compared to AWS KMS automatic CMK rotation.
Important
Cloud Backups with Encryption at Rest
For clusters using Encryption at Rest and Back Up Your Cluster, Atlas uses the project's CMK and AWS IAM user credentials at the time of the snapshot to automatically encrypt the snapshot data files. This is an additional layer of encryption on the existing encryption applied to all Atlas storage and snapshot volumes.
Atlas does not re-encrypt snapshots with the new CMK after rotation. Do not delete the old CMK until you check every backup-enabled cluster in the project for any snapshots still using that CMK. Atlas deletes backups in accordance to the Backup Scheduling, Retention, and On-Demand Snapshots. After Atlas deletes all snapshots depending on a given CMK, you can delete that CMK safely.
Procedure
In Atlas, go to the Advanced page for your project.
If it's not already displayed, select the organization that contains your project from the Organizations menu in the navigation bar.
If it's not already displayed, select your project from the Projects menu in the navigation bar.
In the sidebar, click Database & Network Access under the Security heading.
In the sidebar, click Advanced.
The Advanced page displays.
Update the AWS CMK details.
Enter the following information:
FieldActionAWS IAM role
Select an existing AWS IAM role that already has access to your KMS keys, or authorize a new role and grant this role access to your KMS keys with the following permissions:
To learn more, see Role-Based Access to Your Encryption Key for a Project.
Customer Master Key ID
Enter your AWS customer master key ID.
Customer Master Key Region
Select the AWS region in which you created your AWS CMK.
Atlas lists only AWS regions that support AWS KMS.
Click Save.
Atlas displays a banner in the Atlas console during the CMK rotation process. Do not delete or disable the CMK until your changes have deployed.
Reconfigure AWS KMS Region During an Outage
During a regional outage, your AWS KMS region might become unavailable. If you've enabled Encryption at Rest using Customer Key Management, you can perform encrypt and decrypt operations while at least one node is still available. However, if all nodes become unavailable, you can't perform cryptographic operations. A node becomes unavailable if it restarts during the outage.
To get the unavailable nodes to a healthy state, you can reconfigure your current AWS KMS region to an available region. To change your KMS region, your AWS KMS key must be a multi-Region key. To create a multi-Region Key, see the AWS documentation.
Note
You can't convert a single-Region key to a multi-Region Key.
Procedure
To reconfigure your AWS KMS region, complete the following steps in Atlas:
In Atlas, go to the Advanced page for your project.
If it's not already displayed, select the organization that contains your project from the Organizations menu in the navigation bar.
If it's not already displayed, select your project from the Projects menu in the navigation bar.
In the sidebar, click Database & Network Access under the Security heading.
In the sidebar, click Advanced.
The Advanced page displays.
Next Steps
You can use a customer-managed key (CMK) from your AWS KMS over a public network or over AWS PrivateLink. To learn more, see the following:
Enable Customer-Managed Keys for Search Nodes
By default, MongoDB and search processes run on the same nodes. With this architecture, customer-managed encryption applies to your database data, but it does not apply to search indexes.
When you enable dedicated Search Nodes, search processes run on separate nodes. This allows you to enable Search Node Data Encryption, so you can encrypt both database data and search indexes with the same customer-managed keys for comprehensive encryption coverage.
Note
Database nodes and Search Nodes use different encryption methods with the same customer-managed keys. Database nodes use the WiredTiger Encrypted Storage Engine, while Search Nodes use encryption at the disk level.
Related Topics
To learn more about MongoDB Encryption at Rest, see Encryption at Rest in the MongoDB server documentation.
To learn more about Encryption at Rest with Cloud Backups, see Storage Engine and Cloud Backup Encryption.