EVENTGet 50% off your ticket to MongoDB.local NYC on May 2. Use code Web50! Learn more >

Morphia Java ODM for MongoDB

Morphia is a wrapper around the Java driver for MongoDB. It acts as an ODM (Object Document Model) for MongoDB documents. Its original goal was to provide an easy mapping to POJO (Plain Old Java Objects). Nowadays, newer versions of the Java driver support this mapping out of the box. However, Morphia still has some features, such as referencing and annotation-based indexing, which can provide additional value.

This article will introduce Morphia and highlight some of the Morphia-specific features that it brings to the table.

What is Morphia?

Created initially as a MongoDB project, Morphia was given to the community in late 2018. It’s been maintained by a group of community contributors since and is currently hosted on Github. It was initially created to act as an ODM for MongoDB. Morphia uses an annotation syntax to augment regular classes. This makes it straightforward to create complex objects that can be stored across multiple collections that map to regular POJOs.

What are the benefits of using Morphia?

Most of the use cases of Morphia are also covered by the Java native driver, so you might wonder what are some valid use cases for Morphia nowadays.

Amongst other things, it offers indexing support directly through annotations. This feature makes it very easy to define and keep track of your indexes directly from your application code.

Transparent referencing is also one of the significant benefits of using Morphia. You can reference documents from another collection rather than embedding them directly. This is similar to the concept of foreign keys in traditional databases. Morphia takes care of loading the data from the multiple collections behind the scene, so you don’t need to.

Setting up the Java project

All the code from this article is available on Github. You can create a new maven project with the following command if you want to follow along.

mvn archetype:generate -DgroupId=com.mycompany.morphia -DartifactId=morphia-quickstart -DarchetypeArtifactId=maven-archetype-quickstart -DarchetypeVersion=1.4 -DinteractiveMode=false

This command will generate a boilerplate project. You will need two additional files to store the Morphia entities. Let’s create these files right away.

mkdir morphia-quickstart/src/main/java/com/mycompany/morphia/entities
touch morphia-quickstart/src/main/java/com/mycompany/morphia/entities/Ingredient.java
touch morphia-quickstart/src/main/java/com/mycompany/morphia/entities/Recipe.java

This application will store a recipe and the required ingredients into a MongoDB Atlas database.

This code will be in the main function of the App.java file. You can put in the following code with all the placeholders in that file.

App.java

package com.mongodb.morphia;

// Imports go here

public class App {
    
    // Set database name

    public static void main(String[] args) {
        // Get the database connection string

        // Define a datastore that will connect to the database

        // Configure the data store

        // Clean up the database by deleting any existing entries

        // Create ingredients

        // Query and sort the ingredients collection

        // Update an ingredient to change its name

        // List healthy ingredients

        // Create recipe

        // Fetching the references automatically fetches the associated documents

        // Updating the references

        // The end
        System.out.println("Application terminated.");
    }
}

For now, there isn’t much happening, but this will get filled in as you progress through the article.

Setting up Morphia

Next up, you will need to add Morphia to your project. This is done by adding the library to your Maven dependencies.

To add this new dependency, and update the other properties, replace your existing pom.xml file with the following.

pom.xml

<?xml version="1.0" encoding="UTF-8"?>

<project xmlns="http://maven.apache.org/POM/4.0.0" xmlns:xsi="http://www.w3.org/2001/XMLSchema-instance"
  xsi:schemaLocation="http://maven.apache.org/POM/4.0.0 http://maven.apache.org/xsd/maven-4.0.0.xsd">
  <modelVersion>4.0.0</modelVersion>

  <groupId>com.example.app</groupId>
  <artifactId>morphia-quickstart</artifactId>
  <version>1.0-SNAPSHOT</version>
  <name>morphia-quickstart</name>

  <properties>
    <project.build.sourceEncoding>UTF-8</project.build.sourceEncoding>
    <maven-compiler-plugin.source>8</maven-compiler-plugin.source>
    <maven-compiler-plugin.target>8</maven-compiler-plugin.target>
    <maven-compiler-plugin.version>3.10.1</maven-compiler-plugin.version>
    <mongodb-driver-sync.version>4.5.1</mongodb-driver-sync.version>
    <morphia-core.version>2.2.6</morphia-core.version>
  </properties>

  <dependencies>
    <dependency>
      <groupId>org.mongodb</groupId>
      <artifactId>mongodb-driver-sync</artifactId>
      <version>${mongodb-driver-sync.version}</version>
    </dependency>
    <dependency>
        <groupId>dev.morphia.morphia</groupId>
        <artifactId>morphia-core</artifactId>
        <version>${morphia-core.version}</version>
    </dependency>
  </dependencies>

  <build>
    <plugins>
      <plugin>
        <groupId>org.apache.maven.plugins</groupId>
        <artifactId>maven-compiler-plugin</artifactId>
        <version>${maven-compiler-plugin.version}</version>
        <configuration>
          <source>${maven-compiler-plugin.source}</source>
          <target>${maven-compiler-plugin.target}</target>
        </configuration>
      </plugin>
    </plugins>
  </build>

</project>

You can now run the project with the mvn compile command from the newly created morphia-quickstart folder.

cd morphia-quickstart
mvn compile exec:java -Dexec.mainClass="com.mycompany.morphia.App"

You should see the output of the application, which, at the moment, is only the text “Application Terminated.”

…
Application terminated.
[INFO] ------------------------------------------------------------------------
[INFO] BUILD SUCCESS
[INFO] ------------------------------------------------------------------------
[INFO] Total time: 2.019 s
[INFO] Finished at: 2022-03-25T20:38:04Z
[INFO] ------------------------------------------------------------------------

Now that you have the basic template for this project, you are ready to start coding.

Creating the Morphia entities

Morphia uses models called entities that will map to documents in the database. It has a convenient annotation syntax that you can use to define those models and even create indexes.

This application will have two entities—one for the recipes and another for the ingredients.

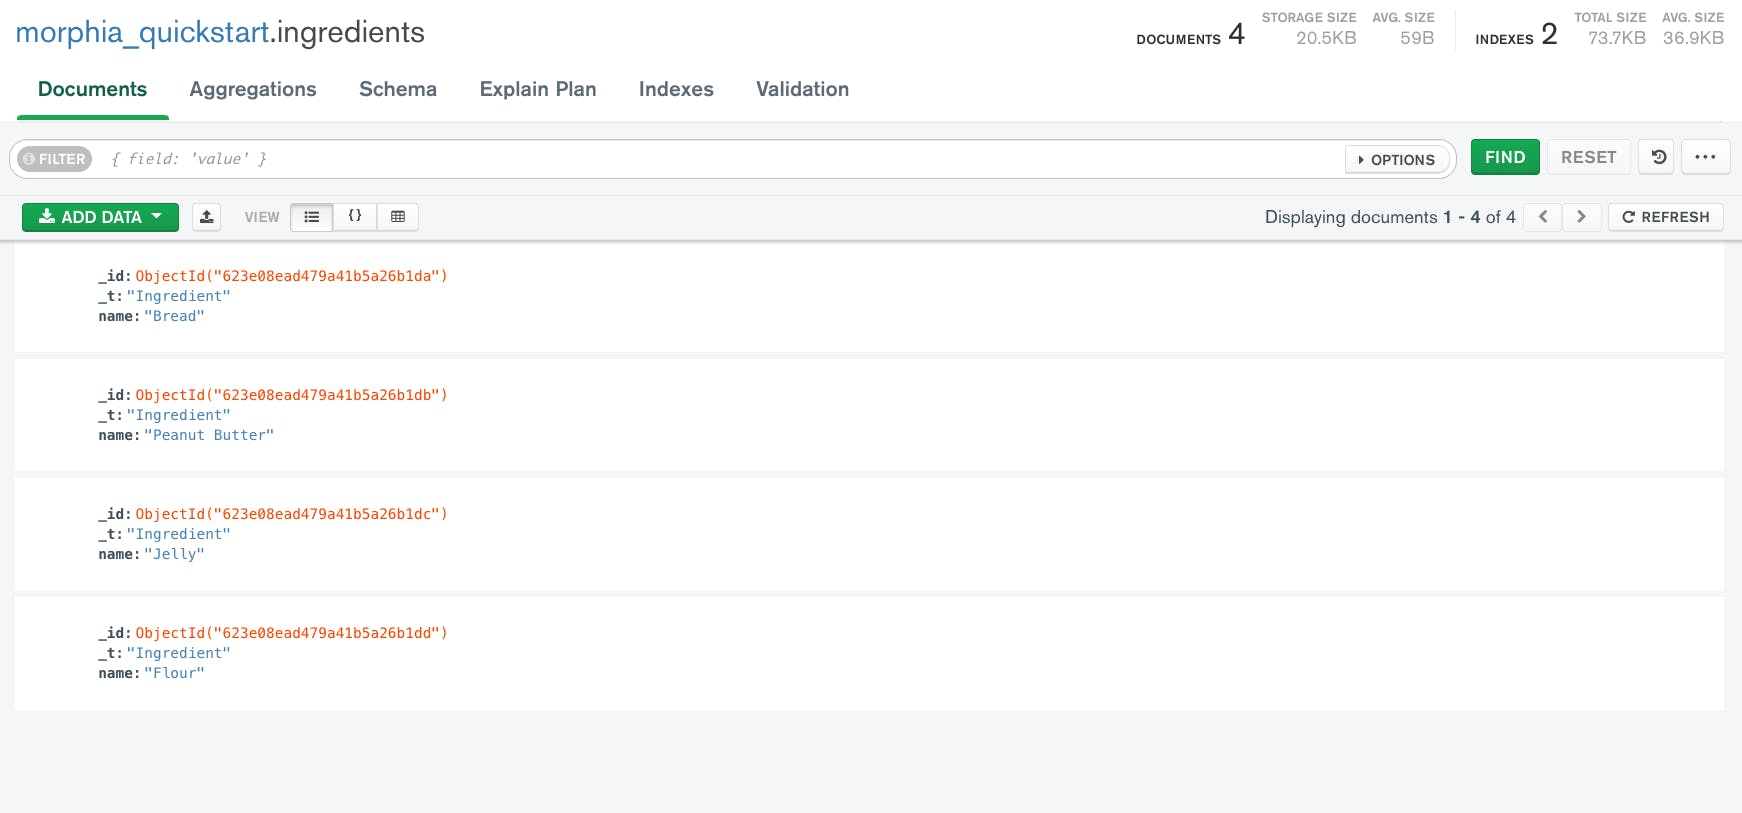
Let’s start with the ingredients entity, as it’s slightly simpler.

entities/Ingredient.java

package com.mycompany.morphia.entities;

import dev.morphia.annotations.*;
import org.bson.types.ObjectId;

@Entity("ingredients")
public class Ingredient {
    @Id
    private ObjectId id;
    private String name;
    private Boolean healthy;

    // Constructors
    public Ingredient() { }
    public Ingredient(String name) {
        this.name = name;
        this.healthy = false;
    }

    // Getters and Setters
    public ObjectId getId() { return id; }
    public void setId(ObjectId id) { this.id = id; }
    public String getName() { return name; }
    public void setName(String name) { this.name = name; }
    public Boolean getHealthy() { return healthy; }
    public void setHealthy(Boolean healthy) { this.healthy = healthy; }

    // toString for output
    @Override
    public String toString() {
        return " - " + name + " -> healthy: " + healthy;
    }
}

You will notice an @Entity annotation above the class definition. This line of code tells Morphia that the following class will be used as an entity. The string passed as a parameter tells Morphia in which collection these documents will go.

In the properties definition of the class, you will list the keys used for this document. Note that there is an @Id annotation to tell Morphia which one of those fields will map to MongoDB’s unique _id field.

The rest of the file is boilerplate, where all the possible constructors, getters, and setters are exposed as public methods. The toString method is also overridden to display the ingredient's name and the value of the healthy property.

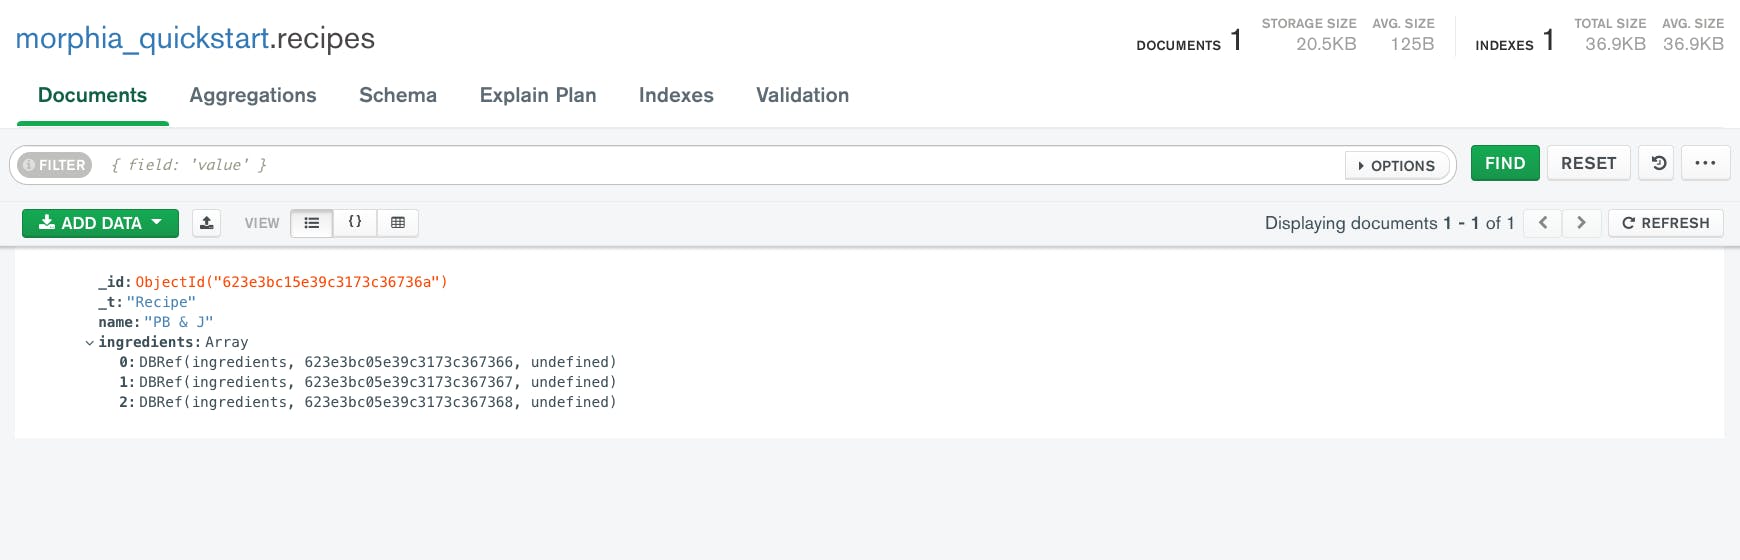
Next, you can create the recipe entity, which follows a similar syntax.

entities/Recipe.java

package com.mycompany.morphia.entities;

import dev.morphia.annotations.*;
import org.bson.types.ObjectId;

import java.util.List;

@Entity("recipes")
public class Recipe {
    @Id
    private ObjectId id;
    private String name;
    @Reference
    private List<Ingredient> ingredients;

    // Constructors
    public Recipe() { }
    public Recipe(String name, List<Ingredient> ingredients) {
        this.name = name;
        this.ingredients = ingredients;
    }

    // Getters and Setters
    public ObjectId getId() { return id; }
    public void setId(ObjectId id) { this.id = id; }
    public String getName() { return name; }
    public void setName(String name) { this.name = name; }
    public List<Ingredient> getIngredients() { return this.ingredients; }
    public void setIngredients(List<Ingredient> ingredients) { this.ingredients = ingredients; } 

    // toString for output
    @Override
    public String toString() {
        StringBuilder output = new StringBuilder(this.name);
        List<Ingredient> ingredients = this.getIngredients();
        output.append(" - ")
              .append(ingredients.size())
              .append(" ingredients with MongoDB _id: ")
              .append(this.id);
        for (Ingredient ingredient : ingredients) {
            output.append("\n").append(ingredient);
        }
        return output.toString();
    }
}

This second is very similar to the first one, apart from the List<Ingredient> ingredients property. Thanks to MongoDB’s document model, we can also store information as an embedded array inside a document. This is a powerful feature that sets MongoDB apart from traditional databases.

You will notice that it has an @Reference annotation above it. We will get back to that later on in the advanced operations.

You now have all of your entities created and are ready to connect to the database and perform operations with Morphia. You should still be able to compile and run your application, and the results at this point should be the same as previously.

How to connect to MongoDB with Morphia

The first step to use Morphia will be to connect to a MongoDB database. The easiest way to access a database is through MongoDB Atlas, the application data platform by MongoDB. There, you will be able to deploy a free cluster to which you will connect. Once your cluster is ready, find your connection string and store it in an environment variable.

export MONGODB_URI="mongodb://<username>:<password>@cluster"

It’s now time to connect your database. In the App.java file, start by adding the following imports at the top of the file.

App.java

// Imports go here
import com.mongodb.client.MongoClients;
import dev.morphia.Datastore;
import dev.morphia.Morphia;

We will also add the name of the database to use as a constant for the class.

App.java

 // Set database name
    private final static String DATABASE = "morphia_quickstart";

Finally, in the main method, you will add the code to get the environment variable from the operating system and connect it to the MongoDB database. Once the database is connected, you can also configure the data store you just created.

App.java

   // Get the database connection string
        String uri = System.getenv("MONGODB_URI");

        // Define a datastore that will connect to the database
        final Datastore datastore = Morphia.createDatastore(MongoClients.create(uri), DATABASE);
        
        // Configure the data store
        datastore.getMapper().mapPackage("com.mongodb.morphia.entities");
        datastore.ensureIndexes();

This new Morphia data store has now mapped all the entities we defined earlier and can map those objects to actual documents in the database. You have also configured the data store to ensure that indexes are enforced, but more on that in the advanced section.

Now that your entities are mapped to collections in the database, you can start interacting with the database.

Basic operations with Morphia

When we talk about basic operations on a database, we usually speak about CRUD (Create, Read, Update, Delete) operations. This is what we will do in this section.

Import the entities and additional packages

First, let’s start by importing the entities you created earlier and additional packages that you will need later on.

App.java

// Imports go here
import com.mycompany.morphia.entities.*;
import dev.morphia.query.FindOptions;
import dev.morphia.DeleteOptions;
import dev.morphia.query.Sort;
import dev.morphia.Datastore;
import static dev.morphia.query.experimental.filters.Filters.eq;
import java.util.List;
import java.util.ArrayList;

Create documents

Now that the entities have been imported, you can create some ingredients that you will use later for our recipes.

App.java

   // Create ingredients
        Ingredient bread = new Ingredient("Bread");
        Ingredient peanutButter = new Ingredient("Peanut Butter");
        Ingredient jelly = new Ingredient("Jelly");
        Ingredient flour = new Ingredient("Flour");
        datastore.save(bread);
        datastore.save(peanutButter);
        datastore.save(jelly);
        datastore.save(flour);

Note: We’ve skipped the section to clean up the database. We’ll come back to that when we do the delete operations.


This code should have created four new documents in your ingredients collection. If you run the code now and open up the Atlas UI or Compass, you can see the new ingredients added to the database.


A screenshot of Compass showing the four newly created ingredients.

The list of ingredients in Compass


Notice how MongoDB automatically assigned a unique id to those ingredients. Morphia also added some additional information to the documents. In this case, you can see that it added a metadata field that specifies the entity to which this document maps.

Read documents

Using the UI to read documents can be helpful, but ultimately, we will want to use this data in our application. Let’s see how to read from the database.

App.java

 // Query and sort the ingredients collection
        List<Ingredient> ingredientList = datastore.find(Ingredient.class)
                                                   .iterator(new FindOptions().sort(Sort.descending("name")))
                                                   .toList();
        System.out.println("List of ingredients in our MongoDB Collection:");
        for (Ingredient i : ingredientList) { System.out.println(i); }

In this code snippet, you use the data store to get all the ingredients from the matching collection. This find method returns an iterable cursor. Here, we add options to request a sorted list of documents from the database. Finally, the cursor is converted into a list using the toList method. Once the query is done, the ingredients are displayed on the screen using the System.out.println function.


Note: If you’ve run the application more than once, you might see multiple instances of the ingredients. Don’t worry about it; we’ll add the clean-up code later.

Update documents

Now that you can read and write from the database, you might want to update some of those entries. Say we wanted to move to a slightly healthier version of a recipe. Changing the flour ingredient to whole wheat might be a good option.

App.java

  // Update an ingredient to change its name
        System.out.println("Updating the Flour to Whole Wheat Flour so it's healthy.");
        flour.setName("Whole Wheat Flour");
        flour.setHealthy(true);
        datastore.save(flour);

As you can see here, Morphia entities can be interacted with just like any other POJO. Once you are ready, you can use the datastore.save method again, and it will update the matching database entry.

Now that you have a healthy ingredient, you can list the ingredients that match this specific filter.

App.java

// List healthy ingredients
        List<Ingredient> healthyIngredients = datastore.find(Ingredient.class).filter(eq("healthy", true)).iterator().toList();
        System.out.println("Healthy ingredients in the collection:");
        for (Ingredient i : healthyIngredients) { System.out.println(i); }

This time, in addition to the find method, we added a filter to find any documents with the field healthy set to true. If you rerun this code, you will see many ingredients, but only one that shows up as being healthy.

Delete documents

Documents keep getting added to these collections, and it’s getting somewhat noisy. Now that you know how to read, add, and update documents, let’s see how to delete some. Going back to the clean-up section, you can add the following code.

App.java

 // Clean up the database by deleting any existing entries
        datastore.find(Ingredient.class).delete(new DeleteOptions().multi(true));
        datastore.find(Recipe.class).delete(new DeleteOptions().multi(true));

This code snippet will delete any existing document in our collections immediately after connecting to the database. Obviously, you wouldn’t want this in production, but for this application, it’s perfect. If you rerun the code, you will start with a clean collection and add those four new ingredients. You will only have the four when you list them rather than an ever-growing collection.

You could also use a filter, just like you did to find any healthy ingredients to delete only a subset of documents rather than the entire collection.

Advanced operations with Morphia

So far, all of the operations that you did on the database could also be done with the native Java driver in an, arguably, easier way. However, there are some specific use cases where Morphia can still be useful. This section will highlight two of them: indexing and referencing.

Referencing documents

In a document database, you can embed complex arrays of objects inside documents. However, sometimes, you might prefer to create a reference to another object rather than create a complete copy of it. This is called referencing.

The recipe entity is ready to do some referencing. Since the @Reference annotation was added, Morphia will create references to ingredients using the DBRef syntax.


A screenshot of Compass showing the ingredients as DBRef's

A recipe in referenced ingredients in Compass


Let's explore this by creating a recipe in our code.

App.java

 // Create recipe
        System.out.println("Create and save a new Recipe.");
        List<Ingredient> ingredients = new ArrayList<>();
        ingredients.add(bread);
        ingredients.add(peanutButter);
        ingredients.add(jelly);
        Recipe pbnj = new Recipe("PB & J", ingredients);
        datastore.save(pbnj);

        // Fetching the references automatically fetches the associated documents
        System.out.println("Retrieving the Recipe document from the database using the reference.");
        System.out.println(pbnj);

This code will create a new record in the recipes collection. When the recipe is printed out, the ingredients are listed as expected. Morphia automatically fetches the matching ingredients from the database and displays those. If you look at the entry in your database, you will notice that the document in your collection uses DBRefs.

If you need to add or remove items to the list, Morphia will automatically change those references.

App.java

    // Updating the references
        System.out.println("Updating the recipe to make it gourmet.");
        pbnj.setName("Gourmet PB & J");
        Ingredient waffle = new Ingredient("Waffle");
        datastore.save(waffle);
        List<Ingredient> pbnjIngredients = pbnj.getIngredients();
        pbnjIngredients.remove(bread);
        pbnjIngredients.add(waffle);
        datastore.save(pbnj);
        System.out.println(pbnj);

If you rerun this code, you will see that the database now has different references pointing back to the matching ingredients.

Indexing collections

The last advanced feature discussed here has to do with Morphia’s ability to create indexes using the annotation syntax.

If you go back to your ingredients entity, you can add an @Index annotation right after the @Entity one.

entities/Ingredient.java

@Entity("ingredients")
@Indexes(@Index(options = @IndexOptions(name = "name"), fields = @Field("name")))

The datastore has already been configured to ensure that those indexes are created. If you run this application one last time and look at the indexes in your collection, you should now see an index on the name field.


A screenshot of Compass showing the name index on the ingredients collection.

The newly created name index in the ingredients collection


This powerful feature makes it easy for your development team to keep track of the database structure and add indexes as needed when queries are added and might require them.

Next steps

In this article, you’ve learned how to use Morphia as an ODM for your Java applications. As you’ve seen, most of the use cases are already covered by the native Java Driver. However, there are some use cases where you might still want to use Morphia. Referencing and indexing are good examples of those use cases.

If you haven’t already, you can create your free MongoDB Atlas cluster and try out the code samples found on Github today.

FAQs

What is Morphia in MongoDB?

Morphia is a wrapper around the Java driver for MongoDB. It acts as an ODM (Object Document Model) for MongoDB documents. Its original goal was to provide an easy mapping to POJO (Plain Old Java Objects). It also offers more advanced features, such as referencing and annotation-based indexing.

What is MongoDB ODM?

An ODM (Object Document Mapping) is to document database what ORM (Object Relational Mapping) is to relational databases. It’s a way to map database documents to native objects that are used in a programming language.