Overview
Atlas App Connections is the MongoDB Atlas OAuth 2.1 platform that enables your application to act on behalf of Atlas users through user-delegated access. When a user authorizes your application, your application receives a set of tokens it can use to call the Atlas Administration API with the same permissions the user holds in their Atlas organizations. For an overview of the platform and how organizations manage connected applications, see Atlas App Connections Overview.
This guide covers the full integration:
Initiating the OAuth 2.1 Authorization Code flow with Proof Key for Code Exchange (PKCE)
Exchanging authorization codes for tokens and refreshing tokens
Using the Atlas Administration API with delegated access
Understanding the scope and limits of delegated access
Configuring network access and managing database users
Handling revocation and errors
Key Concepts
- Delegated access
- Your application acts on behalf of an Atlas user, not as itself. The user's own organization roles and project permissions determine what operations succeed. If the user cannot perform an action, your application cannot perform it on their behalf either.
- Organization delegation settings
- Each Atlas organization controls whether third-party app connections are allowed. Even when a user authorizes your application, operations against a specific organization succeed only if that organization has third-party app connections enabled. Delegation is disabled by default for existing organizations. Because a user can belong to multiple organizations, a single authorization can succeed for some of the user's organizations and fail for others, depending on each organization's delegation setting.
- Proof Key for Code Exchange (PKCE)
- A security extension to the OAuth 2.1 Authorization Code flow that protects against authorization code interception attacks. PKCE requires the client to generate a random
code_verifier, derive acode_challengefrom it, and send the challenge with the authorization request. The client then proves it originated the request by sending the originalcode_verifierwhen exchanging the authorization code for tokens.
Prerequisites
Before you begin, confirm that you have:
Approved design partner status.
A registered OAuth application. MongoDB provides you with a
client_idduring onboarding. Confidential clients (server-side web applications) also receive aclient_secret. Public clients (native and single-page applications) authenticate with only theclient_idand do not receive a secret.A redirect URI registered with your OAuth application. Redirect URIs must use HTTPS except for loopback addresses (
localhost,127.0.0.1,::1), which may use HTTP on any port. Redirect URIs must not contain fragments (#).Familiarity with the OAuth 2.1 Authorization Code flow and Proof Key for Code Exchange (PKCE).
Branding Guidelines
If you need MongoDB branding assets for your integration, such as the MongoDB logo, see the MongoDB Brand Resources page.
Base URLs
Develop and launch your integration against production. Atlas does not provide separate partner environments.
All OAuth and API endpoints use two production base URLs:
Base | URL |
|---|---|
Authorization base ( |
|
Cloud base ( |
|
Throughout this guide, these names stand in for the URLs above. For example, the token endpoint is {OAUTH_BASE}/tokens.
The authorization endpoint where users log in and grant access is hosted on the cloud base ({CLOUD_BASE}/oauth/authorize), while the token and other OAuth endpoints are hosted on the authorization base ({OAUTH_BASE}). This split is intentional. The Atlas Administration API is hosted on the cloud base ({CLOUD_BASE}/api/atlas).
Tip
Discover Endpoints Automatically
Atlas publishes OAuth 2.1 server metadata at {OAUTH_BASE}/.well-known/oauth-authorization-server. Many OAuth client libraries and SDKs can read this endpoint to discover and configure the authorization, token, and related endpoints automatically, which avoids hardcoding endpoint URLs.
OAuth 2.1 Authorization Code Flow with PKCE
Atlas App Connections uses the OAuth 2.1 Authorization Code flow with Proof Key for Code Exchange (PKCE). This flow requires user interaction: the user logs in to Atlas and approves the permissions your application requests.
Flow Overview
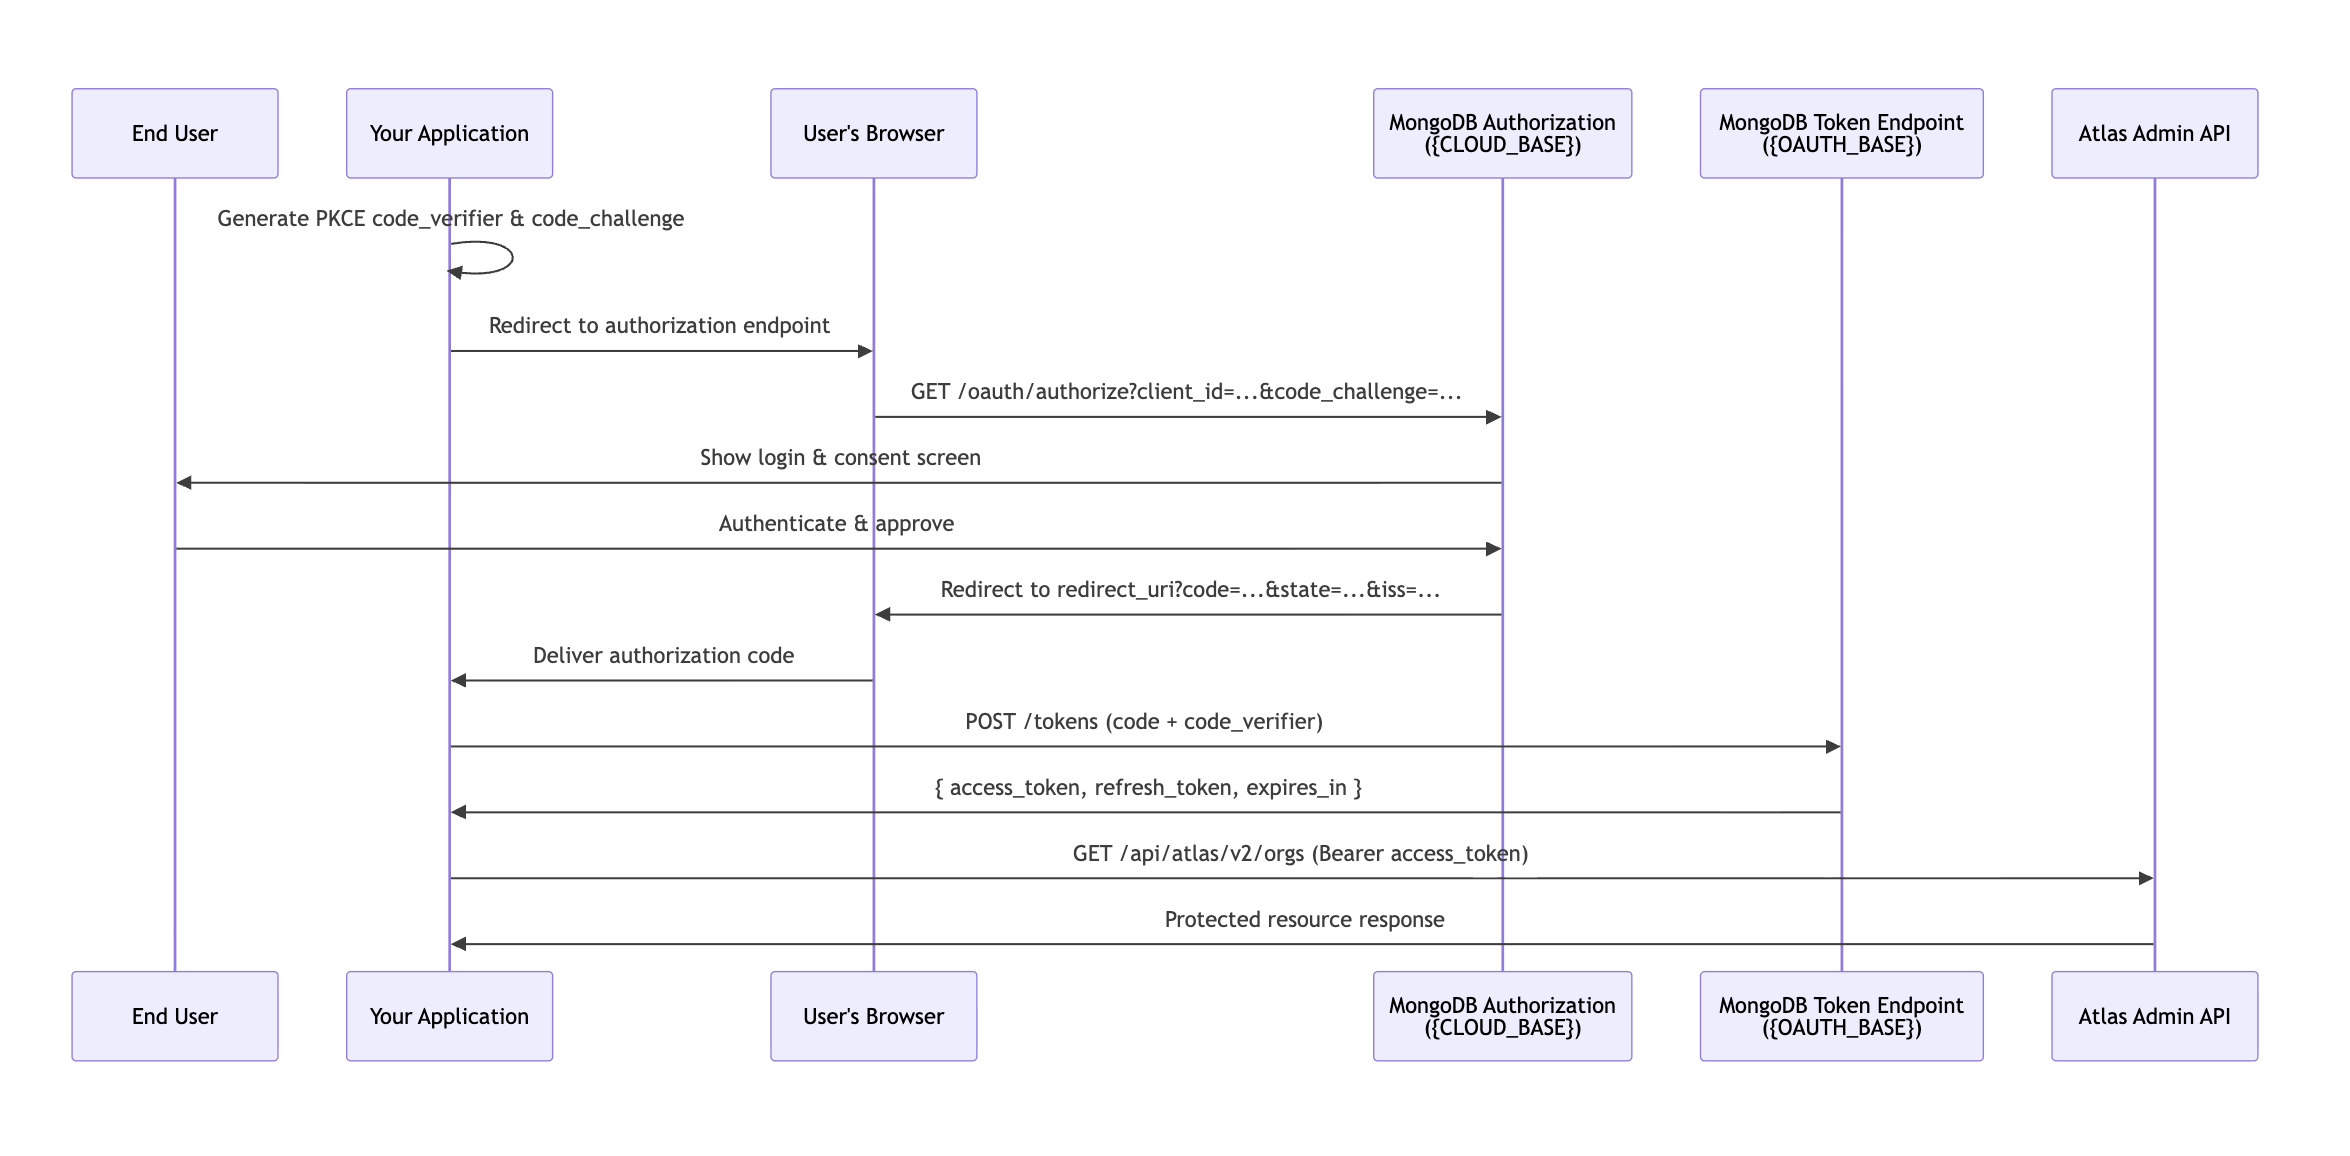
The flow proceeds in three steps:
Your application generates a PKCE code verifier and challenge, redirects the user to the Atlas authorization endpoint, and the user approves access on the consent screen.
Your application exchanges the authorization code for an access token and a refresh token.
Your application uses the access token to call the Atlas Administration API and uses the refresh token to obtain new access tokens before they expire.
Step 1: Authorization Request
Direct the user to the Atlas authorization endpoint (https://cloud.mongodb.com/oauth/authorize) with the following parameters. You control how your application presents this endpoint: a redirect within the existing window, a new browser window, or a pop-up.
Parameter | Required | Description |
|---|---|---|
| Required | Must be |
| Required | Your application's client ID, provided by MongoDB during onboarding. |
| Required | The HTTPS URI where Atlas sends the authorization code after user approval. Must match a URI registered with your OAuth application. |
| Required | The PKCE code challenge derived from your |
| Required | Must be |
| Required | An opaque value your application uses to maintain state between the authorization request and the callback. Use this to protect against cross-site request forgery (CSRF) attacks and to restore application state after the redirect. |
Send only the parameters in the preceding table. The authorization endpoint doesn't require a resource parameter, so omit it from the authorization request even though the OAuth 2.1 specification defines one.
The following example breaks the URL across lines for readability. Send it as a single line:
https://cloud.mongodb.com/oauth/authorize ?response_type=code &client_id=<YOUR_CLIENT_ID> &redirect_uri=https://yourapp.example.com/callback &code_challenge=<CODE_CHALLENGE> &code_challenge_method=S256 &state=<RANDOM_STATE_VALUE>
Consent Screen
After the user logs in to Atlas, they see a consent screen that lists the permissions your application is requesting:
Know which Atlas resources you have access to
Act on your behalf in Atlas organizations
The consent screen also displays the following notice to the user:
By authorizing an application:
You are allowing it to access and take actions in your MongoDB Atlas resources just as you can, using your account's permissions.
You can revoke access at any time.
If the user clicks Authorize, Atlas redirects to your redirect_uri with an authorization code, the state value you provided, and an iss parameter. If the user clicks Decline, Atlas redirects with an error parameter.
Your callback handler must:
Verify
statematches the value you sent in the authorization request to prevent CSRF attacks.Verify
issmatches the authorization base (https://authorize.mongodb.com) to prevent authorization server mix-up attacks.Check for an
errorparameter and handle denial gracefully before attempting to use thecode.
Authorization codes are single-use and expire within 10 minutes. Exchange them promptly.
Step 2: Token Exchange
Exchange the authorization code for tokens by making a POST request to the Atlas token endpoint:
POST https://authorize.mongodb.com/tokens
Body Parameter | Required | Description |
|---|---|---|
| Required | Must be |
| Required | The authorization code received from the redirect. |
| Required | The same redirect URI used in the authorization request. |
| Required | The original PKCE code verifier string. |
| Required | Your application's client ID. |
| Conditional | Your application's client secret. Required only for confidential clients (server-side web applications). Public clients (native and single-page applications) authenticate with only the |
Example request:
curl --request POST \ --url https://authorize.mongodb.com/tokens \ --header 'Content-Type: application/x-www-form-urlencoded' \ --data 'grant_type=authorization_code' \ --data 'code=<AUTHORIZATION_CODE>' \ --data 'code_verifier=<CODE_VERIFIER>' \ --data 'redirect_uri=https://yourapp.example.com/callback' \ --data 'client_id=<YOUR_CLIENT_ID>' \ --data 'client_secret=<YOUR_CLIENT_SECRET>'
The response includes:
Field | Type | Description |
|---|---|---|
| string | Bearer token for authenticating Atlas Administration API requests. Short-lived. Rely on the |
| string | Token used to obtain a new access token when the current one expires. Store this securely. |
| string | Always |
| integer | Access token lifetime in seconds. Currently |
Step 3: Refreshing Access Tokens
Access tokens are short-lived (currently 10 minutes). Before making Atlas Administration API calls after expiry, exchange your refresh token for a new access token:
curl --request POST \ --url https://authorize.mongodb.com/tokens \ --header 'Content-Type: application/x-www-form-urlencoded' \ --data 'grant_type=refresh_token' \ --data 'refresh_token=<YOUR_REFRESH_TOKEN>' \ --data 'client_id=<YOUR_CLIENT_ID>' \ --data 'client_secret=<YOUR_CLIENT_SECRET>'
The response always returns a new access_token and a new refresh_token. The previous refresh token is immediately invalidated. Always replace both stored values.
Important
Refresh tokens expire after 7 days of inactivity (the idle lifetime). Regardless of activity, users must re-authenticate every 30 days (the maximum lifetime). Organization owners can configure stricter limits. When a refresh token expires, the user must re-authorize your application. Design your application to handle this gracefully by prompting the user to reconnect.
Using the Atlas Admin API with Delegated Access
After obtaining an access token, use it to make Atlas Administration API requests by including it in the Authorization header:
Authorization: Bearer <ACCESS_TOKEN>
Example request:
curl --request GET \ --url 'https://cloud.mongodb.com/api/atlas/v2/orgs' \ --header 'Authorization: Bearer <ACCESS_TOKEN>' \ --header 'Accept: application/vnd.atlas.2023-01-01+json'
Your application acts with the same permissions the authorizing user holds at the time of each request. If the user's roles change after authorization, your application's effective permissions change accordingly.
Permissions and Organization Delegation Settings
Operations against a specific Atlas organization succeed only when both of the following are true:
The organization has third-party app connections enabled. Organization owners configure this setting in Organization Settings > App Connections. To learn more about these settings, see Atlas App Connections Overview.
The authorizing user has the required role for the operation within that organization or project.
If delegation is disabled for an organization after a user has already authorized your application, API calls targeting that organization return a 403 Forbidden response.
A completed authorization doesn't guarantee that Atlas Administration API calls succeed. Atlas evaluates the organization's delegation setting and the user's roles on every request, not once at authorization time, so the OAuth flow and consent screen can complete cleanly while requests still return 403 Forbidden.
Checking Organization Access
Call GET /api/atlas/v2/orgs after authorization to determine which organizations your application can act on. Atlas returns only the organizations that allow third-party app connections, so an empty list means that no organization the user belongs to has enabled them.
An empty list is a setup step, not a failure. Prompt the user to ask an Organization Owner to enable app connections for the organization, and point them to Atlas App Connections Overview. Avoid presenting the empty list as an authorization or authentication error, because the user's credentials and consent are valid.
Because delegated access carries the authorizing user's own permissions, write operations also depend on that user's roles. Common provisioning operations require the following roles:
To create a project, the user needs the
Organization OwnerorOrganization Project Creatorrole.To create a cluster, the user needs the
Project OwnerorProject Cluster Creatorrole on the target project.
A user who holds only the Organization Member role can read the resources they have access to, but write operations return 403 Forbidden. Name the required role in your error handling so the user can request the correct role. To learn about all available roles, see Atlas User Roles.
When your application creates an organization on a user's behalf, the new organization doesn't allow third-party app connections yet. Enabling them is a manual step: contact MongoDB to have the organization allowlisted. Until then, your application can't act on the organization, even though the user authorized your application.
Blocked and Filtered Endpoints
Delegated access reaches most Atlas Administration API endpoints, but Atlas treats some endpoints differently regardless of the authorizing user's permissions.
Blocked endpoints return a 403 Forbidden response even when the authorizing user holds a role that would normally permit the operation. Atlas blocks the federation settings endpoints, which read and modify federation and single sign-on (SSO) configuration. Identity provider configuration is shared across every organization in a federation, so delegated access to it could expose or disrupt organizations that never authorized your application.
Filtered endpoints accept the call but constrain what it can see or change, based on which organizations have opted in to third-party app connections. Your application can reach only those organizations, and Atlas blocks access to the resources of an organization that has not opted in.
Endpoints that span organizations, such as those that list every organization, project, or cluster the user can access, return only organizations that allow third-party app connections. For requests that create resources, Atlas validates the target organization and rejects the call when that organization has not opted in.
An organization owner opts in from Organization Settings > App Connections. To learn more, see Permissions and Organization Delegation Settings.
Atlas may block or filter additional endpoints for delegated access over time.
Control Plane versus Data Plane
The Atlas Administration API provides control plane access: you can create, configure, and manage Atlas resources such as organizations, projects, clusters, and users. It does not provide direct data plane access (reading or writing documents in your databases).
To access data in Atlas clusters, retrieve the cluster connection string through the Atlas Administration API and connect using a database user and the MongoDB driver or shell. The connection string and database credentials are separate from the OAuth bearer token.
Revocation affects control plane and data plane access differently. See Data Plane Effects.
Continuous Access with Service Accounts
Delegated access ties your application's tokens to the authorizing user. If that user's roles change, the user is offboarded, or the user doesn't re-authenticate within the refresh token lifetime, your application loses the permissions it needs even though your integration itself is still active.
If your integration needs continuous Atlas Administration API access that doesn't depend on a specific user staying authorized, for example resizing clusters or changing deployment regions on an ongoing basis, create a service account for the customer's organization and project instead of relying on delegated access for that workflow.
A service account authenticates using the OAuth 2.0 Client Credentials flow rather than the Authorization Code flow, so it doesn't depend on a user's ongoing session. Each service account belongs to one organization, and you can grant it access to any number of projects within that organization. Atlas roles limit which operations the service account's access tokens can authenticate, the same way roles limit a user. A service account can't sign in to the Atlas UI and, like delegated access, doesn't provide data plane access.
To create a service account for a customer's organization, see Service Accounts Overview and Create a Service Account for an Organization.
Provisioning Resources for a User
Most partner integrations provision Atlas resources on behalf of the authorizing user. The following sequence covers the common path from an authorized connection to a usable connection string. Each request uses the bearer token from Step 2: Token Exchange.
Identify the target organization and project.
Call GET /api/atlas/v2/orgs to list the organizations the authorizing user can access, then GET /api/atlas/v2/orgs/{orgId}/groups to list the projects within an organization.
Only organizations that allow third-party app connections appear as usable targets. To learn more, see Permissions and Organization Delegation Settings.
Create a database user.
Call POST /api/atlas/v2/groups/{groupId}/databaseUsers to create the identity your application uses for data plane access. For role and lifecycle guidance, see Database User Lifecycle.
Configure network access.
Add your application's outbound IP addresses to the project access list, or configure a private connectivity option. To learn more, see Network Configuration and IP Allowlisting.
For the full request and response schemas for each endpoint, see the Atlas Administration API Specification.
Network Configuration and IP Allowlisting
The Atlas Administration API is available over the public internet only. It is not available through virtual private cloud (VPC) peering or private endpoints. Your application must be able to reach cloud.mongodb.com on port 443.
Note
Delegated access to the Atlas Administration API bypasses any control plane API access list (API key IP allowlist) restrictions the customer has configured. Access is governed by the authorizing user's permissions and the organization's delegation settings, not by control plane IP restrictions. To learn more, see Limitations.
For data plane access, the Atlas cluster you are connecting to may have an IP access list configured. Your application's outbound IP addresses must be added to the cluster's IP access list, or you must configure network peering or a private endpoint appropriate for your deployment.
Connectivity patterns in the initial release:
Your application is responsible for configuring IP allowlisting for data plane access. This is not handled automatically by the Atlas App Connections platform.
For each cluster your application provisions or accesses, add your outbound IPs or Classless Inter-Domain Routing (CIDR) ranges to the cluster's IP access list using the
POST /api/atlas/v2/groups/{groupId}/accessListendpoint.Never expose the data plane to the public internet. Always restrict data plane access with IP access lists or private connections such as network peering or private endpoints.
Database User Lifecycle
Your application may need to create and manage database users when provisioning Atlas clusters on behalf of users. The following patterns are supported in the initial release.
Creating Database Users
Create database users through the Atlas Administration API endpoint POST /api/atlas/v2/groups/{groupId}/databaseUsers using the bearer token of the authorizing user. The user must hold a project role that permits database user management.
Recommended Practices
Stay within the database user limit. Atlas enforces a default limit of 100 database users per project. Reuse existing database users where possible instead of creating a new user for each operation, and deprovision users you no longer need to avoid reaching the limit.
Use scoped roles. Create database users with the minimum database roles required for your use case rather than
atlasAdmin.Deprovision users when no longer needed. When a user revokes access to your application, delete any database users your application created on their behalf. Atlas does not automatically remove database users when access is revoked.
Rotate credentials on a defined schedule. If your application stores database user passwords, rotate them regularly using the
PATCH /api/atlas/v2/groups/{groupId}/databaseUsers/ {databaseName}/{username}endpoint.
Important
Atlas does not automatically delete database users or other resources your application created when a user revokes access. Your application is responsible for cleaning up resources it created. Failure to deprovision database users leaves credentials active in the user's Atlas account after they disconnect your application. To learn more, see Limitations.
If Atlas rotates the credentials for a resource your application provisioned, such as a database user's password, it can notify your application through an optional webhook rather than requiring you to update the credentials yourself. This is unrelated to rotating your OAuth client_secret; for that, see Token and Secret Storage. To implement the webhook, see Implement the Credential Rotation Webhook.
Security Best Practices
This section describes the minimum security requirements for handling credentials and sensitive information in your integration. These practices reduce the blast radius of a security incident and are required for design partners.
Encrypting Credentials at Rest
Your application handles several categories of sensitive information that must be encrypted at rest:
Connection strings. Atlas connection strings contain embedded credentials or reference database users. Encrypt any stored connection strings using Advanced Encryption Standard (AES)-256 or equivalent encryption. Do not store connection strings in plaintext in configuration files, environment variable stores, or databases.
OAuth tokens. Refresh tokens are long-lived credentials. Store them in an encrypted secrets manager (for example, HashiCorp Vault, Amazon Web Services (AWS) Secrets Manager, or Azure Key Vault). Do not store refresh tokens in your application database without encryption.
Client secrets. Your
client_secretis equivalent to a password. Store it in a secrets manager and rotate it if you suspect it has been exposed.
Tip
Prefer Secret-less Authentication
Atlas supports secret-less authentication using PKCE, which removes the need to manage a client_secret altogether. Where your client type allows it, use secret-less authentication as the most secure option rather than provisioning and storing a client secret.
Connection String Handling
When your application retrieves connection strings from the Atlas Administration API on behalf of a user:
Retrieve connection strings at the time they are needed rather than storing them long-term where possible.
If your application must persist a connection string, store only what is required (for example, the hostname and port) separately from the credentials.
Do not log connection strings or include them in error messages or stack traces.
Token and Secret Storage
Do not commit tokens or secrets to source control.
Do not log access tokens, refresh tokens, or client secrets. If your application logs Atlas Administration API requests for debugging, redact the
Authorizationheader.Scope access to secrets in your secrets manager to only the services that require them.
Rotate your
client_secretperiodically and immediately if a suspected compromise occurs. Contact MongoDB to rotate the secret associated with your OAuth application.
Revocation and Error Handling
Understanding revocation behavior is important for designing a resilient integration. Revocation can be triggered in several ways and affects control plane and data plane access differently.
Revocation Triggers
Revocation can occur through any of the following actions:
User revokes access from the Atlas UI (User Settings > Connected Apps).
Organization owner restricts third-party app connections for the entire organization from Organization Settings.
Refresh token expires because the organization's maximum refresh token lifetime was reached or the token was idle beyond the idle lifetime limit.
Your application revokes its own tokens when it no longer needs access.
Important
The triggers above revoke tokens issued through the OAuth flow. They don't affect a service account you created for continuous access (see Continuous Access with Service Accounts), because a service account isn't tied to any individual user's authorization.
Don't revoke or delete a customer's service account credentials solely because an individual user revokes delegated access or is offboarded from the organization. The service account represents your integration's ongoing authorization, not that user's individual access.
Revoke the service account's credentials when the customer deletes or disconnects your integration from their account, according to whatever that action means in your product.
Revoking Tokens from Your Application
When a user disconnects your application from your own interface, or your integration otherwise no longer needs access, revoke the tokens rather than letting them expire. Send a POST request to the revocation endpoint:
curl --request POST \ --url https://authorize.mongodb.com/tokens/revoke \ --header 'Content-Type: application/x-www-form-urlencoded' \ --user '<YOUR_CLIENT_ID>:<YOUR_CLIENT_SECRET>' \ --data 'token=<REFRESH_OR_ACCESS_TOKEN>' \ --data 'token_type_hint=refresh_token'
Parameter | Required | Description |
|---|---|---|
| Required | The access token or refresh token to revoke. |
| Optional | Either |
Revoking a refresh token also invalidates every access token issued from it. The endpoint returns 200 OK whether or not the token was valid, so treat a success response as confirmation that the token is no longer usable rather than as proof that it existed.
Control Plane Effects
How quickly revocation takes effect depends on who revokes access:
An organization owner restricts third-party app connections: the Atlas Administration API checks the organization's delegation settings on every call, so requests against that organization begin returning
403 Forbiddenimmediately.A user revokes your application's access: the refresh token is invalidated immediately, but any access token already issued remains valid until it expires. Because access tokens are short-lived, your application may continue to make successful calls for up to 10 minutes. After that, calls return
401 Unauthorized.MongoDB deletes your OAuth client: revocation cascades across every organization your application is connected to, which takes up to 15 minutes to complete.
Design your application to handle 401 and 403 responses proactively rather than relying on immediate propagation.
Data Plane Effects
Revoking Atlas Administration API access does not immediately terminate existing data plane connections. Your application reaches the data plane through the database users it created, authenticating with credentials that are independent of your OAuth tokens. Revoking a token does not invalidate those credentials. Open MongoDB driver sessions and connection pool connections remain active until they are closed by normal connection lifecycle events, such as a timeout, an idle close, or an explicit close by your application.
Because revocation does not remove the database users your application created, clean them up as part of your disconnect flow. To learn more, see Database User Lifecycle.
Error Scenarios
Scenario | Status | Recommended Action |
|---|---|---|
Access token expired |
| Use the refresh token to obtain a new access token. |
Access token revoked |
| Prompt the user to re-authorize. The refresh token is also invalidated. |
Refresh token expired or revoked |
| Prompt the user to re-authorize. Restart the Authorization Code flow. |
Invalid client credentials |
| Verify your |
Delegation disabled for organization |
| Inform the user that their Atlas organization does not allow third-party app connections. Direct them to their organization owner. |
Blocked endpoint |
| The requested endpoint is not available through delegated access. Remove the call from your integration. |
User lacks required role |
| The authorizing user does not have the role required for this operation. Inform the user and suggest they request the necessary role from their organization owner. |
OAuth Error Responses
Errors from the authorization and token endpoints follow the standard OAuth structure:
{ "error": "error_code", "error_description": "Human-readable explanation" }
The following table lists common error values:
Error Code | When | Recommended Action |
|---|---|---|
| A required parameter is missing or malformed. | Check required parameters and formatting. |
| Client authentication failed. | Verify your |
| The authorization code expired or was already used, or the refresh token is invalid. | Restart the Authorization Code flow. |
| The client is not authorized for this grant type. | Verify that your client registration includes |
| The user denied consent. | Inform the user. Do not retry automatically. |
| The | Verify that the resource is registered for your client. |
| The | Use |
If the same authorization code is presented more than once, the server invalidates all tokens associated with that grant as a security measure against code interception. When this occurs, the user must re-authorize from the start.
Disabled Clients
MongoDB can disable a registered client, for example during incident response or partner offboarding. While your client is disabled, the server refuses to start new authorization flows or issue new tokens:
The authorization endpoint redirects the user to your
redirect_uriwitherror=access_deniedand anerror_descriptionofclient is disabled.The token endpoint returns
401withinvalid_clientand the same description. This applies to every grant type, includingrefresh_token, so your application cannot exchange existing refresh tokens while it is disabled.
Access tokens issued before the client was disabled remain valid until they expire. Disabling a client blocks new tokens rather than invalidating existing ones.
A disabled client cannot recover on its own. Treat client is disabled as a terminal condition: stop retrying, surface the failure, and contact the MongoDB partner team to have the client re-enabled.