Building a Scalable Media Management Back End: Integrating Node.js, Azure Blob Storage, and MongoDB


Rate this tutorial


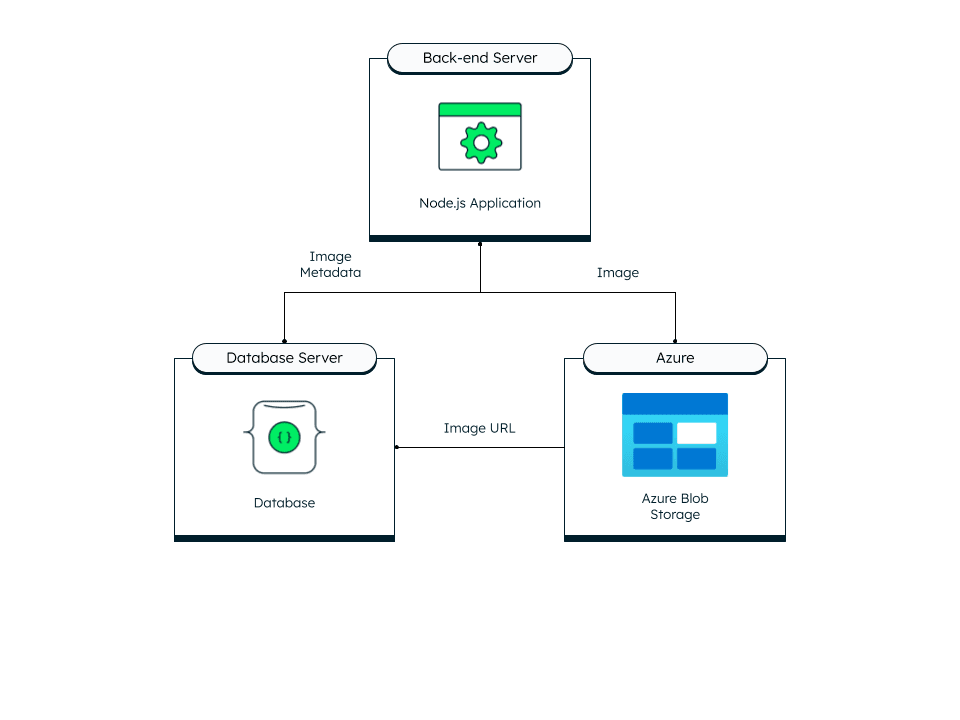
If your goal is to develop a multimedia platform, a robust content management system, or any type of application that requires storing substantial media files, the storage, retrieval, and management of these files are critical to delivering a seamless user experience. This is where a robust media management back end becomes an indispensable component of your tech stack. In this tutorial, we will guide you through the process of creating such a back end utilizing Node.js, Azure Blob Storage, and MongoDB.
Storing media files like images or videos directly in your MongoDB database may not be the most efficient approach. MongoDB has a BSON document size limit of 16MB, which is designed to prevent any single document from consuming too much RAM or bandwidth during transmission. Given the size of many media files, this limitation could be easily exceeded, presenting a significant challenge for storing large files directly in the database.
MongoDB's GridFS is a solution for storing large files beyond the BSON-document size limit by dividing them into chunks and storing these chunks across separate documents. While GridFS is a viable solution for certain scenarios, an efficient approach is to use a dedicated service for storing large media files. Azure Blob (Binary Large Objects) Storage, for example, is optimized for the storage of substantial amounts of unstructured data, which includes binary data like media files. Unstructured data refers to data that does not adhere to a specific model or format.
We'll provide you with a blueprint to architect a backend system capable of handling large-scale media storage with ease, and show you how to post to it using cURL commands. By the end of this article, you'll have a clear understanding of how to leverage Azure Blob Storage for handling massive amounts of unstructured data and MongoDB for efficient data management, all orchestrated with a Node.js API that glues everything together.
Whether you're an experienced developer or just starting out, this guide is designed to equip you with the knowledge to build a media management back end that's not only scalable but also optimized for performance with these large files.
First, we'll cover the necessary prerequisites for this tutorial. Following that, we'll proceed step by step to build the back end for an application that is robust, efficient, and equipped to handle the requirements of a modern, media-focused application.
- Node.js 18 or higher and npm: Make sure you have Node.js and npm (Node.js package manager) installed. Node.js is the runtime environment required to run your JavaScript code server-side. npm is used to manage the dependencies.
- A MongoDB cluster deployed and configured. If you need help, check out our MongoDB Atlas tutorial on how to get started.
For this tutorial, we will use the Microsoft Azure Portal to set up our Azure storage. Begin by logging into your Azure account and it will take you to the home page. Once there, use the search bar at the top of the page to search "Storage accounts."
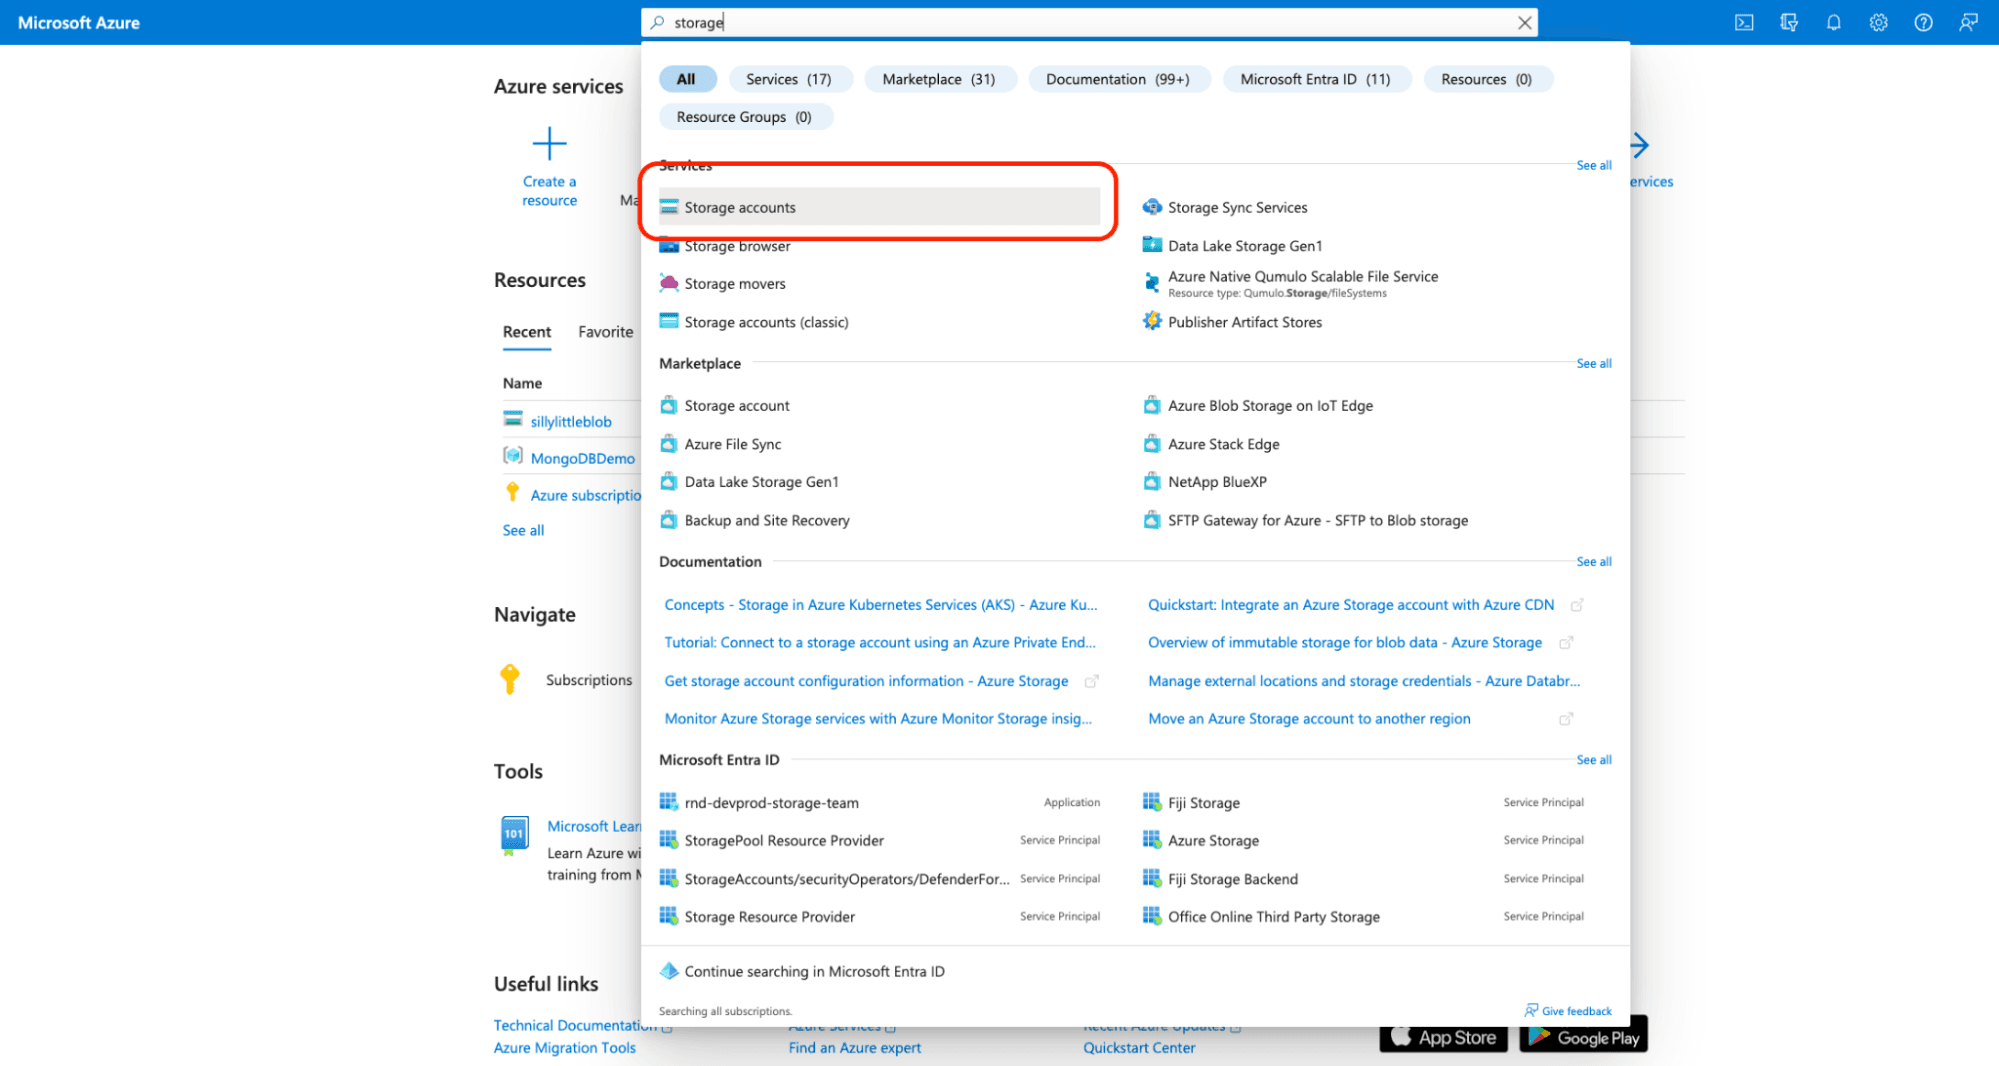
Select “Storage Accounts.” Avoid selecting “Storage accounts (classic)” as this option does not have all the features required for this tutorial.
You'll be directed to a page where you can either create a new storage account or utilize an existing one. In this tutorial, we'll set up the storage account so that it's publicly accessible via its URL. While this setup is appropriate for a demonstration, in a production environment, it's crucial to restrict access to designated individuals or networks for security purposes. Detailed instructions on configuring these access controls can be found in the Microsoft Azure documentation.
Choose your preferred subscription and resource group, then assign a name to your storage account. While the selection of region, performance, and redundancy options will vary based on your application's requirements, the basic tiers will suffice for all the functionalities required in this tutorial.
In the networking section, opt to allow public access from all networks. While this setting is generally not recommended for production environments, it simplifies the process for this tutorial by eliminating the need to set up specific network access rules.
For the rest of the configuration settings, we can accept the default settings. Once your storage account is created, we’re going to navigate to the resource. You can do this by clicking “Go to resource,” or return to the home page and it will be listed under your resources.
Now, we'll proceed to create a container. Think of a container as akin to a directory in a file system, used for organizing blobs. You can have as many containers as you need in a storage account, and each container can hold numerous blobs. To do this, go to the left panel and click on the Containers tab, then choose the “plus container” option. This will open a dialog where you can name your container and, if necessary, alter the access level from the default private setting. Once that's done, you can go ahead and initiate your container.
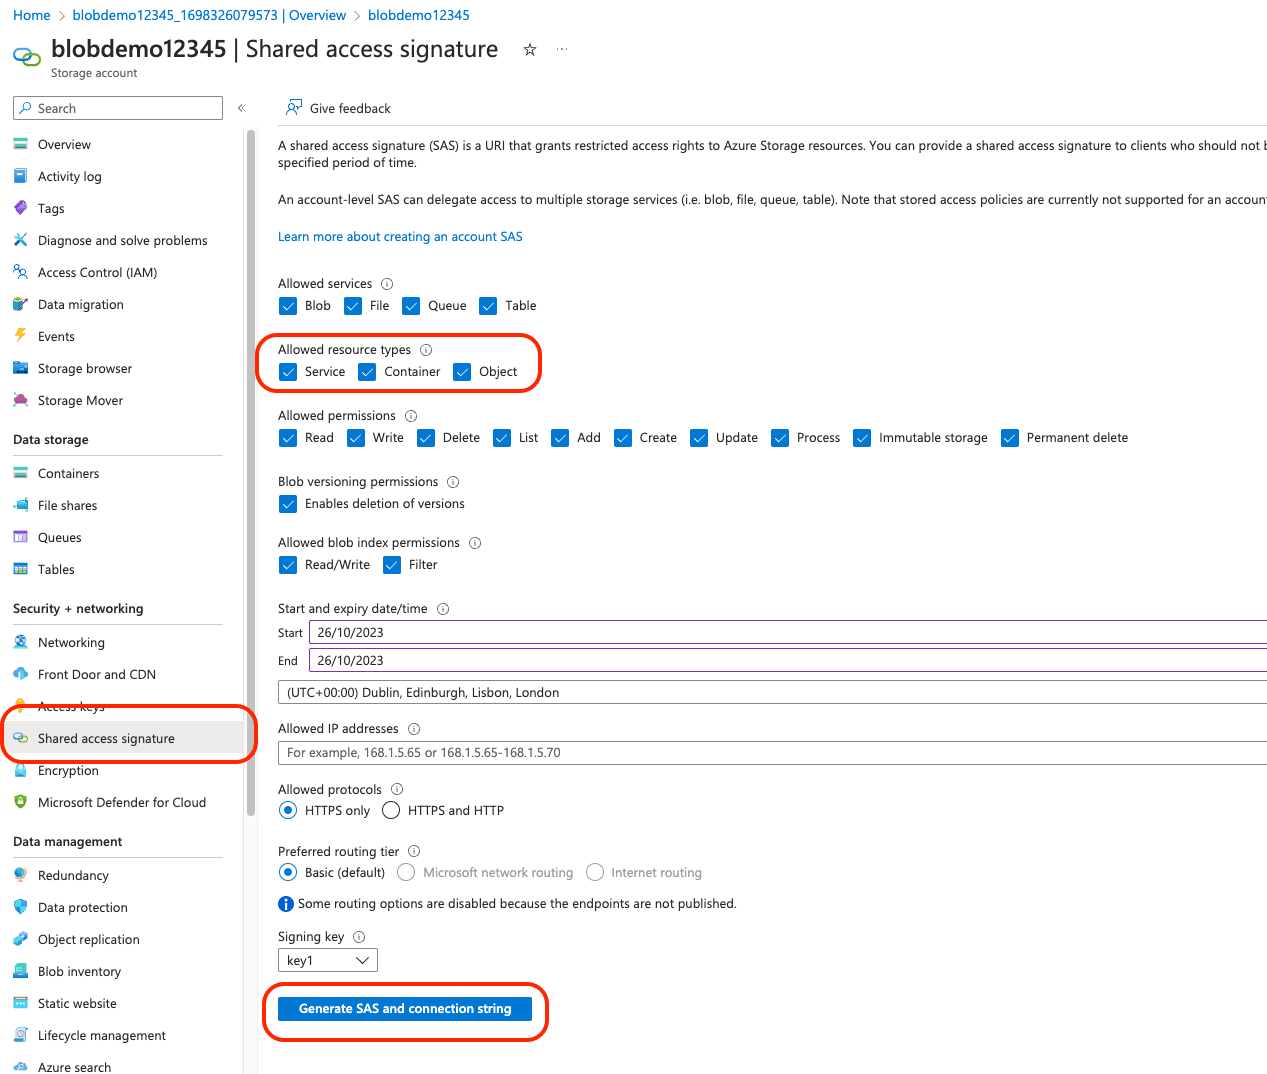
To connect your application to Azure Storage, you'll need to create a
Shared Access Signature (SAS). SAS provides detailed control over the ways your client can access data. From the menu on the left, select “Shared access signature” and set it up to permit the services and resource types you need. For the purposes of this tutorial, choose “Object” under allowed resource types, which is suitable for blob-level APIs and enables operations on individual blobs, such as upload, download, or delete.You can leave the other settings at their default values. However, if you're interested in understanding which configurations are ideal for your application, Microsoft’s documentation offers comprehensive guidance. Once you've finalized your settings, click “Generate SAS and connection string.” This action will produce your SAS, displayed below the button.
Create a .env file in the same location as you’ll be creating your application to store your environment variables. Add in your SAS token here. We’ll also add our account name for our storage account, and the name of our container. Your account name is displayed at the top of the overview page, and the container name can be found by clicking “Container” on the left blade menu. Here you’ll get a list of containers available to use.

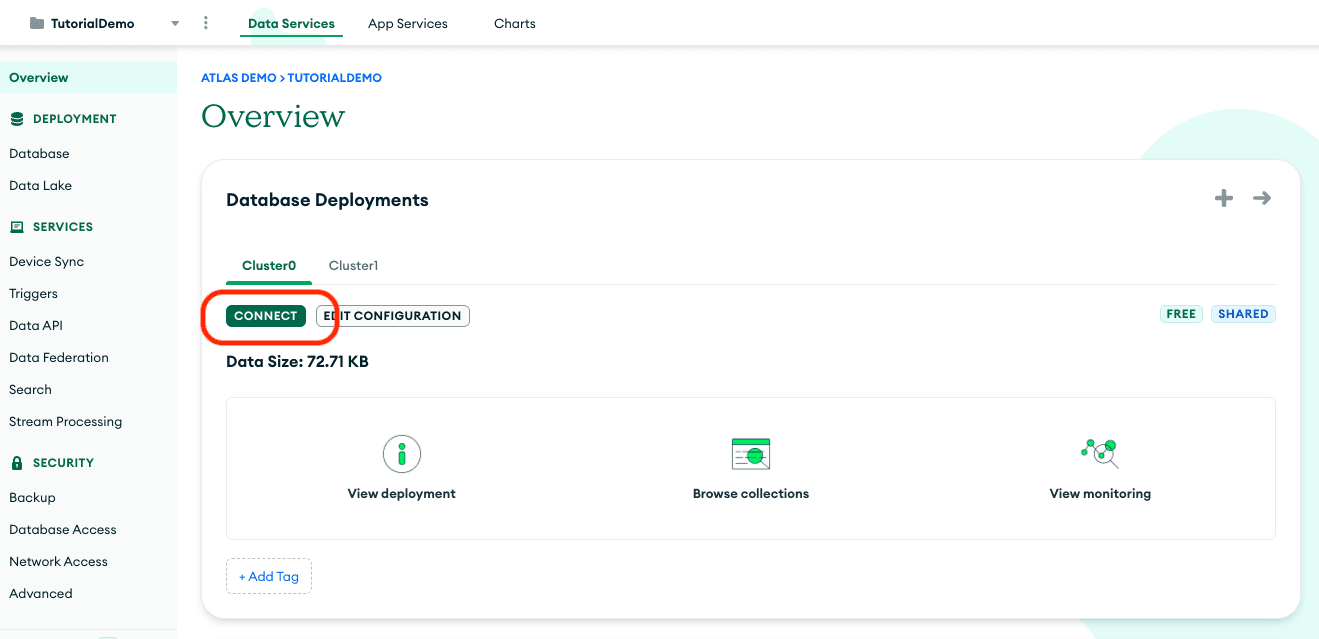
Alright, let's get things rolling with connecting to our Azure blob storage and MongoDB database. To get your MongoDB connection string, log into MongoDB Atlas and click connect. If you need help, check out our guide in the docs.
Copy this string and add it to the .env file with the name
MONGODB_URI.To initialize our project, we’re going to use the following command:
This command will install the
@azure/storage-blob package for interacting with Azure Blob Storage, mongodb for MongoDB operations, and dotenv for loading environment variables.Let’s import our dependencies. At the top of our
app.mjs file, we’ll add the following lines.Below this, we can configure the environment variables we will be using, and connect to our Azure blob storage and MongoDB database.
We need to establish somewhere to make our API calls. We are going to create a new HTTP server. The http.createServer() method is part of Node.js's HTTP module and takes a request listener function as an argument. In this case,
handleImageUpload is passed as the request listener, which means that this function will be called every time the server receives an HTTP request.The
handleImageUpload function is designed to process HTTP POST requests to the /api/upload endpoint, handling the uploading of an image and the storing of its associated metadata. It will call upon a couple of helper functions to achieve this. We’ll break down how these work as well.If the incoming request is a POST to the correct endpoint, it will call our
extractMetadata method. This function takes in our header from the request and extracts the associated metadata.It assumes that the 'content-type' header of the request will include the file type (like image/png or image/jpeg). It extracts this file type from the header. It then attempts to extract a filename from the content-disposition header, if provided. If no filename is given, it generates a default one using a timestamp.
Using the extracted or generated filename and file type, along with the rest of our metadata from the header, it calls
uploadImageStreamed, which uploads the image as a stream directly from the request to Azure Blob Storage.In this method, we are creating our
blobClient. The blobClient opens a connection to an Azure Storage blob and allows us to manipulate it. Here we upload our stream into our blob and finally return our blob URL to be stored in MongoDB.Once we have our image stored in Azure Blob Storage, we are going to take the URL and store it in our database. The metadata you decide to store will depend on your application. In this example, I add a caption for the file, the name, and the URL, but you might also want information like who uploaded the image or when it was uploaded. This document is inserted into a MongoDB collection using the
storeMetadata method.Here we create and connect to our MongoClient, and insert our document into the metadata collection in the tutorial. Don’t worry if the database or collection don’t exist yet. As soon as you try to insert data, MongoDB will create it.
If the upload and metadata storage are successful, it sends back an HTTP 201 status code and a JSON response confirming the successful upload.
Now we have an API call to upload our image, along with some metadata for said image. Let's test what we built! Run your application by executing the
node app.mjs command in a terminal that's open in your app's directory. If you’re following along, you’re going to want to substitute the path to the image below to your own path, and whatever you want the metadata to be.There’s a couple of steps to our cURL command.
curl -X POSTinitiates a curl request using the POST method, which is commonly used for submitting data to be processed to a specified resource.-H "Content-Type: image/png"includes a header in the request that tells the server what the type of the content being sent is. In this case, it indicates that the file being uploaded is a PNG image.-H "Content-Disposition: attachment; filename=\"mongodb-is-webscale.png\""header is used to specify information about the file. It tells the server the file should be treated as an attachment, meaning it should be downloaded or saved rather than displayed. The filename parameter is used to suggest a default filename to be used if the content is saved to a file. (Otherwise, our application will auto-generate one.)-H "X-Image-Caption: Your Image Caption Here"header is used to dictate our caption. Following the colon, include the message you wish to store in or MongoDB document.--data-binary @"{Your-Path}/mongodb-is-webscale.png"tells cURL to read data from a file and to preserve the binary format of the file data. The @ symbol is used to specify that what follows is a file name from which to read the data. {Your-Path} should be replaced with the actual path to the image file you're uploading.http://localhost:3000/api/uploadis the URL where the request is being sent. It indicates that the server is running on localhost (the same machine from which the command is being run) on port 3000, and the specific API endpoint handling the upload is /api/upload.
Let’s see what this looks like in our storage. First, let's check our Azure Storage blob. You can view the
mongodb-is-webscale.png image by accessing the container we created earlier. It confirms that the image has been successfully stored with the designated name.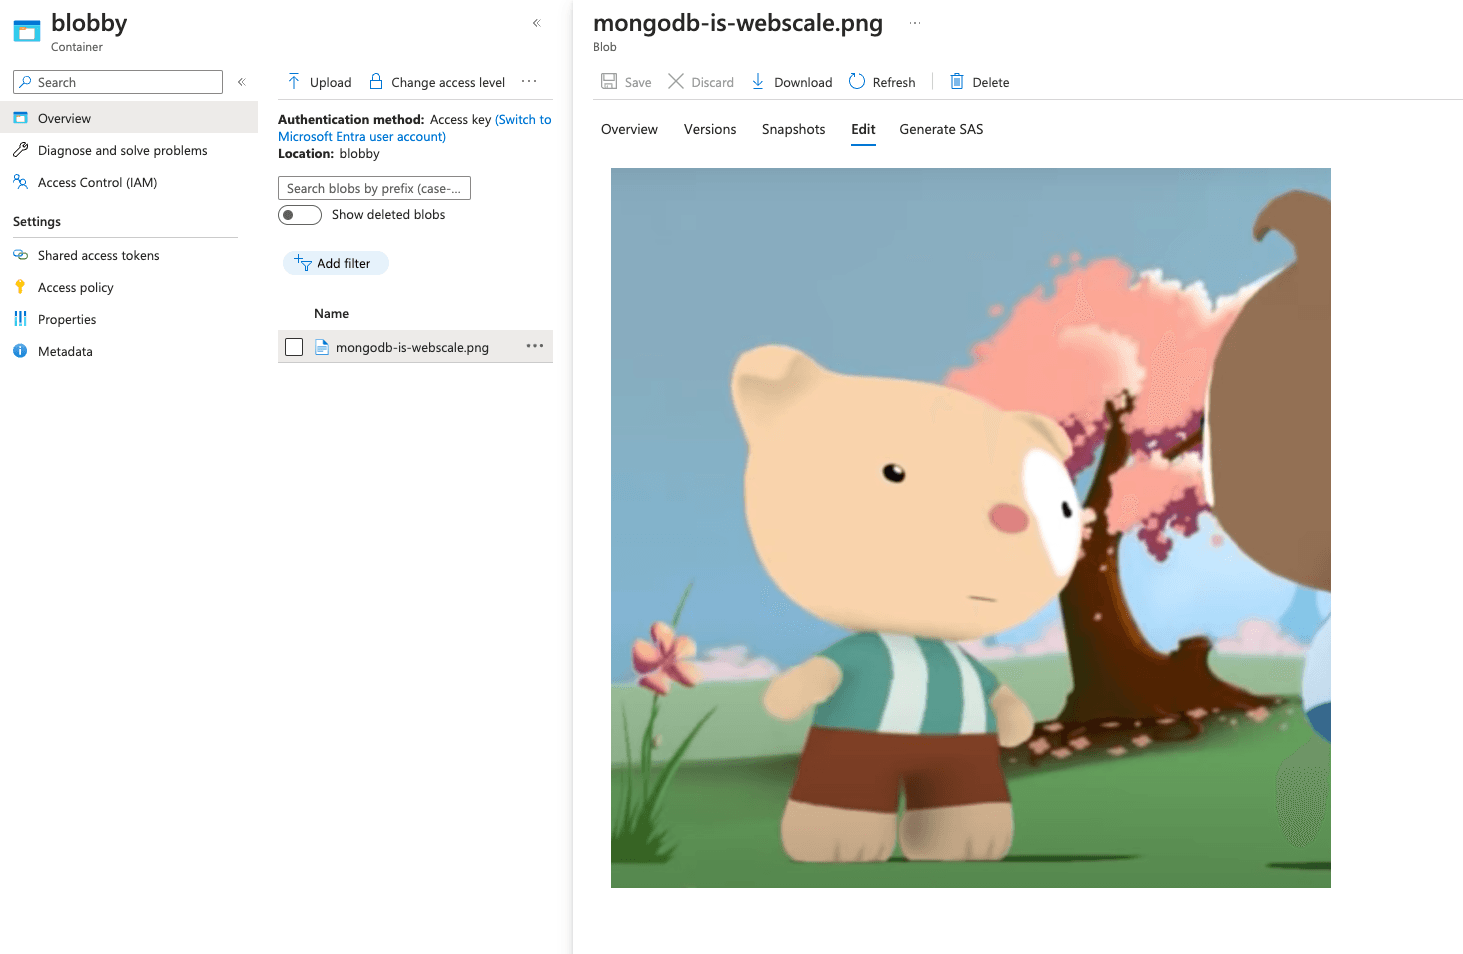
Now, how can we retrieve this image in our application? Let’s check our MongoDB database. You can do this through the MongoDB Atlas UI. Select the cluster and the collection you uploaded your metadata to. Here you can view your document.
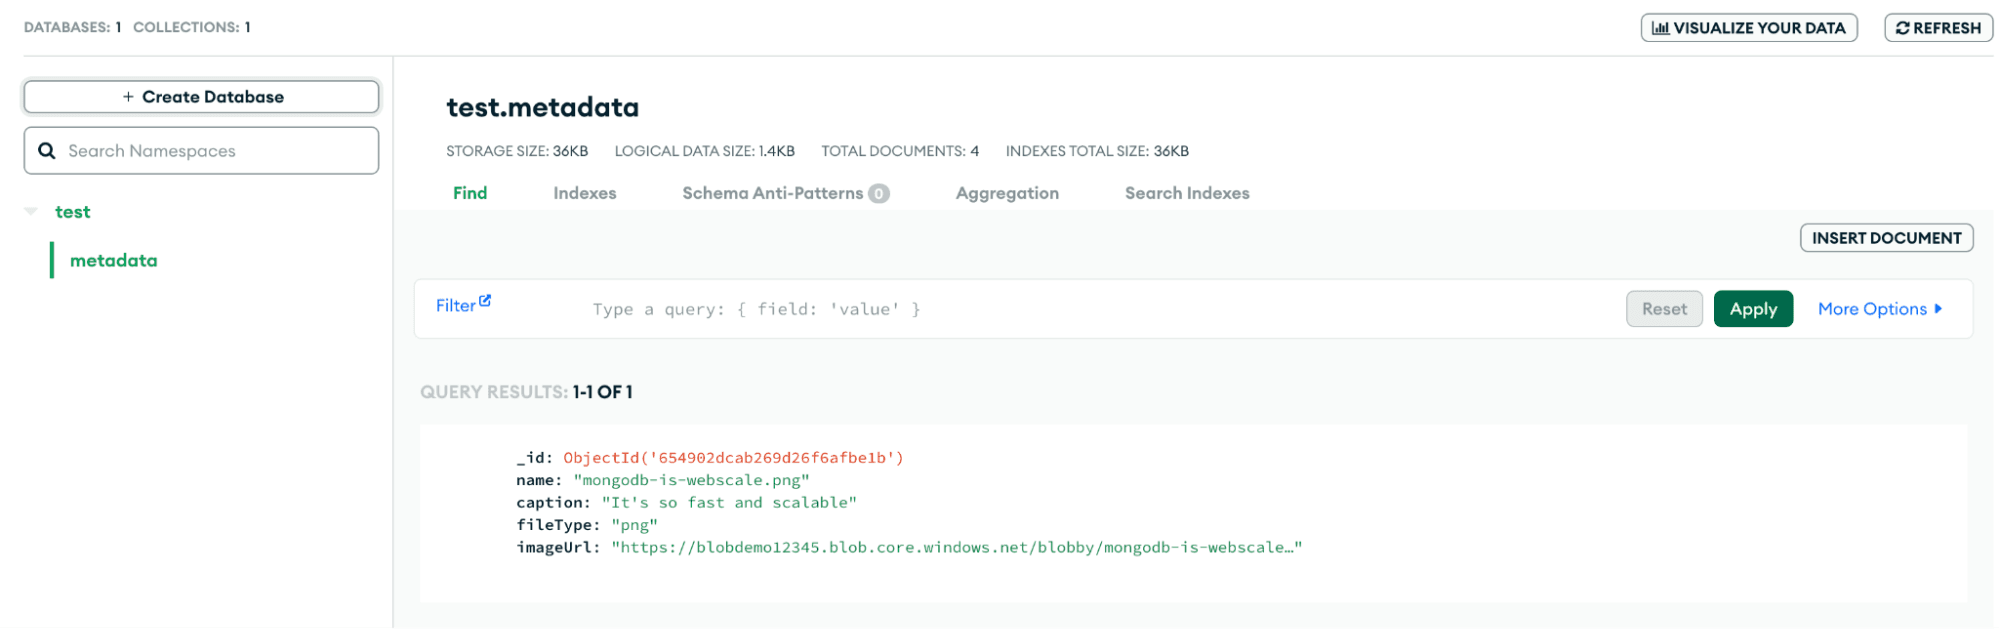
You can see we’ve successfully stored our metadata! If you follow the URL, you will be taken to the image you uploaded, stored in your blob.
Integrating Azure Blob Storage with MongoDB provides an optimal solution for storing large media files, such as images and videos, and provides a solid backbone for building your multimedia applications. Azure Blob Storage, a cloud-based service from Microsoft, excels in handling large quantities of unstructured data. This, combined with the efficient database management of MongoDB, creates a robust system. It not only simplifies the file upload process but also effectively manages relevant metadata, offering a comprehensive solution for data storage needs.
Through this tutorial, we've provided you with the steps to set up a MongoDB Atlas cluster and configure Azure Storage, and we demonstrated how to construct a Node.js API to seamlessly interact with both platforms.
If your goal is to develop a multimedia platform, a robust content management system, or any type of application that requires storing substantial media files, this guide offers a clear pathway to embark on that journey. Utilizing the powerful capabilities of Azure Blob Storage and MongoDB, along with a Node.js API, developers have the tools to create applications that are not only scalable and proficient but also robust enough to meet the demands of today's dynamic web environment.
Want to learn more about what you can do with Microsoft Azure and MongoDB? Check out some of our articles in Developer Center, such as Building a Crypto News Website in C# Using the Microsoft Azure App Service and MongoDB Atlas, where you can learn how to build and deploy a website in just a few simple steps.