Plans and Hardware Selection for a Hands-on Implementation of IoT with MCUs and MongoDB


Rate this tutorial


Do you have a cool idea for a device that you may consider producing and selling? Would you want to have some new functionality implemented for your smart home? Do you want to understand how IoT works with a real example that we can work with from beginning to end? Are you a microcontroller aficionado and want to find some implementation alternatives? If the answer is yes to any of these questions, welcome to this series of articles and videos.
For a while, I have been implementing many automations at home using third-party hardware and software products. This brings me a lot of joy and, in most cases, improves the environment my family and I live in. In the past, this used to be harder, but nowadays, the tools and their compatibility have improved greatly. You can start with something as trivial but useful as turning on the garden lights right after sunset and off at the time that you usually go to bed. But you can easily go much further.
For example, I have a door sensor that is installed in my garage door that triggers a timer when the door is opened and turns a light red after six minutes. This simple application of domotics has helped me to avoid leaving the door open countless times.
All the fun, and sometimes even frustration, that I have experienced implementing these functionalities, together with the crazy ideas that I sometimes have for creating and building things, have made me take a step forward and accept a new challenge in this area. So I did some thinking and came up with a project that combined different requirements that made it suitable to be used as a proof of concept and something that I could share with you.
Let me describe the main characteristics of this project:
- It should be something that a startup could do (or, at least, close enough.) So, I will share the vision and the mission of that wannabe startup. But most importantly, I will introduce the concept for our first product. You don't have to buy the idea, nor will I spend time trying to demonstrate that there is a suitable business need for that, in other words, this is a BPNI (business plan not included) project.
- The idea should involve something beyond just a plain microcontroller (MCU). I would like to have some of those, maybe even in different rooms, and have their data collected in some way.
- The data will be collected wirelessly. Having several sensors in different places, the wired option isn't very appealing. I will opt for communications implemented over radio frequencies: Bluetooth and WiFi. I might consider using ZigBee, Thread, or something similar in the future if there is enough interest. Please be vocal in your comments on this article.
- I will use a computer to collect all the sensor measurements locally and send them to the cloud.
- The data is going to be ingested into MongoDB Atlas and we will use some of its IoT capabilities, such as time series collections and real-time analytics.
- Finally, I'm going to use some programming languages that are on the edge or even out of my comfort zone, just to prove that they shouldn't be the limitation.
Vision: we need work environments that enhance our productivity.
Consider that technology, and IoT in particular, can be helpful for that.
Mission: We are going to create, sell, and support IoT products that will help our users to be more productive and feel more comfortable in their work environments.
The first product in the pipeline is going to help our customers to measure and control noise levels in the workspace.
Hopefully, by now you are relieved that this isn't going to be another temperature sensor tutorial. Yippee-ki-yay!
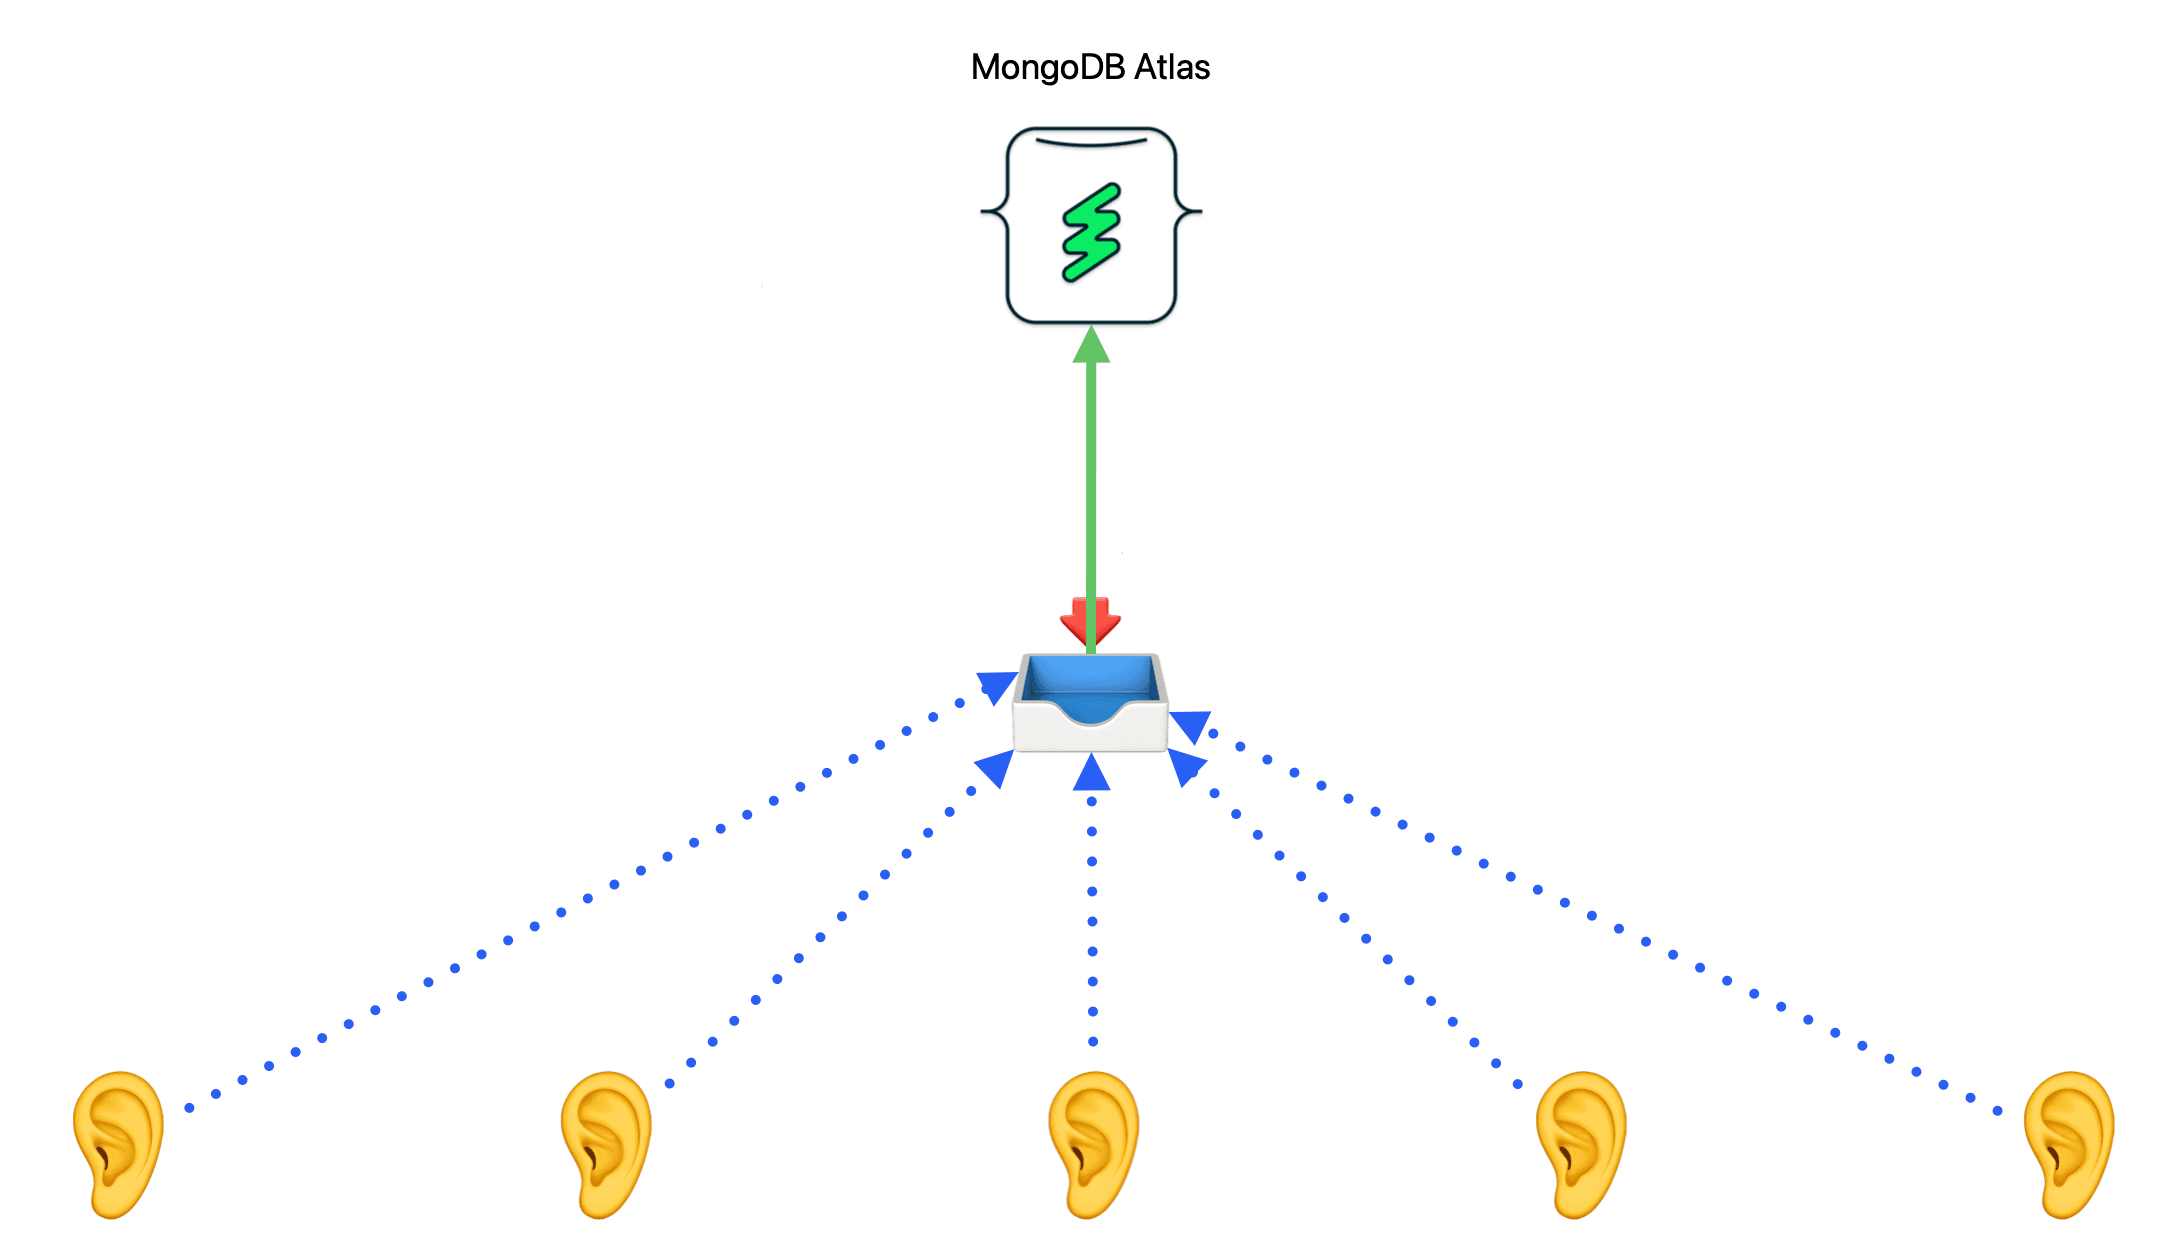
Let's use an implementation diagram that we will refine in the future. In the diagram, I have included an undetermined number of sensors (actually, 5) to measure the noise levels in different places, hence the ear shape used for them. In my initial implementation, I will only use a few (two or three) with the sole purpose of verifying that the collecting station can work with more than one at any given time. My first choice for the collecting station, which is represented by the inbox icon, is to use a Raspberry Pi (RPi) that has built-in support for Bluetooth and WiFi. Finally, on the top of the diagram, we have a MongoDB Atlas cluster that we will use to store and use the sensor data.
As I mentioned above, I didn't want to do a project that was only about implementing a sensor with an MCU and reading values from it. There are plenty of those and some of them are amazing, so my contribution would be worthless. Instead, my goal is to work on the different relevant aspects of a real-world project that uses custom devices. That includes MCU firmware coding, device communication, ingestion of IoT data, and working with it.
But, at the same time, I didn't want to spend more time on this project than strictly required. So, I will start by sharing with you a plan for the implementation of the different parts of the project, including some alternatives for the implementation. I will start with what I consider to be the most interesting one, but I might switch gears if the step I am working on begins to become too complex (for me). If you feel that the option that I have decided to skip still makes sense, feel free to add a comment to encourage me to continue exploring it. I might come back to it after the main project is finished.
I also want to let you know that I am planning to use different programming languages throughout this project. I consider myself quite fluent in some, like Rust and Go, but with others, like Python or C++, it has been a long while since I had to push any actual commits on any production branch of any real-world project. Still, I have challenged myself to work with them and share the code with you. I want to refresh my hands-on experience with them and learn from your comments to do things better.
A word on the tools, too. My friends and colleagues know that I am an Emacs user and fan, but my goal is that this content is useful to the largest number of people. I know that you may have other preferred editors, so I have decided to use what I consider the most popular one nowadays, Visual Studio Code, as I did with the Rust videos in the past. Please forget my mistakes when using it.
Finally, there are some things that I won't be covering in this project, both for the sake of brevity and for my lack of knowledge of them. The most obvious ones are creating custom PCBs with the components and 3D printing a case for the resulting device. But most importantly, I won't be implementing firmware for all of the devkits that I will select and even less in different languages. Just some of the boards in some of the languages. As we lazy people like to say, this is left as an exercise to the reader.
Coming back to the goal of this project, it is to mimic what one would do when one wants to create a new device from scratch. I will start, then, by selecting some microcontroller devkits that are available on the market. That is the first step and it is included in this article.
One of the main features of the hardware that I plan to use is to have some way of working wirelessly. I plan to have some sensors, and if they require a wired connection to the collecting station, it would be a very strong limitation. Thus, my next step is to implement this communication. I have considered two alternatives for the communication. The first one is Bluetooth Low Energy (BLE) and the second one is MQTT over WiFi. I will give a more detailed explanation when we get to them. From the perspective of power consumption, the first option seems to be better, and consuming less power means batteries that last longer and happier users.
But, there seems to be less (complete) documentation on how to implement it. For example, I could find neither good documentation for the BLE library that comes with MicroPython nor anything on how to use BLE with Bluez and DBus. Also, if I successfully implement both sides of the BLE communication, I need to confirm that I can make it work concurrently with more than one sensor.
My second and third steps will be to implement the peripheral role of the BLE communication on the microcontroller devkits and then the central role on the RPi.
I will continue with the implementation of the WiFi counterparts. Step 4 is going to be making the sensors publish their measurements via MQTT over WiFi, and Step 5 will be to have the Raspberry Pi subscribe to the MQTT service and receive the data.
Eventually, in Step 6, I will use the MongoDB C++ driver to upload the data to a MongoDB Atlas cluster. Once the data is ingested by the MongoDB Atlas cluster, we will be able to enjoy the advantages it offers in terms of storing and archiving the data, querying it, and using real-time analytics and visualization.
So, this is the list of steps of the plan:
- Project intro (you are here)
- BLE peripheral firmware
- BLE central for Raspberry Pi OS
- MQTT publisher firmware
- MQTT subscriber for Raspberry Pi OS
- Upload data from Raspberry Pi OS to MongoDB Atlas clusters
- Work with the data using MongoDB
I have a couple of ideas that I may add at the end of this series, but for now, this matches my goals and what I wanted to share with you. Keep in mind that it is also possible that I will need to include intermediate steps to refine some code or include some required functionality. I am open to suggestions for topics that can be added and enhancements to this content. Send them my way while the project is still in progress.
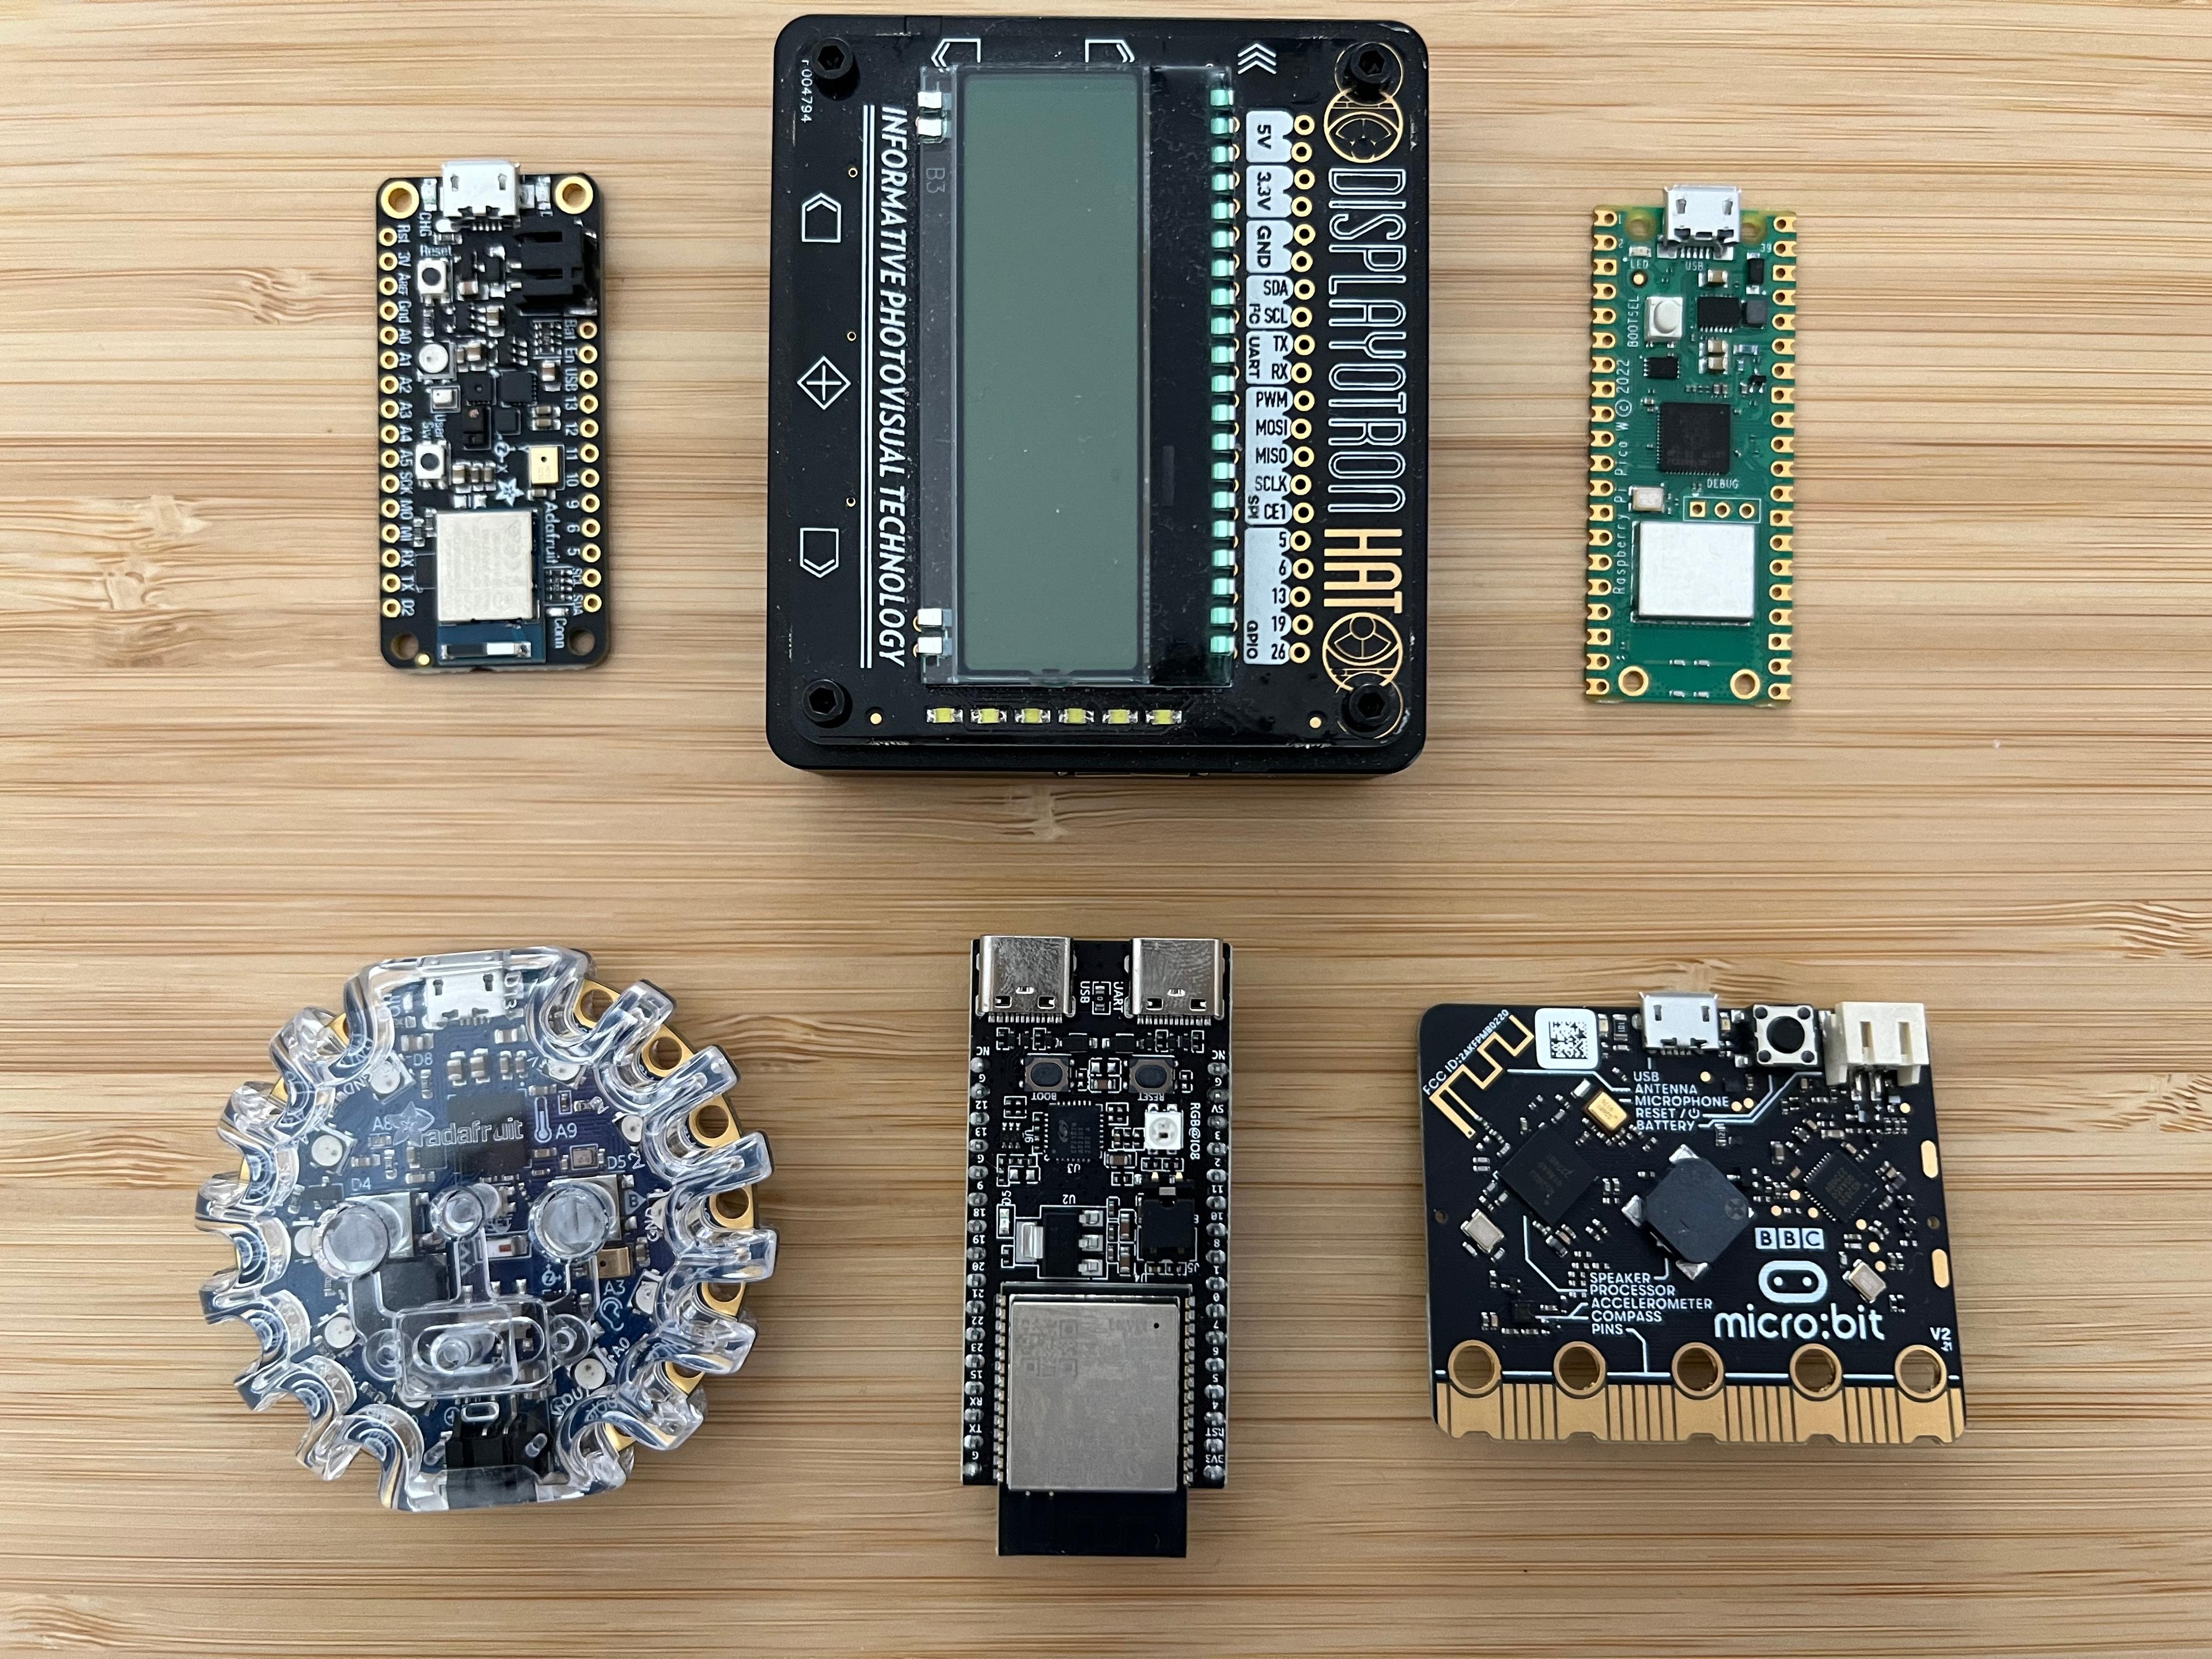
I will start this hands-on part by defining the features that I will be using and then come up with some popular and affordable devkit boards that implement those features or, at least, can be made to do so. I will end up with a list of devkit boards. It will be nothing like the "top devkit boards" of this year, but rather a list of suggested boards that can be used for a project like this one.
Let's start with the features:
- They have to implement at least one of the two radio-frequency communication standards: WiFi and/or Bluetooth.
- They have to have a microphone or some pins that allow me to connect one.
- Having another sensor on board is appreciated but not required. Reading the temperature is extremely simple, so I will start by using that instead of getting audio. I will focus on the audio part later when the communications are implemented and working.
- I plan to have independent sensors, so it would be nice if I could plug a battery instead of using the USB power. Again, a nice feature, but not a must-have.
- Last, but not least, having documentation available, examples, and a vibrant community will make our lives easier.
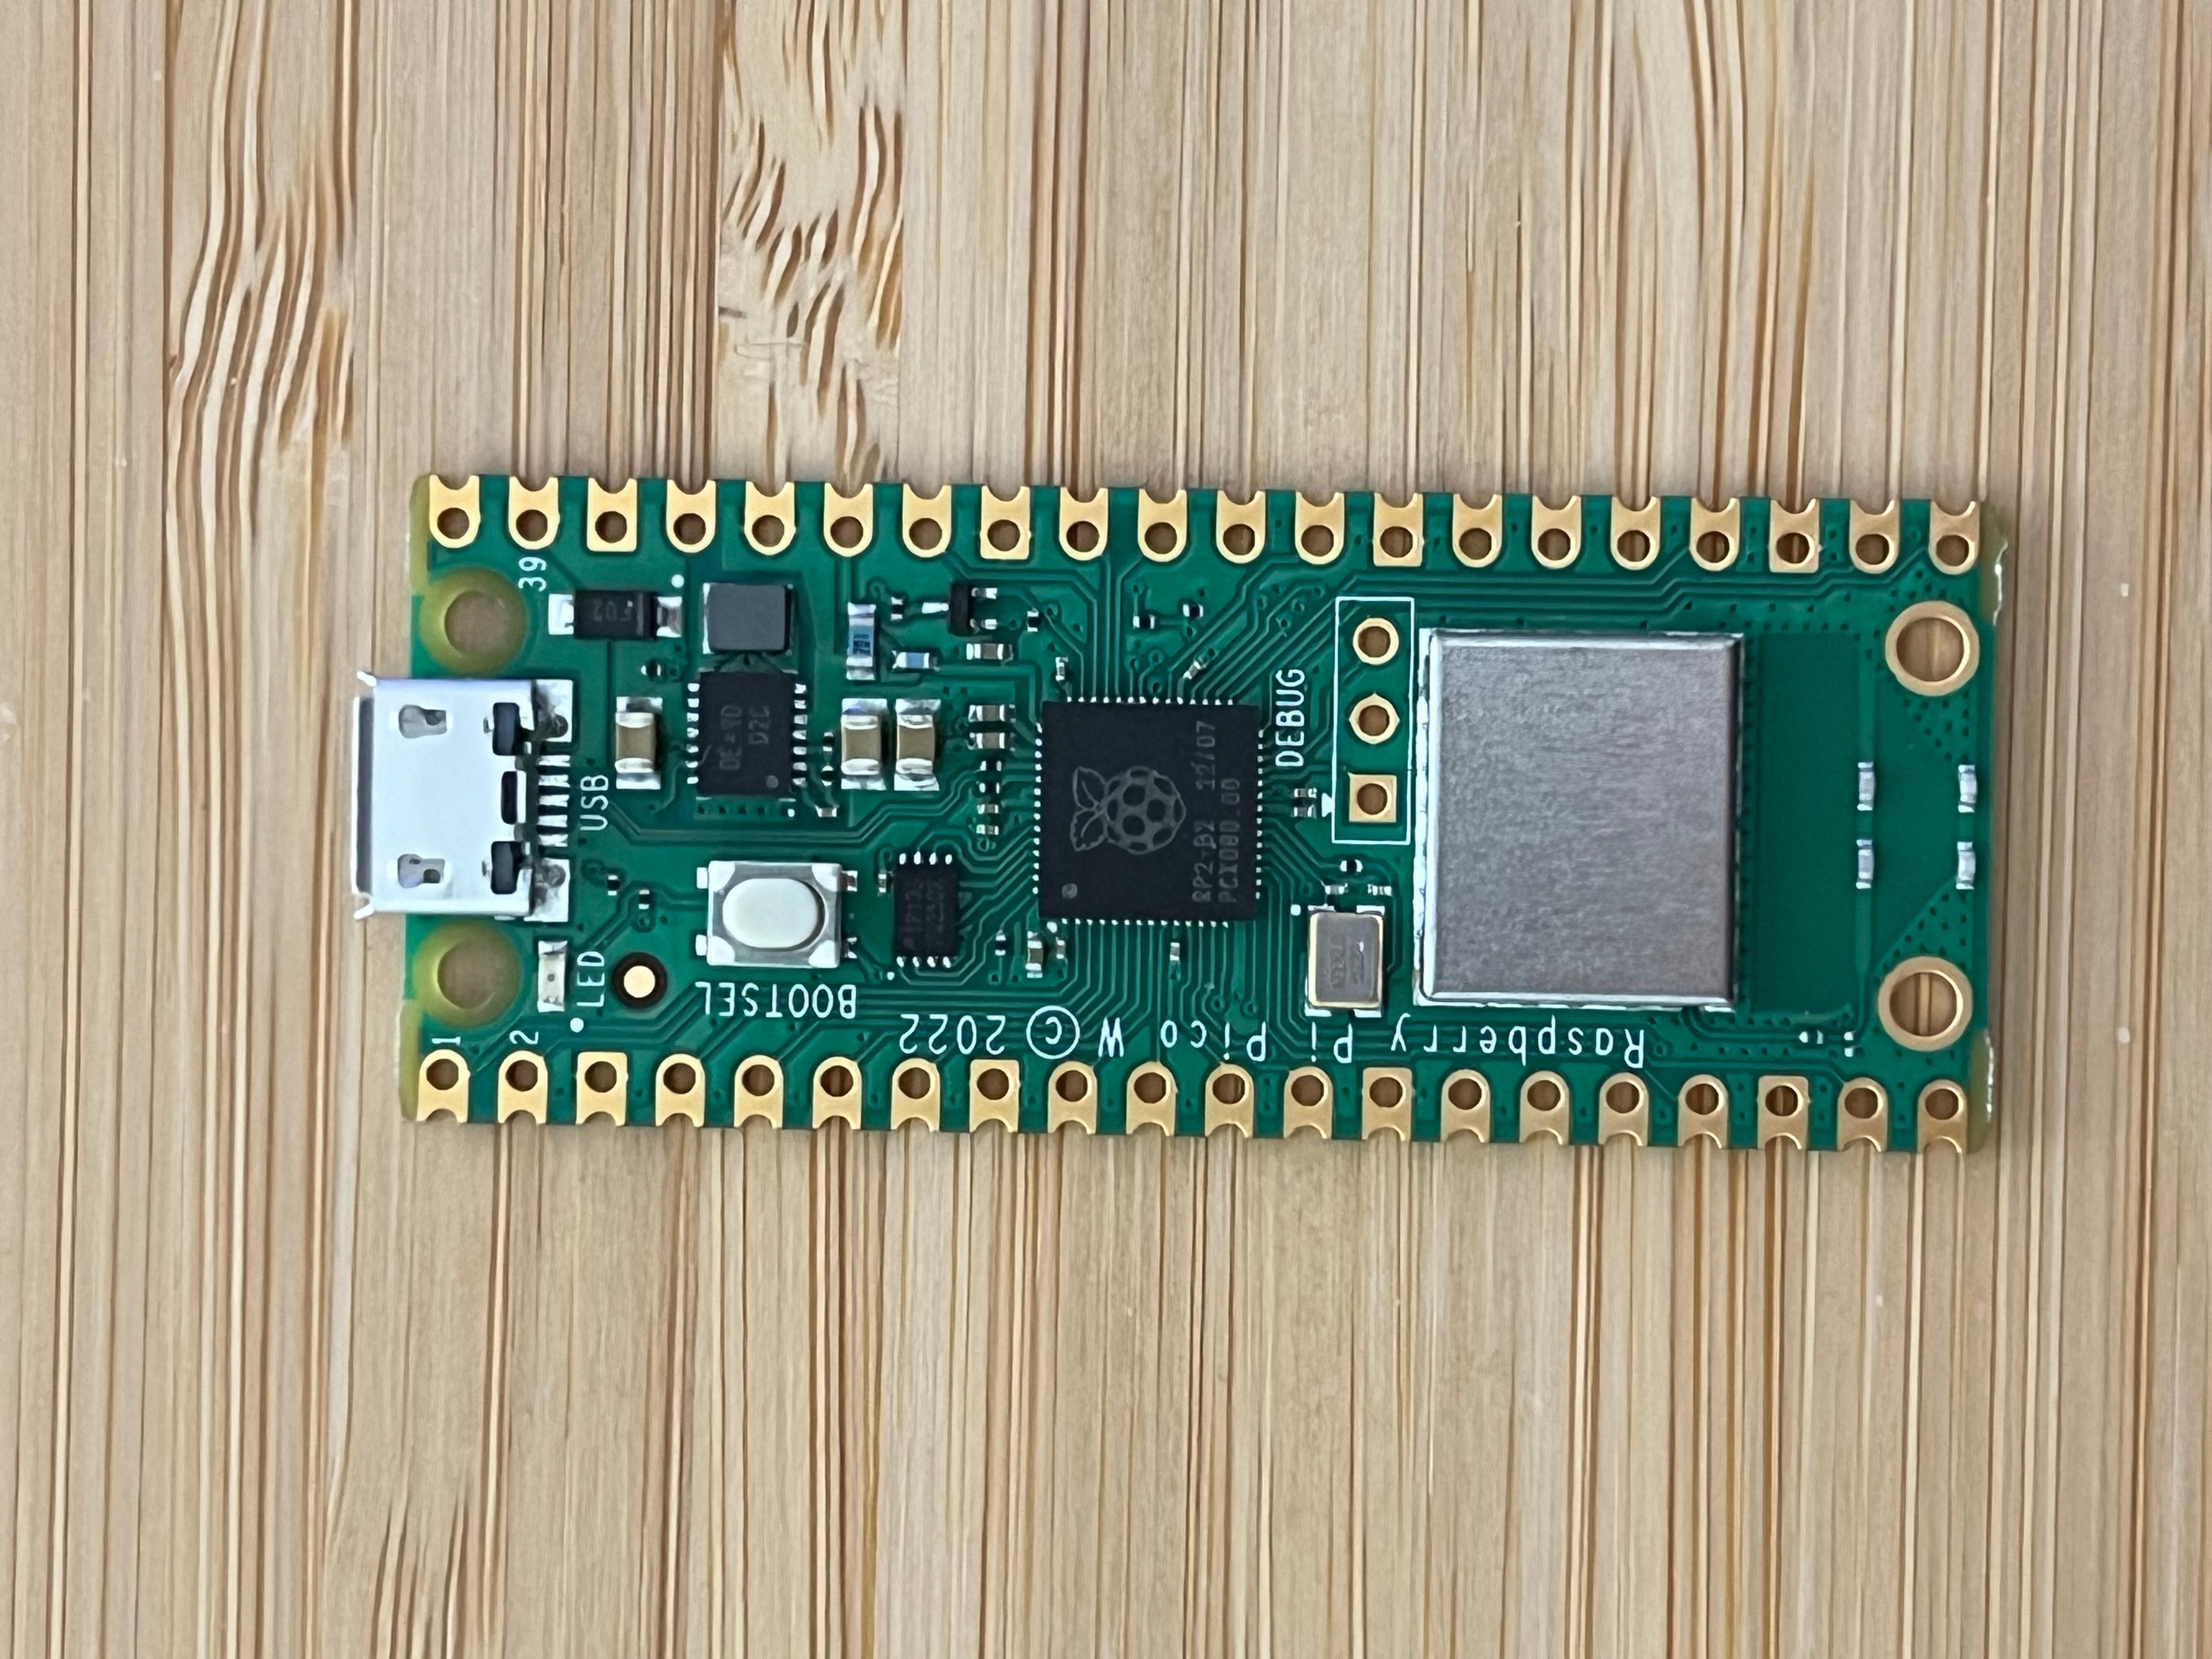
The Rasberry Pi Pico (RP2) is produced by the same company that sells the well-known Raspberry Pi single-board computers, but it is a microcontroller board with its own RP-2040 chip. The RP-2040 is a dual-core Arm Cortex-M0+ processor. The W model includes a fully certified module that provides 802.11n WiFi and Bluetooth 5.2. It doesn't contain a microphone in the devkit board, but there are examples and code available for connecting an electret microphone. It does have a temperature sensor, though. It also doesn't have a battery socket so we will have to use our spare USB chargers.
Finally, in terms of creating code for this board, we can use:
- MicroPython, which is an implementation of Python3 for microcontrollers. It is efficient and offers the niceties of the Python language: easy to learn, mature ecosystem with many libraries, and even REPL.
- C/C++ that provide a lower-level interface to extract every bit of juice from the board.
- JavaScript as I have learned very recently. The concept is similar to the one in the MicroPython environment but less mature (for now).
- There are some Rust crates for this processor and the board, but it may require extra effort to use BLE or WiFi using the embassy crate.
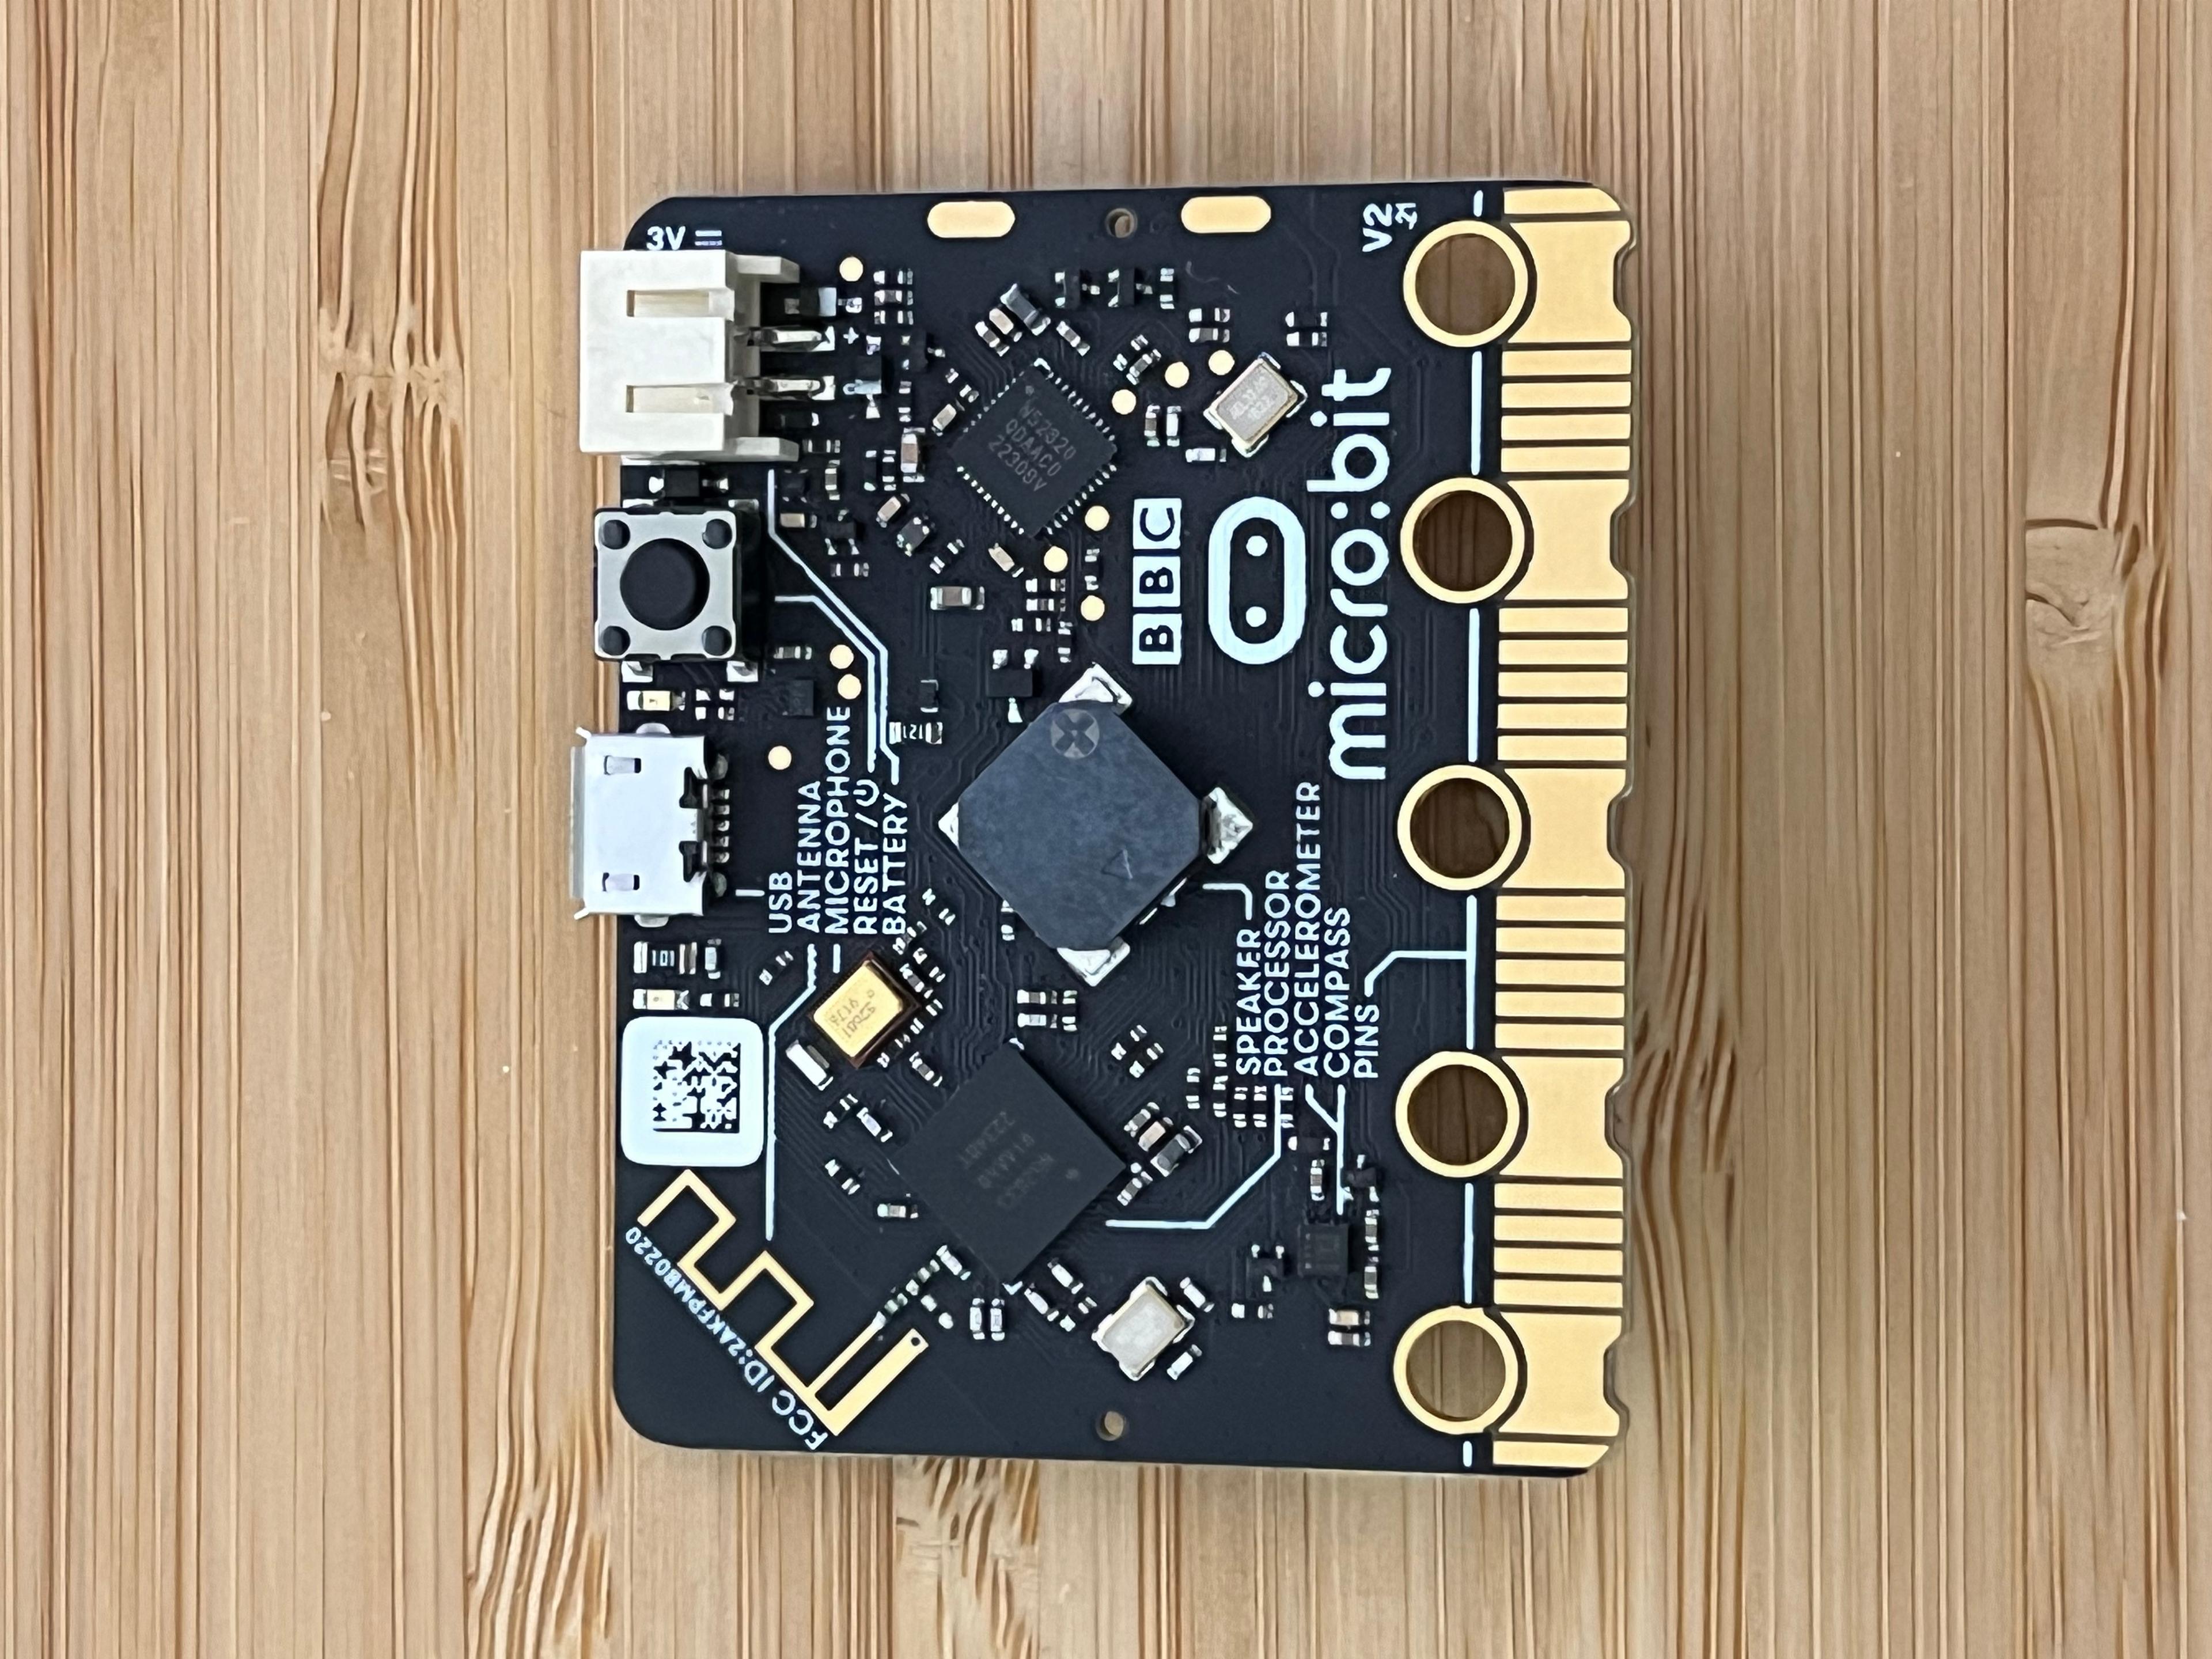
The BBC micro is a board created for learning purposes. It comes with several built-in sensors, including a microphone, and LEDs that we can use to get feedback on the noise levels. It uses a Nordic nRF52833 that features an ARM Cortex-M4 processor with a full Bluetooth Low Energy stack, but no WiFi. It has a battery socket and it can be bought with a case for AA batteries.
The educational goal is also present when we search for options to write code. These are the main options:
- Microsoft MakeCode which is a free platform to learn programming online using a graphical interface to operate with different blocks of code.
- Rust, because the introductory guide for embedded Rust uses the microbit as the reference board. So, no better board to learn how to use Rust with embedded devices. BLE is not in the guide, but we could also use the embassy nrf-softdevice crate to implement it.

This board is also aimed at people who want to have their first contact with electronics. It comes with a bunch of sensors, including temperature one and a microphone, and it also has some very nice RGB LEDs. Its main chip is a Nordic nRF52840 Cortex M4 processor with Bluetooth Low Energy support. As was the case with the micro board, there's no WiFi support on this board. It has a JST PH connector for a lipo battery or an AAA battery pack.
It can be used with Microsoft MakeCode, but its preferred programming environment is CircuitPython. CircuitPython is a fork of MicroPython with some specific and slightly more refined libraries for Adafruit products, such as this board. If you want to use Rust, there is a crate for an older version of this board, without BLE support. But then again, we could use the embassy crates for that purpose.
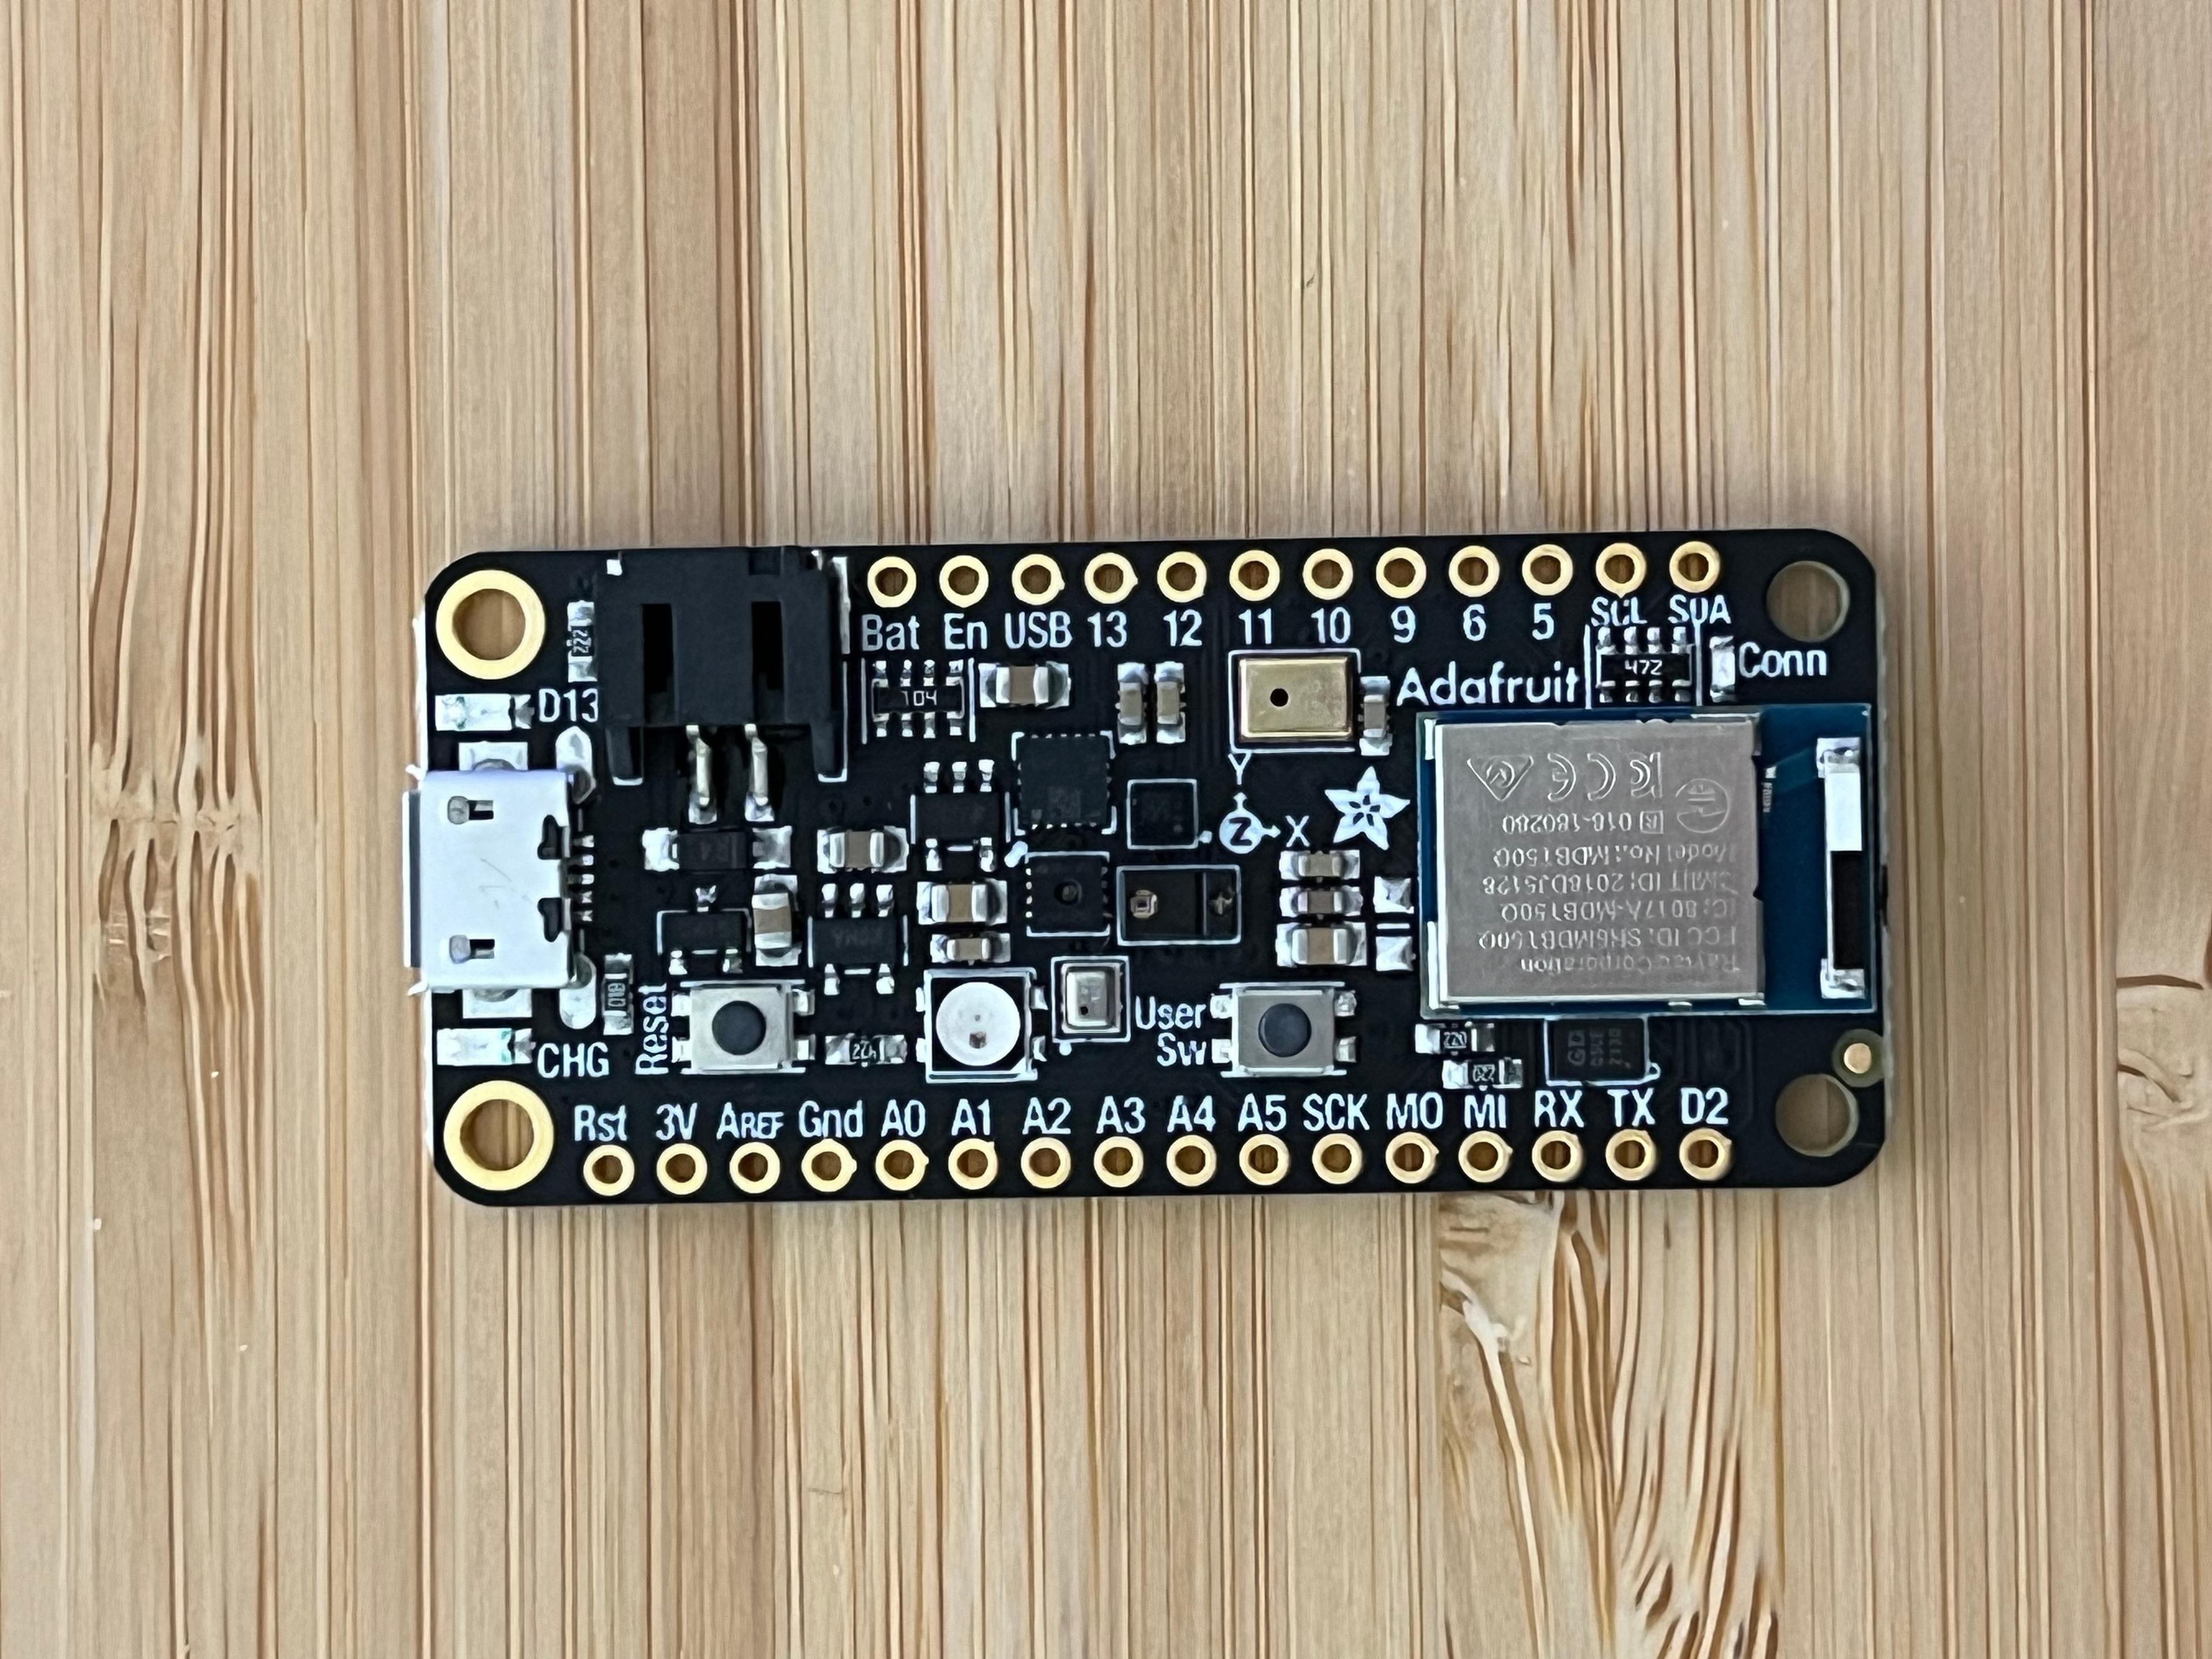
Adafruit Feather is a platform that provides a consistent interface across different chipsets, so you can connect to them any of the companion feather wings, i.e., accessory boards. This model is also based on the Nordic nRF52840 Cortex M4 and offers Bluetooth Low Energy but no WiFi. It comes with many on-board sensors, including microphone and temperature. It also features an RGB LED and a JST PH connector for a battery that can be charged using the USB connector.
While this board can also be used to learn, I would argue that it's more aimed at prototyping and the programming options are:
- CircuitPython as with all the Adafruit boards.
- C/C++ with the Arduino IDE.
- Rust, using the previously mentioned crates.
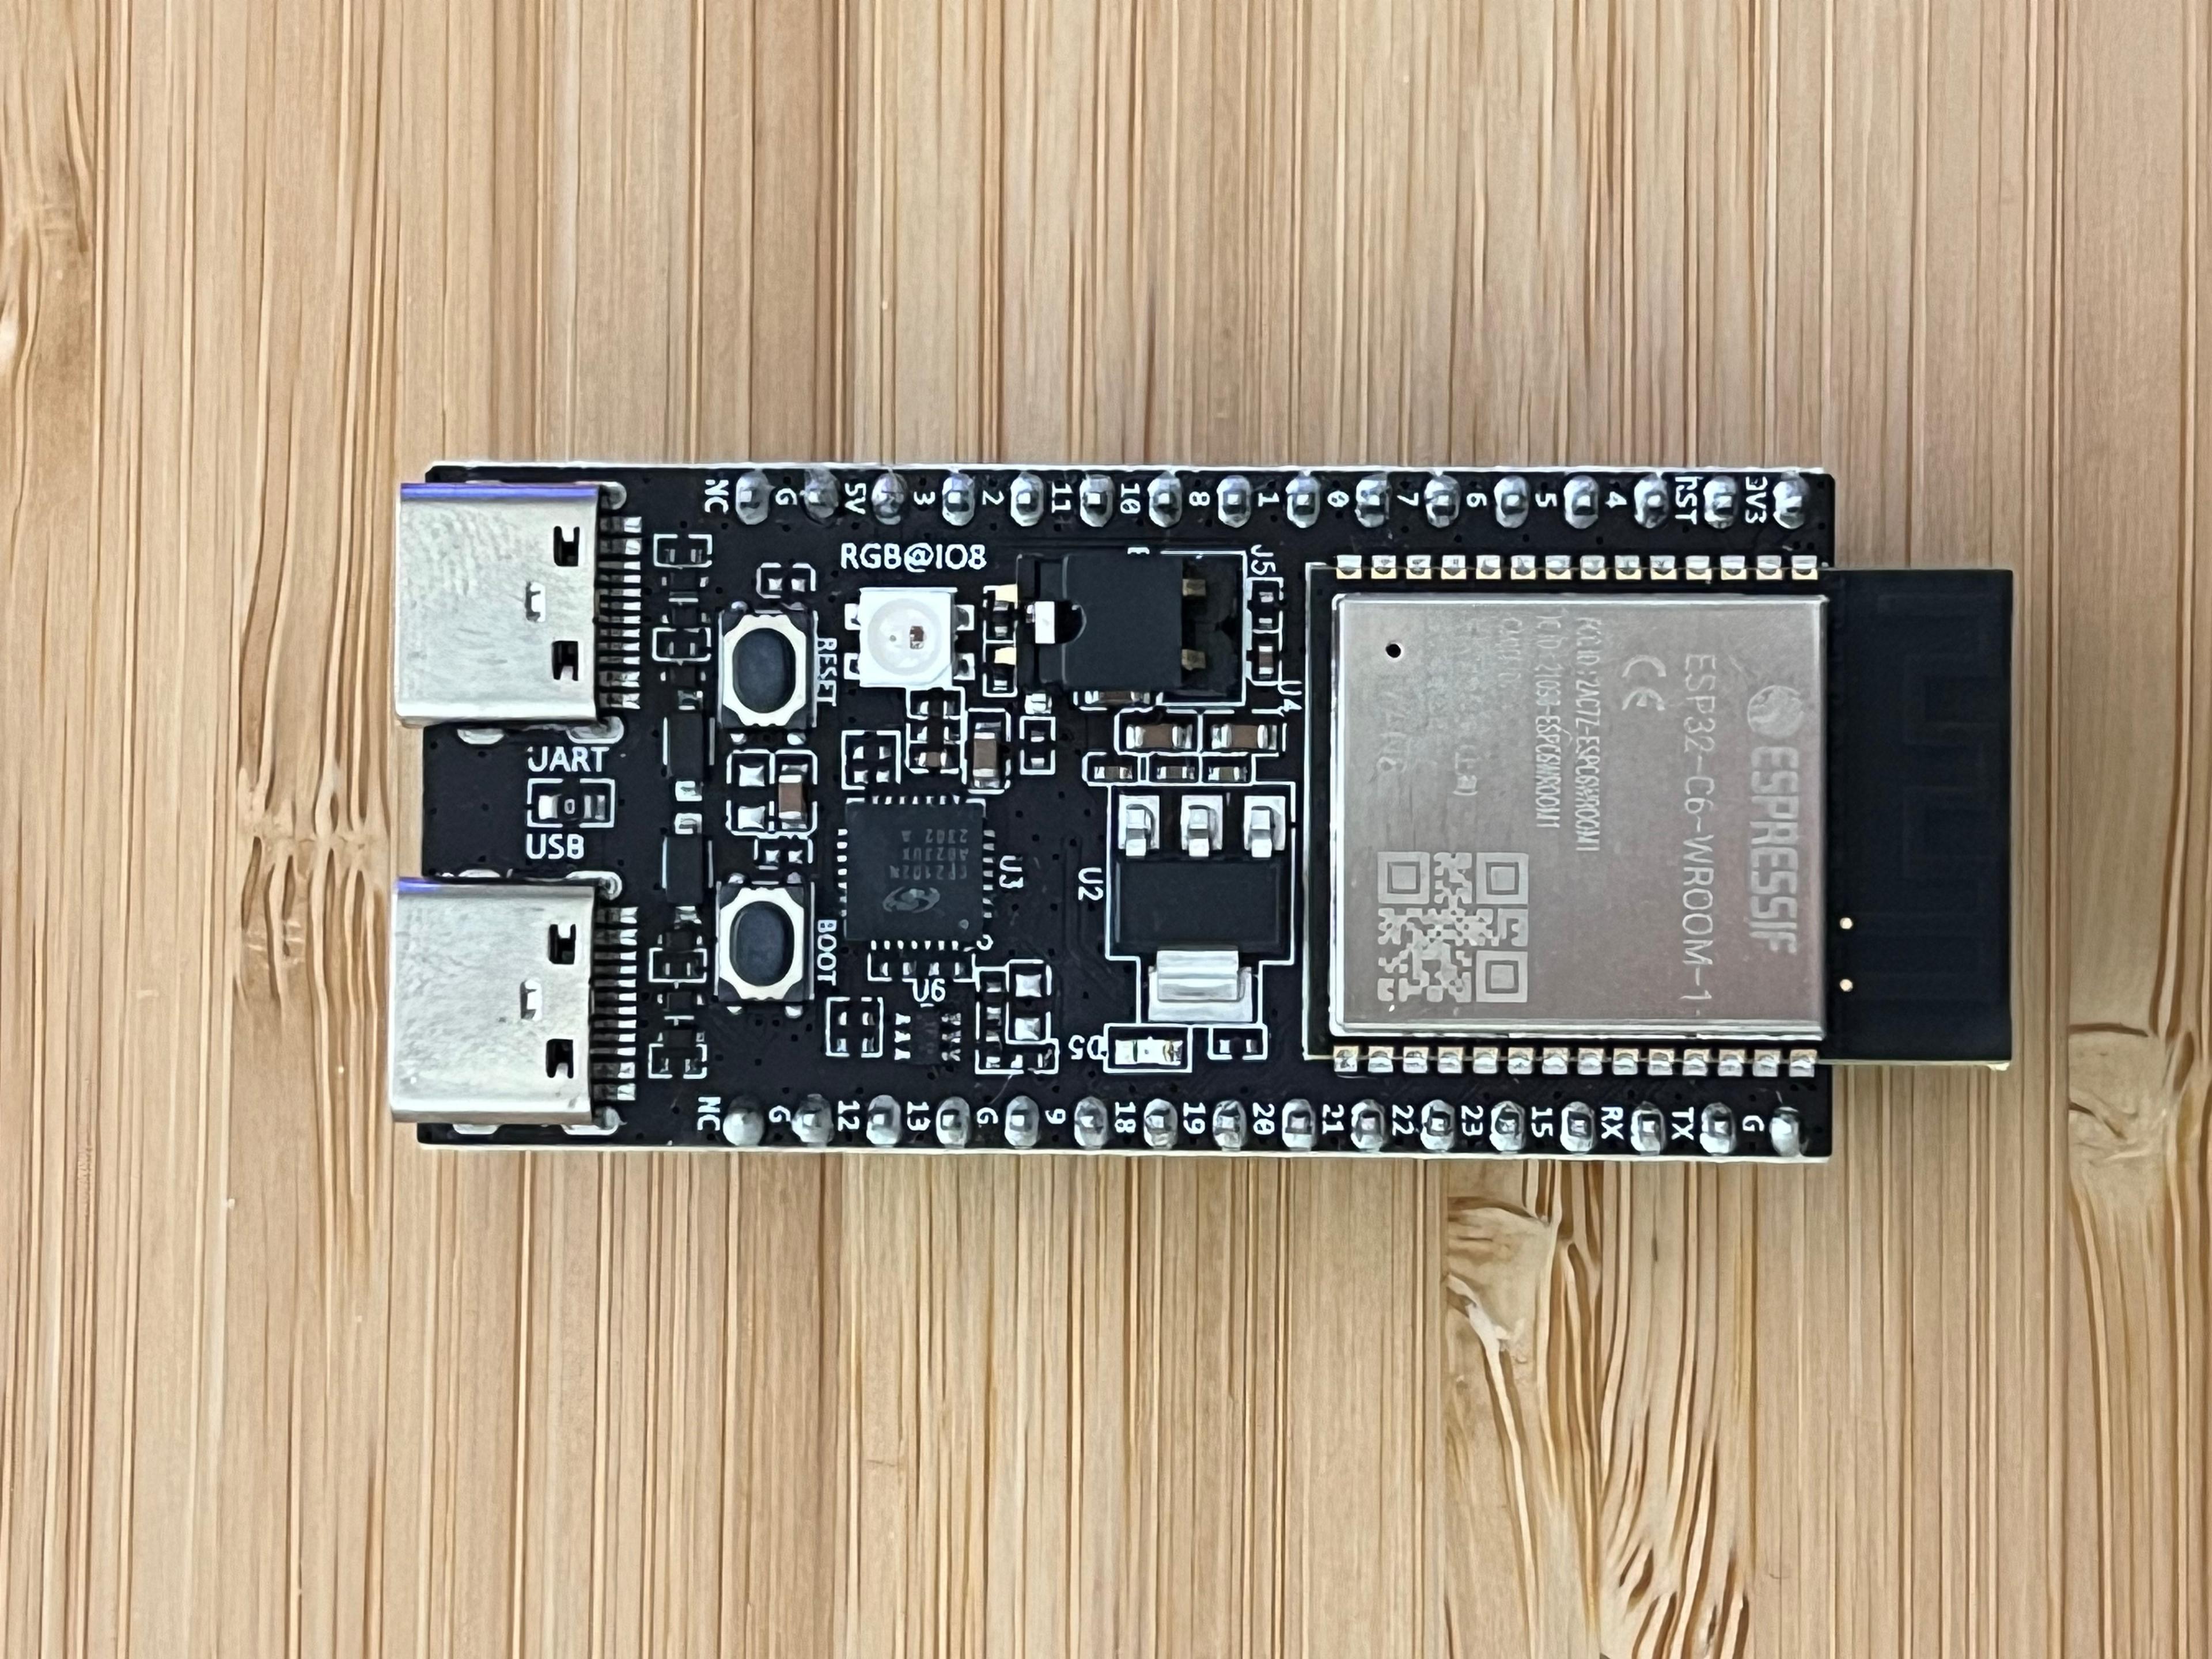
In contrast with all the ARM-based processors of the other boards, this board features a RISC-V single-core processor and a WROOM module that provides not only WiFi and Bluetooth connectivity but also Zigbee and Thread (both are network protocols specifically designed for IoT). It has no sensors on-board, but it does have an LED and two USB-C ports, one for UART communications and the other one for USB Type-C serial communications.
Espressif boards have traditionally been programmed in C/C++, but during the last year, they have been promoting Rust as a supported environment. It even has an introductory book that explains the basics for their boards.
In this article, we have introduced the project that I will be developing. It will be a series of sensors that gather noise data that will be collected by a bespoke implementation of a collecting station. I will explore two mechanisms for the communication between the sensors and the collecting station: BLE and MQTT over WiFi. Once the data is in the collecting station, I will send it to a MongoDB Atlas cluster on the Cloud using the C++ driver and we will finish the project by showing some potential uses of the data in the Cloud.
I have presented you with a list of requirements for the development boards and some alternatives that match those requirements, and you can use it for this or similar projects. In our next episode, I will try to implement the BLE peripheral role in one or more of the boards.
Rate this tutorial