Overview
In this guide, you can learn how to create a React web application that uses the MERN stack. The MERN stack is a web development framework that uses MongoDB, Express, React, and Node.js and consists of the following layers:
Database layer: MongoDB provides data storage and retrieval.
Application layer: Express and Node.js make up the middle tier for server-side logic.
Presentation layer: React implements the user interface and client-side interactions.
Why Use MongoDB in a React Application?
By storing your React application data in MongoDB, you can use the document data model to build complex query expressions. The document model's flexibility allows you to store nested data structures and iterate quickly on your application design. You can also grow your application by using the horizontal scaling capabilities in MongoDB.
The MERN stack with MongoDB supports applications that require dynamic, evolving data structures. As a result, this framework is well-designed for real world applications such as real-time dashboards or one-page applications that update content continuously.
Quick Start Tutorial
This tutorial shows you how to build a web application by using the MERN stack. The application accesses sample restaurant data, queries the data, and displays the results on a locally hosted site. The tutorial also includes instructions for connecting to a MongoDB cluster hosted on MongoDB Atlas and accessing and displaying data from your database.
Tip
If you prefer to connect to MongoDB by using the Node.js driver without React, see the Get Started with the Node.js Driver guide.
Set Up Your Project
Follow the steps in this section to install the project dependencies, create an Atlas cluster, and set up the application directories.
Verify the prerequisites
To create the Quick Start application, you need the following software installed in your development environment:
Prerequisite | Notes |
|---|---|
Download either the Latest LTS or Latest Release version. | |
Code editor | This tutorial uses Visual Studio Code, but you can use the editor of your choice. |
Terminal app and shell | For MacOS users, use Terminal or a similar app. For Windows users, use PowerShell. |
Create a MongoDB Atlas cluster
MongoDB Atlas is a fully managed cloud database service that hosts your MongoDB deployments. If you do not have a MongoDB deployment, you can create a MongoDB cluster for free (no credit card required) by completing the MongoDB Get Started tutorial. The MongoDB Get Started tutorial also demonstrates how to load sample datasets into your cluster, including the sample_restaurants database that is used in this tutorial.
To connect to your MongoDB cluster, you must use a connection URI. To learn how to retrieve your connection URI, see the Add your connection string section of the MongoDB Get Started tutorial.
Important
Save your connection string in a secure location.
Create your project directories
Run the following command in your terminal to create a directory for your project named react-quickstart:
mkdir react-quickstart cd react-quickstart
Then, run the following commands from the react-quickstart directory to create a folder for the back end named server and initialize the package.json file:
mkdir server cd server npm init -y
Modify your package.json file
Navigate to the package.json file in the react-quickstart/server directory. To use ECMAScript modules, the standard format for packaging JavaScript code for reuse, replace the existing line that specifies the "type" field with the following line:
"type": "module",
Run the following command to install the mongodb, express, and cors dependencies:
npm install mongodb express cors
This command installs MongoDB, the Express web framework, and the cors Node.js package that enables cross-origin resource sharing.
Configure the Server
After setting up the project structure and dependencies, follow the steps in this section to configure your web server and connect to MongoDB.
Configure your Express web server
Run the following command from the react-quickstart/server directory to create a file named server.js:
touch server.js
New-Item -ItemType File server.js
Paste the following code into the file:
import express from "express"; import cors from "cors"; import restaurants from "./routes/restaurant.js"; const PORT = process.env.PORT || 5050; const app = express(); app.use(cors()); app.use(express.json()); app.use("/restaurant", restaurants); // start the Express server app.listen(PORT, () => { console.log(`Server listening on port ${PORT}`); });
This file is the entry point for your back end. It starts an Express server, enables Cross-Origin Resource Sharing (CORS) so that your React client can call the server, and mounts the routes defined in routes/restaurant.js at the /restaurant path. You create the routes/restaurant.js file in a later step.
Set environment variables
Run the following command from the server directory to create a file named config.env:
touch config.env
New-Item -ItemType File config.env
Add the following variables to the file:
MONGODB_URI=<connection URI> PORT=5050
Replace the <connection URI> placeholder with the connection URI that you saved in a previous step.
Connect your server to the database
Run the following commands from the server directory to create a new folder named db that contains a connection.js file:
mkdir db touch db/connection.js
mkdir db New-Item -ItemType File db/connection.js
Paste the following code into the connection.js file:
import { MongoClient } from "mongodb"; const uri = process.env.MONGODB_URI || ""; const client = new MongoClient(uri); try { // Connect the client to the server await client.connect(); // Send a ping to confirm a successful connection await client.db("admin").command({ ping: 1 }); console.log( "Pinged your deployment. You successfully connected to MongoDB!" ); } catch(err) { console.error(err); } let db = client.db("sample_restaurants"); export default db;
This file connects to your MongoDB deployment, accesses the sample_restaurants database, and tests the database connection. It exports the database connection as db. In the next step, the routes/restaurant.js file imports this db connection from ../db/connection.js to query the database.
Create server API endpoints
Run the following commands from the server directory to create a new folder named routes that contains a restaurant.js file:
mkdir routes touch routes/restaurant.js
mkdir routes New-Item -ItemType File routes/restaurant.js
Paste the following code into the restaurant.js file:
import express from "express"; import db from "../db/connection.js"; // Creates an instance of the Express router, used to define our routes const router = express.Router(); // Gets a list of all the restaurants router.get("/", async (req, res) => { let collection = await db.collection("restaurants"); let results = await collection.find({}).toArray(); res.send(results).status(200); }); // Lists restaurants that match the query filter router.get("/browse", async (req, res) => { try { let collection = await db.collection("restaurants"); let query = { borough: "Queens", name: { $regex: "Moon", $options: "i" }, }; let results = await collection.find(query).toArray(); res.send(results).status(200); } catch (err) { console.error(err); res.status(500).send("Error browsing restaurants"); } }); export default router;
This file imports the db connection from db/connection.js, accesses the restaurants collection in the sample_restaurants database, and defines the following GET endpoints:
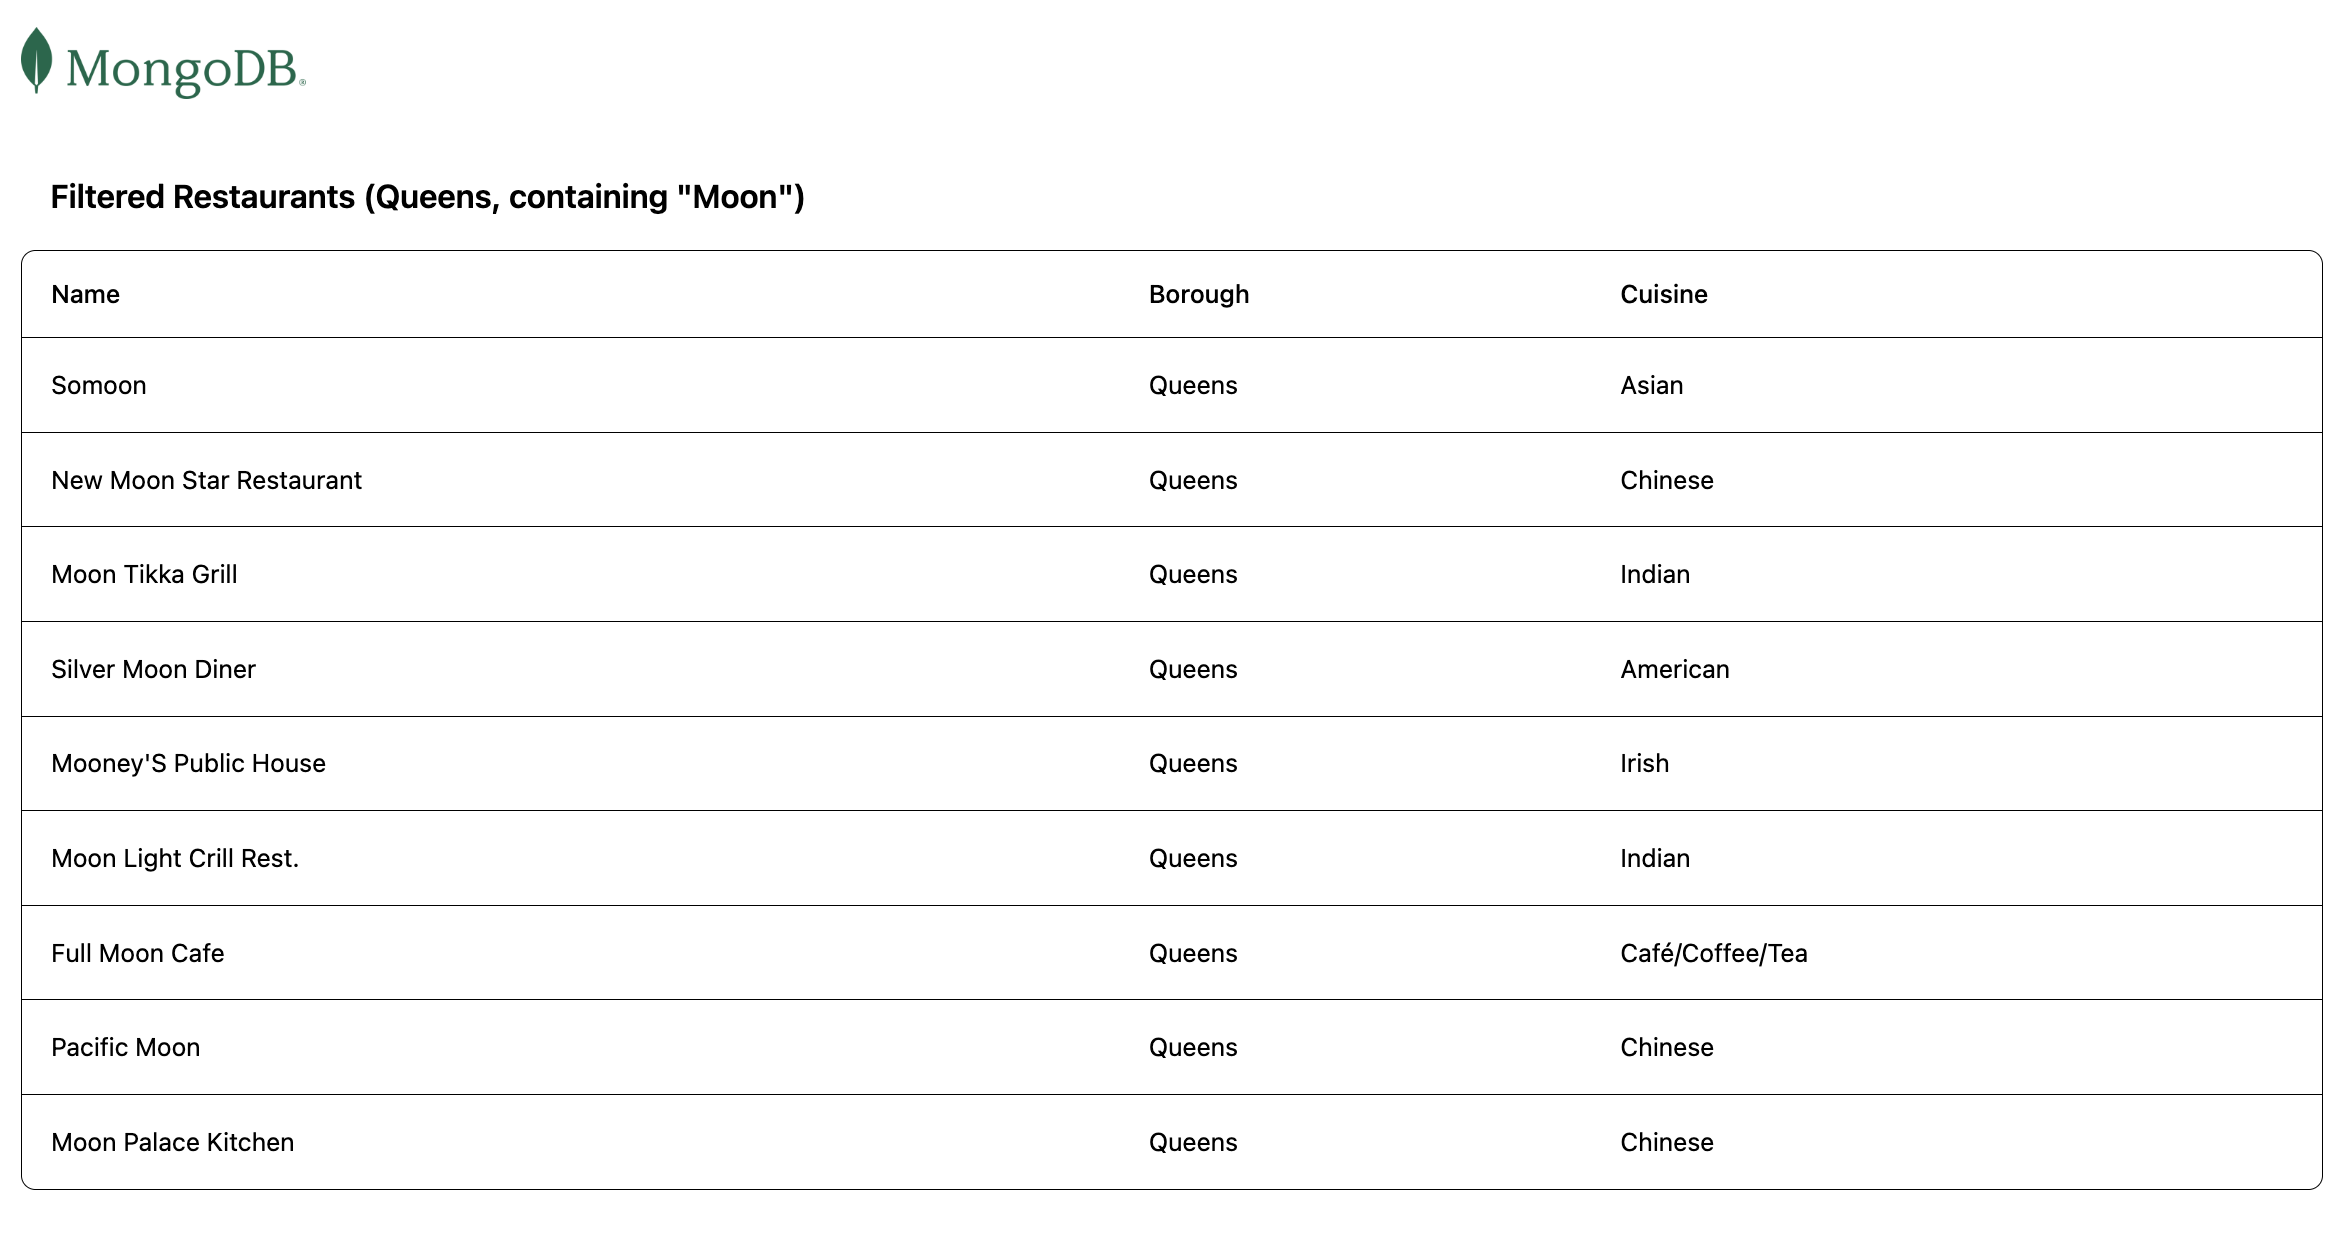
/: Retrieves all restaurants from the sample collection/browse: Retrieves restaurants that match the query criteria, which filters for restaurants in Queens that contain the word"Moon"in the name
Configure the Client
After setting up the application's server, follow the steps in this section to configure React and add the client components.
Add the React template
Navigate to the react-quickstart directory. Then, run the following command to add the React template files by using Vite:
npm create vite@latest client
This command prompts you to respond to a series of configuration questions. For each question, choose the following responses from the dropdown menu:
Select a framework: React
Select a variant: JavaScript
Use rolldown-vite (Experimental)?: No
Install with npm and start now?: No
After running the command, your project has a client directory that contains client-side scaffolding.
Install Tailwind CSS
This sample application uses the Tailwind CSS framework for UI formatting. Navigate to the client directory, then run the following command to install Tailwind CSS:
npm install tailwindcss @tailwindcss/vite
After installing, navigate to your vite.config.js file. Add the @tailwindcss/vite plugin by updating the import statements and plugins array, as shown in the highlighted lines:
import { defineConfig } from 'vite' import react from '@vitejs/plugin-react' import tailwindcss from '@tailwindcss/vite' // https://vite.dev/config/ export default defineConfig({ plugins: [ react(), tailwindcss() ], })
Then, replace the contents of the client/src/index.css file with the following import statement:
@import "tailwindcss";
Set up the React router
Navigate to the client/src/main.jsx file and paste the following code:
import * as React from "react"; import * as ReactDOM from "react-dom/client"; import { createBrowserRouter, RouterProvider } from "react-router-dom"; import App from "./App"; import RestaurantList from "./components/RestaurantList"; import "./index.css"; const router = createBrowserRouter([ { path: "/", element: <App />, children: [ { path: "/", element: <RestaurantList />, }, ], }, { path: "/browse", element: <App />, children: [ { path: "/browse", element: <RestaurantList />, }, ], }, ]); ReactDOM.createRoot(document.getElementById("root")).render( <React.StrictMode> <RouterProvider router={router} /> </React.StrictMode>, );
This file is the entry point for your client. It imports the App layout component and the RestaurantList component, configures client-side routing, and defines the following routes:
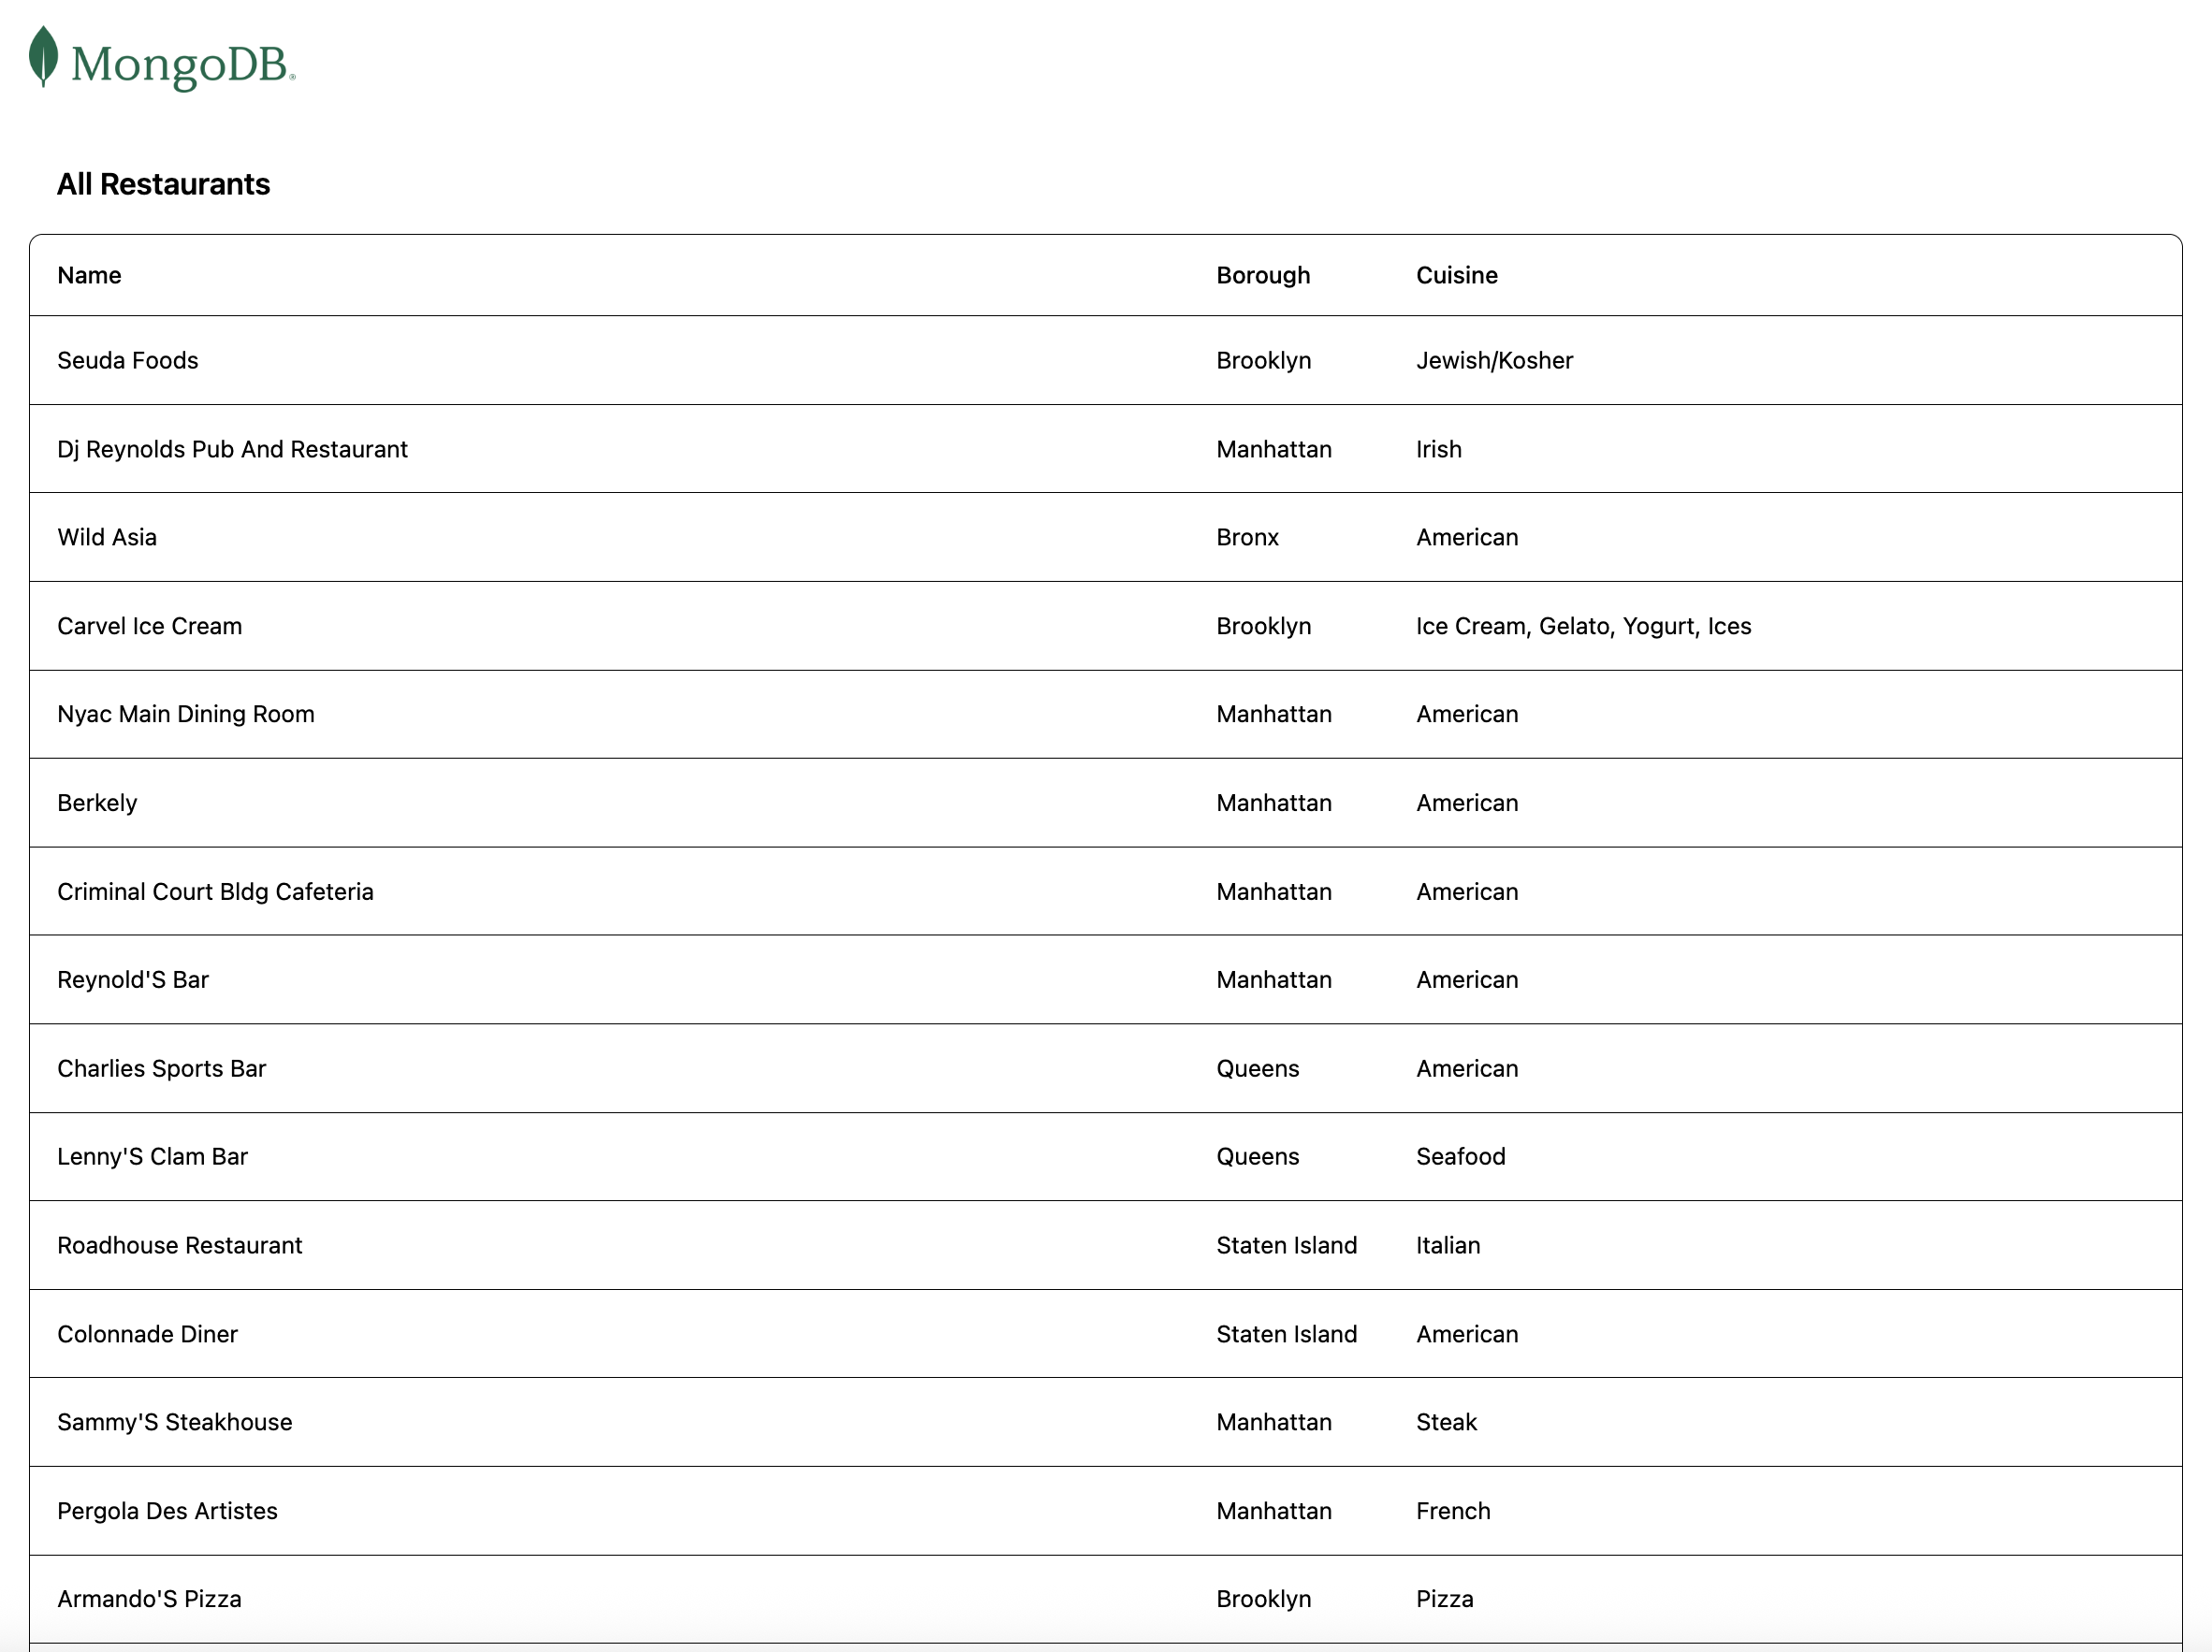
/: Renders theRestaurantListcomponent, which calls the/restaurant/API endpoint to display all restaurants/browse: Renders theRestaurantListcomponent, which calls the/restaurant/browseAPI endpoint to display filtered restaurants
Create the components
Run the following commands from the client directory to create a new folder named components that contains two files:
mkdir src/components cd src/components touch Navbar.jsx RestaurantList.jsx
mkdir src/components cd src/components New-Item -ItemType File Navbar.jsx New-Item -ItemType File RestaurantList.jsx
The Navbar.jsx file configures a navigation bar that links to the required components. Paste the following code into this file:
import { NavLink } from "react-router-dom"; export default function Navbar() { return ( <div> <nav className="flex justify-between items-center mb-6"> <NavLink to="/"> <img alt="MongoDB logo" className="h-10 inline" src="https://d3cy9zhslanhfa.cloudfront.net/media/3800C044-6298-4575-A05D5C6B7623EE37/4B45D0EC-3482-4759-82DA37D8EA07D229/webimage-8A27671A-8A53-45DC-89D7BF8537F15A0D.png" ></img> </NavLink> </nav> </div> ); }
The RestaurantList.jsx file is the viewing component for the restaurants, and it retrieves and displays the restaurant information. It sends requests to the /restaurant API endpoints defined in server/routes/restaurant.js. Paste the following code into this file:
import { useEffect, useState } from "react"; import { useLocation } from "react-router-dom"; const Restaurant = (props) => ( <tr className="border-b transition-colors hover:bg-muted/50 data-[state=selected]:bg-muted"> <td className="p-4 align-middle [&:has([role=checkbox])]:pr-0"> {props.restaurant.name} </td> <td className="p-4 align-middle [&:has([role=checkbox])]:pr-0"> {props.restaurant.borough} </td> <td className="p-4 align-middle [&:has([role=checkbox])]:pr-0"> {props.restaurant.cuisine} </td> </tr> ); export default function RestaurantList() { const [restaurants, setRestaurants] = useState([]); const location = useLocation(); // Fetches the restaurants from the database useEffect(() => { async function getRestaurants() { // Determines which endpoint to call based on current route const endpoint = location.pathname === "/browse" ? "http://localhost:5050/restaurant/browse" : "http://localhost:5050/restaurant/"; const response = await fetch(endpoint); if (!response.ok) { const message = `An error occurred: ${response.statusText}`; console.error(message); return; } const restaurants = await response.json(); setRestaurants(restaurants); } getRestaurants(); return; }, [location.pathname]); // Maps each restaurant on the table function restaurantList() { return restaurants.map((restaurant) => { return <Restaurant restaurant={restaurant} key={restaurant._id} />; }); } // Retrieves the dynamic title based on current route const getTitle = () => { return location.pathname === "/browse" ? 'Filtered Restaurants (Queens, containing "Moon")' : "All Restaurants"; }; // Displays the restaurants table return ( <> <h3 className="text-lg font-semibold p-4">{getTitle()}</h3> <div className="border rounded-lg overflow-hidden"> <div className="relative w-full overflow-auto"> <table className="w-full caption-bottom text-sm"> <thead className="[&_tr]:border-b"> <tr className="border-b transition-colors hover:bg-muted/50 data-[state=selected]:bg-muted"> <th className="h-12 px-4 text-left align-middle font-medium text-muted-foreground [&:has([role=checkbox])]:pr-0"> Name </th> <th className="h-12 px-4 text-left align-middle font-medium text-muted-foreground [&:has([role=checkbox])]:pr-0"> Borough </th> <th className="h-12 px-4 text-left align-middle font-medium text-muted-foreground [&:has([role=checkbox])]:pr-0"> Cuisine </th> </tr> </thead> <tbody className="[&_tr:last-child]:border-0"> {restaurantList()} </tbody> </table> </div> </div> </> ); }
Finally, navigate to the client/src/App.jsx file. This file is the main layout component, and it ensures that the Navbar component renders at the top of each page above the child component. Paste the following code into this file:
import { Outlet } from "react-router-dom"; import Navbar from "./components/Navbar"; const App = () => { return ( <div className="w-full p-6"> <Navbar /> <Outlet /> </div> ); }; export default App;
Run Your Application
Finally, follow the steps in this section to run your application and view the rendered restaurant data.
Run the server application
Navigate to the react-quickstart/server directory and run the following command to start the server:
node --env-file=config.env server
If successful, this command outputs the following information:
Pinged your deployment. You successfully connected to MongoDB! Server listening on port 5050
Run the client application
In a separate terminal window, navigate to the react-quickstart/client directory. Run the following command to start the React client:
npm run dev
If successful, this command outputs the following information:
VITE v7.2.4 ready in 298 ms ➜ Local: http://localhost:5173/ ➜ Network: use --host to expose ➜ press h + enter to show help
Open the application site
Open the http://localhost:5173/ URL, retrieved from the preceding step. The initial landing page displays a list all restaurants in the sample_restaurants.restaurants collection:
Then, navigate to the http://localhost:5173/browse URL to view the restaurants that match the name and borough field query:
Congratulations on completing the Quick Start tutorial!
After you complete these steps, you have a React web application that connects to your MongoDB deployment, runs a query on sample restaurant data, and renders a retrieved result.
Troubleshooting
If you encounter issues while completing this tutorial, review the following common problems and solutions.
Connection Errors
If the server terminal prints a connection error instead of the Pinged your deployment. message, verify the following:
The
MONGODB_URIvalue in yourconfig.envfile matches the connection string from Atlas and includes your database username and password.You loaded the
sample_restaurantsdataset into your cluster.
CORS Errors
If your browser console shows a CORS error when the client requests data, confirm that your server.js file calls app.use(cors()) before the route definitions.
No Data Displays
If the web page loads but no restaurants appear, confirm that both the server and the client are running at the same time in separate terminal windows. The React client fetches data from the server at http://localhost:5050, so the server must be running for data to display.
Port Conflicts
If the server fails to start because port 5050 is already in use, change the PORT value in your config.env file. If you change the server port, update the endpoint URLs in RestaurantList.jsx to match. If the client port 5173 is in use, Vite automatically selects the next available port and prints the URL in the terminal.
Additional Resources
To learn more about React, MongoDB, and the MERN stack, view the following resources:
React documentation
Express documentation
Node.js driver documentation