Overview
在本指南中,您可以学习如何创建使用MERN 堆栈的React Web 应用程序。MERN堆栈是一个 Web 开发框架,使用 MongoDB、Express、React 和 节点.js,由以下各层组成:
数据库层:MongoDB提供数据存储和检索。
应用程序层: Express和 节点.js 构成服务器端逻辑的中间层级。
表示层: React实现用户界面和前端交互。
为何在React应用程序中使用MongoDB?
通过将React应用程序数据存储在MongoDB中,您可以使用文档数据模型来构建复杂的查询表达式。文档模型的灵活性允许您存储嵌套数据结构并快速迭代应用程序设计。您还可以使用 MongoDB 的水平扩展功能轻松扩展应用程序。
带有MongoDB的MERN堆栈支持需要动态、不断发展的数据结构的应用程序。因此,该框架非常适合现实世界的应用程序,例如实时仪表盘或不断更新内容的单页应用程序。
快速入门教程
本教程向您展示如何使用MERN堆栈构建应用程序。该应用程序访问示例餐厅数据,查询数据,并在本地托管站点上显示结果。本教程还包括有关连接到MongoDB Atlas上托管的MongoDB 集群以及访问和显示数据库数据的说明。
提示
如果您希望使用 Node.js 驱动程序而不使用 React 连接到 MongoDB,请参阅 Node.js 驱动程序入门指南。
设置您的项目
按照本节中的步骤安装项目依赖项、创建Atlas集群并设立应用程序目录。
验证先决条件
要创建快速入门应用程序,您需要在开发环境中安装以下软件:
先决条件 | 注意 |
|---|---|
下载最新 LTS或最新版本。 | |
代码编辑器 | 本教程使用Visual Studio Code,但你也可以使用自己选择的编辑器。 |
终端应用和shell | 对于 MacOS 用户,请使用终端或类似应用程序。对于 Windows 用户,请使用 PowerShell。 |
创建 MongoDB Atlas 集群
MongoDB Atlas是一项托管云数据库服务,用于托管您的MongoDB部署。如果您没有MongoDB 部署,可以通过完成MongoDB入门教程免费创建MongoDB 集群(无需信用)。MongoDB入门教程还演示了如何将示例数据集加载到集群中,包括本教程中使用的 sample_restaurants数据库。
要连接到MongoDB集群,您必须使用连接 URI。学习如何检索连接 URI,请参阅MongoDB入门教程的添加连接字符串部分。
重要
将连接string保存在安全位置。
修改 package.json文件
导航到 react-quickstart/server目录中的 package.json文件。要使用 ECMAScript 模块,打包 JavaScript 代码以供重复使用的标准格式,请将指定 "type" 字段的现有行替换为以下行:
"type": "module",
运行以下命令以安装 mongodb、express 和 cors 依赖项:
npm install mongodb express cors
此命令会安装MongoDB、 Express Web框架以及支持跨源资源共享的 cors 节点.js包。
配置后端
设置项目结构和依赖项后,请按照本节中的步骤配置 Web服务器并连接到MongoDB。
配置Express Web服务器
在 react-quickstart/server目录中创建名为 server.js 的文件并粘贴以下代码:
import express from "express"; import cors from "cors"; import restaurants from "./routes/restaurant.js"; const PORT = process.env.PORT || 5050; const app = express(); app.use(cors()); app.use(express.json()); app.use("/restaurant", restaurants); // start the Express server app.listen(PORT, () => { console.log(`Server listening on port ${PORT}`); });
设置环境变量
在 server目录中,创建用于存储以下变量的 config.env文件:
MONGODB_URI=<connection URI> PORT=5050
将 <connection URI> 占位符替换为您在上一个步骤。中保存的连接 URI。
创建服务器API终结点
在 server目录中,创建一个名为 routes 的子目录。在 routes 子目录中创建名为 restaurant.js 的文件并粘贴以下代码:
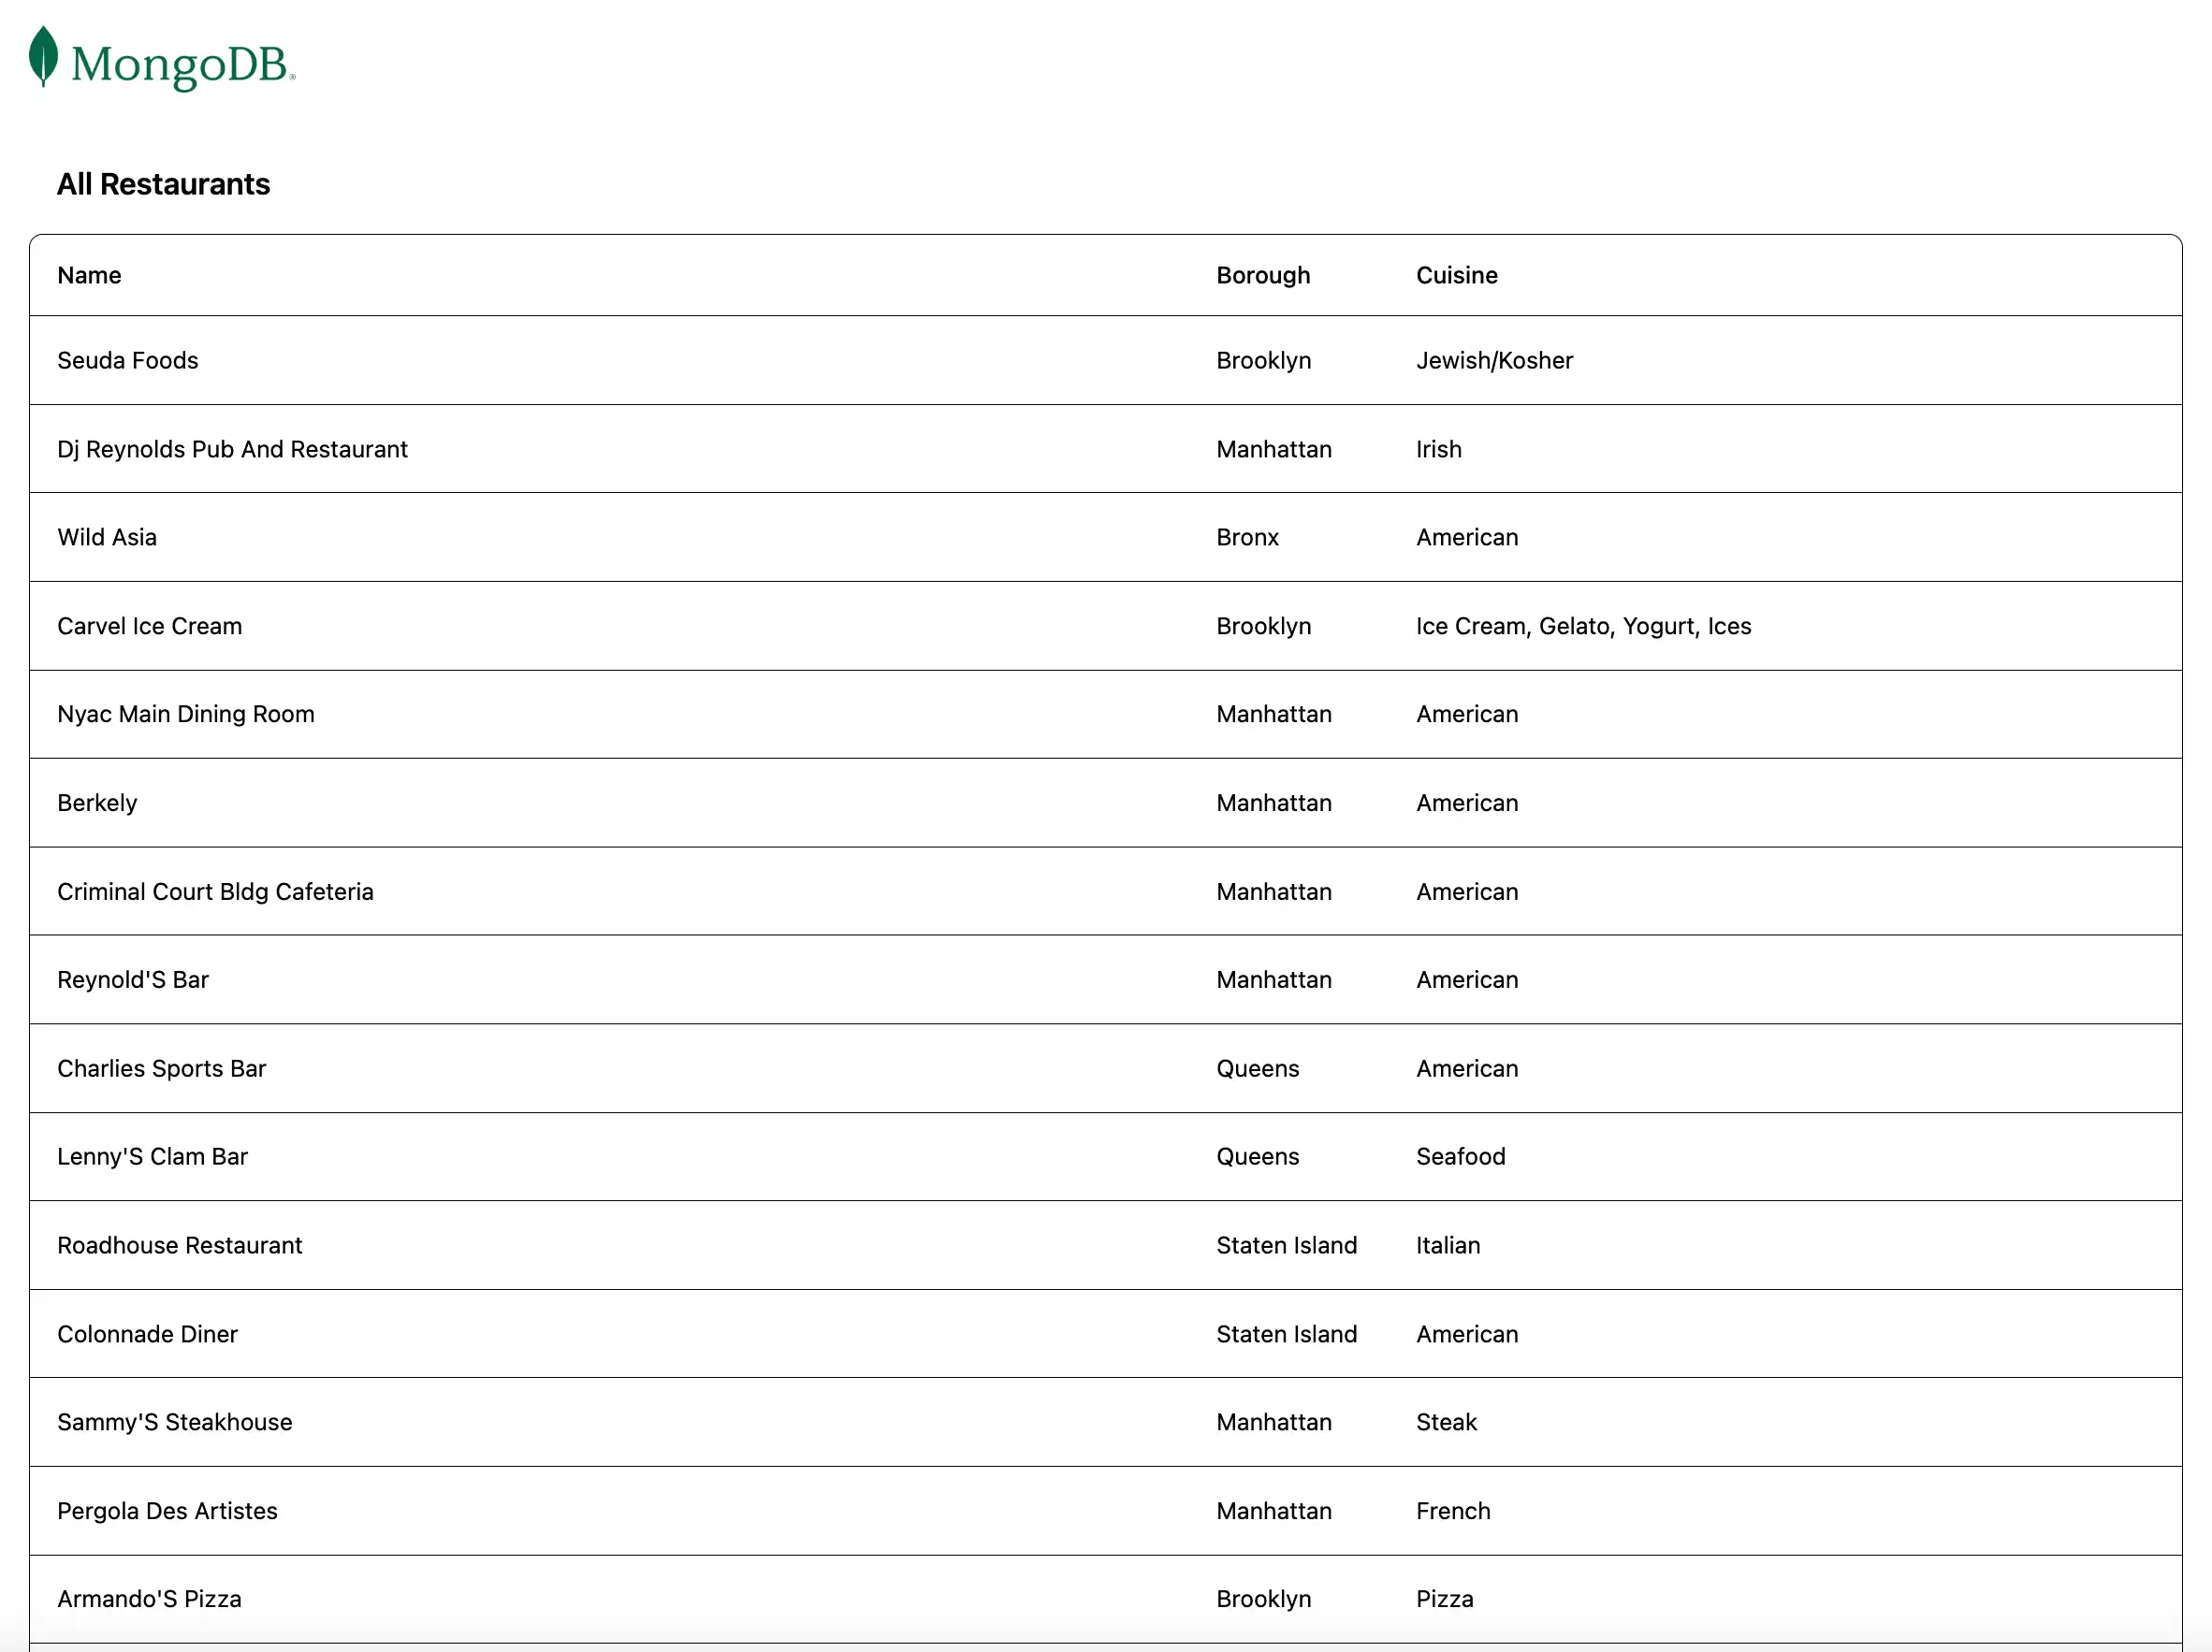
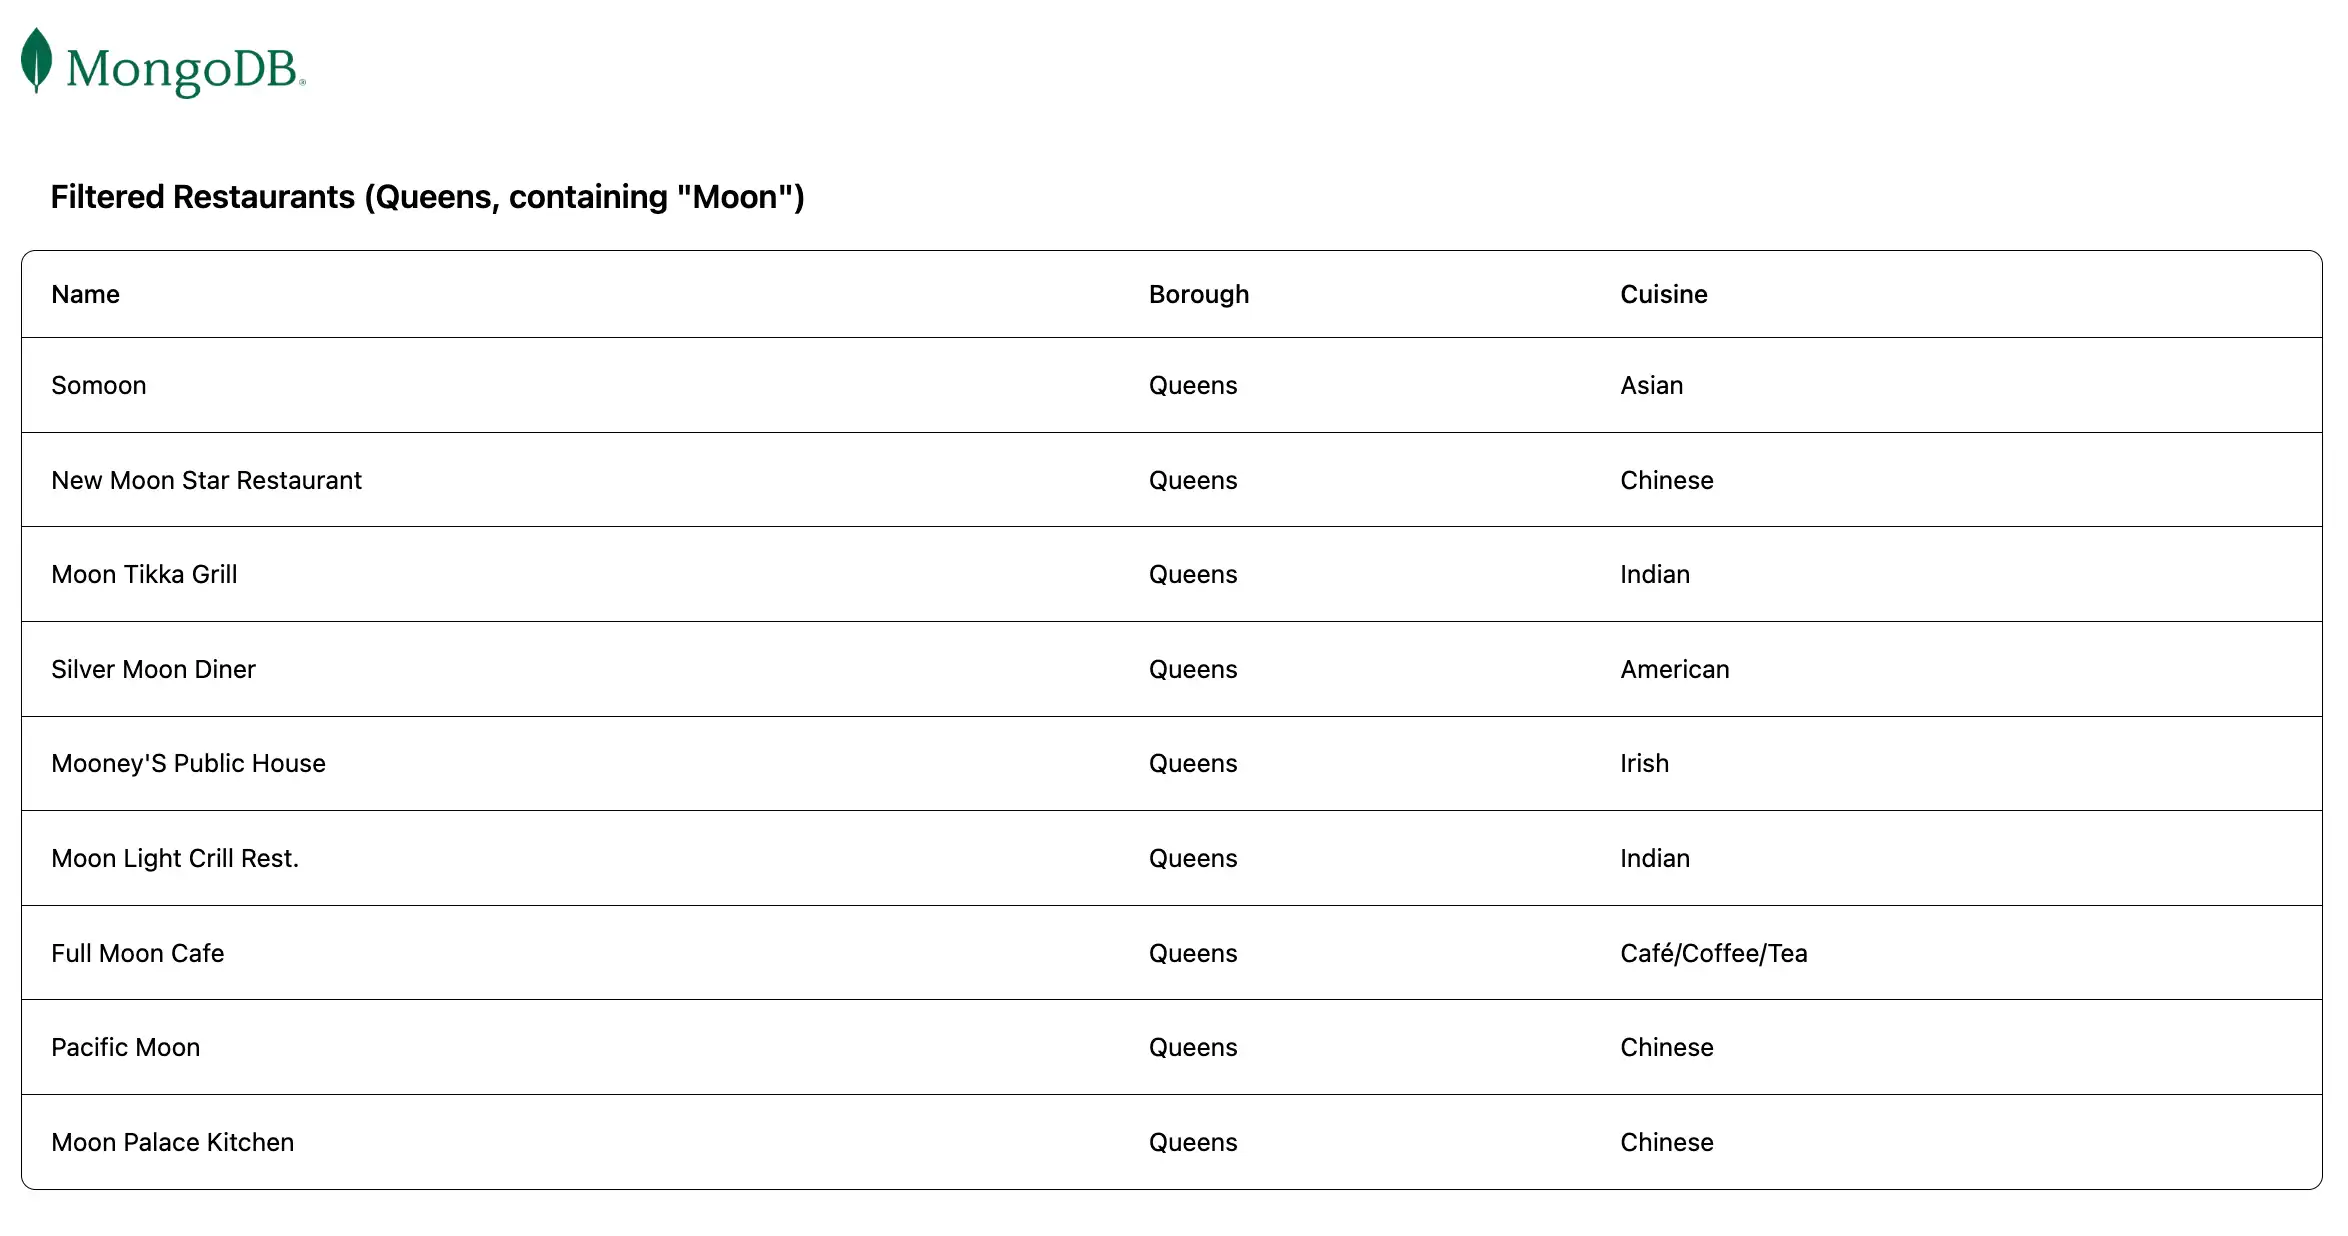
import express from "express"; import db from "../db/connection.js"; // Creates an instance of the Express router, used to define our routes const router = express.Router(); // Gets a list of all the restaurants router.get("/", async (req, res) => { let collection = await db.collection("restaurants"); let results = await collection.find({}).toArray(); res.send(results).status(200); }); // Lists restaurants that match the query filter router.get("/browse", async (req, res) => { try { let collection = await db.collection("restaurants"); let query = { borough: "Queens", name: { $regex: "Moon", $options: "i" }, }; let results = await collection.find(query).toArray(); res.send(results).status(200); } catch (err) { console.error(err); res.status(500).send("Error browsing restaurants"); } }); export default router;
此文件访问 sample_restaurants数据库中的 restaurants集合并定义以下 GET 终结点:
/:从示例集合中检索所有餐厅/browse:检索符合查询条件的餐厅,该条件过滤器出位于皇后区且名称中包含"Moon"一词的餐厅
配置前端
设置应用程序的后端后,请按照本节中的步骤配置React并添加前端组件。
添加React模板
在 react-quickstart目录中,运行以下命令以使用 Vite:添加React模板文件:
npm create vite@latest client
此命令会提示您回答一系列配置问题。对于每个问题,从下拉菜单中选择以下答案:
选择一个框架:React
选择一个变体:JavaScript
使用 rolldown-vite(实验性):否
使用npm安装并立即启动?:否
运行该命令后,您的项目将出现一个包含前端脚手架的 client目录。
安装 Tailwind CSS
此示例应用程序使用 Tailwind CSS框架进行用户界面格式设置。要安装它,请导航到上一个步骤中创建的 client目录并运行以下命令:
npm install tailwindcss @tailwindcss/vite
安装后,导航到您的 vite.config.js文件。通过更新 import 语句和 plugins数组来添加 @tailwindcss/vite 插件,如突出显示的行所示:
import { defineConfig } from 'vite' import react from '@vitejs/plugin-react' import tailwindcss from '@tailwindcss/vite' // https://vite.dev/config/ export default defineConfig({ plugins: [ react(), tailwindcss() ], })
然后,导航到 client/src/index.css文件并添加以下导入声明:
@import "tailwindcss";
设置React路由器
导航到 client/src/main.jsx文件并粘贴以下代码:
import * as React from "react"; import * as ReactDOM from "react-dom/client"; import { createBrowserRouter, RouterProvider } from "react-router-dom"; import App from "./App"; import RestaurantList from "./components/RestaurantList"; import "./index.css"; const router = createBrowserRouter([ { path: "/", element: <App />, children: [ { path: "/", element: <RestaurantList />, }, ], }, { path: "/browse", element: <App />, children: [ { path: "/browse", element: <RestaurantList />, }, ], }, ]); ReactDOM.createRoot(document.getElementById("root")).render( <React.StrictMode> <RouterProvider router={router} /> </React.StrictMode>, );
此文件配置客户端路由并定义以下路由:
/:渲染RestaurantList组件,该组件调用/restaurant/API终结点以显示所有餐厅/browse:渲染RestaurantList组件,该组件调用/restaurant/browseAPI终结点以显示过滤器后的餐厅
创建组件
从 client目录运行以下命令,创建名为 components 的新文件夹,其中包含两个文件:
mkdir src/components cd src/components touch Navbar.jsx RestaurantList.jsx
Navbar.jsx文件配置链接到所需组件的导航栏。将以下代码粘贴到此文件中:
import { NavLink } from "react-router-dom"; export default function Navbar() { return ( <div> <nav className="flex justify-between items-center mb-6"> <NavLink to="/"> <img alt="MongoDB logo" className="h-10 inline" src="https://d3cy9zhslanhfa.cloudfront.net/media/3800C044-6298-4575-A05D5C6B7623EE37/4B45D0EC-3482-4759-82DA37D8EA07D229/webimage-8A27671A-8A53-45DC-89D7BF8537F15A0D.png" ></img> </NavLink> </nav> </div> ); }
RestaurantList.jsx文件是餐厅的查看组件,用于检索并显示餐厅信息。将以下代码粘贴到此文件中:
import { useEffect, useState } from "react"; import { useLocation } from "react-router-dom"; const Restaurant = (props) => ( <tr className="border-b transition-colors hover:bg-muted/50 data-[state=selected]:bg-muted"> <td className="p-4 align-middle [&:has([role=checkbox])]:pr-0"> {props.restaurant.name} </td> <td className="p-4 align-middle [&:has([role=checkbox])]:pr-0"> {props.restaurant.borough} </td> <td className="p-4 align-middle [&:has([role=checkbox])]:pr-0"> {props.restaurant.cuisine} </td> </tr> ); export default function RestaurantList() { const [restaurants, setRestaurants] = useState([]); const location = useLocation(); // Fetches the restaurants from the database useEffect(() => { async function getRestaurants() { // Determines which endpoint to call based on current route const endpoint = location.pathname === "/browse" ? "http://localhost:5050/restaurant/browse" : "http://localhost:5050/restaurant/"; const response = await fetch(endpoint); if (!response.ok) { const message = `An error occurred: ${response.statusText}`; console.error(message); return; } const restaurants = await response.json(); setRestaurants(restaurants); } getRestaurants(); return; }, [location.pathname]); // Maps each restaurant on the table function restaurantList() { return restaurants.map((restaurant) => { return <Restaurant restaurant={restaurant} key={restaurant._id} />; }); } // Retrieves the dynamic title based on current route const getTitle = () => { return location.pathname === "/browse" ? 'Filtered Restaurants (Queens, containing "Moon")' : "All Restaurants"; }; // Displays the restaurants table return ( <> <h3 className="text-lg font-semibold p-4">{getTitle()}</h3> <div className="border rounded-lg overflow-hidden"> <div className="relative w-full overflow-auto"> <table className="w-full caption-bottom text-sm"> <thead className="[&_tr]:border-b"> <tr className="border-b transition-colors hover:bg-muted/50 data-[state=selected]:bg-muted"> <th className="h-12 px-4 text-left align-middle font-medium text-muted-foreground [&:has([role=checkbox])]:pr-0"> Name </th> <th className="h-12 px-4 text-left align-middle font-medium text-muted-foreground [&:has([role=checkbox])]:pr-0"> Borough </th> <th className="h-12 px-4 text-left align-middle font-medium text-muted-foreground [&:has([role=checkbox])]:pr-0"> Cuisine </th> </tr> </thead> <tbody className="[&_tr:last-child]:border-0"> {restaurantList()} </tbody> </table> </div> </div> </> ); }
最后,导航到 client/src/App.jsx文件。此文件是主要布局组件,它确保 Navbar 组件渲染在每个页面的顶部,位于子组件上方。将以下代码粘贴到此文件中:
import { Outlet } from "react-router-dom"; import Navbar from "./components/Navbar"; const App = () => { return ( <div className="w-full p-6"> <Navbar /> <Outlet /> </div> ); }; export default App;
运行应用程序
最后,按照本节中的步骤运行应用程序并查看呈现的餐厅数据。
打开应用程序站点
打开在上一步中检索到的 http://localhost:5173/ URL。初始登陆页面显示 sample_restaurants.restaurants集合中所有餐厅的列表:

然后,导航到 http://localhost:5173/browse URL以查看与 name 和 borough 字段查询匹配的餐厅:

恭喜您完成快速入门教程!
完成这些步骤后,您将拥有一个React 应用程序,它可连接到MongoDB 部署、对示例餐厅数据运行查询并渲染检索到的结果。
其他资源
要学习有关React、MongoDB和MERN堆栈的更多信息,请查看以下资源: