Overview
このガイドでは、MERNスタックを使用するReactアプリケーションを作成する方法について説明します。MERNスタックは、MongoDB、Express、React、ノードを使用するWeb開発フレームワークであり、次のレイヤーで構成されています。
データベースレイヤー: MongoDB は、データのストレージと検索を提供します。
アプリケーション階層: Expressとノード.js は、サーバー側ロジックの中間階層を構成します。
プレゼンテーションレイヤー: React は、ユーザー インターフェイスとフロントエンド インタラクションを実装します。
ReactアプリケーションでMongoDBを使用する理由
ReactアプリケーションデータをMongoDBに保存することで、ドキュメントデータモデルを使用して複雑なクエリ式を構築できます。ドキュメントモデルの柔軟性により、ネストされたデータ構造を保存し、アプリケーション設計を迅速に反復処理できます。また、MongoDB の水平拡大機能を使用して、アプリケーションを簡単に拡張することもできます。
MongoDBとMERNスタックは、動的に変化するデータ構造を必要とするアプリケーションをサポートします。その結果、このフレームワークは、リアルタイムダッシュボードやコンテンツを継続的に更新する 1 ページのアプリケーションなどの本番環境のアプリケーション向けに適切に設計されています。
クイック スタート チュートリアル
このチュートリアルでは、MERNスタックを使用してWebアプリケーションをビルドする方法を説明します。アプリケーションはサンプルレストランデータにアクセスし、データをクエリし、その結果をローカルでホストされた場に表示します。このチュートリアルには、 MongoDB AtlasでホストされているMongoDBクラスターに接続し、データベースのデータにアクセスして表示する手順も含まれています。
Tip
React以外でNode.jsドライバーを使用してMongoDBに接続する場合は、Node.jsドライバーを使い始めるガイドを参照してください。
プロジェクトを設定する
このセクションの手順に従って、プロジェクトの依存関係のインストール、Atlas クラスターの作成、アプリケーションディレクトリの設定を行います。
前提条件を確認します
クイック スタート アプリケーションを作成するには、開発環境に次のソフトウェアがインストールされている必要があります。
前提条件 | ノート |
|---|---|
最新の LTS または 最新リリース バージョンのいずれかをダウンロードする。 | |
コードエディター | このチュートリアルでは Visual Studio Code を使用しますが、お好みのエディターを使用できます。 |
ターミナルアプリとシェル | MacOS ユーザーの場合は、 ターミナル または 類似アプリを使用します。Windowsユーザーの場合は、 PowerShell を使用します。 |
MongoDB Atlasクラスターを作成する
MongoDB Atlas は、MongoDB配置をホストするマネージドクラウドデータベースサービスです。MongoDB配置がない場合は、MongoDBを使い始めるチュートリアルを完了することで、MongoDBクラスターを無料で作成できます(クレジットは不要)。MongoDBを使い始めるチュートリアルでは、このチュートリアルで使用されるsample_restaurantsデータベースなどのサンプルデータセットをクラスターにロードする方法も説明します。
MongoDBクラスターに接続するには、接続 URI を使用する必要があります。接続文字列を検索する方法については、MongoDBを使い始めるチュートリアルの接続文字列の追加セクションを参照してください。
重要
接続stringを安全な場所に保存します。
package.jsonファイルを変更します
react-quickstart/serverディレクトリ内の package.jsonファイルに移動します。再利用するためにJavaScriptコードをパッケージ化するための標準形式であるECMAScript モジュールを使用するには、"type"フィールドを指定する既存の行を次の行に置き換えます。
"type": "module",
次のコマンドを実行して、mongodb、express、cors の依存関係をインストールします。
npm install mongodb express cors
このコマンドは、MongoDB、Expressフレームワーク、およびクロスオリジンリソース共有を可能にするcorsノード.jsパッケージをインストールします。
バックエンドの設定
プロジェクト構造と依存関係を設定したら、このセクションの手順に従ってサーバーを構成し、MongoDBに接続します。
Expressウェブサーバーの構成
react-quickstart/serverディレクトリに server.js という名前のファイルを作成し、次のコードを貼り付けます。
import express from "express"; import cors from "cors"; import restaurants from "./routes/restaurant.js"; const PORT = process.env.PORT || 5050; const app = express(); app.use(cors()); app.use(express.json()); app.use("/restaurant", restaurants); // start the Express server app.listen(PORT, () => { console.log(`Server listening on port ${PORT}`); });
環境変数を設定する
serverディレクトリに、次の変数を保存する config.envファイルを作成します。
MONGODB_URI=<connection URI> PORT=5050
<connection URI>プレースホルダーを、前の手順で保存した接続 URI に置き換えます。
サーバーAPIエンドポイントとなる接続されたデバイスの作成
serverディレクトリに、routes という名前のサブディレクトリを作成します。routes サブディレクトリに restaurant.js という名前のファイルを作成し、次のコードを貼り付けます。
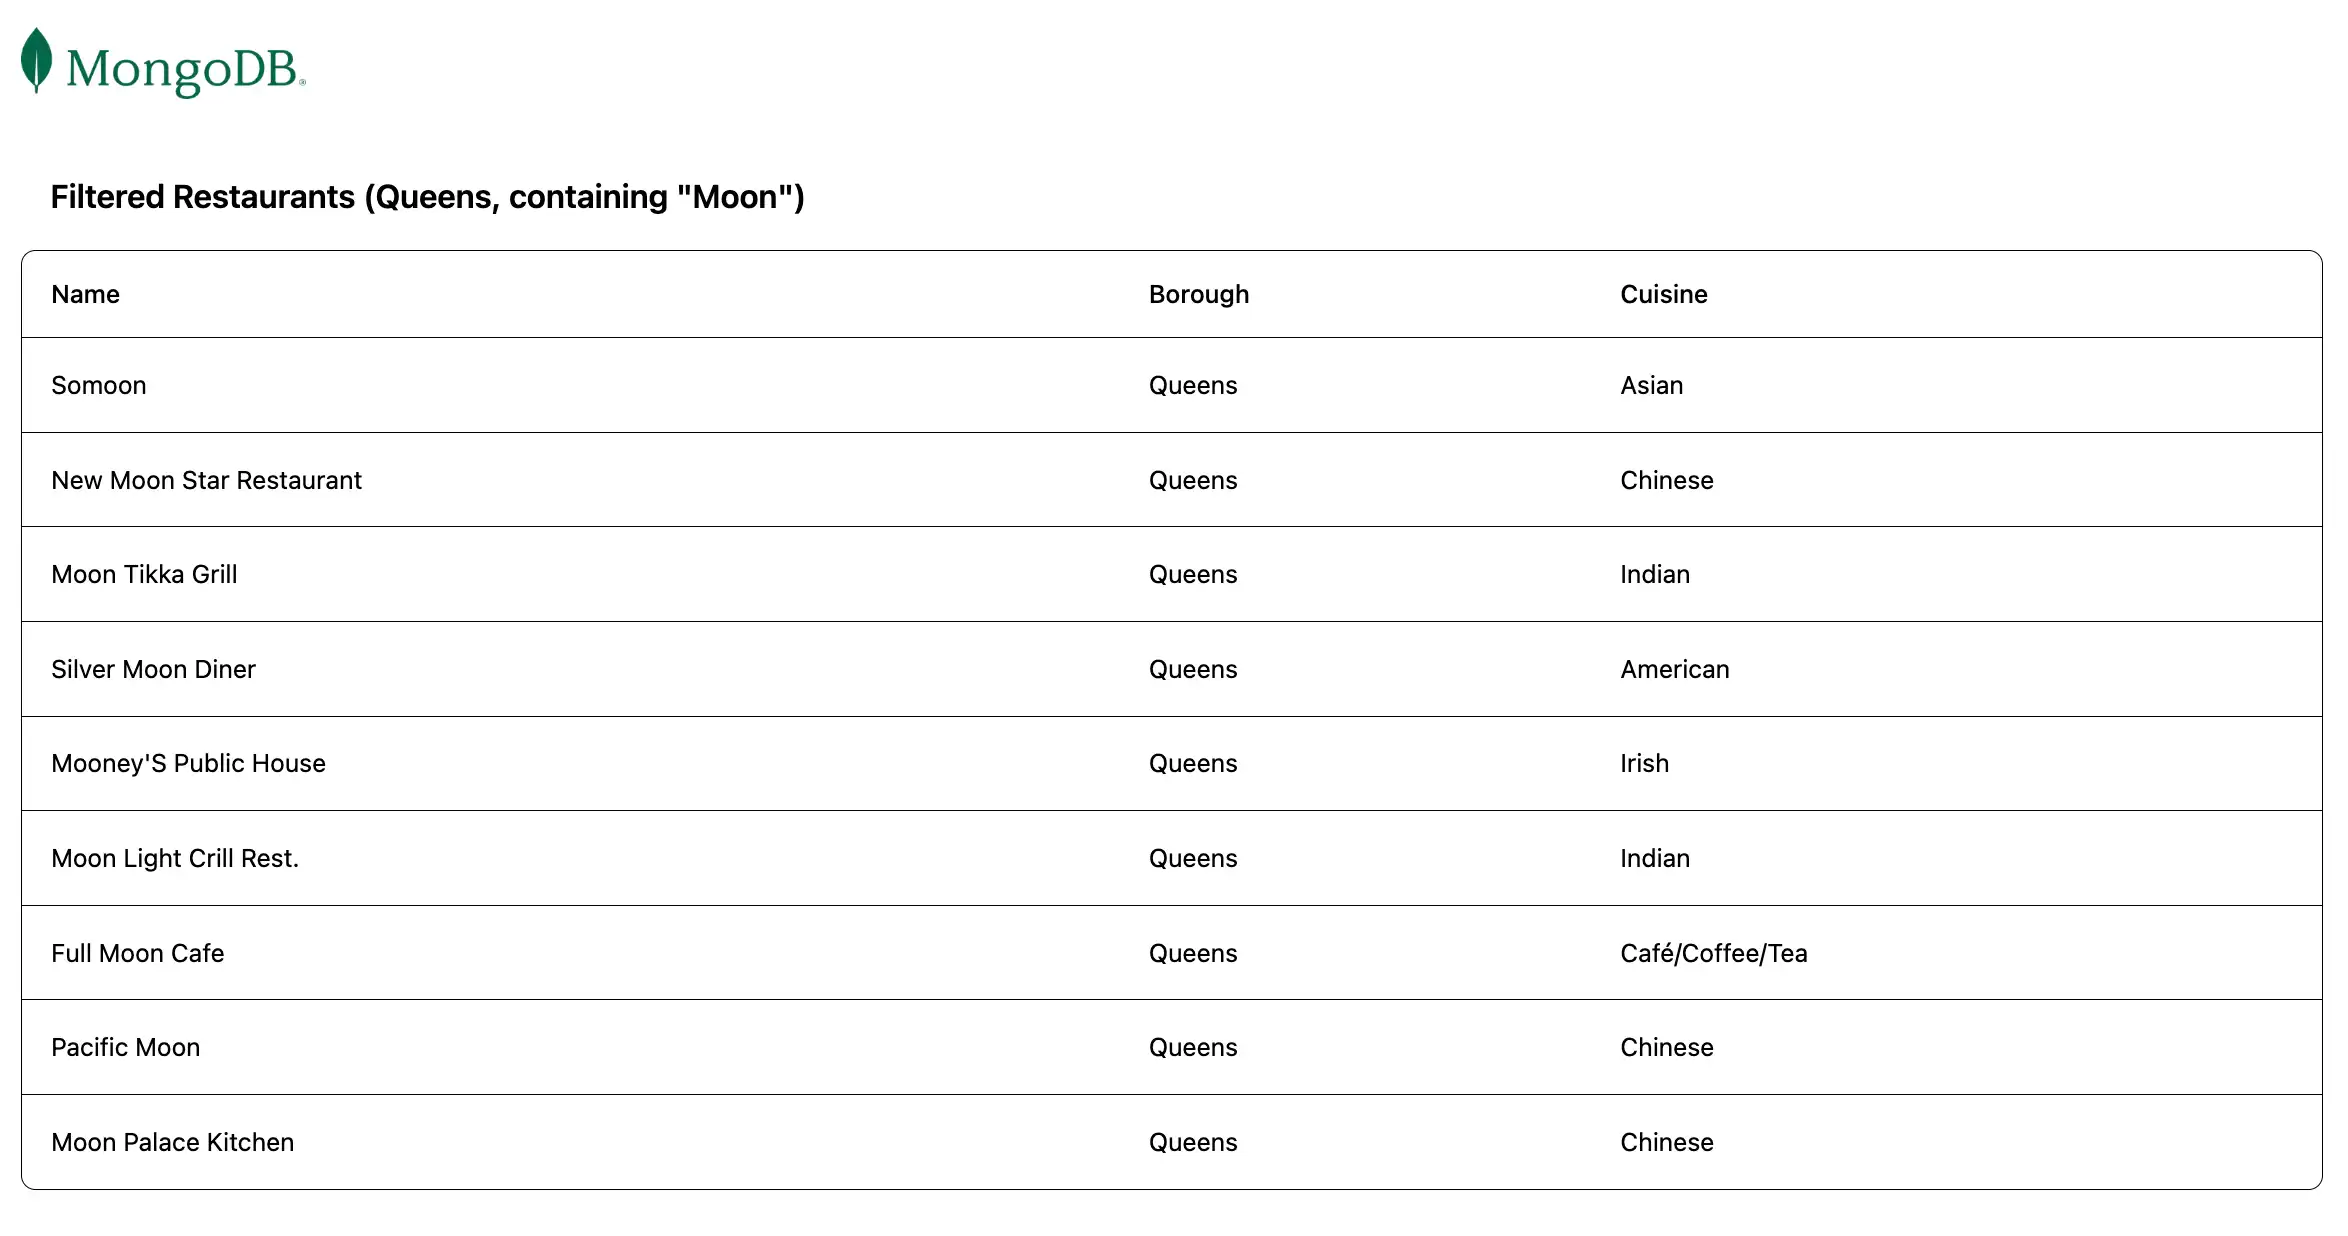
import express from "express"; import db from "../db/connection.js"; // Creates an instance of the Express router, used to define our routes const router = express.Router(); // Gets a list of all the restaurants router.get("/", async (req, res) => { let collection = await db.collection("restaurants"); let results = await collection.find({}).toArray(); res.send(results).status(200); }); // Lists restaurants that match the query filter router.get("/browse", async (req, res) => { try { let collection = await db.collection("restaurants"); let query = { borough: "Queens", name: { $regex: "Moon", $options: "i" }, }; let results = await collection.find(query).toArray(); res.send(results).status(200); } catch (err) { console.error(err); res.status(500).send("Error browsing restaurants"); } }); export default router;
このファイルは、sample_restaurantsデータベース内の restaurantsコレクションにアクセスし、次の GET エンドポイントとなる接続されたデバイスを定義します。
/:サンプルコレクションからすべてのレストランを検索します/browse: クエリ条件に一致するレストランを検索します。これにより、名前に"Moon"という単語が含まれるクイーンズのレストランがフィルターされます。
フロントエンドの設定
アプリケーションのバックエンドを設定したら、このセクションの手順に従ってReactを構成し、フロントエンド コンポーネントを追加します。
Reactテンプレートの追加
react-quickstartディレクトリで、次のコマンドを実行することで、Vite:を使用してReactテンプレートファイルを追加します。
npm create vite@latest client
このコマンドは、一連の設定質問に応答するように要求します。質問ごとに、ドロップダウン メニューから次の応答を選択します。
フレームワーク の選択: React
バリアントの選択: JavaScript
ロールダウンバイト(試験用)を使用するかどうか: いいえ
npmを使用してインストールし、今すぐ起動するかどうか: いいえ
コマンドの実行中後、プロジェクトにはフロントエンド スキャフォールディングを含む clientディレクトリが作成されます。
tailwind CSS のインストール
このサンプルアプリケーションでは、 UI形式に tailwind CSSフレームワークを使用します。これをインストールするには、前のステップで作成された clientディレクトリに移動し、次のコマンドを実行します。
npm install tailwindcss @tailwindcss/vite
インストール後、vite.config.jsファイルに移動します。強調表示された行に示すように、インポート ステートメントと plugins 配列を更新して @tailwindcss/viteプラグインを追加します。
import { defineConfig } from 'vite' import react from '@vitejs/plugin-react' import tailwindcss from '@tailwindcss/vite' // https://vite.dev/config/ export default defineConfig({ plugins: [ react(), tailwindcss() ], })
次に、client/src/index.cssファイルに移動し、次のインポート ステートメントを追加します。
@import "tailwindcss";
Reactルーターをセットアップする
client/src/main.jsxファイルに移動し、次のコードを貼り付けます。
import * as React from "react"; import * as ReactDOM from "react-dom/client"; import { createBrowserRouter, RouterProvider } from "react-router-dom"; import App from "./App"; import RestaurantList from "./components/RestaurantList"; import "./index.css"; const router = createBrowserRouter([ { path: "/", element: <App />, children: [ { path: "/", element: <RestaurantList />, }, ], }, { path: "/browse", element: <App />, children: [ { path: "/browse", element: <RestaurantList />, }, ], }, ]); ReactDOM.createRoot(document.getElementById("root")).render( <React.StrictMode> <RouterProvider router={router} /> </React.StrictMode>, );
このファイルは、クライアント側ルーティングを構成し、次のルートを定義します。
/: すべてのレストランを表示するために/restaurant/API エンドポイントとなる接続されたデバイスを呼び出すRestaurantListコンポーネントをレンダーします/browse: フィルターされたレストランを表示するために/restaurant/browseAPI エンドポイントとなる接続されたデバイスを呼び出すRestaurantListコンポーネントをレンダーします
コンポーネントの作成
clientディレクトリから次のコマンドを実行して、2 つのファイルを含む components という名前の新しいフォルダーを作成します。
mkdir src/components cd src/components touch Navbar.jsx RestaurantList.jsx
Navbar.jsxファイルは、必要なコンポーネントにリンクするナビゲーション バーを構成します。次のコードをこのファイルに貼り付けます。
import { NavLink } from "react-router-dom"; export default function Navbar() { return ( <div> <nav className="flex justify-between items-center mb-6"> <NavLink to="/"> <img alt="MongoDB logo" className="h-10 inline" src="https://d3cy9zhslanhfa.cloudfront.net/media/3800C044-6298-4575-A05D5C6B7623EE37/4B45D0EC-3482-4759-82DA37D8EA07D229/webimage-8A27671A-8A53-45DC-89D7BF8537F15A0D.png" ></img> </NavLink> </nav> </div> ); }
RestaurantList.jsxファイルはレストランの表示コンポーネントであり、レストラン情報を検索して表示します。次のコードをこのファイルに貼り付けます。
import { useEffect, useState } from "react"; import { useLocation } from "react-router-dom"; const Restaurant = (props) => ( <tr className="border-b transition-colors hover:bg-muted/50 data-[state=selected]:bg-muted"> <td className="p-4 align-middle [&:has([role=checkbox])]:pr-0"> {props.restaurant.name} </td> <td className="p-4 align-middle [&:has([role=checkbox])]:pr-0"> {props.restaurant.borough} </td> <td className="p-4 align-middle [&:has([role=checkbox])]:pr-0"> {props.restaurant.cuisine} </td> </tr> ); export default function RestaurantList() { const [restaurants, setRestaurants] = useState([]); const location = useLocation(); // Fetches the restaurants from the database useEffect(() => { async function getRestaurants() { // Determines which endpoint to call based on current route const endpoint = location.pathname === "/browse" ? "http://localhost:5050/restaurant/browse" : "http://localhost:5050/restaurant/"; const response = await fetch(endpoint); if (!response.ok) { const message = `An error occurred: ${response.statusText}`; console.error(message); return; } const restaurants = await response.json(); setRestaurants(restaurants); } getRestaurants(); return; }, [location.pathname]); // Maps each restaurant on the table function restaurantList() { return restaurants.map((restaurant) => { return <Restaurant restaurant={restaurant} key={restaurant._id} />; }); } // Retrieves the dynamic title based on current route const getTitle = () => { return location.pathname === "/browse" ? 'Filtered Restaurants (Queens, containing "Moon")' : "All Restaurants"; }; // Displays the restaurants table return ( <> <h3 className="text-lg font-semibold p-4">{getTitle()}</h3> <div className="border rounded-lg overflow-hidden"> <div className="relative w-full overflow-auto"> <table className="w-full caption-bottom text-sm"> <thead className="[&_tr]:border-b"> <tr className="border-b transition-colors hover:bg-muted/50 data-[state=selected]:bg-muted"> <th className="h-12 px-4 text-left align-middle font-medium text-muted-foreground [&:has([role=checkbox])]:pr-0"> Name </th> <th className="h-12 px-4 text-left align-middle font-medium text-muted-foreground [&:has([role=checkbox])]:pr-0"> Borough </th> <th className="h-12 px-4 text-left align-middle font-medium text-muted-foreground [&:has([role=checkbox])]:pr-0"> Cuisine </th> </tr> </thead> <tbody className="[&_tr:last-child]:border-0"> {restaurantList()} </tbody> </table> </div> </div> </> ); }
最後に、client/src/App.jsxファイルに移動します。このファイルはメインのレイアウト コンポーネントであり、Navbar コンポーネントが子コンポーネントの上にある各ページの上部にレンダーされるようにします。次のコードをこのファイルに貼り付けます。
import { Outlet } from "react-router-dom"; import Navbar from "./components/Navbar"; const App = () => { return ( <div className="w-full p-6"> <Navbar /> <Outlet /> </div> ); }; export default App;
アプリケーションの実行
最後に、このセクションの手順に従ってアプリケーションを実行し、レンダリングされたレストラン データを表示します。
アプリケーション場を開きます
前の手順で検索した http://localhost:5173/ URLを開きます。最初のランディング ページには、sample_restaurants.restaurantsコレクション内のすべてのレストランのリストが表示されます。


次に、 http://localhost:5173/browse URLに移動して、name と boroughフィールドクエリに一致するレストランを表示します。

クイック スタート チュートリアルが完了しました。
これらの手順を完了すると、MongoDB配置に接続し、サンプルレストランデータに対してクエリを実行し、検索した結果をレンダーするReactアプリケーションが作成されます。
追加リソース
React、MongoDB、およびMERNスタックの詳細については、次のリソースを表示します。
React のドキュメント
Express ドキュメント
ノード.jsドライバーのドキュメント