The Aggregation Pipeline Builder in MongoDB Compass helps you create aggregation pipelines to process documents from a collection or view and return computed results.
About this Task
MongoDB Compass provides different modes to create aggregation pipelines:
Stage View Mode, a visual pipeline editor that preloads pipeline syntax based on your selected stages.
Stage Wizard, a feature of Stage View Mode that provides a set of templates for simple aggregation stage use cases. The Stage Wizard only includes simple use cases to help you get started with your aggregation pipeline.
Focus Mode, a feature of Stage View Mode where you edit one pipeline stage at a time. Focus Mode helps you manage complex or deeply nested aggregation pipeline stages.
Text View Mode, a text-based pipeline editor that accepts raw pipeline syntax.
Before You Begin
To build an aggregation pipeline, choose a collection and click the Aggregations tab. Compass displays a blank aggregation pipeline. The Preview of Documents in the Collection section shows 10 documents randomly sampled from the chosen collection.
Note
Atlas Search Stages
When you connect to a MongoDB deployment hosted on Atlas, Atlas-only stages $search and $searchMeta become available in the Aggregation Pipeline Builder. Use these stages to perform full-text search on Atlas collections.
Steps
To see how to create an aggregation pipeline, select the tab corresponding to your chosen view mode:


Select an aggregation pipeline stage
On the upper-left corner of the aggregation stage card, click the Select drop-down menu and select the aggregation pipeline stage to use for the first stage of the pipeline.
Fill in your pipeline stage
Fill in your selected stage. You can adjust the width of the pipeline stage by dragging its border to the right.
Note
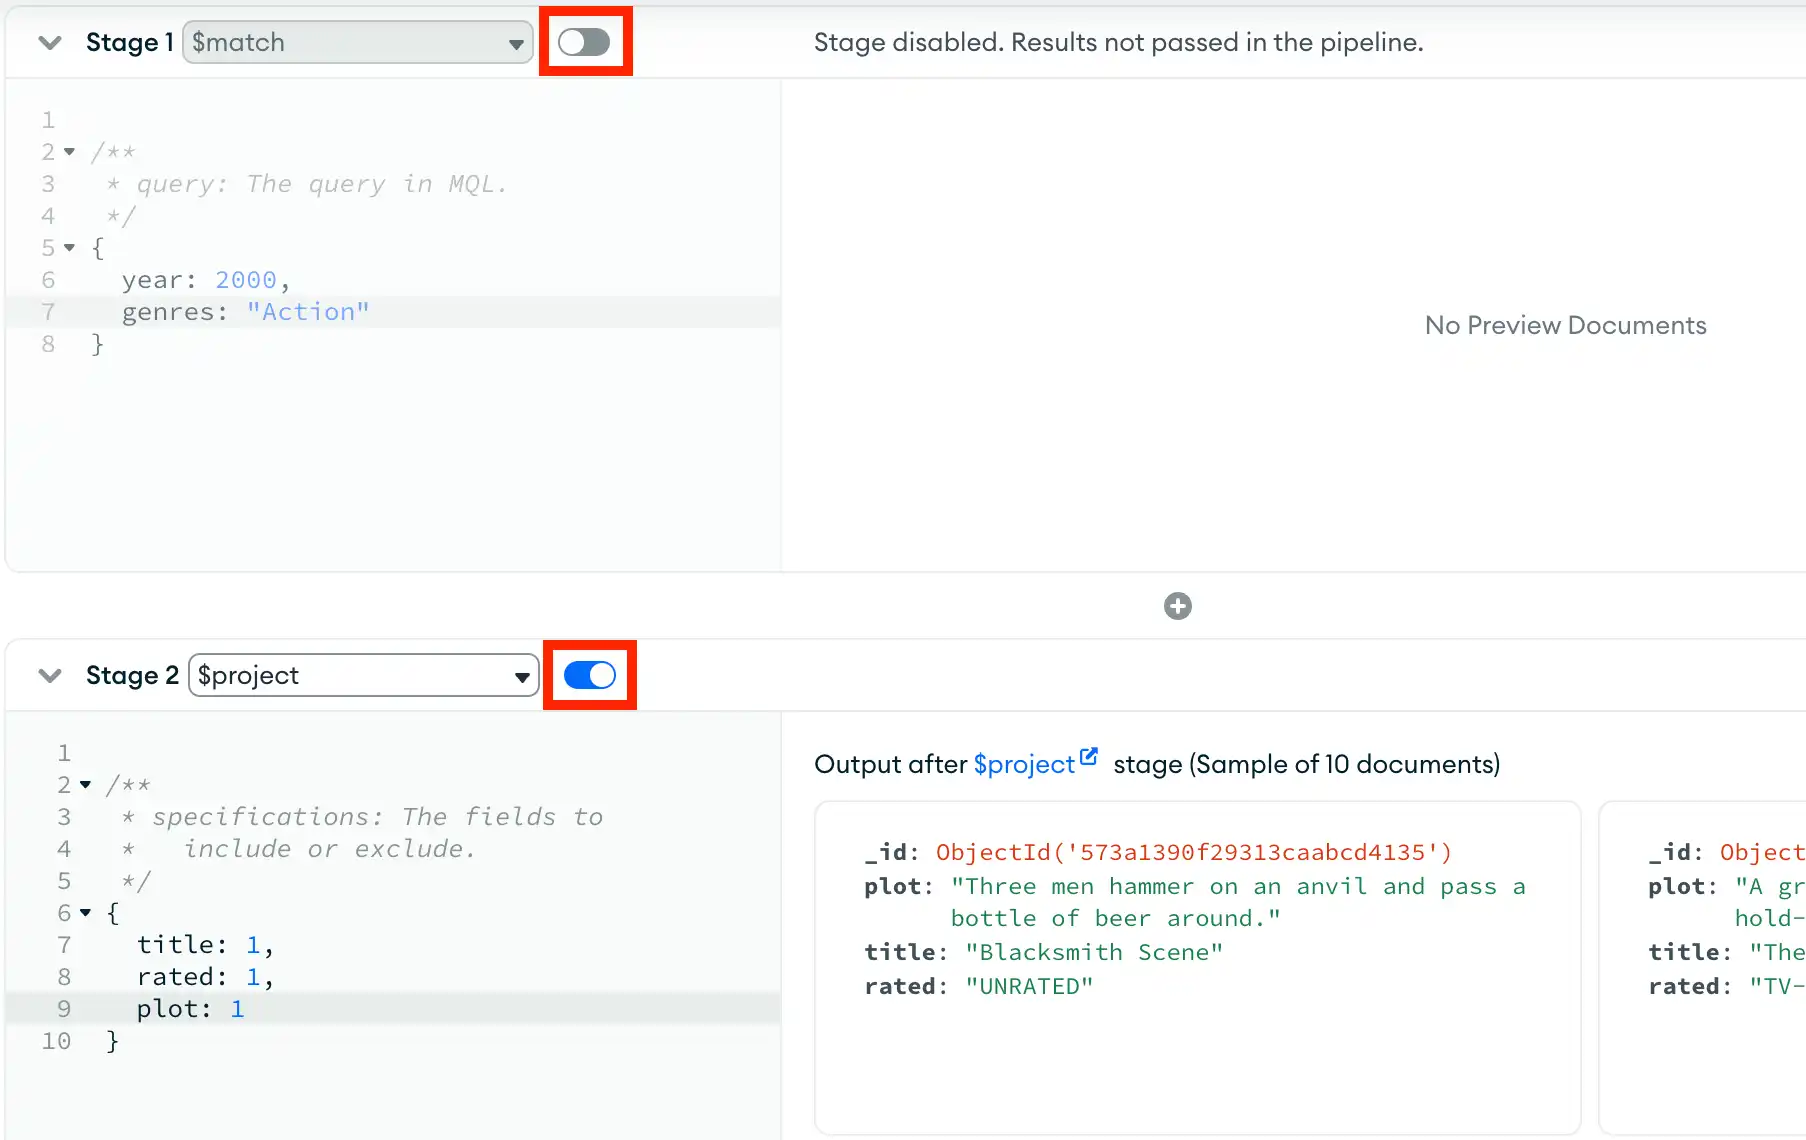
The toggle to the right of each pipeline stage name dictates whether that stage is included in the pipeline. Toggling a pipeline stage also updates the pipeline preview, which updates based on whether or not that stage is included.
For example, the following pipeline excludes the first
$match stage and only includes the
$project stage:

Add additional pipeline stages
To add an additional pipeline stage after your last aggregation stage, click Add Stage. To add an aggregation stage before your most recently added stage, click the + icon above the stage card.
Repeat steps 3 and 4 for each additional stage.
Note
You can change the order of pipeline stages by dragging the header of each stage card.


Select an aggregation pipeline stage use case
On the Stage Wizard card, select a stage use case for the first stage of your pipeline. You can click the stage card to add it to the end of your pipeline or drag it to your preferred position.
After you select a use case, Compass populates the stage card with a form that corresponds to the selected aggregation pipeline stage.
The Stage Wizard use cases include the following aggregation stages:
Fill in your pipeline stage
Fill in the form for your selected stage and click Apply. After you click Apply, the form will turn into a stage card that you can edit in Stage View Mode, Focus Mode, or Text View Mode.
Compass populates the Stage Output with up to ten sample output documents.
Note
You cannot edit an existing stage through the Stage Wizard. The Stage Wizard can only add new stages. To edit an existing stage, use Stage View Mode, Focus Mode, or Text View Mode.

Select an aggregation pipeline stage
Click the Select drop-down menu and select the aggregation pipeline stage to use for the first stage of the pipeline.
Fill in your pipeline stage
Fill in your selected stage. Compass populates the Stage Output with up to ten sample output documents.
You can adjust the width of the Stage Input, stage editor, and the Stage Output by dragging their border to the desired size.
Note
The toggle to the right of each pipeline stage name dictates whether that stage is included in the pipeline. Toggling a pipeline stage also updates the pipeline preview, which updates based on whether or not that stage is included.
Add additional pipeline stages
Click the Add Stage dropdown to add additional aggregation stages before or after your last aggregation stage. Repeat steps 4 and 5 for each additional stage.
You can add stages with the following keyboard shortcuts:
To add a stage after the current stage:
Windows / Linux: Ctrl + Shift + A
Mac: ⌘ + Shift + A
To add a stage before the current stage:
Windows / Linux: Ctrl + Shift + B
Mac: ⌘ + Shift + B
Navigate between stages
To navigate between different stages, select the stage you want to edit from the Stage dropdown in the upper-left corner of the Focus Mode modal.
You can navigate between stages with the following keyboard shortcuts:
To go to the stage before the current stage:
Windows / Linux: Ctrl + Shift + 9
Mac: ⌘ + Shift + 9
To add a stage before the current stage:
Windows / Linux: Ctrl + Shift + 0
Mac: ⌘ + Shift + 0


Enter your aggregation pipeline
Enter valid aggregation syntax into the text editor. The text editor provides real-time linting for correct syntax and debugging information.
You can also use Text View Mode to import aggregation pipelines from plain text by typing or pasting your pipeline into the text editor.
For example, following pipeline limits the query results to 4
documents.
[ { "$limit" : 4 } ]
Note
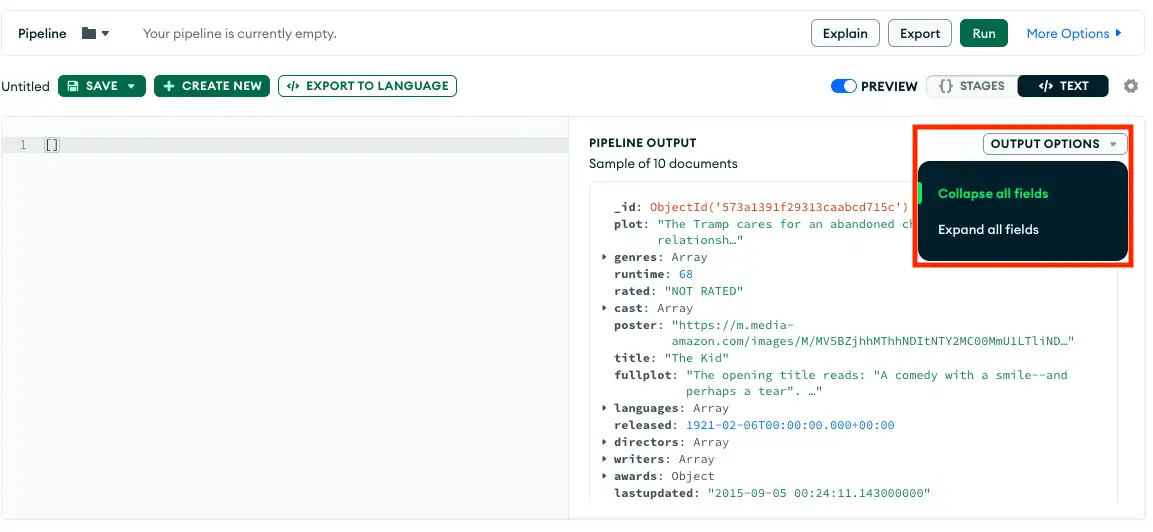
To expand all embedded fields and documents within the preview results, click Output Options and select Expand all fields.