定义
$densify5.1版本新增。
在文档序列中创建新文档,其中缺少字段中的某些值。
You can use
$densifyto:填补时间序列数据的空白
在数据群组之间添加缺失值。
用指定的数值范围填充数据。
语法
The $densify stage has this syntax:
{ $densify: { field: <fieldName>, partitionByFields: [ <field 1>, <field 2> ... <field n> ], range: { step: <number>, unit: <time unit>, bounds: < "full" || "partition" > || [ < lower bound >, < upper bound > ] } } }
The $densify stage takes a document with these fields:
字段 | 必要性 | 说明 |
|---|---|---|
必需 | 要密集化的字段。指定 不包含指定的 要在嵌入式文档或数组中指定 For restrictions, see | |
Optional | The set of fields to act as the compound key to group the documents. In the If you omit this field, For an example, see Densification with Partitions. For restrictions, see | |
必需 | 指定如何密集化数据的对象。 | |
必需 | 您可以将
如果
如果
如果
| |
必需 | The amount to increment the field value in each document. If range.unit is specified, | |
如果字段是日期,则为必填项。 |
行为和限制
field 限制
For documents that contain the specified field, $densify errors if:
集合中的任何文档都有日期类型的
field值,且未指定单位字段。集合中的任何文档都有数值类型的
field值,并指定了单位字段。field名称以$开头。如果要密集化字段,必须重新命名。如需重命名字段,请使用$project。8.1 版本新增:
field与partitionByFields数组中的任何字段共享其前缀。例如,示例的以下组合field和partitionByFields会导致错误:field: "timestamp",partitionByFields: ["timestamp"]field: "timestamp",partitionByFields: ["timestamp.hours"]field: "timestamp.hours",partitionByFields: ["timestamp"]
partitionByFields 限制
$densify errors if any field name in the partitionByFields array:
求值为非字符串值。
以
$开头。
range.bounds 行为
如果 range.bounds 是一个数组:
下限值表示新增文档的起始值,与集合中已有的文档无关。
下限包含在内。
不含上边界。
注意
从MongoDB8.0 开始,$densify 将具有相等下限和上限的边界视为空设立,并且不会生成将该边界作为字段值的文档。
In prior versions, $densify treats bounds with an equal lower and upper bound as a closed interval and generates a document with the bound value as a field value if the collection does not already contain a document with the bound value.
示例, 的范围.bounds [10, 10]108在. 之前的版本中会生成字段值为08 的额外的文档,但在.0 及更高版本中不会生成此类文档。 。
文档生成限制
如果$densify 生成的文档数量超过internalQueryMaxAllowedDensifyDocs500 参数设立的限制,则会返回错误。默认下,此限制为,000 个文档。
要允许生成更多的文档,请增加 internalQueryMaxAllowedDensifyDocs 参数的值。
输出顺序
$densify 不保证其输出的文档的排序顺序。
如需保证排序顺序,请在要排序的字段上使用 $sort。
示例
使时间序列数据密集化
创建 weather 集合,其中包含每隔四小时的温度读数。
db.weather.insertMany( [ { "metadata": { "sensorId": 5578, "type": "temperature" }, "timestamp": ISODate("2021-05-18T00:00:00.000Z"), "temp": 12 }, { "metadata": { "sensorId": 5578, "type": "temperature" }, "timestamp": ISODate("2021-05-18T04:00:00.000Z"), "temp": 11 }, { "metadata": { "sensorId": 5578, "type": "temperature" }, "timestamp": ISODate("2021-05-18T08:00:00.000Z"), "temp": 11 }, { "metadata": { "sensorId": 5578, "type": "temperature" }, "timestamp": ISODate("2021-05-18T12:00:00.000Z"), "temp": 12 } ] )
This example uses the $densify stage to fill in the gaps between the four-hour intervals to achieve hourly granularity for the data points:
db.weather.aggregate( [ { $densify: { field: "timestamp", range: { step: 1, unit: "hour", bounds:[ ISODate("2021-05-18T00:00:00.000Z"), ISODate("2021-05-18T08:00:00.000Z") ] } } } ] )
在示例中:
The
$densifystage fills in the gaps of time in between the recorded temperatures.field: "timestamp"密集化timestamp字段。
range:step: 1将timestamp字段增加 1 个单位。unit: hour按小时密集化timestamp字段。bounds: [ ISODate("2021-05-18T00:00:00.000Z"), ISODate("2021-05-18T08:00:00.000Z") ]设置密集化的时间范围。
In the following output, the $densify stage fills in the gaps of time between the hours of 00:00:00 and 08:00:00.
[ { _id: ObjectId("618c207c63056cfad0ca4309"), metadata: { sensorId: 5578, type: 'temperature' }, timestamp: ISODate("2021-05-18T00:00:00.000Z"), temp: 12 }, { timestamp: ISODate("2021-05-18T01:00:00.000Z") }, { timestamp: ISODate("2021-05-18T02:00:00.000Z") }, { timestamp: ISODate("2021-05-18T03:00:00.000Z") }, { _id: ObjectId("618c207c63056cfad0ca430a"), metadata: { sensorId: 5578, type: 'temperature' }, timestamp: ISODate("2021-05-18T04:00:00.000Z"), temp: 11 }, { timestamp: ISODate("2021-05-18T05:00:00.000Z") }, { timestamp: ISODate("2021-05-18T06:00:00.000Z") }, { timestamp: ISODate("2021-05-18T07:00:00.000Z") }, { _id: ObjectId("618c207c63056cfad0ca430b"), metadata: { sensorId: 5578, type: 'temperature' }, timestamp: ISODate("2021-05-18T08:00:00.000Z"), temp: 11 } { _id: ObjectId("618c207c63056cfad0ca430c"), metadata: { sensorId: 5578, type: 'temperature' }, timestamp: ISODate("2021-05-18T12:00:00.000Z"), temp: 12 } ]
通过分区实现密集化
创建 coffee 集合,其中包含两种咖啡豆的数据:
db.coffee.insertMany( [ { "altitude": 600, "variety": "Arabica Typica", "score": 68.3 }, { "altitude": 750, "variety": "Arabica Typica", "score": 69.5 }, { "altitude": 950, "variety": "Arabica Typica", "score": 70.5 }, { "altitude": 1250, "variety": "Gesha", "score": 88.15 }, { "altitude": 1700, "variety": "Gesha", "score": 95.5, "price": 1029 } ] )
密集化各种数值
This example uses $densify to densify the altitude field for each coffee variety:
db.coffee.aggregate( [ { $densify: { field: "altitude", partitionByFields: [ "variety" ], range: { bounds: "full", step: 200 } } } ] )
聚合示例:
按
variety对文档分区,为Arabica Typica和Gesha咖啡分别创建一个分组。指定
full范围,这意味着数据在每个分区的整个现有文档范围内进行密集化。指定
step为200,意味着以200的altitude间隔创建新文档。
该聚合输出以下文档:
[ { _id: ObjectId("618c031814fbe03334480475"), altitude: 600, variety: 'Arabica Typica', score: 68.3 }, { _id: ObjectId("618c031814fbe03334480476"), altitude: 750, variety: 'Arabica Typica', score: 69.5 }, { variety: 'Arabica Typica', altitude: 800 }, { _id: ObjectId("618c031814fbe03334480477"), altitude: 950, variety: 'Arabica Typica', score: 70.5 }, { variety: 'Gesha', altitude: 600 }, { variety: 'Gesha', altitude: 800 }, { variety: 'Gesha', altitude: 1000 }, { variety: 'Gesha', altitude: 1200 }, { _id: ObjectId("618c031814fbe03334480478"), altitude: 1250, variety: 'Gesha', score: 88.15 }, { variety: 'Gesha', altitude: 1400 }, { variety: 'Gesha', altitude: 1600 }, { _id: ObjectId("618c031814fbe03334480479"), altitude: 1700, variety: 'Gesha', score: 95.5, price: 1029 }, { variety: 'Arabica Typica', altitude: 1000 }, { variety: 'Arabica Typica', altitude: 1200 }, { variety: 'Arabica Typica', altitude: 1400 }, { variety: 'Arabica Typica', altitude: 1600 } ]
This image visualizes the documents created with $densify:
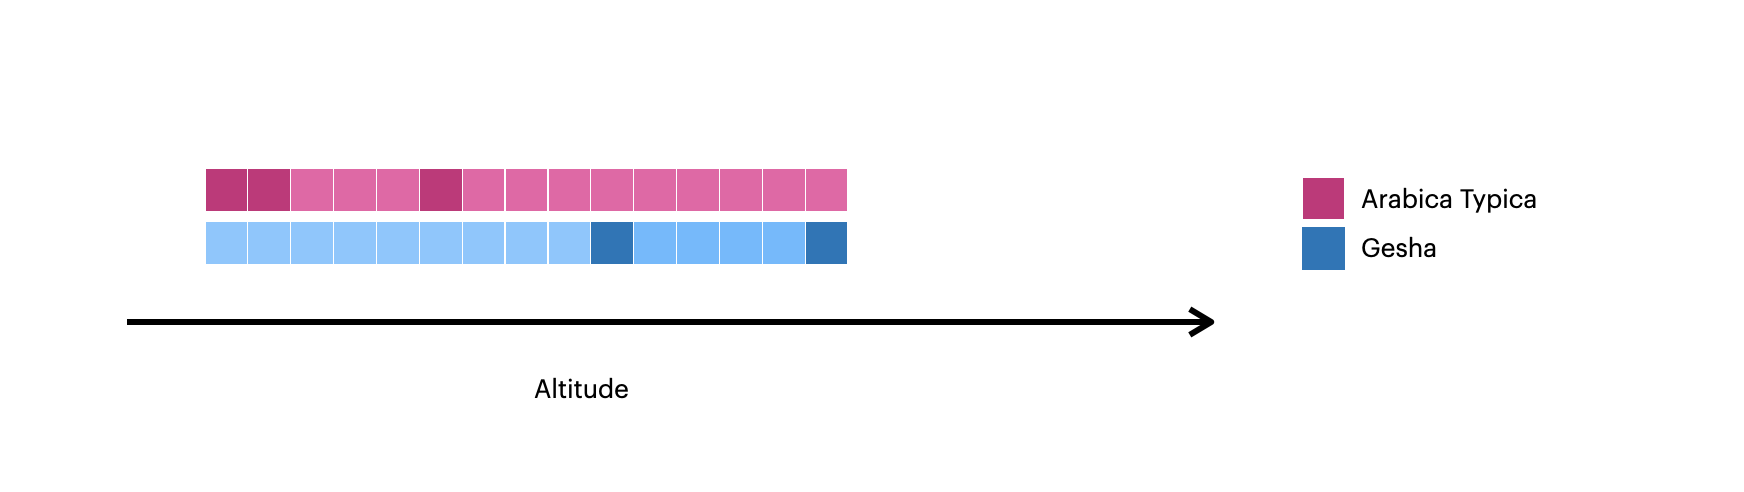
较深的方块表示集合中的原始文档。
The lighter squares represent the documents created with
$densify.
密集化每个分区中的值
This example uses $densify to only densify gaps in the altitude field within each variety:
db.coffee.aggregate( [ { $densify: { field: "altitude", partitionByFields: [ "variety" ], range: { bounds: "partition", step: 200 } } } ] )
聚合示例:
按
variety对文档分区,为Arabica Typica和Gesha咖啡分别创建一个分组。指定
partition范围,这意味着数据在每个分区内均已加密。对于
Arabica Typica分区,范围是600-950。对于
Gesha分区,范围是1250-1700。
指定
step为200,意味着以200的altitude间隔创建新文档。
该聚合输出以下文档:
[ { _id: ObjectId("618c031814fbe03334480475"), altitude: 600, variety: 'Arabica Typica', score: 68.3 }, { _id: ObjectId("618c031814fbe03334480476"), altitude: 750, variety: 'Arabica Typica', score: 69.5 }, { variety: 'Arabica Typica', altitude: 800 }, { _id: ObjectId("618c031814fbe03334480477"), altitude: 950, variety: 'Arabica Typica', score: 70.5 }, { _id: ObjectId("618c031814fbe03334480478"), altitude: 1250, variety: 'Gesha', score: 88.15 }, { variety: 'Gesha', altitude: 1450 }, { variety: 'Gesha', altitude: 1650 }, { _id: ObjectId("618c031814fbe03334480479"), altitude: 1700, variety: 'Gesha', score: 95.5, price: 1029 } ]
This image visualizes the documents created with $densify:
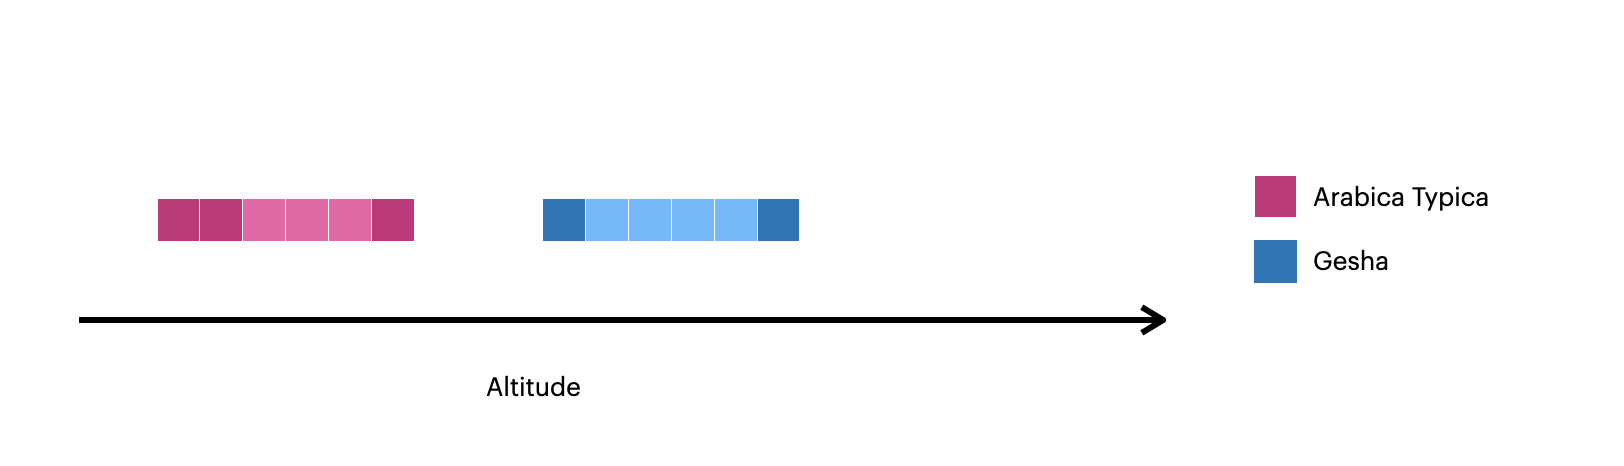
较深的方块表示集合中的原始文档。
The lighter squares represent the documents created with
$densify.
本页上的C#示例使用Atlas示例数据集中的 sample_weatherdata.data集合。要学习;了解如何创建免费的MongoDB Atlas 群集并加载示例数据集,请参阅MongoDB .NET/ C#驱动程序文档中的入门。
以下 Weather 和 Point 类对 sample_weatherdata.data集合中的文档进行建模:
[] public class Weather { [] public ObjectId Id { get; set; } [] public Point Position { get; set; } = null!; [] public DateTime Timestamp { get; set; } } public class Point { [] public string Type { get; set; } = null!; [] public double[] Coordinates { get; set; } = null!; }
To use the MongoDB .NET/C# driver to add a $densify stage to an aggregation pipeline, call the UnionWith() method on a PipelineDefinition object.
以下示例创建了一个管道阶段,用于筛选坐标为 [-47.9, 47.6] 处的文档,然后在两个源文档之间每隔 15 分钟添加一个文档。代码按文档的 Position.Coordinates字段的值对文档进行分区。
var matchFilter = Builders<Weather>.Filter.Eq( w => w.Position.Coordinates, new double[] { -47.9, 47.6 }); var densifyTimeRange = new DensifyDateTimeRange( new DensifyLowerUpperDateTimeBounds( lowerBound: new DateTime(1984, 3, 5, 13, 0, 0, DateTimeKind.Utc), upperBound: new DateTime(1984, 3, 5, 14, 0, 0, DateTimeKind.Utc) ), step: 15, unit: DensifyDateTimeUnit.Minutes ); var pipeline = new EmptyPipelineDefinition<Weather>() .Match(matchFilter) .Densify( field: w => w.Timestamp, range: densifyTimeRange, partitionByFields: [w => w.Position.Coordinates]);
上一个聚合阶段会在集合中生成以下突出显示的文档:
{ _id: ObjectId("..."), position: { type: "Point", coordinates: [-47.9, 47.6] }, ts: 1984-03-05T13:00:00Z, ... } { position: { coordinates: [-47.9, 47.6] }, ts: 1984-03-05T13:15:00Z } { position: { coordinates: [-47.9, 47.6] }, ts: 1984-03-05T13:30:00Z } { position: { coordinates: [-47.9, 47.6] }, ts: 1984-03-05T13:45:00Z } { _id: ObjectId("..."), position: { type: "Point", coordinates: [-47.9, 47.6] }, ts: 1984-03-05T14:00:00Z, ... }
本页中的 Node.js 示例使用来自 Atlas 示例数据集的 sample_weatherdata.data 集合。要学习如何创建免费的 MongoDB Atlas 集群并加载示例数据集,请参阅 MongoDB Node.js 驱动程序文档中的入门指南。
sample_weatherdata.data集合包含以下文档,这些文档包含同一 position字段的测量值,间隔一小时:
{_id: new ObjectId(...), ts: 1984-03-05T13:00:00.000Z, position: {type: 'Point', coordinates: [-47.9, 47.6]}, ... }, {_id: new ObjectId(...), ts: 1984-03-05T14:00:00.000Z, position: {type: 'Point', coordinates: [-47.9, 47.6]}, ... }
要使用MongoDB Node.js驱动程序将 $densify 阶段添加到聚合管道,请在管道对象中使用 $densify操作符。
以下示例创建了一个管道阶段,该阶段在前两个文档之间每隔 15 分钟添加一个文档。然后,代码根据这些文档的 position.coordinates字段的值对这些文档进行分组。然后,该示例运行聚合管道:
const pipeline = [ { $densify: { field: "ts", partitionByFields: ["position.coordinates"], range: { step: 15, unit: "minute", bounds: [new Date(1984, 3, 5, 8, 0, 0), new Date(1984, 3, 5, 9, 0, 0)] } } } ]; const cursor = collection.aggregate(pipeline); return cursor;
上一个聚合阶段会在集合中生成以下突出显示的文档:
{ _id: new ObjectId(...), ts: 1984-03-05T13:00:00.000Z, position: {type: 'Point', coordinates: [-47.9, 47.6]}, ... }, { position: { coordinates: [-47.9, 47.6] }, ts: 1984-03-05T13:15:00.000Z }, { position: { coordinates: [-47.9, 47.6] }, ts: 1984-03-05T13:30:00.000Z }, { position: { coordinates: [-47.9, 47.6] }, ts: 1984-03-05T13:45:00.000Z }, { _id: new ObjectId(...), ts: 1984-03-05T14:00:00.000Z, position: {type: 'Point', coordinates: [-47.9, 47.6]}, ... }