Menu Docs
Página inicial do Docs
/
Atlas
/ /

Geração Aumentada de Recuperação (RAG) com MongoDB

A geração aumentada de recuperação (RAG) é uma arquitetura usada para aumentar modelos de linguagem grandes (LLMs) com dados adicionais para que eles possam gerar respostas mais precisas. Você pode implementar RAG em seus aplicativos de IA generativa combinando um LLM com um sistema de recuperação com base na MongoDB Vector Search.

Para experimentar rapidamente o RAG com o MongoDB Vector Search, use o Construtor de demonstração do chatbot no MongoDB Search Playground. Para saber mais, consulte Construtor de Demonstrações do chatbot no Search Playground.

Para implementar seu próprio sistema RAG com o MongoDB Vector Search, consulte o tutorial nesta página.

Ao usar LLMs, você pode encontrar as seguintes limitações:

  • Dados obsoletos: os LLMssão treinados em um conjunto de dados estático até um determinado ponto no tempo. Isso significa que eles têm uma base de conhecimento limitada e podem usar dados desatualizados.

  • Sem acesso aos dados locais: os LLMsnão têm acesso aos dados locais ou personalizados. Portanto, eles podem não ter conhecimento sobre domínios específicos.

  • Alucinações: Quando os dados de treinamento estão incompletos ou desatualizados, os LLMspodem gerar informações imprecisas.

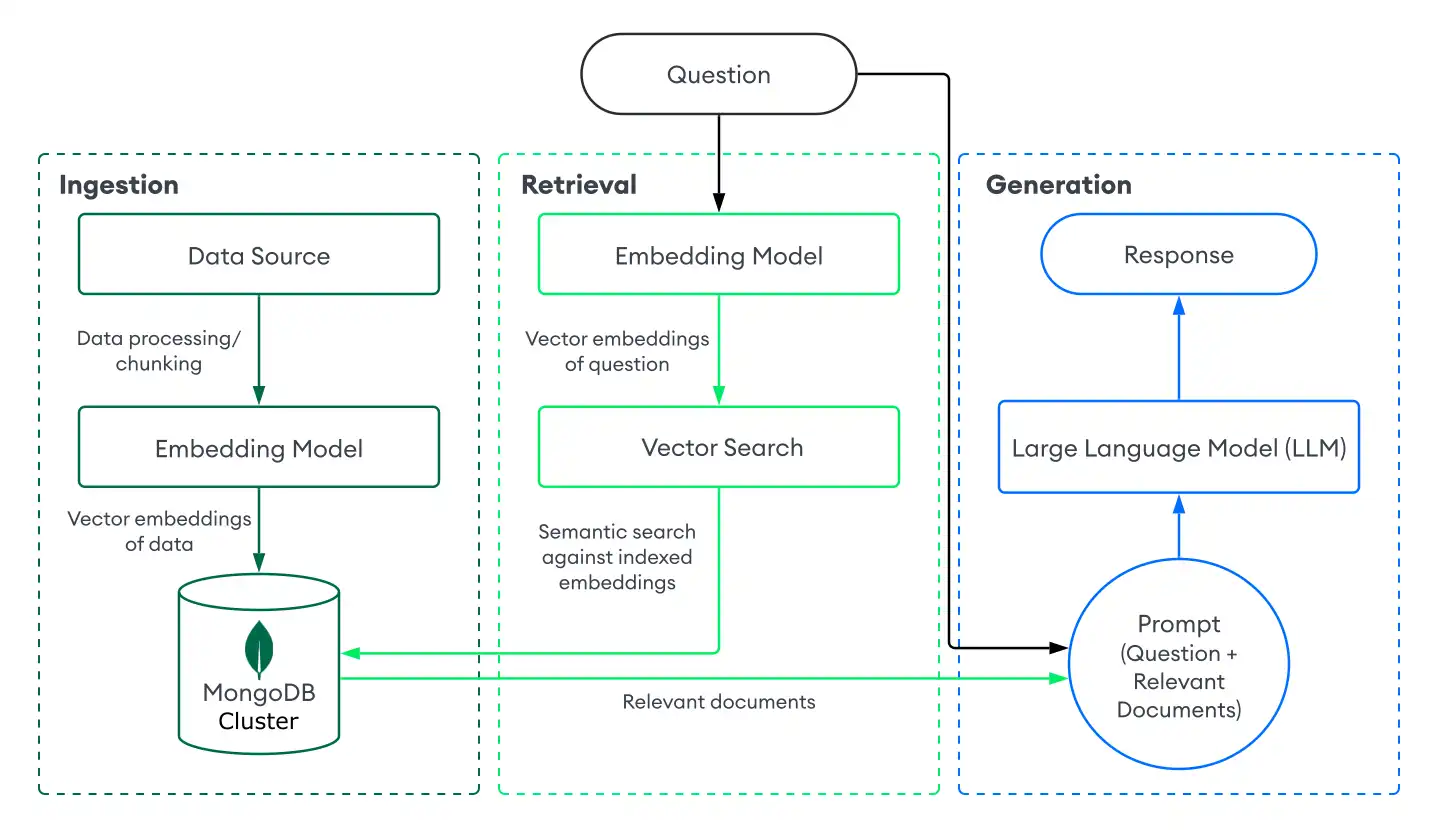
Você pode resolver essas limitações seguindo as seguintes etapas para implementar o RAG:

  1. Ingestão: armazene seus dados personalizados como incorporações vetoriais em um banco de dados vetorial, como MongoDB. Isso permite que você crie uma base de conhecimento de dados atualizados e personalizados.

  2. Recuperação: recupere documentos semanticamente semelhantes do banco de dados com base na pergunta do usuário usando uma solução de pesquisa, como o MongoDB Vector Search. Esses documentos ampliam o LLM com dados adicionais relevantes.

  3. Geração: envie uma solicitação para o LLM. O LLM usa os documentos recuperados como contexto para gerar uma resposta mais precisa e relevante, reduzindo as alucinações.

Como a RAG permite tarefas como resposta a perguntas e geração de texto, é uma arquitetura eficaz para criar chatbots de AI que fornecem respostas personalizadas e específicas do domínio. Para criar chatbots prontos para produção, você deve configurar um servidor para rotear solicitações e criar uma interface de usuário com base na implementação da RAG.

Para implementar o RAG com o MongoDB Vector Search, você ingere dados no MongoDB, recupera documentos com o MongoDB Vector Search e gera respostas usando um LLM. Esta seção descreve os componentes de uma implementação básica ou ingênua de RAG com o MongoDB Vector Search. Para obter instruções passo a passo, consulte Tutorial.

Fluxograma RAG com Vector Search do MongoDB

Assista a um vídeo que demonstra como implementar o RAG com o MongoDB Vector Search.

Duração: 5 minutos

A ingestão de dados para RAG envolve o processamento de seus dados personalizados e o armazenamento em um banco de dados vetorial para prepará-los para a recuperação. Para criar um pipeline de ingestão básico com MongoDB como banco de dados vetorial, faça o seguinte:

  1. Prepare seus dados.

    Carregue, processe e particione seus dados para prepará-los para o seu aplicativo RAG. O particionamento envolve a divisão dos seus dados em partes menores para gerar uma recuperação ideal.

  2. Converta os dados em incorporações vetoriais.

    Converta seus dados em incorporações vetoriais usando um modelo de incorporação. Para saber mais, consulte Como criar incorporações vetoriais.

  3. Armazene os dados e incorporações no MongoDB.

    Armazene essas incorporações em seu cluster. Você armazena incorporações como um campo junto com outros dados em sua coleção.

A criação de um sistema de recuperação envolve a pesquisa e a devolução dos documentos mais relevantes do seu banco de dados vetorial para aumentar o LLM. Para recuperar documentos relevantes com a Vector Search do MongoDB, converta a pergunta do usuário em incorporações vetoriais e execute uma query de pesquisa vetorial nos dados de sua collection do MongoDB para encontrar documentos com as incorporações mais semelhantes.

Para realizar a recuperação básica com o MongoDB Vector Search, faça o seguinte:

  1. Defina um índice do MongoDB Vector Search na collection que contém suas incorporações vetoriais.

  2. Escolha um dos seguintes métodos para recuperar documentos com base na pergunta do usuário:

    • Use uma integração do MongoDB Vector Search com uma estrutura ou serviço popular. Essas integrações incluem bibliotecas integradas e FERRAMENTAS que permitem criar facilmente sistemas de recuperação com o MongoDB Vector Search.

    • Construa seu próprio sistema de recuperação. Você pode definir suas próprias funções e pipelines para executar queries do MongoDB Vector Search específicas para seu caso de uso.

      Para saber como criar um sistema básico de recuperação com o MongoDB Vector Search, consulte Tutorial.

Para gerar respostas, combine seu sistema de recuperação com um LLM. Depois de realizar uma pesquisa vetorial para recuperar documentos relevantes, você fornece a pergunta do usuário junto com os documentos relevantes como contexto para o LLM para que ele possa gerar uma resposta mais precisa.

Escolha um dos seguintes métodos para se conectar a um LLM:

  • Use uma integração do MongoDB Vector Search com uma estrutura ou serviço popular. Essas integrações incluem bibliotecas integradas e FERRAMENTAS para ajudá-lo a se conectar aos LLMs com o mínimo de configuração.

  • Chame a API do LLM. A maioria dos provedores de IA oferece APIs para seus modelos generativos que você pode usar para gerar respostas.

  • Carregue um LLM de código aberto. Se você não tiver chaves de API ou créditos, poderá usar um LLM de código aberto carregando-o localmente a partir do seu aplicação. Para obter um exemplo de implementação, consulte o tutorial Criar uma implementação de RAG local com Vector Search do MongoDB.

O exemplo a seguir demonstra como implementar RAG com um sistema de recuperação desenvolvido pela MongoDB Vector Search.


➤ Use o menu suspenso Selecione sua linguagem para definir o idioma dos exemplos nesta página.

Trabalhe com uma versão executável deste tutorial como um bloco de anotações Python.

Para concluir este exemplo, você deve ter o seguinte:

  • Um dos seguintes tipos de cluster MongoDB :

  • Uma chave de API do Voyage AI ou um token de acesso ao Face do Abraço para acessar um modelo de incorporação.

  • Uma chave de API da OpenAI. Você deve ter uma conta da OpenAI com créditos disponíveis para solicitações de API. Para aprender mais sobre como registrar uma conta OpenAI, consulte o website de API OpenAI.

  • Um terminal e editor de código para executar seu projeto Go.

  • Go instalado.

  • Java Development Kit (JDK) versão 8 ou posterior.

  • Um ambiente para configurar e executar um aplicação Java . Recomendamos que você use um ambiente de desenvolvimento integrado (IDE) como IntelliJ IDEA ou Eclipse IDE para configurar Maven ou Gradle para construir e executar seu projeto.

1
  1. Inicialize seu projeto .NET.

    Execute os seguintes comandos no seu terminal para criar um novo diretório denominado MyCompany.RAG e inicializar seu projeto:

    dotnet new console -o MyCompany.RAG
    cd MyCompany.RAG
  2. Instalar e importar dependências.

    Execute os seguintes comandos:

    dotnet add package MongoDB.Driver --version 3.1.0
    dotnet add package PdfPig
    dotnet add package OpenAI
  3. Defina suas variáveis de ambiente.

    Exporte as seguintes variáveis de ambiente, set no PowerShell ou use o gerenciador de variáveis de ambiente do seu IDE para tornar essas variáveis disponíveis para o seu projeto.

    export VOYAGE_API_KEY="<voyage-api-key>"
    export OPENAI_API_KEY="<openai-api-key>"
    export MONGODB_URI="<connection-string>"

Substitua os valores do espaço reservado pelas suas chaves de API Voyage AI e OpenAI.

Substitua <connection-string> pela string de conexão do seu cluster do Atlas ou da implantação local do Atlas.

Sua string de conexão deve usar o seguinte formato:

mongodb+srv://<db_username>:<db_password>@<clusterName>.<hostname>.mongodb.net

Para saber mais, consulte Conectar a um cluster via drivers.

Sua string de conexão deve usar o seguinte formato:

mongodb://localhost:<port-number>/?directConnection=true

Para saber mais, consulte Connection strings.

2

Crie uma nova classe chamada AIService em um arquivo com o mesmo nome colando o código a seguir. Esse código define uma tarefa assíncrona denominada GetEmbeddingsAsync() para gerar uma array de incorporações para uma array de entradas de string fornecidas. Essa função usa o modelo voyage-3-large da Voyage AI para gerar uma incorporação para uma determinada entrada.

AIService.cs
namespace MyCompany.RAG;
using System;
using System.Collections.Generic;
using System.Linq;
using System.Net.Http;
using System.Net.Http.Headers;
using System.Text;
using System.Text.Json;
using System.Text.Json.Serialization;
using System.Threading.Tasks;
public class AIService
{
private static readonly string? VoyageApiKey = Environment.GetEnvironmentVariable("VOYAGE_API_KEY");
private static readonly string EmbeddingModelName = "voyage-3-large";
private static readonly string ApiEndpoint = "https://api.voyageai.com/v1/embeddings";
public async Task<Dictionary<string, float[]>> GetEmbeddingsAsync(string[] texts)
{
Dictionary<string, float[]> documentData = new Dictionary<string, float[]>();
try
{
using HttpClient client = new HttpClient();
client.DefaultRequestHeaders.Authorization =
new AuthenticationHeaderValue("Bearer", VoyageApiKey);
var requestBody = new
{
input = texts,
model = EmbeddingModelName,
truncation = true
};
var content = new StringContent(
JsonSerializer.Serialize(requestBody),
Encoding.UTF8,
"application/json");
HttpResponseMessage response = await client.PostAsync(ApiEndpoint, content);
if (response.IsSuccessStatusCode)
{
string responseBody = await response.Content.ReadAsStringAsync();
var embeddingResponse = JsonSerializer.Deserialize<EmbeddingResponse>(responseBody);
if (embeddingResponse != null && embeddingResponse.Data != null)
{
foreach (var embeddingResult in embeddingResponse.Data)
{
if (embeddingResult.Index < texts.Length)
{
documentData[texts[embeddingResult.Index]] =
embeddingResult.Embedding.Select(e => (float)e).ToArray();
}
}
}
}
else
{
throw new ApplicationException($"Error calling Voyage API: {response.ReasonPhrase}");
}
}
catch (Exception e)
{
throw new ApplicationException(e.Message);
}
return documentData;
}
private class EmbeddingResponse
{
[JsonPropertyName("object")]
public string Object { get; set; } = string.Empty;
[JsonPropertyName("data")]
public List<EmbeddingResult>? Data { get; set; }
[JsonPropertyName("model")]
public string Model { get; set; } = string.Empty;
[JsonPropertyName("usage")]
public Usage? Usage { get; set; }
}
private class EmbeddingResult
{
[JsonPropertyName("object")]
public string Object { get; set; } = string.Empty;
[JsonPropertyName("embedding")]
public List<double> Embedding { get; set; } = new();
[JsonPropertyName("index")]
public int Index { get; set; }
}
private class Usage
{
[JsonPropertyName("total_tokens")]
public int TotalTokens { get; set; }
}
}
3

Nesta seção, você ingere dados de amostra no MongoDB aos quais os LLMs não têm acesso.

  1. Carregar e dividir os dados.

    Crie uma nova classe chamada PdfIngester em um arquivo com o mesmo nome colando o código a seguir. Este código contém algumas funções para realizar as seguintes tarefas:

    • Carregue um PDF que contenha um relatório de ganhos do MongoDB.

    • Use o PdfPig para analisar o PDF em texto.

    • Divida o texto em partes, especificando o tamanho da parte (número de caracteres) e a sobreposição da parte (número de caracteres sobrepostos entre partes consecutivas).

    PdfIngester.cs
    namespace MyCompany.RAG;
    using System;
    using System.Net.Http;
    using System.IO;
    using System.Threading.Tasks;
    using System.Collections.Generic;
    using System.Text;
    using UglyToad.PdfPig;
    using UglyToad.PdfPig.Content;
    public class PdfIngester
    {
    public async Task<String> DownloadPdf(string url, string path, string fileName)
    {
    using (HttpClient client = new HttpClient())
    {
    try
    {
    byte[] pdfBytes = await client.GetByteArrayAsync(url);
    await File.WriteAllBytesAsync(path + fileName, pdfBytes);
    return "PDF downloaded and saved to " + path + fileName;
    }
    catch (HttpRequestException e)
    {
    throw new ApplicationException("Error downloading the PDF: " + e.Message);
    }
    catch (IOException e)
    {
    throw new ApplicationException("Error writing the file to disk: " + e.Message);
    }
    }
    }
    public List<string> ConvertPdfToChunkedText(string filePath)
    {
    List<string> textChunks;
    using (var document = PdfDocument.Open(filePath))
    {
    StringBuilder fullText = new StringBuilder();
    foreach (Page page in document.GetPages())
    {
    fullText.Append(page.Text + "\n");
    }
    textChunks = ChunkText(fullText.ToString(), 400, 20);
    }
    var chunkCount = textChunks.Count;
    if (chunkCount == 0)
    {
    throw new ApplicationException("Unable to chunk PDF contents into text.");
    }
    Console.WriteLine($"Successfully chunked the PDF text into {chunkCount} chunks.");
    return textChunks;
    }
    static List<string> ChunkText(string text, int chunkSize, int overlap)
    {
    List<string> chunks = new List<string>();
    int start = 0;
    int textLength = text.Length;
    while (start < textLength)
    {
    int end = start + chunkSize;
    if (end > textLength)
    {
    end = textLength;
    }
    string chunk = text.Substring(start, end - start);
    chunks.Add(chunk);
    // Increment starting point, considering the overlap
    start += chunkSize - overlap;
    if (start >= textLength) break;
    }
    return chunks;
    }
    }
  2. Prepare-se para armazenar os dados e incorporações no MongoDB.

    Crie uma nova classe denominada MongoDBDataService em um arquivo do mesmo nome colando o seguinte código. Este código define uma tarefa assíncrona chamada AddDocumentsAsync para adicionar documentos ao MongoDB. Esta função usa o método Collection.InsertManyAsync() C# Driver para inserir uma lista do tipo BsonDocument. Este código armazena as incorporações juntamente com os dados fragmentados na coleção rag_db.test.

    MongoDBDataService.cs
    namespace MyCompany.RAG;
    using MongoDB.Driver;
    using MongoDB.Bson;
    public class MongoDBDataService
    {
    private static readonly string? ConnectionString = Environment.GetEnvironmentVariable("MONGODB_URI");
    private static readonly MongoClient Client = new MongoClient(ConnectionString);
    private static readonly IMongoDatabase Database = Client.GetDatabase("rag_db");
    private static readonly IMongoCollection<BsonDocument> Collection = Database.GetCollection<BsonDocument>("test");
    public async Task<string> AddDocumentsAsync(Dictionary<string, float[]> embeddings)
    {
    var documents = new List<BsonDocument>();
    foreach( KeyValuePair<string, float[]> var in embeddings )
    {
    var document = new BsonDocument
    {
    {
    "text", var.Key
    },
    {
    "embedding", new BsonArray(var.Value)
    }
    };
    documents.Add(document);
    }
    await Collection.InsertManyAsync(documents);
    return $"Successfully inserted {embeddings.Count} documents.";
    }
    }
  3. Converta os dados em incorporações vetoriais.

    Crie uma nova classe chamada EmbeddingGenerator em um arquivo com o mesmo nome colando o código a seguir. Este código prepara os documentos fragmentados para ingestão criando uma lista de documentos com suas respectivas incorporações vetoriais. Você gera essas incorporações usando a função GetEmbeddingsAsync() que você definiu anteriormente.

    EmbeddingGenerator.cs
    namespace MyCompany.RAG;
    public class EmbeddingGenerator
    {
    private readonly MongoDBDataService _dataService = new();
    private readonly AIService _AiService = new();
    public async Task<string> GenerateEmbeddings(List<string> textChunks)
    {
    Console.WriteLine("Generating embeddings.");
    Dictionary<string, float[]> docs = new Dictionary<string, float[]>();
    try
    {
    // Pass the text chunks to AI to generate vector embeddings
    var embeddings = await _AiService.GetEmbeddingsAsync(textChunks.ToArray());
    // Pair each embedding with the text chunk used to generate it
    int index = 0;
    foreach (var embedding in embeddings)
    {
    docs[textChunks[index]] = embedding.Value;
    index++;
    }
    }
    catch (Exception e)
    {
    throw new ApplicationException("Error creating embeddings for text chunks: " + e.Message);
    }
    // Add a new document to the MongoDB collection for each text and vector embedding pair
    var result = await _dataService.AddDocumentsAsync(docs);
    return result;
    }
    }
  4. Atualize o arquivo Program.cs.

    Cole este código em seu Program.cs:

    Program.cs
    using MyCompany.RAG;
    const string pdfUrl = "https://investors.mongodb.com/node/12236/pdf";
    const string savePath = "<path-name>";
    const string fileName = "investor-report.pdf";
    var pdfIngester = new PdfIngester();
    var pdfDownloadResult = await pdfIngester.DownloadPdf(pdfUrl, savePath, fileName);
    Console.WriteLine(pdfDownloadResult);
    var textChunks = pdfIngester.ConvertPdfToChunkedText(savePath + fileName);
    if (textChunks.Any()) {
    var embeddingGenerator = new EmbeddingGenerator();
    var embeddingGenerationResult = await embeddingGenerator.GenerateEmbeddings(textChunks);
    Console.WriteLine(embeddingGenerationResult);
    }

    Este código:

    • Usa o PdfIngester para carregar e dividir o PDF em partes de texto.

    • Utiliza o EmbeddingGenerator para gerar incorporações para cada parte de texto do PDF e gravar as partes de texto e incorporações na coleção rag_db.test

    Substitua o espaço reservado <path-name> pelo caminho onde você deseja baixar o relatório. Em um sistema macOS, o caminho deve ser semelhante a /Users/<username>/MyCompany.RAG/. O caminho deve terminar com uma barra à direita.

  5. Compile e execute seu projeto para gerar incorporações.

    dotnet run MyCompany.RAG.csproj
    PDF downloaded and saved to <PATH>
    Successfully chunked the PDF text into 73 chunks.
    Generating embeddings.
    Successfully inserted 73 documents.
4

Nesta seção, você configura a Vector Search do MongoDB para recuperar documentos do seu banco de dados vetorial. Para criar um índice do MongoDB Vector Search para uma coleção usando o driver C# do MongoDB v3.1.0 ou posterior, execute as seguintes etapas:

  1. Defina o índice do MongoDB Vector Search .

    Adicione um novo método CreateVectorIndex() no arquivo denominado MongoDBDataService.cs para definir o índice de pesquisa. Este código se conecta à sua implantação do MongoDB e cria um índice do tipo vectorSearch na coleção rag_db.test.

    MongoDBDataService.cs
    namespace MyCompany.RAG;
    using MongoDB.Driver;
    using MongoDB.Bson;
    public class DataService
    {
    private static readonly string? ConnectionString = Environment.GetEnvironmentVariable("MONGODB_URI");
    private static readonly MongoClient Client = new MongoClient(ConnectionString);
    private static readonly IMongoDatabase Database = Client.GetDatabase("rag_db");
    private static readonly IMongoCollection<BsonDocument> Collection = Database.GetCollection<BsonDocument>("test");
    public async Task<string> AddDocumentsAsync(Dictionary<string, float[]> embeddings)
    {
    // Method details...
    }
    public string CreateVectorIndex()
    {
    var searchIndexView = Collection.SearchIndexes;
    var name = "vector_index";
    var type = SearchIndexType.VectorSearch;
    var definition = new BsonDocument
    {
    { "fields", new BsonArray
    {
    new BsonDocument
    {
    { "type", "vector" },
    { "path", "embedding" },
    { "numDimensions", 1024 },
    { "similarity", "cosine" }
    }
    }
    }
    };
    var model = new CreateSearchIndexModel(name, type, definition);
    try
    {
    searchIndexView.CreateOne(model);
    Console.WriteLine($"New search index named {name} is building.");
    // Polling for index status
    Console.WriteLine("Polling to check if the index is ready. This may take up to a minute.");
    bool queryable = false;
    while (!queryable)
    {
    var indexes = searchIndexView.List();
    foreach (var index in indexes.ToEnumerable())
    {
    if (index["name"] == name)
    {
    queryable = index["queryable"].AsBoolean;
    }
    }
    if (!queryable)
    {
    Thread.Sleep(5000);
    }
    }
    }
    catch (Exception e)
    {
    throw new ApplicationException("Error creating the vector index: " + e.Message);
    }
    return $"{name} is ready for querying.";
    }
    }
  2. Atualize o arquivo Program.cs.

    Substitua o código em Program.cs pelo seguinte código para criar o índice:

    Program.cs
    using MyCompany.RAG;
    var dataService = new MongoDBDataService();
    var result = dataService.CreateVectorIndex();
    Console.WriteLine(result);
  3. Compile e execute seu projeto para criar o índice.

    dotnet run MyCompany.RAG.csproj
  4. Defina uma função para recuperar dados relevantes.

    Adicione um novo método PerformVectorQuery no arquivo chamado MongoDBDataService.cs para recuperar documentos relevantes. Para saber mais, consulte Executar queries na Pesquisa Vetorial.

    MongoDBDataService.cs
    namespace MyCompany.RAG;
    using MongoDB.Driver;
    using MongoDB.Bson;
    public class MongoDBDataService
    {
    private static readonly string? ConnectionString = Environment.GetEnvironmentVariable("MONGODB_URI");
    private static readonly MongoClient Client = new MongoClient(ConnectionString);
    private static readonly IMongoDatabase Database = Client.GetDatabase("rag_db");
    private static readonly IMongoCollection<BsonDocument> Collection = Database.GetCollection<BsonDocument>("test");
    public async Task<string> AddDocumentsAsync(Dictionary<string, float[]> embeddings)
    {
    // Method details...
    }
    public string CreateVectorIndex()
    {
    // Method details...
    }
    public List<BsonDocument>? PerformVectorQuery(float[] vector)
    {
    var vectorSearchStage = new BsonDocument
    {
    {
    "$vectorSearch",
    new BsonDocument
    {
    { "index", "vector_index" },
    { "path", "embedding" },
    { "queryVector", new BsonArray(vector) },
    { "exact", true },
    { "limit", 5 }
    }
    }
    };
    var projectStage = new BsonDocument
    {
    {
    "$project",
    new BsonDocument
    {
    { "_id", 0 },
    { "text", 1 },
    { "score",
    new BsonDocument
    {
    { "$meta", "vectorSearchScore"}
    }
    }
    }
    }
    };
    var pipeline = new[] { vectorSearchStage, projectStage };
    return Collection.Aggregate<BsonDocument>(pipeline).ToList();
    }
    }
  5. Teste a recuperação dos dados.

    1. Crie uma nova classe chamada PerformTestQuery em um arquivo com o mesmo nome colando o código a seguir. Este código transforma uma string de entrada de texto em incorporações vetoriais e consulta o banco de dados para obter resultados correspondentes. Ele usa a função GetEmbeddingsAsync() para criar incorporações a partir da query de pesquisa. Em seguida, ele executa a query para retornar documentos semanticamente semelhantes.

      PerformTestQuery.cs
      namespace MyCompany.RAG;
      public class PerformTestQuery
      {
      private readonly MongoDBDataService _dataService = new();
      private readonly AIService _AiService = new();
      public async Task<string> GetQueryResults(string question)
      {
      // Get the vector embedding for the query
      var query = question;
      var queryEmbeddings = await _AiService.GetEmbeddingsAsync([query]);
      // Query the vector database for applicable query results
      var matchingDocuments = _dataService.PerformVectorQuery(queryEmbeddings[query]);
      // Construct a string from the query results for performing QA with the LLM
      var sb = new System.Text.StringBuilder();
      if (matchingDocuments != null)
      {
      foreach (var doc in matchingDocuments)
      {
      sb.AppendLine($"Text: {doc.GetValue("text").ToString()}");
      sb.AppendLine($"Score: {doc.GetValue("score").ToString()}");
      }
      }
      else
      {
      return "No matching documents found.";
      }
      return sb.ToString();
      }
      }
    2. Atualize o arquivo Program.cs.

      Substitua o código em Program.cs pelo seguinte código para realizar uma consulta de teste:

      Program.cs
      using MyCompany.RAG;
      var query = "AI Technology";
      var queryCoordinator = new PerformTestQuery();
      var result = await queryCoordinator.GetQueryResults(query);
      Console.WriteLine(result);
    3. Compile e execute seu projeto para verificar os resultados da query.

      dotnet run MyCompany.RAG.csproj
      Text: time series queries—and the general availability of Atlas Stream Processing to build sophisticated,event-driven applications with real-time data.MongoDB continues to expand its AI ecosystem with the announcement of the MongoDB AI Applications Program (MAAP),
      which provides customers with reference architectures, pre-built partner integrations, and professional services to helpthem quickly build AI
      Score: 0.72528624534606934
      Text: hem quickly build AI-powered applications. Accenture will establish a center of excellence focused on MongoDB projects,and is the first global systems integrator to join MAAP.Bendigo and Adelaide Bank partnered with MongoDB to modernize their core banking technology. With the help ofMongoDB Relational Migrator and generative AI-powered modernization tools, Bendigo and Adelaide Bank decomposed anou
      Score: 0.71915638446807861
      Text: and regulatory issues relating to the use of new and evolving technologies, such asartificial intelligence, in our offerings or partnerships; the growth and expansion of the market for database products and our ability to penetrate thatmarket; our ability to integrate acquired businesses and technologies successfully or achieve the expected benefits of such acquisitions; our ability tomaintain the
      Score: 0.70376789569854736
      Text: architecture is particularly well-suited for the variety and scale of data required by AI-powered applications. We are confident MongoDB will be a substantial beneficiary of this next wave of application development."First Quarter Fiscal 2025 Financial HighlightsRevenue: Total revenue was $450.6 million for the first quarter of fiscal 2025, an increase of 22% year-over-year.Subscription revenue wa
      Score: 0.67905724048614502
      Text: tures, services orenhancements; our ability to effectively expand our sales and marketing organization; our ability to continue to build and maintain credibility with thedeveloper community; our ability to add new customers or increase sales to our existing customers; our ability to maintain, protect, enforce andenhance our intellectual property; the effects of social, ethical and regulatory issue
      Score: 0.64435118436813354
5

Nesta seção, você gera respostas solicitando que um LLM use os documentos recuperados como contexto. Este exemplo usa a função que você acabou de definir para recuperar documentos correspondentes do banco de dados e, além disso:

  • Acessa o modelo gpt-4o-mini da OpenAI.

  • Instrui o LLM a incluir a pergunta do usuário e os documentos recuperados no prompt.

  • Pergunta ao LLM sobre os anúncios mais recentes de IA do MongoDB.

  1. Adicione as importações, as novas informações de ChatClient e um novo método chamado GenerateAnswer no arquivo denominado AIService.cs.

    AIService.cs
    namespace MyCompany.RAG;
    using OpenAI.Chat;
    using System;
    using System.Collections.Generic;
    using System.Linq;
    using System.Net.Http;
    using System.Net.Http.Headers;
    using System.Text;
    using System.Text.Json;
    using System.Text.Json.Serialization;
    using System.Threading.Tasks;
    public class AIService
    {
    private static readonly string? VoyageApiKey = Environment.GetEnvironmentVariable("VOYAGE_API_KEY");
    private static readonly string EmbeddingModelName = "voyage-3-large";
    private static readonly string ApiEndpoint = "https://api.voyageai.com/v1/embeddings";
    private static readonly string? OpenAIApiKey = Environment.GetEnvironmentVariable("OPENAI_API_KEY");
    private static readonly string ChatModelName = "gpt-4o-mini";
    private static readonly ChatClient ChatClient = new(model: ChatModelName, apiKey: OpenAIApiKey);
    public async Task<Dictionary<string, float[]>> GetEmbeddingsAsync(string[] texts)
    {
    // Method details...
    }
    public async Task<string> GenerateAnswer(string question, string context)
    {
    string prompt = $"""
    Answer the following question based on the given context.
    Context: {context}
    Question: {question}
    """;
    byte[] binaryContent = Encoding.UTF8.GetBytes(prompt);
    IEnumerable<ChatMessage> messages = new List<ChatMessage>([prompt]);
    ChatCompletion responses = await ChatClient.CompleteChatAsync(messages, new ChatCompletionOptions { MaxOutputTokenCount = 400 });
    var summaryResponse = responses.Content[0].Text;
    if (summaryResponse is null)
    {
    throw new ApplicationException("No response from the chat client.");
    }
    return summaryResponse;
    }
    // Rest of code...
    }
  2. Crie uma classe RAGPipeline.

    Crie uma nova classe chamada RAGPipeline em um arquivo de mesmo nome e cole o código a seguir. Este código coordena os seguintes componentes:

    • GetEmbeddingsAsync() função: transformar a consulta de string em incorporações vetoriais.

    • PerformVectorQuery Função: recuperar resultados semanticamente semelhantes do banco de dados.

    • GenerateAnswer Função: passar os documentos recuperados do banco de dados para o LLM para gerar a resposta.

    RAGPipeline.cs
    namespace MyCompany.RAG;
    public class RAGPipeline
    {
    private readonly MongoDBDataService _dataService = new();
    private readonly AIService _AiService = new();
    public async Task<string> GenerateResults(string question)
    {
    // Get the vector embedding for the query
    var query = question;
    var queryEmbedding = await _AiService.GetEmbeddingsAsync([query]);
    // Query the vector database for applicable query results
    var matchingDocuments = _dataService.PerformVectorQuery(queryEmbedding[query]);
    // Construct a string from the query results for performing QA with the LLM
    var sb = new System.Text.StringBuilder();
    if (matchingDocuments != null)
    {
    foreach (var doc in matchingDocuments)
    {
    sb.AppendLine($"Text: {doc.GetValue("text").ToString()}");
    }
    }
    else
    {
    return "No matching documents found.";
    }
    return await _AiService.GenerateAnswer(question, sb.ToString());
    }
    }
  3. Atualize o arquivo Program.cs.

    Substitua o código em Program.cs pelo seguinte código para chamar seu pipeline RAG.

    Program.cs
    using MyCompany.RAG;
    var question = "In a few sentences, what are MongoDB's latest AI announcements?";
    var ragPipeline = new RAGPipeline();
    var result = await ragPipeline.GenerateResults(question);
    Console.WriteLine(result);
  4. Compile e execute seu projeto para executar o RAG. A resposta gerada pode variar.

    dotnet run MyCompany.RAG.csproj
    MongoDB has recently announced the MongoDB AI Applications Program (MAAP),
    which aims to support customers in building AI-powered applications through
    reference architectures, pre-built partner integrations, and professional
    services. Additionally, the program includes a partnership with Accenture,
    which will establish a center of excellence focused on MongoDB projects. These
    initiatives demonstrate MongoDB's commitment to expanding its AI ecosystem and
    its strategy to adapt its document-based architecture for the demands of
    AI-driven application development.
1
  1. Inicialize seu projeto Go.

    Execute os seguintes comandos em seu terminal para criar um novo diretório chamado rag-mongodb e inicializar seu projeto:

    mkdir rag-mongodb
    cd rag-mongodb
    go mod init rag-mongodb
  2. Instalar e importar dependências.

    Execute os seguintes comandos:

    go get github.com/joho/godotenv
    go get go.mongodb.org/mongo-driver/v2/mongo
    go get github.com/tmc/langchaingo/llms
    go get github.com/tmc/langchaingo/documentloaders
    go get github.com/tmc/langchaingo/embeddings/huggingface
    go get github.com/tmc/langchaingo/embeddings/voyageai
    go get github.com/tmc/langchaingo/llms/openai
    go get github.com/tmc/langchaingo/prompts
    go get github.com/tmc/langchaingo/vectorstores/mongovector
  3. Crie um arquivo .env .

    Em seu projeto , crie um arquivo .env para armazenar sua string de conexão do MongoDB e quaisquer chaves de API necessárias para acessar os modelos.

    .env
    MONGODB_URI = "<connection-string>"
    VOYAGEAI_API_KEY = "<voyage-api-key>" # If using Voyage AI embedding model
    HUGGINGFACEHUB_API_TOKEN = "<hf-token>" # If using Hugging Face embedding model
    OPENAI_API_KEY = "<openai-api-key>"

    Substitua os valores do espaço reservado pelas suas credenciais.

    Substitua <connection-string> pela string de conexão do seu cluster do Atlas ou da implantação local do Atlas.

    Sua string de conexão deve usar o seguinte formato:

    mongodb+srv://<db_username>:<db_password>@<clusterName>.<hostname>.mongodb.net

    Para saber mais, consulte Conectar a um cluster via drivers.

    Sua string de conexão deve usar o seguinte formato:

    mongodb://localhost:<port-number>/?directConnection=true

    Para saber mais, consulte Connection strings.

2

Nesta seção, você baixa e processa dados de amostra no MongoDB aos quais os LLMs não têm acesso. O código a seguir usa a biblioteca Go para LangChain para executar as seguintes tarefas:

  • Crie um arquivo HTML que contenha um relatório de ganhos do MongoDB.

  • Divida os dados em partes, especificando o tamanho da parte (número de caracteres) e a sobreposição da parte (número de caracteres sobrepostos entre partes consecutivas).

  1. Execute o seguinte comando para criar um diretório que armazena funções comuns.

    mkdir common && cd common
  2. Crie um arquivo chamado process-file.go no diretório common e cole o seguinte código nele:

    process-file.go
    package common
    import (
    "context"
    "io"
    "log"
    "net/http"
    "os"
    "github.com/tmc/langchaingo/documentloaders"
    "github.com/tmc/langchaingo/schema"
    "github.com/tmc/langchaingo/textsplitter"
    )
    func DownloadReport(filename string) {
    _, err := os.Stat(filename)
    if err == nil {
    return
    }
    const url = "https://investors.mongodb.com/node/12236"
    log.Println("Downloading ", url, " to ", filename)
    resp, err := http.Get(url)
    if err != nil {
    log.Fatalf("failed to connect to download the report: %v", err)
    }
    defer func() {
    if err := resp.Body.Close(); err != nil {
    log.Fatalf("failed to close the resource: %v", err)
    }
    }()
    f, err := os.Create(filename)
    if err != nil {
    return
    }
    defer func() {
    if err := f.Close(); err != nil {
    log.Fatalf("failed to close file: %v", err)
    }
    }()
    _, err = io.Copy(f, resp.Body)
    if err != nil {
    log.Fatalf("failed to copy the report: %v", err)
    }
    }
    func ProcessFile(filename string) []schema.Document {
    ctx := context.Background()
    f, err := os.Open(filename)
    if err != nil {
    log.Fatalf("failed to open file: %v", err)
    }
    defer func() {
    if err := f.Close(); err != nil {
    log.Fatalf("failed to close file: %v", err)
    }
    }()
    html := documentloaders.NewHTML(f)
    split := textsplitter.NewRecursiveCharacter()
    split.ChunkSize = 400
    split.ChunkOverlap = 20
    docs, err := html.LoadAndSplit(ctx, split)
    if err != nil {
    log.Fatalf("failed to chunk the HTML into documents: %v", err)
    }
    log.Printf("Successfully chunked the HTML into %v documents.\n", len(docs))
    return docs
    }
3

Nesta seção, você ingere dados de amostra no MongoDB aos quais os LLMs não têm acesso. O código a seguir usa a biblioteca Go para LangChain e o driver Go para executar as seguintes tarefas:

  • Carregue o modelo de incorporação.

  • Crie uma instância de mongovector a partir do seu cliente de driver Go e do modelo de incorporação Hugging Face para implementar o armazenamento vetorial.

  • Crie e armazene incorporações vetoriais a partir dos dados fragmentados usando o método mongovector.AddDocuments() . O código armazena os dados fragmentados e as incorporações correspondentes na coleção rag_db.test.

  1. Navegue até a raiz do diretório do projeto rag-mongodb.

  2. Crie um arquivo chamado ingest-data.go no seu projeto e cole o seguinte código nele:

    Esse código usa o modelo de incorporação voyage-3-large da Voyage AI para gerar incorporações vetoriais.

    ingest-data.go
    package main
    import (
    "context"
    "fmt"
    "log"
    "os"
    "rag-mongodb/common"
    "github.com/joho/godotenv"
    "github.com/tmc/langchaingo/embeddings/voyageai"
    "github.com/tmc/langchaingo/vectorstores/mongovector"
    "go.mongodb.org/mongo-driver/v2/mongo"
    "go.mongodb.org/mongo-driver/v2/mongo/options"
    )
    func main() {
    filename := "investor-report.html"
    common.DownloadReport(filename)
    docs := common.ProcessFile(filename)
    if err := godotenv.Load(); err != nil {
    log.Fatal("no .env file found")
    }
    // Connect to your MongoDB cluster
    uri := os.Getenv("MONGODB_URI")
    if uri == "" {
    log.Fatal("set your 'MONGODB_URI' environment variable.")
    }
    client, err := mongo.Connect(options.Client().ApplyURI(uri))
    if err != nil {
    log.Fatalf("failed to connect to server: %v", err)
    }
    defer func() {
    if err := client.Disconnect(context.Background()); err != nil {
    log.Fatalf("error disconnecting the client: %v", err)
    }
    }()
    coll := client.Database("rag_db").Collection("test")
    embedder, err := voyageai.NewVoyageAI(
    voyageai.WithModel("voyage-3-large"),
    )
    if err != nil {
    log.Fatal("failed to create an embedder: %v", err)
    }
    store := mongovector.New(coll, embedder, mongovector.WithPath("embedding"))
    // Add documents to the MongoDB collection.
    log.Println("Generating embeddings.")
    result, err := store.AddDocuments(context.Background(), docs)
    if err != nil {
    log.Fatalf("failed to insert documents: %v", err)
    }
    fmt.Printf("Successfully inserted %v documents\n", len(result))
    }

    Esse código usa o modelo de incorporação mxbai-embed-large-v1 do Hugging Face para gerar incorporações vetoriais.

    ingest-data.go
    package main
    import (
    "context"
    "fmt"
    "log"
    "os"
    "rag-mongodb/common"
    "github.com/joho/godotenv"
    "github.com/tmc/langchaingo/embeddings/huggingface"
    "github.com/tmc/langchaingo/vectorstores/mongovector"
    "go.mongodb.org/mongo-driver/v2/mongo"
    "go.mongodb.org/mongo-driver/v2/mongo/options"
    )
    func main() {
    filename := "investor-report.html"
    common.DownloadReport(filename)
    docs := common.ProcessFile(filename)
    if err := godotenv.Load(); err != nil {
    log.Fatal("no .env file found")
    }
    // Connect to your MongoDB cluster
    uri := os.Getenv("MONGODB_URI")
    if uri == "" {
    log.Fatal("set your 'MONGODB_URI' environment variable.")
    }
    client, err := mongo.Connect(options.Client().ApplyURI(uri))
    if err != nil {
    log.Fatalf("failed to connect to server: %v", err)
    }
    defer func() {
    if err := client.Disconnect(context.Background()); err != nil {
    log.Fatalf("error disconnecting the client: %v", err)
    }
    }()
    coll := client.Database("rag_db").Collection("test")
    embedder, err := huggingface.NewHuggingface(
    huggingface.WithModel("mixedbread-ai/mxbai-embed-large-v1"),
    huggingface.WithTask("feature-extraction"))
    if err != nil {
    log.Fatal("failed to create an embedder: %v", err)
    }
    store := mongovector.New(coll, embedder, mongovector.WithPath("embedding"))
    // Add documents to the MongoDB collection.
    log.Println("Generating embeddings.")
    result, err := store.AddDocuments(context.Background(), docs)
    if err != nil {
    log.Fatalf("failed to insert documents: %v", err)
    }
    fmt.Printf("Successfully inserted %v documents\n", len(result))
    }
  3. Execute o seguinte comando para executar o código:

    go run ingest-data.go
    Successfully chunked the HTML into 163 documents.
    Generating embeddings.
    Successfully inserted 163 documents
4

Nesta seção, você configura a Vector Search do MongoDB para recuperar documentos do seu banco de dados vetorial. Conclua as seguintes etapas:

  1. Crie um índice do MongoDB Vector Search em suas incorporações vetoriais.

    Crie um novo arquivo denominado rag-vector-index.go e cole o seguinte código. Este código se conecta à sua implementação do MongoDB e cria um índice do tipo vectorSearch na coleção rag_db.test.

    rag-vector-index.go
    package main
    import (
    "context"
    "log"
    "os"
    "time"
    "github.com/joho/godotenv"
    "go.mongodb.org/mongo-driver/v2/bson"
    "go.mongodb.org/mongo-driver/v2/mongo"
    "go.mongodb.org/mongo-driver/v2/mongo/options"
    )
    func main() {
    ctx := context.Background()
    if err := godotenv.Load(); err != nil {
    log.Fatal("no .env file found")
    }
    // Connect to your MongoDB cluster
    uri := os.Getenv("MONGODB_URI")
    if uri == "" {
    log.Fatal("set your 'MONGODB_URI' environment variable.")
    }
    clientOptions := options.Client().ApplyURI(uri)
    client, err := mongo.Connect(clientOptions)
    if err != nil {
    log.Fatalf("failed to connect to the server: %v", err)
    }
    defer func() { _ = client.Disconnect(ctx) }()
    // Specify the database and collection
    coll := client.Database("rag_db").Collection("test")
    indexName := "vector_index"
    opts := options.SearchIndexes().SetName(indexName).SetType("vectorSearch")
    type vectorDefinitionField struct {
    Type string `bson:"type"`
    Path string `bson:"path"`
    NumDimensions int `bson:"numDimensions"`
    Similarity string `bson:"similarity"`
    }
    type filterField struct {
    Type string `bson:"type"`
    Path string `bson:"path"`
    }
    type vectorDefinition struct {
    Fields []vectorDefinitionField `bson:"fields"`
    }
    indexModel := mongo.SearchIndexModel{
    Definition: vectorDefinition{
    Fields: []vectorDefinitionField{{
    Type: "vector",
    Path: "embedding",
    NumDimensions: 1024,
    Similarity: "cosine"}},
    },
    Options: opts,
    }
    log.Println("Creating the index.")
    searchIndexName, err := coll.SearchIndexes().CreateOne(ctx, indexModel)
    if err != nil {
    log.Fatalf("failed to create the search index: %v", err)
    }
    // Await the creation of the index.
    log.Println("Polling to confirm successful index creation.")
    log.Println("NOTE: This may take up to a minute.")
    searchIndexes := coll.SearchIndexes()
    var doc bson.Raw
    for doc == nil {
    cursor, err := searchIndexes.List(ctx, options.SearchIndexes().SetName(searchIndexName))
    if err != nil {
    log.Printf("failed to list search indexes: %w", err)
    }
    if !cursor.Next(ctx) {
    break
    }
    name := cursor.Current.Lookup("name").StringValue()
    queryable := cursor.Current.Lookup("queryable").Boolean()
    if name == searchIndexName && queryable {
    doc = cursor.Current
    } else {
    time.Sleep(5 * time.Second)
    }
    }
    log.Println("Name of Index Created: " + searchIndexName)
    }
  2. Execute o comando a seguir para criar o índice:

    go run rag-vector-index.go
  3. Defina uma função para recuperar dados relevantes.

    Nesta etapa, você cria uma função de recuperação chamada GetQueryResults() que executa uma query para recuperar documentos relevantes. Ela utiliza o método mongovector.SimilaritySearch(), que gera automaticamente uma representação vetorial da string da query e retorna resultados relevantes.

    Para saber mais, consulte Executar queries no Vector Search.

    No diretório common, crie um novo arquivo chamado get-query-results.go e cole o seguinte código nele:

    get-query-results.go
    package common
    import (
    "context"
    "log"
    "os"
    "github.com/joho/godotenv"
    "github.com/tmc/langchaingo/embeddings/voyageai"
    "github.com/tmc/langchaingo/schema"
    "github.com/tmc/langchaingo/vectorstores/mongovector"
    "go.mongodb.org/mongo-driver/v2/mongo"
    "go.mongodb.org/mongo-driver/v2/mongo/options"
    )
    func GetQueryResults(query string) []schema.Document {
    ctx := context.Background()
    if err := godotenv.Load(); err != nil {
    log.Fatal("no .env file found")
    }
    // Connect to your MongoDB cluster
    uri := os.Getenv("MONGODB_URI")
    if uri == "" {
    log.Fatal("set your 'MONGODB_URI' environment variable.")
    }
    clientOptions := options.Client().ApplyURI(uri)
    client, err := mongo.Connect(clientOptions)
    if err != nil {
    log.Fatalf("failed to connect to the server: %v", err)
    }
    defer func() { _ = client.Disconnect(ctx) }()
    // Specify the database and collection
    coll := client.Database("rag_db").Collection("test")
    embedder, err := voyageai.NewVoyageAI(
    voyageai.WithModel("voyage-3-large"),
    )
    if err != nil {
    log.Fatal("failed to create an embedder: %v", err)
    }
    store := mongovector.New(coll, embedder, mongovector.WithPath("embedding"))
    // Search for similar documents.
    docs, err := store.SimilaritySearch(context.Background(), query, 5)
    if err != nil {
    log.Fatal("error performing similarity search: %v", err)
    }
    return docs
    }

    Esse código usa o modelo de incorporação mxbai-embed-large-v1 do Hugging Face para gerar incorporações vetoriais.

    get-query-results.go
    package common
    import (
    "context"
    "log"
    "os"
    "github.com/joho/godotenv"
    "github.com/tmc/langchaingo/embeddings/huggingface"
    "github.com/tmc/langchaingo/schema"
    "github.com/tmc/langchaingo/vectorstores/mongovector"
    "go.mongodb.org/mongo-driver/v2/mongo"
    "go.mongodb.org/mongo-driver/v2/mongo/options"
    )
    func GetQueryResults(query string) []schema.Document {
    ctx := context.Background()
    if err := godotenv.Load(); err != nil {
    log.Fatal("no .env file found")
    }
    // Connect to your MongoDB cluster
    uri := os.Getenv("MONGODB_URI")
    if uri == "" {
    log.Fatal("set your 'MONGODB_URI' environment variable.")
    }
    clientOptions := options.Client().ApplyURI(uri)
    client, err := mongo.Connect(clientOptions)
    if err != nil {
    log.Fatalf("failed to connect to the server: %v", err)
    }
    defer func() { _ = client.Disconnect(ctx) }()
    // Specify the database and collection
    coll := client.Database("rag_db").Collection("test")
    embedder, err := huggingface.NewHuggingface(
    huggingface.WithModel("mixedbread-ai/mxbai-embed-large-v1"),
    huggingface.WithTask("feature-extraction"))
    if err != nil {
    log.Fatal("failed to create an embedder: %v", err)
    }
    store := mongovector.New(coll, embedder, mongovector.WithPath("embedding"))
    // Search for similar documents.
    docs, err := store.SimilaritySearch(context.Background(), query, 5)
    if err != nil {
    log.Fatal("error performing similarity search: %v", err)
    }
    return docs
    }
  4. Teste a recuperação dos dados.

    1. No diretório do projeto rag-mongodb, crie um novo arquivo chamado retrieve-documents-test.go. Nesta etapa, você verifica se a função que você acabou de definir retorna resultados relevantes.

    2. Cole este código no seu arquivo:

      retrieve-documents-test.go
      package main
      import (
      "fmt"
      "rag-mongodb/common" // Module that contains the GetQueryResults function
      )
      func main() {
      query := "AI Technology"
      documents := common.GetQueryResults(query)
      for _, doc := range documents {
      fmt.Printf("Text: %s \nScore: %v \n\n", doc.PageContent, doc.Score)
      }
      }
    3. Execute o seguinte comando para executar o código:

      go run retrieve-documents-test.go
      Text: for the variety and scale of data required by AI-powered applications. We are confident MongoDB will be a substantial beneficiary of this next wave of application development.&#34;
      Score: 0.83503306
      Text: &#34;As we look ahead, we continue to be incredibly excited by our large market opportunity, the potential to increase share, and become a standard within more of our customers. We also see a tremendous opportunity to win more legacy workloads, as AI has now become a catalyst to modernize these applications. MongoDB&#39;s document-based architecture is particularly well-suited for the variety and
      Score: 0.82807535
      Text: to the use of new and evolving technologies, such as artificial intelligence, in our offerings or partnerships; the growth and expansion of the market for database products and our ability to penetrate that market; our ability to integrate acquired businesses and technologies successfully or achieve the expected benefits of such acquisitions; our ability to maintain the security of our software
      Score: 0.8165897
      Text: MongoDB continues to expand its AI ecosystem with the announcement of the MongoDB AI Applications Program (MAAP), which provides customers with reference architectures, pre-built partner integrations, and professional services to help them quickly build AI-powered applications. Accenture will establish a center of excellence focused on MongoDB projects, and is the first global systems
      Score: 0.8023907
      Text: assumptions, our ability to capitalize on our market opportunity and deliver strong growth for the foreseeable future as well as the criticality of MongoDB to artificial intelligence application development. These forward-looking statements include, but are not limited to, plans, objectives, expectations and intentions and other statements contained in this press release that are not historical
      Score: 0.7829329
5

Nesta seção, você gera respostas solicitando a um LLM da OpenAI para usar os documentos recuperados como contexto. Este exemplo usa a função que você acabou de definir para recuperar documentos correspondentes do banco de dados e, adicionalmente:

  • Instrui o LLM a incluir a pergunta do usuário e os documentos recuperados no prompt.

  • Pergunta ao LLM sobre os anúncios mais recentes de IA do MongoDB.

  1. Crie um novo arquivo chamado generate-responses.go e cole o seguinte código nele:

    generate-responses.go
    package main
    import (
    "context"
    "fmt"
    "log"
    "os"
    "rag-mongodb/common" // Module that contains the GetQueryResults function
    "strings"
    "github.com/tmc/langchaingo/llms"
    "github.com/tmc/langchaingo/llms/openai"
    "github.com/tmc/langchaingo/prompts"
    )
    func main() {
    ctx := context.Background()
    question := "In a few sentences, what are MongoDB's latest AI announcements?"
    documents := common.GetQueryResults(question)
    var textDocuments strings.Builder
    for _, doc := range documents {
    textDocuments.WriteString(doc.PageContent)
    }
    template := prompts.NewPromptTemplate(
    `Answer the following question based on the given context.
    Question: {{.question}}
    Context: {{.context}}`,
    []string{"question", "context"},
    )
    prompt, err := template.Format(map[string]any{
    "question": question,
    "context": textDocuments.String(),
    })
    // Loads OpenAI API key from environment
    openaiApiKey := os.Getenv("OPENAI_API_KEY")
    if openaiApiKey == "" {
    log.Fatal("Set your OPENAI_API_KEY environment variable in the .env file")
    }
    // Creates an OpenAI LLM client
    llm, err := openai.New(
    openai.WithToken(openaiApiKey),
    openai.WithModel("gpt-4o"),
    )
    if err != nil {
    log.Fatalf("Failed to create an LLM client: %v", err)
    }
    completion, err := llms.GenerateFromSinglePrompt(ctx, llm, prompt)
    if err != nil {
    log.Fatalf("failed to generate a response from the prompt: %v", err)
    }
    fmt.Println(completion)
    }
  2. Execute este comando para executar o código. A resposta gerada pode variar.

    go run generate-responses.go
    MongoDB recently announced several developments in its AI ecosystem.
    These include the MongoDB AI Applications Program (MAAP), which offers
    reference architectures, pre-built partner integrations, and professional
    services to help customers efficiently build AI-powered applications.
    Accenture is the first global systems integrator to join MAAP and will
    establish a center of excellence for MongoDB projects. Additionally,
    MongoDB introduced significant updates, including faster performance
    in version 8.0 and the general availability of Atlas Stream Processing
    to enable real-time, event-driven applications. These advancements
    highlight MongoDB's focus on supporting AI-powered applications and
    modernizing legacy workloads.
1
  1. No seu IDE, crie um projeto Java usando Maven ou Gradle.

  2. Adicione as seguintes dependências, dependendo do seu gerenciador de pacotes:

    Se você estiver usando o Maven, adicione as seguintes dependências ao array dependencies e a Lista de Materiais (BOM) ao array dependencyManagement no arquivo pom.xml do seu projeto:

    pom.xml
    <dependencies>
    <!-- MongoDB Java Sync Driver -->
    <dependency>
    <groupId>org.mongodb</groupId>
    <artifactId>mongodb-driver-sync</artifactId>
    <version>5.2.0</version>
    </dependency>
    <!-- Core LangChain4j library (provides Document interface, etc.) -->
    <dependency>
    <groupId>dev.langchain4j</groupId>
    <artifactId>langchain4j</artifactId>
    </dependency>
    <!-- Voyage AI integration -->
    <dependency>
    <groupId>dev.langchain4j</groupId>
    <artifactId>langchain4j-voyage-ai</artifactId>
    </dependency>
    <!-- Hugging Face integration -->
    <dependency>
    <groupId>dev.langchain4j</groupId>
    <artifactId>langchain4j-hugging-face</artifactId>
    </dependency>
    <!-- Open AI integration -->
    <dependency>
    <groupId>dev.langchain4j</groupId>
    <artifactId>langchain4j-open-ai</artifactId>
    </dependency>
    <!-- Apache PDFBox Document Parser -->
    <dependency>
    <groupId>dev.langchain4j</groupId>
    <artifactId>langchain4j-document-parser-apache-pdfbox</artifactId>
    </dependency>
    </dependencies>
    <dependencyManagement>
    <dependencies>
    <!-- Bill of Materials (BOM) to manage Java library versions -->
    <dependency>
    <groupId>dev.langchain4j</groupId>
    <artifactId>langchain4j-bom</artifactId>
    <version>1.1.0</version>
    <type>pom</type>
    <scope>import</scope>
    </dependency>
    </dependencies>
    </dependencyManagement>

    Adicione o seguinte Bill of Materials (BOM) e dependências à array dependencies no arquivo build.gradle do seu projeto:

    build.gradle
    dependencies {
    // Bill of Materials (BOM) to manage Java library versions
    implementation platform('dev.langchain4j:langchain4j-bom:1.1.0')
    // MongoDB Java Sync Driver v5.2.0 or later
    implementation 'org.mongodb:mongodb-driver-sync:5.2.0'
    // Java library for Voyage AI models
    implementation 'dev.langchain4j:langchain4j-voyage-ai'
    // Java library for Hugging Face models
    implementation 'dev.langchain4j:langchain4j-hugging-face'
    // Java library for Open AI models
    implementation 'dev.langchain4j:langchain4j-open-ai'
    // Java library for URL Document Loader
    implementation 'dev.langchain4j:langchain4j'
    // Java library for Apache PDFBox Document Parser
    implementation 'dev.langchain4j:langchain4j-document-parser-apache-pdfbox'
    }
  3. Execute seu gerenciador de pacote para instalar as dependências em seu projeto.

2

Observação

Este exemplo define as variáveis do projeto no IDE. Os aplicativos de produção podem gerenciar variáveis de ambiente por meio de uma configuração de sistema, pipeline CI/CD ou gerenciador de segredos, mas você pode adaptar o código fornecido para se adequar ao seu caso de uso.

Defina somente as variáveis de ambiente necessárias para seu projeto.

No seu IDE, crie um novo modelo de configuração e adicione as seguintes variáveis ao seu projeto:

  • Se você estiver usando o IntelliJ IDEA, crie um novo modelo de configuração de execução Application, depois adicione suas variáveis como valores separados por ponto e vírgula no campo Environment variables (por exemplo, FOO=123;BAR=456). Aplique as alterações e clique em OK.

    Para saber mais, consulte a seção Criar uma configuração de execução/depuração a partir de um modelo da documentação do IntelliJ IDEA.

  • Se você estiver usando o Eclipse, crie uma nova configuração de inicialização Java Application e, em seguida, adicione cada variável como um novo par de valores-chave na guia Environment. Aplique as alterações e clique em OK.

    Para saber mais, consulte a seção Criando uma configuração de inicialização do aplicação Java da documentação do IDE do Eclipse.

Variáveis de ambiente
VOYAGE_AI_KEY=<voyage-api-key> # If using Voyage AI embedding models
HUGGING_FACE_ACCESS_TOKEN=<access-token> # If using Hugging Face embedding models
OPENAI_API_KEY=<openai-api-key>
MONGODB_URI=<connection-string>

Atualize os espaços reservados com os seguintes valores:

  • Substitua o valor do espaço reservado <access-token> pelo token de acesso do Abraçando a Face.

  • Substitua o valor do espaço reservado <api-key> pela sua chave de API da Voyage AI, caso esteja utilizando a Voyage AI.

  • Substitua <connection-string> pela string de conexão do seu cluster do Atlas ou da implantação local do Atlas.

    Sua string de conexão deve usar o seguinte formato:

    mongodb+srv://<db_username>:<db_password>@<clusterName>.<hostname>.mongodb.net

    Para saber mais, consulte Conectar a um cluster via drivers.

    Sua string de conexão deve usar o seguinte formato:

    mongodb://localhost:<port-number>/?directConnection=true

    Para saber mais, consulte Connection strings.

3

Crie um arquivo denominado PDFProcessor.java e cole o seguinte código.

Este código define os seguintes métodos:

  • O método parsePDFDocument utiliza a biblioteca Apache PDFBox e o LangChain4j URL Document Loader para carregar e analisar um arquivo PDF em um URL especificado. O método retorna o PDF analisado como um documento langchain4j.

  • O método splitDocument divide um documento langchain4j em partes de acordo com o tamanho da parte especificado (número de caracteres) e a sobreposição da parte (número de caracteres sobrepostos entre partes consecutivas). O método retorna uma lista de segmentos de texto.

PDFProcessor.java
import dev.langchain4j.data.document.Document;
import dev.langchain4j.data.document.DocumentParser;
import dev.langchain4j.data.document.DocumentSplitter;
import dev.langchain4j.data.document.loader.UrlDocumentLoader;
import dev.langchain4j.data.document.parser.apache.pdfbox.ApachePdfBoxDocumentParser;
import dev.langchain4j.data.document.splitter.DocumentByCharacterSplitter;
import dev.langchain4j.data.segment.TextSegment;
import java.util.List;
public class PDFProcessor {
/** Parses a PDF document from the specified URL, and returns a
* langchain4j Document object.
* */
public static Document parsePDFDocument(String url) {
DocumentParser parser = new ApachePdfBoxDocumentParser();
return UrlDocumentLoader.load(url, parser);
}
/** Splits a parsed langchain4j Document based on the specified chunking
* parameters, and returns an array of text segments.
*/
public static List<TextSegment> splitDocument(Document document) {
int maxChunkSize = 400; // number of characters
int maxChunkOverlap = 20; // number of overlapping characters between consecutive chunks
DocumentSplitter splitter = new DocumentByCharacterSplitter(maxChunkSize, maxChunkOverlap);
return splitter.split(document);
}
}
4

Crie um arquivo denominado EmbeddingProvider.java e cole o seguinte código.

Este código define dois métodos para gerar incorporações para uma determinada entrada usando o modelo de incorporações voyage-3-large da Voyage AI:

  • Várias Entradas: O método getEmbeddings() aceita uma array de entradas de texto (List<String>), permitindo criar várias incorporações em uma única chamada de API. O método converte as arrays de floats fornecidas pela API em arrays BSON de double para armazenamento no MongoDB.

  • Entrada única: o getEmbedding() método aceita um String único, que representa uma query que você deseja fazer em relação aos dados vetoriais. O método converte a array de flutuantes fornecida pela API em uma array BSON de valores duplos para usar ao fazer query em sua coleção.

EmbeddingProvider.java
import dev.langchain4j.data.embedding.Embedding;
import dev.langchain4j.data.segment.TextSegment;
import dev.langchain4j.model.embedding.EmbeddingModel;
import dev.langchain4j.model.voyageai.VoyageAiEmbeddingModel;
import dev.langchain4j.model.output.Response;
import org.bson.BsonArray;
import org.bson.BsonDouble;
import java.util.List;
import static java.time.Duration.ofSeconds;
public class EmbeddingProvider {
private static EmbeddingModel embeddingModel;
private static EmbeddingModel getEmbeddingModel() {
if (embeddingModel == null) {
String apiKey = System.getenv("VOYAGE_AI_KEY");
if (apiKey == null || apiKey.isEmpty()) {
throw new IllegalStateException("VOYAGE_AI_KEY env variable is not set or is empty.");
}
return VoyageAiEmbeddingModel.builder()
.apiKey(apiKey)
.modelName("voyage-3-large")
.build();
}
return embeddingModel;
}
/**
* Takes an array of strings and returns a BSON array of embeddings to
* store in the database.
*/
public List<BsonArray> getEmbeddings(List<String> texts) {
List<TextSegment> textSegments = texts.stream()
.map(TextSegment::from)
.toList();
Response<List<Embedding>> response = getEmbeddingModel().embedAll(textSegments);
return response.content().stream()
.map(e -> new BsonArray(
e.vectorAsList().stream()
.map(BsonDouble::new)
.toList()))
.toList();
}
/**
* Takes a single string and returns a BSON array embedding to
* use in a vector query.
*/
public BsonArray getEmbedding(String text) {
Response<Embedding> response = getEmbeddingModel().embed(text);
return new BsonArray(
response.content().vectorAsList().stream()
.map(BsonDouble::new)
.toList());
}
}

Este código define dois métodos para gerar incorporações para uma determinada entrada usando o modelo de incorporação de código aberto mxbai-embed-large-v1:

  • Várias Entradas: O método getEmbeddings() aceita uma array de entradas de segmento de texto (List<TextSegment>), permitindo criar várias incorporações em uma única chamada de API. O método converte as arrays de floats fornecidas pela API em arrays BSON de double para armazenamento no MongoDB.

  • Entrada única: o getEmbedding() método aceita um String único, que representa uma query que você deseja fazer em relação aos dados vetoriais. O método converte a array de flutuantes fornecida pela API em uma array BSON de valores duplos para usar ao fazer query em sua coleção.

EmbeddingProvider.java
import dev.langchain4j.data.embedding.Embedding;
import dev.langchain4j.data.segment.TextSegment;
import dev.langchain4j.model.huggingface.HuggingFaceEmbeddingModel;
import dev.langchain4j.model.output.Response;
import org.bson.BsonArray;
import org.bson.BsonDouble;
import java.util.List;
import static java.time.Duration.ofSeconds;
public class EmbeddingProvider {
private static HuggingFaceEmbeddingModel embeddingModel;
private static HuggingFaceEmbeddingModel getEmbeddingModel() {
if (embeddingModel == null) {
String accessToken = System.getenv("HUGGING_FACE_ACCESS_TOKEN");
if (accessToken == null || accessToken.isEmpty()) {
throw new RuntimeException("HUGGING_FACE_ACCESS_TOKEN env variable is not set or is empty.");
}
embeddingModel = HuggingFaceEmbeddingModel.builder()
.accessToken(accessToken)
.modelId("mixedbread-ai/mxbai-embed-large-v1")
.waitForModel(true)
.timeout(ofSeconds(60))
.build();
}
return embeddingModel;
}
/**
* Takes an array of text segments and returns a BSON array of embeddings to
* store in the database.
*/
public List<BsonArray> getEmbeddings(List<TextSegment> texts) {
List<TextSegment> textSegments = texts.stream()
.toList();
Response<List<Embedding>> response = getEmbeddingModel().embedAll(textSegments);
return response.content().stream()
.map(e -> new BsonArray(
e.vectorAsList().stream()
.map(BsonDouble::new)
.toList()))
.toList();
}
/**
* Takes a single string and returns a BSON array embedding to
* use in a vector query.
*/
public static BsonArray getEmbedding(String text) {
Response<Embedding> response = getEmbeddingModel().embed(text);
return new BsonArray(
response.content().vectorAsList().stream()
.map(BsonDouble::new)
.toList());
}
}
5

Crie um arquivo denominado DataIngest.java e cole o seguinte código.

Este código utiliza a biblioteca LangChain4j e o MongoDB Java Sync Driver para alimentar dados de amostra no MongoDB aos quais os LLMs não têm acesso.

Especificamente, esse código faz o seguinte:

  1. Conecta-se à sua implantação do MongoDB .

  2. Carrega e analisa o arquivo PDF do relatório de resultados do MongoDB a partir do URL usando o método parsePDFDocument que você definiu anteriormente.

  3. Divide os dados em partes usando o método splitDocument que você definiu anteriormente.

  4. Cria incorporações vetoriais a partir dos dados fragmentados usando o método GetEmbeddings() que você definiu.

  5. Armazena as incorporações juntamente com os dados fragmentados na collection rag_db.test.

    DataIngest.java
    import com.mongodb.MongoException;
    import com.mongodb.client.MongoClient;
    import com.mongodb.client.MongoClients;
    import com.mongodb.client.MongoCollection;
    import com.mongodb.client.MongoDatabase;
    import com.mongodb.client.result.InsertManyResult;
    import dev.langchain4j.data.segment.TextSegment;
    import org.bson.BsonArray;
    import org.bson.Document;
    import java.util.ArrayList;
    import java.util.List;
    import java.util.stream.Collectors;
    public class DataIngest {
    public static void main(String[] args) {
    String uri = System.getenv("MONGODB_URI");
    if (uri == null || uri.isEmpty()) {
    throw new RuntimeException("MONGODB_URI env variable is not set or is empty.");
    }
    // establish connection and set namespace
    try (MongoClient mongoClient = MongoClients.create(uri)) {
    MongoDatabase database = mongoClient.getDatabase("rag_db");
    MongoCollection<Document> collection = database.getCollection("test");
    // parse the PDF file at the specified URL
    String url = "https://investors.mongodb.com/node/12236/pdf";
    String fileName = "mongodb_annual_report.pdf";
    System.out.println("Parsing the [" + fileName + "] file from url: " + url);
    dev.langchain4j.data.document.Document parsedDoc = PDFProcessor.parsePDFDocument(url);
    // split (or "chunk") the parsed document into text segments
    List<TextSegment> segments = PDFProcessor.splitDocument(parsedDoc);
    System.out.println(segments.size() + " text segments created successfully.");
    // create vector embeddings from the chunked data (i.e. text segments)
    System.out.println("Creating vector embeddings from the parsed data segments. This may take a few moments.");
    List<Document> documents = embedText(segments);
    // insert the embeddings into the MongoDB collection
    try {
    System.out.println("Ingesting data into the " + collection.getNamespace() + " collection.");
    insertDocuments(documents, collection);
    }
    catch (MongoException me) {
    throw new RuntimeException("Failed to insert documents", me);
    }
    } catch (MongoException me) {
    throw new RuntimeException("Failed to connect to MongoDB", me);
    } catch (Exception e) {
    throw new RuntimeException("Operation failed: ", e);
    }
    }
    /**
    * Embeds text segments into vector embeddings using the EmbeddingProvider
    * class and returns a list of BSON documents containing the text and
    * generated embeddings.
    */
    private static List<Document> embedText(List<TextSegment> segments) {
    EmbeddingProvider embeddingProvider = new EmbeddingProvider();
    List<String> texts = segments.stream()
    .map(TextSegment::text)
    .collect(Collectors.toList());
    List<BsonArray> embeddings = embeddingProvider.getEmbeddings(texts);
    List<Document> documents = new ArrayList<>();
    int i = 0;
    for (TextSegment segment : segments) {
    Document doc = new Document("text", segment.text()).append("embedding", embeddings.get(i));
    documents.add(doc);
    i++;
    }
    return documents;
    }
    /**
    * Inserts a list of BSON documents into the specified MongoDB collection.
    */
    private static void insertDocuments(List<Document> documents, MongoCollection<Document> collection) {
    List<String> insertedIds = new ArrayList<>();
    InsertManyResult result = collection.insertMany(documents);
    result.getInsertedIds().values()
    .forEach(doc -> insertedIds.add(doc.toString()));
    System.out.println(insertedIds.size() + " documents inserted into the " + collection.getNamespace() + " collection successfully.");
    }
    }
6

Observação

503 ao chamar modelos de Face Abraços

Ocasionalmente, você pode receber erros 503 ao chamar modelos a partir do hub de modelos Hugging Face. Para resolver esse problema, tente novamente após um breve intervalo.

Salve e execute o arquivo DataIngest.java. A saída se assemelha a:

Parsing the [mongodb_annual_report.pdf] file from url: https://investors.mongodb.com/node/12236/pdf
72 text segments created successfully.
Creating vector embeddings from the parsed data segments. This may take a few moments...
Ingesting data into the rag_db.test collection.
72 documents inserted into the rag_db.test collection successfully.
7

Nesta seção, você configura a Vector Search do MongoDB para recuperar documentos do seu banco de dados vetorial.

  1. Crie um arquivo denominado VectorIndex.java e cole o seguinte código.

    Esse código cria um índice do MongoDB Vector Search em sua collection usando a seguinte definição de índice:

    • Indexe o campo embedding em um índice do tipo vetorial para a coleção rag_db.test. Esse campo contém a incorporação criada utilizando o modelo de incorporação.

    • Aplique 1024 dimensões vetoriais e meça a similaridade entre vetores usando cosine.

    VectorIndex.java
    import com.mongodb.MongoException;
    import com.mongodb.client.ListSearchIndexesIterable;
    import com.mongodb.client.MongoClient;
    import com.mongodb.client.MongoClients;
    import com.mongodb.client.MongoCollection;
    import com.mongodb.client.MongoCursor;
    import com.mongodb.client.MongoDatabase;
    import com.mongodb.client.model.SearchIndexModel;
    import com.mongodb.client.model.SearchIndexType;
    import org.bson.Document;
    import org.bson.conversions.Bson;
    import java.util.Collections;
    import java.util.List;
    public class VectorIndex {
    public static void main(String[] args) {
    String uri = System.getenv("MONGODB_URI");
    if (uri == null || uri.isEmpty()) {
    throw new IllegalStateException("MONGODB_URI env variable is not set or is empty.");
    }
    // establish connection and set namespace
    try (MongoClient mongoClient = MongoClients.create(uri)) {
    MongoDatabase database = mongoClient.getDatabase("rag_db");
    MongoCollection<Document> collection = database.getCollection("test");
    // define the index details for the index model
    String indexName = "vector_index";
    Bson definition = new Document(
    "fields",
    Collections.singletonList(
    new Document("type", "vector")
    .append("path", "embedding")
    .append("numDimensions", 1024)
    .append("similarity", "cosine")));
    SearchIndexModel indexModel = new SearchIndexModel(
    indexName,
    definition,
    SearchIndexType.vectorSearch());
    // create the index using the defined model
    try {
    List<String> result = collection.createSearchIndexes(Collections.singletonList(indexModel));
    System.out.println("Successfully created vector index named: " + result);
    System.out.println("It may take up to a minute for the index to build before you can query using it.");
    } catch (Exception e) {
    throw new RuntimeException(e);
    }
    // wait for index to build and become queryable
    System.out.println("Polling to confirm the index has completed building.");
    waitForIndexReady(collection, indexName);
    } catch (MongoException me) {
    throw new RuntimeException("Failed to connect to MongoDB", me);
    } catch (Exception e) {
    throw new RuntimeException("Operation failed: ", e);
    }
    }
    /**
    * Polls the collection to check whether the specified index is ready to query.
    */
    public static void waitForIndexReady(MongoCollection<Document> collection, String indexName) throws InterruptedException {
    ListSearchIndexesIterable<Document> searchIndexes = collection.listSearchIndexes();
    while (true) {
    try (MongoCursor<Document> cursor = searchIndexes.iterator()) {
    if (!cursor.hasNext()) {
    break;
    }
    Document current = cursor.next();
    String name = current.getString("name");
    boolean queryable = current.getBoolean("queryable");
    if (name.equals(indexName) && queryable) {
    System.out.println(indexName + " index is ready to query");
    return;
    } else {
    Thread.sleep(500);
    }
    }
    }
    }
    }
  2. Crie o índice do MongoDB Vector Search .

    Salve e execute o arquivo. A saída se assemelha a:

    Successfully created a vector index named: [vector_index]
    Polling to confirm the index has completed building.
    It may take up to a minute for the index to build before you can query using it.
    vector_index index is ready to query
8

Nesta seção, você gera respostas solicitando que um LLM use os documentos recuperados como contexto.

Crie um novo arquivo chamado LLMPrompt.java e cole o seguinte código nele:

Este código faz o seguinte:

  1. Consulta a coleção rag_db.test para encontrar documentos correspondentes usando um método retrieveDocuments.

    Este método usa o método getEmbedding() que você criou anteriormente para gerar uma incorporação a partir da consulta de pesquisa, e então executa a consulta para retornar documentos semanticamente semelhantes.

    Para saber mais, consulte Executar queries no Vector Search.

  2. Acesse um LLM da OpenAI e crie um prompt modelo usando um método createPrompt.

    O método instrui o LLM a incluir a pergunta do usuário e os documentos recuperados no prompt definido.

  3. Pergunta ao LLM sobre os anúncios mais recentes de IA do MongoDB e, em seguida, retorna uma resposta gerada.

    LLMPrompt.java
    import com.mongodb.MongoException;
    import com.mongodb.client.MongoClient;
    import com.mongodb.client.MongoClients;
    import com.mongodb.client.MongoCollection;
    import com.mongodb.client.MongoDatabase;
    import com.mongodb.client.model.search.FieldSearchPath;
    import dev.langchain4j.data.message.AiMessage;
    import dev.langchain4j.model.chat.ChatModel;
    import dev.langchain4j.model.chat.request.ChatRequest;
    import dev.langchain4j.model.chat.response.ChatResponse;
    import dev.langchain4j.model.input.Prompt;
    import dev.langchain4j.model.input.PromptTemplate;
    import dev.langchain4j.model.openai.OpenAiChatModel;
    import org.bson.BsonArray;
    import org.bson.BsonValue;
    import org.bson.Document;
    import org.bson.conversions.Bson;
    import java.util.ArrayList;
    import java.util.Collections;
    import java.util.HashMap;
    import java.util.List;
    import java.util.Map;
    import static com.mongodb.client.model.Aggregates.project;
    import static com.mongodb.client.model.Aggregates.vectorSearch;
    import static com.mongodb.client.model.Projections.exclude;
    import static com.mongodb.client.model.Projections.fields;
    import static com.mongodb.client.model.Projections.include;
    import static com.mongodb.client.model.Projections.metaVectorSearchScore;
    import static com.mongodb.client.model.search.SearchPath.fieldPath;
    import static com.mongodb.client.model.search.VectorSearchOptions.exactVectorSearchOptions;
    import static java.util.Arrays.asList;
    public class LLMPrompt {
    // User input: the question to answer
    static String question = "In a few sentences, what are MongoDB's latest AI announcements?";
    public static void main(String[] args) {
    String uri = System.getenv("MONGODB_URI");
    if (uri == null || uri.isEmpty()) {
    throw new IllegalStateException("MONGODB_URI env variable is not set or is empty.");
    }
    // establish connection and set namespace
    try (MongoClient mongoClient = MongoClients.create(uri)) {
    MongoDatabase database = mongoClient.getDatabase("rag_db");
    MongoCollection<Document> collection = database.getCollection("test");
    // generate a response to the user question
    try {
    createPrompt(question, collection);
    } catch (Exception e) {
    throw new RuntimeException("An error occurred while generating the response: ", e);
    }
    } catch (MongoException me) {
    throw new RuntimeException("Failed to connect to MongoDB ", me);
    } catch (Exception e) {
    throw new RuntimeException("Operation failed: ", e);
    }
    }
    /**
    * Returns a list of documents from the specified MongoDB collection that
    * match the user's question.
    * NOTE: Update or omit the projection stage to change the desired fields in the response
    */
    public static List<Document> retrieveDocuments(String question, MongoCollection<Document> collection) {
    try {
    // generate the query embedding to use in the vector search
    EmbeddingProvider embeddingProvider = new EmbeddingProvider();
    BsonArray queryEmbeddingBsonArray = embeddingProvider.getEmbedding(question);
    List<Double> queryEmbedding = new ArrayList<>();
    for (BsonValue value : queryEmbeddingBsonArray.stream().toList()) {
    queryEmbedding.add(value.asDouble().getValue());
    }
    // define the pipeline stages for the vector search index
    String indexName = "vector_index";
    FieldSearchPath fieldSearchPath = fieldPath("embedding");
    int limit = 5;
    List<Bson> pipeline = asList(
    vectorSearch(
    fieldSearchPath,
    queryEmbedding,
    indexName,
    limit,
    exactVectorSearchOptions()),
    project(
    fields(
    exclude("_id"),
    include("text"),
    metaVectorSearchScore("score"))));
    // run the query and return the matching documents
    List<Document> matchingDocuments = new ArrayList<>();
    collection.aggregate(pipeline).forEach(matchingDocuments::add);
    return matchingDocuments;
    } catch (Exception e) {
    System.err.println("Error occurred while retrieving documents: " + e.getMessage());
    return new ArrayList<>();
    }
    }
    /**
    * Creates a templated prompt from a submitted question string and any retrieved documents,
    * then generates a response using the OpenAI chat model.
    */
    public static void createPrompt(String question, MongoCollection<Document> collection) {
    // retrieve documents matching the user's question
    List<Document> retrievedDocuments = retrieveDocuments(question, collection);
    if (retrievedDocuments.isEmpty()) {
    System.out.println("No relevant documents found. Unable to generate a response.");
    return;
    } else
    System.out.println("Generating a response from the retrieved documents. This may take a few moments.");
    // define a prompt template
    PromptTemplate promptBuilder = PromptTemplate.from("""
    Answer the following question based on the given context:
    Question: {{question}}
    Context: {{information}}
    -------
    """);
    // build the information string from the retrieved documents
    StringBuilder informationBuilder = new StringBuilder();
    for (Document doc : retrievedDocuments) {
    String text = doc.getString("text");
    informationBuilder.append(text).append("\n");
    }
    Map<String, Object> variables = new HashMap<>();
    variables.put("question", question);
    variables.put("information", informationBuilder);
    // generate and output the response from the chat model
    Prompt prompt = promptBuilder.apply(variables);
    ChatRequest chatRequest = ChatRequest.builder()
    .messages(Collections.singletonList(prompt.toUserMessage()))
    .build();
    String openAIApiKey = System.getenv("OPENAI_API_KEY");
    if (openAIApiKey == null || openAIApiKey.isEmpty()) {
    throw new IllegalStateException("OPENAI_API_KEY env variable is not set or is empty.");
    }
    ChatModel chatModel = OpenAiChatModel.builder()
    .apiKey(openAIApiKey)
    .modelName("gpt-4o")
    .build();
    ChatResponse chatResponse = chatModel.chat(chatRequest);
    AiMessage aiMessage = chatResponse.aiMessage();
    // extract the generated text to output a formatted response
    String responseText = aiMessage.text();
    String marker = "-------";
    int markerIndex = responseText.indexOf(marker);
    String generatedResponse;
    if (markerIndex != -1) {
    generatedResponse = responseText.substring(markerIndex + marker.length()).trim();
    } else {
    generatedResponse = responseText; // else fallback to the full response
    }
    // output the question and formatted response
    System.out.println("Question:\n " + question);
    System.out.println("Response:\n " + generatedResponse);
    // output the filled-in prompt and context information for demonstration purposes
    System.out.println("\n" + "---- Prompt Sent to LLM ----");
    System.out.println(prompt.text() + "\n");
    }
    }
9

Salve e execute o arquivo. A saída se assemelha ao seguinte, mas observe que a resposta gerada pode variar.

Question:
In a few sentences, what are MongoDB's latest AI announcements?
Response:
MongoDB recently made significant AI-related announcements, including the launch of the MongoDB AI Applications Program (MAAP). This initiative provides customers with tools such as reference architectures, pre-built partner integrations, and professional services to accelerate the development of AI-powered applications. Accenture has joined as the first global systems integrator for MAAP and will establish a center of excellence focused on MongoDB projects. Additionally, MongoDB unveiled version 8.0 with major performance improvements, including faster reads, updates, and bulk inserts, as well as enhanced time series queries. The company also announced the general availability of Atlas Stream Processing for real-time, event-driven applications. These advancements position MongoDB to support the growing demands of AI-driven workloads.
---- Prompt Sent to Azure OpenAI LLM ----
Answer the following question based on the given context:
Question: In a few sentences, what are MongoDB's latest AI announcements?
Context: MongoDB continues to expand its AI ecosystem with the announcement of the MongoDB AI Applications Program (MAAP),
more of our customers. We also see a tremendous opportunity to win more legacy workloads, as AI has now become a catalyst to modernize these
applications. MongoDB's document-based architecture is particularly well-suited for the variety and scale of data required by AI-powered applications.
We are confident MongoDB will be a substantial beneficiary of this next wave of application development."
of MongoDB 8.0—with significant performance improvements such as faster reads and updates, along with significantly
faster bulk inserts and time series queries—and the general availability of Atlas Stream Processing to build sophisticated,
event-driven applications with real-time data.
which provides customers with reference architectures, pre-built partner integrations, and professional services to help
them quickly build AI-powered applications. Accenture will establish a center of excellence focused on MongoDB projects,
and is the first global systems integrator to join MAAP.
included at the end of this press release. An explanation of these measures is also included below under the heading "Non-GAAP Financial
Measures."
First Quarter Fiscal 2025 and Recent Business Highlights
MongoDB announced a number of new products and capabilities at MongoDB.local NYC. Highlights included the preview
1
  1. Inicialize seu projeto Node.js.

    Execute os seguintes comandos em seu terminal para criar um novo diretório chamado rag-mongodb e inicializar seu projeto:

    mkdir rag-mongodb
    cd rag-mongodb
    npm init -y
  2. Instalar e importar dependências.

    Execute o seguinte comando:

    npm install mongodb voyageai openai @huggingface/inference @xenova/transformers langchain @langchain/community pdf-parse
  3. Atualize seu arquivo package.json.

    No arquivo package.json do seu projeto, especifique o campo type como mostrado no exemplo a seguir e salve o arquivo.

    {
    "name": "rag-mongodb",
    "type": "module",
    ...
  4. Crie um arquivo .env .

    Em seu projeto , crie um arquivo .env para armazenar sua string de conexão do MongoDB e as chaves de API para os modelos que você deseja usar:

    MONGODB_URI = "<connection-string>"
    VOYAGE_API_KEY = "<voyage-api-key>" # If using Voyage AI embedding model
    HUGGING_FACE_ACCESS_TOKEN = "<hf-token>" # If using Hugging Face embedding or generative model
    OPENAI_API_KEY = "<openai-api-key>" # If using OpenAI generative model

    Substitua <connection-string> pela string de conexão do seu cluster do Atlas ou da implantação local do Atlas.

    Sua string de conexão deve usar o seguinte formato:

    mongodb+srv://<db_username>:<db_password>@<clusterName>.<hostname>.mongodb.net

    Para saber mais, consulte Conectar a um cluster via drivers.

    Sua string de conexão deve usar o seguinte formato:

    mongodb://localhost:<port-number>/?directConnection=true

    Para saber mais, consulte Connection strings.

    Observação

    Requisitos mínimos de versão do Node.js

    O Node.js v20.x introduziu a opção --env-file. Se você estiver usando uma versão mais antiga do Node.js, adicione o pacote dotenv ao seu projeto ou use um método diferente para gerenciar suas variáveis de ambiente.

2

Para gerar incorporações, utilize um modelo de incorporação. Para este tutorial, você pode usar um modelo de código aberto da Hugging Face ou um modelo proprietário da Voyage AI.

No seu projeto, crie um arquivo chamado get-embeddings.js e cole o seguinte código:

import { VoyageAIClient } from 'voyageai';
// Set up Voyage AI configuration
const client = new VoyageAIClient({apiKey: process.env.VOYAGE_API_KEY});
// Function to generate embeddings using the Voyage AI API
export async function getEmbedding(text) {
const results = await client.embed({
input: text,
model: "voyage-3-large"
});
return results.data[0].embedding;
}

A função getEmbedding() gera incorporações vetoriais usando o modelo de incorporação voyage-3-large da Voyage AI.

Dica

import { pipeline } from '@xenova/transformers';
// Function to generate embeddings for a given data source
export async function getEmbedding(data) {
const embedder = await pipeline(
'feature-extraction',
'Xenova/nomic-embed-text-v1');
const results = await embedder(data, { pooling: 'mean', normalize: true });
return Array.from(results.data);
}

A função getEmbedding() gera incorporações vetoriais usando o modelo de incorporação nomic-embed-text-v1 do Sentence Transformers.

3

Nesta seção, você ingere dados de amostra no MongoDB aos quais os LLMs não têm acesso. O código a seguir usa a integração LangChain e o driver Node.js para fazer o seguinte:

  • Carregue um PDF que contenha um relatório de ganhos do MongoDB.

  • Divida os dados em partes, especificando o tamanho da parte (número de caracteres) e a sobreposição da parte (número de caracteres sobrepostos entre partes consecutivas).

  • Crie incorporações vetoriais a partir dos dados fragmentados usando a função getEmbedding() que você definiu.

  • Armazene estas incorporações juntamente com os dados fragmentados na collection rag_db.test.

Crie um arquivo chamado ingest-data.js no seu projeto e cole o seguinte código:

import { PDFLoader } from "@langchain/community/document_loaders/fs/pdf";
import { RecursiveCharacterTextSplitter } from "langchain/text_splitter";
import { MongoClient } from 'mongodb';
import { getEmbedding } from './get-embeddings.js';
import * as fs from 'fs';
async function run() {
const client = new MongoClient(process.env.MONGODB_URI);
try {
// Save online PDF as a file
const rawData = await fetch("https://investors.mongodb.com/node/12236/pdf");
const pdfBuffer = await rawData.arrayBuffer();
const pdfData = Buffer.from(pdfBuffer);
fs.writeFileSync("investor-report.pdf", pdfData);
const loader = new PDFLoader(`investor-report.pdf`);
const data = await loader.load();
// Chunk the text from the PDF
const textSplitter = new RecursiveCharacterTextSplitter({
chunkSize: 400,
chunkOverlap: 20,
});
const docs = await textSplitter.splitDocuments(data);
console.log(`Successfully chunked the PDF into ${docs.length} documents.`);
// Connect to your MongoDB cluster
await client.connect();
const db = client.db("rag_db");
const collection = db.collection("test");
console.log("Generating embeddings and inserting documents...");
const insertDocuments = [];
await Promise.all(docs.map(async doc => {
// Generate embeddings using the function that you defined
const embedding = await getEmbedding(doc.pageContent);
// Add the document with the embedding to array of documents for bulk insert
insertDocuments.push({
document: doc,
embedding: embedding
});
}))
// Continue processing documents if an error occurs during an operation
const options = { ordered: false };
// Insert documents with embeddings into collection
const result = await collection.insertMany(insertDocuments, options);
console.log("Count of documents inserted: " + result.insertedCount);
} catch (err) {
console.log(err.stack);
}
finally {
await client.close();
}
}
run().catch(console.dir);

Em seguida, execute o seguinte comando para executar o código:

node --env-file=.env ingest-data.js
Generating embeddings and inserting documents...
Count of documents inserted: 86

Dica

Este código leva algum tempo para ser executado. Se estiver usando o Atlas, você pode verificar suas incorporações vetoriais navegando até o namespace rag_db.test na interface do usuário do Atlas.

4

Nesta seção, você configura a Vector Search do MongoDB para recuperar documentos do seu banco de dados vetorial. Conclua as seguintes etapas:

  1. Crie um índice do MongoDB Vector Search em suas incorporações vetoriais.

    Crie um novo arquivo denominado rag-vector-index.js e cole o seguinte código. Este código se conecta à sua implementação do MongoDB e cria um índice do tipo vectorSearch na coleção rag_db.test. Substitua o espaço reservado <dimensions> por um dos seguintes valores:

    • 768 se você usou nomic-embed-text-v1

    • 1024 se você usou voyage-3-large

    import { MongoClient } from 'mongodb';
    // Connect to your MongoDB cluster
    const client = new MongoClient(process.env.MONGODB_URI);
    async function run() {
    try {
    const database = client.db("rag_db");
    const collection = database.collection("test");
    // Define your Vector Search index
    const index = {
    name: "vector_index",
    type: "vectorSearch",
    definition: {
    "fields": [
    {
    "type": "vector",
    "path": "embedding",
    "similarity": "cosine",
    "numDimensions": <dimensions> // Replace with the number of dimensions of your embeddings
    }
    ]
    }
    }
    // Call the method to create the index
    const result = await collection.createSearchIndex(index);
    console.log(result);
    } finally {
    await client.close();
    }
    }
    run().catch(console.dir);

    Em seguida, execute o seguinte comando para executar o código:

    node --env-file=.env rag-vector-index.js
  2. Defina uma função para recuperar dados relevantes.

    Crie um novo arquivo chamado retrieve-documents.js.

    Nesta etapa, você cria uma função de recuperação chamada getQueryResults() que executa uma query para recuperar documentos relevantes. Ele usa a função getEmbedding() para criar uma incorporação a partir da query de pesquisa. Em seguida, ele executa a query para retornar documentos semanticamente semelhantes.

    Para saber mais, consulte Executar queries no Vector Search.

    Cole este código no seu arquivo:

    import { MongoClient } from 'mongodb';
    import { getEmbedding } from './get-embeddings.js';
    // Function to get the results of a vector query
    export async function getQueryResults(query) {
    // Connect to your Atlas cluster
    const client = new MongoClient(process.env.MONGODB_URI);
    try {
    // Get embedding for a query
    const queryEmbedding = await getEmbedding(query);
    await client.connect();
    const db = client.db("rag_db");
    const collection = db.collection("test");
    const pipeline = [
    {
    $vectorSearch: {
    index: "vector_index",
    queryVector: queryEmbedding,
    path: "embedding",
    exact: true,
    limit: 5
    }
    },
    {
    $project: {
    _id: 0,
    document: 1,
    }
    }
    ];
    // Retrieve documents using a Vector Search query
    const result = collection.aggregate(pipeline);
    const arrayOfQueryDocs = [];
    for await (const doc of result) {
    arrayOfQueryDocs.push(doc);
    }
    return arrayOfQueryDocs;
    } catch (err) {
    console.log(err.stack);
    }
    finally {
    await client.close();
    }
    }
  3. Teste a recuperação dos dados.

    Crie um novo arquivo chamado retrieve-documents-test.js. Nesta etapa, você verifica se a função que você acabou de definir retorna resultados relevantes.

    Cole este código no seu arquivo:

    import { getQueryResults } from './retrieve-documents.js';
    async function run() {
    try {
    const query = "AI Technology";
    const documents = await getQueryResults(query);
    documents.forEach( doc => {
    console.log(doc);
    });
    } catch (err) {
    console.log(err.stack);
    }
    }
    run().catch(console.dir);

    Em seguida, execute o seguinte comando para executar o código. Seus resultados podem variar dependendo do modelo de incorporação que você usa.

    node --env-file=.env retrieve-documents-test.js
    {
    document: {
    pageContent: 'MongoDB continues to expand its AI ecosystem with the announcement of the MongoDB AI Applications Program (MAAP),',
    metadata: { source: 'investor-report.pdf', pdf: [Object], loc: [Object] },
    id: null
    }
    }
    {
    document: {
    pageContent: 'artificial intelligence, in our offerings or partnerships; the growth and expansion of the market for database products and our ability to penetrate that\n' +
    'market; our ability to integrate acquired businesses and technologies successfully or achieve the expected benefits of such acquisitions; our ability to',
    metadata: { source: 'investor-report.pdf', pdf: [Object], loc: [Object] },
    id: null
    }
    }
    {
    document: {
    pageContent: 'more of our customers. We also see a tremendous opportunity to win more legacy workloads, as AI has now become a catalyst to modernize these\n' +
    "applications. MongoDB's document-based architecture is particularly well-suited for the variety and scale of data required by AI-powered applications. \n" +
    'We are confident MongoDB will be a substantial beneficiary of this next wave of application development."',
    metadata: { source: 'investor-report.pdf', pdf: [Object], loc: [Object] },
    id: null
    }
    }
    {
    document: {
    pageContent: 'which provides customers with reference architectures, pre-built partner integrations, and professional services to help\n' +
    'them quickly build AI-powered applications. Accenture will establish a center of excellence focused on MongoDB projects,\n' +
    'and is the first global systems integrator to join MAAP.',
    metadata: { source: 'investor-report.pdf', pdf: [Object], loc: [Object] },
    id: null
    }
    }
    {
    document: {
    pageContent: 'Bendigo and Adelaide Bank partnered with MongoDB to modernize their core banking technology. With the help of\n' +
    'MongoDB Relational Migrator and generative AI-powered modernization tools, Bendigo and Adelaide Bank decomposed an\n' +
    'outdated consumer-servicing application into microservices and migrated off its underlying legacy relational database',
    metadata: { source: 'investor-report.pdf', pdf: [Object], loc: [Object] },
    id: null
    }
    }
5

Nesta seção, você gera respostas solicitando a um LLM que use os documentos recuperados como contexto. Para este tutorial, você pode usar um modelo da OpenAI ou um modelo de código aberto da Abraçando a face. Este exemplo usa a função que você acabou de definir para recuperar documentos correspondentes do banco de dados e, adicionalmente:

  • Instrui o LLM a incluir a pergunta do usuário e os documentos recuperados no prompt.

  • Pergunta ao LLM sobre os anúncios mais recentes de IA do MongoDB.

Crie um novo arquivo chamado generate-responses.js e cole o seguinte código nele:

import { getQueryResults } from './retrieve-documents.js';
import OpenAI from 'openai';
async function run() {
try {
// Specify search query and retrieve relevant documents
const question = "In a few sentences, what are MongoDB's latest AI announcements?";
const documents = await getQueryResults(question);
// Build a string representation of the retrieved documents to use in the prompt
let textDocuments = "";
documents.forEach(doc => {
textDocuments += doc.document.pageContent;
});
// Create a prompt consisting of the question and context to pass to the LLM
const prompt = `Answer the following question based on the given context.
Question: {${question}}
Context: {${textDocuments}}
`;
// Initialize OpenAI client
const client = new OpenAI({
apiKey: process.env.OPENAI_API_KEY,
});
// Prompt the LLM to generate a response based on the context
const chatCompletion = await client.chat.completions.create({
model: "gpt-4o",
messages: [
{
role: "user",
content: prompt
},
],
});
// Output the LLM's response as text.
console.log(chatCompletion.choices[0].message.content);
} catch (err) {
console.log(err.stack);
}
}
run().catch(console.dir);
import { getQueryResults } from './retrieve-documents.js';
import { HfInference } from '@huggingface/inference'
async function run() {
try {
// Specify search query and retrieve relevant documents
const question = "In a few sentences, what are MongoDB's latest AI announcements?";
const documents = await getQueryResults(question);
// Build a string representation of the retrieved documents to use in the prompt
let textDocuments = "";
documents.forEach(doc => {
textDocuments += doc.document.pageContent;
});
// Create a prompt consisting of the question and context to pass to the LLM
const prompt = `Answer the following question based on the given context.
Question: {${question}}
Context: {${textDocuments}}
`;
// Prompt the LLM to generate a response based on the context
const client = new InferenceClient(process.env.HUGGING_FACE_ACCESS_TOKEN);
const chatCompletion = await client.chatCompletion({
provider: "fireworks-ai",
model: "mistralai/Mixtral-8x22B-Instruct-v0.1",
messages: [
{
role: "user",
content: prompt
},
],
});
// Output the LLM's response as text.
console.log(chatCompletion.choices[0].message.content);
} catch (err) {
console.log(err.stack);
}
}
run().catch(console.dir);

Em seguida, execute este comando para executar o código. A resposta gerada pode variar.

node --env-file=.env generate-responses.js
MongoDB's latest AI announcements include the launch of the MongoDB
AI Applications Program (MAAP), which provides customers with
reference architectures, pre-built partner integrations, and
professional services to help them build AI-powered applications
quickly. Accenture has joined MAAP as the first global systems
integrator, establishing a center of excellence focused on MongoDB
projects. Additionally, Bendigo and Adelaide Bank have partnered
with MongoDB to modernize their core banking technology using
MongoDB's Relational Migrator and generative AI-powered
modernization tools.
1

Crie um notebook Python interativo salvando um arquivo com a extensão .ipynb. Este notebook permite que você execute trechos de código Python individualmente. Em seu notebook, execute o código a seguir para instalar as dependências deste tutorial:

pip install --quiet --upgrade pymongo sentence_transformers voyageai huggingface_hub openai einops langchain langchain_community pypdf

Em seguida, execute o código a seguir para definir as variáveis de ambiente para este tutorial, substituindo os espaços reservados por quaisquer chaves de API necessárias para acessar os modelos.

import os
os.environ["VOYAGE_API_KEY"] = "<voyage-api-key>" # If using Voyage AI embedding model
os.environ["HF_TOKEN"] = "<hf-token>" # If using Hugging Face embedding or generative model
os.environ["OPENAI_API_KEY"] = "<openai-api-key>" # If using OpenAI generative model
2

Nesta seção, você ingere dados de amostra no MongoDB aos quais os LLMs não têm acesso. Cole e execute cada um dos seguintes trechos de código em seu bloco de anotações:

  1. Defina uma função para gerar incorporações vetoriais.

    Para gerar incorporações, utilize um modelo de incorporação. Para este tutorial, você pode usar um modelo de código aberto da Hugging Face ou um modelo proprietário da Voyage AI.

    Cole e execute o código a seguir em seu bloco de anotações para criar uma função chamada get_embedding() que gera incorporações vetoriais usando um modelo de incorporação da Voyage AI. Substitua <api-key> pela sua chave API do Voyage.

    A função especifica o seguinte:

    • voyage-3-large como o modelo de incorporação a ser usado.

    • input_type para otimizar suas incorporações para recuperação. Para saber mais, consulte a API Python da Voyage AI.

    Dica

    Para todos os modelos e parâmetros, consulte Incorporações de texto Voyage AI.

    import os
    import voyageai
    # Specify the embedding model
    model = "voyage-3-large"
    vo = voyageai.Client()
    # Define a function to generate embeddings
    def get_embedding(data, input_type = "document"):
    embeddings = vo.embed(
    data, model = model, input_type = input_type
    ).embeddings
    return embeddings[0]

    Cole e execute o seguinte código em seu bloco de anotações para criar uma função denominada get_embedding() que gera incorporações vetoriais utilizando o modelo de incorporação nomic-embed-text-v1 de Sentence Transformers.

    from sentence_transformers import SentenceTransformer
    # Load the embedding model (https://huggingface.co/nomic-ai/nomic-embed-text-v1")
    model = SentenceTransformer("nomic-ai/nomic-embed-text-v1", trust_remote_code=True)
    # Define a function to generate embeddings
    def get_embedding(data):
    """Generates vector embeddings for the given data."""
    embedding = model.encode(data)
    return embedding.tolist()
  2. Carregar e dividir os dados.

    Execute este código para carregar e dividir dados de amostra usando a integração LangChain. Especificamente, esse código faz o seguinte:

    • Carregue um PDF que contenha um relatório de ganhos do MongoDB.

    • Divida os dados em partes, especificando o tamanho da parte (número de caracteres) e a sobreposição da parte (número de caracteres sobrepostos entre partes consecutivas).

    from langchain_community.document_loaders import PyPDFLoader
    from langchain.text_splitter import RecursiveCharacterTextSplitter
    # Load the PDF
    loader = PyPDFLoader("https://investors.mongodb.com/node/12236/pdf")
    data = loader.load()
    # Split the data into chunks
    text_splitter = RecursiveCharacterTextSplitter(chunk_size=400, chunk_overlap=20)
    documents = text_splitter.split_documents(data)
  3. Converta os dados em incorporações vetoriais.

    Execute esse código para preparar os documentos em partes para ingestão criando uma lista de documentos com suas incorporações de vetor correspondentes. Você gera essas incorporações usando a função get_embedding() que você acabou de definir.

    # Prepare documents for insertion
    docs_to_insert = [{
    "text": doc.page_content,
    "embedding": get_embedding(doc.page_content)
    } for doc in documents]
  4. Armazene os dados e incorporações no MongoDB.

    Execute este código para inserir os documentos que contêm as incorporações na coleção rag_db.test. Antes de executar o código, substitua <connection-string> por sua string de conexão do MongoDB .

    from pymongo import MongoClient
    # Connect to your MongoDB deployment
    client = MongoClient("<connection-string>")
    collection = client["rag_db"]["test"]
    # Insert documents into the collection
    result = collection.insert_many(docs_to_insert)

    Dica

    Depois de executar o código, se estiver usando o Atlas, poderá verificar suas incorporações vetoriais navegando até o namespace rag_db.test na interface do usuário do Atlas .

3

Nesta seção, você cria um sistema de recuperação usando o MongoDB Vector Search para obter documentos relevantes do seu banco de dados vetorial. Cole e execute cada um dos seguintes trechos de código em seu bloco de anotações:

  1. Crie um índice do MongoDB Vector Search em suas incorporações vetoriais.

    Execute o código a seguir para criar o índice diretamente do seu aplicativo com o Driver PyMongo. Este código também inclui um mecanismo de sondagem para verificar se o índice está pronto para uso.

    Para saber mais, consulte Como indexar campos do Vector Search.

    from pymongo.operations import SearchIndexModel
    import time
    # Create your index model, then create the search index
    index_name="vector_index"
    search_index_model = SearchIndexModel(
    definition = {
    "fields": [
    {
    "type": "vector",
    "numDimensions": 768,
    "path": "embedding",
    "similarity": "cosine"
    }
    ]
    },
    name = index_name,
    type = "vectorSearch"
    )
    collection.create_search_index(model=search_index_model)
    # Wait for initial sync to complete
    print("Polling to check if the index is ready. This may take up to a minute.")
    predicate=None
    if predicate is None:
    predicate = lambda index: index.get("queryable") is True
    while True:
    indices = list(collection.list_search_indexes(index_name))
    if len(indices) and predicate(indices[0]):
    break
    time.sleep(5)
    print(index_name + " is ready for querying.")
    from pymongo.operations import SearchIndexModel
    import time
    # Create your index model, then create the search index
    index_name="vector_index"
    search_index_model = SearchIndexModel(
    definition = {
    "fields": [
    {
    "type": "vector",
    "numDimensions": 1024,
    "path": "embedding",
    "similarity": "cosine"
    }
    ]
    },
    name = index_name,
    type = "vectorSearch"
    )
    collection.create_search_index(model=search_index_model)
    # Wait for initial sync to complete
    print("Polling to check if the index is ready. This may take up to a minute.")
    predicate=None
    if predicate is None:
    predicate = lambda index: index.get("queryable") is True
    while True:
    indices = list(collection.list_search_indexes(index_name))
    if len(indices) and predicate(indices[0]):
    break
    time.sleep(5)
    print(index_name + " is ready for querying.")
  2. Defina uma função para executar as queries de pesquisa vetorial.

    Execute este código para criar uma função de recuperação chamada get_query_results() que executa uma query de pesquisa vetorial básica. Utiliza a função get_embedding() para criar incorporações a partir da query de pesquisa. Em seguida, ele executa a query para retornar documentos semanticamente semelhantes. Seus resultados podem variar dependendo do modelo de incorporação que você usa.

    Para saber mais, consulte Executar queries de pesquisa vetorial.

    # Define a function to run vector search queries
    def get_query_results(query):
    """Gets results from a vector search query."""
    query_embedding = get_embedding(query)
    pipeline = [
    {
    "$vectorSearch": {
    "index": "vector_index",
    "queryVector": query_embedding,
    "path": "embedding",
    "exact": True,
    "limit": 5
    }
    }, {
    "$project": {
    "_id": 0,
    "text": 1
    }
    }
    ]
    results = collection.aggregate(pipeline)
    array_of_results = []
    for doc in results:
    array_of_results.append(doc)
    return array_of_results
    # Test the function with a sample query
    import pprint
    pprint.pprint(get_query_results("AI technology"))
    [{'text': 'more of our customers. We also see a tremendous opportunity to win '
    'more legacy workloads, as AI has now become a catalyst to modernize '
    'these\n'
    "applications. MongoDB's document-based architecture is "
    'particularly well-suited for the variety and scale of data required '
    'by AI-powered applications.'},
    {'text': 'artificial intelligence, in our offerings or partnerships; the '
    'growth and expansion of the market for database products and our '
    'ability to penetrate that\n'
    'market; our ability to integrate acquired businesses and '
    'technologies successfully or achieve the expected benefits of such '
    'acquisitions; our ability to'},
    {'text': 'MongoDB continues to expand its AI ecosystem with the announcement '
    'of the MongoDB AI Applications Program (MAAP),'},
    {'text': 'which provides customers with reference architectures, pre-built '
    'partner integrations, and professional services to help\n'
    'them quickly build AI-powered applications. Accenture will '
    'establish a center of excellence focused on MongoDB projects,\n'
    'and is the first global systems integrator to join MAAP.'},
    {'text': 'Bendigo and Adelaide Bank partnered with MongoDB to modernize '
    'their core banking technology. With the help of\n'
    'MongoDB Relational Migrator and generative AI-powered modernization '
    'tools, Bendigo and Adelaide Bank decomposed an\n'
    'outdated consumer-servicing application into microservices and '
    'migrated off its underlying legacy relational database'}]
    # Define a function to run vector search queries
    def get_query_results(query):
    """Gets results from a vector search query."""
    query_embedding = get_embedding(query, input_type="query")
    pipeline = [
    {
    "$vectorSearch": {
    "index": "vector_index",
    "queryVector": query_embedding,
    "path": "embedding",
    "exact": True,
    "limit": 5
    }
    }, {
    "$project": {
    "_id": 0,
    "text": 1
    }
    }
    ]
    results = collection.aggregate(pipeline)
    array_of_results = []
    for doc in results:
    array_of_results.append(doc)
    return array_of_results
    # Test the function with a sample query
    import pprint
    pprint.pprint(get_query_results("AI technology"))
    [{'text': 'more of our customers. We also see a tremendous opportunity to win '
    'more legacy workloads, as AI has now become a catalyst to modernize '
    'these\n'
    "applications. MongoDB's document-based architecture is "
    'particularly well-suited for the variety and scale of data required '
    'by AI-powered applications.'},
    {'text': 'artificial intelligence, in our offerings or partnerships; the '
    'growth and expansion of the market for database products and our '
    'ability to penetrate that\n'
    'market; our ability to integrate acquired businesses and '
    'technologies successfully or achieve the expected benefits of such '
    'acquisitions; our ability to'},
    {'text': 'MongoDB continues to expand its AI ecosystem with the announcement '
    'of the MongoDB AI Applications Program (MAAP),'},
    {'text': 'which provides customers with reference architectures, pre-built '
    'partner integrations, and professional services to help\n'
    'them quickly build AI-powered applications. Accenture will '
    'establish a center of excellence focused on MongoDB projects,\n'
    'and is the first global systems integrator to join MAAP.'},
    {'text': 'Bendigo and Adelaide Bank partnered with MongoDB to modernize '
    'their core banking technology. With the help of\n'
    'MongoDB Relational Migrator and generative AI-powered modernization '
    'tools, Bendigo and Adelaide Bank decomposed an\n'
    'outdated consumer-servicing application into microservices and '
    'migrated off its underlying legacy relational database'}]
4

Nesta seção, você gera respostas solicitando a um LLM que use os documentos recuperados como contexto. Para este tutorial, você pode usar um modelo da OpenAI ou um modelo de código aberto da Abraçando a face. Este código faz o seguinte:

  • Utiliza a função get_query_results() que definiu para recuperar documentos relevantes da sua coleção.

  • Cria um prompt usando a pergunta do usuário e os documentos recuperados como contexto.

  • Pergunta ao LLM sobre os anúncios mais recentes de IA do MongoDB. A resposta gerada pode variar.

from openai import OpenAI
# Specify search query, retrieve relevant documents, and convert to string
query = "What are MongoDB's latest AI announcements?"
context_docs = get_query_results(query)
context_string = " ".join([doc["text"] for doc in context_docs])
# Construct prompt for the LLM using the retrieved documents as the context
prompt = f"""Use the following pieces of context to answer the question at the end.
{context_string}
Question: {query}
"""
openai_client = OpenAI()
# OpenAI model to use
model_name = "gpt-4o"
completion = openai_client.chat.completions.create(
model=model_name,
messages=[{"role": "user",
"content": prompt
}]
)
print(completion.choices[0].message.content)
MongoDB recently announced several developments in its AI ecosystem.
These include the MongoDB AI Applications Program (MAAP), which offers
reference architectures, pre-built partner integrations, and professional
services to help customers efficiently build AI-powered applications.
Accenture is the first global systems integrator to join MAAP and will
establish a center of excellence for MongoDB projects. Additionally,
MongoDB introduced significant updates, including faster performance
in version 8.0 and the general availability of Atlas Stream Processing
to enable real-time, event-driven applications. These advancements
highlight MongoDB's focus on supporting AI-powered applications and
modernizing legacy workloads.
from huggingface_hub import InferenceClient
# Specify search query, retrieve relevant documents, and convert to string
query = "What are MongoDB's latest AI announcements?"
context_docs = get_query_results(query)
context_string = " ".join([doc["text"] for doc in context_docs])
# Construct prompt for the LLM using the retrieved documents as the context
prompt = f"""Use the following pieces of context to answer the question at the end.
{context_string}
Question: {query}
"""
# Use a model from Hugging Face
llm = InferenceClient(
"mistralai/Mixtral-8x22B-Instruct-v0.1",
provider = "fireworks-ai"
token = os.getenv("HF_TOKEN"))
# Prompt the LLM (this code varies depending on the model you use)
output = llm.chat_completion(
messages=[{"role": "user", "content": prompt}],
max_tokens=150
)
print(output.choices[0].message.content)
MongoDB's latest AI announcements include the
MongoDB AI Applications Program (MAAP), a program designed
to help customers build AI-powered applications more efficiently.
Additionally, they have announced significant performance
improvements in MongoDB 8.0, featuring faster reads, updates,
bulk inserts, and time series queries. Another announcement is the
general availability of Atlas Stream Processing to build sophisticated,
event-driven applications with real-time data.

Para tutoriais de RAG adicionais, consulte os seguintes recursos:

Para criar agentes de IA e implementar RAG agente, consulte Criar agentes de IA com MongoDB.

Para otimizar seus aplicativos RAG, certifique-se de usar um modelo de incorporação poderoso como Voyage AI para gerar incorporações vetoriais de alta qualidade.

Além disso, o MongoDB Vector Search oferece suporte a sistemas avançados de recuperação. Você pode indexar dados vetoriais perfeitamente junto com seus outros dados em seu cluster. Isso permite que você melhore seus resultados pré-filtrando outros campos em sua collection ou realizando pesquisa híbrida que combina pesquisa semântica com resultados de pesquisa de texto completo.

Você também pode usar os seguintes recursos:

Para saber mais sobre como escolher um modelo de incorporação, estratégias de fragmentação e avaliações, consulte os seguintes recursos:

Voltar

Casos de uso e padrões de design

Receber um selo de habilidade

Domine "RAG com MongoDB" gratuitamente!

Saiba mais

Nesta página