개요
이 가이드 TanStack Start 및 MongoDB 사용하여 최신 웹 애플리케이션 빌드 방법을 보여줍니다. 탄스택 스타트(TanStack Start)는 프론트엔드 와 백엔드 개발을 통합하는 풀스택 프레임워크 , React 와 탄스택 에코시스템 의 탄스택 라우터(TanStack 라우터) 및 탄스택 쿼리(TanStack Query)와 같은 인기 라이브러리를 사용합니다.
이 튜토리얼의 애플리케이션 다음과 같은 계층으로 구성되어 있습니다.
데이터베이스 계층: MongoDB 데이터를 저장하고 검색합니다.
서버 계층: 탄스택 스타트(TanStack Start)는 프론트엔드 를 MongoDB 데이터베이스 에 연결하기 위한 API 엔드포인트와 로직을 제공합니다.
데이터 관리 계층: TanStack 쿼리는 프론트엔드 에서 서버 측 상태 관리하여 데이터 가져오기, 로드 상태 및 오류 처리를 위한 로직을 통합합니다.
프레젠테이션 계층: React 탄스택 쿼리 데이터를 사용하여 UI 구현합니다.
탄스택 스타트 애플리케이션에서 MongoDB 사용하는 이유는 무엇인가요?
MongoDB의 문서 모델 데이터를 JSON 과 유사한 문서로 저장하므로 복잡한 매핑 없이 JavaScript 객체로 쉽게 작업할 수 있습니다. 이는 TanStack Start의 React 컴포넌트 및 TypeScript 인터페이스와 일치합니다.
탄스택 쿼리는 MongoDB 응답을 캐싱하고, 로딩 상태를 관리하고, 구성 요소 간 데이터를 동기화하여 데이터 계층을 효율적으로 처리합니다. 이를 통해 수동 상태 관리 필요 없고 중복 데이터베이스 호출이 줄어듭니다.
이 조합은 다음 기능이 필요한 애플리케이션에 적합합니다.
시간이 지남에 따라 발전할 수 있는 유연한 데이터 구조
최소한의 클라이언트 사이드 코드로 실시간 데이터 업데이트
데이터베이스 에서 UI 로의 유형 안전성
효율적인 캐싱 및 배경 데이터 동기화
빠른 시작 튜토리얼
이 튜토리얼은 MongoDB 와 통합되는 TanStack Start 애플리케이션 빌드하는 과정을 안내합니다. 애플리케이션 샘플 레스토랑 데이터에 액세스하고 로컬에서 호스팅되는 사이트 에 결과를 표시합니다. 여기에는 MongoDB Atlas 에서 호스팅되는 MongoDB 클러스터 연결하고 데이터베이스 의 정보에 액세스하고 표시하는 방법에 대한 지침이 포함되어 있습니다.
팁
TanStack Start 없이 Node.js 드라이버 사용하여 MongoDB 에 연결하려는 경우, Node.js 드라이버 시작하기 가이드 참조하세요.
프로젝트 설정
이 섹션의 단계에 따라 프로젝트 종속성을 설치하고, Atlas 클러스터를 만들고, 애플리케이션 디렉토리를 설정하다.
전제 조건 확인
빠른 시작 애플리케이션 만들려면 다음 소프트웨어가 설치되어 있어야 합니다.
전제 조건 | 참고 사항 |
|---|---|
버전 20 이상을 사용하세요. | |
코드 편집기 | 이 튜토리얼에서는 Visual Studio Code를 사용하지만 원하는 편집기를 사용할 수 있습니다. |
터미널 | MacOS 사용자의 경우 터미널 또는 유사한 앱 사용하세요. Windows 사용자의 경우 PowerShell을 사용하세요. |
MongoDB Atlas 클러스터 생성
MongoDB Atlas 는 MongoDB 배포를 호스팅하는 완전 관리형 클라우드 데이터베이스 서비스입니다. MongoDB deployment 없는 경우,MongoDB 시작하기 튜토리얼을 완료하여 무료 클러스터 ( 크레딧 카드 필요 없음)를 생성하세요. MongoDB 시작하기 튜토리얼에서는 sample_restaurants 이 튜토리얼에서 사용되는 데이터베이스 포함하여 샘플 데이터베이스를 클러스터 에 로드하는 방법도 보여줍니다.
클러스터에 연결하려면 연결 URI를 사용해야 합니다. 연결 URI를 조회 하려면 Atlas 설명서의 Connect to Your Cluster(클러스터에 연결하기) 튜토리얼의 지침을 따르세요.
팁
연결 URI를 안전한 위치 에 저장합니다.
프로젝트 스켈레톤 만들기
공식 탄스택 시작 CLI 사용하여 프로젝트 스켈레톤을 초기화합니다. 터미널을 열고 원하는 프로젝트 디렉토리 로 이동합니다.
초기화 명령을 실행합니다.
npm create @tanstack/start@latest
구성 프롬프트
설치 마법사가 설정 가이드합니다. 다음 옵션을 선택합니다.
프롬프트 | 입력 | 작업 |
|---|---|---|
프로젝트 이름을 무엇으로 지정하고 싶으신가요? | 원하는 프로젝트 이름 | 이름을 입력하고 Enter 키를 누릅니다. |
Tailwind CSS를 사용하시겠습니까? | 예 | Y를 입력하고 Enter 키를 누릅니다. |
도구 모음 선택 | 기본값(없음) | 없음을 선택하고 Enter 키를 누릅니다. |
배포서버 어댑터 선택 | 기본값: (니트로) | 엔터 키를 누릅니다. |
프로젝트 에 어떤 추가 기능을 추가하고 싶으신가요? | none | Enter 키를 누릅니다(TanStack 쿼리는 수동으로 설치됨). |
예시를 원하시나요? | none | 엔터 키를 누릅니다. |
설치가 완료되면 프로젝트 디렉토리 로 이동합니다.
MongoDB 호환성을 위한 Vite 구성
탄스택 스타트(TanStack Start)는 빌드 도구로 Vite를 사용합니다. 기본값 으로 Vite는 브라우저에 대한 종속성을 번들로 시도합니다. 그러나 노드.js 드라이버 Vite가 브라우저 환경에 번들로 제공할 때 오류를 발생시키는 서버 측 네이티브 모듈인 mongodb-client-encryption에 의존합니다.
이를 방지하려면 최적화 및 서버 측 렌더링에서 mongodb-client-encryption 모듈을 제외하도록 Vite를 구성합니다.
프로젝트 루트에서 vite.config.ts 로 이동하여 내용을 다음 코드로 바꿉니다.
import { defineConfig } from 'vite' import { devtools } from '@tanstack/devtools-vite' import { tanstackStart } from '@tanstack/react-start/plugin/vite' import viteReact from '@vitejs/plugin-react' import viteTsConfigPaths from 'vite-tsconfig-paths' import tailwindcss from '@tailwindcss/vite' import { nitro } from 'nitro/vite' const config = defineConfig({ plugins: [ devtools(), nitro(), // this is the plugin that enables path aliases viteTsConfigPaths({ projects: ['./tsconfig.json'], }), tailwindcss(), tanstackStart(), viteReact(), ], optimizeDeps: { // Exclude this server-side dependency to avoid bundling errors exclude: ['mongodb-client-encryption'], }, ssr: { // Ensure this module is externalized during server-side rendering external: ['mongodb-client-encryption'], }, }) export default config
백엔드 구성
프로젝트 구조를 설정한 후 이 섹션의 단계에 따라 백엔드 설정하다 합니다.
데이터베이스 연결 만들기
MongoDB 클라이언트 초기화하기 위한 전용 TypeScript 파일 만듭니다.
프로젝트 루트에서 다음 명령을 실행하여 파일 구조를 만듭니다.
mkdir -p src/lib touch src/lib/db.ts
src/lib/db.ts 를 열고 다음 코드를 붙여넣습니다.
import { MongoClient } from "mongodb" // Connection string from the MongoDB atlas dashboard const uri = process.env.MONGODB_URI let connected = false let client: MongoClient export async function connectToDatabase() { if (!uri) { throw new Error("MONGODB_URI is not defined in environment variables") } if (!connected) { try { client = new MongoClient(uri) await client.connect() connected = true } catch (error) { throw new Error(`Failed to connect to database: ${error instanceof Error ? error.message : 'Unknown error'}`) } } return client.db("sample_restaurants") }
이 파일 MongoDB cluster 및 sample_restaurants 데이터베이스 에 연결하는 connectToDatabase() 함수가 포함되어 있습니다. sample_restaurants 데이터베이스 에는 레스토랑 이름, 요리 유형, 자치구, 주소 정보 등의 필드를 포함하여 뉴욕시의 레스토랑 데이터가 포함되어 있습니다.
서버 함수 만들기
TanStack Start는 서버 기능을 사용하여 서버 에서 코드를 안전하게 실행 . 데이터베이스 쿼리를 처리하다 할 전용 파일 만듭니다.
프로젝트 루트에서 다음 명령을 실행하여 restaurants.ts 파일 만듭니다.
mkdir -p src/server touch src/server/restaurants.ts
src/server/restaurants.ts 를 열고 다음 코드를 붙여넣습니다.
import { createServerFn } from "@tanstack/react-start" import { connectToDatabase } from "../lib/db" export interface Restaurant { _id: string address: { building: string coord: [number, number] street: string zipcode: string } borough: string cuisine: string name: string restaurant_id: string } // Gets a list of all restaurants from the database export const getAllRestaurants = createServerFn({ method: 'GET'}) .handler(async () => { const db = await connectToDatabase() const restaurants = await db .collection<Restaurant>("restaurants") .find({}) .limit(100) .toArray() return restaurants.map((restaurant) => ({ ...restaurant, _id: restaurant._id.toString(), })) }) // Gets a list of restaurants in Queens with "Moon" in the name export const getRestaurantsByBorough = createServerFn({ method: 'GET'}) .handler(async () => { const db = await connectToDatabase() const restaurants = await db .collection<Restaurant>("restaurants") .find({ borough: 'Queens', name: {$regex: 'Moon', $options: 'i'} // case-insensitive match }) .limit(100) .toArray() // Convert ObjectId to string for client-side serialization return restaurants.map((restaurant) => ({ ...restaurant, _id: restaurant._id.toString(), })) })
이 파일 getAllRestaurants() 및 getRestaurantsByBorough()라는 두 가지 함수가 포함되어 있습니다. 이 두 함수는 MongoDB 클러스터 쿼리 하고 요청된 데이터를 반환합니다.
프런트 엔드 구성
데이터베이스 및 서버 계층을 설정한 후 이 섹션의 단계에 따라 데이터 관리 및 프레젠테이션 계층을 완료합니다.
헤더 구성 요소 만들기
src/components/Header.tsx (으)로 이동하여 콘텐츠를 다음 코드로 바꿉니다.
import { Link } from "@tanstack/react-router" export function Header() { return( <> <nav className="bg-white px-6 py-2 shadow-md"> <div className="flex justify-between items-center gap-8"> <Link to ="/"> <img alt="MongoDB logo" className="h-10 inline" src="https://d3cy9zhslanhfa.cloudfront.net/media/3800C044-6298-4575-A05D5C6B7623EE37/4B45D0EC-3482-4759-82DA37D8EA07D229/webimage-8A27671A-8A53-45DC-89D7BF8537F15A0D.png" width="120" height="40" loading="eager" style={{ maxHeight: '2.5rem', width: 'auto' }} /> </Link> <Link to ="/browse" className="text-lime-800 text-lg font-semibold hover:text-green-700"> Browse </Link> </div> </nav> </> ) }
이 구성 요소는 레스토랑 결과 위에 헤더를 렌더링하며 찾아보기 링크와 로고를 포함합니다. 이를 통해 경로 간을 탐색할 수 있습니다.
레스토랑 목록 구성 요소 만들기
프로젝트 루트에서 다음 명령을 실행하여 RestaurantList 구성 요소를 만듭니다.
touch src/components/RestaurantList.tsx
src/components/RestaurantList.tsx에 다음 코드를 붙여넣습니다.
import {Restaurant} from "../server/restaurants" type Props = { restaurants: Restaurant[] } export function RestaurantList({restaurants}: Props) { return ( <div className="overflow-hidden rounded-lg border border-gray-200 shadow-md"> <table className="w-full"> <thead className="bg-gray-50"> <tr> <th className="px-4 py-3 text-left text-sm font-bold text-gray-700">Name</th> <th className="px-4 py-3 text-left text-sm font-bold text-gray-700">Borough</th> <th className="px-4 py-3 text-left text-sm font-bold text-gray-700">Cuisine</th> </tr> </thead> <tbody className="divide-y divide-gray-200"> {restaurants.map((restaurant) => ( <tr key={restaurant._id}> <td className="px-4 py-3">{restaurant.name}</td> <td className="px-4 py-3">{restaurant.borough}</td> <td className="px-4 py-3">{restaurant.cuisine}</td> </tr> ))} </tbody> </table> </div> ) }
이 구성 요소는 레스토랑의 표시를 처리합니다. 쿼리 데이터는 프롭으로 처리되며 프롭은 테이블 내에 표시됩니다.
애플리케이션 라우팅 구성
src/routes/__root.tsx(으)로 이동합니다. __root.tsx 의 내용을 다음 코드로 바꿉니다.
import { HeadContent, Scripts, createRootRoute, Outlet } from '@tanstack/react-router' import { QueryClient, QueryClientProvider } from '@tanstack/react-query' import '../styles.css' import {Header} from '../components/Header' //Configure TanStack Query Client with cache and retry options const queryClient = new QueryClient({ defaultOptions: { queries: { staleTime: 60 * 1000, // Data stays fresh for one minute retry: 1, // Retry failed requests once retryDelay: 1000 // Wait one second before retrying }, }, }) export const Route = createRootRoute({ component: () => ( <html lang="en"> <head> <HeadContent /> </head> <body> <QueryClientProvider client={queryClient}> <Header /> <main> <Outlet /> </main> </QueryClientProvider> <Scripts /> </body> </html> ), // Handle 404 errors for non-existent routes notFoundComponent: () => { return ( <div className="p-6"> <h1 className="text-2xl font-bold">404 - Page Not Found</h1> <p>The page you're looking for doesn't exist.</p> </div> ) } })
이 파일 전체 애플리케이션 감싸는 래퍼입니다. 이 코드는 QueryClientProvider 를 사용하여 탄스택 쿼리가 데이터 상태 를 관리하도록 합니다.
홈페이지 구성
src/routes/index.tsx(으)로 이동합니다. index.tsx 의 내용을 다음 코드로 바꿉니다.
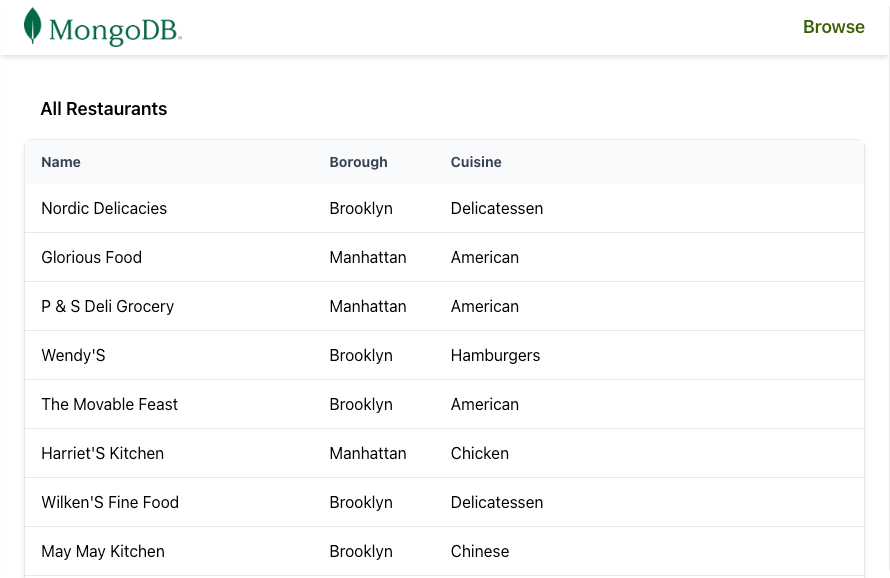
import { createFileRoute } from "@tanstack/react-router"; import {useSuspenseQuery} from '@tanstack/react-query' import { RestaurantList } from "../components/RestaurantList"; import { getAllRestaurants } from "../server/restaurants"; export const Route = createFileRoute('/')({ component: Home, pendingComponent: () => ( <div className="p-6 text-gray-500"> Loading restaurants... </div> ), errorComponent: ({error}) => ( <div className="p-6 text-red-600"> <h2 className="text-xl font-bold">Connection Error</h2> <p>{error.message}</p> <p className="text-sm mt-2">Please check your MongoDB connection string in your .env file</p> </div> ), }) function Home() { const{data: restaurants} = useSuspenseQuery({ queryKey:['restaurants'], queryFn: () => getAllRestaurants(), }) return ( <div className="w-full p-6"> <h2 className="text-lg font-semibold p-4">All Restaurants</h2> <RestaurantList restaurants={restaurants} /> </div> ) }
이 경로는 Header 및 RestaurantList 구성 요소를 사용하여 getAllRestaurants() 의 결과를 표시합니다.
찾아보기 페이지 만들기
프로젝트 루트에서 다음 명령을 실행하여 browse.tsx 경로를 만듭니다.
touch src/routes/browse.tsx
src/routes/browse.tsx에 다음 코드를 붙여넣습니다.
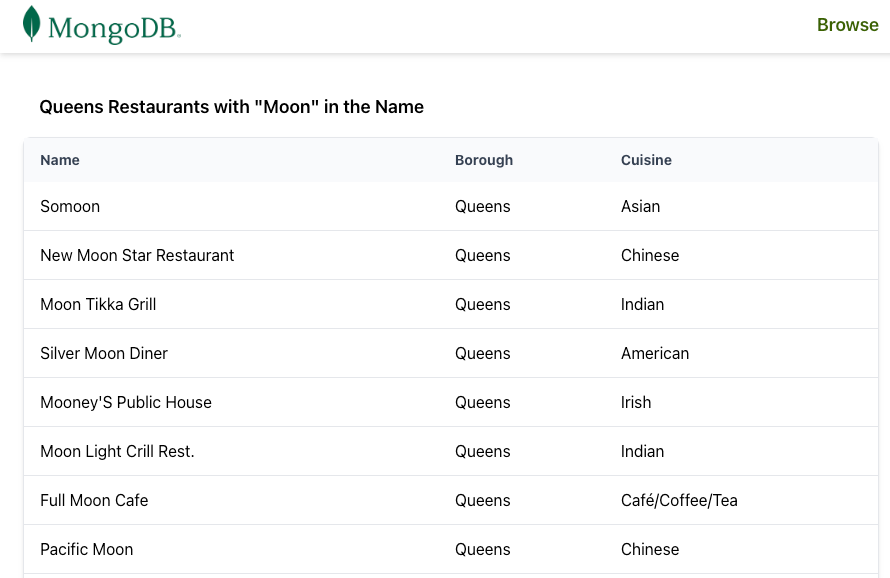
import { createFileRoute } from '@tanstack/react-router' import { useSuspenseQuery } from '@tanstack/react-query' import { RestaurantList } from '../components/RestaurantList' import { getRestaurantsByBorough } from '../server/restaurants' export const Route = createFileRoute('/browse')({ component: BrowsePage, // Display error UI if MongoDB connection or query fails errorComponent: ({ error }) => ( <div className="p-6 text-red-600"> <h2 className="text-xl font-bold">Connection Error</h2> <p>{error.message}</p> <p className="text-sm mt-2"> Please check your MongoDB connection string in your .env file </p> </div> ), }) function BrowsePage() { // Fetch filtered restaurants using TanStack Query // Query includes borough and search term in the key for proper caching const { data: restaurants } = useSuspenseQuery({ queryKey: ['restaurants', 'queens', 'moon'], // Unique cache key for this filtered query queryFn: () => getRestaurantsByBorough(), // Server function with MongoDB filter }) return ( <div className='w-full p-6'> <h2 className='text-lg font-semibold p-4'> Queens Restaurants with "Moon" in the Name </h2> <RestaurantList restaurants={restaurants} /> </div> ) }
이 페이지에는 sample_restaurants 데이터베이스 의 필터링된 쿼리 표시됩니다. 이름에 Moon 이(가) 포함된 퀸즈의 모든 레스토랑이 표시됩니다. 또한 Header 및 RestaurantList 구성 요소를 사용합니다.
참고
서버 실행 때까지 IDE의 createFileRoute 줄에 빨간색 밑줄 경고가 표시될 수 있습니다. 이는 정상입니다. npm run dev(으)로 애플리케이션 처음 실행 때tanStack 라우터는 경로에 필요한 TypeScript 유형 정의를 생성합니다. 서버 시작되면 경고가 사라집니다.
파일 구조 확인
계속하기 전에 파일 트리가 아래 구조와 거의 일치하는지 확인하세요. 추가 프로젝트 파일은 모두 무시해도 됩니다.
your-app/ ├─ node_modules/ ├─ public/ ├─ src/ │ ├─ components/ │ │ ├─ Header.tsx <-- Logo and browse link │ │ ├─ RestaurantList.tsx <-- Table that displays results of DB query │ ├─ routes/ │ │ ├─ __root.tsx <-- Application wrapper │ │ ├─ browse.tsx <-- Browse page, holds results of getRestaurantsByBorough() │ │ ├─ index.tsx <-- Home page, holds results of getAllRestaurants() │ ├─ server/ │ │ ├─ restaurants.ts <--- Server functions │ ├─ lib/ │ │ ├─ db.ts <--- Database connection ├─ .env <-- Connection URI
애플리케이션 실행하기
나머지 단계에 따라 서버 시작하고 렌더링된 레스토랑 데이터를 확인합니다.
빠른 시작 튜토리얼을 완료하신 것을 축하드립니다!
이 단계를 완료하면 MongoDB 배포서버에 연결하고, 샘플 레스토랑 데이터에 대한 쿼리를 실행하고, 실시간 반응성으로 결과를 렌더링하는 TanStack Start 애플리케이션 갖게 됩니다.
추가 리소스
탄스택 스타트(TanStack Start), 탄스택 에코시스템 및 MongoDB 에 대해 자세히 학습 다음 리소스를 참조하세요.
탄스택 시작 문서
탄스택 문서
Node.js 운전자 문서