Docs Menu
Docs Home
/
Atlas
/

Atlas 벡터 검색을 사용한 검색-증강 생성(RAG)

이 페이지의 내용

  • 왜 RAG를 사용해야 하나요?
  • Atlas Vector Search를 사용한 RAG
  • 수집
  • Retrieval
  • 생성
  • 시작하기
  • 전제 조건
  • 절차
  • 다음 단계
  • 미세 조정

RAG(검색 증강 생성)는 대규모 언어 모델(LLM)을 추가 데이터로 보강하여 더 정확한 응답을 생성할 수 있도록 하는 데 사용되는 아키텍처입니다. LLM과 Atlas Vector Search 기반 검색 시스템을 결합하여 생성 AI 애플리케이션에서 RAG를 구현할 수 있습니다.

시작하기

LLM으로 작업할 때 다음과 같은 제한 사항이 발생할 수 있습니다.

  • 오래된 데이터: LLM은 특정 시점까지의 정적 데이터 세트를 기반으로 훈련되었습니다. 따라서 지식 기반이 제한되어 있고 오래된 데이터를 사용할 수 있습니다.

  • 로컬 데이터에 액세스할 수 없음: LLM이 로컬 데이터나 개인화된 데이터에 액세스할 수 없습니다. 따라서 특정 도메인에 대한 정보가 부족할 수 있습니다.

  • 환각: 훈련 데이터가 불완전하거나 오래된 경우 LLM은 부정확한 정보를 생성할 수 있습니다.

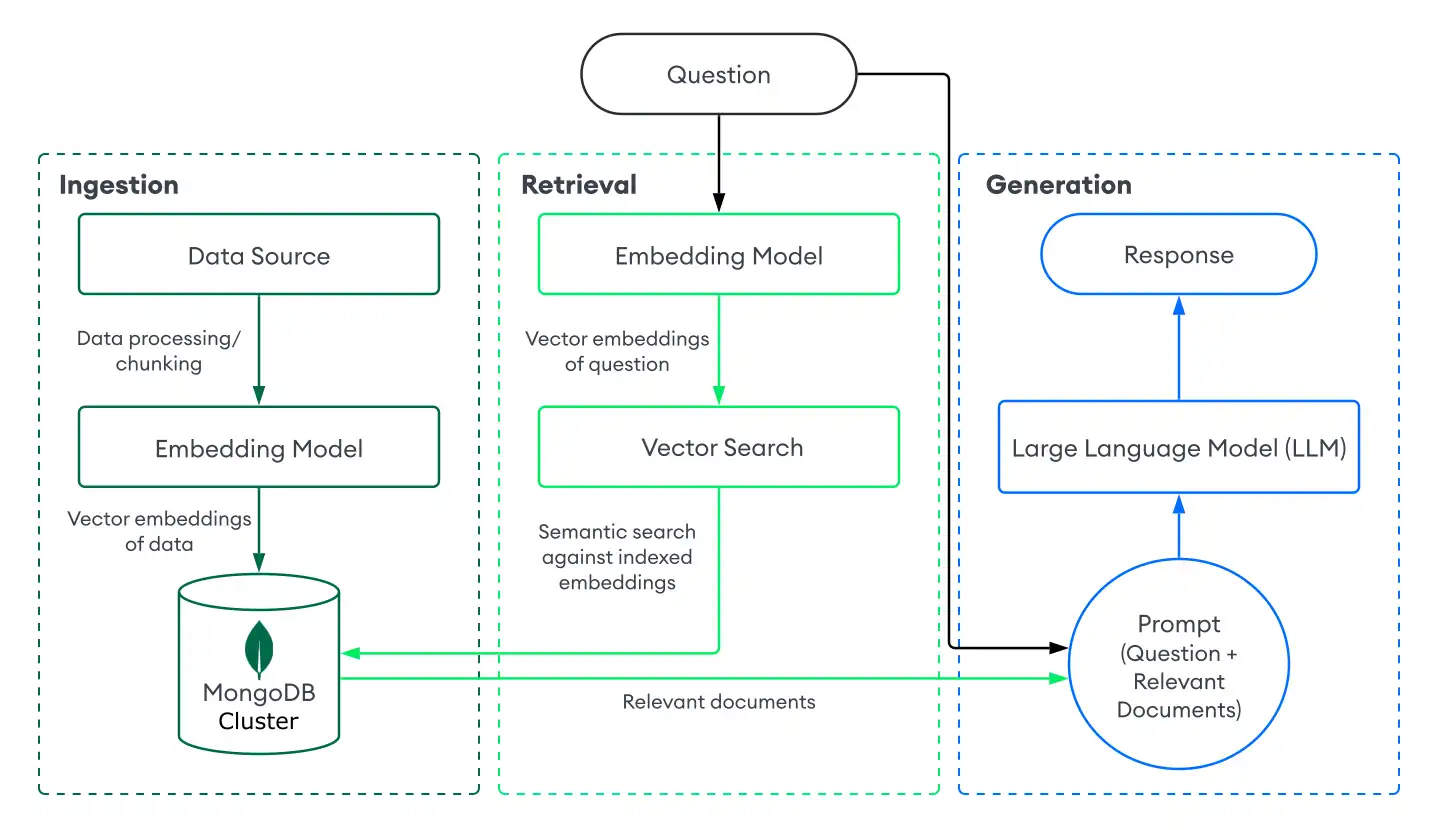
이러한 제한 사항은 다음 단계를 통해 RAG를 구현하여 해결할 수 있습니다.

  1. 수집: MongoDB Atlas와 같은 벡터 데이터베이스에 사용자 지정 데이터를 벡터 임베딩으로 저장합니다. 이를 통해 최신의 개인화된 데이터로 구성된 지식 기반을 구축할 수 있습니다.

  2. 조회: Atlas Vector Search와 같은 검색 솔루션을 사용하여 사용자의 질문을 기반으로 데이터베이스에서 의미적으로 유사한 문서를 검색합니다. 이러한 문서는 관련성 있는 추가 데이터로 LLM을 증강합니다.

  3. 세대: LLM을 프롬프트합니다. LLM은 검색된 문서를 맥락으로 활용하여 더 정확하고 관련성 있는 응답을 생성하고 환각을 줄입니다.

RAG는 질문 응답 및 텍스트 생성과 같은 작업을 지원하므로 개인화되고 도메인에 특화된 응답을 제공하는 AI 챗봇을 구축하기 위한 효과적인 아키텍처입니다. 생산에 바로 사용할 수 있는 챗봇을 만들려면 RAG 구현 위에 요청을 라우팅하는 서버를 구성하고 사용자 인터페이스를 구축해야 합니다.

Atlas Vector Search를 사용하여 RAG를 구현하려면 Atlas로 데이터를 수집하고, Atlas Vector Search로 문서를 조회하고, LLM을 사용하여 응답을 생성해야 합니다. 이 섹션에서는 Atlas Vector Search를 이용한 기본적이고 단순한 RAG 구현의 구성 요소를 설명합니다. 단계별 지침은 시작하기를 참조하세요.

Atlas Vector Search가 포함된 RAG 순서도
클릭하여 확대

RAG에 대한 데이터 수집에는 사용자 지정 데이터를 처리하고 이를 벡터 데이터베이스에 저장하여 검색에 대비하는 작업이 포함됩니다. Atlas를 벡터 데이터베이스로 사용하여 기본 수집 파이프라인을 만들려면 다음을 수행하세요.

  1. 데이터를 로드합니다.

    이 튜토리얼에서는 PDF Pig를 사용하여 PDF에서 데이터를 로드합니다.

  2. 데이터를 청크로 분할합니다.

    데이터를 처리하거나 청크화합니다. 청크화는 성능을 향상시키기 위해 데이터를 더 작은 부분으로 나누는 것을 말합니다.

  3. 데이터를 벡터 임베딩으로 변환합니다.

    임베딩 모델을 사용하여 데이터를 벡터 임베딩으로 변환합니다. 자세한 내용은 벡터 임베딩을 만드는 방법을 참조하세요.

  4. Atlas에 데이터와 임베딩을 저장합니다.

    이러한 임베딩을 Atlas에 저장합니다. 컬렉션의 다른 데이터와 함께 임베딩을 필드로 저장합니다.

  1. 데이터를 로드합니다.

    문서 로더와 같은 도구를 사용하여 다양한 데이터 형식 및 위치에서 데이터를 로드할 수 있습니다.

  2. 데이터를 청크로 분할합니다.

    데이터를 처리하거나 청크화합니다. 청크화는 성능을 향상시키기 위해 데이터를 더 작은 부분으로 나누는 것을 말합니다.

  3. 데이터를 벡터 임베딩으로 변환합니다.

    임베딩 모델을 사용하여 데이터를 벡터 임베딩으로 변환합니다. 자세한 내용은 벡터 임베딩을 만드는 방법을 참조하세요.

  4. Atlas에 데이터와 임베딩을 저장합니다.

    이러한 임베딩을 Atlas 에 저장합니다. 컬렉션 의 다른 데이터와 함께 필드 에 임베딩을 저장 .

  1. 데이터를 로드합니다.

    문서 로더파서 같은 도구를 사용하여 다양한 데이터 형식 및 위치에서 데이터를 로드합니다.

  2. 구문 분석된 데이터를 청크로 분할합니다.

    데이터를 처리하거나 청크화합니다. 청크화는 성능을 향상시키기 위해 데이터를 더 작은 부분으로 나누는 것을 말합니다.

  3. 데이터를 벡터 임베딩으로 변환합니다.

    임베딩 모델을 사용하여 데이터를 벡터 임베딩으로 변환합니다. 자세한 내용은 벡터 임베딩을 만드는 방법을 참조하세요.

  4. Atlas에 데이터와 임베딩을 저장합니다.

    이러한 임베딩을 Atlas에 저장합니다. 컬렉션의 다른 데이터와 함께 임베딩을 필드로 저장합니다.

  1. 데이터를 로드합니다.

    문서 로더 또는 데이터 커넥터와 같은 도구를 사용하여 다양한 데이터 형식 및 위치에서 데이터를 로드할 수 있습니다.

  2. 데이터를 청크로 분할합니다.

    데이터를 처리하거나 청크화합니다. 청크화는 성능을 향상시키기 위해 데이터를 더 작은 부분으로 나누는 것을 말합니다.

  3. 데이터를 벡터 임베딩으로 변환합니다.

    임베딩 모델을 사용하여 데이터를 벡터 임베딩으로 변환합니다. 자세한 내용은 벡터 임베딩을 만드는 방법을 참조하세요.

  4. Atlas에 데이터와 임베딩을 저장합니다.

    이러한 임베딩을 Atlas에 저장합니다. 컬렉션의 다른 데이터와 함께 임베딩을 필드로 저장합니다.

조회 시스템을 구축하려면 벡터 데이터베이스에서 가장 관련성이 높은 문서를 검색하고 반환하여 LLM을 보강해야 합니다. Atlas Vector Search를 이용해 관련 문서를 조회하려면 사용자의 질문을 벡터 임베딩으로 변환하고 Atlas에서 데이터에 대해 벡터 검색 쿼리를 실행해 임베딩이 가장 유사한 문서를 찾습니다.

Atlas Vector Search로 기본 검색을 수행하려면 다음을 수행하세요.

  1. 벡터 임베딩이 포함된 컬렉션에 대한 Atlas Vector Search 인덱스를 정의합니다.

  2. 사용자의 질문에 따라 문서를 검색하려면 다음 방법 중 하나를 선택하세요.

    • 널리 사용되는 프레임워크나 서비스에서 Atlas Vector Search 통합을 사용하세요. 이러한 통합에는 Atlas Vector Search로 검색 시스템을 쉽게 구축할 수 있는 내장 라이브러리 및 도구가 포함되어 있습니다.

    • 나만의 조회 시스템을 구축하세요. 사용 사례에 맞게 Atlas Vector Search 쿼리를 실행하기 위해 맞춤형 기능과 파이프라인을 정의할 수 있습니다.

      Atlas Vector Search를 사용하여 기본 검색 시스템을 구축하는 방법을 알아보려면 시작하기를 참조하세요.

응답을 생성하려면 조회 시스템을 LLM과 결합하세요. 관련 문서를 조회하기 위해 벡터 검색을 수행한 후 LLM에 사용자의 질문과 관련 문서를 맥락으로 제공하면 더 정확한 응답을 생성할 수 있습니다.

다음 방법 중 하나를 선택하여 LLM에 연결합니다.

  • 널리 사용되는 프레임워크나 서비스에서 Atlas Vector Search 통합을 사용하세요. 이러한 통합에는 최소한의 설정으로 LLM에 연결할 수 있는 내장 라이브러리와 도구가 포함되어 있습니다.

  • LLMAPI를 호출합니다. 대부분의 AI 공급자는 응답을 생성하는 데 사용할 수 있는 API를 생성 모델에 제공합니다.

  • 오픈 소스 LLM을 로드합니다. API 키나 크레딧이 없는 경우 애플리케이션에서 로컬로 로드하여 오픈 소스 LLM을 사용할 수 있습니다. 예시 구현에 대해서는 Atlas Vector Search를 사용하여 로컬 RAG 구현 구축 튜토리얼을 참조하세요.

Atlas Vector Search 사용하여 RAG 시스템을 개발하는 방법을 알아보세요.

지속 시간: 1.16 분

다음 예시는 Atlas Vector Search를 기반으로 한 검색 시스템을 사용하여 RAG를 구현하는 방법을 보여줍니다.


언어 선택 드롭다운 메뉴를 사용하여 이 페이지에 있는 예시의 언어를 설정합니다.


이 튜토리얼의 실행 가능한 버전을 Python 노트북으로 작업하세요.

이 예제를 완료하려면 다음이 필요합니다.

  • Atlas 계정, 클러스터에서 MongoDB 버전 6.0.11, 7.0.2 또는 그 이상 실행( RC 포함). IP 주소가 Atlas 프로젝트의 액세스 목록에 포함되어 있는지 확인하세요. 자세히 알아보려면 클러스터 생성을 참조하세요.

  • OpenAI API 키.

  • .NET 프로젝트를 실행하기 위한 터미널 및 코드 편집기.

  • .NET 버전 8.0 이상이 설치되었습니다.

  • Atlas 계정, 클러스터에서 MongoDB 버전 6.0.11, 7.0.2 또는 그 이상 실행( RC 포함). IP 주소가 Atlas 프로젝트의 액세스 목록에 포함되어 있는지 확인하세요. 자세히 알아보려면 클러스터 생성을 참조하세요.

  • 읽기 권한이 있는 Hugging Face 액세스 토큰

  • Go 프로젝트를 실행하기 위한 터미널 및 코드 편집기입니다.

  • Go가 설치되었습니다.

  • Atlas 계정, 클러스터에서 MongoDB 버전 6.0.11, 7.0.2 또는 그 이상 실행( RC 포함). IP 주소가 Atlas 프로젝트의 액세스 목록에 포함되어 있는지 확인하세요. 자세히 알아보려면 클러스터 생성을 참조하세요.

  • Java Development Kit (JDK) 버전 8 이상.

  • Java 애플리케이션 설정하다 하고 실행 위한 환경입니다. IntelliJ IDEA 또는 Eclipse IDE와 같은 통합 개발 환경(IDE)을 사용하여 프로젝트 를 빌드 하고 실행 하도록 Maven 또는 Gradle을 구성하는 것이 좋습니다.

1
  1. .NET 프로젝트를 초기화합니다.

    터미널에서 다음 명령을 실행하여 MyCompany.RAG 라는 새 디렉토리를 만들고 프로젝트를 초기화합니다.

    dotnet new console -o MyCompany.RAG
    cd MyCompany.RAG
  2. 종속성을 설치하고 가져옵니다.

    다음 명령을 실행합니다.

    dotnet add package MongoDB.Driver --version 3.1.0
    dotnet add package PdfPig
    dotnet add package OpenAI
  3. 환경 변수를 설정합니다.

    다음 환경 변수를 내보내고 PowerShell에서 set를 실행하거나 IDE의 환경 변수 관리자를 사용하여 이러한 변수를 프로젝트에서 사용할 수 있도록 합니다.

    export OPENAI_API_KEY="<api-key>"
    export ATLAS_CONNECTION_STRING="<connection-string>"

<api-key> 자리 표시자 값을 OpenAI API 키로 바꿉니다.

자리 <connection-string> 표시자 값을 Atlas cluster 의 SRV 연결 문자열 로 바꿉니다.

연결 문자열은 다음 형식을 사용해야 합니다.

mongodb+srv://<db_username>:<db_password>@<clusterName>.<hostname>.mongodb.net
2

OpenAIService라는 이름의 파일에 다음 코드를 붙여넣어 같은 이름의 새 클래스를 만듭니다. 이 코드는 주어진 문자열 입력 배열에 대한 임베딩 배열을 생성하기 위해 GetEmbeddingsAsync라는 비동기 작업을 정의합니다. 이 함수는 OpenAI의 text-embedding-3-small 모델을 사용하여 주어진 입력에 대한 임베딩을 생성합니다.

OpenAIService.cs
namespace MyCompany.RAG;
using OpenAI.Embeddings;
using System;
using System.Threading.Tasks;
public class OpenAIService
{
private static readonly string? OpenAIApiKey = Environment.GetEnvironmentVariable("OPENAI_API_KEY");
private static readonly string EmbeddingModelName = "text-embedding-3-small";
private static readonly EmbeddingClient EmbeddingClient = new(model: EmbeddingModelName, apiKey: OpenAIApiKey);
public async Task<Dictionary<string, float[]>> GetEmbeddingsAsync(string[] texts)
{
Dictionary<string, float[]> documentData = new Dictionary<string, float[]>();
try
{
var result = await EmbeddingClient.GenerateEmbeddingsAsync(texts);
var embeddingCount = result.Value.Count;
foreach (var index in Enumerable.Range(0, embeddingCount))
{
// Pair each embedding with the text used to generate it.
documentData[texts[index]] = result.Value[index].ToFloats().ToArray();
}
}
catch (Exception e)
{
throw new ApplicationException(e.Message);
}
return documentData;
}
}
3

이 섹션에서는 LLM이 액세스할 수 없는 샘플 데이터를 Atlas로 수집합니다.

  1. 데이터를 로드하고 분할합니다.

    PdfIngester라는 이름의 파일에 다음 코드를 붙여넣어 같은 이름의 새 클래스를 만듭니다. 이 코드는 다음 작업을 수행하는 몇 가지 함수를 포함하고 있습니다.

    • MongoDB 수익 보고서가 포함된 PDF를 로드합니다.

    • PdfPig를 사용하여 PDF를 텍스트로 구문 분석합니다.

    • 텍스트를 청크로 분할하여 청크 크기(문자 수)와 청크 겹침(연속된 청크 사이에 겹치는 문자 수)을 지정합니다.

    PdfIngester.cs
    namespace MyCompany.RAG;
    using System;
    using System.Net.Http;
    using System.IO;
    using System.Threading.Tasks;
    using System.Collections.Generic;
    using System.Text;
    using UglyToad.PdfPig;
    using UglyToad.PdfPig.Content;
    public class PdfIngester
    {
    public async Task<String> DownloadPdf(string url, string path, string fileName)
    {
    using (HttpClient client = new HttpClient())
    {
    try
    {
    byte[] pdfBytes = await client.GetByteArrayAsync(url);
    await File.WriteAllBytesAsync(path + fileName, pdfBytes);
    return "PDF downloaded and saved to " + path + fileName;
    }
    catch (HttpRequestException e)
    {
    throw new ApplicationException("Error downloading the PDF: " + e.Message);
    }
    catch (IOException e)
    {
    throw new ApplicationException("Error writing the file to disk: " + e.Message);
    }
    }
    }
    public List<string> ConvertPdfToChunkedText(string filePath)
    {
    List<string> textChunks;
    using (var document = PdfDocument.Open(filePath))
    {
    StringBuilder fullText = new StringBuilder();
    foreach (Page page in document.GetPages())
    {
    fullText.Append(page.Text + "\n");
    }
    textChunks = ChunkText(fullText.ToString(), 400, 20);
    }
    var chunkCount = textChunks.Count;
    if (chunkCount == 0)
    {
    throw new ApplicationException("Unable to chunk PDF contents into text.");
    }
    Console.WriteLine($"Successfully chunked the PDF text into {chunkCount} chunks.");
    return textChunks;
    }
    static List<string> ChunkText(string text, int chunkSize, int overlap)
    {
    List<string> chunks = new List<string>();
    int start = 0;
    int textLength = text.Length;
    while (start < textLength)
    {
    int end = start + chunkSize;
    if (end > textLength)
    {
    end = textLength;
    }
    string chunk = text.Substring(start, end - start);
    chunks.Add(chunk);
    // Increment starting point, considering the overlap
    start += chunkSize - overlap;
    if (start >= textLength) break;
    }
    return chunks;
    }
    }
  2. Atlas에 데이터와 임베딩을 저장할 준비를 합니다.

    MongoDBDataService라는 이름의 파일에 다음 코드를 붙여넣어 같은 이름의 새 클래스를 만듭니다. 이 코드는 Atlas에 문서를 추가하기 위해 AddDocumentsAsync라는 이름의 비동기 작업을 정의합니다. 이 함수는 Collection.InsertManyAsync() C# 드라이버 메서드를 사용하여 BsonDocument 유형의 목록을 삽입합니다. 이 코드는 Atlas 클러스터의 rag_db.test 컬렉션에 있는 청크 데이터와 함께 임베딩을 저장합니다.

    MongoDBDataService.cs
    namespace MyCompany.RAG;
    using MongoDB.Driver;
    using MongoDB.Bson;
    public class MongoDBDataService
    {
    private static readonly string? ConnectionString = Environment.GetEnvironmentVariable("ATLAS_CONNECTION_STRING");
    private static readonly MongoClient Client = new MongoClient(ConnectionString);
    private static readonly IMongoDatabase Database = Client.GetDatabase("rag_db");
    private static readonly IMongoCollection<BsonDocument> Collection = Database.GetCollection<BsonDocument>("test");
    public async Task<string> AddDocumentsAsync(Dictionary<string, float[]> embeddings)
    {
    var documents = new List<BsonDocument>();
    foreach( KeyValuePair<string, float[]> var in embeddings )
    {
    var document = new BsonDocument
    {
    {
    "text", var.Key
    },
    {
    "embedding", new BsonArray(var.Value)
    }
    };
    documents.Add(document);
    }
    await Collection.InsertManyAsync(documents);
    return $"Successfully inserted {embeddings.Count} documents into Atlas.";
    }
    }
  3. 데이터를 벡터 임베딩으로 변환합니다.

    EmbeddingGenerator라는 이름의 파일에 다음 코드를 붙여넣어 같은 이름의 새 클래스를 만듭니다. 이 코드는 해당 벡터 임베딩이 포함된 문서 목록을 생성하여 청크화된 문서를 수집할 준비를 합니다. 앞서 정의한 GetEmbeddingsAsync 함수를 사용하여 이러한 임베딩을 생성합니다.

    EmbeddingGenerator.cs
    namespace MyCompany.RAG;
    public class EmbeddingGenerator
    {
    private readonly MongoDBDataService _dataService = new();
    private readonly OpenAIService _openAiService = new();
    public async Task<string> GenerateEmbeddings(List<string> textChunks)
    {
    Console.WriteLine("Generating embeddings.");
    Dictionary<string, float[]> docs = new Dictionary<string, float[]>();
    try
    {
    // Pass the text chunks to OpenAI to generate vector embeddings
    var embeddings = await _openAiService.GetEmbeddingsAsync(textChunks.ToArray());
    // Pair each embedding with the text chunk used to generate it
    int index = 0;
    foreach (var embedding in embeddings)
    {
    docs[textChunks[index]] = embedding.Value;
    index++;
    }
    }
    catch (Exception e)
    {
    throw new ApplicationException("Error creating embeddings for text chunks: " + e.Message);
    }
    // Add a new document to the MongoDB collection for each text and vector embedding pair
    var result = await _dataService.AddDocumentsAsync(docs);
    return result;
    }
    }
  4. Program.cs 파일을 업데이트합니다.

    이 코드를 Program.cs에 붙여넣습니다.

    Program.cs
    using MyCompany.RAG;
    const string pdfUrl = "https://investors.mongodb.com/node/12236/pdf";
    const string savePath = "<path-name>";
    const string fileName = "investor-report.pdf";
    var pdfIngester = new PdfIngester();
    var pdfDownloadResult = await pdfIngester.DownloadPdf(pdfUrl, savePath, fileName);
    Console.WriteLine(pdfDownloadResult);
    var textChunks = pdfIngester.ConvertPdfToChunkedText(savePath + fileName);
    if (textChunks.Any()) {
    var embeddingGenerator = new EmbeddingGenerator();
    var embeddingGenerationResult = await embeddingGenerator.GenerateEmbeddings(textChunks);
    Console.WriteLine(embeddingGenerationResult);
    }

    이 코드:

    • PdfIngester를 사용하여 PDF를 로드하고 텍스트 세그먼트로 청크화합니다.

    • EmbeddingGenerator를 사용하여 PDF의 각 텍스트 청크에 대한 임베딩을 생성하고, 텍스트 청크 및 임베딩을 rag_db.test 컬렉션에 씁니다.

    <path-name> 자리 표시자를 보고서를 다운로드할 경로로 대체합니다. macOS 시스템에서 경로는 /Users/<username>/MyCompany.RAG/와 유사합니다. 경로는 트레일링 슬래시로 끝나야 합니다.

  5. 프로젝트를 컴파일하고 실행하여 임베딩을 생성합니다.

    dotnet run MyCompany.RAG.csproj
    PDF downloaded and saved to <PATH>
    Successfully chunked the PDF text into 73 chunks.
    Generating embeddings.
    Successfully inserted 73 documents into Atlas.
4

이 섹션에서는 Atlas Vector Search를 설정하여 벡터 데이터베이스에서 문서를 조회합니다. MongoDB C# 드라이버 v3.1.0 이상을 사용하여 컬렉션의 Atlas Vector Search 인덱스를 생성하려면 다음 단계를 수행하세요.

  1. Atlas Vector Search 인덱스를 정의합니다.

    MongoDBDataService.cs 파일에 새 CreateVectorIndex() 메서드를 추가하여 검색 인덱스를 정의합니다. 이 코드는 Atlas 클러스터에 연결하고 rag_db.test 컬렉션에 vectorSearch 유형의 인덱스를 생성합니다.

    MongoDBDataService.cs
    namespace MyCompany.RAG;
    using MongoDB.Driver;
    using MongoDB.Bson;
    public class DataService
    {
    private static readonly string? ConnectionString = Environment.GetEnvironmentVariable("ATLAS_CONNECTION_STRING");
    private static readonly MongoClient Client = new MongoClient(ConnectionString);
    private static readonly IMongoDatabase Database = Client.GetDatabase("rag_db");
    private static readonly IMongoCollection<BsonDocument> Collection = Database.GetCollection<BsonDocument>("test");
    public async Task<string> AddDocumentsAsync(Dictionary<string, float[]> embeddings)
    {
    // Method details...
    }
    public string CreateVectorIndex()
    {
    var searchIndexView = Collection.SearchIndexes;
    var name = "vector_index";
    var type = SearchIndexType.VectorSearch;
    var definition = new BsonDocument
    {
    { "fields", new BsonArray
    {
    new BsonDocument
    {
    { "type", "vector" },
    { "path", "embedding" },
    { "numDimensions", 1536 },
    { "similarity", "cosine" }
    }
    }
    }
    };
    var model = new CreateSearchIndexModel(name, type, definition);
    try
    {
    searchIndexView.CreateOne(model);
    Console.WriteLine($"New search index named {name} is building.");
    // Polling for index status
    Console.WriteLine("Polling to check if the index is ready. This may take up to a minute.");
    bool queryable = false;
    while (!queryable)
    {
    var indexes = searchIndexView.List();
    foreach (var index in indexes.ToEnumerable())
    {
    if (index["name"] == name)
    {
    queryable = index["queryable"].AsBoolean;
    }
    }
    if (!queryable)
    {
    Thread.Sleep(5000);
    }
    }
    }
    catch (Exception e)
    {
    throw new ApplicationException("Error creating the vector index: " + e.Message);
    }
    return $"{name} is ready for querying.";
    }
    }
  2. Program.cs 파일을 업데이트합니다.

    Program.cs의 코드를 다음 코드로 대체하여 인덱스를 생성합니다.

    Program.cs
    using MyCompany.RAG;
    var dataService = new MongoDBDataService();
    var result = dataService.CreateVectorIndex();
    Console.WriteLine(result);
  3. 프로젝트 컴파일하고 실행 인덱스 만듭니다.

    dotnet run MyCompany.RAG.csproj
  4. 관련 데이터를 검색하는 함수를 정의합니다.

    MongoDBDataService.cs 파일에 새 PerformVectorQuery 메서드를 추가하여 관련 문서를 조회합니다. 자세한 내용은 벡터 검색 쿼리 실행을 참조하세요.

    MongoDBDataService.cs
    namespace MyCompany.RAG;
    using MongoDB.Driver;
    using MongoDB.Bson;
    public class MongoDBDataService
    {
    private static readonly string? ConnectionString = Environment.GetEnvironmentVariable("ATLAS_CONNECTION_STRING");
    private static readonly MongoClient Client = new MongoClient(ConnectionString);
    private static readonly IMongoDatabase Database = Client.GetDatabase("rag_db");
    private static readonly IMongoCollection<BsonDocument> Collection = Database.GetCollection<BsonDocument>("test");
    public async Task<string> AddDocumentsAsync(Dictionary<string, float[]> embeddings)
    {
    // Method details...
    }
    public string CreateVectorIndex()
    {
    // Method details...
    }
    public List<BsonDocument>? PerformVectorQuery(float[] vector)
    {
    var vectorSearchStage = new BsonDocument
    {
    {
    "$vectorSearch",
    new BsonDocument
    {
    { "index", "vector_index" },
    { "path", "embedding" },
    { "queryVector", new BsonArray(vector) },
    { "exact", true },
    { "limit", 5 }
    }
    }
    };
    var projectStage = new BsonDocument
    {
    {
    "$project",
    new BsonDocument
    {
    { "_id", 0 },
    { "text", 1 },
    { "score",
    new BsonDocument
    {
    { "$meta", "vectorSearchScore"}
    }
    }
    }
    }
    };
    var pipeline = new[] { vectorSearchStage, projectStage };
    return Collection.Aggregate<BsonDocument>(pipeline).ToList();
    }
    }
  5. 데이터 검색 테스트.

    1. PerformTestQuery라는 이름의 파일에 다음 코드를 붙여넣어 같은 이름의 새 클래스를 만듭니다. 이 코드는 텍스트 입력 문자열을 벡터 임베딩으로 변환하고 데이터베이스에서 일치하는 결과를 쿼리합니다. 검색 쿼리에서 임베딩을 생성하기 위해 GetEmbeddingsAsync 함수를 사용합니다. 그런 다음 쿼리를 실행하여 의미적으로 유사한 문서를 반환합니다.

      PerformTestQuery.cs
      namespace MyCompany.RAG;
      public class PerformTestQuery
      {
      private readonly MongoDBDataService _dataService = new();
      private readonly OpenAIService _openAiService = new();
      public async Task<string> GetQueryResults(string question)
      {
      // Get the vector embedding for the query
      var query = question;
      var queryEmbeddings = await _openAiService.GetEmbeddingsAsync([query]);
      // Query the vector database for applicable query results
      var matchingDocuments = _dataService.PerformVectorQuery(queryEmbeddings[query]);
      // Construct a string from the query results for performing QA with the LLM
      var sb = new System.Text.StringBuilder();
      if (matchingDocuments != null)
      {
      foreach (var doc in matchingDocuments)
      {
      sb.AppendLine($"Text: {doc.GetValue("text").ToString()}");
      sb.AppendLine($"Score: {doc.GetValue("score").ToString()}");
      }
      }
      else
      {
      return "No matching documents found.";
      }
      return sb.ToString();
      }
      }
    2. Program.cs 파일을 업데이트합니다.

      Program.cs의 코드를 다음 코드로 대체하여 테스트 쿼리를 수행합니다.

      Program.cs
      using MyCompany.RAG;
      var query = "AI Technology";
      var queryCoordinator = new PerformTestQuery();
      var result = await queryCoordinator.GetQueryResults(query);
      Console.WriteLine(result);
    3. 프로젝트를 컴파일하고 실행하여 쿼리 결과를 확인합니다.

      dotnet run MyCompany.RAG.csproj
      Text: time series queries—and the general availability of Atlas Stream Processing to build sophisticated,event-driven applications with real-time data.MongoDB continues to expand its AI ecosystem with the announcement of the MongoDB AI Applications Program (MAAP),
      which provides customers with reference architectures, pre-built partner integrations, and professional services to helpthem quickly build AI
      Score: 0.72528624534606934
      Text: hem quickly build AI-powered applications. Accenture will establish a center of excellence focused on MongoDB projects,and is the first global systems integrator to join MAAP.Bendigo and Adelaide Bank partnered with MongoDB to modernize their core banking technology. With the help ofMongoDB Relational Migrator and generative AI-powered modernization tools, Bendigo and Adelaide Bank decomposed anou
      Score: 0.71915638446807861
      Text: and regulatory issues relating to the use of new and evolving technologies, such asartificial intelligence, in our offerings or partnerships; the growth and expansion of the market for database products and our ability to penetrate thatmarket; our ability to integrate acquired businesses and technologies successfully or achieve the expected benefits of such acquisitions; our ability tomaintain the
      Score: 0.70376789569854736
      Text: architecture is particularly well-suited for the variety and scale of data required by AI-powered applications. We are confident MongoDB will be a substantial beneficiary of this next wave of application development."First Quarter Fiscal 2025 Financial HighlightsRevenue: Total revenue was $450.6 million for the first quarter of fiscal 2025, an increase of 22% year-over-year.Subscription revenue wa
      Score: 0.67905724048614502
      Text: tures, services orenhancements; our ability to effectively expand our sales and marketing organization; our ability to continue to build and maintain credibility with thedeveloper community; our ability to add new customers or increase sales to our existing customers; our ability to maintain, protect, enforce andenhance our intellectual property; the effects of social, ethical and regulatory issue
      Score: 0.64435118436813354
5

이 섹션에서는 조회된 문서를 컨텍스트로 사용하도록 LLM에 지시하여 응답을 생성합니다. 이 예시에서는 방금 정의한 함수를 사용하여 데이터베이스에서 일치하는 문서를 조회하고 추가로 검색합니다.

  • OpenAI의 gpt-4o-mini 모델에 액세스합니다.

  • 사용자의 질문과 조회된 문서를 프롬프트에 포함하도록 LLM에 지시합니다.

  • LLM에 MongoDB의 최신 AI 발표 내용을 알립니다.

  1. 가져오기, 새 ChatClient 정보, GenerateAnswer라는 새 메서드를 OpenAIService.cs 파일에 추가합니다.

    OpenAIService.cs
    namespace MyCompany.RAG;
    using OpenAI.Embeddings;
    using OpenAI.Chat;
    using System;
    using System.Text;
    using System.Threading.Tasks;
    public class OpenAIService
    {
    private static readonly string? OpenAIApiKey = Environment.GetEnvironmentVariable("OPENAI_API_KEY");
    private static readonly string EmbeddingModelName = "text-embedding-3-small";
    private static readonly EmbeddingClient EmbeddingClient = new(model: EmbeddingModelName, apiKey: OpenAIApiKey);
    private static readonly string ChatModelName = "gpt-4o-mini";
    private static readonly ChatClient ChatClient = new(model: ChatModelName, apiKey: OpenAIApiKey);
    public async Task<Dictionary<string, float[]>> GetEmbeddingsAsync(string[] texts)
    {
    // Method details...
    }
    public async Task<string> GenerateAnswer(string question, string context)
    {
    string prompt = $"""
    Answer the following question based on the given context.
    Context: {context}
    Question: {question}
    """;
    byte[] binaryContent = Encoding.UTF8.GetBytes(prompt);
    IEnumerable<ChatMessage> messages = new List<ChatMessage>([prompt]);
    ChatCompletion responses = await ChatClient.CompleteChatAsync(messages, new ChatCompletionOptions { MaxOutputTokenCount = 400 });
    var summaryResponse = responses.Content[0].Text;
    if (summaryResponse is null)
    {
    throw new ApplicationException("No response from the chat client.");
    }
    return summaryResponse;
    }
    }
  2. RAGPipeline 클래스를 생성합니다.

    RAGPipeline라는 이름의 파일에 다음 코드를 붙여넣어 같은 이름의 새 클래스를 만듭니다. 이 코드는 다음 구성 요소를 조정합니다.

    • GetEmbeddingsAsync 함수: 문자열 쿼리를 벡터 임베딩으로 변환합니다.

    • PerformVectorQuery 함수: 데이터베이스에서 의미적으로 유사한 결과를 조회합니다.

    • GenerateAnswer 함수: 데이터베이스에서 조회된 문서를 LLM에 전달하여 응답을 생성합니다.

    RAGPipeline.cs
    namespace MyCompany.RAG;
    public class RAGPipeline
    {
    private readonly MongoDBDataService _dataService = new();
    private readonly OpenAIService _openAiService = new();
    public async Task<string> GenerateResults(string question)
    {
    // Get the vector embedding for the query
    var query = question;
    var queryEmbedding = await _openAiService.GetEmbeddingsAsync([query]);
    // Query the vector database for applicable query results
    var matchingDocuments = _dataService.PerformVectorQuery(queryEmbedding[query]);
    // Construct a string from the query results for performing QA with the LLM
    var sb = new System.Text.StringBuilder();
    if (matchingDocuments != null)
    {
    foreach (var doc in matchingDocuments)
    {
    sb.AppendLine($"Text: {doc.GetValue("text").ToString()}");
    }
    }
    else
    {
    return "No matching documents found.";
    }
    return await _openAiService.GenerateAnswer(question, sb.ToString());
    }
    }
  3. Program.cs 파일을 업데이트합니다.

    Program.cs의 코드를 다음 코드로 대체하여 RAG 파이프라인을 호출합니다.

    Program.cs
    using MyCompany.RAG;
    var question = "In a few sentences, what are MongoDB's latest AI announcements?";
    var ragPipeline = new RAGPipeline();
    var result = await ragPipeline.GenerateResults(question);
    Console.WriteLine(result);
  4. 프로젝트를 컴파일하고 실행하여 RAG를 수행합니다. 생성된 응답은 다를 수 있습니다.

    dotnet run MyCompany.RAG.csproj
    MongoDB has recently announced the MongoDB AI Applications Program (MAAP),
    which aims to support customers in building AI-powered applications through
    reference architectures, pre-built partner integrations, and professional
    services. Additionally, the program includes a partnership with Accenture,
    which will establish a center of excellence focused on MongoDB projects. These
    initiatives demonstrate MongoDB's commitment to expanding its AI ecosystem and
    its strategy to adapt its document-based architecture for the demands of
    AI-driven application development.
1
  1. Go 프로젝트를 초기화합니다.

    터미널에서 다음 명령을 실행하여 rag-mongodb라는 새 디렉터리를 만들고 프로젝트를 초기화합니다.

    mkdir rag-mongodb
    cd rag-mongodb
    go mod init rag-mongodb
  2. 종속성을 설치하고 가져옵니다.

    다음 명령을 실행합니다.

    go get github.com/joho/godotenv
    go get go.mongodb.org/mongo-driver/v2/mongo
    go get github.com/tmc/langchaingo/llms
    go get github.com/tmc/langchaingo/documentloaders
    go get github.com/tmc/langchaingo/embeddings/huggingface
    go get github.com/tmc/langchaingo/llms/huggingface
    go get github.com/tmc/langchaingo/prompts
    go get github.com/tmc/langchaingo/vectorstores/mongovector
  3. .env 파일을 만듭니다.

    프로젝트에서 Atlas 연결 문자열과 Hugging Face 액세스 토큰을 저장할 .env 파일을 생성하세요.

    .env
    HUGGINGFACEHUB_API_TOKEN = "<access-token>"
    ATLAS_CONNECTION_STRING = "<connection-string>"

    <access-token> 자리 표시자 값을 허깅 페이스 액세스 토큰으로 바꿉니다.

    자리 <connection-string> 표시자 값을 Atlas cluster 의 SRV 연결 문자열 로 바꿉니다.

    연결 문자열은 다음 형식을 사용해야 합니다.

    mongodb+srv://<db_username>:<db_password>@<clusterName>.<hostname>.mongodb.net
2

이 섹션에서는 LLM이액세스 할 수 없는 샘플 데이터를 Atlas 로 다운로드 프로세스 .다음 코드는 LangChain용 고 (Go) 라이브러리를 사용하여 다음 작업을 수행합니다.

  • MongoDB 수익 보고서가 포함된 HTML 파일을 만듭니다.

  • 데이터를 청크로 분할하여 청크 크기(문자 수)와 청크 겹침(연속된 청크 사이에 겹치는 문자 수)을 지정합니다.

  1. 다음 명령을 실행하여 일반 기능을 저장하는 디렉토리 만듭니다.

    mkdir common && cd common
  2. common 디렉토리에 process-file.go 파일을 만들고 다음 코드를 붙여넣습니다.

    process-file.go
    package common
    import (
    "context"
    "io"
    "log"
    "net/http"
    "os"
    "github.com/tmc/langchaingo/documentloaders"
    "github.com/tmc/langchaingo/schema"
    "github.com/tmc/langchaingo/textsplitter"
    )
    func DownloadReport(filename string) {
    _, err := os.Stat(filename)
    if err == nil {
    return
    }
    const url = "https://investors.mongodb.com/node/12236"
    log.Println("Downloading ", url, " to ", filename)
    resp, err := http.Get(url)
    if err != nil {
    log.Fatalf("failed to connect to download the report: %v", err)
    }
    defer func() {
    if err := resp.Body.Close(); err != nil {
    log.Fatalf("failed to close the resource: %v", err)
    }
    }()
    f, err := os.Create(filename)
    if err != nil {
    return
    }
    defer func() {
    if err := f.Close(); err != nil {
    log.Fatalf("failed to close file: %v", err)
    }
    }()
    _, err = io.Copy(f, resp.Body)
    if err != nil {
    log.Fatalf("failed to copy the report: %v", err)
    }
    }
    func ProcessFile(filename string) []schema.Document {
    ctx := context.Background()
    f, err := os.Open(filename)
    if err != nil {
    log.Fatalf("failed to open file: %v", err)
    }
    defer func() {
    if err := f.Close(); err != nil {
    log.Fatalf("failed to close file: %v", err)
    }
    }()
    html := documentloaders.NewHTML(f)
    split := textsplitter.NewRecursiveCharacter()
    split.ChunkSize = 400
    split.ChunkOverlap = 20
    docs, err := html.LoadAndSplit(ctx, split)
    if err != nil {
    log.Fatalf("failed to chunk the HTML into documents: %v", err)
    }
    log.Printf("Successfully chunked the HTML into %v documents.\n", len(docs))
    return docs
    }
3

이 섹션에서는 LLM이액세스 할 수 없는 샘플 데이터를 Atlas 로 수집합니다. 다음 코드는 LangChain고 (Go) 운전자 용 고 (Go) 라이브러리를 사용하여 다음 작업을 수행합니다.

  • 허깅 페이스의 모델 허브에서 mxbai-embed-large-v1 임베딩 모델을 로드합니다.

  • 고 (Go) 운전자 클라이언트 및 허깅 페이스 임베딩 모델에서 mongovector 인스턴스를 만들어 벡터 저장 구현 .

  • mongovector.AddDocuments() 메서드를 사용하여 청크 데이터에서 벡터 임베딩을 생성하고 저장 . 이 코드는 청크 데이터와 해당 임베딩을 Atlas cluster 의 rag_db.test 컬렉션 에 저장합니다.

  1. rag-mongodb 프로젝트 디렉토리의 루트로 이동합니다.

  2. 프로젝트에 ingest-data.go 파일을 만들고 이 파일에 다음 코드를 붙여넣습니다.

    ingest-data.go
    package main
    import (
    "context"
    "fmt"
    "log"
    "os"
    "rag-mongodb/common"
    "github.com/joho/godotenv"
    "github.com/tmc/langchaingo/embeddings/huggingface"
    "github.com/tmc/langchaingo/vectorstores/mongovector"
    "go.mongodb.org/mongo-driver/v2/mongo"
    "go.mongodb.org/mongo-driver/v2/mongo/options"
    )
    func main() {
    filename := "investor-report.html"
    common.DownloadReport(filename)
    docs := common.ProcessFile(filename)
    if err := godotenv.Load(); err != nil {
    log.Fatal("no .env file found")
    }
    // Connect to your Atlas cluster
    uri := os.Getenv("ATLAS_CONNECTION_STRING")
    if uri == "" {
    log.Fatal("set your 'ATLAS_CONNECTION_STRING' environment variable.")
    }
    client, err := mongo.Connect(options.Client().ApplyURI(uri))
    if err != nil {
    log.Fatalf("failed to connect to server: %v", err)
    }
    defer func() {
    if err := client.Disconnect(context.Background()); err != nil {
    log.Fatalf("error disconnecting the client: %v", err)
    }
    }()
    coll := client.Database("rag_db").Collection("test")
    embedder, err := huggingface.NewHuggingface(
    huggingface.WithModel("mixedbread-ai/mxbai-embed-large-v1"),
    huggingface.WithTask("feature-extraction"))
    if err != nil {
    log.Fatal("failed to create an embedder: %v", err)
    }
    store := mongovector.New(coll, embedder, mongovector.WithPath("embedding"))
    // Add documents to the MongoDB Atlas Database vector store.
    log.Println("Generating embeddings.")
    result, err := store.AddDocuments(context.Background(), docs)
    if err != nil {
    log.Fatalf("failed to insert documents: %v", err)
    }
    fmt.Printf("Successfully inserted %v documents into Atlas\n", len(result))
    }
  3. 다음 명령을 실행하여 코드를 실행합니다.

    go run ingest-data.go
    Successfully chunked the HTML into 163 documents.
    Generating embeddings.
    Successfully inserted 163 documents into Atlas
4

이 섹션에서는 Atlas Vector Search를 설정하여 벡터 데이터베이스에서 문서를 조회합니다. 다음 단계를 완료하세요.

  1. 벡터 임베딩에 대한 Atlas Vector Search 인덱스를 만듭니다.

    rag-vector-index.go 라는 이름의 새 파일을 만들고 다음 코드를 붙여넣습니다. 이 코드는 Atlas 클러스터에 연결하고 rag_db.test 컬렉션에 vectorSearch 유형의 인덱스를 생성합니다.

    rag-vector-index.go
    package main
    import (
    "context"
    "log"
    "os"
    "time"
    "github.com/joho/godotenv"
    "go.mongodb.org/mongo-driver/v2/bson"
    "go.mongodb.org/mongo-driver/v2/mongo"
    "go.mongodb.org/mongo-driver/v2/mongo/options"
    )
    func main() {
    ctx := context.Background()
    if err := godotenv.Load(); err != nil {
    log.Fatal("no .env file found")
    }
    // Connect to your Atlas cluster
    uri := os.Getenv("ATLAS_CONNECTION_STRING")
    if uri == "" {
    log.Fatal("set your 'ATLAS_CONNECTION_STRING' environment variable.")
    }
    clientOptions := options.Client().ApplyURI(uri)
    client, err := mongo.Connect(clientOptions)
    if err != nil {
    log.Fatalf("failed to connect to the server: %v", err)
    }
    defer func() { _ = client.Disconnect(ctx) }()
    // Specify the database and collection
    coll := client.Database("rag_db").Collection("test")
    indexName := "vector_index"
    opts := options.SearchIndexes().SetName(indexName).SetType("vectorSearch")
    type vectorDefinitionField struct {
    Type string `bson:"type"`
    Path string `bson:"path"`
    NumDimensions int `bson:"numDimensions"`
    Similarity string `bson:"similarity"`
    }
    type filterField struct {
    Type string `bson:"type"`
    Path string `bson:"path"`
    }
    type vectorDefinition struct {
    Fields []vectorDefinitionField `bson:"fields"`
    }
    indexModel := mongo.SearchIndexModel{
    Definition: vectorDefinition{
    Fields: []vectorDefinitionField{{
    Type: "vector",
    Path: "embedding",
    NumDimensions: 1024,
    Similarity: "cosine"}},
    },
    Options: opts,
    }
    log.Println("Creating the index.")
    searchIndexName, err := coll.SearchIndexes().CreateOne(ctx, indexModel)
    if err != nil {
    log.Fatalf("failed to create the search index: %v", err)
    }
    // Await the creation of the index.
    log.Println("Polling to confirm successful index creation.")
    log.Println("NOTE: This may take up to a minute.")
    searchIndexes := coll.SearchIndexes()
    var doc bson.Raw
    for doc == nil {
    cursor, err := searchIndexes.List(ctx, options.SearchIndexes().SetName(searchIndexName))
    if err != nil {
    log.Printf("failed to list search indexes: %w", err)
    }
    if !cursor.Next(ctx) {
    break
    }
    name := cursor.Current.Lookup("name").StringValue()
    queryable := cursor.Current.Lookup("queryable").Boolean()
    if name == searchIndexName && queryable {
    doc = cursor.Current
    } else {
    time.Sleep(5 * time.Second)
    }
    }
    log.Println("Name of Index Created: " + searchIndexName)
    }
  2. 다음 명령을 실행하여 인덱스를 생성합니다.

    go run rag-vector-index.go
  3. 관련 데이터를 검색하는 함수를 정의합니다.

    이 단계에서는 관련 문서를 조회 쿼리 실행하는 GetQueryResults 조회 함수를 만듭니다. 쿼리 문자열의 벡터 표현을 자동으로 생성하고 관련 결과를 반환하는 mongovector.SimilaritySearch() 메서드를 사용합니다.

    자세한 내용은 벡터 검색 쿼리 실행을 참조하세요.

    common 디렉토리에서 get-query-results.go라는 새 파일을 만들고 다음 코드를 붙여넣습니다.

    get-query-results.go
    package common
    import (
    "context"
    "log"
    "os"
    "github.com/joho/godotenv"
    "github.com/tmc/langchaingo/embeddings/huggingface"
    "github.com/tmc/langchaingo/schema"
    "github.com/tmc/langchaingo/vectorstores/mongovector"
    "go.mongodb.org/mongo-driver/v2/mongo"
    "go.mongodb.org/mongo-driver/v2/mongo/options"
    )
    func GetQueryResults(query string) []schema.Document {
    ctx := context.Background()
    if err := godotenv.Load(); err != nil {
    log.Fatal("no .env file found")
    }
    // Connect to your Atlas cluster
    uri := os.Getenv("ATLAS_CONNECTION_STRING")
    if uri == "" {
    log.Fatal("set your 'ATLAS_CONNECTION_STRING' environment variable.")
    }
    clientOptions := options.Client().ApplyURI(uri)
    client, err := mongo.Connect(clientOptions)
    if err != nil {
    log.Fatalf("failed to connect to the server: %v", err)
    }
    defer func() { _ = client.Disconnect(ctx) }()
    // Specify the database and collection
    coll := client.Database("rag_db").Collection("test")
    embedder, err := huggingface.NewHuggingface(
    huggingface.WithModel("mixedbread-ai/mxbai-embed-large-v1"),
    huggingface.WithTask("feature-extraction"))
    if err != nil {
    log.Fatal("failed to create an embedder: %v", err)
    }
    store := mongovector.New(coll, embedder, mongovector.WithPath("embedding"))
    // Search for similar documents.
    docs, err := store.SimilaritySearch(context.Background(), query, 5)
    if err != nil {
    log.Fatal("error performing similarity search: %v", err)
    }
    return docs
    }
  4. 데이터 검색 테스트.

    1. rag-mongodb 프로젝트 디렉토리에 retrieve-documents-test.go라는 새 파일을 만듭니다. 이 단계에서는 방금 정의한 함수가 관련 결과를 반환하는지 확인합니다.

    2. 이 코드를 파일에 붙여넣습니다.

      retrieve-documents-test.go
      package main
      import (
      "fmt"
      "rag-mongodb/common" // Module that contains the GetQueryResults function
      )
      func main() {
      query := "AI Technology"
      documents := common.GetQueryResults(query)
      for _, doc := range documents {
      fmt.Printf("Text: %s \nScore: %v \n\n", doc.PageContent, doc.Score)
      }
      }
    3. 다음 명령을 실행하여 코드를 실행합니다.

      go run retrieve-documents-test.go
      Text: for the variety and scale of data required by AI-powered applications. We are confident MongoDB will be a substantial beneficiary of this next wave of application development.&#34;
      Score: 0.83503306
      Text: &#34;As we look ahead, we continue to be incredibly excited by our large market opportunity, the potential to increase share, and become a standard within more of our customers. We also see a tremendous opportunity to win more legacy workloads, as AI has now become a catalyst to modernize these applications. MongoDB&#39;s document-based architecture is particularly well-suited for the variety and
      Score: 0.82807535
      Text: to the use of new and evolving technologies, such as artificial intelligence, in our offerings or partnerships; the growth and expansion of the market for database products and our ability to penetrate that market; our ability to integrate acquired businesses and technologies successfully or achieve the expected benefits of such acquisitions; our ability to maintain the security of our software
      Score: 0.8165897
      Text: MongoDB continues to expand its AI ecosystem with the announcement of the MongoDB AI Applications Program (MAAP), which provides customers with reference architectures, pre-built partner integrations, and professional services to help them quickly build AI-powered applications. Accenture will establish a center of excellence focused on MongoDB projects, and is the first global systems
      Score: 0.8023907
      Text: assumptions, our ability to capitalize on our market opportunity and deliver strong growth for the foreseeable future as well as the criticality of MongoDB to artificial intelligence application development. These forward-looking statements include, but are not limited to, plans, objectives, expectations and intentions and other statements contained in this press release that are not historical
      Score: 0.7829329
5

이 섹션에서는 조회된 문서를 컨텍스트로 사용하도록 LLM에 지시하여 응답을 생성합니다. 이 예시에서는 방금 정의한 함수를 사용하여 데이터베이스에서 일치하는 문서를 조회하고 추가로 검색합니다.

  • Hugging Face의 모델 허브에서 Mistral 7B Instruct 모델에 액세스합니다.

  • 사용자의 질문과 조회된 문서를 프롬프트에 포함하도록 LLM에 지시합니다.

  • LLM에 MongoDB의 최신 AI 발표 내용을 알립니다.

  1. generate-responses.go라는 새 파일을 만들고 다음 코드를 붙여넣습니다.

    generate-responses.go
    package main
    import (
    "context"
    "fmt"
    "log"
    "rag-mongodb/common" // Module that contains the GetQueryResults function
    "strings"
    "github.com/tmc/langchaingo/llms"
    "github.com/tmc/langchaingo/llms/huggingface"
    "github.com/tmc/langchaingo/prompts"
    )
    func main() {
    ctx := context.Background()
    query := "AI Technology"
    documents := common.GetQueryResults(query)
    var textDocuments strings.Builder
    for _, doc := range documents {
    textDocuments.WriteString(doc.PageContent)
    }
    question := "In a few sentences, what are MongoDB's latest AI announcements?"
    template := prompts.NewPromptTemplate(
    `Answer the following question based on the given context.
    Question: {{.question}}
    Context: {{.context}}`,
    []string{"question", "context"},
    )
    prompt, err := template.Format(map[string]any{
    "question": question,
    "context": textDocuments.String(),
    })
    opts := llms.CallOptions{
    Model: "mistralai/Mistral-7B-Instruct-v0.3",
    MaxTokens: 150,
    Temperature: 0.1,
    }
    llm, err := huggingface.New(huggingface.WithModel("mistralai/Mistral-7B-Instruct-v0.3"))
    if err != nil {
    log.Fatalf("failed to initialize a Hugging Face LLM: %v", err)
    }
    completion, err := llms.GenerateFromSinglePrompt(ctx, llm, prompt, llms.WithOptions(opts))
    if err != nil {
    log.Fatalf("failed to generate a response from the prompt: %v", err)
    }
    response := strings.Split(completion, "\n\n")
    if len(response) == 2 {
    fmt.Printf("Prompt: %v\n\n", response[0])
    fmt.Printf("Response: %v\n", response[1])
    }
    }
  2. 이 명령을 실행하여 코드를 실행합니다. 생성된 응답은 다를 수 있습니다.

    go run generate-responses.go
    Prompt: Answer the following question based on the given context.
    Question: In a few sentences, what are MongoDB's latest AI announcements?
    Context: for the variety and scale of data required by AI-powered applications. We are confident MongoDB will be a substantial beneficiary of this next wave of application development.&#34;&#34;As we look ahead, we continue to be incredibly excited by our large market opportunity,...
    Response: MongoDB's latest AI announcements include the launch of the MongoDB AI Applications Program (MAAP), which offers customers reference architectures, pre-built partner integrations, and professional services to help them build AI-powered applications quickly. Additionally, Accenture will establish a center of excellence focused on MongoDB projects, making them the first global systems integrator to do so. These announcements demonstrate MongoDB's commitment to expanding its AI ecosystem and positioning itself as a key player in AI-powered application development.
1
  1. IDE에서 Maven 또는 Gradle을 사용하여 Java 프로젝트 만듭니다.

  2. 패키지 관리자에 따라 다음 종속성을 추가합니다.

    Maven을 사용하는 경우, 프로젝트의 pom.xml 파일에 있는 dependencies 배열에 다음 종속성을 추가하고, dependencyManagement 배열에 BOM(Bill of Materials)을 추가하세요.

    pom.xml
    <dependencies>
    <!-- MongoDB Java Sync Driver v5.2.0 or later -->
    <dependency>
    <groupId>org.mongodb</groupId>
    <artifactId>mongodb-driver-sync</artifactId>
    <version>[5.2.0,)</version>
    </dependency>
    <!-- Java library for Hugging Face models -->
    <dependency>
    <groupId>dev.langchain4j</groupId>
    <artifactId>langchain4j-hugging-face</artifactId>
    </dependency>
    <!-- Java library for URL Document Loader -->
    <dependency>
    <groupId>dev.langchain4j</groupId>
    <artifactId>langchain4j</artifactId>
    </dependency>
    <!-- Java library for ApachePDFBox Document Parser -->
    <dependency>
    <groupId>dev.langchain4j</groupId>
    <artifactId>langchain4j-document-parser-apache-pdfbox</artifactId>
    </dependency>
    </dependencies>
    <dependencyManagement>
    <dependencies>
    <!-- Bill of Materials (BOM) to manage Java library versions -->
    <dependency>
    <groupId>dev.langchain4j</groupId>
    <artifactId>langchain4j-bom</artifactId>
    <version>0.36.2</version>
    <type>pom</type>
    <scope>import</scope>
    </dependency>
    </dependencies>
    </dependencyManagement>

    Gradle을 사용하는 경우, 프로젝트의 build.gradle 파일에 있는 dependencies 배열에 다음 BOM(Bill of Materials) 및 종속성을 추가하세요.

    build.gradle
    dependencies {
    // Bill of Materials (BOM) to manage Java library versions
    implementation platform('dev.langchain4j:langchain4j-bom:0.36.2')
    // MongoDB Java Sync Driver v5.2.0 or later
    implementation 'org.mongodb:mongodb-driver-sync:5.2.0'
    // Java library for Hugging Face models
    implementation 'dev.langchain4j:langchain4j-hugging-face'
    // Java library for URL Document Loader
    implementation 'dev.langchain4j:langchain4j'
    // Java library for Apache PDFBox Document Parser
    implementation 'dev.langchain4j:langchain4j-document-parser-apache-pdfbox'
    }
  3. 패키지 관리자를 실행하여 프로젝트 에 종속성을 설치합니다.

2

참고

이 예시 IDE에서 프로젝트 에 대한 변수를 설정합니다. 프로덕션 애플리케이션은 배포서버 구성, CI/CD 파이프라인 또는 시크릿 관리자를 통해 환경 변수를 관리 할 수 있지만, 제공된 코드를 사용 사례 에 맞게 조정할 수 있습니다.

IDE에서 새 구성 템플릿을 만들고 프로젝트 에 다음 변수를 추가합니다.

  • IntelliJ IDEA를 사용하는 경우, 새 Application 실행 구성 템플릿을 만든 후, Environment variables 필드에 세미콜론으로 구분된 값으로 변수를 추가합니다(예: FOO=123;BAR=456). 변경 사항을 적용하고 OK를 클릭합니다.

    자세한 학습 은 IntelliJ IDEA 문서의 템플릿에서 실행/디버그 구성 만들기 섹션을 참조하세요.

  • Eclipse를 사용하는 경우 새 Java Application 시작 구성을 생성한 다음 Environment 탭 에서 각 변수를 새 키-값 쌍으로 추가합니다. 변경 사항을 적용하고 OK를 클릭합니다.

    자세한 학습 은 Eclipse IDE 문서의 Java 애플리케이션 실행 구성 생성하기 섹션을 참조하세요.

환경 변수
HUGGING_FACE_ACCESS_TOKEN=<access-token>
ATLAS_CONNECTION_STRING=<connection-string>

자리 표시자를 다음 값으로 업데이트합니다.

  • <access-token> 자리 표시자 값을 허깅 페이스 액세스 토큰으로 바꿉니다.

  • 자리 <connection-string> 표시자 값을 Atlas cluster 의 SRV 연결 문자열 로 바꿉니다.

    연결 문자열은 다음 형식을 사용해야 합니다.

    mongodb+srv://<db_username>:<db_password>@<clusterName>.<hostname>.mongodb.net
3

PDFProcessor.java 이라는 파일을 만들고 다음 코드를 붙여넣습니다.

이 코드는 다음 메서드를 정의합니다.

  • parsePDFDocument 메서드는 Apache PDFBox 라이브러리와 LangChain4j URL 문서 로더를 사용하여 주어진 URL에서 PDF 파일을 로드하고 구문 분석합니다. 이 메서드는 구문 분석된 PDF를 langchain4j 문서로 반환합니다.

  • splitDocument 메서드는 지정된 청크 크기(문자 수) 및 청크 겹침(연속된 청크 사이의 겹치는 문자 수)에 따라 langchain4j 문서를 청크로 분할합니다. 이 메서드는 텍스트 세그먼트 목록을 반환합니다.

PDFProcessor.java
import dev.langchain4j.data.document.Document;
import dev.langchain4j.data.document.DocumentParser;
import dev.langchain4j.data.document.DocumentSplitter;
import dev.langchain4j.data.document.loader.UrlDocumentLoader;
import dev.langchain4j.data.document.parser.apache.pdfbox.ApachePdfBoxDocumentParser;
import dev.langchain4j.data.document.splitter.DocumentByCharacterSplitter;
import dev.langchain4j.data.segment.TextSegment;
import java.util.List;
public class PDFProcessor {
/** Parses a PDF document from the specified URL, and returns a
* langchain4j Document object.
* */
public static Document parsePDFDocument(String url) {
DocumentParser parser = new ApachePdfBoxDocumentParser();
return UrlDocumentLoader.load(url, parser);
}
/** Splits a parsed langchain4j Document based on the specified chunking
* parameters, and returns an array of text segments.
*/
public static List<TextSegment> splitDocument(Document document) {
int maxChunkSize = 400; // number of characters
int maxChunkOverlap = 20; // number of overlapping characters between consecutive chunks
DocumentSplitter splitter = new DocumentByCharacterSplitter(maxChunkSize, maxChunkOverlap);
return splitter.split(document);
}
}
4

EmbeddingProvider.java 이라는 파일을 만들고 다음 코드를 붙여넣습니다.

이 코드는 mxbai-embed-large-v1 오픈 소스 임베딩 모델을 사용하여 지정된 입력에 대한 임베딩을 생성하는 두 가지 메서드를 정의합니다.

  • 다중 입력: getEmbeddings 메서드는 텍스트 세그먼트 입력 배열(List<TextSegment>)을 사용하므로 단일 API 호출로 여러 임베딩을 생성할 수 있습니다. 이 메서드는 API에서 제공하는 부동 소수점 배열을 Atlas 클러스터에 저장하기 위해 double 유형의 BSON 배열로 변환합니다.

  • 단일 입력: 메서드는 getEmbedding String벡터 데이터에 대해 수행하려는 쿼리 나타내는 단일 를 허용합니다. 이 메서드는 컬렉션 을 쿼리할 때 사용할 수 있도록 API 에서 제공하는 부동 소수점 배열 을 double의 BSON 배열 로 변환합니다.

EmbeddingProvider.java
import dev.langchain4j.data.embedding.Embedding;
import dev.langchain4j.data.segment.TextSegment;
import dev.langchain4j.model.huggingface.HuggingFaceChatModel;
import dev.langchain4j.model.huggingface.HuggingFaceEmbeddingModel;
import dev.langchain4j.model.output.Response;
import org.bson.BsonArray;
import org.bson.BsonDouble;
import java.util.List;
import static java.time.Duration.ofSeconds;
public class EmbeddingProvider {
private static HuggingFaceEmbeddingModel embeddingModel;
private static HuggingFaceEmbeddingModel getEmbeddingModel() {
if (embeddingModel == null) {
String accessToken = System.getenv("HUGGING_FACE_ACCESS_TOKEN");
if (accessToken == null || accessToken.isEmpty()) {
throw new RuntimeException("HUGGING_FACE_ACCESS_TOKEN env variable is not set or is empty.");
}
embeddingModel = HuggingFaceEmbeddingModel.builder()
.accessToken(accessToken)
.modelId("mixedbread-ai/mxbai-embed-large-v1")
.waitForModel(true)
.timeout(ofSeconds(60))
.build();
}
return embeddingModel;
}
/**
* Returns the Hugging Face chat model interface used by the createPrompt() method
* to process queries and generate responses.
*/
private static HuggingFaceChatModel chatModel;
public static HuggingFaceChatModel getChatModel() {
String accessToken = System.getenv("HUGGING_FACE_ACCESS_TOKEN");
if (accessToken == null || accessToken.isEmpty()) {
throw new IllegalStateException("HUGGING_FACE_ACCESS_TOKEN env variable is not set or is empty.");
}
if (chatModel == null) {
chatModel = HuggingFaceChatModel.builder()
.timeout(ofSeconds(25))
.modelId("mistralai/Mistral-7B-Instruct-v0.3")
.temperature(0.1)
.maxNewTokens(150)
.accessToken(accessToken)
.waitForModel(true)
.build();
}
return chatModel;
}
/**
* Takes an array of text segments and returns a BSON array of embeddings to
* store in the database.
*/
public List<BsonArray> getEmbeddings(List<TextSegment> texts) {
List<TextSegment> textSegments = texts.stream()
.toList();
Response<List<Embedding>> response = getEmbeddingModel().embedAll(textSegments);
return response.content().stream()
.map(e -> new BsonArray(
e.vectorAsList().stream()
.map(BsonDouble::new)
.toList()))
.toList();
}
/**
* Takes a single string and returns a BSON array embedding to
* use in a vector query.
*/
public static BsonArray getEmbedding(String text) {
Response<Embedding> response = getEmbeddingModel().embed(text);
return new BsonArray(
response.content().vectorAsList().stream()
.map(BsonDouble::new)
.toList());
}
}
5

DataIngest.java 이라는 파일을 만들고 다음 코드를 붙여넣습니다.

이 코드는 LangChain4j 라이브러리와 MongoDB Java Sync Driver를 사용하여 LLM이 액세스할 수 없는 샘플 데이터를 Atlas에 수집합니다.

구체적으로 이 코드는 다음을 수행합니다.

  1. Atlas 클러스터에 연결합니다.

  2. 이전에 정의한 parsePDFDocument 메서드를 사용하여 URL에서 MongoDB 수익 보고서 PDF 파일을 로드하고 파싱합니다.

  3. 이전에 정의한 splitDocument 메서드를 사용하여 데이터를 청크로 분할합니다.

  4. 이전에 정의한 GetEmbeddings 메서드를 사용하여 청크 데이터에서 벡터 임베딩을 만듭니다.

  5. Atlas 클러스터의 rag_db.test 컬렉션에 있는 청크 데이터와 함께 임베딩을 저장합니다.

    DataIngest.java
    import com.mongodb.MongoException;
    import com.mongodb.client.MongoClient;
    import com.mongodb.client.MongoClients;
    import com.mongodb.client.MongoCollection;
    import com.mongodb.client.MongoDatabase;
    import com.mongodb.client.result.InsertManyResult;
    import dev.langchain4j.data.segment.TextSegment;
    import org.bson.BsonArray;
    import org.bson.Document;
    import java.util.ArrayList;
    import java.util.List;
    public class DataIngest {
    public static void main(String[] args) {
    String uri = System.getenv("ATLAS_CONNECTION_STRING");
    if (uri == null || uri.isEmpty()) {
    throw new RuntimeException("ATLAS_CONNECTION_STRING env variable is not set or is empty.");
    }
    // establish connection and set namespace
    try (MongoClient mongoClient = MongoClients.create(uri)) {
    MongoDatabase database = mongoClient.getDatabase("rag_db");
    MongoCollection<Document> collection = database.getCollection("test");
    // parse the PDF file at the specified URL
    String url = "https://investors.mongodb.com/node/12236/pdf";
    String fileName = "mongodb_annual_report.pdf";
    System.out.println("Parsing the [" + fileName + "] file from url: " + url);
    dev.langchain4j.data.document.Document parsedDoc = PDFProcessor.parsePDFDocument(url);
    // split (or "chunk") the parsed document into text segments
    List<TextSegment> segments = PDFProcessor.splitDocument(parsedDoc);
    System.out.println(segments.size() + " text segments created successfully.");
    // create vector embeddings from the chunked data (i.e. text segments)
    System.out.println("Creating vector embeddings from the parsed data segments. This may take a few moments.");
    List<Document> documents = embedText(segments);
    // insert the embeddings into the Atlas collection
    try {
    System.out.println("Ingesting data into the " + collection.getNamespace() + " collection.");
    insertDocuments(documents, collection);
    }
    catch (MongoException me) {
    throw new RuntimeException("Failed to insert documents", me);
    }
    } catch (MongoException me) {
    throw new RuntimeException("Failed to connect to MongoDB", me);
    } catch (Exception e) {
    throw new RuntimeException("Operation failed: ", e);
    }
    }
    /**
    * Embeds text segments into vector embeddings using the EmbeddingProvider
    * class and returns a list of BSON documents containing the text and
    * generated embeddings.
    */
    private static List<Document> embedText(List<TextSegment> segments) {
    EmbeddingProvider embeddingProvider = new EmbeddingProvider();
    List<BsonArray> embeddings = embeddingProvider.getEmbeddings(segments);
    List<Document> documents = new ArrayList<>();
    int i = 0;
    for (TextSegment segment : segments) {
    Document doc = new Document("text", segment.text()).append("embedding", embeddings.get(i));
    documents.add(doc);
    i++;
    }
    return documents;
    }
    /**
    * Inserts a list of BSON documents into the specified MongoDB collection.
    */
    private static void insertDocuments(List<Document> documents, MongoCollection<Document> collection) {
    List<String> insertedIds = new ArrayList<>();
    InsertManyResult result = collection.insertMany(documents);
    result.getInsertedIds().values()
    .forEach(doc -> insertedIds.add(doc.toString()));
    System.out.println(insertedIds.size() + " documents inserted into the " + collection.getNamespace() + " collection successfully.");
    }
    }
6

참고

허깅 페이스 모델을 호출할 때 503

Hugging Face 모델 허브 모델을 호출할 때 503 오류가 발생할 수 있습니다. 이 문제를 해결하려면 잠시 후 다시 시도하세요.

DataIngest.java 파일을 저장하고 실행합니다. 출력은 다음과 같습니다.

Parsing the [mongodb_annual_report.pdf] file from url: https://investors.mongodb.com/node/12236/pdf
72 text segments created successfully.
Creating vector embeddings from the parsed data segments. This may take a few moments...
Ingesting data into the rag_db.test collection.
72 documents inserted into the rag_db.test collection successfully.
7

이 섹션에서는 Atlas Vector Search를 설정하여 벡터 데이터베이스에서 문서를 조회합니다.

  1. VectorIndex.java 이라는 파일을 만들고 다음 코드를 붙여넣습니다.

    이 코드는 다음 인덱스 정의를 사용하여 컬렉션에 Atlas Vector Search 인덱스를 생성합니다.

    • rag_db.test 컬렉션에 대해 벡터 인덱스 유형으로 embedding 필드를 인덱싱합니다. 이 필드에는 임베딩 모델을 사용하여 생성된 임베딩이 포함되어 있습니다.

    • 1024 벡터 차원을 적용하고 cosine을 사용하여 벡터 간의 유사성을 측정합니다.

    VectorIndex.java
    import com.mongodb.MongoException;
    import com.mongodb.client.ListSearchIndexesIterable;
    import com.mongodb.client.MongoClient;
    import com.mongodb.client.MongoClients;
    import com.mongodb.client.MongoCollection;
    import com.mongodb.client.MongoCursor;
    import com.mongodb.client.MongoDatabase;
    import com.mongodb.client.model.SearchIndexModel;
    import com.mongodb.client.model.SearchIndexType;
    import org.bson.Document;
    import org.bson.conversions.Bson;
    import java.util.Collections;
    import java.util.List;
    public class VectorIndex {
    public static void main(String[] args) {
    String uri = System.getenv("ATLAS_CONNECTION_STRING");
    if (uri == null || uri.isEmpty()) {
    throw new IllegalStateException("ATLAS_CONNECTION_STRING env variable is not set or is empty.");
    }
    // establish connection and set namespace
    try (MongoClient mongoClient = MongoClients.create(uri)) {
    MongoDatabase database = mongoClient.getDatabase("rag_db");
    MongoCollection<Document> collection = database.getCollection("test");
    // define the index details for the index model
    String indexName = "vector_index";
    Bson definition = new Document(
    "fields",
    Collections.singletonList(
    new Document("type", "vector")
    .append("path", "embedding")
    .append("numDimensions", 1024)
    .append("similarity", "cosine")));
    SearchIndexModel indexModel = new SearchIndexModel(
    indexName,
    definition,
    SearchIndexType.vectorSearch());
    // create the index using the defined model
    try {
    List<String> result = collection.createSearchIndexes(Collections.singletonList(indexModel));
    System.out.println("Successfully created vector index named: " + result);
    System.out.println("It may take up to a minute for the index to build before you can query using it.");
    } catch (Exception e) {
    throw new RuntimeException(e);
    }
    // wait for Atlas to build the index and make it queryable
    System.out.println("Polling to confirm the index has completed building.");
    waitForIndexReady(collection, indexName);
    } catch (MongoException me) {
    throw new RuntimeException("Failed to connect to MongoDB", me);
    } catch (Exception e) {
    throw new RuntimeException("Operation failed: ", e);
    }
    }
    /**
    * Polls the collection to check whether the specified index is ready to query.
    */
    public static void waitForIndexReady(MongoCollection<Document> collection, String indexName) throws InterruptedException {
    ListSearchIndexesIterable<Document> searchIndexes = collection.listSearchIndexes();
    while (true) {
    try (MongoCursor<Document> cursor = searchIndexes.iterator()) {
    if (!cursor.hasNext()) {
    break;
    }
    Document current = cursor.next();
    String name = current.getString("name");
    boolean queryable = current.getBoolean("queryable");
    if (name.equals(indexName) && queryable) {
    System.out.println(indexName + " index is ready to query");
    return;
    } else {
    Thread.sleep(500);
    }
    }
    }
    }
    }
  2. Atlas Vector Search 인덱스를 정의합니다.

    파일 저장하고 실행 . 출력은 다음과 유사합니다.

    Successfully created a vector index named: [vector_index]
    Polling to confirm the index has completed building.
    It may take up to a minute for the index to build before you can query using it.
    vector_index index is ready to query
8

이 섹션에서는 검색된 문서를 컨텍스트로 사용하라는 메시지를 LLM에 표시하여 응답을 생성합니다.

LLMPrompt.java라는 새 파일을 만들고 다음 코드를 붙여넣습니다.

이 코드는 다음을 수행합니다.

  1. retrieveDocuments 메서드를 사용하여 rag_db.test 컬렉션에서 일치하는 문서를 쿼리합니다.

    이 메서드는 이전에 만든 getEmbedding 메서드를 사용하여 검색 쿼리에서 임베딩을 생성한 후, 쿼리를 실행하여 의미적으로 유사한 문서를 반환합니다.

    자세한 내용은 벡터 검색 쿼리 실행을 참조하세요.

  2. Hugging Face의 모델 허브에서 Mistral 7B Instruct 모델에 액세스하고, createPrompt 메서드를 사용하여 템플릿 프롬프트를 생성합니다.

    이 메서드는 LLM에 사용자의 질문과 조회된 문서를 정의된 프롬프트에 포함하도록 지시합니다.

  3. LLM에 MongoDB의 최신 AI 발표에 대해 묻고, 생성된 응답을 반환합니다.

    LLMPrompt.java
    import com.mongodb.MongoException;
    import com.mongodb.client.MongoClient;
    import com.mongodb.client.MongoClients;
    import com.mongodb.client.MongoCollection;
    import com.mongodb.client.MongoDatabase;
    import com.mongodb.client.model.search.FieldSearchPath;
    import dev.langchain4j.data.message.AiMessage;
    import dev.langchain4j.model.huggingface.HuggingFaceChatModel;
    import dev.langchain4j.model.input.Prompt;
    import dev.langchain4j.model.input.PromptTemplate;
    import org.bson.BsonArray;
    import org.bson.BsonValue;
    import org.bson.Document;
    import org.bson.conversions.Bson;
    import java.util.ArrayList;
    import java.util.HashMap;
    import java.util.List;
    import java.util.Map;
    import static com.mongodb.client.model.Aggregates.project;
    import static com.mongodb.client.model.Aggregates.vectorSearch;
    import static com.mongodb.client.model.Projections.exclude;
    import static com.mongodb.client.model.Projections.fields;
    import static com.mongodb.client.model.Projections.include;
    import static com.mongodb.client.model.Projections.metaVectorSearchScore;
    import static com.mongodb.client.model.search.SearchPath.fieldPath;
    import static com.mongodb.client.model.search.VectorSearchOptions.exactVectorSearchOptions;
    import static java.util.Arrays.asList;
    public class LLMPrompt {
    // User input: the question to answer
    static String question = "In a few sentences, what are MongoDB's latest AI announcements?";
    public static void main(String[] args) {
    String uri = System.getenv("ATLAS_CONNECTION_STRING");
    if (uri == null || uri.isEmpty()) {
    throw new IllegalStateException("ATLAS_CONNECTION_STRING env variable is not set or is empty.");
    }
    // establish connection and set namespace
    try (MongoClient mongoClient = MongoClients.create(uri)) {
    MongoDatabase database = mongoClient.getDatabase("rag_db");
    MongoCollection<Document> collection = database.getCollection("test");
    // generate a response to the user question
    try {
    createPrompt(question, collection);
    } catch (Exception e) {
    throw new RuntimeException("An error occurred while generating the response: ", e);
    }
    } catch (MongoException me) {
    throw new RuntimeException("Failed to connect to MongoDB ", me);
    } catch (Exception e) {
    throw new RuntimeException("Operation failed: ", e);
    }
    }
    /**
    * Returns a list of documents from the specified MongoDB collection that
    * match the user's question.
    * NOTE: Update or omit the projection stage to change the desired fields in the response
    */
    public static List<Document> retrieveDocuments(String question, MongoCollection<Document> collection) {
    try {
    // generate the query embedding to use in the vector search
    BsonArray queryEmbeddingBsonArray = EmbeddingProvider.getEmbedding(question);
    List<Double> queryEmbedding = new ArrayList<>();
    for (BsonValue value : queryEmbeddingBsonArray.stream().toList()) {
    queryEmbedding.add(value.asDouble().getValue());
    }
    // define the pipeline stages for the vector search index
    String indexName = "vector_index";
    FieldSearchPath fieldSearchPath = fieldPath("embedding");
    int limit = 5;
    List<Bson> pipeline = asList(
    vectorSearch(
    fieldSearchPath,
    queryEmbedding,
    indexName,
    limit,
    exactVectorSearchOptions()),
    project(
    fields(
    exclude("_id"),
    include("text"),
    metaVectorSearchScore("score"))));
    // run the query and return the matching documents
    List<Document> matchingDocuments = new ArrayList<>();
    collection.aggregate(pipeline).forEach(matchingDocuments::add);
    return matchingDocuments;
    } catch (Exception e) {
    System.err.println("Error occurred while retrieving documents: " + e.getMessage());
    return new ArrayList<>();
    }
    }
    /**
    * Creates a templated prompt from a submitted question string and any retrieved documents,
    * then generates a response using the Hugging Face chat model.
    */
    public static void createPrompt(String question, MongoCollection<Document> collection) {
    // retrieve documents matching the user's question
    List<Document> retrievedDocuments = retrieveDocuments(question, collection);
    if (retrievedDocuments.isEmpty()) {
    System.out.println("No relevant documents found. Unable to generate a response.");
    return;
    } else
    System.out.println("Generating a response from the retrieved documents. This may take a few moments.");
    // define a prompt template
    HuggingFaceChatModel huggingFaceChatModel = EmbeddingProvider.getChatModel();
    PromptTemplate promptBuilder = PromptTemplate.from("""
    Answer the following question based on the given context:
    Question: {{question}}
    Context: {{information}}
    -------
    """);
    // build the information string from the retrieved documents
    StringBuilder informationBuilder = new StringBuilder();
    for (Document doc : retrievedDocuments) {
    String text = doc.getString("text");
    informationBuilder.append(text).append("\n");
    }
    Map<String, Object> variables = new HashMap<>();
    variables.put("question", question);
    variables.put("information", informationBuilder);
    // generate and output the response from the chat model
    Prompt prompt = promptBuilder.apply(variables);
    AiMessage response = huggingFaceChatModel.generate(prompt.toUserMessage()).content();
    // extract the generated text to output a formatted response
    String responseText = response.text();
    String marker = "-------";
    int markerIndex = responseText.indexOf(marker);
    String generatedResponse;
    if (markerIndex != -1) {
    generatedResponse = responseText.substring(markerIndex + marker.length()).trim();
    } else {
    generatedResponse = responseText; // else fallback to the full response
    }
    // output the question and formatted response
    System.out.println("Question:\n " + question);
    System.out.println("Response:\n " + generatedResponse);
    // output the filled-in prompt and context information for demonstration purposes
    System.out.println("\n" + "---- Prompt Sent to LLM ----");
    System.out.println(prompt.text() + "\n");
    }
    }
9

파일을 저장하고 실행합니다. 출력은 다음과 유사하지만 생성된 응답은 달라질 수 있습니다.

Generating a response from the retrieved documents. This may take a few moments.
Question:
In a few sentences, what are MongoDB's latest AI announcements?
Response:
MongoDB's latest AI announcements include the MongoDB AI Applications Program (MAAP), which provides customers with reference architectures, pre-built partner integrations, and professional services to help them quickly build AI-powered applications. Accenture will establish a center of excellence focused on MongoDB projects. These announcements highlight MongoDB's growing focus on AI application development and its potential to modernize legacy workloads.
---- Prompt Sent to LLM ----
Answer the following question based on the given context:
Question: In a few sentences, what are MongoDB's latest AI announcements?
Context: time data.
MongoDB continues to expand its AI ecosystem with the announcement of the MongoDB AI Applications Program (MAAP),
which provides customers with reference architectures, pre-built partner integrations, and professional services to help
them quickly build AI-powered applications. Accenture will establish a center of excellence focused on MongoDB projects,
and is the first global systems i
ighlights
MongoDB announced a number of new products and capabilities at MongoDB.local NYC. Highlights included the preview
of MongoDB 8.0—with significant performance improvements such as faster reads and updates, along with significantly
faster bulk inserts and time series queries—and the general availability of Atlas Stream Processing to build sophisticated,
event-driven applications with real-
ble future as well as the criticality of MongoDB to artificial intelligence application development. These forward-looking
statements include, but are not limited to, plans, objectives, expectations and intentions and other statements contained in this press release that are
not historical facts and statements identified by words such as "anticipate," "believe," "continue," "could," "estimate," "e
ve Officer of MongoDB.
"As we look ahead, we continue to be incredibly excited by our large market opportunity, the potential to increase share, and become a standard within
more of our customers. We also see a tremendous opportunity to win more legacy workloads, as AI has now become a catalyst to modernize these
applications. MongoDB's document-based architecture is particularly well-suited for t
ictable, impact on its future GAAP financial results.
Conference Call Information
MongoDB will host a conference call today, May 30, 2024, at 5:00 p.m. (Eastern Time) to discuss its financial results and business outlook. A live
webcast of the call will be available on the "Investor Relations" page of MongoDB's website at https://investors.mongodb.com. To access the call by
phone, please go to thi
1
  1. Node.js 프로젝트를 초기화합니다.

    터미널에서 다음 명령을 실행하여 rag-mongodb라는 새 디렉터리를 만들고 프로젝트를 초기화합니다.

    mkdir rag-mongodb
    cd rag-mongodb
    npm init -y
  2. 종속성을 설치하고 가져옵니다.

    다음 명령을 실행합니다:

    npm install mongodb langchain @langchain/community @xenova/transformers @huggingface/inference pdf-parse
  3. package.json 파일을 업데이트합니다.

    다음 예시와 같이 프로젝트의 package.json 파일에서 type 필드를 지정한 다음 파일을 저장합니다.

    {
    "name": "rag-mongodb",
    "type": "module",
    ...
  4. .env 파일을 만듭니다.

    프로젝트에서 Atlas 연결 문자열과 Hugging Face 액세스 토큰을 저장할 .env 파일을 생성하세요.

    HUGGING_FACE_ACCESS_TOKEN = "<access-token>"
    ATLAS_CONNECTION_STRING = "<connection-string>"

    <access-token> 자리 표시자 값을 허깅 페이스 액세스 토큰으로 바꿉니다.

    자리 <connection-string> 표시자 값을 Atlas cluster 의 SRV 연결 문자열 로 바꿉니다.

    연결 문자열은 다음 형식을 사용해야 합니다.

    mongodb+srv://<db_username>:<db_password>@<clusterName>.<hostname>.mongodb.net

    참고

    최소 Node.js 버전 요구 사항

    Node.js v20.x --env-file 옵션을 도입했습니다. 이전 버전의 Node.js를 사용하는 경우 프로젝트에 dotenv 패키지를 추가하거나 다른 방법으로 환경 변수를 관리하세요.

2

이 섹션에서는 다음을 수행하는 함수를 만듭니다.

  • Hugging Face의 모델 허브에서 nomic-embed-text-v1 임베딩 모델을 로드합니다.

  • 입력된 데이터에서 벡터 임베딩을 생성합니다.

프로젝트에 get-embeddings.js라는 파일을 만들고 다음 코드를 붙여넣습니다.

import { pipeline } from '@xenova/transformers';
// Function to generate embeddings for a given data source
export async function getEmbedding(data) {
const embedder = await pipeline(
'feature-extraction',
'Xenova/nomic-embed-text-v1');
const results = await embedder(data, { pooling: 'mean', normalize: true });
return Array.from(results.data);
}
3

이 섹션에서는 LLM이 액세스할 수 없는 샘플 데이터를 Atlas로 수집합니다. 다음 코드는 LangChain 통합Node.js 드라이버를 사용하여 다음 작업을 수행합니다.

  • MongoDB 수익 보고서가 포함된 PDF를 로드합니다.

  • 데이터를 청크로 분할하여 청크 크기(문자 수)와 청크 겹침(연속된 청크 사이에 겹치는 문자 수)을 지정합니다.

  • 정의한 getEmbedding 함수를 사용하여 청크 데이터에서 벡터 임베딩을 만듭니다.

  • 이러한 임베딩을 Atlas 클러스터의 rag_db.test 컬렉션에 있는 청크 데이터와 함께 저장합니다.

프로젝트에 ingest-data.js라는 파일을 만들고 다음 코드를 붙여넣습니다.

import { PDFLoader } from "@langchain/community/document_loaders/fs/pdf";
import { RecursiveCharacterTextSplitter } from "langchain/text_splitter";
import { MongoClient } from 'mongodb';
import { getEmbedding } from './get-embeddings.js';
import * as fs from 'fs';
async function run() {
const client = new MongoClient(process.env.ATLAS_CONNECTION_STRING);
try {
// Save online PDF as a file
const rawData = await fetch("https://investors.mongodb.com/node/12236/pdf");
const pdfBuffer = await rawData.arrayBuffer();
const pdfData = Buffer.from(pdfBuffer);
fs.writeFileSync("investor-report.pdf", pdfData);
const loader = new PDFLoader(`investor-report.pdf`);
const data = await loader.load();
// Chunk the text from the PDF
const textSplitter = new RecursiveCharacterTextSplitter({
chunkSize: 400,
chunkOverlap: 20,
});
const docs = await textSplitter.splitDocuments(data);
console.log(`Successfully chunked the PDF into ${docs.length} documents.`);
// Connect to your Atlas cluster
await client.connect();
const db = client.db("rag_db");
const collection = db.collection("test");
console.log("Generating embeddings and inserting documents...");
const insertDocuments = [];
await Promise.all(docs.map(async doc => {
// Generate embeddings using the function that you defined
const embedding = await getEmbedding(doc.pageContent);
// Add the document with the embedding to array of documents for bulk insert
insertDocuments.push({
document: doc,
embedding: embedding
});
}))
// Continue processing documents if an error occurs during an operation
const options = { ordered: false };
// Insert documents with embeddings into Atlas
const result = await collection.insertMany(insertDocuments, options);
console.log("Count of documents inserted: " + result.insertedCount);
} catch (err) {
console.log(err.stack);
}
finally {
await client.close();
}
}
run().catch(console.dir);

그리고 다음 명령을 실행하여 코드를 실행합니다.

node --env-file=.env ingest-data.js
Generating embeddings and inserting documents...
Count of documents inserted: 86

이 코드는 실행하는 데 시간이 다소 걸립니다. Atlas UI에서 rag_db.test 컬렉션으로 이동하여 삽입된 벡터 임베딩을 확인할 수 있습니다.

4

이 섹션에서는 Atlas Vector Search를 설정하여 벡터 데이터베이스에서 문서를 조회합니다. 다음 단계를 완료하세요.

  1. 벡터 임베딩에 대한 Atlas Vector Search 인덱스를 만듭니다.

    rag-vector-index.js 라는 이름의 새 파일을 만들고 다음 코드를 붙여넣습니다. 이 코드는 Atlas 클러스터에 연결하고 rag_db.test 컬렉션에 vectorSearch 유형의 인덱스를 생성합니다.

    import { MongoClient } from 'mongodb';
    // Connect to your Atlas cluster
    const client = new MongoClient(process.env.ATLAS_CONNECTION_STRING);
    async function run() {
    try {
    const database = client.db("rag_db");
    const collection = database.collection("test");
    // Define your Atlas Vector Search index
    const index = {
    name: "vector_index",
    type: "vectorSearch",
    definition: {
    "fields": [
    {
    "type": "vector",
    "numDimensions": 768,
    "path": "embedding",
    "similarity": "cosine"
    }
    ]
    }
    }
    // Call the method to create the index
    const result = await collection.createSearchIndex(index);
    console.log(result);
    } finally {
    await client.close();
    }
    }
    run().catch(console.dir);

    그리고 다음 명령을 실행하여 코드를 실행합니다.

    node --env-file=.env rag-vector-index.js
  2. 관련 데이터를 검색하는 함수를 정의합니다.

    retrieve-documents.js라는 이름의 새 파일을 만듭니다.

    이 단계에서는 getQueryResults라는 검색 함수를 생성하여 관련 문서를 검색하는 쿼리를 실행합니다. 검색 쿼리에서 임베딩을 생성하기 위해 getEmbedding 함수를 사용합니다. 그런 다음 쿼리를 실행하여 의미적으로 유사한 문서를 반환합니다.

    자세한 내용은 벡터 검색 쿼리 실행을 참조하세요.

    이 코드를 파일에 붙여넣습니다.

    import { MongoClient } from 'mongodb';
    import { getEmbedding } from './get-embeddings.js';
    // Function to get the results of a vector query
    export async function getQueryResults(query) {
    // Connect to your Atlas cluster
    const client = new MongoClient(process.env.ATLAS_CONNECTION_STRING);
    try {
    // Get embedding for a query
    const queryEmbedding = await getEmbedding(query);
    await client.connect();
    const db = client.db("rag_db");
    const collection = db.collection("test");
    const pipeline = [
    {
    $vectorSearch: {
    index: "vector_index",
    queryVector: queryEmbedding,
    path: "embedding",
    exact: true,
    limit: 5
    }
    },
    {
    $project: {
    _id: 0,
    document: 1,
    }
    }
    ];
    // Retrieve documents from Atlas using this Vector Search query
    const result = collection.aggregate(pipeline);
    const arrayOfQueryDocs = [];
    for await (const doc of result) {
    arrayOfQueryDocs.push(doc);
    }
    return arrayOfQueryDocs;
    } catch (err) {
    console.log(err.stack);
    }
    finally {
    await client.close();
    }
    }
  3. 데이터 검색 테스트.

    retrieve-documents-test.js라는 이름의 새 파일을 만듭니다. 이 단계에서는 방금 정의한 함수가 관련 결과를 반환하는지 확인합니다.

    이 코드를 파일에 붙여넣습니다.

    import { getQueryResults } from './retrieve-documents.js';
    async function run() {
    try {
    const query = "AI Technology";
    const documents = await getQueryResults(query);
    documents.forEach( doc => {
    console.log(doc);
    });
    } catch (err) {
    console.log(err.stack);
    }
    }
    run().catch(console.dir);

    그리고 다음 명령을 실행하여 코드를 실행합니다.

    node --env-file=.env retrieve-documents-test.js
    {
    document: {
    pageContent: 'MongoDB continues to expand its AI ecosystem with the announcement of the MongoDB AI Applications Program (MAAP),',
    metadata: { source: 'investor-report.pdf', pdf: [Object], loc: [Object] },
    id: null
    }
    }
    {
    document: {
    pageContent: 'artificial intelligence, in our offerings or partnerships; the growth and expansion of the market for database products and our ability to penetrate that\n' +
    'market; our ability to integrate acquired businesses and technologies successfully or achieve the expected benefits of such acquisitions; our ability to',
    metadata: { source: 'investor-report.pdf', pdf: [Object], loc: [Object] },
    id: null
    }
    }
    {
    document: {
    pageContent: 'more of our customers. We also see a tremendous opportunity to win more legacy workloads, as AI has now become a catalyst to modernize these\n' +
    "applications. MongoDB's document-based architecture is particularly well-suited for the variety and scale of data required by AI-powered applications. \n" +
    'We are confident MongoDB will be a substantial beneficiary of this next wave of application development."',
    metadata: { source: 'investor-report.pdf', pdf: [Object], loc: [Object] },
    id: null
    }
    }
    {
    document: {
    pageContent: 'which provides customers with reference architectures, pre-built partner integrations, and professional services to help\n' +
    'them quickly build AI-powered applications. Accenture will establish a center of excellence focused on MongoDB projects,\n' +
    'and is the first global systems integrator to join MAAP.',
    metadata: { source: 'investor-report.pdf', pdf: [Object], loc: [Object] },
    id: null
    }
    }
    {
    document: {
    pageContent: 'Bendigo and Adelaide Bank partnered with MongoDB to modernize their core banking technology. With the help of\n' +
    'MongoDB Relational Migrator and generative AI-powered modernization tools, Bendigo and Adelaide Bank decomposed an\n' +
    'outdated consumer-servicing application into microservices and migrated off its underlying legacy relational database',
    metadata: { source: 'investor-report.pdf', pdf: [Object], loc: [Object] },
    id: null
    }
    }
5

이 섹션에서는 조회된 문서를 컨텍스트로 사용하도록 LLM에 지시하여 응답을 생성합니다. 이 예시에서는 방금 정의한 함수를 사용하여 데이터베이스에서 일치하는 문서를 조회하고 추가로 검색합니다.

  • Hugging Face의 모델 허브에서 Mistral 7B Instruct 모델에 액세스합니다.

  • 사용자의 질문과 조회된 문서를 프롬프트에 포함하도록 LLM에 지시합니다.

  • LLM에 MongoDB의 최신 AI 발표 내용을 알립니다.

generate-responses.js라는 새 파일을 만들고 다음 코드를 붙여넣습니다.

import { getQueryResults } from './retrieve-documents.js';
import { HfInference } from '@huggingface/inference'
async function run() {
try {
// Specify search query and retrieve relevant documents
const query = "AI Technology";
const documents = await getQueryResults(query);
// Build a string representation of the retrieved documents to use in the prompt
let textDocuments = "";
documents.forEach(doc => {
textDocuments += doc.document.pageContent;
});
const question = "In a few sentences, what are MongoDB's latest AI announcements?";
// Create a prompt consisting of the question and context to pass to the LLM
const prompt = `Answer the following question based on the given context.
Question: {${question}}
Context: {${textDocuments}}
`;
// Connect to Hugging Face, using the access token from the environment file
const hf = new HfInference(process.env.HUGGING_FACE_ACCESS_TOKEN);
const llm = hf.endpoint(
"https://api-inference.huggingface.co/models/mistralai/Mistral-7B-Instruct-v0.3"
);
// Prompt the LLM to answer the question using the
// retrieved documents as the context
const output = await llm.chatCompletion({
model: "mistralai/Mistral-7B-Instruct-v0.2",
messages: [{ role: "user", content: prompt }],
max_tokens: 150,
});
// Output the LLM's response as text.
console.log(output.choices[0].message.content);
} catch (err) {
console.log(err.stack);
}
}
run().catch(console.dir);

그런 다음 이 명령을 실행 하여 코드를 실행합니다. 생성된 응답은 다를 수 있습니다.

node --env-file=.env generate-responses.js
MongoDB's latest AI announcements include the launch of the MongoDB
AI Applications Program (MAAP), which provides customers with
reference architectures, pre-built partner integrations, and
professional services to help them build AI-powered applications
quickly. Accenture has joined MAAP as the first global systems
integrator, establishing a center of excellence focused on MongoDB
projects. Additionally, Bendigo and Adelaide Bank have partnered
with MongoDB to modernize their core banking technology using
MongoDB's Relational Migrator and generative AI-powered
modernization tools.
1

확장자가 .ipynb인 파일 을 저장하여 대화형 Python 노트북을 만듭니다. 이 노트북을 사용하면 Python 코드 스니펫을 개별적으로 실행할 수 있습니다. 노트북에서 다음 코드를 실행하여 이 튜토리얼의 종속성을 설치합니다.

pip install --quiet --upgrade pymongo sentence_transformers einops langchain langchain_community pypdf huggingface_hub
2

이 섹션에서는 LLM이 액세스할 수 없는 샘플 데이터를 Atlas로 수집합니다. 다음 코드 스니펫을 노트북에 붙여넣고 실행합니다.

  1. 벡터 임베딩을 생성하는 함수를 정의합니다.

    이 코드를 실행하여 오픈 소스 임베딩 모델을 사용해 벡터 임베딩을 생성하는 함수를 만듭니다. 구체적으로 이 코드는 다음을 수행합니다.

    • Sentence Transformers의 모델 허브에서 nomic-embed-text-v1 임베딩 모델을 로드합니다.

    • 주어진 텍스트 입력에 대한 임베딩을 생성하기 위해 모델을 사용하는 get_embedding이라는 함수를 생성합니다.

    from sentence_transformers import SentenceTransformer
    # Load the embedding model (https://huggingface.co/nomic-ai/nomic-embed-text-v1")
    model = SentenceTransformer("nomic-ai/nomic-embed-text-v1", trust_remote_code=True)
    # Define a function to generate embeddings
    def get_embedding(data):
    """Generates vector embeddings for the given data."""
    embedding = model.encode(data)
    return embedding.tolist()
  2. 데이터를 로드하고 분할합니다.

    이 코드를 실행하여 LangChain 통합을 사용해 샘플 데이터를 로드 및 분할합니다. 구체적으로 이 코드는 다음을 수행합니다.

    • MongoDB 수익 보고서가 포함된 PDF를 로드합니다.

    • 데이터를 청크로 분할하여 청크 크기(문자 수)와 청크 겹침(연속된 청크 사이에 겹치는 문자 수)을 지정합니다.

    from langchain_community.document_loaders import PyPDFLoader
    from langchain.text_splitter import RecursiveCharacterTextSplitter
    # Load the PDF
    loader = PyPDFLoader("https://investors.mongodb.com/node/12236/pdf")
    data = loader.load()
    # Split the data into chunks
    text_splitter = RecursiveCharacterTextSplitter(chunk_size=400, chunk_overlap=20)
    documents = text_splitter.split_documents(data)
  3. 데이터를 벡터 임베딩으로 변환합니다.

    이 코드를 실행하여 해당 벡터 임베딩이 포함된 문서 목록을 만들어 청크된 문서를 수집할 준비를 합니다. 방금 정의한 get_embedding 함수를 사용하여 임베딩을 생성합니다.

    # Prepare documents for insertion
    docs_to_insert = [{
    "text": doc.page_content,
    "embedding": get_embedding(doc.page_content)
    } for doc in documents]
  4. Atlas에 데이터와 임베딩을 저장합니다.

    이 코드를 실행하여 임베딩이 포함된 문서를 Atlas 클러스터의 rag_db.test 컬렉션에 삽입합니다. 코드를 실행하기 전에 <connection-string> Atlas 연결 문자열로 변경합니다.

    from pymongo import MongoClient
    # Connect to your Atlas cluster
    client = MongoClient("<connection-string>")
    collection = client["rag_db"]["test"]
    # Insert documents into the collection
    result = collection.insert_many(docs_to_insert)

    코드를 실행한 후 클러스터의 rag_db.test 컬렉션으로 이동하여 Atlas UI에서 벡터 임베딩을 볼 수 있습니다.

3

이 섹션에서는 Atlas Vector Search를 사용하여 벡터 데이터베이스에서 관련 문서를 가져오는 검색 시스템을 생성합니다. 노트북에 다음 코드 스니펫을 각각 붙여넣고 실행합니다.

  1. 벡터 임베딩에 대한 Atlas Vector Search 인덱스를 만듭니다.

    PyMongo 드라이버를 사용하여 애플리케이션에서 직접 인덱스를 생성하려면 다음 코드를 실행하세요. 이 코드에는 인덱스를 사용할 준비가 되었는지 확인하는 폴링 메커니즘도 포함되어 있습니다.

    자세한 사항은 벡터 검색용 필드 인덱싱 방법을 참조하십시오.

    from pymongo.operations import SearchIndexModel
    import time
    # Create your index model, then create the search index
    index_name="vector_index"
    search_index_model = SearchIndexModel(
    definition = {
    "fields": [
    {
    "type": "vector",
    "numDimensions": 768,
    "path": "embedding",
    "similarity": "cosine"
    }
    ]
    },
    name = index_name,
    type = "vectorSearch"
    )
    collection.create_search_index(model=search_index_model)
    # Wait for initial sync to complete
    print("Polling to check if the index is ready. This may take up to a minute.")
    predicate=None
    if predicate is None:
    predicate = lambda index: index.get("queryable") is True
    while True:
    indices = list(collection.list_search_indexes(index_name))
    if len(indices) and predicate(indices[0]):
    break
    time.sleep(5)
    print(index_name + " is ready for querying.")
  2. 벡터 검색 쿼리를 실행하는 함수를 정의합니다.

    이 코드를 실행하여 기본 벡터 검색 쿼리를 실행하는 get_query_results라는 조회 함수를 생성합니다. 검색 쿼리에서 임베딩을 생성하기 위해 get_embedding 함수를 사용합니다. 그런 다음 쿼리를 실행하여 의미적으로 유사한 문서를 반환합니다.

    자세한 내용은 벡터 검색 쿼리 실행을 참조하세요.

    # Define a function to run vector search queries
    def get_query_results(query):
    """Gets results from a vector search query."""
    query_embedding = get_embedding(query)
    pipeline = [
    {
    "$vectorSearch": {
    "index": "vector_index",
    "queryVector": query_embedding,
    "path": "embedding",
    "exact": True,
    "limit": 5
    }
    }, {
    "$project": {
    "_id": 0,
    "text": 1
    }
    }
    ]
    results = collection.aggregate(pipeline)
    array_of_results = []
    for doc in results:
    array_of_results.append(doc)
    return array_of_results
    # Test the function with a sample query
    import pprint
    pprint.pprint(get_query_results("AI technology"))
    [{'text': 'more of our customers. We also see a tremendous opportunity to win '
    'more legacy workloads, as AI has now become a catalyst to modernize '
    'these\n'
    "applications. MongoDB's document-based architecture is "
    'particularly well-suited for the variety and scale of data required '
    'by AI-powered applications.'},
    {'text': 'artificial intelligence, in our offerings or partnerships; the '
    'growth and expansion of the market for database products and our '
    'ability to penetrate that\n'
    'market; our ability to integrate acquired businesses and '
    'technologies successfully or achieve the expected benefits of such '
    'acquisitions; our ability to'},
    {'text': 'MongoDB continues to expand its AI ecosystem with the announcement '
    'of the MongoDB AI Applications Program (MAAP),'},
    {'text': 'which provides customers with reference architectures, pre-built '
    'partner integrations, and professional services to help\n'
    'them quickly build AI-powered applications. Accenture will '
    'establish a center of excellence focused on MongoDB projects,\n'
    'and is the first global systems integrator to join MAAP.'},
    {'text': 'Bendigo and Adelaide Bank partnered with MongoDB to modernize '
    'their core banking technology. With the help of\n'
    'MongoDB Relational Migrator and generative AI-powered modernization '
    'tools, Bendigo and Adelaide Bank decomposed an\n'
    'outdated consumer-servicing application into microservices and '
    'migrated off its underlying legacy relational database'}]
4

이 섹션에서는 검색된 문서를 컨텍스트로 사용하라는 메시지를 LLM에 표시하여 응답을 생성합니다.

다음 코드의 <token>을 Hugging Face 액세스 토큰으로 바꾼 다음, Notebook에서 코드를 실행합니다. 이 코드는 다음을 수행합니다.

  • 정의한 get_query_results 함수를 사용하여 Atlas에서 관련 문서를 조회합니다.

  • 사용자의 질문과 조회된 문서를 맥락으로 사용하여 프롬프트를 생성합니다.

  • Hugging Face의 모델 허브에서 Mistral 7B Instruct 모델에 액세스합니다.

  • LLM에 MongoDB의 최신 AI 발표 내용을 알립니다. 생성된 응답은 다를 수 있습니다.

import os
from huggingface_hub import InferenceClient
# Specify search query, retrieve relevant documents, and convert to string
query = "What are MongoDB's latest AI announcements?"
context_docs = get_query_results(query)
context_string = " ".join([doc["text"] for doc in context_docs])
# Construct prompt for the LLM using the retrieved documents as the context
prompt = f"""Use the following pieces of context to answer the question at the end.
{context_string}
Question: {query}
"""
# Authenticate to Hugging Face and access the model
os.environ["HF_TOKEN"] = "<token>"
llm = InferenceClient(
"mistralai/Mistral-7B-Instruct-v0.3",
token = os.getenv("HF_TOKEN"))
# Prompt the LLM (this code varies depending on the model you use)
output = llm.chat_completion(
messages=[{"role": "user", "content": prompt}],
max_tokens=150
)
print(output.choices[0].message.content)
MongoDB's latest AI announcements include the
MongoDB AI Applications Program (MAAP), a program designed
to help customers build AI-powered applications more efficiently.
Additionally, they have announced significant performance
improvements in MongoDB 8.0, featuring faster reads, updates,
bulk inserts, and time series queries. Another announcement is the
general availability of Atlas Stream Processing to build sophisticated,
event-driven applications with real-time data.

더 자세한 RAG 튜토리얼은 다음 리소스를 참조하세요.

Atlas Vector Search를 사용하여 프로덕션에 적합한 챗봇을 구축하려면 MongoDB 챗봇 프레임워크를 사용할 수 있습니다. 이 프레임워크는 AI 챗봇 애플리케이션을 빠르게 구축할 수 있는 라이브러리 세트를 제공합니다.

RAG 애플리케이션을 최적화하고 미세 조정하려면 쿼리 결과의 정확성을 측정하고 벡터 검색 성능을 개선하는 방법을 참조하세요.

다양한 임베딩 모델, 청킹 전략 및 LLM을 실험해볼 수도 있습니다. 자세히 학습 다음 리소스를 참조하세요.

또한 Atlas Vector Search는 고급 검색 시스템을 지원합니다. Atlas 에서는 벡터 데이터를 다른 데이터와 함께 원활하게 인덱싱할 수 있으므로 컬렉션의 다른 필드를 사전 필터링하거나 하이브리드 검색을 수행하여 시맨틱 검색을 전체 텍스트 검색 결과와 결합하여 검색 결과를 미세 조정할 수 있습니다.

돌아가기

벡터 양자화