Docs Menu
Docs Home
/ /

MongoDBによる検索拡張生成(RAG)

検索拡張生成(RAG)は、大規模な言語モデル(llm)を追加のデータで強化して、より正確な応答を生成できるようにするために使用されるアーキテクチャです。MongoDB ベクトル検索を基盤とした検索システムと LVM を組み合わせて、生成系AIアプリケーションに RAG を実装できます。

MongoDB ベクトル検索で RAG をすばやく試すには、 MongoDB Search Playground で チャットボット Demo Builder を使用します。詳しくは、検索プレイグラウンドのチャットボット デモ ビルダを参照してください。

MongoDB ベクトル検索を使用して独自の RAG システムを実装するには、このページのチュートリアルを参照してください。

LLM を使用する際、以下の制限事項に直面する可能性があります。

  • 古いデータ: LLM は特定の時点まで静的なデータセットで訓練されます。これは、その知識ベースが限られており、古いデータを使用する可能性があることを意味します。

  • ローカルデータへのアクセスがない: LLM はローカルデータやパーソナライズされたデータにアクセスできません。したがって、特定の領域に関する知識が不足している可能性があります。

  • ハルシネーション: 訓練データが不完全または古い場合、LLM は不正確な情報を生成することがあります。

RAGを実装するには次の手順を持つことで、これらの制限に対処できます。

  1. 取り込み: MongoDBなどのベクトルデータベースにカスタム データをベクトル埋め込みとして保存します。これにより、最新のパーソナライズされたデータの知識ベースを作成できます。

  2. 検索: MongoDB ベクトル検索などの検索ソリューションを使用して、ユーザーの質問に基づいてデータベースからセマンティックに類似したドキュメントを検索します。これらのドキュメントは、TLM に関連するデータを追加します。

  3. 生成: LLM にプロンプトを出します。LLM は取得されたドキュメントをコンテキストとして使用し、より正確で関連性の高い応答を生成して、ハルシネーションを減らします。

RAGは質問応答やテキスト生成などのタスクを実行できるため、パーソナライズされたドメイン固有の応答を提供する AI チャットボットを構築するための効果的なアーキテクチャになります。 本番環境に対応したチャットボットを作成するには、リクエストをルーティングするようにサーバーを設定し、 RAG実装上にユーザー インターフェースを構築する必要があります。

MongoDB ベクトル検索で RG を実装するには、 MongoDBにデータを取り込み 、 MongoDB ベクトル検索を使用してドキュメントを検索し、 LM を使用して応答を生成します。このセクションでは、 MongoDB ベクトル検索を使用した基本的な、またはネイティブの RAG実装のコンポーネントについて説明します。段階的な手順については、「 チュートリアル 」を参照してください。
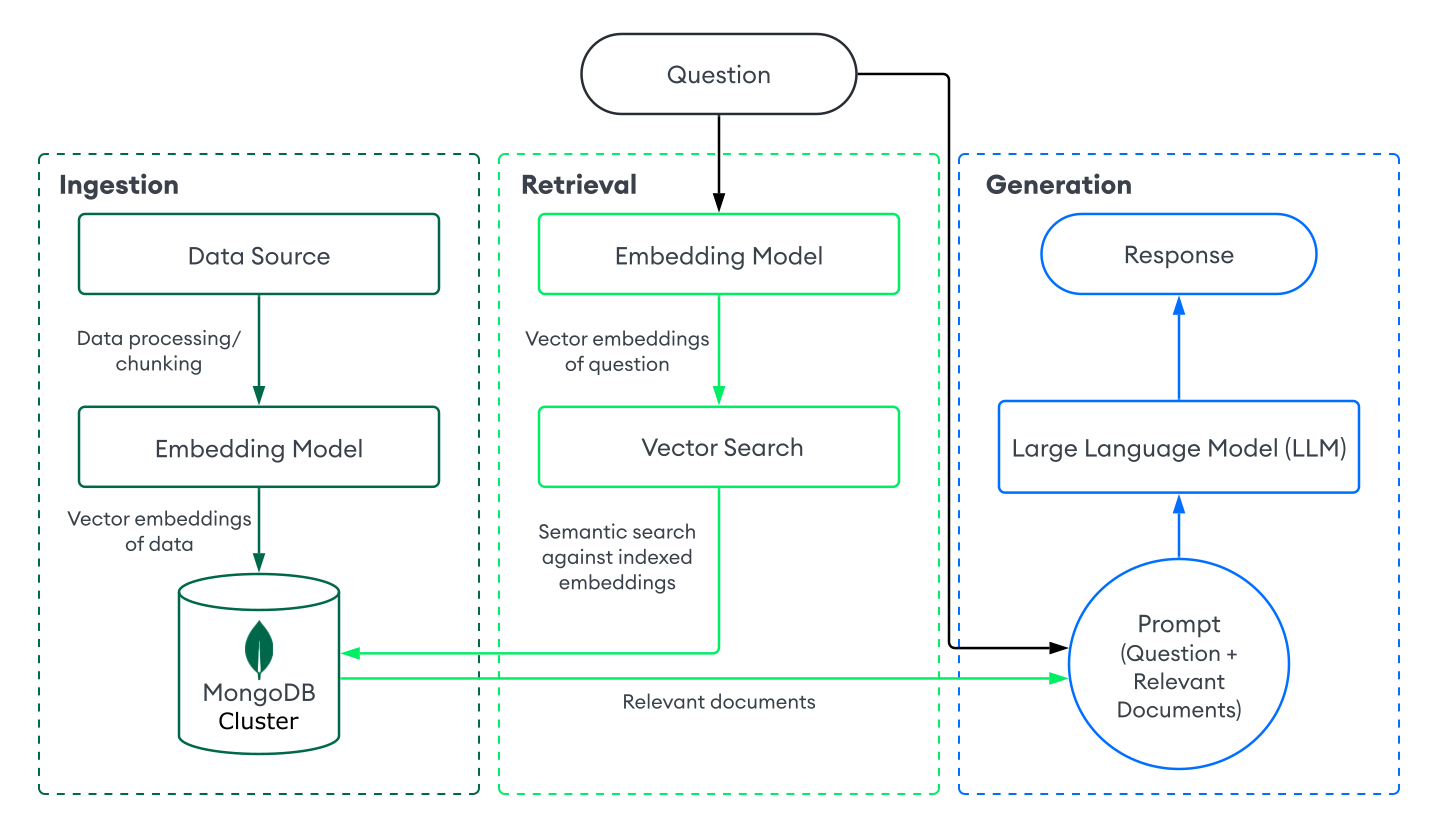
MongoDB ベクトル検索を使用した RG フローチャート

MongoDB ベクトル検索で RAG を実装する方法のビデオをご覧ください。

所要時間: 5分

RG のデータ取り込みには、カスタム データを処理し、ベクトルデータベースに保存して取得に準備する方法が含まれます。MongoDBをベクトルデータベースとして基本的な取り込みパイプラインを作成するには、次の手順を実行します。

  1. データを準備します。

    データをロードし、処理し、チャンク化して、RAG アプリケーション用に準備します。チャンク処理とは、最適な検索のためにデータを小さな単位に分割する処理です。

  2. データをベクトル埋め込みに変換します。

    埋め込みモデル を使用してデータを ベクトル埋め込み に変換します。詳細については、「ベクトル埋め込みの作成方法」を参照してください。

  3. データと埋め込みをMongoDBに保存します。

    これらの埋め込みをクラスターに保存します。埋め込みは、コレクション内の他のデータと一緒にフィールドとして保存します。

取得システムを構築するには、ベクトルデータベースから最も関連するドキュメントを検索して返すことが含まれ、TLM で増加します。 MongoDB ベクトル検索で関連するドキュメントを検索するには、ユーザーの質問をベクトル埋め込みに変換し、MongoDBコレクション内のデータに対してベクトル検索クエリーを実行し、最も類似した埋め込みを持つドキュメントを検索します。

MongoDB ベクトル検索を使用して基本的な検索を実行するには、次の手順を実行します。

  1. ベクトル埋め込みを含むコレクションにMongoDB ベクトル検索インデックスを定義します。

  2. ユーザーの質問に基づいてドキュメントを取得するには、次のいずれかの方法を選択します。

    • MongoDB ベクトル検索 を一般的なフレームワークまたはサービスと統合して使用します。これらの統合には、 MongoDB ベクトル検索で検索システムを簡単に構築できる組み込みのライブラリとツールが含まれています。

    • 独自の検索システムをビルドします。独自の関数とパイプラインを定義して、ユースケースに固有のMongoDB ベクトル検索クエリを実行できます。

      MongoDB ベクトル検索を使用して基本的な検索システムを構築する方法については、チュートリアル を参照してください。

応答を生成するには、検索システムを LLM と組み合わせます。ベクトル検索を実行して関連するドキュメントを取得した後、ユーザーの質問と関連するドキュメントをコンテキストとして LLM に提供し、LLM がより正確な応答を生成できるようにします。

LLM に接続するには、次のいずれかの方法を選択します。

  • MongoDB ベクトル検索 を一般的なフレームワークまたはサービスと統合して使用します。これらの統合には組み込みのライブラリとツールが含まれており、最小限の設定で LM に接続するのに役立ちます。

  • LLM の API を呼び出します。ほとんどの AI プロバイダーは、応答を生成するために使用できる生成モデルへの API を提供しています。

  • オープンソース LVM をロードします。 APIキーまたはクレジットがない場合は、アプリケーションからローカルにロードすることで、オープンソースの LVM を使用できます。 実装例については、「 MongoDB ベクトル検索を使用してローカル RAG 実装を構築する 」チュートリアルを参照してください。

次の例は、 MongoDB ベクトル検索を基盤とした検索システムで RAG を実装する方法を示しています。


➤ [言語の選択] ドロップダウン メニューを使用して、このページの例の言語を設定します。

このチュートリアルの実行可能なバージョンをPythonノートとして操作します。

この例を完了するには、次のものが必要です。

  • 次のいずれかのMongoDBクラスター タイプ

    • MongoDB バージョン 6.0.11、7.0.2、またはそれ以降を実行している Atlas クラスター。IP アドレスが Atlas プロジェクトのアクセスリストに含まれていることを確認する。

    • Atlas CLI を使用して作成されたローカル Atlas 配置。詳細については、「Atlas 配置のローカル配置の作成」を参照してください。

    • Search とベクトル検索がインストールされたMongoDB Community または Enterprise クラスター。

  • 投票AI APIキー。

  • OpenAI APIキー。APIリクエストに使用できるクレジットを持つ OpenAI アカウントが必要です。OpenAI アカウントの登録の詳細については、OpenAI APIウェブサイト を参照してください。

  • .NET プロジェクトを実行するためのターミナルとコードエディター。

  • .NET バージョン 8.0 以上 がインストールされています。

  • 次のいずれかのMongoDBクラスター タイプ

    • MongoDB バージョン 6.0.11、7.0.2、またはそれ以降を実行している Atlas クラスター。IP アドレスが Atlas プロジェクトのアクセスリストに含まれていることを確認する。

    • Atlas CLI を使用して作成されたローカル Atlas 配置。詳細については、「Atlas 配置のローカル配置の作成」を参照してください。

    • Search とベクトル検索がインストールされたMongoDB Community または Enterprise クラスター。

  • 埋め込みモデルにアクセスするには、Voyage AI APIキーまたは Huge Page アクセス トークンが必要です。

  • OpenAI APIキー。APIリクエストに使用できるクレジットを持つ OpenAI アカウントが必要です。OpenAI アカウントの登録の詳細については、OpenAI APIウェブサイト を参照してください。

  • Go プロジェクトを実行するためのターミナルとコード エディター。

  • Go がインストールされました。

  • 次のいずれかのMongoDBクラスター タイプ

    • MongoDB バージョン 6.0.11、7.0.2、またはそれ以降を実行している Atlas クラスター。IP アドレスが Atlas プロジェクトのアクセスリストに含まれていることを確認する。

    • Atlas CLI を使用して作成されたローカル Atlas 配置。詳細については、「Atlas 配置のローカル配置の作成」を参照してください。

    • Search とベクトル検索がインストールされたMongoDB Community または Enterprise クラスター。

  • Java 開発キット(JDK) バージョン8 以降。

  • Javaアプリケーションを設定して実行する環境。Maven または Gradle を構成してプロジェクトを構築および実行するようにするには、IntelliJ IDEAEclipse IDE などの統合開発環境(IDE)を使用することをお勧めします。

  • 読み取りアクセス権を持つ は、ユーザーの認証を参照してください。

1
  1. .NET プロジェクトを初期化します。

    ターミナルで次のコマンドを実行して、 MyCompany.RAGという名前の新しいディレクトリを作成し、プロジェクトを初期化します。

    dotnet new console -o MyCompany.RAG
    cd MyCompany.RAG
  2. 依存関係をインストールしてインポートします。

    次のコマンドを実行します。

    dotnet add package MongoDB.Driver --version 3.1.0
    dotnet add package PdfPig
    dotnet add package OpenAI
  3. 環境変数を設定します。

    次の環境変数をエクスポートして、PowerShellに set するか、IDE の環境変数マネージャーを使用して、これらの変数をプロジェクトで利用可能にします。

    export VOYAGE_API_KEY="<voyage-api-key>"
    export OPENAI_API_KEY="<openai-api-key>"
    export MONGODB_URI="<connection-string>"

プレースホルダーの値を、Voyage AI および OpenAI API キーに置き換えます。

<connection-string> を Atlas クラスターまたはローカル Atlas 配置の接続文字列に置き換えます。

接続stringには、次の形式を使用する必要があります。

mongodb+srv://<db_username>:<db_password>@<clusterName>.<hostname>.mongodb.net

詳しくは、ドライバーを使用してクラスターに接続する を参照してください。

接続stringには、次の形式を使用する必要があります。

mongodb://localhost:<port-number>/?directConnection=true

詳細については、「接続文字列 」を参照してください。

2

次のコードを貼り付けて、AIService という名前の新しいクラスを同じ名前のファイル内に作成します。このコードは、GetEmbeddingsAsync() という名前の非同期タスクを定義して、指定された string 入力の配列に対する埋め込みの配列を生成します。この関数は、Voyage AI の voyage-3-large モデルを使用して、指定された入力の埋め込みを生成します。

AIService.cs
namespace MyCompany.RAG;
using System;
using System.Collections.Generic;
using System.Linq;
using System.Net.Http;
using System.Net.Http.Headers;
using System.Text;
using System.Text.Json;
using System.Text.Json.Serialization;
using System.Threading.Tasks;
public class AIService
{
private static readonly string? VoyageApiKey = Environment.GetEnvironmentVariable("VOYAGE_API_KEY");
private static readonly string EmbeddingModelName = "voyage-3-large";
private static readonly string ApiEndpoint = "https://api.voyageai.com/v1/embeddings";
public async Task<Dictionary<string, float[]>> GetEmbeddingsAsync(string[] texts)
{
Dictionary<string, float[]> documentData = new Dictionary<string, float[]>();
try
{
using HttpClient client = new HttpClient();
client.DefaultRequestHeaders.Authorization =
new AuthenticationHeaderValue("Bearer", VoyageApiKey);
var requestBody = new
{
input = texts,
model = EmbeddingModelName,
truncation = true
};
var content = new StringContent(
JsonSerializer.Serialize(requestBody),
Encoding.UTF8,
"application/json");
HttpResponseMessage response = await client.PostAsync(ApiEndpoint, content);
if (response.IsSuccessStatusCode)
{
string responseBody = await response.Content.ReadAsStringAsync();
var embeddingResponse = JsonSerializer.Deserialize<EmbeddingResponse>(responseBody);
if (embeddingResponse != null && embeddingResponse.Data != null)
{
foreach (var embeddingResult in embeddingResponse.Data)
{
if (embeddingResult.Index < texts.Length)
{
documentData[texts[embeddingResult.Index]] =
embeddingResult.Embedding.Select(e => (float)e).ToArray();
}
}
}
}
else
{
throw new ApplicationException($"Error calling Voyage API: {response.ReasonPhrase}");
}
}
catch (Exception e)
{
throw new ApplicationException(e.Message);
}
return documentData;
}
private class EmbeddingResponse
{
[JsonPropertyName("object")]
public string Object { get; set; } = string.Empty;
[JsonPropertyName("data")]
public List<EmbeddingResult>? Data { get; set; }
[JsonPropertyName("model")]
public string Model { get; set; } = string.Empty;
[JsonPropertyName("usage")]
public Usage? Usage { get; set; }
}
private class EmbeddingResult
{
[JsonPropertyName("object")]
public string Object { get; set; } = string.Empty;
[JsonPropertyName("embedding")]
public List<double> Embedding { get; set; } = new();
[JsonPropertyName("index")]
public int Index { get; set; }
}
private class Usage
{
[JsonPropertyName("total_tokens")]
public int TotalTokens { get; set; }
}
}
3

このセクションでは、TLM がアクセスできないMongoDBにサンプルデータを取り込みます。

  1. データをロードして分割します。

    次のコードを貼り付けて、PdfIngester という名前の新しいクラスを同じ名前のファイル内に作成します。このコードには、次の処理を実行するいくつかの関数が含まれています。

    • MongoDB の収益レポートを含む PDF をロードします。

    • PfPig を使用して PDF をテキストに解析します。

    • チャンクサイズ(文字数)とチャンクのオーバーラップ(連続するチャンク間で重なり合う文字数)を指定して、テキストをチャンクに分割します。

    PdfIngester.cs
    namespace MyCompany.RAG;
    using System;
    using System.Net.Http;
    using System.IO;
    using System.Threading.Tasks;
    using System.Collections.Generic;
    using System.Text;
    using UglyToad.PdfPig;
    using UglyToad.PdfPig.Content;
    public class PdfIngester
    {
    public async Task<String> DownloadPdf(string url, string path, string fileName)
    {
    using (HttpClient client = new HttpClient())
    {
    try
    {
    byte[] pdfBytes = await client.GetByteArrayAsync(url);
    await File.WriteAllBytesAsync(path + fileName, pdfBytes);
    return "PDF downloaded and saved to " + path + fileName;
    }
    catch (HttpRequestException e)
    {
    throw new ApplicationException("Error downloading the PDF: " + e.Message);
    }
    catch (IOException e)
    {
    throw new ApplicationException("Error writing the file to disk: " + e.Message);
    }
    }
    }
    public List<string> ConvertPdfToChunkedText(string filePath)
    {
    List<string> textChunks;
    using (var document = PdfDocument.Open(filePath))
    {
    StringBuilder fullText = new StringBuilder();
    foreach (Page page in document.GetPages())
    {
    fullText.Append(page.Text + "\n");
    }
    textChunks = ChunkText(fullText.ToString(), 400, 20);
    }
    var chunkCount = textChunks.Count;
    if (chunkCount == 0)
    {
    throw new ApplicationException("Unable to chunk PDF contents into text.");
    }
    Console.WriteLine($"Successfully chunked the PDF text into {chunkCount} chunks.");
    return textChunks;
    }
    static List<string> ChunkText(string text, int chunkSize, int overlap)
    {
    List<string> chunks = new List<string>();
    int start = 0;
    int textLength = text.Length;
    while (start < textLength)
    {
    int end = start + chunkSize;
    if (end > textLength)
    {
    end = textLength;
    }
    string chunk = text.Substring(start, end - start);
    chunks.Add(chunk);
    // Increment starting point, considering the overlap
    start += chunkSize - overlap;
    if (start >= textLength) break;
    }
    return chunks;
    }
    }
  2. データと埋め込みをMongoDBに保存するために準備します。

    次のコードを貼り付けて、同じ名前のファイルに MongoDBDataService という名前の新しいクラスを作成します。このコードでは、 MongoDBにドキュメントを追加するための AddDocumentsAsync という名前の非同期タスクを定義します。この関数では、Collection.InsertManyAsync() C#ドライバー メソッド を使用して、BsonDocument 型のリストを挿入します。このコードは、埋め込みをチャンクされたデータとともに rag_db.testコレクションに保存します。

    MongoDBDataService.cs
    namespace MyCompany.RAG;
    using MongoDB.Driver;
    using MongoDB.Bson;
    public class MongoDBDataService
    {
    private static readonly string? ConnectionString = Environment.GetEnvironmentVariable("MONGODB_URI");
    private static readonly MongoClient Client = new MongoClient(ConnectionString);
    private static readonly IMongoDatabase Database = Client.GetDatabase("rag_db");
    private static readonly IMongoCollection<BsonDocument> Collection = Database.GetCollection<BsonDocument>("test");
    public async Task<string> AddDocumentsAsync(Dictionary<string, float[]> embeddings)
    {
    var documents = new List<BsonDocument>();
    foreach( KeyValuePair<string, float[]> var in embeddings )
    {
    var document = new BsonDocument
    {
    {
    "text", var.Key
    },
    {
    "embedding", new BsonArray(var.Value)
    }
    };
    documents.Add(document);
    }
    await Collection.InsertManyAsync(documents);
    return $"Successfully inserted {embeddings.Count} documents.";
    }
    }
  3. データをベクトル埋め込みに変換します。

    次のコードを貼り付けて、EmbeddingGenerator という名前の新しいクラスを同じ名前のファイル内に作成します。このコードは、対応するベクトル埋め込みを含むドキュメントのリストを作成することで、チャンク化されたドキュメントの取り込みを準備します。これらの埋め込みは、以前に定義した GetEmbeddingsAsync() 関数を使用して生成します。

    EmbeddingGenerator.cs
    namespace MyCompany.RAG;
    public class EmbeddingGenerator
    {
    private readonly MongoDBDataService _dataService = new();
    private readonly AIService _AiService = new();
    public async Task<string> GenerateEmbeddings(List<string> textChunks)
    {
    Console.WriteLine("Generating embeddings.");
    Dictionary<string, float[]> docs = new Dictionary<string, float[]>();
    try
    {
    // Pass the text chunks to AI to generate vector embeddings
    var embeddings = await _AiService.GetEmbeddingsAsync(textChunks.ToArray());
    // Pair each embedding with the text chunk used to generate it
    int index = 0;
    foreach (var embedding in embeddings)
    {
    docs[textChunks[index]] = embedding.Value;
    index++;
    }
    }
    catch (Exception e)
    {
    throw new ApplicationException("Error creating embeddings for text chunks: " + e.Message);
    }
    // Add a new document to the MongoDB collection for each text and vector embedding pair
    var result = await _dataService.AddDocumentsAsync(docs);
    return result;
    }
    }
  4. Program.cs ファイルを更新してください。

    Program.cs にこのコードを貼り付けます。

    Program.cs
    using MyCompany.RAG;
    const string pdfUrl = "https://investors.mongodb.com/node/12236/pdf";
    const string savePath = "<path-name>";
    const string fileName = "investor-report.pdf";
    var pdfIngester = new PdfIngester();
    var pdfDownloadResult = await pdfIngester.DownloadPdf(pdfUrl, savePath, fileName);
    Console.WriteLine(pdfDownloadResult);
    var textChunks = pdfIngester.ConvertPdfToChunkedText(savePath + fileName);
    if (textChunks.Any()) {
    var embeddingGenerator = new EmbeddingGenerator();
    var embeddingGenerationResult = await embeddingGenerator.GenerateEmbeddings(textChunks);
    Console.WriteLine(embeddingGenerationResult);
    }

    このコードを貼り付けます:

    • PdfIngester を使用して PDF をテキストセグメントに読み込み、チャンク化します。

    • EmbeddingGenerator を使用して PDF から各テキストチャンクの埋め込みを生成し、テキストチャンクと埋め込みを rag_db.test コレクションに書き込みます。

    <path-name> プレースホルダーを、レポートをダウンロードしたいパスに置き換えます。macOS システムでは、パスは /Users/<username>/MyCompany.RAG/ のように表示されます。パスは後続のスラッシュで終わる必要があります。

  5. プロジェクトをコンパイルして実行し、埋め込みを生成します。

    dotnet run MyCompany.RAG.csproj
    PDF downloaded and saved to <PATH>
    Successfully chunked the PDF text into 73 chunks.
    Generating embeddings.
    Successfully inserted 73 documents.
4

このセクションでは、 MongoDB ベクトル検索を設定して、ベクトルデータベースからドキュメントを検索します。MongoDB C#ドライバー v3.1.0 以降を使用してコレクションのMongoDB ベクトル検索インデックスを作成するには、次の手順を実行します。

  1. MongoDB ベクトル検索インデックスを定義します。

    検索インデックスを定義するために、MongoDBDataService.cs という名前のファイルに新しい CreateVectorIndex() メソッドを追加します。このコードはMongoDBデプロイに接続し、rag_db.testコレクションにvectorSearchタイプのインデックスを作成します。

    MongoDBDataService.cs
    namespace MyCompany.RAG;
    using MongoDB.Driver;
    using MongoDB.Bson;
    public class DataService
    {
    private static readonly string? ConnectionString = Environment.GetEnvironmentVariable("MONGODB_URI");
    private static readonly MongoClient Client = new MongoClient(ConnectionString);
    private static readonly IMongoDatabase Database = Client.GetDatabase("rag_db");
    private static readonly IMongoCollection<BsonDocument> Collection = Database.GetCollection<BsonDocument>("test");
    public async Task<string> AddDocumentsAsync(Dictionary<string, float[]> embeddings)
    {
    // Method details...
    }
    public string CreateVectorIndex()
    {
    var searchIndexView = Collection.SearchIndexes;
    var name = "vector_index";
    var type = SearchIndexType.VectorSearch;
    var definition = new BsonDocument
    {
    { "fields", new BsonArray
    {
    new BsonDocument
    {
    { "type", "vector" },
    { "path", "embedding" },
    { "numDimensions", 1024 },
    { "similarity", "cosine" }
    }
    }
    }
    };
    var model = new CreateSearchIndexModel(name, type, definition);
    try
    {
    searchIndexView.CreateOne(model);
    Console.WriteLine($"New search index named {name} is building.");
    // Polling for index status
    Console.WriteLine("Polling to check if the index is ready. This may take up to a minute.");
    bool queryable = false;
    while (!queryable)
    {
    var indexes = searchIndexView.List();
    foreach (var index in indexes.ToEnumerable())
    {
    if (index["name"] == name)
    {
    queryable = index["queryable"].AsBoolean;
    }
    }
    if (!queryable)
    {
    Thread.Sleep(5000);
    }
    }
    }
    catch (Exception e)
    {
    throw new ApplicationException("Error creating the vector index: " + e.Message);
    }
    return $"{name} is ready for querying.";
    }
    }
  2. Program.cs ファイルを更新してください。

    Program.cs のコードを以下のコードに置き換えて、インデックスを作成します。

    Program.cs
    using MyCompany.RAG;
    var dataService = new MongoDBDataService();
    var result = dataService.CreateVectorIndex();
    Console.WriteLine(result);
  3. プロジェクトをコンパイルして実行し、インデックスを作成します。

    dotnet run MyCompany.RAG.csproj
  4. 関連データを取得するための関数を定義します。

    MongoDBDataService.cs という名前のファイルに新しい PerformVectorQuery メソッドを追加して、関連するドキュメントを検索します。詳細については、「ベクター検索クエリの実行」を参照してください。

    MongoDBDataService.cs
    namespace MyCompany.RAG;
    using MongoDB.Driver;
    using MongoDB.Bson;
    public class MongoDBDataService
    {
    private static readonly string? ConnectionString = Environment.GetEnvironmentVariable("MONGODB_URI");
    private static readonly MongoClient Client = new MongoClient(ConnectionString);
    private static readonly IMongoDatabase Database = Client.GetDatabase("rag_db");
    private static readonly IMongoCollection<BsonDocument> Collection = Database.GetCollection<BsonDocument>("test");
    public async Task<string> AddDocumentsAsync(Dictionary<string, float[]> embeddings)
    {
    // Method details...
    }
    public string CreateVectorIndex()
    {
    // Method details...
    }
    public List<BsonDocument>? PerformVectorQuery(float[] vector)
    {
    var vectorSearchStage = new BsonDocument
    {
    {
    "$vectorSearch",
    new BsonDocument
    {
    { "index", "vector_index" },
    { "path", "embedding" },
    { "queryVector", new BsonArray(vector) },
    { "exact", true },
    { "limit", 5 }
    }
    }
    };
    var projectStage = new BsonDocument
    {
    {
    "$project",
    new BsonDocument
    {
    { "_id", 0 },
    { "text", 1 },
    { "score",
    new BsonDocument
    {
    { "$meta", "vectorSearchScore"}
    }
    }
    }
    }
    };
    var pipeline = new[] { vectorSearchStage, projectStage };
    return Collection.Aggregate<BsonDocument>(pipeline).ToList();
    }
    }
  5. データの取得をテストします。

    1. 次のコードを貼り付けて、PerformTestQuery という名前の新しいクラスを同じ名前のファイル内に作成します。このコードは、テキスト入力 string をベクトル埋め込みに変換し、一致する結果をデータベースにクエリします。GetEmbeddingsAsync() 関数を使用して、検索クエリから埋め込みを作成します。次に、クエリを実行して、意味的に類似したドキュメントを返します。

      PerformTestQuery.cs
      namespace MyCompany.RAG;
      public class PerformTestQuery
      {
      private readonly MongoDBDataService _dataService = new();
      private readonly AIService _AiService = new();
      public async Task<string> GetQueryResults(string question)
      {
      // Get the vector embedding for the query
      var query = question;
      var queryEmbeddings = await _AiService.GetEmbeddingsAsync([query]);
      // Query the vector database for applicable query results
      var matchingDocuments = _dataService.PerformVectorQuery(queryEmbeddings[query]);
      // Construct a string from the query results for performing QA with the LLM
      var sb = new System.Text.StringBuilder();
      if (matchingDocuments != null)
      {
      foreach (var doc in matchingDocuments)
      {
      sb.AppendLine($"Text: {doc.GetValue("text").ToString()}");
      sb.AppendLine($"Score: {doc.GetValue("score").ToString()}");
      }
      }
      else
      {
      return "No matching documents found.";
      }
      return sb.ToString();
      }
      }
    2. Program.cs ファイルを更新してください。

      Program.cs のコードを次のコードに置き換えて、テストクエリを実行します。

      Program.cs
      using MyCompany.RAG;
      var query = "AI Technology";
      var queryCoordinator = new PerformTestQuery();
      var result = await queryCoordinator.GetQueryResults(query);
      Console.WriteLine(result);
    3. プロジェクトをコンパイルして実行し、クエリ結果を確認してください。

      dotnet run MyCompany.RAG.csproj
      Text: time series queries—and the general availability of Atlas Stream Processing to build sophisticated,event-driven applications with real-time data.MongoDB continues to expand its AI ecosystem with the announcement of the MongoDB AI Applications Program (MAAP),
      which provides customers with reference architectures, pre-built partner integrations, and professional services to helpthem quickly build AI
      Score: 0.72528624534606934
      Text: hem quickly build AI-powered applications. Accenture will establish a center of excellence focused on MongoDB projects,and is the first global systems integrator to join MAAP.Bendigo and Adelaide Bank partnered with MongoDB to modernize their core banking technology. With the help ofMongoDB Relational Migrator and generative AI-powered modernization tools, Bendigo and Adelaide Bank decomposed anou
      Score: 0.71915638446807861
      Text: and regulatory issues relating to the use of new and evolving technologies, such asartificial intelligence, in our offerings or partnerships; the growth and expansion of the market for database products and our ability to penetrate thatmarket; our ability to integrate acquired businesses and technologies successfully or achieve the expected benefits of such acquisitions; our ability tomaintain the
      Score: 0.70376789569854736
      Text: architecture is particularly well-suited for the variety and scale of data required by AI-powered applications. We are confident MongoDB will be a substantial beneficiary of this next wave of application development."First Quarter Fiscal 2025 Financial HighlightsRevenue: Total revenue was $450.6 million for the first quarter of fiscal 2025, an increase of 22% year-over-year.Subscription revenue wa
      Score: 0.67905724048614502
      Text: tures, services orenhancements; our ability to effectively expand our sales and marketing organization; our ability to continue to build and maintain credibility with thedeveloper community; our ability to add new customers or increase sales to our existing customers; our ability to maintain, protect, enforce andenhance our intellectual property; the effects of social, ethical and regulatory issue
      Score: 0.64435118436813354
5

このセクションでは、検索されたドキュメントをコンテキストとして使用するよう LLM に指示して応答を生成します。この例では、先ほど定義した関数を使用して、一致するドキュメントをデータベースから検索し、さらに次のことも行います。

  • OpenAI の gpt-4o-mini モデルにアクセスします。

  • ユーザーの質問と取得したドキュメントをプロンプトに含めるように LLM に指示します。

  • LLM に MongoDB の最新の AI に関する発表を支持します。

  1. AIService.cs という名前のファイルに、インポート、新しい ChatClient 情報、および GenerateAnswer という新しいメソッドを追加します。

    AIService.cs
    namespace MyCompany.RAG;
    using OpenAI.Chat;
    using System;
    using System.Collections.Generic;
    using System.Linq;
    using System.Net.Http;
    using System.Net.Http.Headers;
    using System.Text;
    using System.Text.Json;
    using System.Text.Json.Serialization;
    using System.Threading.Tasks;
    public class AIService
    {
    private static readonly string? VoyageApiKey = Environment.GetEnvironmentVariable("VOYAGE_API_KEY");
    private static readonly string EmbeddingModelName = "voyage-3-large";
    private static readonly string ApiEndpoint = "https://api.voyageai.com/v1/embeddings";
    private static readonly string? OpenAIApiKey = Environment.GetEnvironmentVariable("OPENAI_API_KEY");
    private static readonly string ChatModelName = "gpt-4o-mini";
    private static readonly ChatClient ChatClient = new(model: ChatModelName, apiKey: OpenAIApiKey);
    public async Task<Dictionary<string, float[]>> GetEmbeddingsAsync(string[] texts)
    {
    // Method details...
    }
    public async Task<string> GenerateAnswer(string question, string context)
    {
    string prompt = $"""
    Answer the following question based on the given context.
    Context: {context}
    Question: {question}
    """;
    byte[] binaryContent = Encoding.UTF8.GetBytes(prompt);
    IEnumerable<ChatMessage> messages = new List<ChatMessage>([prompt]);
    ChatCompletion responses = await ChatClient.CompleteChatAsync(messages, new ChatCompletionOptions { MaxOutputTokenCount = 400 });
    var summaryResponse = responses.Content[0].Text;
    if (summaryResponse is null)
    {
    throw new ApplicationException("No response from the chat client.");
    }
    return summaryResponse;
    }
    // Rest of code...
    }
  2. RAGPipeline クラスを作成します。

    次のコードを貼り付けて、RAGPipeline という名前の新しいクラスを同じ名前のファイル内に作成します。このコードは、次のコンポーネントを調整します。

    • GetEmbeddingsAsync() 関数: string クエリをベクトル埋め込みに変換する。

    • PerformVectorQuery 関数: データベースから意味的に類似した結果を検索する。

    • GenerateAnswer 関数: データベースから検索したドキュメントをLLMに渡して、応答を生成する。

    RAGPipeline.cs
    namespace MyCompany.RAG;
    public class RAGPipeline
    {
    private readonly MongoDBDataService _dataService = new();
    private readonly AIService _AiService = new();
    public async Task<string> GenerateResults(string question)
    {
    // Get the vector embedding for the query
    var query = question;
    var queryEmbedding = await _AiService.GetEmbeddingsAsync([query]);
    // Query the vector database for applicable query results
    var matchingDocuments = _dataService.PerformVectorQuery(queryEmbedding[query]);
    // Construct a string from the query results for performing QA with the LLM
    var sb = new System.Text.StringBuilder();
    if (matchingDocuments != null)
    {
    foreach (var doc in matchingDocuments)
    {
    sb.AppendLine($"Text: {doc.GetValue("text").ToString()}");
    }
    }
    else
    {
    return "No matching documents found.";
    }
    return await _AiService.GenerateAnswer(question, sb.ToString());
    }
    }
  3. Program.cs ファイルを更新してください。

    Program.cs のコードを次のコードに置き換えて、RAG パイプラインを呼び出します。

    Program.cs
    using MyCompany.RAG;
    var question = "In a few sentences, what are MongoDB's latest AI announcements?";
    var ragPipeline = new RAGPipeline();
    var result = await ragPipeline.GenerateResults(question);
    Console.WriteLine(result);
  4. プロジェクトをコンパイルして実行し、RAG を実行します。生成される応答は異なる場合があります。

    dotnet run MyCompany.RAG.csproj
    MongoDB has recently announced the MongoDB AI Applications Program (MAAP),
    which aims to support customers in building AI-powered applications through
    reference architectures, pre-built partner integrations, and professional
    services. Additionally, the program includes a partnership with Accenture,
    which will establish a center of excellence focused on MongoDB projects. These
    initiatives demonstrate MongoDB's commitment to expanding its AI ecosystem and
    its strategy to adapt its document-based architecture for the demands of
    AI-driven application development.
1
  1. Go プロジェクトを初期化します。

    ターミナルで次のコマンドを実行して、 rag-mongodbという名前の新しいディレクトリを作成し、プロジェクトを初期化します。

    mkdir rag-mongodb
    cd rag-mongodb
    go mod init rag-mongodb
  2. 依存関係をインストールしてインポートします。

    次のコマンドを実行します。

    go get github.com/joho/godotenv
    go get go.mongodb.org/mongo-driver/v2/mongo
    go get github.com/tmc/langchaingo/llms
    go get github.com/tmc/langchaingo/documentloaders
    go get github.com/tmc/langchaingo/embeddings/huggingface
    go get github.com/tmc/langchaingo/embeddings/voyageai
    go get github.com/tmc/langchaingo/llms/openai
    go get github.com/tmc/langchaingo/prompts
    go get github.com/tmc/langchaingo/vectorstores/mongovector
  3. .envファイルを作成します。

    プロジェクトでは、 MongoDB接続文字列とモデルにアクセスするために必要なAPIキーを保存するための .envファイルを作成します。

    .env
    MONGODB_URI = "<connection-string>"
    VOYAGEAI_API_KEY = "<voyage-api-key>" # If using Voyage AI embedding model
    HUGGINGFACEHUB_API_TOKEN = "<hf-token>" # If using Hugging Face embedding model
    OPENAI_API_KEY = "<openai-api-key>"

    プレースホルダーの値をお客様の認証情報に置き換えてください。

    <connection-string> を Atlas クラスターまたはローカル Atlas 配置の接続文字列に置き換えます。

    接続stringには、次の形式を使用する必要があります。

    mongodb+srv://<db_username>:<db_password>@<clusterName>.<hostname>.mongodb.net

    詳しくは、ドライバーを使用してクラスターに接続する を参照してください。

    接続stringには、次の形式を使用する必要があります。

    mongodb://localhost:<port-number>/?directConnection=true

    詳細については、「接続文字列 」を参照してください。

2

このセクションでは、LVM がアクセスできないMongoDBにサンプルデータをダウンロードして処理します。次のコードでは、Llang のGoライブラリを使用して次のタスクを実行します。

  • MongoDB 収益レポートを含む HTML ファイルを作成します。

  • データをチャンクに分割し、チャンク サイズ(文字数)とチャンクの重複(連続するチャンク間で重複する文字数)を指定します。

  1. 以下のコマンドを実行して、共通関数を保存するディレクトリを作成します。

    mkdir common && cd common
  2. common ディレクトリに process-file.go というファイルを作成し、次のコードをそのファイルに貼り付けます。

    process-file.go
    package common
    import (
    "context"
    "io"
    "log"
    "net/http"
    "os"
    "github.com/tmc/langchaingo/documentloaders"
    "github.com/tmc/langchaingo/schema"
    "github.com/tmc/langchaingo/textsplitter"
    )
    func DownloadReport(filename string) {
    _, err := os.Stat(filename)
    if err == nil {
    return
    }
    const url = "https://investors.mongodb.com/node/12236"
    log.Println("Downloading ", url, " to ", filename)
    resp, err := http.Get(url)
    if err != nil {
    log.Fatalf("failed to connect to download the report: %v", err)
    }
    defer func() {
    if err := resp.Body.Close(); err != nil {
    log.Fatalf("failed to close the resource: %v", err)
    }
    }()
    f, err := os.Create(filename)
    if err != nil {
    return
    }
    defer func() {
    if err := f.Close(); err != nil {
    log.Fatalf("failed to close file: %v", err)
    }
    }()
    _, err = io.Copy(f, resp.Body)
    if err != nil {
    log.Fatalf("failed to copy the report: %v", err)
    }
    }
    func ProcessFile(filename string) []schema.Document {
    ctx := context.Background()
    f, err := os.Open(filename)
    if err != nil {
    log.Fatalf("failed to open file: %v", err)
    }
    defer func() {
    if err := f.Close(); err != nil {
    log.Fatalf("failed to close file: %v", err)
    }
    }()
    html := documentloaders.NewHTML(f)
    split := textsplitter.NewRecursiveCharacter()
    split.ChunkSize = 400
    split.ChunkOverlap = 20
    docs, err := html.LoadAndSplit(ctx, split)
    if err != nil {
    log.Fatalf("failed to chunk the HTML into documents: %v", err)
    }
    log.Printf("Successfully chunked the HTML into %v documents.\n", len(docs))
    return docs
    }
3

このセクションでは、TLM がアクセスできないMongoDBにサンプルデータを取り込みます。次のコードでは、LangChain のGoライブラリGoドライバーを使用して次のタスクを実行します。

  • 埋め込みモデルをロードしてください。

  • ベクターストアを実装するために、Go ドライバ クライアントと Hugging Face 埋め込みモデルから mongovector のインスタンスを作成します。

  • mongovector.AddDocuments() メソッドを使用して、チャンク データからベクトル埋め込みを作成して保存します。このコードは、チャンクされたデータと対応する埋め込みを rag_db.testコレクションに保存します。

  1. rag-mongodb プロジェクト ディレクトリのルートに移動します。

  2. プロジェクトに ingest-data.go というファイルを作成し、次のコードをそのファイルに貼り付けます。

    このコードは、Voyage AIvoyage-3-large 埋め込みモデルを使用してベクトル埋め込みを生成します。

    ingest-data.go
    package main
    import (
    "context"
    "fmt"
    "log"
    "os"
    "rag-mongodb/common"
    "github.com/joho/godotenv"
    "github.com/tmc/langchaingo/embeddings/voyageai"
    "github.com/tmc/langchaingo/vectorstores/mongovector"
    "go.mongodb.org/mongo-driver/v2/mongo"
    "go.mongodb.org/mongo-driver/v2/mongo/options"
    )
    func main() {
    filename := "investor-report.html"
    common.DownloadReport(filename)
    docs := common.ProcessFile(filename)
    if err := godotenv.Load(); err != nil {
    log.Fatal("no .env file found")
    }
    // Connect to your MongoDB cluster
    uri := os.Getenv("MONGODB_URI")
    if uri == "" {
    log.Fatal("set your 'MONGODB_URI' environment variable.")
    }
    client, err := mongo.Connect(options.Client().ApplyURI(uri))
    if err != nil {
    log.Fatalf("failed to connect to server: %v", err)
    }
    defer func() {
    if err := client.Disconnect(context.Background()); err != nil {
    log.Fatalf("error disconnecting the client: %v", err)
    }
    }()
    coll := client.Database("rag_db").Collection("test")
    embedder, err := voyageai.NewVoyageAI(
    voyageai.WithModel("voyage-3-large"),
    )
    if err != nil {
    log.Fatal("failed to create an embedder: %v", err)
    }
    store := mongovector.New(coll, embedder, mongovector.WithPath("embedding"))
    // Add documents to the MongoDB collection.
    log.Println("Generating embeddings.")
    result, err := store.AddDocuments(context.Background(), docs)
    if err != nil {
    log.Fatalf("failed to insert documents: %v", err)
    }
    fmt.Printf("Successfully inserted %v documents\n", len(result))
    }

    このコードでは、Hugging Face のmxbai-embed-large-v1 埋め込みモデルを使用してベクトル埋め込みを生成します。

    ingest-data.go
    package main
    import (
    "context"
    "fmt"
    "log"
    "os"
    "rag-mongodb/common"
    "github.com/joho/godotenv"
    "github.com/tmc/langchaingo/embeddings/huggingface"
    "github.com/tmc/langchaingo/vectorstores/mongovector"
    "go.mongodb.org/mongo-driver/v2/mongo"
    "go.mongodb.org/mongo-driver/v2/mongo/options"
    )
    func main() {
    filename := "investor-report.html"
    common.DownloadReport(filename)
    docs := common.ProcessFile(filename)
    if err := godotenv.Load(); err != nil {
    log.Fatal("no .env file found")
    }
    // Connect to your MongoDB cluster
    uri := os.Getenv("MONGODB_URI")
    if uri == "" {
    log.Fatal("set your 'MONGODB_URI' environment variable.")
    }
    client, err := mongo.Connect(options.Client().ApplyURI(uri))
    if err != nil {
    log.Fatalf("failed to connect to server: %v", err)
    }
    defer func() {
    if err := client.Disconnect(context.Background()); err != nil {
    log.Fatalf("error disconnecting the client: %v", err)
    }
    }()
    coll := client.Database("rag_db").Collection("test")
    embedder, err := huggingface.NewHuggingface(
    huggingface.WithModel("mixedbread-ai/mxbai-embed-large-v1"),
    huggingface.WithTask("feature-extraction"))
    if err != nil {
    log.Fatal("failed to create an embedder: %v", err)
    }
    store := mongovector.New(coll, embedder, mongovector.WithPath("embedding"))
    // Add documents to the MongoDB collection.
    log.Println("Generating embeddings.")
    result, err := store.AddDocuments(context.Background(), docs)
    if err != nil {
    log.Fatalf("failed to insert documents: %v", err)
    }
    fmt.Printf("Successfully inserted %v documents\n", len(result))
    }
  3. 次のコマンドを実行して、コードを実行します。

    go run ingest-data.go
    Successfully chunked the HTML into 163 documents.
    Generating embeddings.
    Successfully inserted 163 documents
4

このセクションでは、 MongoDB ベクトル検索を設定して、ベクトルデータベースからドキュメントを検索します。次の手順を実行します。

  1. ベクトル埋め込みにMongoDB ベクトル検索インデックスを作成します。

    rag-vector-index.go という名前の新しいファイルを作成し、次のコードを貼り付けます。このコードはMongoDBデプロイに接続し、rag_db.testコレクションにvectorSearchタイプのインデックスを作成します。

    rag-vector-index.go
    package main
    import (
    "context"
    "log"
    "os"
    "time"
    "github.com/joho/godotenv"
    "go.mongodb.org/mongo-driver/v2/bson"
    "go.mongodb.org/mongo-driver/v2/mongo"
    "go.mongodb.org/mongo-driver/v2/mongo/options"
    )
    func main() {
    ctx := context.Background()
    if err := godotenv.Load(); err != nil {
    log.Fatal("no .env file found")
    }
    // Connect to your MongoDB cluster
    uri := os.Getenv("MONGODB_URI")
    if uri == "" {
    log.Fatal("set your 'MONGODB_URI' environment variable.")
    }
    clientOptions := options.Client().ApplyURI(uri)
    client, err := mongo.Connect(clientOptions)
    if err != nil {
    log.Fatalf("failed to connect to the server: %v", err)
    }
    defer func() { _ = client.Disconnect(ctx) }()
    // Specify the database and collection
    coll := client.Database("rag_db").Collection("test")
    indexName := "vector_index"
    opts := options.SearchIndexes().SetName(indexName).SetType("vectorSearch")
    type vectorDefinitionField struct {
    Type string `bson:"type"`
    Path string `bson:"path"`
    NumDimensions int `bson:"numDimensions"`
    Similarity string `bson:"similarity"`
    }
    type filterField struct {
    Type string `bson:"type"`
    Path string `bson:"path"`
    }
    type vectorDefinition struct {
    Fields []vectorDefinitionField `bson:"fields"`
    }
    indexModel := mongo.SearchIndexModel{
    Definition: vectorDefinition{
    Fields: []vectorDefinitionField{{
    Type: "vector",
    Path: "embedding",
    NumDimensions: 1024,
    Similarity: "cosine"}},
    },
    Options: opts,
    }
    log.Println("Creating the index.")
    searchIndexName, err := coll.SearchIndexes().CreateOne(ctx, indexModel)
    if err != nil {
    log.Fatalf("failed to create the search index: %v", err)
    }
    // Await the creation of the index.
    log.Println("Polling to confirm successful index creation.")
    log.Println("NOTE: This may take up to a minute.")
    searchIndexes := coll.SearchIndexes()
    var doc bson.Raw
    for doc == nil {
    cursor, err := searchIndexes.List(ctx, options.SearchIndexes().SetName(searchIndexName))
    if err != nil {
    log.Printf("failed to list search indexes: %w", err)
    }
    if !cursor.Next(ctx) {
    break
    }
    name := cursor.Current.Lookup("name").StringValue()
    queryable := cursor.Current.Lookup("queryable").Boolean()
    if name == searchIndexName && queryable {
    doc = cursor.Current
    } else {
    time.Sleep(5 * time.Second)
    }
    }
    log.Println("Name of Index Created: " + searchIndexName)
    }
  2. 次のコマンドを実行して、インデックスを作成します。

    go run rag-vector-index.go
  3. 関連データを取得するための関数を定義します。

    このステップでは、関連ドキュメントを取得するクエリを実行するリトリーバル関数 GetQueryResults() を作成します。この関数は、mongovector.SimilaritySearch() メソッドを使用してクエリ文字列のベクトル表現を自動的に生成し、関連する結果を返します。

    詳細については、「ベクトル検索クエリの実行 」を参照してください。

    common ディレクトリに get-query-results.go という新しいファイルを作成し、そのファイルに次のコードを貼り付けます。

    get-クエリ-results.go
    package common
    import (
    "context"
    "log"
    "os"
    "github.com/joho/godotenv"
    "github.com/tmc/langchaingo/embeddings/voyageai"
    "github.com/tmc/langchaingo/schema"
    "github.com/tmc/langchaingo/vectorstores/mongovector"
    "go.mongodb.org/mongo-driver/v2/mongo"
    "go.mongodb.org/mongo-driver/v2/mongo/options"
    )
    func GetQueryResults(query string) []schema.Document {
    ctx := context.Background()
    if err := godotenv.Load(); err != nil {
    log.Fatal("no .env file found")
    }
    // Connect to your MongoDB cluster
    uri := os.Getenv("MONGODB_URI")
    if uri == "" {
    log.Fatal("set your 'MONGODB_URI' environment variable.")
    }
    clientOptions := options.Client().ApplyURI(uri)
    client, err := mongo.Connect(clientOptions)
    if err != nil {
    log.Fatalf("failed to connect to the server: %v", err)
    }
    defer func() { _ = client.Disconnect(ctx) }()
    // Specify the database and collection
    coll := client.Database("rag_db").Collection("test")
    embedder, err := voyageai.NewVoyageAI(
    voyageai.WithModel("voyage-3-large"),
    )
    if err != nil {
    log.Fatal("failed to create an embedder: %v", err)
    }
    store := mongovector.New(coll, embedder, mongovector.WithPath("embedding"))
    // Search for similar documents.
    docs, err := store.SimilaritySearch(context.Background(), query, 5)
    if err != nil {
    log.Fatal("error performing similarity search: %v", err)
    }
    return docs
    }

    このコードでは、Hugging Face のmxbai-embed-large-v1 埋め込みモデルを使用してベクトル埋め込みを生成します。

    get-クエリ-results.go
    package common
    import (
    "context"
    "log"
    "os"
    "github.com/joho/godotenv"
    "github.com/tmc/langchaingo/embeddings/huggingface"
    "github.com/tmc/langchaingo/schema"
    "github.com/tmc/langchaingo/vectorstores/mongovector"
    "go.mongodb.org/mongo-driver/v2/mongo"
    "go.mongodb.org/mongo-driver/v2/mongo/options"
    )
    func GetQueryResults(query string) []schema.Document {
    ctx := context.Background()
    if err := godotenv.Load(); err != nil {
    log.Fatal("no .env file found")
    }
    // Connect to your MongoDB cluster
    uri := os.Getenv("MONGODB_URI")
    if uri == "" {
    log.Fatal("set your 'MONGODB_URI' environment variable.")
    }
    clientOptions := options.Client().ApplyURI(uri)
    client, err := mongo.Connect(clientOptions)
    if err != nil {
    log.Fatalf("failed to connect to the server: %v", err)
    }
    defer func() { _ = client.Disconnect(ctx) }()
    // Specify the database and collection
    coll := client.Database("rag_db").Collection("test")
    embedder, err := huggingface.NewHuggingface(
    huggingface.WithModel("mixedbread-ai/mxbai-embed-large-v1"),
    huggingface.WithTask("feature-extraction"))
    if err != nil {
    log.Fatal("failed to create an embedder: %v", err)
    }
    store := mongovector.New(coll, embedder, mongovector.WithPath("embedding"))
    // Search for similar documents.
    docs, err := store.SimilaritySearch(context.Background(), query, 5)
    if err != nil {
    log.Fatal("error performing similarity search: %v", err)
    }
    return docs
    }
  4. データの取得をテストします。

    1. rag-mongodb プロジェクト ディレクトリに、retrieve-documents-test.go という新しいファイルを作成します。この手順では、定義した関数が適切な結果を返すことを確認します。

    2. このコードを ファイルに貼り付けます。

      retrieve-documents-test.go
      package main
      import (
      "fmt"
      "rag-mongodb/common" // Module that contains the GetQueryResults function
      )
      func main() {
      query := "AI Technology"
      documents := common.GetQueryResults(query)
      for _, doc := range documents {
      fmt.Printf("Text: %s \nScore: %v \n\n", doc.PageContent, doc.Score)
      }
      }
    3. 次のコマンドを実行して、コードを実行します。

      go run retrieve-documents-test.go
      Text: for the variety and scale of data required by AI-powered applications. We are confident MongoDB will be a substantial beneficiary of this next wave of application development.&#34;
      Score: 0.83503306
      Text: &#34;As we look ahead, we continue to be incredibly excited by our large market opportunity, the potential to increase share, and become a standard within more of our customers. We also see a tremendous opportunity to win more legacy workloads, as AI has now become a catalyst to modernize these applications. MongoDB&#39;s document-based architecture is particularly well-suited for the variety and
      Score: 0.82807535
      Text: to the use of new and evolving technologies, such as artificial intelligence, in our offerings or partnerships; the growth and expansion of the market for database products and our ability to penetrate that market; our ability to integrate acquired businesses and technologies successfully or achieve the expected benefits of such acquisitions; our ability to maintain the security of our software
      Score: 0.8165897
      Text: MongoDB continues to expand its AI ecosystem with the announcement of the MongoDB AI Applications Program (MAAP), which provides customers with reference architectures, pre-built partner integrations, and professional services to help them quickly build AI-powered applications. Accenture will establish a center of excellence focused on MongoDB projects, and is the first global systems
      Score: 0.8023907
      Text: assumptions, our ability to capitalize on our market opportunity and deliver strong growth for the foreseeable future as well as the criticality of MongoDB to artificial intelligence application development. These forward-looking statements include, but are not limited to, plans, objectives, expectations and intentions and other statements contained in this press release that are not historical
      Score: 0.7829329
5

このセクションでは、検索されたドキュメントをコンテキストとして使用するよう OpenAI からの LM にプロンプトを入力して応答を生成します。この例では、先ほど定義した関数を使用して、データベースから一致するドキュメントを検索し、さらに次のことを行います。

  • ユーザーの質問と取得したドキュメントをプロンプトに含めるように LLM に指示します。

  • LLM に MongoDB の最新の AI に関する発表を支持します。

  1. generate-responses.goという新しいファイルを作成し、次のコードをそのファイルに貼り付けます。

    generate-responses.go
    package main
    import (
    "context"
    "fmt"
    "log"
    "os"
    "rag-mongodb/common" // Module that contains the GetQueryResults function
    "strings"
    "github.com/tmc/langchaingo/llms"
    "github.com/tmc/langchaingo/llms/openai"
    "github.com/tmc/langchaingo/prompts"
    )
    func main() {
    ctx := context.Background()
    question := "In a few sentences, what are MongoDB's latest AI announcements?"
    documents := common.GetQueryResults(question)
    var textDocuments strings.Builder
    for _, doc := range documents {
    textDocuments.WriteString(doc.PageContent)
    }
    template := prompts.NewPromptTemplate(
    `Answer the following question based on the given context.
    Question: {{.question}}
    Context: {{.context}}`,
    []string{"question", "context"},
    )
    prompt, err := template.Format(map[string]any{
    "question": question,
    "context": textDocuments.String(),
    })
    // Loads OpenAI API key from environment
    openaiApiKey := os.Getenv("OPENAI_API_KEY")
    if openaiApiKey == "" {
    log.Fatal("Set your OPENAI_API_KEY environment variable in the .env file")
    }
    // Creates an OpenAI LLM client
    llm, err := openai.New(
    openai.WithToken(openaiApiKey),
    openai.WithModel("gpt-4o"),
    )
    if err != nil {
    log.Fatalf("Failed to create an LLM client: %v", err)
    }
    completion, err := llms.GenerateFromSinglePrompt(ctx, llm, prompt)
    if err != nil {
    log.Fatalf("failed to generate a response from the prompt: %v", err)
    }
    fmt.Println(completion)
    }
  2. このコマンドを実行してコードを実行します。生成される応答は異なる場合があります。

    go run generate-responses.go
    MongoDB recently announced several developments in its AI ecosystem.
    These include the MongoDB AI Applications Program (MAAP), which offers
    reference architectures, pre-built partner integrations, and professional
    services to help customers efficiently build AI-powered applications.
    Accenture is the first global systems integrator to join MAAP and will
    establish a center of excellence for MongoDB projects. Additionally,
    MongoDB introduced significant updates, including faster performance
    in version 8.0 and the general availability of Atlas Stream Processing
    to enable real-time, event-driven applications. These advancements
    highlight MongoDB's focus on supporting AI-powered applications and
    modernizing legacy workloads.
1
  1. IDE から、Maven または Gradle を使用してJavaプロジェクトを作成します。

  2. パッケージマネージャーに応じて、次の依存関係を追加します。

    Maven を使用している場合は、プロジェクトの pom.xml ファイルの dependencies 配列に次の依存関係を追加し、dependencyManagement 配列にBill of Materials(BOM)を追加します。

    pom.xml
    <dependencies>
    <!-- MongoDB Java Sync Driver -->
    <dependency>
    <groupId>org.mongodb</groupId>
    <artifactId>mongodb-driver-sync</artifactId>
    <version>5.2.0</version>
    </dependency>
    <!-- Core LangChain4j library (provides Document interface, etc.) -->
    <dependency>
    <groupId>dev.langchain4j</groupId>
    <artifactId>langchain4j</artifactId>
    </dependency>
    <!-- Voyage AI integration -->
    <dependency>
    <groupId>dev.langchain4j</groupId>
    <artifactId>langchain4j-voyage-ai</artifactId>
    </dependency>
    <!-- Hugging Face integration -->
    <dependency>
    <groupId>dev.langchain4j</groupId>
    <artifactId>langchain4j-hugging-face</artifactId>
    </dependency>
    <!-- Open AI integration -->
    <dependency>
    <groupId>dev.langchain4j</groupId>
    <artifactId>langchain4j-open-ai</artifactId>
    </dependency>
    <!-- Apache PDFBox Document Parser -->
    <dependency>
    <groupId>dev.langchain4j</groupId>
    <artifactId>langchain4j-document-parser-apache-pdfbox</artifactId>
    </dependency>
    </dependencies>
    <dependencyManagement>
    <dependencies>
    <!-- Bill of Materials (BOM) to manage Java library versions -->
    <dependency>
    <groupId>dev.langchain4j</groupId>
    <artifactId>langchain4j-bom</artifactId>
    <version>1.1.0</version>
    <type>pom</type>
    <scope>import</scope>
    </dependency>
    </dependencies>
    </dependencyManagement>

    Gradle を使用している場合は、プロジェクトの build.gradle ファイルの dependencies 配列に次の Bill of Materials(BOM)と依存関係を追加します。

    build.grouple
    dependencies {
    // Bill of Materials (BOM) to manage Java library versions
    implementation platform('dev.langchain4j:langchain4j-bom:1.1.0')
    // MongoDB Java Sync Driver v5.2.0 or later
    implementation 'org.mongodb:mongodb-driver-sync:5.2.0'
    // Java library for Voyage AI models
    implementation 'dev.langchain4j:langchain4j-voyage-ai'
    // Java library for Hugging Face models
    implementation 'dev.langchain4j:langchain4j-hugging-face'
    // Java library for Open AI models
    implementation 'dev.langchain4j:langchain4j-open-ai'
    // Java library for URL Document Loader
    implementation 'dev.langchain4j:langchain4j'
    // Java library for Apache PDFBox Document Parser
    implementation 'dev.langchain4j:langchain4j-document-parser-apache-pdfbox'
    }
  3. パッケージマネージャーを実行して、プロジェクトに依存関係をインストールします。

2

注意

この例では、 IDE でプロジェクトの変数を設定します。 実稼働アプリケーションでは、配置構成、 CI/CDパイプライン、または シークレット マネージャー を使用して環境変数を管理する場合がありますが、提供されたコードをユースケースに合わせて調整できます。

プロジェクトに必要な環境変数のみを設定します。

IDE で新しい構成テンプレートを作成し、次の変数をプロジェクトに追加します 。

  • IntelliJ IDEA を使用している場合は、新しい Application 実行構成テンプレートを作成し、Environment variables フィールドに変数をセミコロン区切りの値として追加します(例: FOO=123;BAR=456)。[OK] をクリックして、変更を適用します。

    詳細については、IntelliJ IDEA ドキュメントの「 テンプレートから実行/デバッグ構成を作成する 」セクションを参照してください。

  • Eclipse を使用している場合は、新しい Java Application 起動構成を作成し、各変数を新しいキーと値のペアとして Environmentタブに追加します。 変更を適用し、OK をクリックします。

    詳細については、Eclipse IDE ドキュメントの「 Javaアプリケーション起動構成の作成 」セクションを参照してください。

環境変数
VOYAGE_AI_KEY=<voyage-api-key> # If using Voyage AI embedding models
HUGGING_FACE_ACCESS_TOKEN=<access-token> # If using Hugging Face embedding models
OPENAI_API_KEY=<openai-api-key>
MONGODB_URI=<connection-string>

プレースホルダーを次の値で更新します。

  • <access-token> プレースホルダー値を 1 つのドキュメント アクセス トークンに置き換えます。

  • Voyage AI を使用している場合は、<api-key> プレースホルダーの値を Voyage AI API キーに置き換えます。

  • <connection-string> を Atlas クラスターまたはローカル Atlas 配置の接続文字列に置き換えます。

    接続stringには、次の形式を使用する必要があります。

    mongodb+srv://<db_username>:<db_password>@<clusterName>.<hostname>.mongodb.net

    詳しくは、ドライバーを使用してクラスターに接続する を参照してください。

    接続stringには、次の形式を使用する必要があります。

    mongodb://localhost:<port-number>/?directConnection=true

    詳細については、「接続文字列 」を参照してください。

3

PDFProcessor.javaという名前のファイルを作成し、次のコードを貼り付けます。

このコードは、次のメソッドを定義します。

  • parsePDFDocument メソッドは Apache PDFBox ライブラリと LangChain4j URL ドキュメントローダーを使用して、指定された URL の PDF ファイルを読み込み、解析します。このメソッドは解析された PDF を langchain4j ドキュメントとして返します。

  • splitDocument メソッドは、指定された langchain4j ドキュメントを、指定されたチャンクサイズ(文字数)とチャンクオーバーラップ(連続するチャンク間で重複する文字数)に従ってチャンクに分割します。このメソッドはテキストセグメントのリストを返します。

PDFProcessor.java
import dev.langchain4j.data.document.Document;
import dev.langchain4j.data.document.DocumentParser;
import dev.langchain4j.data.document.DocumentSplitter;
import dev.langchain4j.data.document.loader.UrlDocumentLoader;
import dev.langchain4j.data.document.parser.apache.pdfbox.ApachePdfBoxDocumentParser;
import dev.langchain4j.data.document.splitter.DocumentByCharacterSplitter;
import dev.langchain4j.data.segment.TextSegment;
import java.util.List;
public class PDFProcessor {
/** Parses a PDF document from the specified URL, and returns a
* langchain4j Document object.
* */
public static Document parsePDFDocument(String url) {
DocumentParser parser = new ApachePdfBoxDocumentParser();
return UrlDocumentLoader.load(url, parser);
}
/** Splits a parsed langchain4j Document based on the specified chunking
* parameters, and returns an array of text segments.
*/
public static List<TextSegment> splitDocument(Document document) {
int maxChunkSize = 400; // number of characters
int maxChunkOverlap = 20; // number of overlapping characters between consecutive chunks
DocumentSplitter splitter = new DocumentByCharacterSplitter(maxChunkSize, maxChunkOverlap);
return splitter.split(document);
}
}
4

EmbeddingProvider.javaという名前のファイルを作成し、次のコードを貼り付けます。

このコードは、Voyage AIのvoyage-3-large 埋め込みモデルを使用して、与えられた入力に対する埋め込みを生成する以下の2つのメソッドを定義します。

  • 複数の入力: getEmbeddings() メソッドはテキスト入力の配列(List<String>)を受け入れるため、1 回のAPI呼び出しに複数の埋め込みを作成できます。メソッドは、 APIが提供する浮動小数点数の配列を、 MongoDBに保存するために double のBSON配列に変換します。

  • 単一入力:getEmbedding() メソッドは単一のString を受け入れます。これはベクトルデータに対して実行するクエリを表します。メソッドは、 APIが提供する浮動小数点数の配列を、コレクションをクエリするときに使用する double のBSON配列に変換します 。

EmbeddingProvider.java
import dev.langchain4j.data.embedding.Embedding;
import dev.langchain4j.data.segment.TextSegment;
import dev.langchain4j.model.embedding.EmbeddingModel;
import dev.langchain4j.model.voyageai.VoyageAiEmbeddingModel;
import dev.langchain4j.model.output.Response;
import org.bson.BsonArray;
import org.bson.BsonDouble;
import java.util.List;
import static java.time.Duration.ofSeconds;
public class EmbeddingProvider {
private static EmbeddingModel embeddingModel;
private static EmbeddingModel getEmbeddingModel() {
if (embeddingModel == null) {
String apiKey = System.getenv("VOYAGE_AI_KEY");
if (apiKey == null || apiKey.isEmpty()) {
throw new IllegalStateException("VOYAGE_AI_KEY env variable is not set or is empty.");
}
return VoyageAiEmbeddingModel.builder()
.apiKey(apiKey)
.modelName("voyage-3-large")
.build();
}
return embeddingModel;
}
/**
* Takes an array of strings and returns a BSON array of embeddings to
* store in the database.
*/
public List<BsonArray> getEmbeddings(List<String> texts) {
List<TextSegment> textSegments = texts.stream()
.map(TextSegment::from)
.toList();
Response<List<Embedding>> response = getEmbeddingModel().embedAll(textSegments);
return response.content().stream()
.map(e -> new BsonArray(
e.vectorAsList().stream()
.map(BsonDouble::new)
.toList()))
.toList();
}
/**
* Takes a single string and returns a BSON array embedding to
* use in a vector query.
*/
public BsonArray getEmbedding(String text) {
Response<Embedding> response = getEmbeddingModel().embed(text);
return new BsonArray(
response.content().vectorAsList().stream()
.map(BsonDouble::new)
.toList());
}
}

このコードでは、mxます。1

  • 複数の入力: getEmbeddings() メソッドはテキスト セグメント入力の配列(List<TextSegment>)を受け入れるため、1 回のAPI呼び出しに複数の埋め込みを作成できます。メソッドは、 APIが提供する浮動小数点数の配列を、 MongoDBに保存するために double のBSON配列に変換します。

  • 単一入力:getEmbedding() メソッドは単一のString を受け入れます。これはベクトルデータに対して実行するクエリを表します。メソッドは、 APIが提供する浮動小数点数の配列を、コレクションをクエリするときに使用する double のBSON配列に変換します 。

EmbeddingProvider.java
import dev.langchain4j.data.embedding.Embedding;
import dev.langchain4j.data.segment.TextSegment;
import dev.langchain4j.model.huggingface.HuggingFaceEmbeddingModel;
import dev.langchain4j.model.output.Response;
import org.bson.BsonArray;
import org.bson.BsonDouble;
import java.util.List;
import static java.time.Duration.ofSeconds;
public class EmbeddingProvider {
private static HuggingFaceEmbeddingModel embeddingModel;
private static HuggingFaceEmbeddingModel getEmbeddingModel() {
if (embeddingModel == null) {
String accessToken = System.getenv("HUGGING_FACE_ACCESS_TOKEN");
if (accessToken == null || accessToken.isEmpty()) {
throw new RuntimeException("HUGGING_FACE_ACCESS_TOKEN env variable is not set or is empty.");
}
embeddingModel = HuggingFaceEmbeddingModel.builder()
.accessToken(accessToken)
.modelId("mixedbread-ai/mxbai-embed-large-v1")
.waitForModel(true)
.timeout(ofSeconds(60))
.build();
}
return embeddingModel;
}
/**
* Takes an array of text segments and returns a BSON array of embeddings to
* store in the database.
*/
public List<BsonArray> getEmbeddings(List<TextSegment> texts) {
List<TextSegment> textSegments = texts.stream()
.toList();
Response<List<Embedding>> response = getEmbeddingModel().embedAll(textSegments);
return response.content().stream()
.map(e -> new BsonArray(
e.vectorAsList().stream()
.map(BsonDouble::new)
.toList()))
.toList();
}
/**
* Takes a single string and returns a BSON array embedding to
* use in a vector query.
*/
public static BsonArray getEmbedding(String text) {
Response<Embedding> response = getEmbeddingModel().embed(text);
return new BsonArray(
response.content().vectorAsList().stream()
.map(BsonDouble::new)
.toList());
}
}
5

DataIngest.javaという名前のファイルを作成し、次のコードを貼り付けます。

このコードでは、LgChuin4j ライブラリとMongoDB Java Sync Driver を使用して、LM がアクセスできないMongoDBにサンプルデータを取り込みます。

具体的には、このコードでは次の処理が行われます。

  1. MongoDBデプロイに接続します。

  2. 以前に定義した parsePDFDocument メソッドを使用して、URL から MongoDB の収益報告書 PDF ファイルを読み込み、解析します。

  3. 以前に定義された splitDocument メソッドを使用して、データをチャンクに分割します。

  4. 以前に定義した GetEmbeddings() メソッドを使用して、チャンクされたデータからベクトル埋め込みを作成します。

  5. 埋め込みをチャンクされたデータと一緒に rag_db.testコレクションに保存します。

    DataIngest.java
    import com.mongodb.MongoException;
    import com.mongodb.client.MongoClient;
    import com.mongodb.client.MongoClients;
    import com.mongodb.client.MongoCollection;
    import com.mongodb.client.MongoDatabase;
    import com.mongodb.client.result.InsertManyResult;
    import dev.langchain4j.data.segment.TextSegment;
    import org.bson.BsonArray;
    import org.bson.Document;
    import java.util.ArrayList;
    import java.util.List;
    import java.util.stream.Collectors;
    public class DataIngest {
    public static void main(String[] args) {
    String uri = System.getenv("MONGODB_URI");
    if (uri == null || uri.isEmpty()) {
    throw new RuntimeException("MONGODB_URI env variable is not set or is empty.");
    }
    // establish connection and set namespace
    try (MongoClient mongoClient = MongoClients.create(uri)) {
    MongoDatabase database = mongoClient.getDatabase("rag_db");
    MongoCollection<Document> collection = database.getCollection("test");
    // parse the PDF file at the specified URL
    String url = "https://investors.mongodb.com/node/12236/pdf";
    String fileName = "mongodb_annual_report.pdf";
    System.out.println("Parsing the [" + fileName + "] file from url: " + url);
    dev.langchain4j.data.document.Document parsedDoc = PDFProcessor.parsePDFDocument(url);
    // split (or "chunk") the parsed document into text segments
    List<TextSegment> segments = PDFProcessor.splitDocument(parsedDoc);
    System.out.println(segments.size() + " text segments created successfully.");
    // create vector embeddings from the chunked data (i.e. text segments)
    System.out.println("Creating vector embeddings from the parsed data segments. This may take a few moments.");
    List<Document> documents = embedText(segments);
    // insert the embeddings into the MongoDB collection
    try {
    System.out.println("Ingesting data into the " + collection.getNamespace() + " collection.");
    insertDocuments(documents, collection);
    }
    catch (MongoException me) {
    throw new RuntimeException("Failed to insert documents", me);
    }
    } catch (MongoException me) {
    throw new RuntimeException("Failed to connect to MongoDB", me);
    } catch (Exception e) {
    throw new RuntimeException("Operation failed: ", e);
    }
    }
    /**
    * Embeds text segments into vector embeddings using the EmbeddingProvider
    * class and returns a list of BSON documents containing the text and
    * generated embeddings.
    */
    private static List<Document> embedText(List<TextSegment> segments) {
    EmbeddingProvider embeddingProvider = new EmbeddingProvider();
    List<String> texts = segments.stream()
    .map(TextSegment::text)
    .collect(Collectors.toList());
    List<BsonArray> embeddings = embeddingProvider.getEmbeddings(texts);
    List<Document> documents = new ArrayList<>();
    int i = 0;
    for (TextSegment segment : segments) {
    Document doc = new Document("text", segment.text()).append("embedding", embeddings.get(i));
    documents.add(doc);
    i++;
    }
    return documents;
    }
    /**
    * Inserts a list of BSON documents into the specified MongoDB collection.
    */
    private static void insertDocuments(List<Document> documents, MongoCollection<Document> collection) {
    List<String> insertedIds = new ArrayList<>();
    InsertManyResult result = collection.insertMany(documents);
    result.getInsertedIds().values()
    .forEach(doc -> insertedIds.add(doc.toString()));
    System.out.println(insertedIds.size() + " documents inserted into the " + collection.getNamespace() + " collection successfully.");
    }
    }
6

注意

は額文字モデルを呼び出す場合の 503

Hugging Face モデル ハブ モデルを呼び出すときに、503 エラーが発生する場合があります。この問題を解決するには、少し待ってから再試行します。

DataIngest.java ファイルを保存して実行します。出力は次のようになります。

Parsing the [mongodb_annual_report.pdf] file from url: https://investors.mongodb.com/node/12236/pdf
72 text segments created successfully.
Creating vector embeddings from the parsed data segments. This may take a few moments...
Ingesting data into the rag_db.test collection.
72 documents inserted into the rag_db.test collection successfully.
7

このセクションでは、 MongoDB ベクトル検索を設定して、ベクトルデータベースからドキュメントを検索します。

  1. VectorIndex.javaという名前のファイルを作成し、次のコードを貼り付けます。

    このコードでは、次のインデックス定義を使用してコレクションにMongoDB ベクトル検索インデックスが作成されます。

    • rag_db.test コレクションのベクトルインデックスタイプに embedding フィールドをインデックスします。このフィールドには、埋め込みモデルを使用して作成された埋め込みが含まれます。

    • 1024ベクトル次元を強制し、cosine を使用してベクトル間の類似性を測定します。

    VectorIndex.java
    import com.mongodb.MongoException;
    import com.mongodb.client.ListSearchIndexesIterable;
    import com.mongodb.client.MongoClient;
    import com.mongodb.client.MongoClients;
    import com.mongodb.client.MongoCollection;
    import com.mongodb.client.MongoCursor;
    import com.mongodb.client.MongoDatabase;
    import com.mongodb.client.model.SearchIndexModel;
    import com.mongodb.client.model.SearchIndexType;
    import org.bson.Document;
    import org.bson.conversions.Bson;
    import java.util.Collections;
    import java.util.List;
    public class VectorIndex {
    public static void main(String[] args) {
    String uri = System.getenv("MONGODB_URI");
    if (uri == null || uri.isEmpty()) {
    throw new IllegalStateException("MONGODB_URI env variable is not set or is empty.");
    }
    // establish connection and set namespace
    try (MongoClient mongoClient = MongoClients.create(uri)) {
    MongoDatabase database = mongoClient.getDatabase("rag_db");
    MongoCollection<Document> collection = database.getCollection("test");
    // define the index details for the index model
    String indexName = "vector_index";
    Bson definition = new Document(
    "fields",
    Collections.singletonList(
    new Document("type", "vector")
    .append("path", "embedding")
    .append("numDimensions", 1024)
    .append("similarity", "cosine")));
    SearchIndexModel indexModel = new SearchIndexModel(
    indexName,
    definition,
    SearchIndexType.vectorSearch());
    // create the index using the defined model
    try {
    List<String> result = collection.createSearchIndexes(Collections.singletonList(indexModel));
    System.out.println("Successfully created vector index named: " + result);
    System.out.println("It may take up to a minute for the index to build before you can query using it.");
    } catch (Exception e) {
    throw new RuntimeException(e);
    }
    // wait for index to build and become queryable
    System.out.println("Polling to confirm the index has completed building.");
    waitForIndexReady(collection, indexName);
    } catch (MongoException me) {
    throw new RuntimeException("Failed to connect to MongoDB", me);
    } catch (Exception e) {
    throw new RuntimeException("Operation failed: ", e);
    }
    }
    /**
    * Polls the collection to check whether the specified index is ready to query.
    */
    public static void waitForIndexReady(MongoCollection<Document> collection, String indexName) throws InterruptedException {
    ListSearchIndexesIterable<Document> searchIndexes = collection.listSearchIndexes();
    while (true) {
    try (MongoCursor<Document> cursor = searchIndexes.iterator()) {
    if (!cursor.hasNext()) {
    break;
    }
    Document current = cursor.next();
    String name = current.getString("name");
    boolean queryable = current.getBoolean("queryable");
    if (name.equals(indexName) && queryable) {
    System.out.println(indexName + " index is ready to query");
    return;
    } else {
    Thread.sleep(500);
    }
    }
    }
    }
    }
  2. MongoDB ベクトル検索インデックスを作成します。

    ファイルを保存して実行します。 出力は次のようになります。

    Successfully created a vector index named: [vector_index]
    Polling to confirm the index has completed building.
    It may take up to a minute for the index to build before you can query using it.
    vector_index index is ready to query
8

このセクションでは、検索されたドキュメントをコンテキストとして使用するよう LLM に指示して応答を生成します。

LLMPrompt.javaという新しいファイルを作成し、次のコードを貼り付けてください。

このコードでは、次の処理が行われます。

  1. retrieveDocuments メソッドを使用して、rag_db.test コレクション内の一致するドキュメントをクエリします。

    このメソッドは、以前に作成した getEmbedding() メソッドを使用して検索クエリから埋め込みを生成し、そのクエリを実行して意味的に類似したドキュメントを返します。

    詳細については、「ベクトル検索クエリの実行 」を参照してください。

  2. OpenAI から LM にアクセスし、createPrompt メソッドを使用してテンプレート化されたプロンプトを作成します。

    このメソッドは、ユーザーの質問と検索されたドキュメントを定義されたプロンプトに含めるように LLM に指示します。

  3. MongoDB の最新の AI 発表について LLM にプロンプトを出し、生成された応答を返します。

    LLMPrompt.java
    import com.mongodb.MongoException;
    import com.mongodb.client.MongoClient;
    import com.mongodb.client.MongoClients;
    import com.mongodb.client.MongoCollection;
    import com.mongodb.client.MongoDatabase;
    import com.mongodb.client.model.search.FieldSearchPath;
    import dev.langchain4j.data.message.AiMessage;
    import dev.langchain4j.model.chat.ChatModel;
    import dev.langchain4j.model.chat.request.ChatRequest;
    import dev.langchain4j.model.chat.response.ChatResponse;
    import dev.langchain4j.model.input.Prompt;
    import dev.langchain4j.model.input.PromptTemplate;
    import dev.langchain4j.model.openai.OpenAiChatModel;
    import org.bson.BsonArray;
    import org.bson.BsonValue;
    import org.bson.Document;
    import org.bson.conversions.Bson;
    import java.util.ArrayList;
    import java.util.Collections;
    import java.util.HashMap;
    import java.util.List;
    import java.util.Map;
    import static com.mongodb.client.model.Aggregates.project;
    import static com.mongodb.client.model.Aggregates.vectorSearch;
    import static com.mongodb.client.model.Projections.exclude;
    import static com.mongodb.client.model.Projections.fields;
    import static com.mongodb.client.model.Projections.include;
    import static com.mongodb.client.model.Projections.metaVectorSearchScore;
    import static com.mongodb.client.model.search.SearchPath.fieldPath;
    import static com.mongodb.client.model.search.VectorSearchOptions.exactVectorSearchOptions;
    import static java.util.Arrays.asList;
    public class LLMPrompt {
    // User input: the question to answer
    static String question = "In a few sentences, what are MongoDB's latest AI announcements?";
    public static void main(String[] args) {
    String uri = System.getenv("MONGODB_URI");
    if (uri == null || uri.isEmpty()) {
    throw new IllegalStateException("MONGODB_URI env variable is not set or is empty.");
    }
    // establish connection and set namespace
    try (MongoClient mongoClient = MongoClients.create(uri)) {
    MongoDatabase database = mongoClient.getDatabase("rag_db");
    MongoCollection<Document> collection = database.getCollection("test");
    // generate a response to the user question
    try {
    createPrompt(question, collection);
    } catch (Exception e) {
    throw new RuntimeException("An error occurred while generating the response: ", e);
    }
    } catch (MongoException me) {
    throw new RuntimeException("Failed to connect to MongoDB ", me);
    } catch (Exception e) {
    throw new RuntimeException("Operation failed: ", e);
    }
    }
    /**
    * Returns a list of documents from the specified MongoDB collection that
    * match the user's question.
    * NOTE: Update or omit the projection stage to change the desired fields in the response
    */
    public static List<Document> retrieveDocuments(String question, MongoCollection<Document> collection) {
    try {
    // generate the query embedding to use in the vector search
    EmbeddingProvider embeddingProvider = new EmbeddingProvider();
    BsonArray queryEmbeddingBsonArray = embeddingProvider.getEmbedding(question);
    List<Double> queryEmbedding = new ArrayList<>();
    for (BsonValue value : queryEmbeddingBsonArray.stream().toList()) {
    queryEmbedding.add(value.asDouble().getValue());
    }
    // define the pipeline stages for the vector search index
    String indexName = "vector_index";
    FieldSearchPath fieldSearchPath = fieldPath("embedding");
    int limit = 5;
    List<Bson> pipeline = asList(
    vectorSearch(
    fieldSearchPath,
    queryEmbedding,
    indexName,
    limit,
    exactVectorSearchOptions()),
    project(
    fields(
    exclude("_id"),
    include("text"),
    metaVectorSearchScore("score"))));
    // run the query and return the matching documents
    List<Document> matchingDocuments = new ArrayList<>();
    collection.aggregate(pipeline).forEach(matchingDocuments::add);
    return matchingDocuments;
    } catch (Exception e) {
    System.err.println("Error occurred while retrieving documents: " + e.getMessage());
    return new ArrayList<>();
    }
    }
    /**
    * Creates a templated prompt from a submitted question string and any retrieved documents,
    * then generates a response using the OpenAI chat model.
    */
    public static void createPrompt(String question, MongoCollection<Document> collection) {
    // retrieve documents matching the user's question
    List<Document> retrievedDocuments = retrieveDocuments(question, collection);
    if (retrievedDocuments.isEmpty()) {
    System.out.println("No relevant documents found. Unable to generate a response.");
    return;
    } else
    System.out.println("Generating a response from the retrieved documents. This may take a few moments.");
    // define a prompt template
    PromptTemplate promptBuilder = PromptTemplate.from("""
    Answer the following question based on the given context:
    Question: {{question}}
    Context: {{information}}
    -------
    """);
    // build the information string from the retrieved documents
    StringBuilder informationBuilder = new StringBuilder();
    for (Document doc : retrievedDocuments) {
    String text = doc.getString("text");
    informationBuilder.append(text).append("\n");
    }
    Map<String, Object> variables = new HashMap<>();
    variables.put("question", question);
    variables.put("information", informationBuilder);
    // generate and output the response from the chat model
    Prompt prompt = promptBuilder.apply(variables);
    ChatRequest chatRequest = ChatRequest.builder()
    .messages(Collections.singletonList(prompt.toUserMessage()))
    .build();
    String openAIApiKey = System.getenv("OPENAI_API_KEY");
    if (openAIApiKey == null || openAIApiKey.isEmpty()) {
    throw new IllegalStateException("OPENAI_API_KEY env variable is not set or is empty.");
    }
    ChatModel chatModel = OpenAiChatModel.builder()
    .apiKey(openAIApiKey)
    .modelName("gpt-4o")
    .build();
    ChatResponse chatResponse = chatModel.chat(chatRequest);
    AiMessage aiMessage = chatResponse.aiMessage();
    // extract the generated text to output a formatted response
    String responseText = aiMessage.text();
    String marker = "-------";
    int markerIndex = responseText.indexOf(marker);
    String generatedResponse;
    if (markerIndex != -1) {
    generatedResponse = responseText.substring(markerIndex + marker.length()).trim();
    } else {
    generatedResponse = responseText; // else fallback to the full response
    }
    // output the question and formatted response
    System.out.println("Question:\n " + question);
    System.out.println("Response:\n " + generatedResponse);
    // output the filled-in prompt and context information for demonstration purposes
    System.out.println("\n" + "---- Prompt Sent to LLM ----");
    System.out.println(prompt.text() + "\n");
    }
    }
9

ファイルを保存して実行します。出力は次のようになりますが、生成される応答は異なる場合があることにご注意ください。

Question:
In a few sentences, what are MongoDB's latest AI announcements?
Response:
MongoDB recently made significant AI-related announcements, including the launch of the MongoDB AI Applications Program (MAAP). This initiative provides customers with tools such as reference architectures, pre-built partner integrations, and professional services to accelerate the development of AI-powered applications. Accenture has joined as the first global systems integrator for MAAP and will establish a center of excellence focused on MongoDB projects. Additionally, MongoDB unveiled version 8.0 with major performance improvements, including faster reads, updates, and bulk inserts, as well as enhanced time series queries. The company also announced the general availability of Atlas Stream Processing for real-time, event-driven applications. These advancements position MongoDB to support the growing demands of AI-driven workloads.
---- Prompt Sent to Azure OpenAI LLM ----
Answer the following question based on the given context:
Question: In a few sentences, what are MongoDB's latest AI announcements?
Context: MongoDB continues to expand its AI ecosystem with the announcement of the MongoDB AI Applications Program (MAAP),
more of our customers. We also see a tremendous opportunity to win more legacy workloads, as AI has now become a catalyst to modernize these
applications. MongoDB's document-based architecture is particularly well-suited for the variety and scale of data required by AI-powered applications.
We are confident MongoDB will be a substantial beneficiary of this next wave of application development."
of MongoDB 8.0—with significant performance improvements such as faster reads and updates, along with significantly
faster bulk inserts and time series queries—and the general availability of Atlas Stream Processing to build sophisticated,
event-driven applications with real-time data.
which provides customers with reference architectures, pre-built partner integrations, and professional services to help
them quickly build AI-powered applications. Accenture will establish a center of excellence focused on MongoDB projects,
and is the first global systems integrator to join MAAP.
included at the end of this press release. An explanation of these measures is also included below under the heading "Non-GAAP Financial
Measures."
First Quarter Fiscal 2025 and Recent Business Highlights
MongoDB announced a number of new products and capabilities at MongoDB.local NYC. Highlights included the preview
1
  1. Node.js プロジェクトを初期化します。

    ターミナルで次のコマンドを実行して、 rag-mongodbという名前の新しいディレクトリを作成し、プロジェクトを初期化します。

    mkdir rag-mongodb
    cd rag-mongodb
    npm init -y
  2. 依存関係をインストールしてインポートします。

    次のコマンドを実行します:

    npm install mongodb voyageai openai @huggingface/inference @xenova/transformers langchain @langchain/community pdf-parse
  3. package.jsonファイルを更新します。

    プロジェクトのpackage.jsonファイルで、次の例に示すようにtypeフィールドを指定し、ファイルを保存します。

    {
    "name": "rag-mongodb",
    "type": "module",
    ...
  4. .envファイルを作成します。

    プロジェクトでは、使用するモデルのMongoDB接続文字列とAPIキーを保存するための .envファイルを作成します。

    MONGODB_URI = "<connection-string>"
    VOYAGE_API_KEY = "<voyage-api-key>" # If using Voyage AI embedding model
    HUGGING_FACE_ACCESS_TOKEN = "<hf-token>" # If using Hugging Face embedding or generative model
    OPENAI_API_KEY = "<openai-api-key>" # If using OpenAI generative model

    <connection-string> を Atlas クラスターまたはローカル Atlas 配置の接続文字列に置き換えます。

    接続stringには、次の形式を使用する必要があります。

    mongodb+srv://<db_username>:<db_password>@<clusterName>.<hostname>.mongodb.net

    詳しくは、ドライバーを使用してクラスターに接続する を参照してください。

    接続stringには、次の形式を使用する必要があります。

    mongodb://localhost:<port-number>/?directConnection=true

    詳細については、「接続文字列 」を参照してください。

    注意

    Node.js の最低バージョン要件

    Node.js v20.x は、--env-file オプションを導入しました。古いバージョンの Node.js を使用している場合は、dotenv パッケージをプロジェクトに追加するか、別の方法を使用して環境変数を管理します。

2

埋め込みを生成するには、 埋め込みモデル を使用します。このチュートリアルでは、 Hugeface のオープンソース モデルまたは Vyage AIのプロプライマリ モデルを使用できます。

プロジェクトで、get-embeddings.js というファイルを作成し、次のコードを貼り付けます。

import { VoyageAIClient } from 'voyageai';
// Set up Voyage AI configuration
const client = new VoyageAIClient({apiKey: process.env.VOYAGE_API_KEY});
// Function to generate embeddings using the Voyage AI API
export async function getEmbedding(text) {
const results = await client.embed({
input: text,
model: "voyage-3-large"
});
return results.data[0].embedding;
}

getEmbedding()voyage-3-large関数は、Vorage AIの 埋め込みモデルを使用してベクトル埋め込みを生成します。

Tip

詳細については、Vorage AI Typescriptライブラリを参照してください。

import { pipeline } from '@xenova/transformers';
// Function to generate embeddings for a given data source
export async function getEmbedding(data) {
const embedder = await pipeline(
'feature-extraction',
'Xenova/nomic-embed-text-v1');
const results = await embedder(data, { pooling: 'mean', normalize: true });
return Array.from(results.data);
}

getEmbedding()関数は、 区別変換 の noomic- embedded-text-v1 埋め込みモデルを使用してベクトル埋め込みを生成します。

3

このセクションでは、TLM がアクセスできないMongoDBにサンプルデータを取り込みます。次のコードでは、Lgachein 統合Node.jsドライバーを使用して次の処理を実行します。

  • MongoDB のレポートを含む PDF を読み込みます。

  • データをチャンクに分割し、チャンク サイズ(文字数)とチャンクの重複(連続するチャンク間で重複する文字数)を指定します。

  • 定義したgetEmbedding()関数を使用して、チャンク データからベクトル埋め込みを作成します。

  • これらの埋め込みを、チャンクされたデータと一緒に rag_db.testコレクションに保存します。

プロジェクトにingest-data.jsというファイルを作成し、次のコードを貼り付けます。

import { PDFLoader } from "@langchain/community/document_loaders/fs/pdf";
import { RecursiveCharacterTextSplitter } from "langchain/text_splitter";
import { MongoClient } from 'mongodb';
import { getEmbedding } from './get-embeddings.js';
import * as fs from 'fs';
async function run() {
const client = new MongoClient(process.env.MONGODB_URI);
try {
// Save online PDF as a file
const rawData = await fetch("https://investors.mongodb.com/node/12236/pdf");
const pdfBuffer = await rawData.arrayBuffer();
const pdfData = Buffer.from(pdfBuffer);
fs.writeFileSync("investor-report.pdf", pdfData);
const loader = new PDFLoader(`investor-report.pdf`);
const data = await loader.load();
// Chunk the text from the PDF
const textSplitter = new RecursiveCharacterTextSplitter({
chunkSize: 400,
chunkOverlap: 20,
});
const docs = await textSplitter.splitDocuments(data);
console.log(`Successfully chunked the PDF into ${docs.length} documents.`);
// Connect to your MongoDB cluster
await client.connect();
const db = client.db("rag_db");
const collection = db.collection("test");
console.log("Generating embeddings and inserting documents...");
const insertDocuments = [];
await Promise.all(docs.map(async doc => {
// Generate embeddings using the function that you defined
const embedding = await getEmbedding(doc.pageContent);
// Add the document with the embedding to array of documents for bulk insert
insertDocuments.push({
document: doc,
embedding: embedding
});
}))
// Continue processing documents if an error occurs during an operation
const options = { ordered: false };
// Insert documents with embeddings into collection
const result = await collection.insertMany(insertDocuments, options);
console.log("Count of documents inserted: " + result.insertedCount);
} catch (err) {
console.log(err.stack);
}
finally {
await client.close();
}
}
run().catch(console.dir);

次に、次のコマンドを実行してコードを実行します。

node --env-file=.env ingest-data.js
Generating embeddings and inserting documents...
Count of documents inserted: 86
4

このセクションでは、 MongoDB ベクトル検索を設定して、ベクトルデータベースからドキュメントを検索します。次の手順を実行します。

  1. ベクトル埋め込みにMongoDB ベクトル検索インデックスを作成します。

    rag-vector-index.js という名前の新しいファイルを作成し、次のコードを貼り付けます。このコードはMongoDBデプロイに接続し、rag_db.testコレクションに vectorSearch タイプのインデックスを作成します。<dimensions> プレースホルダーを次のいずれかの値に置き換えます。

    • 768 使用した場合 nomic-embed-text-v1

    • 1024 使用した場合 voyage-3-large

    import { MongoClient } from 'mongodb';
    // Connect to your MongoDB cluster
    const client = new MongoClient(process.env.MONGODB_URI);
    async function run() {
    try {
    const database = client.db("rag_db");
    const collection = database.collection("test");
    // Define your Vector Search index
    const index = {
    name: "vector_index",
    type: "vectorSearch",
    definition: {
    "fields": [
    {
    "type": "vector",
    "path": "embedding",
    "similarity": "cosine",
    "numDimensions": <dimensions> // Replace with the number of dimensions of your embeddings
    }
    ]
    }
    }
    // Call the method to create the index
    const result = await collection.createSearchIndex(index);
    console.log(result);
    } finally {
    await client.close();
    }
    }
    run().catch(console.dir);

    次に、次のコマンドを実行してコードを実行します。

    node --env-file=.env rag-vector-index.js
  2. 関連データを取得するための関数を定義します。

    retrieve-documents.jsという新しいファイルを作成します。

    このステップでは、関連するドキュメントを検索するクエリを実行する getQueryResults() という検索関数を作成します。getEmbedding() 関数を使用して、検索クエリから埋め込みを作成します。次に、クエリを実行して、意味的に類似したドキュメントを返します。

    詳細については、「ベクトル検索クエリの実行 」を参照してください。

    このコードを ファイルに貼り付けます。

    import { MongoClient } from 'mongodb';
    import { getEmbedding } from './get-embeddings.js';
    // Function to get the results of a vector query
    export async function getQueryResults(query) {
    // Connect to your Atlas cluster
    const client = new MongoClient(process.env.MONGODB_URI);
    try {
    // Get embedding for a query
    const queryEmbedding = await getEmbedding(query);
    await client.connect();
    const db = client.db("rag_db");
    const collection = db.collection("test");
    const pipeline = [
    {
    $vectorSearch: {
    index: "vector_index",
    queryVector: queryEmbedding,
    path: "embedding",
    exact: true,
    limit: 5
    }
    },
    {
    $project: {
    _id: 0,
    document: 1,
    }
    }
    ];
    // Retrieve documents using a Vector Search query
    const result = collection.aggregate(pipeline);
    const arrayOfQueryDocs = [];
    for await (const doc of result) {
    arrayOfQueryDocs.push(doc);
    }
    return arrayOfQueryDocs;
    } catch (err) {
    console.log(err.stack);
    }
    finally {
    await client.close();
    }
    }
  3. データの取得をテストします。

    retrieve-documents-test.jsという新しいファイルを作成します。 この手順では、定義した関数が関連する結果を返すことを確認します。

    このコードを ファイルに貼り付けます。

    import { getQueryResults } from './retrieve-documents.js';
    async function run() {
    try {
    const query = "AI Technology";
    const documents = await getQueryResults(query);
    documents.forEach( doc => {
    console.log(doc);
    });
    } catch (err) {
    console.log(err.stack);
    }
    }
    run().catch(console.dir);

    次に、次のコマンドを実行してコードを実行します。使用する埋め込みモデルによって結果が異なる場合があります。

    node --env-file=.env retrieve-documents-test.js
    {
    document: {
    pageContent: 'MongoDB continues to expand its AI ecosystem with the announcement of the MongoDB AI Applications Program (MAAP),',
    metadata: { source: 'investor-report.pdf', pdf: [Object], loc: [Object] },
    id: null
    }
    }
    {
    document: {
    pageContent: 'artificial intelligence, in our offerings or partnerships; the growth and expansion of the market for database products and our ability to penetrate that\n' +
    'market; our ability to integrate acquired businesses and technologies successfully or achieve the expected benefits of such acquisitions; our ability to',
    metadata: { source: 'investor-report.pdf', pdf: [Object], loc: [Object] },
    id: null
    }
    }
    {
    document: {
    pageContent: 'more of our customers. We also see a tremendous opportunity to win more legacy workloads, as AI has now become a catalyst to modernize these\n' +
    "applications. MongoDB's document-based architecture is particularly well-suited for the variety and scale of data required by AI-powered applications. \n" +
    'We are confident MongoDB will be a substantial beneficiary of this next wave of application development."',
    metadata: { source: 'investor-report.pdf', pdf: [Object], loc: [Object] },
    id: null
    }
    }
    {
    document: {
    pageContent: 'which provides customers with reference architectures, pre-built partner integrations, and professional services to help\n' +
    'them quickly build AI-powered applications. Accenture will establish a center of excellence focused on MongoDB projects,\n' +
    'and is the first global systems integrator to join MAAP.',
    metadata: { source: 'investor-report.pdf', pdf: [Object], loc: [Object] },
    id: null
    }
    }
    {
    document: {
    pageContent: 'Bendigo and Adelaide Bank partnered with MongoDB to modernize their core banking technology. With the help of\n' +
    'MongoDB Relational Migrator and generative AI-powered modernization tools, Bendigo and Adelaide Bank decomposed an\n' +
    'outdated consumer-servicing application into microservices and migrated off its underlying legacy relational database',
    metadata: { source: 'investor-report.pdf', pdf: [Object], loc: [Object] },
    id: null
    }
    }
5

このセクションでは、検索されたドキュメントをコンテキストとして使用するよう LM にプロンプトを表示して応答を生成します。このチュートリアルでは、OpenAI のモデルまたは Huge Page のオープンソース モデルを使用できます。この例では、先ほど定義した関数を使用して、データベースから一致するドキュメントを検索し、さらに次のことを行います。

  • ユーザーの質問と取得したドキュメントをプロンプトに含めるように LLM に指示します。

  • LLM に MongoDB の最新の AI に関する発表を支持します。

generate-responses.jsという新しいファイルを作成し、次のコードをそのファイルに貼り付けます。

import { getQueryResults } from './retrieve-documents.js';
import OpenAI from 'openai';
async function run() {
try {
// Specify search query and retrieve relevant documents
const question = "In a few sentences, what are MongoDB's latest AI announcements?";
const documents = await getQueryResults(question);
// Build a string representation of the retrieved documents to use in the prompt
let textDocuments = "";
documents.forEach(doc => {
textDocuments += doc.document.pageContent;
});
// Create a prompt consisting of the question and context to pass to the LLM
const prompt = `Answer the following question based on the given context.
Question: {${question}}
Context: {${textDocuments}}
`;
// Initialize OpenAI client
const client = new OpenAI({
apiKey: process.env.OPENAI_API_KEY,
});
// Prompt the LLM to generate a response based on the context
const chatCompletion = await client.chat.completions.create({
model: "gpt-4o",
messages: [
{
role: "user",
content: prompt
},
],
});
// Output the LLM's response as text.
console.log(chatCompletion.choices[0].message.content);
} catch (err) {
console.log(err.stack);
}
}
run().catch(console.dir);
import { getQueryResults } from './retrieve-documents.js';
import { HfInference } from '@huggingface/inference'
async function run() {
try {
// Specify search query and retrieve relevant documents
const question = "In a few sentences, what are MongoDB's latest AI announcements?";
const documents = await getQueryResults(question);
// Build a string representation of the retrieved documents to use in the prompt
let textDocuments = "";
documents.forEach(doc => {
textDocuments += doc.document.pageContent;
});
// Create a prompt consisting of the question and context to pass to the LLM
const prompt = `Answer the following question based on the given context.
Question: {${question}}
Context: {${textDocuments}}
`;
// Prompt the LLM to generate a response based on the context
const client = new InferenceClient(process.env.HUGGING_FACE_ACCESS_TOKEN);
const chatCompletion = await client.chatCompletion({
provider: "fireworks-ai",
model: "mistralai/Mixtral-8x22B-Instruct-v0.1",
messages: [
{
role: "user",
content: prompt
},
],
});
// Output the LLM's response as text.
console.log(chatCompletion.choices[0].message.content);
} catch (err) {
console.log(err.stack);
}
}
run().catch(console.dir);

次に、このコマンドを実行してコードを実行します。 生成される応答は異なる場合があります。

node --env-file=.env generate-responses.js
MongoDB's latest AI announcements include the launch of the MongoDB
AI Applications Program (MAAP), which provides customers with
reference architectures, pre-built partner integrations, and
professional services to help them build AI-powered applications
quickly. Accenture has joined MAAP as the first global systems
integrator, establishing a center of excellence focused on MongoDB
projects. Additionally, Bendigo and Adelaide Bank have partnered
with MongoDB to modernize their core banking technology using
MongoDB's Relational Migrator and generative AI-powered
modernization tools.
1

.ipynb 拡張機能を持つファイルを保存して、インタラクティブな Python ノートブックを作成します。このノートブックで、 Python コード スニペットを個別に実行できます。ノートブックで次のコードを実行して、このチュートリアルのための依存関係をインストールします。

pip install --quiet --upgrade pymongo sentence_transformers voyageai huggingface_hub openai einops langchain langchain_community pypdf

次に、次のコードを実行してこのチュートリアルの環境変数を設定し、プレースホルダーをモデルにアクセスするために必要なAPIキーに置き換えます。

import os
os.environ["VOYAGE_API_KEY"] = "<voyage-api-key>" # If using Voyage AI embedding model
os.environ["HF_TOKEN"] = "<hf-token>" # If using Hugging Face embedding or generative model
os.environ["OPENAI_API_KEY"] = "<openai-api-key>" # If using OpenAI generative model
2

このセクションでは、TLM がアクセスできないMongoDBにサンプルデータを取り込みます。次の各コード スニペットをノートに貼り付けて実行します。

  1. ベクトル埋め込みを生成する関数を定義する。

    埋め込みを生成するには、 埋め込みモデル を使用します。このチュートリアルでは、 Hugeface のオープンソース モデルまたは Vyage AIのプロプライマリ モデルを使用できます。

    次のコードをノート PC に貼り付けて実行し、Voyage AIの埋め込みモデルを使用してベクトル埋め込みを生成する get_embedding() という名前の関数を作成します。<api-key>Vyage APIキー に置き換えます。

    この関数は、以下を指定します。

    • voyage-3-large 使用する埋め込みモデルとして 。

    • input_type パラメーターを使用して、検索用に埋め込みを最適化します。詳細については、 Vyage AI Python API を参照してください。

    import os
    import voyageai
    # Specify the embedding model
    model = "voyage-3-large"
    vo = voyageai.Client()
    # Define a function to generate embeddings
    def get_embedding(data, input_type = "document"):
    embeddings = vo.embed(
    data, model = model, input_type = input_type
    ).embeddings
    return embeddings[0]

    次のコードをノートget_embedding() PC に貼り付けて実行し、 という名前の関数を作成します。この関数は、文章変換 の noomic- embedded-text-v 埋め込みモデルを使用してベクトル埋め込みを生成します。1

    from sentence_transformers import SentenceTransformer
    # Load the embedding model (https://huggingface.co/nomic-ai/nomic-embed-text-v1")
    model = SentenceTransformer("nomic-ai/nomic-embed-text-v1", trust_remote_code=True)
    # Define a function to generate embeddings
    def get_embedding(data):
    """Generates vector embeddings for the given data."""
    embedding = model.encode(data)
    return embedding.tolist()
  2. データをロードして分割します。

    このコードを実行すると、LangChain 統合を使用してサンプル データをロードし、分割できます。具体的には、このコードでは次の処理が行われます。

    • MongoDB の収益レポートを含む PDF をロードします。

    • チャンクサイズ(文字数)とチャンクのオーバーラップ(連続するチャンク間で重なり合う文字数)を指定して、データをチャンクに分割します。

    from langchain_community.document_loaders import PyPDFLoader
    from langchain.text_splitter import RecursiveCharacterTextSplitter
    # Load the PDF
    loader = PyPDFLoader("https://investors.mongodb.com/node/12236/pdf")
    data = loader.load()
    # Split the data into chunks
    text_splitter = RecursiveCharacterTextSplitter(chunk_size=400, chunk_overlap=20)
    documents = text_splitter.split_documents(data)
  3. データをベクトル埋め込みに変換します。

    このコードを実行して、対応するベクトルが埋め込まれたドキュメントのリストを作成し、チャンク化されたドキュメントを取り込む準備をします。これらの埋め込みは、先ほど定義した get_embedding() 関数を使用して生成します。

    # Prepare documents for insertion
    docs_to_insert = [{
    "text": doc.page_content,
    "embedding": get_embedding(doc.page_content)
    } for doc in documents]
  4. データと埋め込みをMongoDBに保存します。

    このコードを実行して、埋め込みを含むドキュメントを rag_db.testコレクションに挿入します。コードを実行中前に、<connection-string> をMongoDB接続文字列に置き換えます。

    from pymongo import MongoClient
    # Connect to your MongoDB deployment
    client = MongoClient("<connection-string>")
    collection = client["rag_db"]["test"]
    # Insert documents into the collection
    result = collection.insert_many(docs_to_insert)
3

このセクションでは、 MongoDB ベクトル検索を使用して検索システムを作成し、ベクトルデータベースから関連するドキュメントを取得します。次の各コード スニペットをノートに貼り付けて実行します。

  1. ベクトル埋め込みにMongoDB ベクトル検索インデックスを作成します。

    PyMongo ドライバーを使用してアプリケーションから直接インデックスを作成するには、次のコードを実行します。このコードには、インデックスが使用可能かどうかを確認するポーリング メカニズムも含まれています。

    詳細については、「ベクトル検索のフィールドにインデックスを作成する方法 」を参照してください。

    from pymongo.operations import SearchIndexModel
    import time
    # Create your index model, then create the search index
    index_name="vector_index"
    search_index_model = SearchIndexModel(
    definition = {
    "fields": [
    {
    "type": "vector",
    "numDimensions": 768,
    "path": "embedding",
    "similarity": "cosine"
    }
    ]
    },
    name = index_name,
    type = "vectorSearch"
    )
    collection.create_search_index(model=search_index_model)
    # Wait for initial sync to complete
    print("Polling to check if the index is ready. This may take up to a minute.")
    predicate=None
    if predicate is None:
    predicate = lambda index: index.get("queryable") is True
    while True:
    indices = list(collection.list_search_indexes(index_name))
    if len(indices) and predicate(indices[0]):
    break
    time.sleep(5)
    print(index_name + " is ready for querying.")
    from pymongo.operations import SearchIndexModel
    import time
    # Create your index model, then create the search index
    index_name="vector_index"
    search_index_model = SearchIndexModel(
    definition = {
    "fields": [
    {
    "type": "vector",
    "numDimensions": 1024,
    "path": "embedding",
    "similarity": "cosine"
    }
    ]
    },
    name = index_name,
    type = "vectorSearch"
    )
    collection.create_search_index(model=search_index_model)
    # Wait for initial sync to complete
    print("Polling to check if the index is ready. This may take up to a minute.")
    predicate=None
    if predicate is None:
    predicate = lambda index: index.get("queryable") is True
    while True:
    indices = list(collection.list_search_indexes(index_name))
    if len(indices) and predicate(indices[0]):
    break
    time.sleep(5)
    print(index_name + " is ready for querying.")
  2. ベクトル検索クエリを実行するための関数を定義します。

    このコードを実行して、基本的なベクトル検索クエリーを実行する get_query_results() という検索関数を作成します。検索クエリーから埋め込みを作成するには、 get_embedding() 関数を使用します。次に、 クエリを実行して、セマンティックに類似したドキュメントを返します。使用する埋め込みモデルによって結果が異なる場合があります。

    詳細については、「ベクター検索クエリの実行」を参照してください。

    # Define a function to run vector search queries
    def get_query_results(query):
    """Gets results from a vector search query."""
    query_embedding = get_embedding(query)
    pipeline = [
    {
    "$vectorSearch": {
    "index": "vector_index",
    "queryVector": query_embedding,
    "path": "embedding",
    "exact": True,
    "limit": 5
    }
    }, {
    "$project": {
    "_id": 0,
    "text": 1
    }
    }
    ]
    results = collection.aggregate(pipeline)
    array_of_results = []
    for doc in results:
    array_of_results.append(doc)
    return array_of_results
    # Test the function with a sample query
    import pprint
    pprint.pprint(get_query_results("AI technology"))
    [{'text': 'more of our customers. We also see a tremendous opportunity to win '
    'more legacy workloads, as AI has now become a catalyst to modernize '
    'these\n'
    "applications. MongoDB's document-based architecture is "
    'particularly well-suited for the variety and scale of data required '
    'by AI-powered applications.'},
    {'text': 'artificial intelligence, in our offerings or partnerships; the '
    'growth and expansion of the market for database products and our '
    'ability to penetrate that\n'
    'market; our ability to integrate acquired businesses and '
    'technologies successfully or achieve the expected benefits of such '
    'acquisitions; our ability to'},
    {'text': 'MongoDB continues to expand its AI ecosystem with the announcement '
    'of the MongoDB AI Applications Program (MAAP),'},
    {'text': 'which provides customers with reference architectures, pre-built '
    'partner integrations, and professional services to help\n'
    'them quickly build AI-powered applications. Accenture will '
    'establish a center of excellence focused on MongoDB projects,\n'
    'and is the first global systems integrator to join MAAP.'},
    {'text': 'Bendigo and Adelaide Bank partnered with MongoDB to modernize '
    'their core banking technology. With the help of\n'
    'MongoDB Relational Migrator and generative AI-powered modernization '
    'tools, Bendigo and Adelaide Bank decomposed an\n'
    'outdated consumer-servicing application into microservices and '
    'migrated off its underlying legacy relational database'}]
    # Define a function to run vector search queries
    def get_query_results(query):
    """Gets results from a vector search query."""
    query_embedding = get_embedding(query, input_type="query")
    pipeline = [
    {
    "$vectorSearch": {
    "index": "vector_index",
    "queryVector": query_embedding,
    "path": "embedding",
    "exact": True,
    "limit": 5
    }
    }, {
    "$project": {
    "_id": 0,
    "text": 1
    }
    }
    ]
    results = collection.aggregate(pipeline)
    array_of_results = []
    for doc in results:
    array_of_results.append(doc)
    return array_of_results
    # Test the function with a sample query
    import pprint
    pprint.pprint(get_query_results("AI technology"))
    [{'text': 'more of our customers. We also see a tremendous opportunity to win '
    'more legacy workloads, as AI has now become a catalyst to modernize '
    'these\n'
    "applications. MongoDB's document-based architecture is "
    'particularly well-suited for the variety and scale of data required '
    'by AI-powered applications.'},
    {'text': 'artificial intelligence, in our offerings or partnerships; the '
    'growth and expansion of the market for database products and our '
    'ability to penetrate that\n'
    'market; our ability to integrate acquired businesses and '
    'technologies successfully or achieve the expected benefits of such '
    'acquisitions; our ability to'},
    {'text': 'MongoDB continues to expand its AI ecosystem with the announcement '
    'of the MongoDB AI Applications Program (MAAP),'},
    {'text': 'which provides customers with reference architectures, pre-built '
    'partner integrations, and professional services to help\n'
    'them quickly build AI-powered applications. Accenture will '
    'establish a center of excellence focused on MongoDB projects,\n'
    'and is the first global systems integrator to join MAAP.'},
    {'text': 'Bendigo and Adelaide Bank partnered with MongoDB to modernize '
    'their core banking technology. With the help of\n'
    'MongoDB Relational Migrator and generative AI-powered modernization '
    'tools, Bendigo and Adelaide Bank decomposed an\n'
    'outdated consumer-servicing application into microservices and '
    'migrated off its underlying legacy relational database'}]
4

このセクションでは、検索されたドキュメントをコンテキストとして使用するよう LM にプロンプトを表示して応答を生成します。このチュートリアルでは、OpenAI のモデルまたは Huge Page のオープンソース モデルを使用できます。このコードでは、次の処理が行われます。

  • 定義した get_query_results() 関数を使用して、コレクションから関連するドキュメントを検索します。

  • ユーザーの質問と検索されたドキュメントをコンテキストとして、プロンプトを作成します。

  • LLM に MongoDB の最新の AI に関する発表を支持します。生成される応答は異なる場合があります。

from openai import OpenAI
# Specify search query, retrieve relevant documents, and convert to string
query = "What are MongoDB's latest AI announcements?"
context_docs = get_query_results(query)
context_string = " ".join([doc["text"] for doc in context_docs])
# Construct prompt for the LLM using the retrieved documents as the context
prompt = f"""Use the following pieces of context to answer the question at the end.
{context_string}
Question: {query}
"""
openai_client = OpenAI()
# OpenAI model to use
model_name = "gpt-4o"
completion = openai_client.chat.completions.create(
model=model_name,
messages=[{"role": "user",
"content": prompt
}]
)
print(completion.choices[0].message.content)
MongoDB recently announced several developments in its AI ecosystem.
These include the MongoDB AI Applications Program (MAAP), which offers
reference architectures, pre-built partner integrations, and professional
services to help customers efficiently build AI-powered applications.
Accenture is the first global systems integrator to join MAAP and will
establish a center of excellence for MongoDB projects. Additionally,
MongoDB introduced significant updates, including faster performance
in version 8.0 and the general availability of Atlas Stream Processing
to enable real-time, event-driven applications. These advancements
highlight MongoDB's focus on supporting AI-powered applications and
modernizing legacy workloads.
from huggingface_hub import InferenceClient
# Specify search query, retrieve relevant documents, and convert to string
query = "What are MongoDB's latest AI announcements?"
context_docs = get_query_results(query)
context_string = " ".join([doc["text"] for doc in context_docs])
# Construct prompt for the LLM using the retrieved documents as the context
prompt = f"""Use the following pieces of context to answer the question at the end.
{context_string}
Question: {query}
"""
# Use a model from Hugging Face
llm = InferenceClient(
"mistralai/Mixtral-8x22B-Instruct-v0.1",
provider = "fireworks-ai"
token = os.getenv("HF_TOKEN"))
# Prompt the LLM (this code varies depending on the model you use)
output = llm.chat_completion(
messages=[{"role": "user", "content": prompt}],
max_tokens=150
)
print(output.choices[0].message.content)
MongoDB's latest AI announcements include the
MongoDB AI Applications Program (MAAP), a program designed
to help customers build AI-powered applications more efficiently.
Additionally, they have announced significant performance
improvements in MongoDB 8.0, featuring faster reads, updates,
bulk inserts, and time series queries. Another announcement is the
general availability of Atlas Stream Processing to build sophisticated,
event-driven applications with real-time data.

その他の RAG チュートリアルについては、次のリソースを参照してください。

AIエージェントを構築し、エージェント RG を実装するには、MongoDBでAIエージェントを構築を参照してください。

RG アプリケーションを最適化するには、Voyage AIなどの強力な埋め込みモデルを使用して高品質のベクトル埋め込みを生成していることを確認してください。

さらに、 MongoDB ベクトル検索 は高度な検索システムをサポートします。ベクトルデータをクラスター内の他のデータとシームレスにインデックスできます。これにより、コレクション内の他のフィールドを事前にフィルタリングしたり、セマンティック検索と全文検索結果を組み合わせたハイブリッド検索を実行したりすることで、結果を向上させることができます。

次のリソースを使用することもできます。

埋め込みモデルの選択、チャンク化戦略、評価に関する詳細は、次のリソースを参照してください。

戻る

ユースケースと設計パターン

ルール バッジを取得する

「MongoDB を使用した RAG」を無料でマスターしましょう!

詳細

項目一覧