In the 70s and 80s, there were few commercial off-the-shelf solutions available for many core insurance functions, so insurers had to build their own applications. Such applications are often host-based, meaning that they are mainframe technologies. These legacy platforms include software languages such as COBOL and CICS. Many insurers are still struggling to replace these legacy technologies due to a confluence of variables such as a lack of developers with programming skills in these older technologies and complicated insurance products. This results in high maintenance costs and difficulty in making changes. In brief, legacy systems are a barrier to progress in the insurance industry.
Whether you’re looking to maintain and improve existing applications or push new products and features to market, the data trapped inside those systems is a drag on innovation.
This is particularly true when we think about the data models that sit at the core of application systems (e.g., underwriting), defining entities and relationships between them.
In this tutorial, we will demonstrate:
Why the document model simplifies the data model of a standard insurance system.
How MongoDB's Relational Migrator effortlessly transforms an unwieldy 21-table schema into a lean five-collection MongoDB model.
This will ultimately prove that with MongoDB, insurers will launch new products faster, swiftly adapt to regulatory changes, and enhance customer experiences.
To do this, we will focus on the Object Management Group’s Party Role model and how the model can be ported from a relational structure to MongoDB’s document model.
Figure 1. OMG Property and Casualty Data Model, representing the major entities and their relationships.
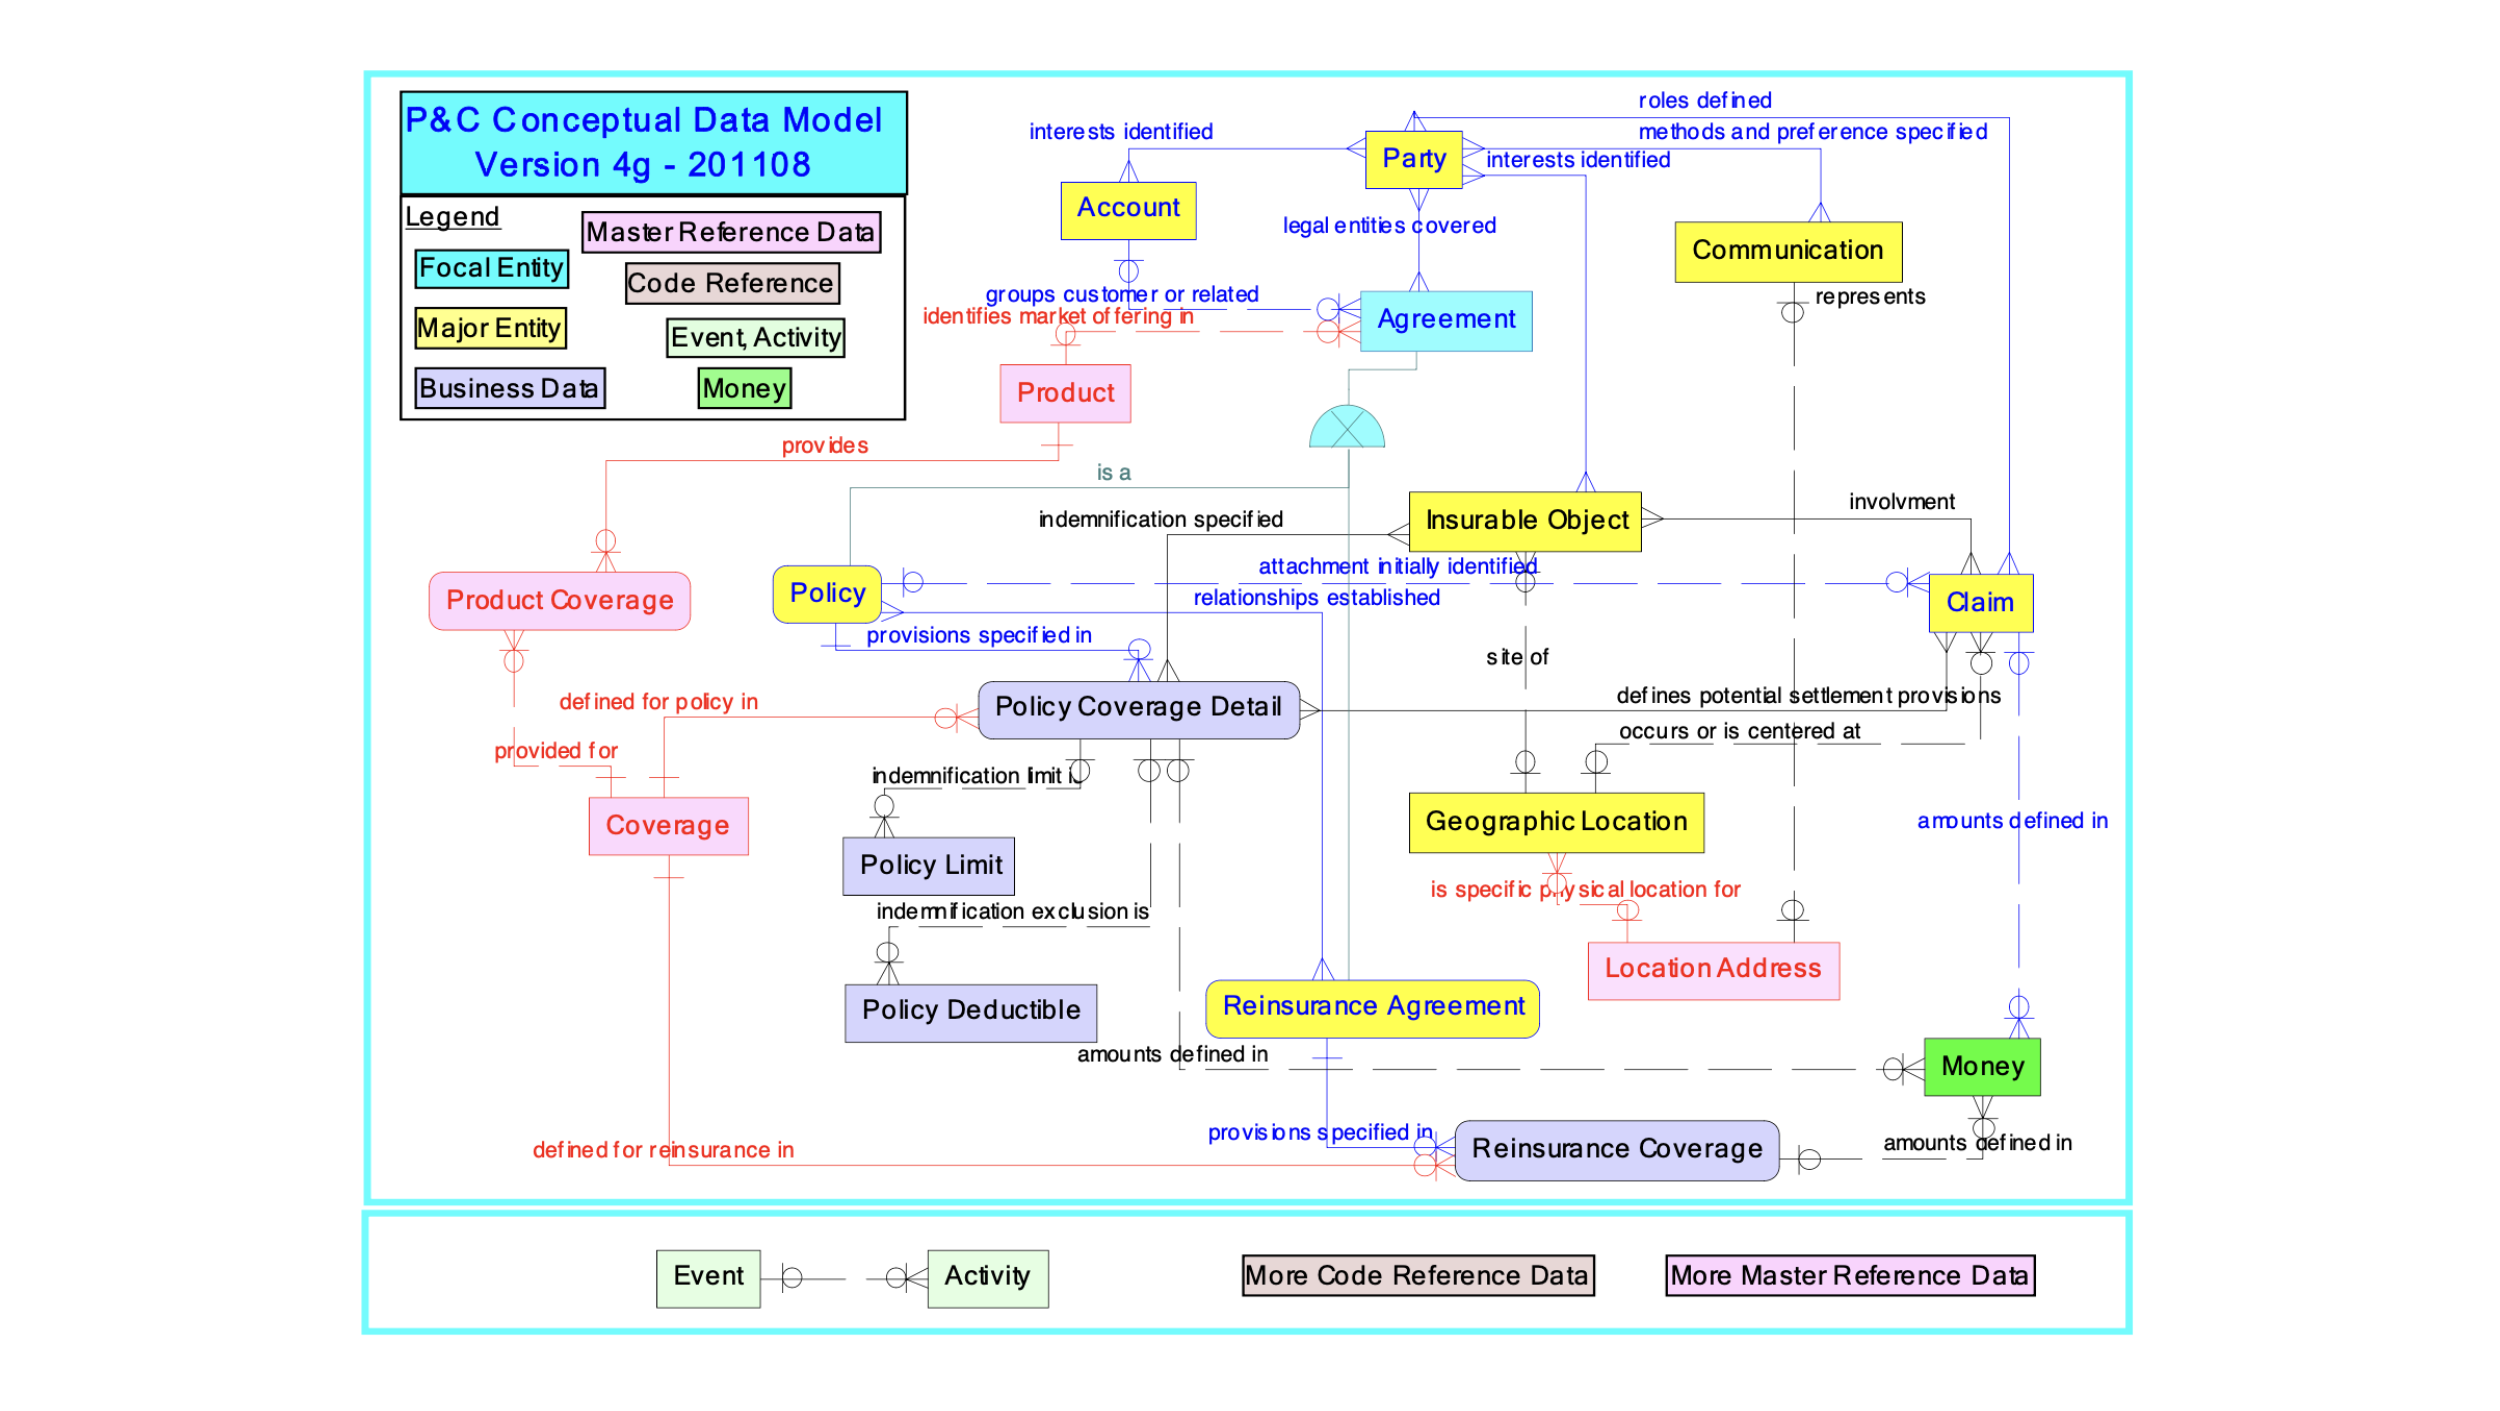
In particular, we will describe the refactoring of Party in the context of Policy and Claim & Litigation. For each of them, a short description, a simplified Hackolade model (Entity Relationship Diagrams - ERD), and the document refactoring using Relational Migrator are provided.
Relational Migrator is a tool that allows you to:
- Design an effective MongoDB schema, derived from an existing relational schema.
Migrate data from Oracle, SQL Server, MySQL, PostgreSQL, or Sybase ASE to MongoDB, while transforming to the target schema.
Generate code artifacts to reduce the time required to update application code.
At the end of this tutorial, you will have learned how to use Relational Migrator to refactor the Party Role relational data model and migrate the data into MongoDB collections.
Connect to Postgres and set up Relational Migrator
Prerequisites
MongoDB Relational Migrator (version 1.4.3 or higher): MongoDB Relational Migrator is a powerful tool to help you migrate relational workloads to MongoDB. Download and install the latest version.
PostgreSQL (version 15 or higher): PostgreSQL is a relational database management system. It will serve as the source database for our migration task. Download the last version of PostgreSQL.
MongoDB (version 7.0 or higher): You will need access to a MongoDB instance with write permissions to create the new database where we are going to migrate the data. You can install the latest version of the MongoDB Community Server or simply deploy a free MongoDB Atlas cluster in less than three minutes!
In this tutorial, we will use PostgreSQL as the RDBMS to hold the original tabular schema that will be migrated to MongoDB. To follow it, you will need access to a PostgreSQL database server instance with permission to create a new database and user. The instance may be in the cloud, on-prem, or on your local machine. You just need to know the URL, port, username, and password for the PostgreSQL instance you choose.
We will also use two PostgreSQL Client Applications: psql and pg_restore. These terminal-based applications will allow us to interact with our PostgreSQL database server instance. The first application, psql, enables you to type in queries interactively, issue them to PostgreSQL, and see the query results. It will be useful to create the database and run queries to verify that the schema has been successfully replicated. On the other hand, we will use pg_restore to restore the PostgreSQL database from the archive file available in the GitHub repository. This archive file contains all the tables, relationships, and sample data from the Party Role model in a tabular format. It will serve as the starting point in our data migration journey.
The standard ready-to-use packages will already include both the server and these client tools. We recommend using version 15 or higher. You can download it from the official PostgreSQL Downloads site or, if you are a macOS user, just run the command below in your terminal.
Note: Verify that Postgres database tools have been successfully installed by running `psql --version` and `pg_restore --version`. If you see an error message, make sure the containing directory of the tools is added to your `PATH`.
Replicate the Party Role model in PostgreSQL
First, we need to connect to the PostgreSQL database.
If it’s a newly installed local instance with the default parameters, you can use `127.0.0.1` as your host, `5432` as the port, `postgres` as the database, and type `whoami` in your terminal to get your default username if no other has been specified during the installation of the PostgreSQL database server.
Once you are connected, we need to create a database to load the data.
Then, we will create the user that will have access to the new database, so we don’t need to use the root user in the relational migrator. Please remember to change the password in the command below.
Finally, we will populate the database with the Party Role model, a standard widely used in the insurance industry to define how people, organizations, and groups are involved in agreements, policies, claims, insurable objects, and other major entities. This will not only replicate the table structure, relationships, and ownership, but it will also load some sample data.
First, download the .tar file that contains the backup of the database.
Navigate to the folder where the file is downloaded using your terminal.
Run the command below in your terminal to load the data. Please remember to change the host, port, and user before executing the command.
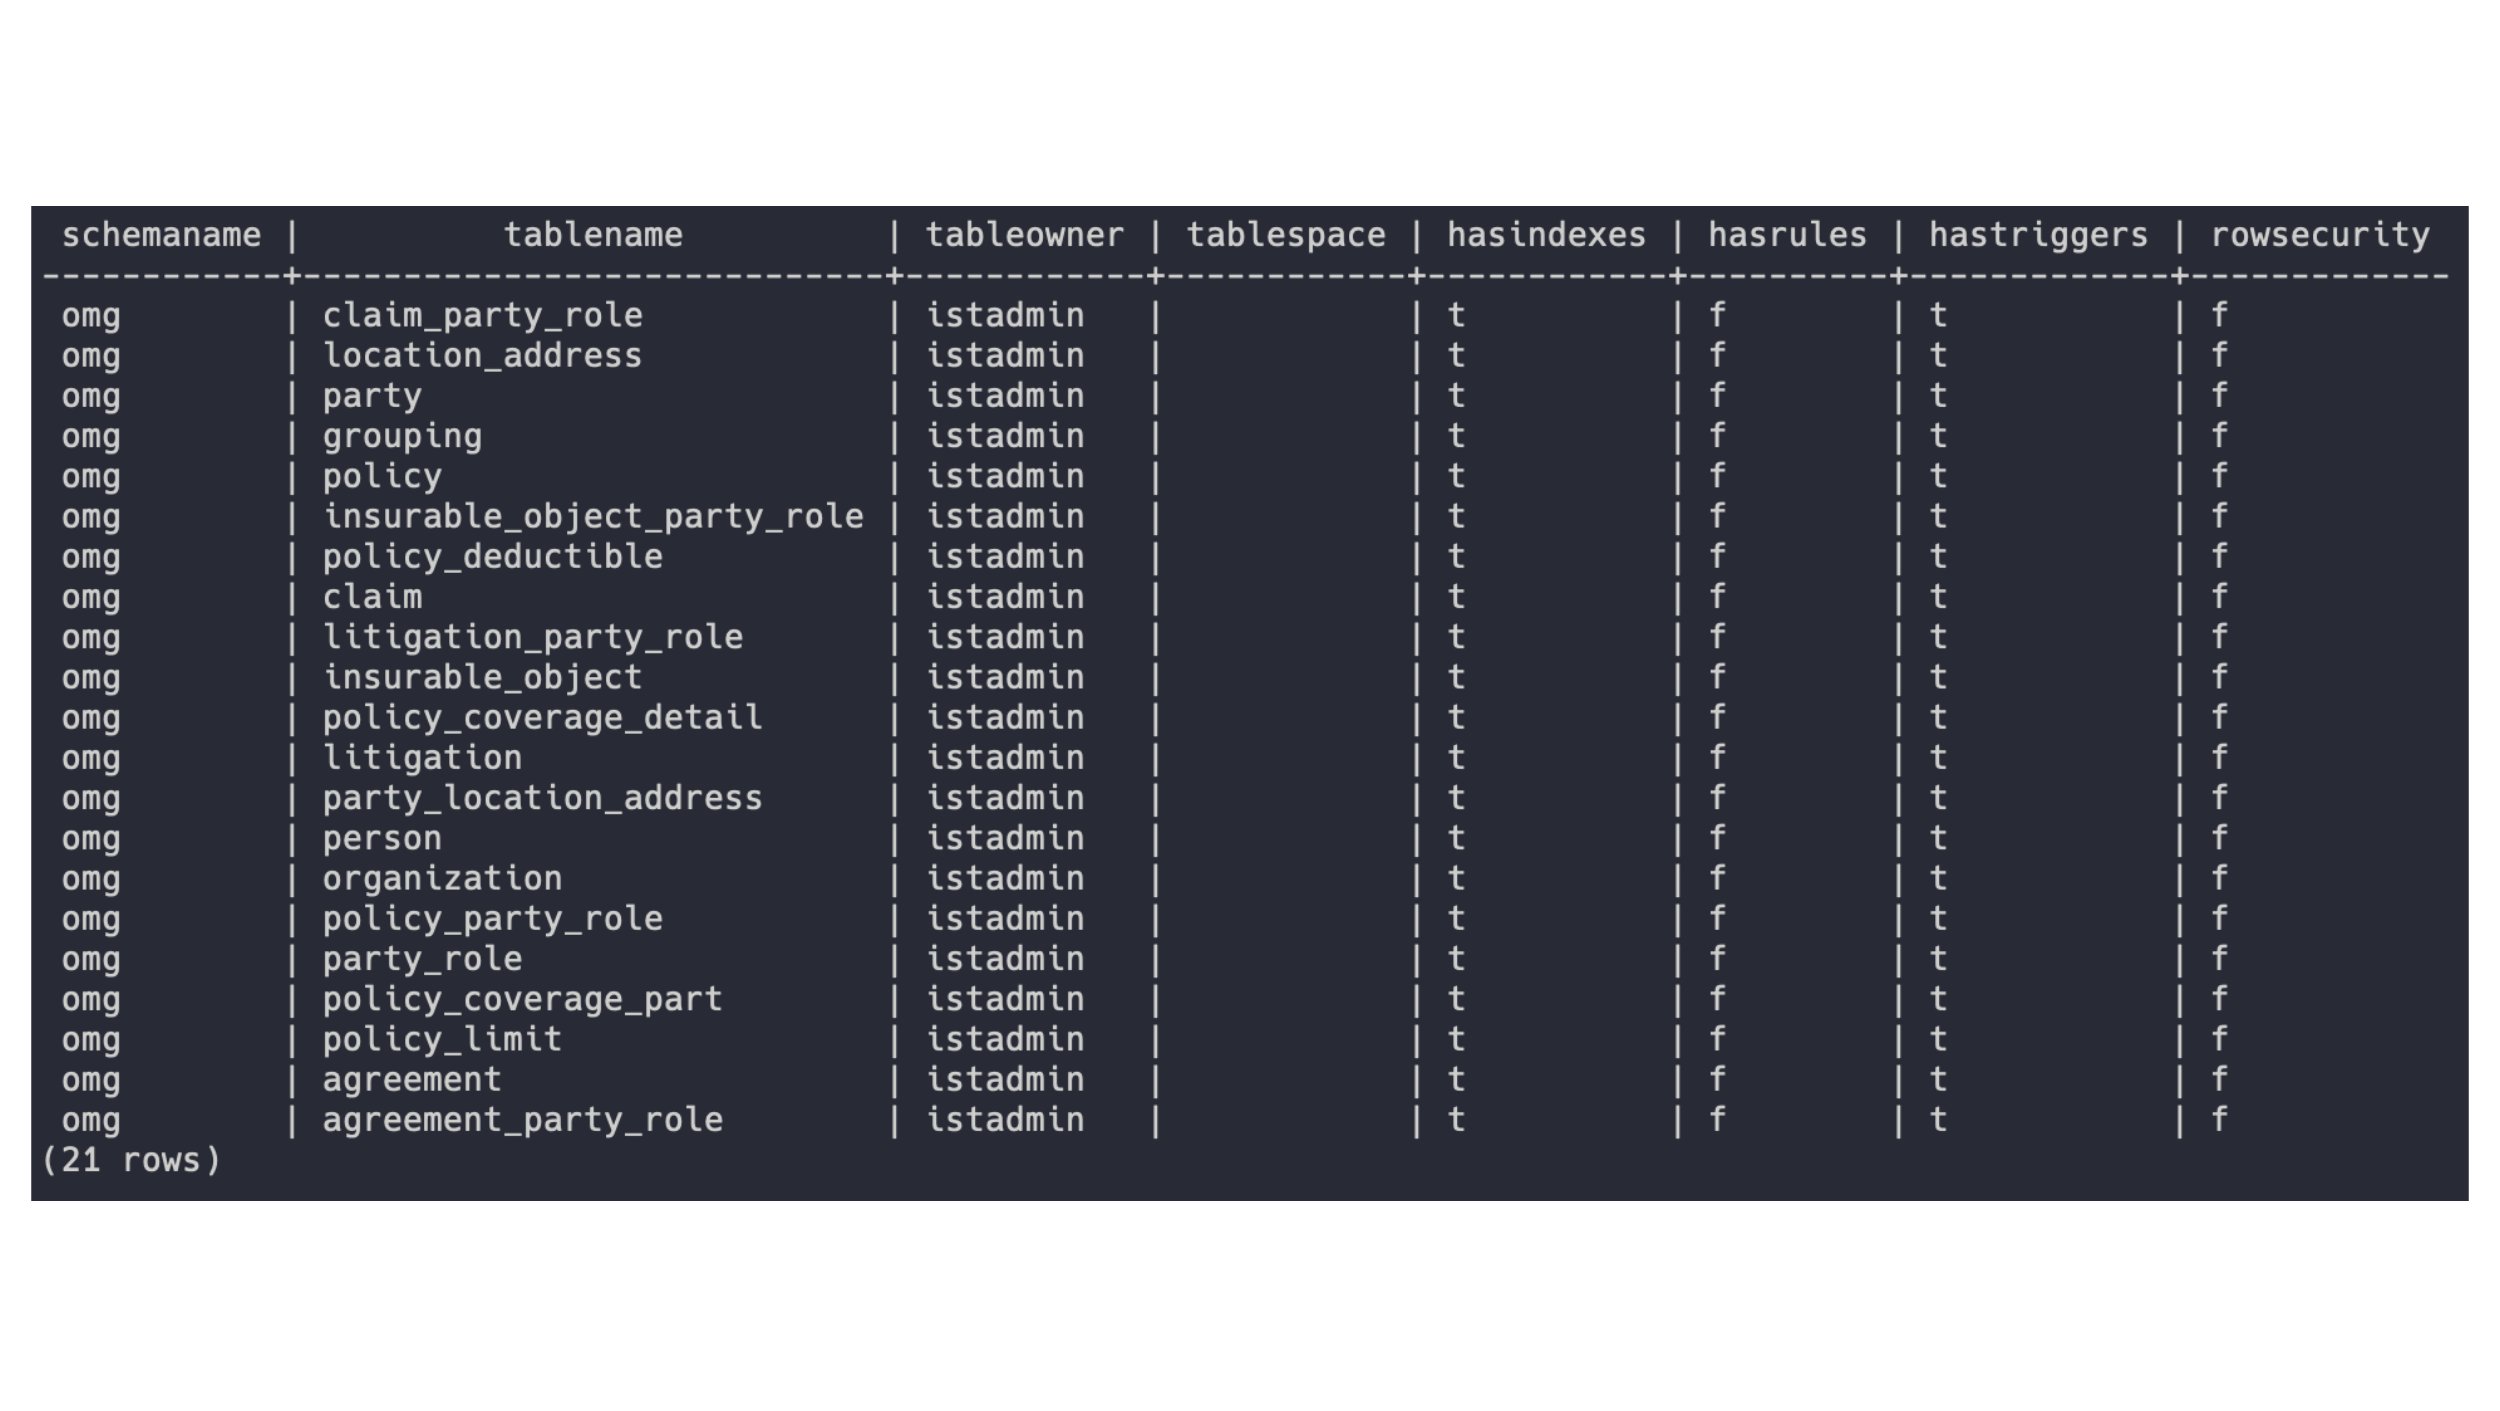
After a few seconds, our new database will be ready to use. Verify the successful restore by running the command below:
You should see a list of 21 tables similar to the one in the figure below.
Figure 2. List of tables in the Party Role model.
If all looks good, you are ready to connect your data to MongoDB Relational Migrator.
Connect to Relational Migrator
Open the Relational Migrator app and click on the “New Project” button. We will start a new project from scratch by connecting to the database we just created. Click on “Connect database,” select “PostgreSQL” as the database type, and fill in the connection details. Test the connection before proceeding, and if the connection test is successful, click “Connect.” If a “no encryption” error is thrown, click on SSL → enable SSL.
Figure 3. Database connection in Relational Migrator.
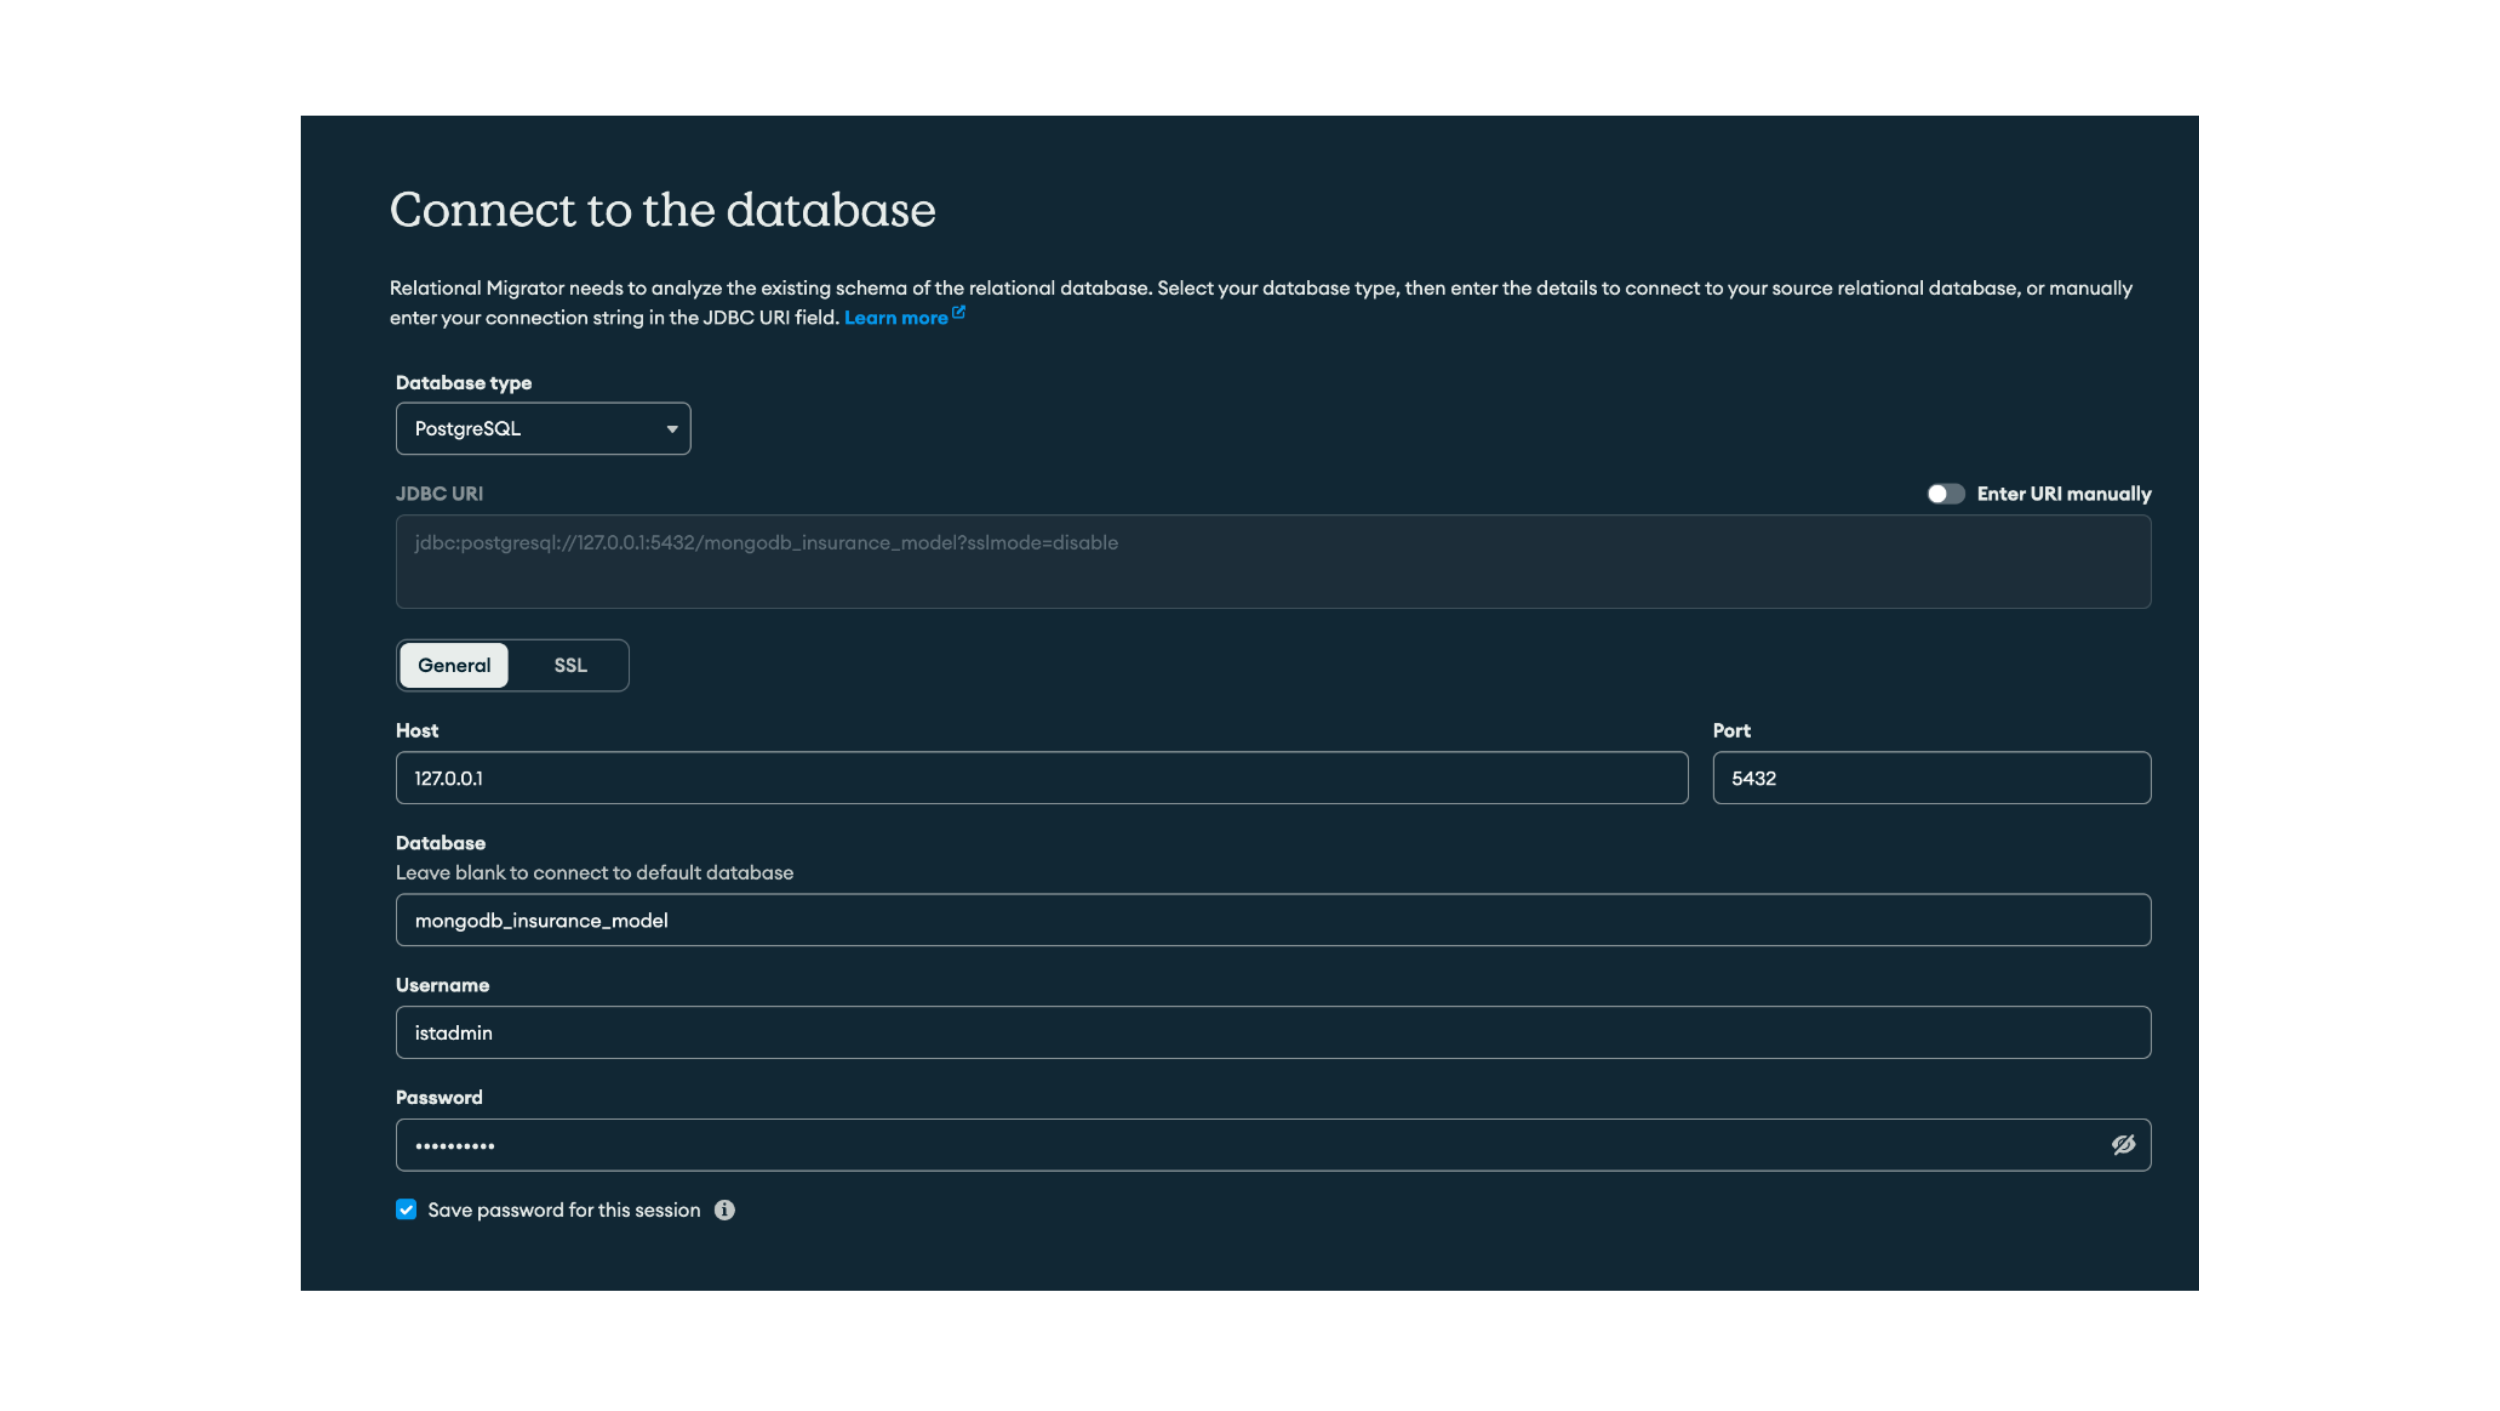
In the next screen, select all 21 tables from the OMG schema and click “Next.” On this new screen, you will need to define your initial schema. We will start with a MongoDB schema that matches your relational schema. Leave the other options as default. Next, give the project a name and click “Done.”
This will generate a schema that matches the original one. That is, we will have one collection per table in the original schema. This is a good starting point, but as we have seen, one of the advantages of the document model is that it is able to reduce this initial complexity. To do so, we will take an object-modeling approach. We will focus on four top-level objects that will serve as the starting point to define the entire schema: Party, Policy, Claim, and Litigation.
By default, you will see a horizontal split view of the Relational (upper part) and MongoDB (lower part) model. You can change the view model from the bottom-left corner “View” menu. Please note that all the following steps in the tutorial will be done in the MongoDB view (MDB). Feel free to change the view mode to “MDB” for a more spacious working view.
Party domain
The Party Subject Area (Figure 4) shows that all persons, organizations, and groups can be represented as “parties,” and parties can then be related to other major objects with specified roles. The Party design also provides a common approach to describing communication identifiers, relationships between parties, and legal identifiers.
Figure 4. Party Subject Area.
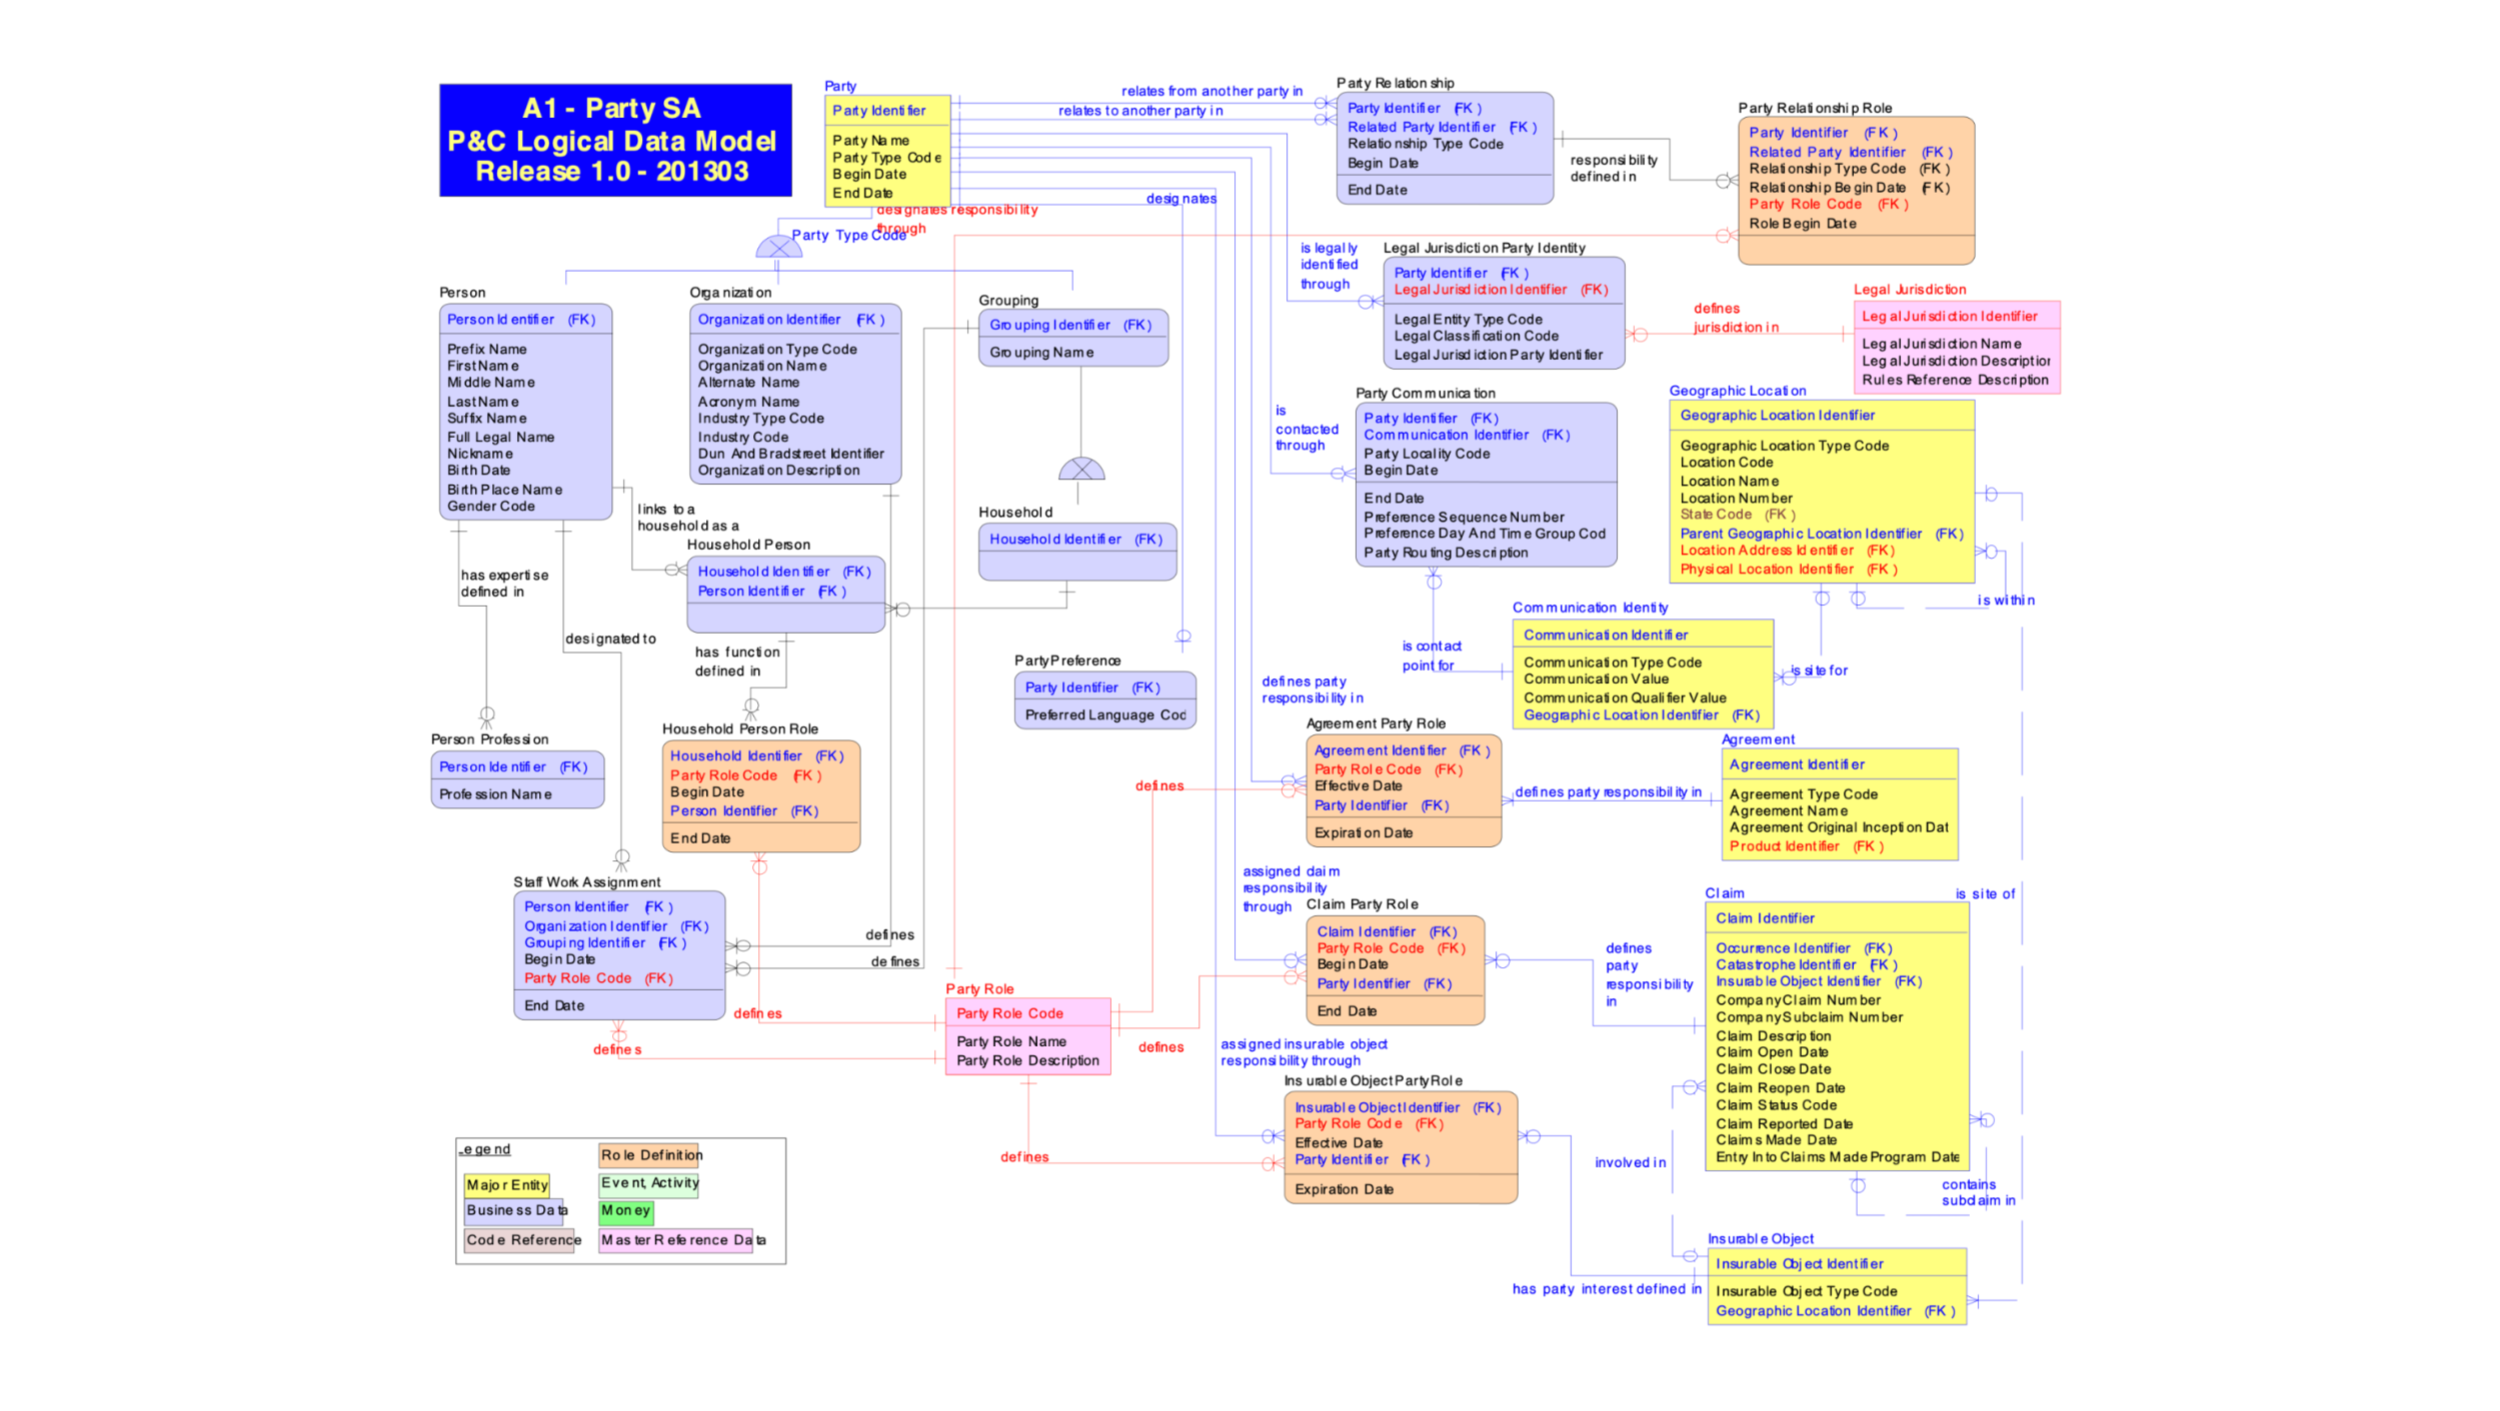
To illustrate the process in a simpler and clearer way, we reduced the number of objects and built a new ERD in Relational Migrator (Figure 5). Such models are most often implemented in run-time transactional systems. Their impact and dependencies can be found across multiple systems and domains. Additionally, they can result in very large physical database objects, and centralized storage and access patterns can be bottlenecks.
Figure 5. Party Model tables.
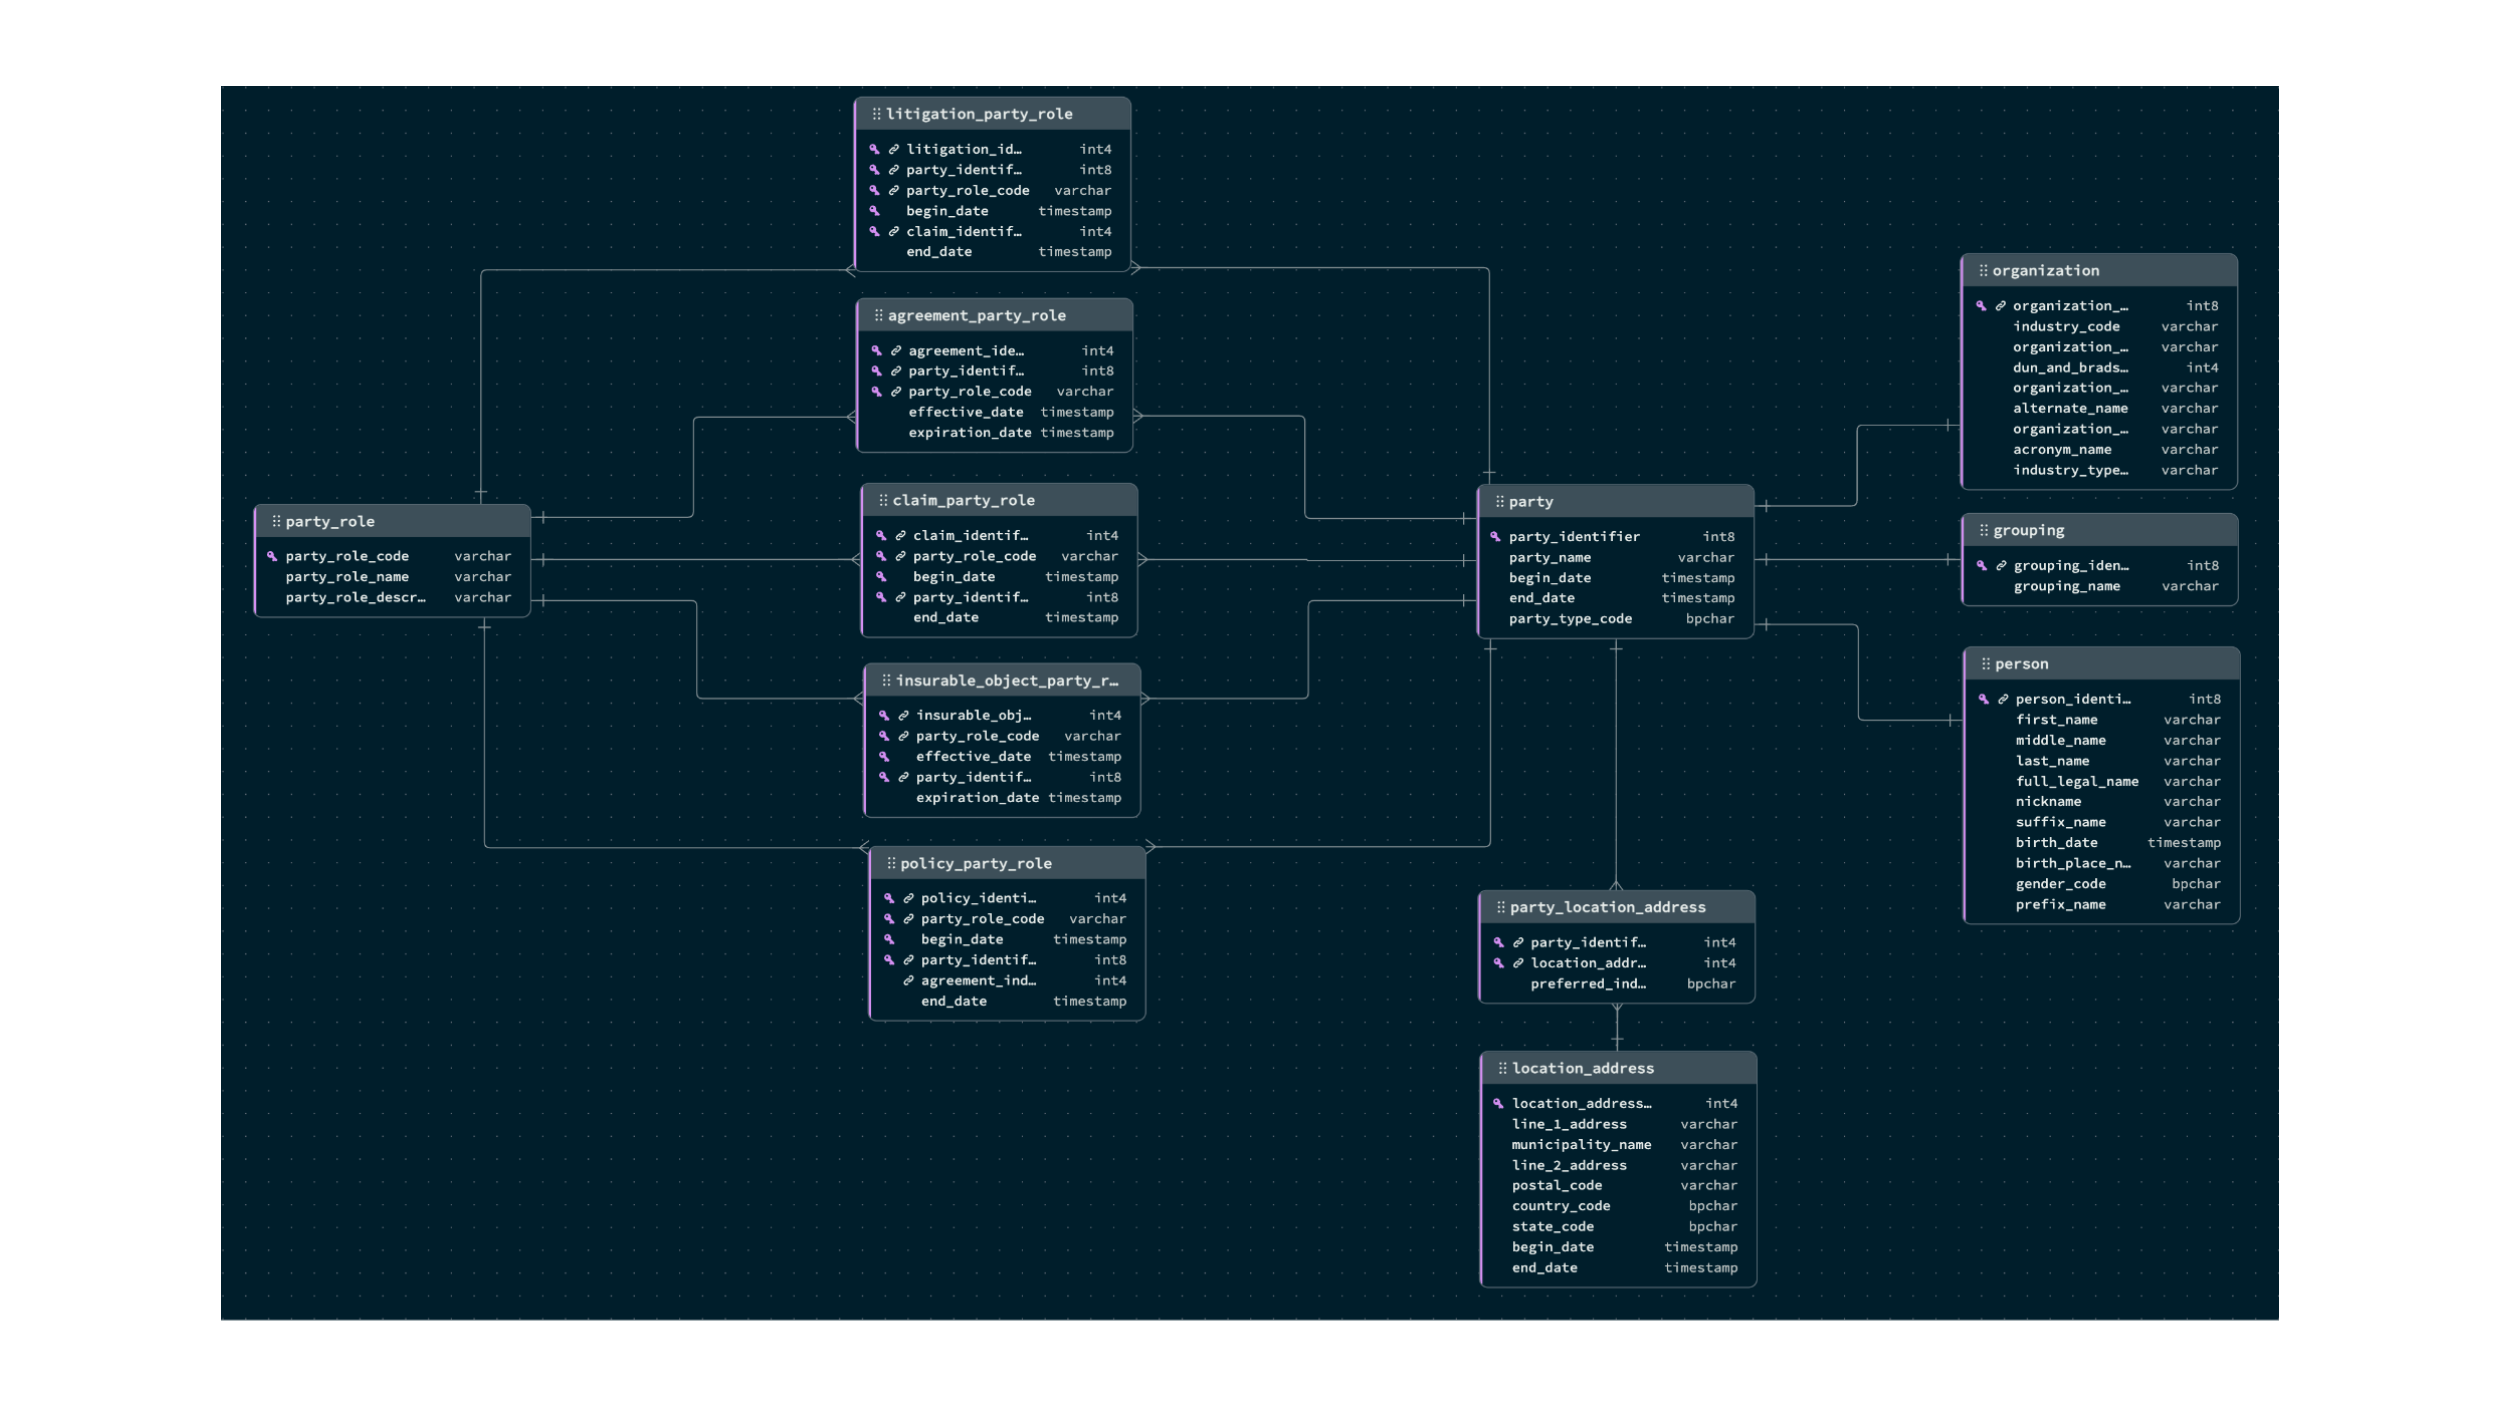
The key Party entities are:
Party — represents people, organizations, and groups
Party Role — defines the role a party plays within a context:
Policy
Claim
Agreement
Litigation
Insurable Object
Communication Identity — generic representation of things like:
Address
Phone
Email
Party represents people, organizations, and groups. In the original schema, this is represented through one-to-one relationships. Party holds the common attributes for all parties, while each of the other three tables stores the particularities of each party class. These differences result in distinct fields for each class, which forces tabular schemas to create new tables. The inherent flexibility of the document model allows embedding this information in a single document. To do this, follow the steps below:
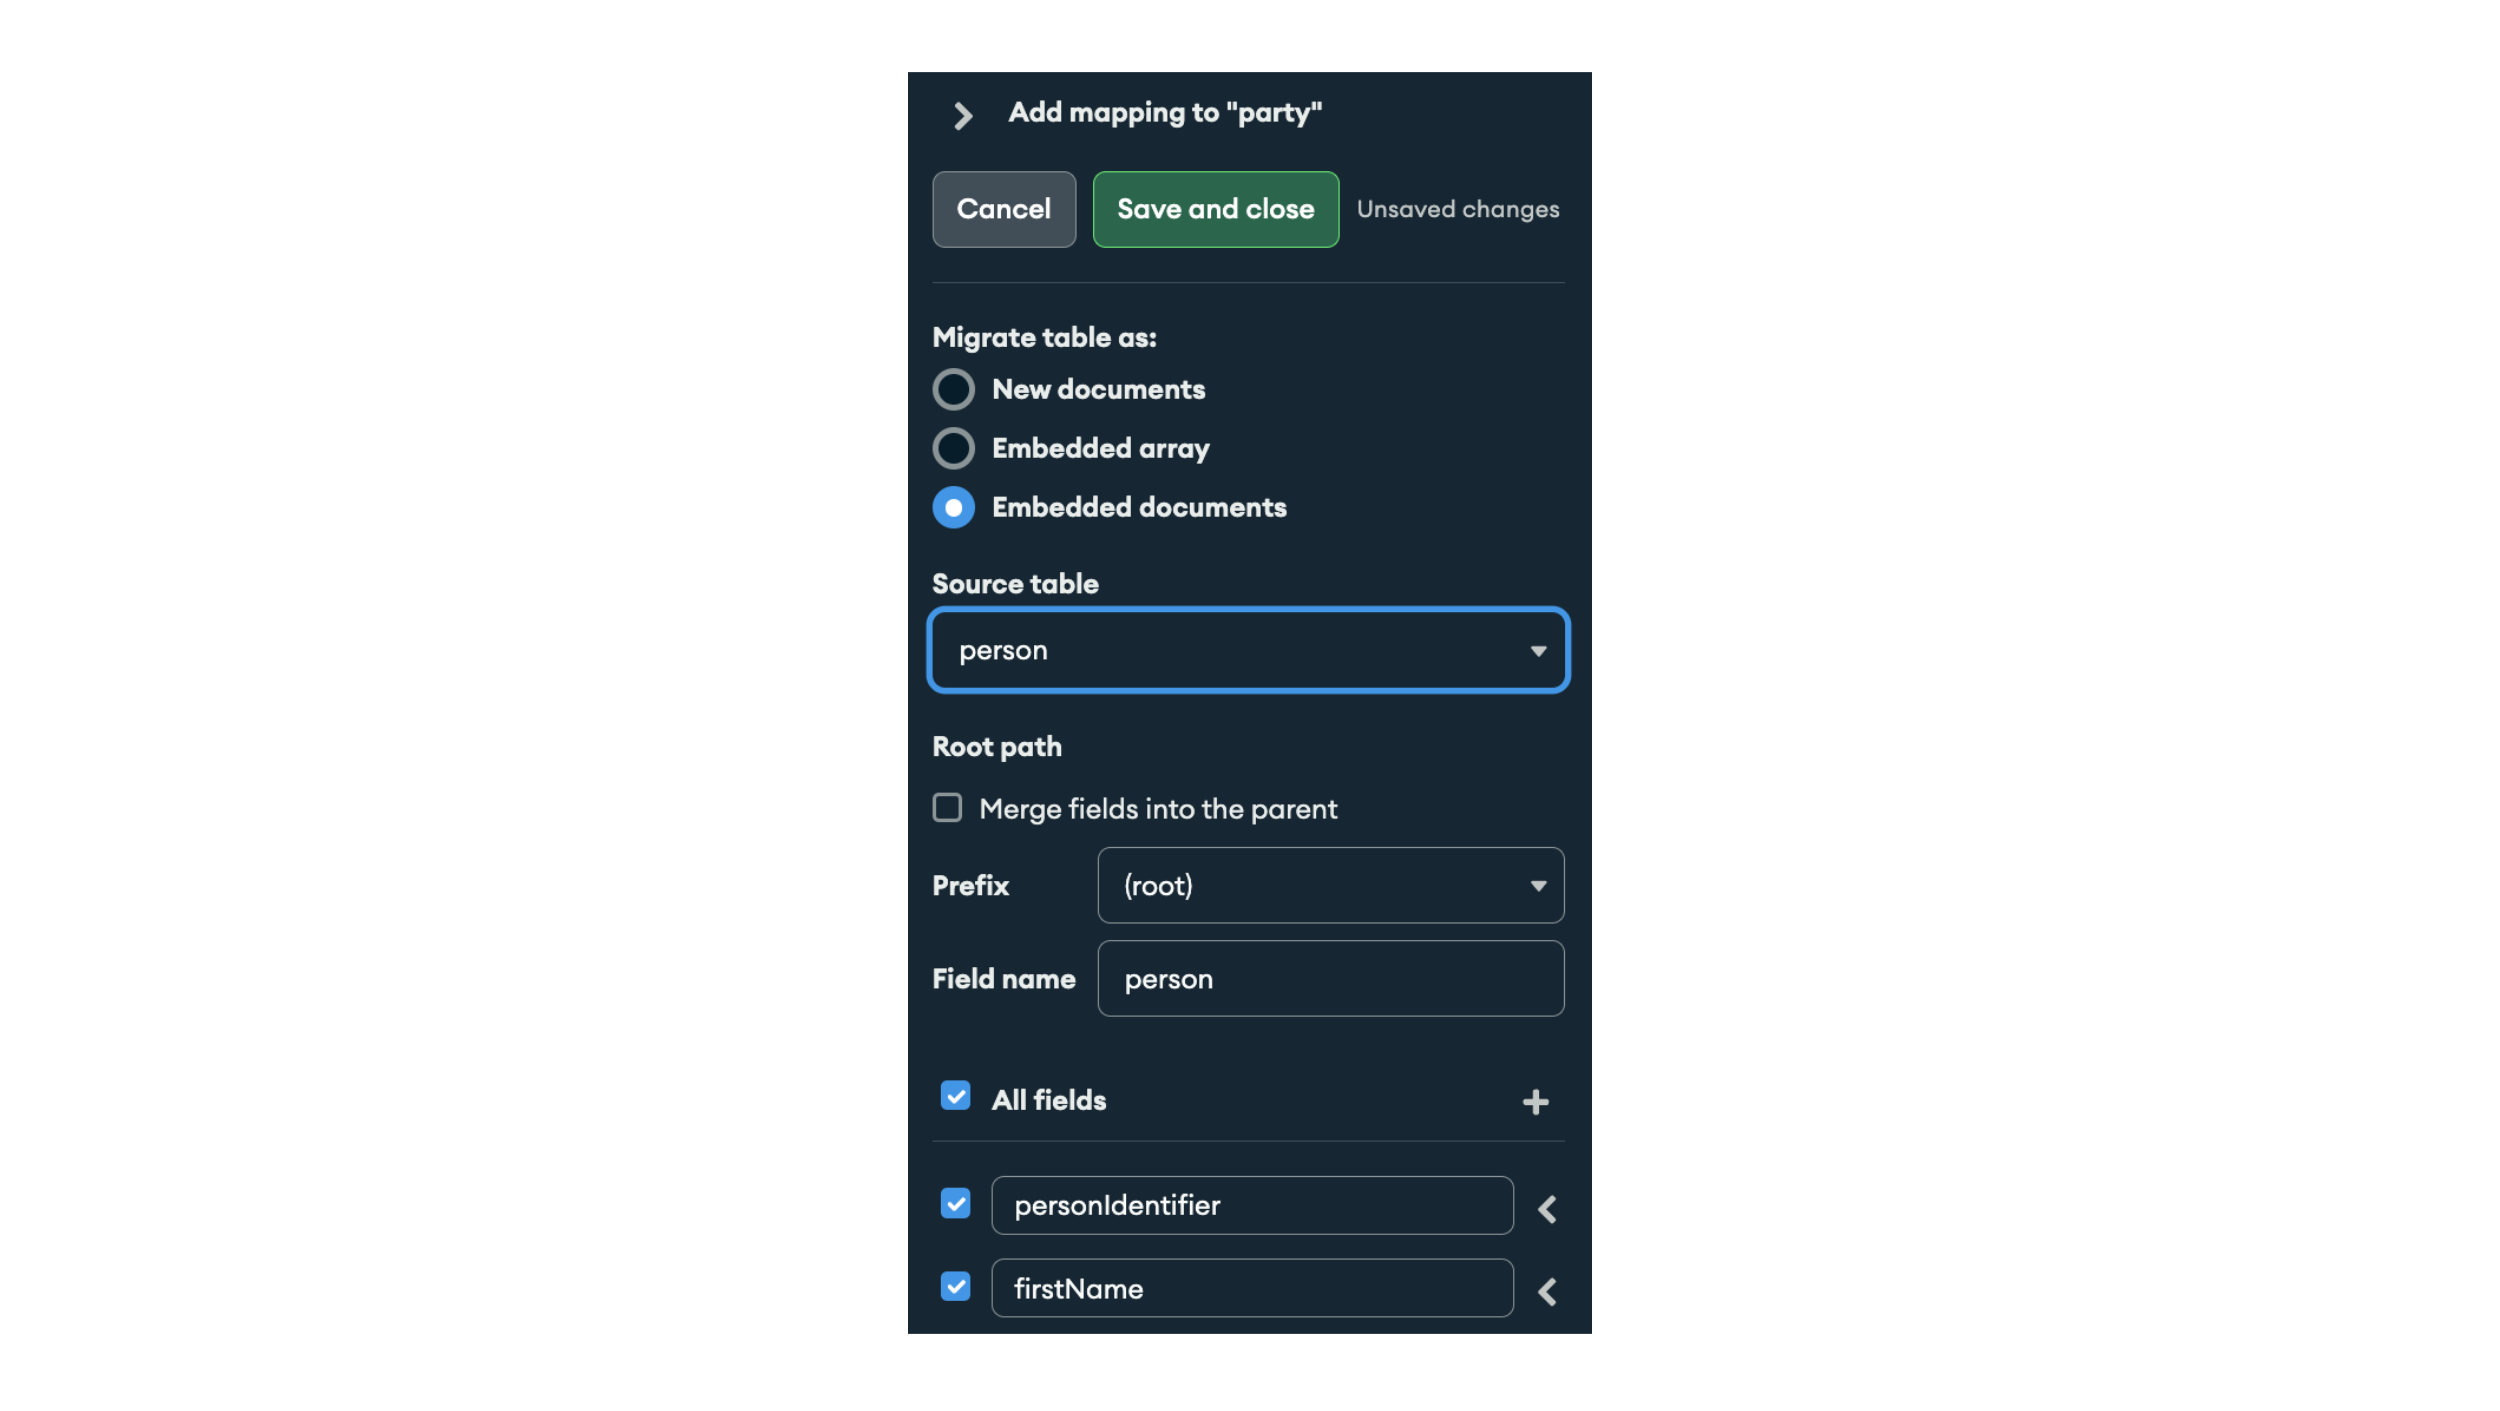
Select the "party" collection in the MDB view of Relational Migrator. At the moment, this collection has the same fields as the original matched table.
On the right-hand side, you will see the mappings menu (Figure 6). Click on the “Add” button, select “Embedded documents,” and choose "person" in the “Source table” dropdown menu. Click “Save and close” and repeat this process for the "organization" and "grouping" tables.
After this, you can remove the "person," "organization," and "grouping" collections.
Right-click on them, select “Remove Entity,” and confirm “Remove from the MongoDB model.” You have already simplified your original model by three tables, and we’re just getting started.
Figure 6. Party mapping menu.
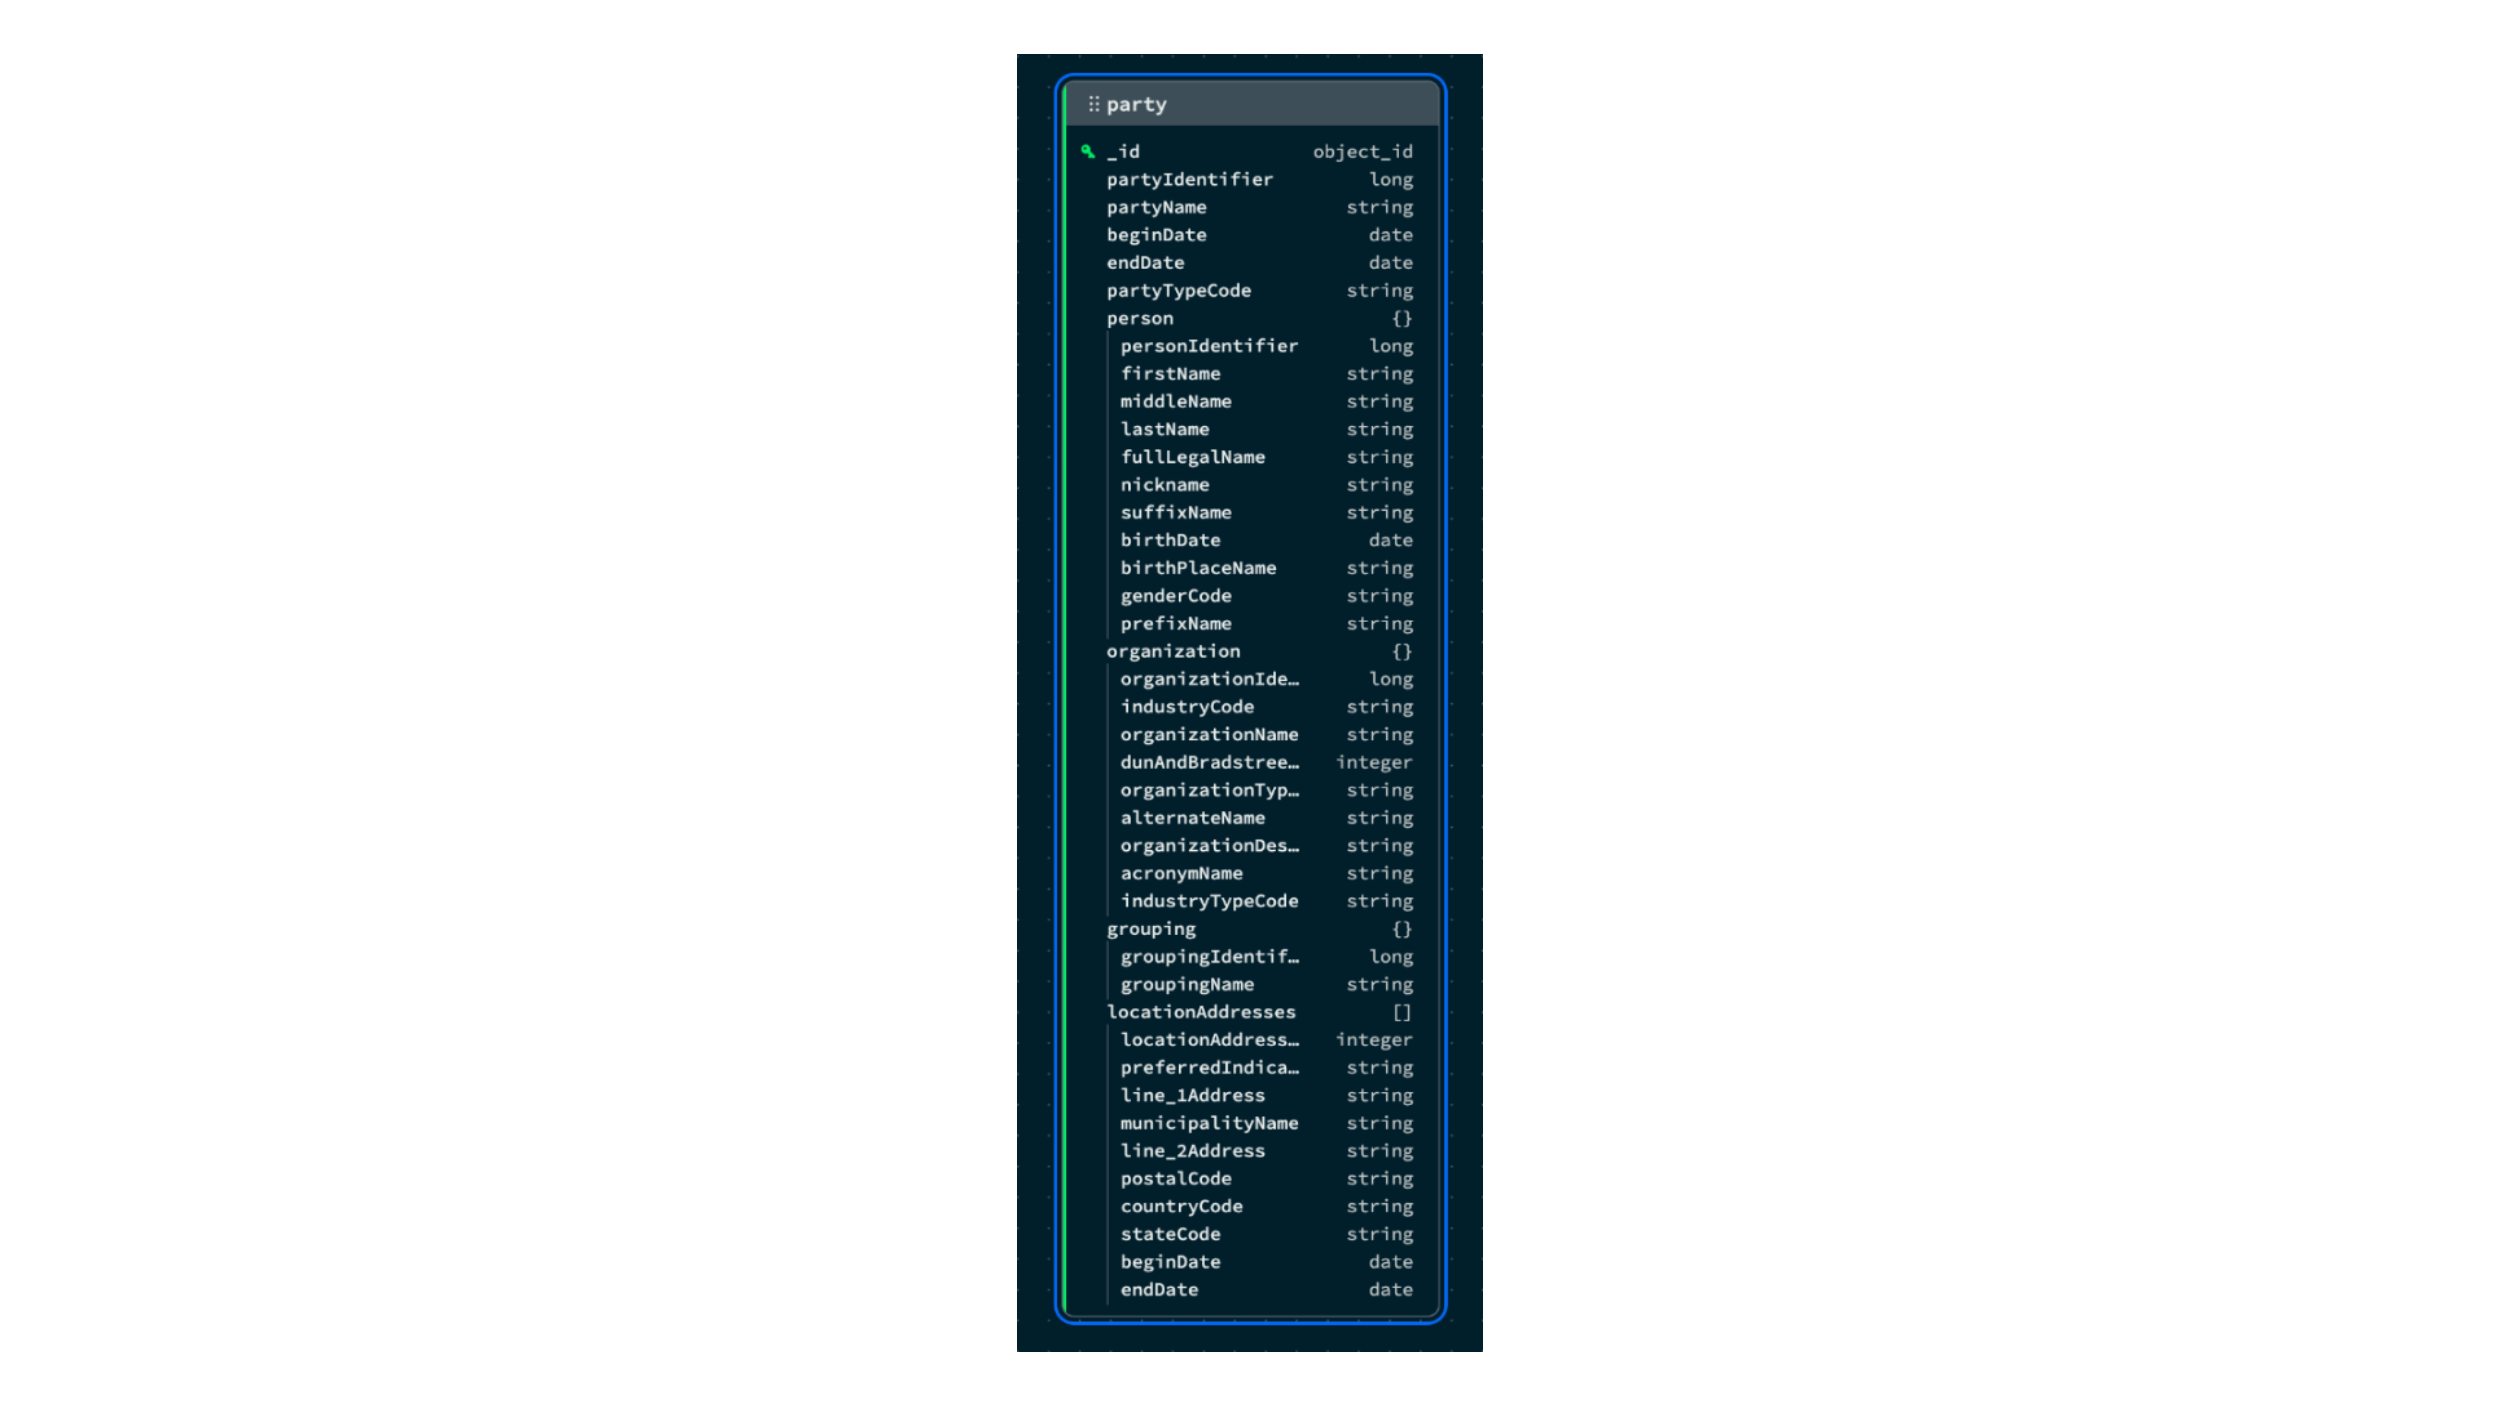
Looking at Figure 5, we can see that there is another entity that could be easily embedded in the party collection: location addresses. In this case, this table has a many-to-many relationship facilitated by the "party_location_address" table. As a party can have many location addresses, instead of an embedded document, we will use an embedded array. You can do it in the following way:
Select the collection "party" again, click the “Add” button, select “Embedded array,” and choose "party_location_address" in the “Source table” dropdown. Under the “All fields” checkbox, uncheck the `partyIdentifier` field. We are not going to need it. Addresses will be contained in the “party” document anyway. Leave the other fields as default and click the “Save and close” button.
We have now established the relationship, but we want to have the address details too. From the “party” mapping menu, click the “Add” button again. Then, select “Embedded documents,” choose “location_address,” and in the “Root path” section, check the box that says “Merge fields into the parent.” This will ensure that we don’t have more nested fields than necessary. Click “Save and close.”
You can now delete the “party_location_address” collection, but don’t delete “location_address” as it still has an existing relationship with “insurable_object.”
You are done. The “party” entity is ready to go. We have not only reduced six tables to just one, but the “person,” “organization,” and “grouping” embedded documents will only show up if that party is indeed a person, organization, or grouping. One collection can contain documents with different schemas for each of these classes.
Figure 7. Document representation of the Party entity.
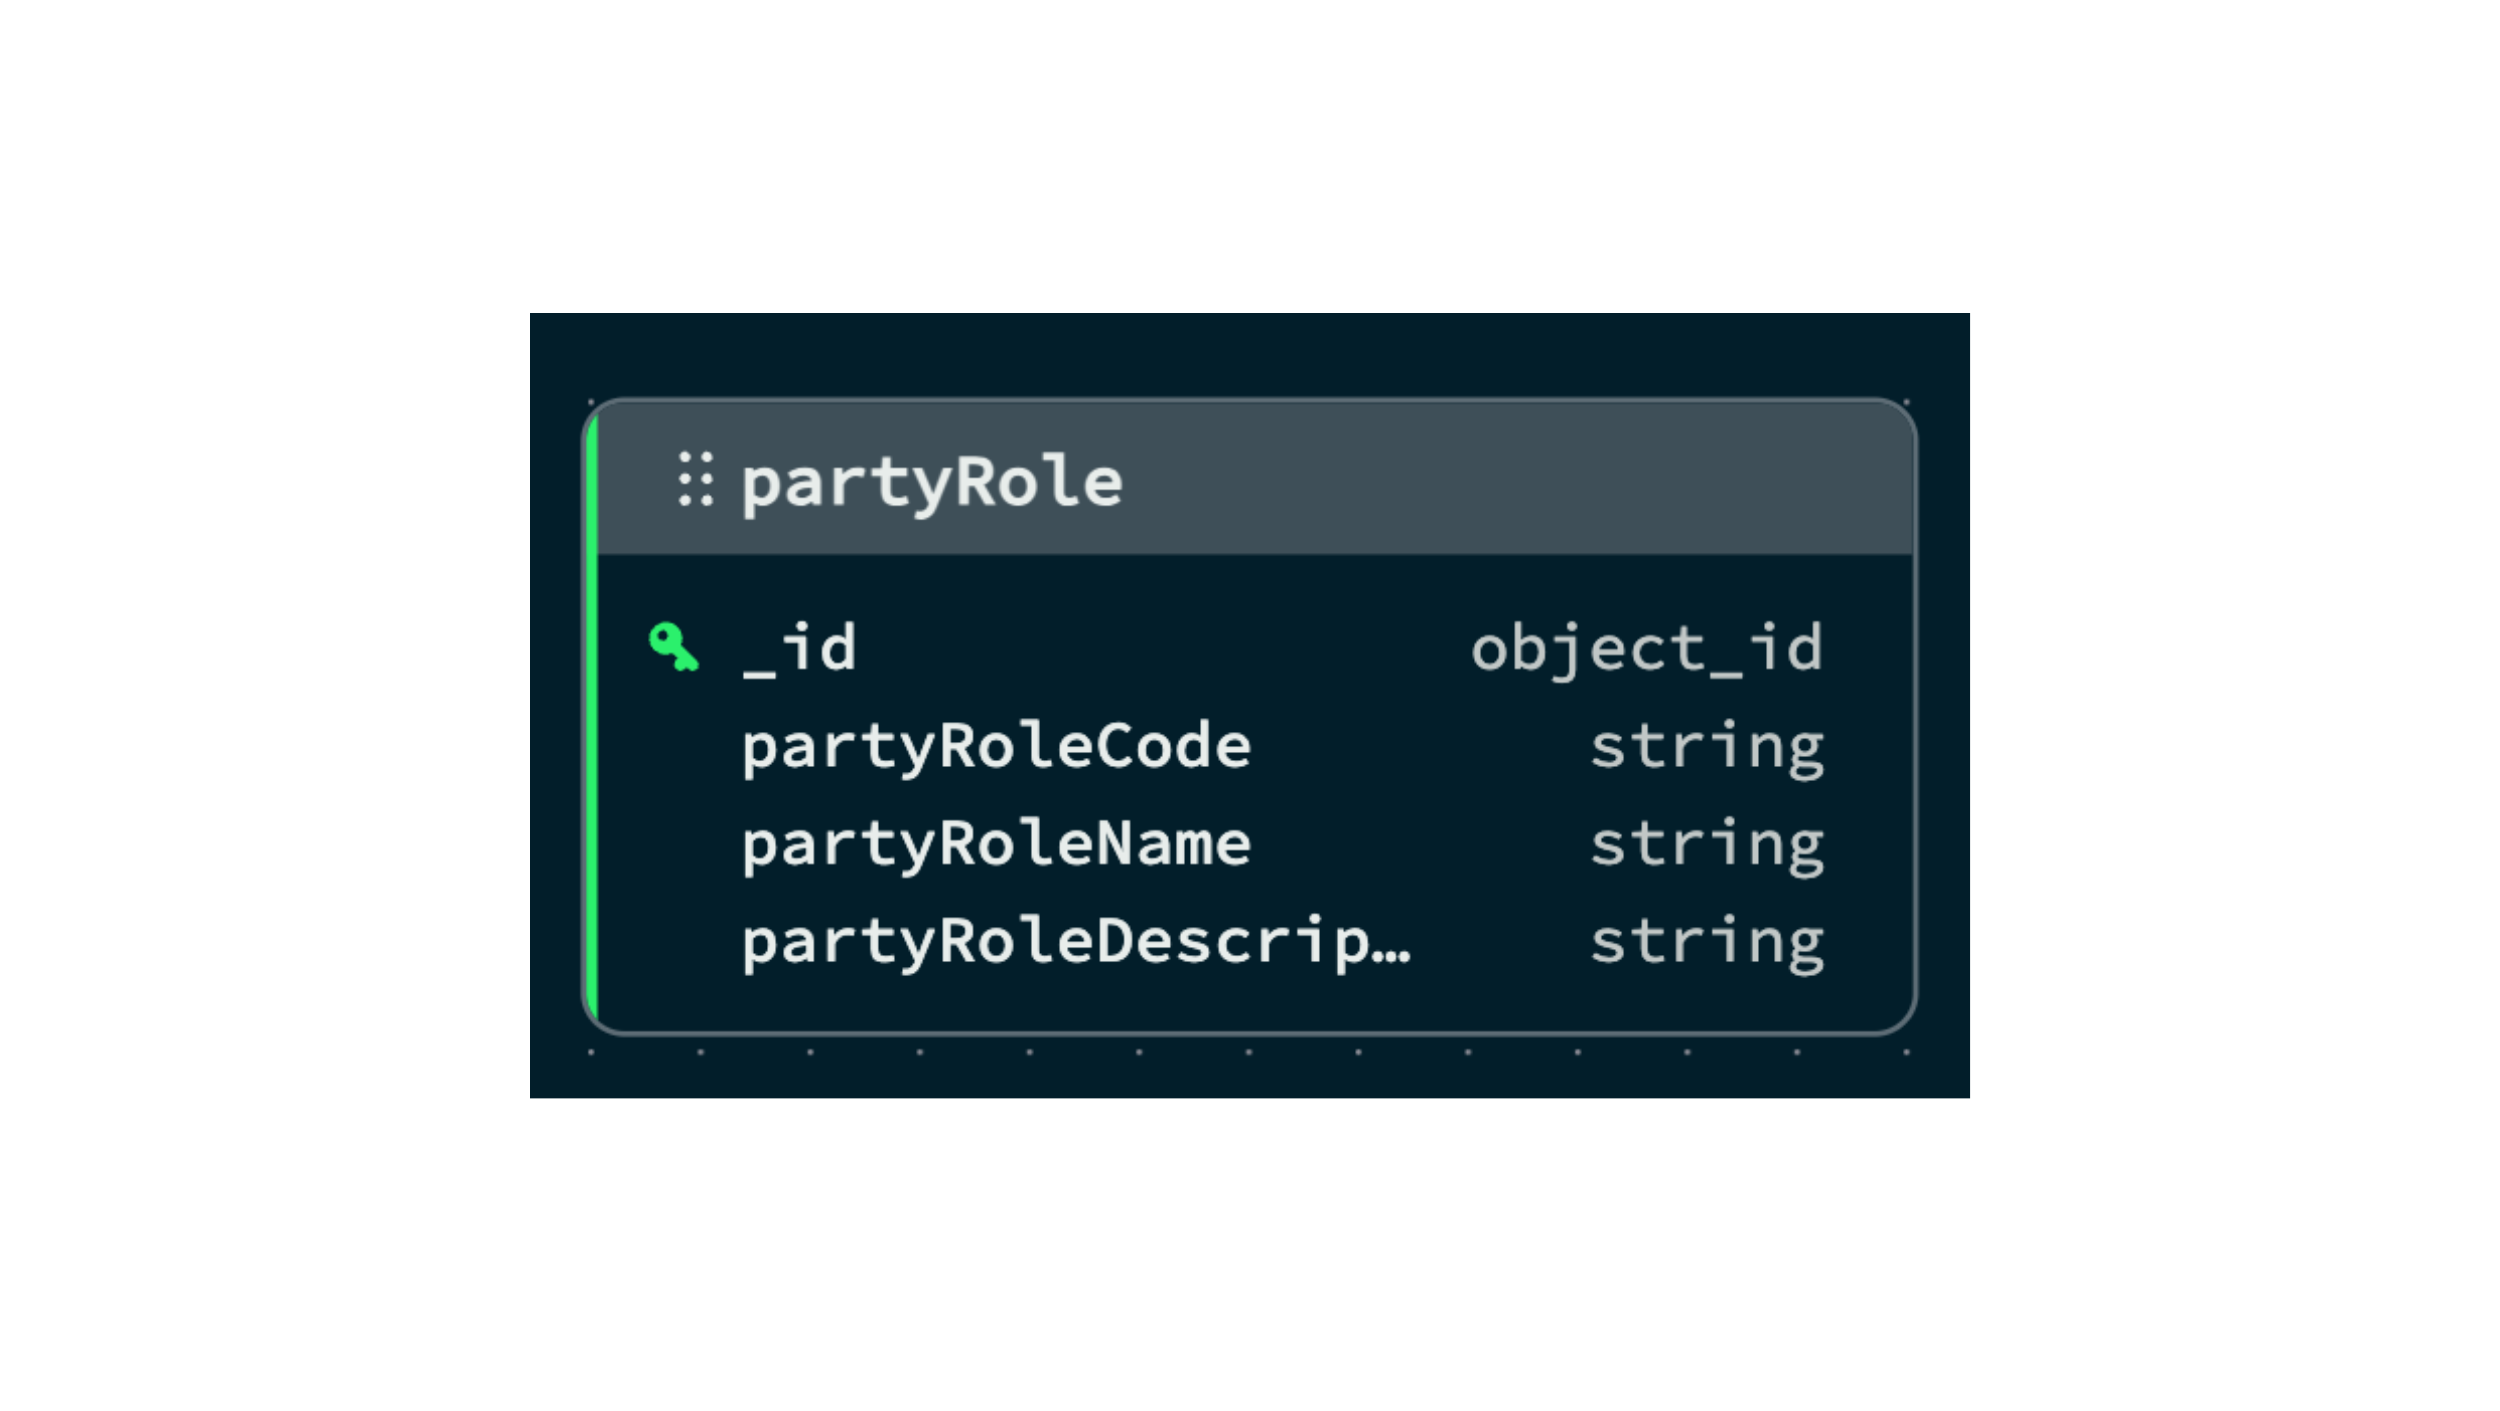
At the beginning of the section, we also spoke about the “party role” entity. It represents the role a party plays in a specific context such as policy, claim, or litigation. In the original schema, this many-to-many relationship is facilitated via intermediate tables like “policy_party_role,” “claim_party_role,” and “litigation_party_role” respectively. These intermediate tables will be embedded in other collections, but the “party_role” table can be left out as a reference collection on its own. In this way, we avoid having to update one by one all policy, claim, and litigation documents if one of the attributes of “party role” changes.
Figure 8. Document representation of the PartyRole entity.
Let’s see next how we can model the “policy” entity.
Policy domain
The key entities of Policy are:
Insurable Object — an object insured by a policy agreement
Insurable Object Party Role — associative entity which links:
Party
The role the Party plays
Insurable Objects
Agreement Party role — associative entity which links:
Party
The role the Party plays
Agreement (which is related to a product and policy)
Figure 9. Party in the context of Policy tables.
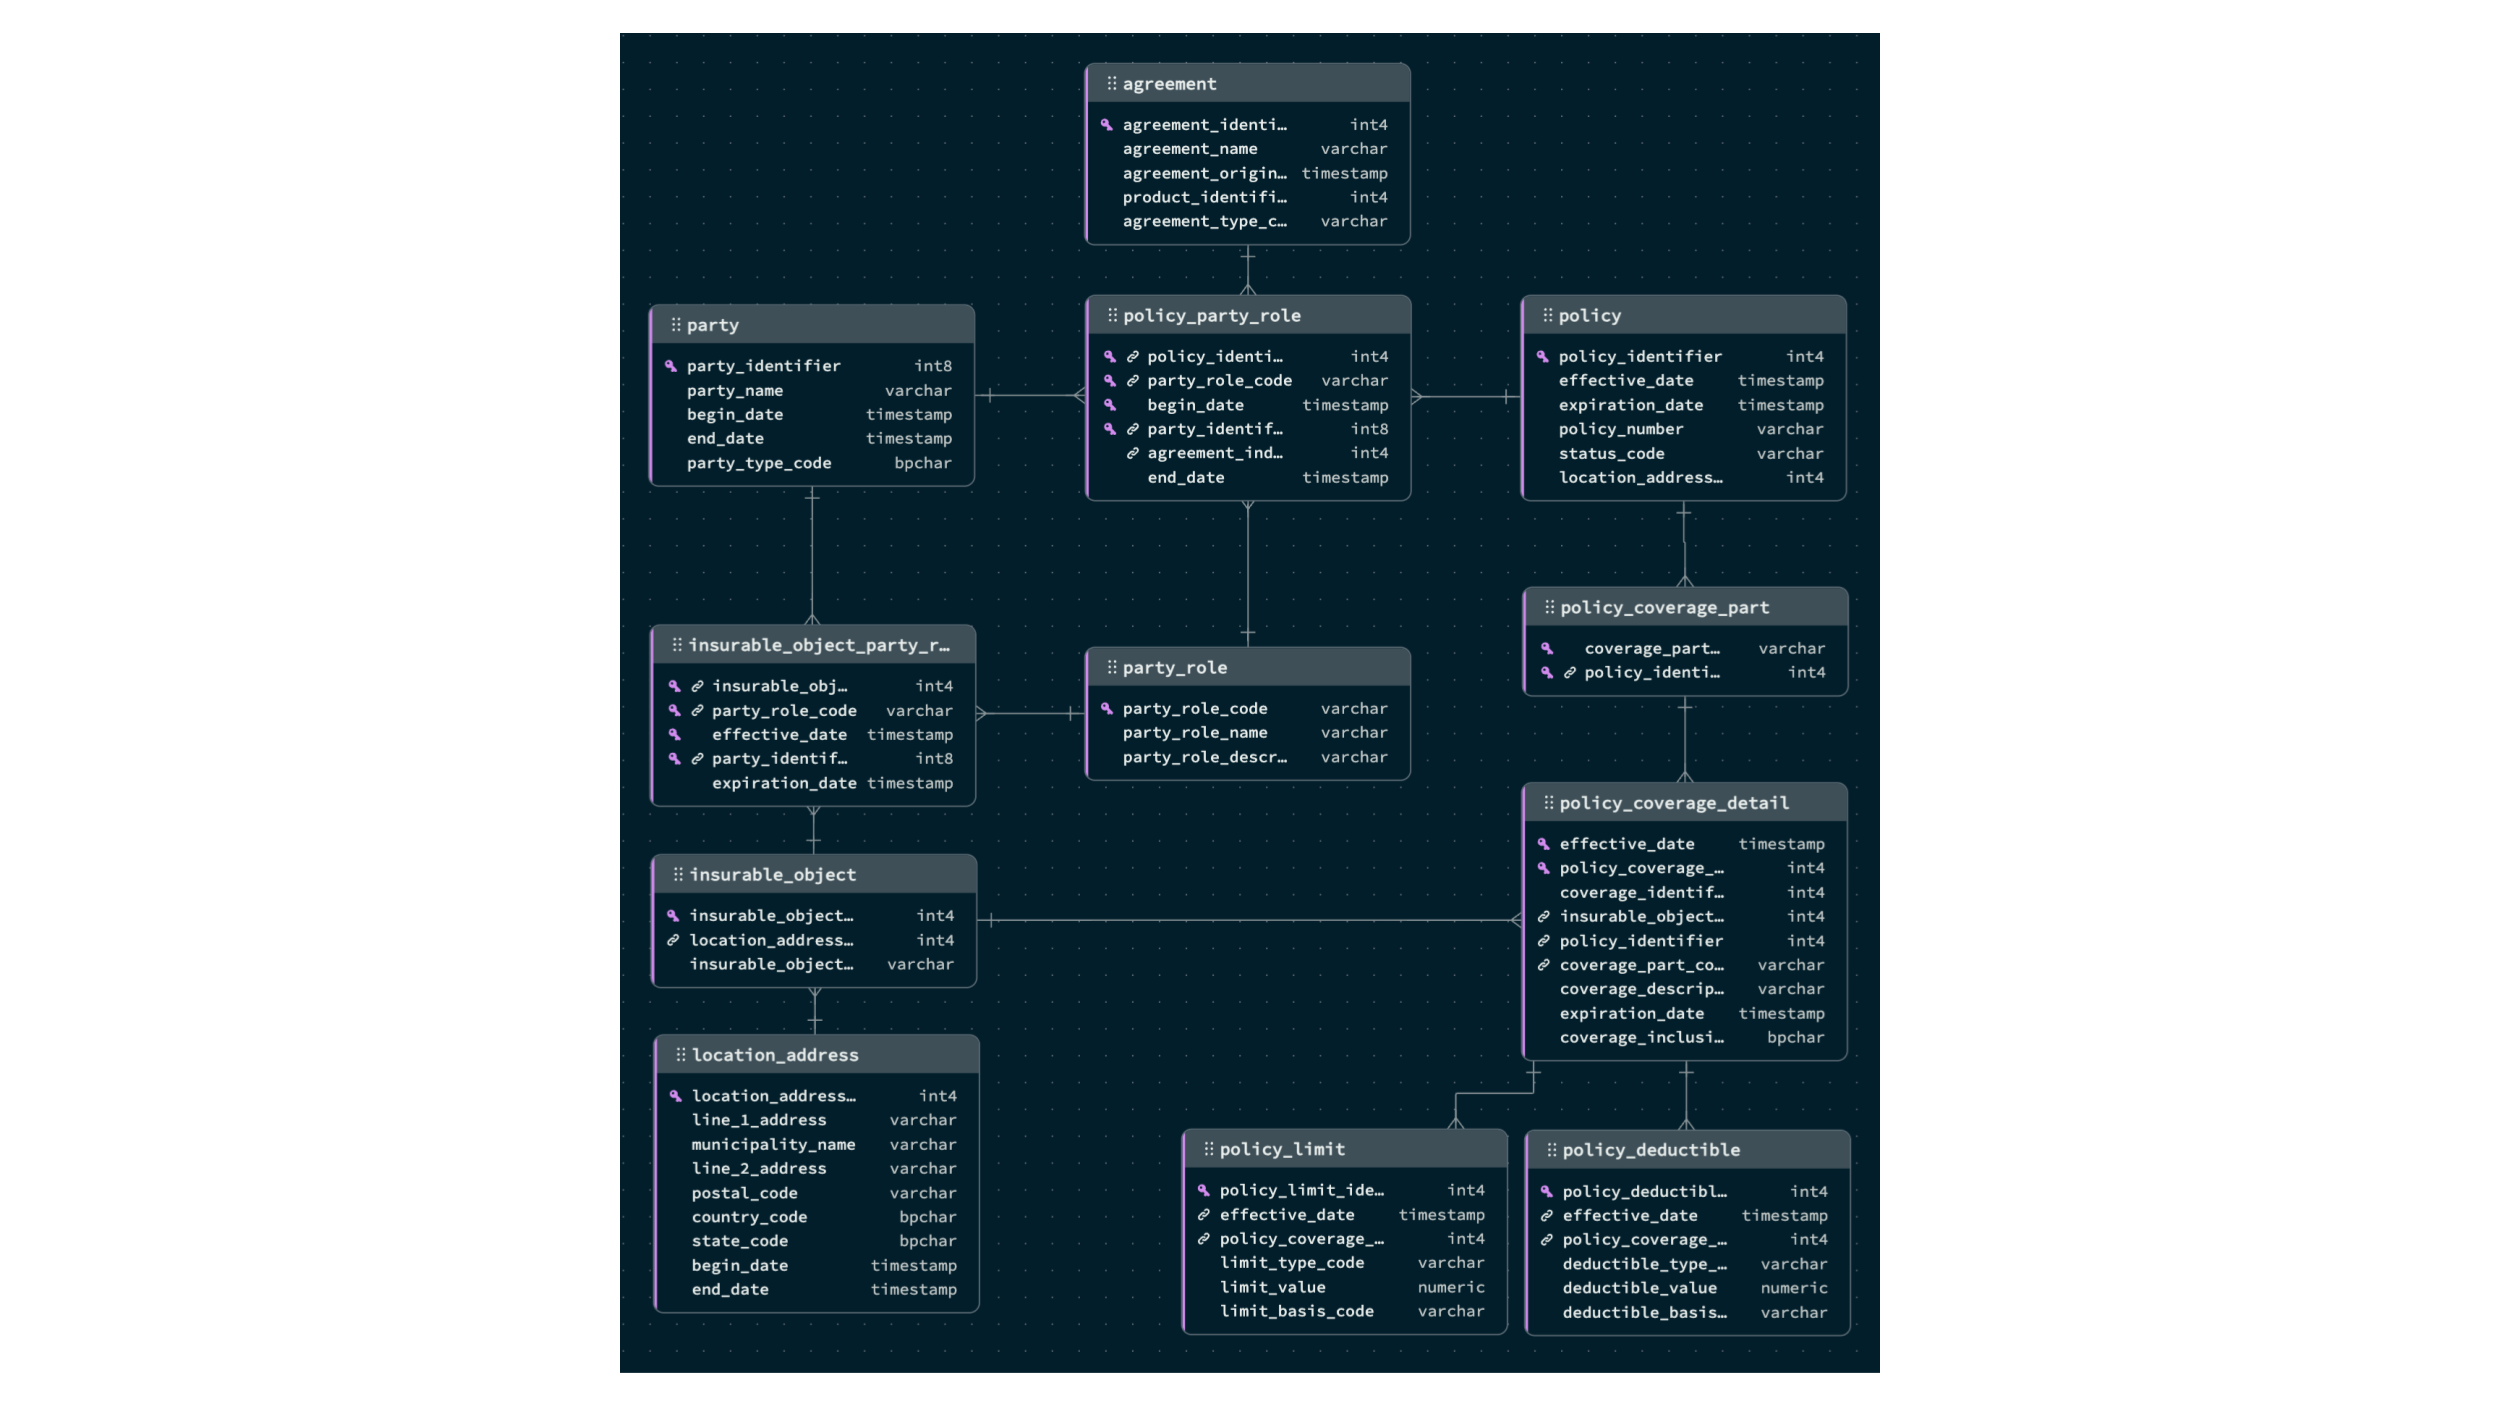
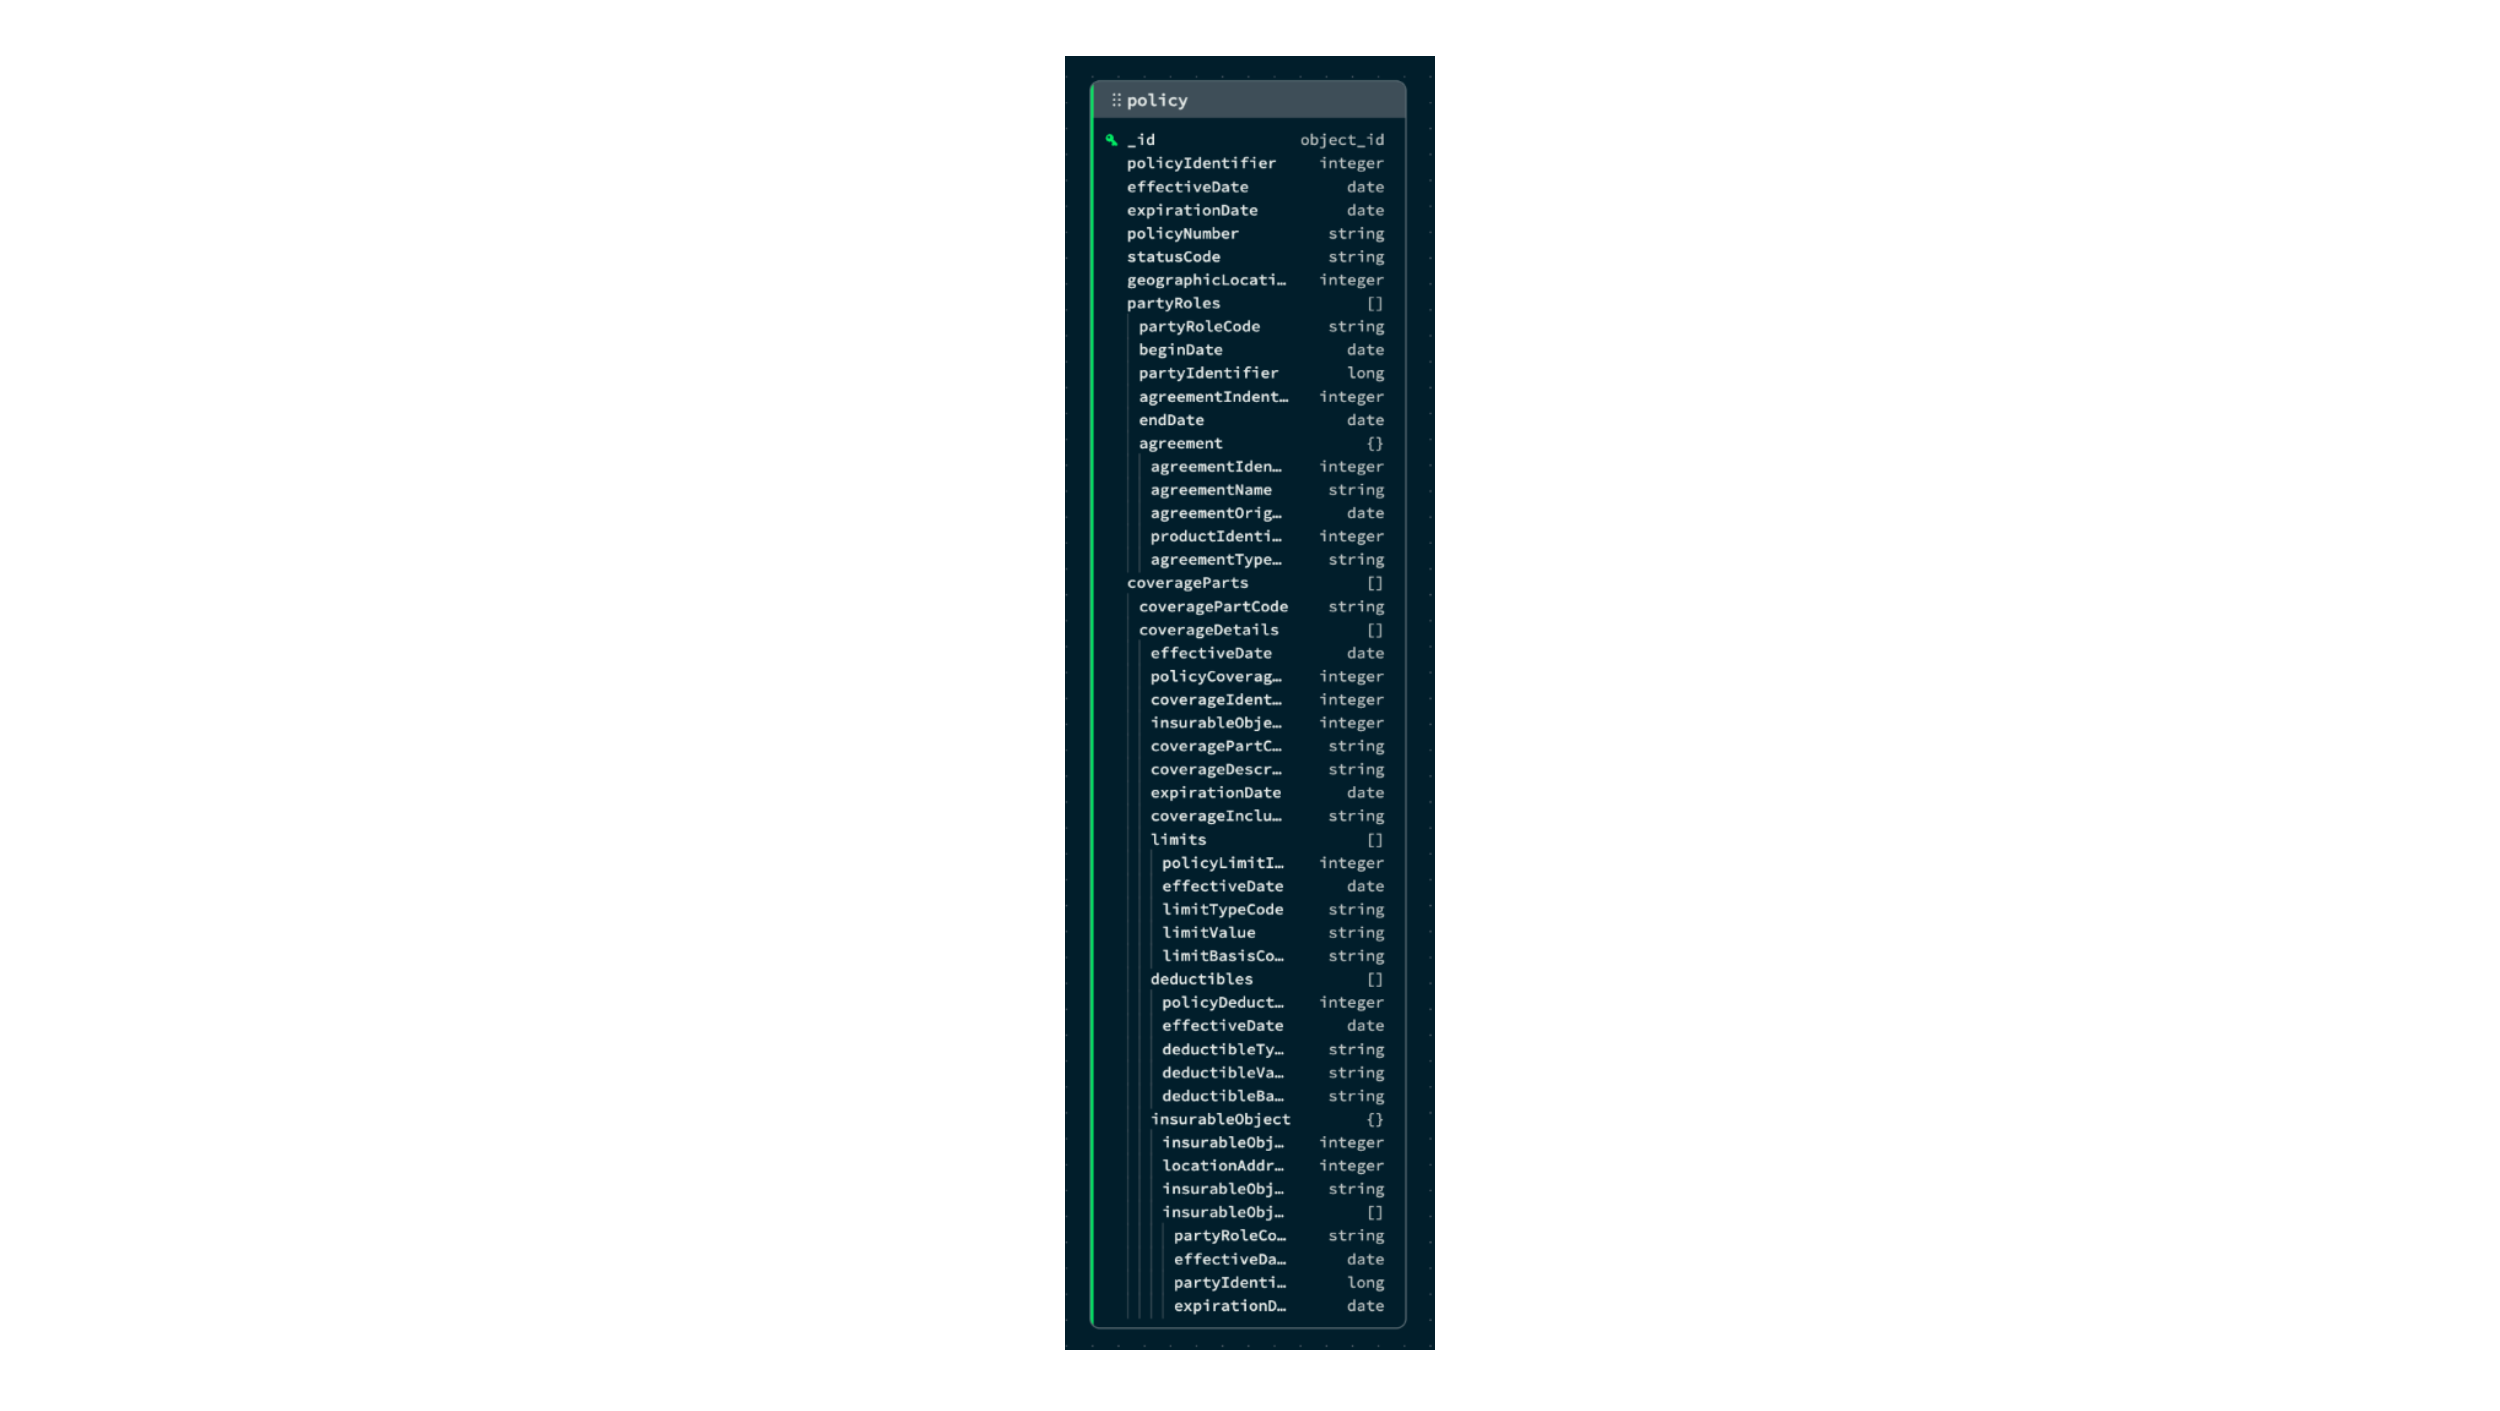
From a top-level perspective, we can observe that the “policy” entity is composed of policy coverage parts and the agreements of each of the parties involved with their respective roles. A policy can have several parts to cover and several parties' agreements involved. Therefore, similarly to what happened with party location addresses, they will be matched to array embeddings.
Let’s start with the party agreements. A policy may have many parties involved, and each party may be part of many policies. This results in a many-to-many relationship facilitated by the “policy_party_role” table. This table also covers the relationships between roles and agreements, as each party will play a role and will have an agreement in a specific policy.
From the MDB view, select the “policy” collection. Click on the “Add” button, select “embedded array,” and choose “policy_party_role” in the source table dropdown. Uncheck the `policyIdentifier` field, leave the other fields as default, and click “Save and close.”
We will leave the party as a referenced object to the “party” collection we created earlier, so we don’t need to take any further action on this. The relationship remains in the new model through the `partyIdentifier` field acting as a foreign key. However, we need to include the agreements. From the “policy” mapping menu, click “Add,” select “Embedded document,” pick “agreement” as the source table, leave the other options as default, and click “Save and close.”
At this point, we can remove the collections “policy_party_role” and “agreement.” Remember that we have defined “party_role” as a separate reference collection, so just having `partyRoleCode` as an identifier in the destination table will be enough.
Next, we will include the policy coverage parts.
From the “policy” mapping menu, click “Add,” select “Embedded array,” pick “policy_coverage_part” as the source table, uncheck the `policyIdentifier` field, leave the other options as default, and click “Save and close.”
Each coverage part has details included in the “policy_coverage_detail”. We will add this as an embedded array inside of each coverage part. In the “policy” mapping menu, click “Add,” select “Embedded array,” pick “policy_coverage_detail,” and make sure that the prefix selected in the “Root path” section is `policyCoverageParts`. Remove `policyIdentifier` and `coveragePartCode` fields and click “Save and close.”
Coverage details include “limits,” “deductibles,” and “insurableObjects.” Let’s add them in! Click “Add” in the “policy” mapping menu, “Embedded Array,” pick “policy_limit,” remove the `policyCoverageDetailIdentifier`, and click “Save and close.” Repeat the process for “policy_deductible.” For “insurable_object,” repeat the process but select “Embedded document” instead of “Embedded array.”
As you can see in Figure 9, insurable objects have additional relationships to specify the address and roles played by the different parties. To add them, we just need to embed them in the same fashion we have done so far. Click “Add” in the “policy” mapping menu, select “Embedded array,” and pick “insurable_object_party_role.” This is the table used to facilitate the many-to-many relationship between insurable objects and party roles. Uncheck `insurableObjectIdentifier` and click “Save and close.” Party will be referenced by the `partyIdentifier` field. For the sake of simplicity, we won’t embed address details here, but remember in a production environment, you would need to add it in a similar way as we did before in the “party” collection.
After this, we can safely remove the collections “policy_coverage_part,” “policy_coverage_detail,” “policy_deductible,” and “policy_limit.”
By now, we should have a collection similar to the one below and five fewer tables than in our original model.
Figure 10. Document representation of the Policy entity.
Claim & litigation domain
Figure 11. Party in context of Claim & Litigation Hackolade model.
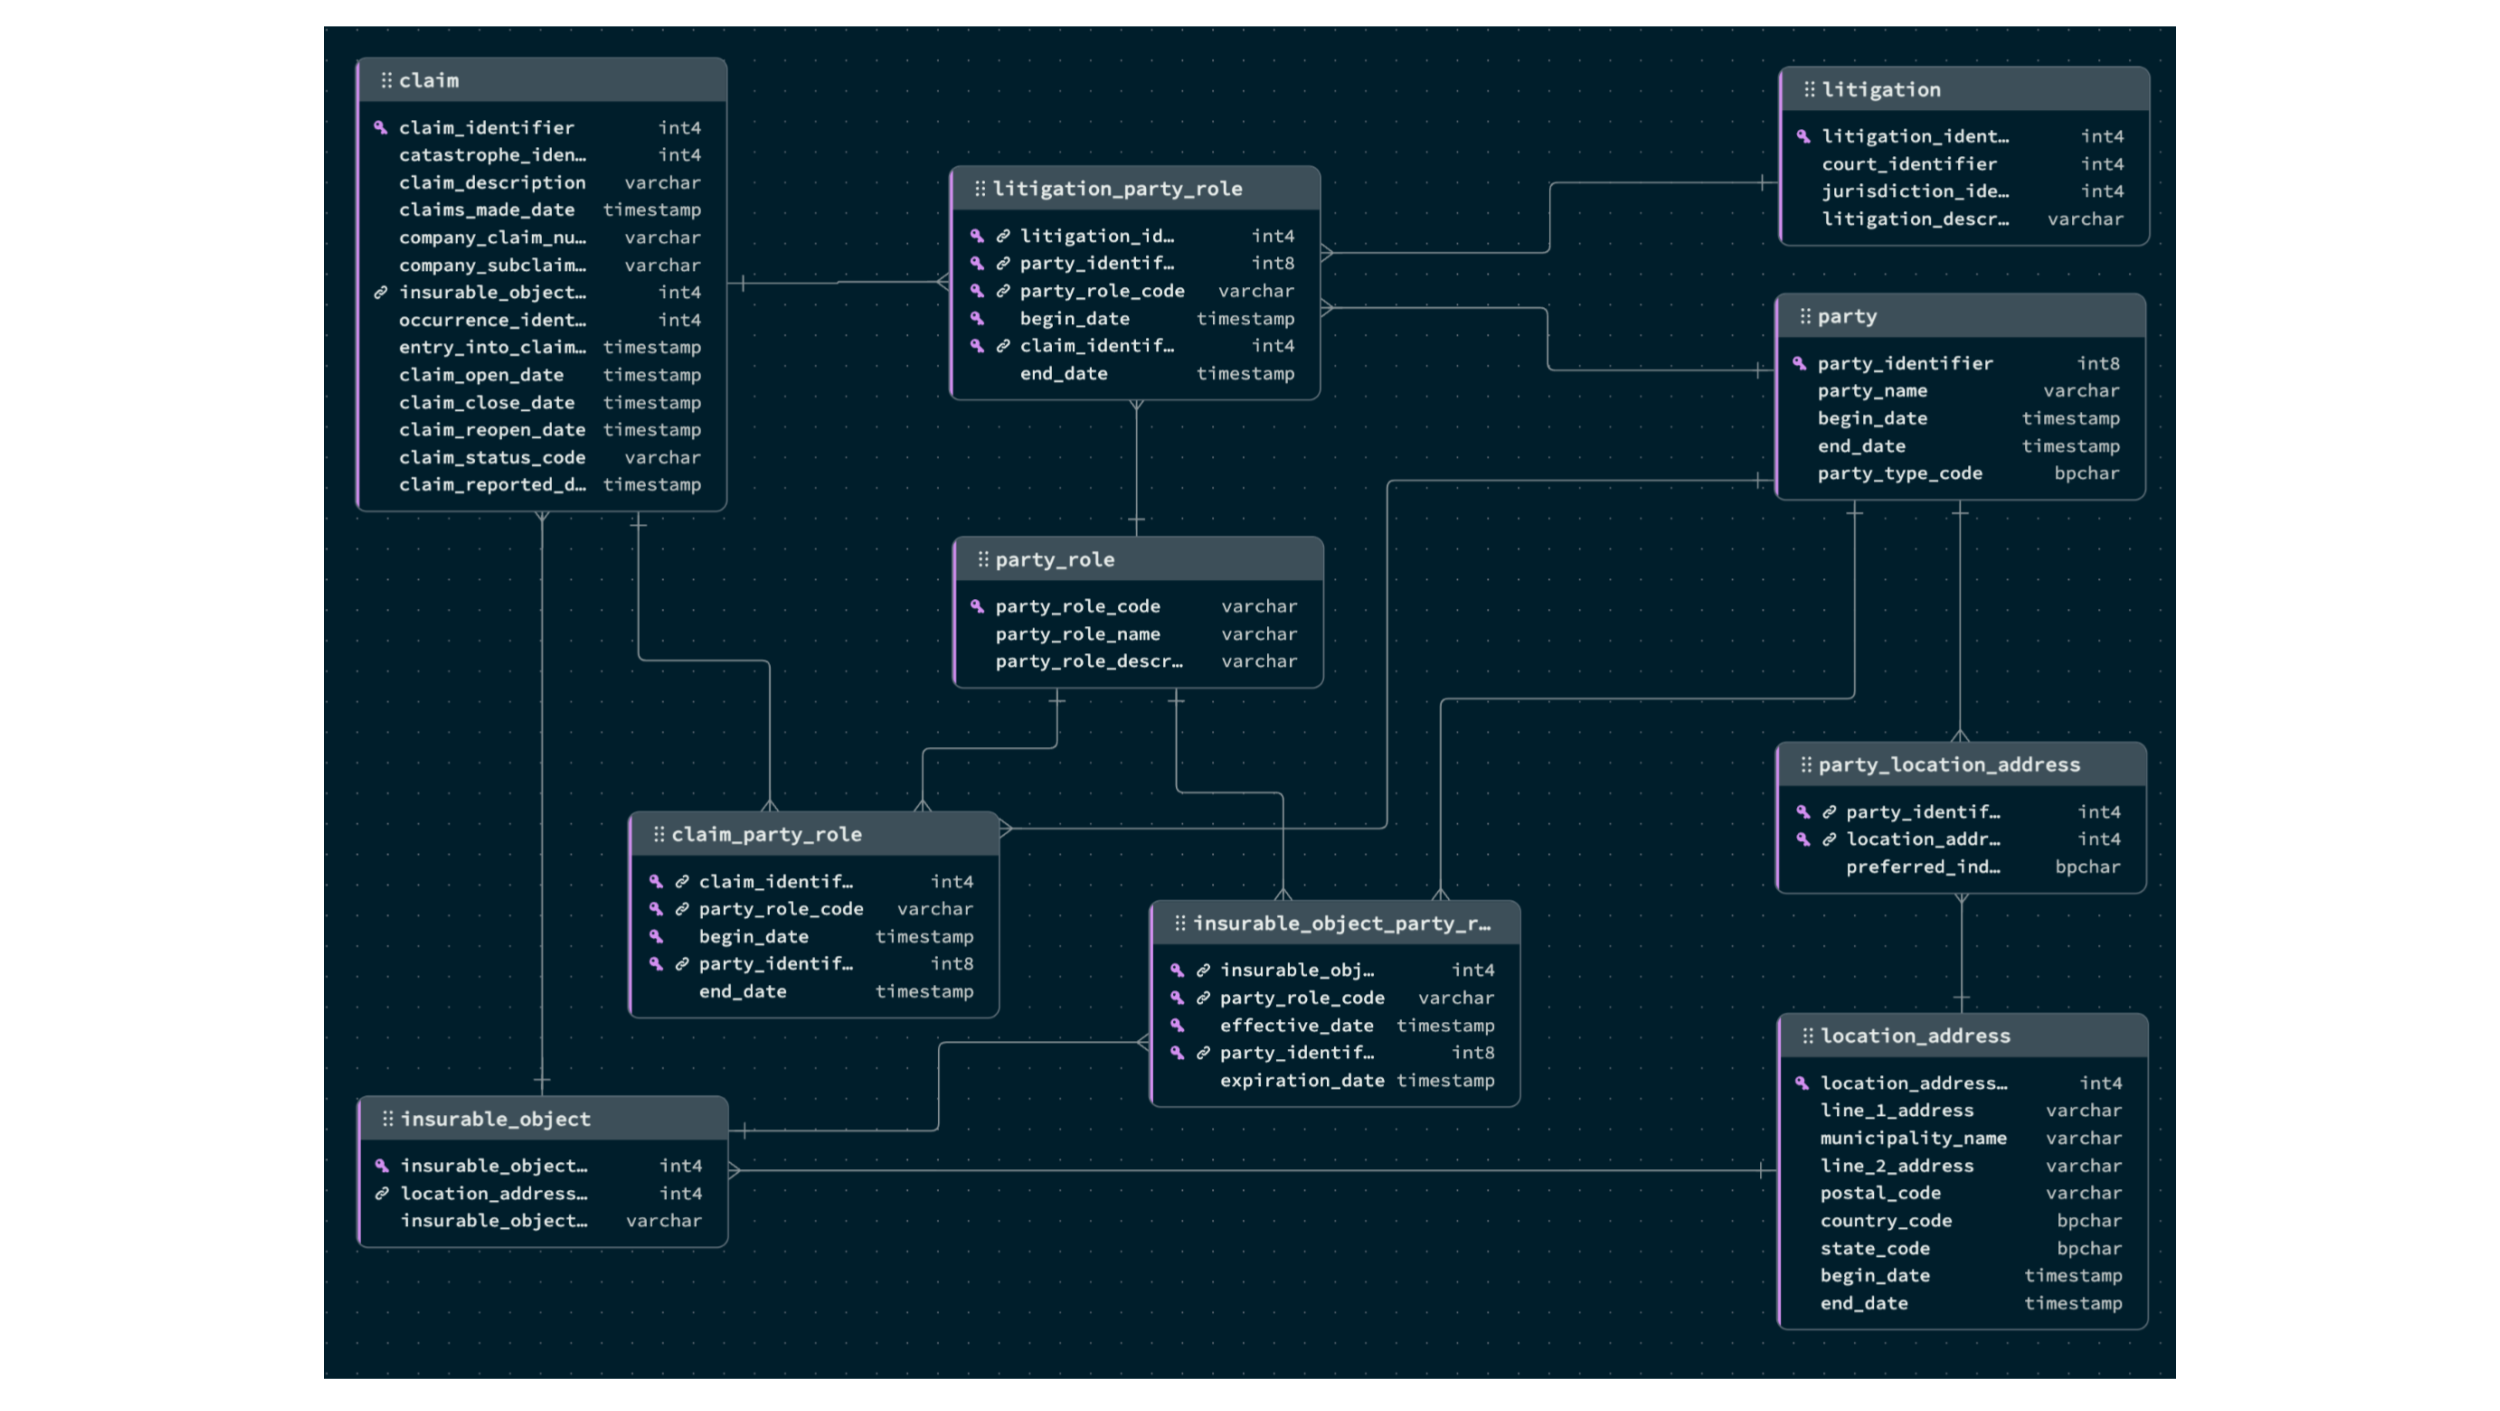
The key entities of Claim and Litigation are:
Claim — claim for coverage or compensation
Litigation — claim litigation
Claim Party Role — associative entity which links:
Party
The role the Party plays
Insurable Objects
Litigation Party Role - associative entity which links:
Claim
The role the Party plays
Insurable Objects
Insurable Object Party Role - associative entity which links:
Party
The role the Party plays
Insurable Objects
In this domain, we have already identified the two main entities: claim and litigation. We will use them as top-level documents to refactor the relationships shown in Figure 10 in a more intuitive way. Let’s see how you can model claims first.
We’ll begin embedding the parties involved in a claim with their respective roles. Select “claim” collection, click “Add” in the mapping menu, select “Embedded array,” and pick “claim_party_role” as the source table. You can uncheck `claimIdentifier` from the field list. Lastly, click the “Save and close” button.
Next, we will integrate the insurable object that is part of the claim. Repeat the previous step, but choose “Embedded documents” as the table migration option and “insurable_object” as the source table. Again, we will not embed the “location_address” entity to keep it simple.
Within insurableObject, we will include the policy coverage details establishing the link between claims and policies. Add a new mapping, select “Embedded array,” choose “policy_coverage_detail” as the source table, and uncheck the field insurableObjectIdentifier. Leave the other options as default.
Lastly, we will recreate the many-to-many relationship between litigation and claim. As we will have a separate litigation entity, we just need to reference that entity from the claims document, which means that just having an array of litigation identifiers will be enough. Repeat the previous step by selecting “Embedded array,” “litigation_party_role,” and unchecking all fields except `litigationIdentifier` in the field list.
Figure 12. Document representation of the Claim entity.
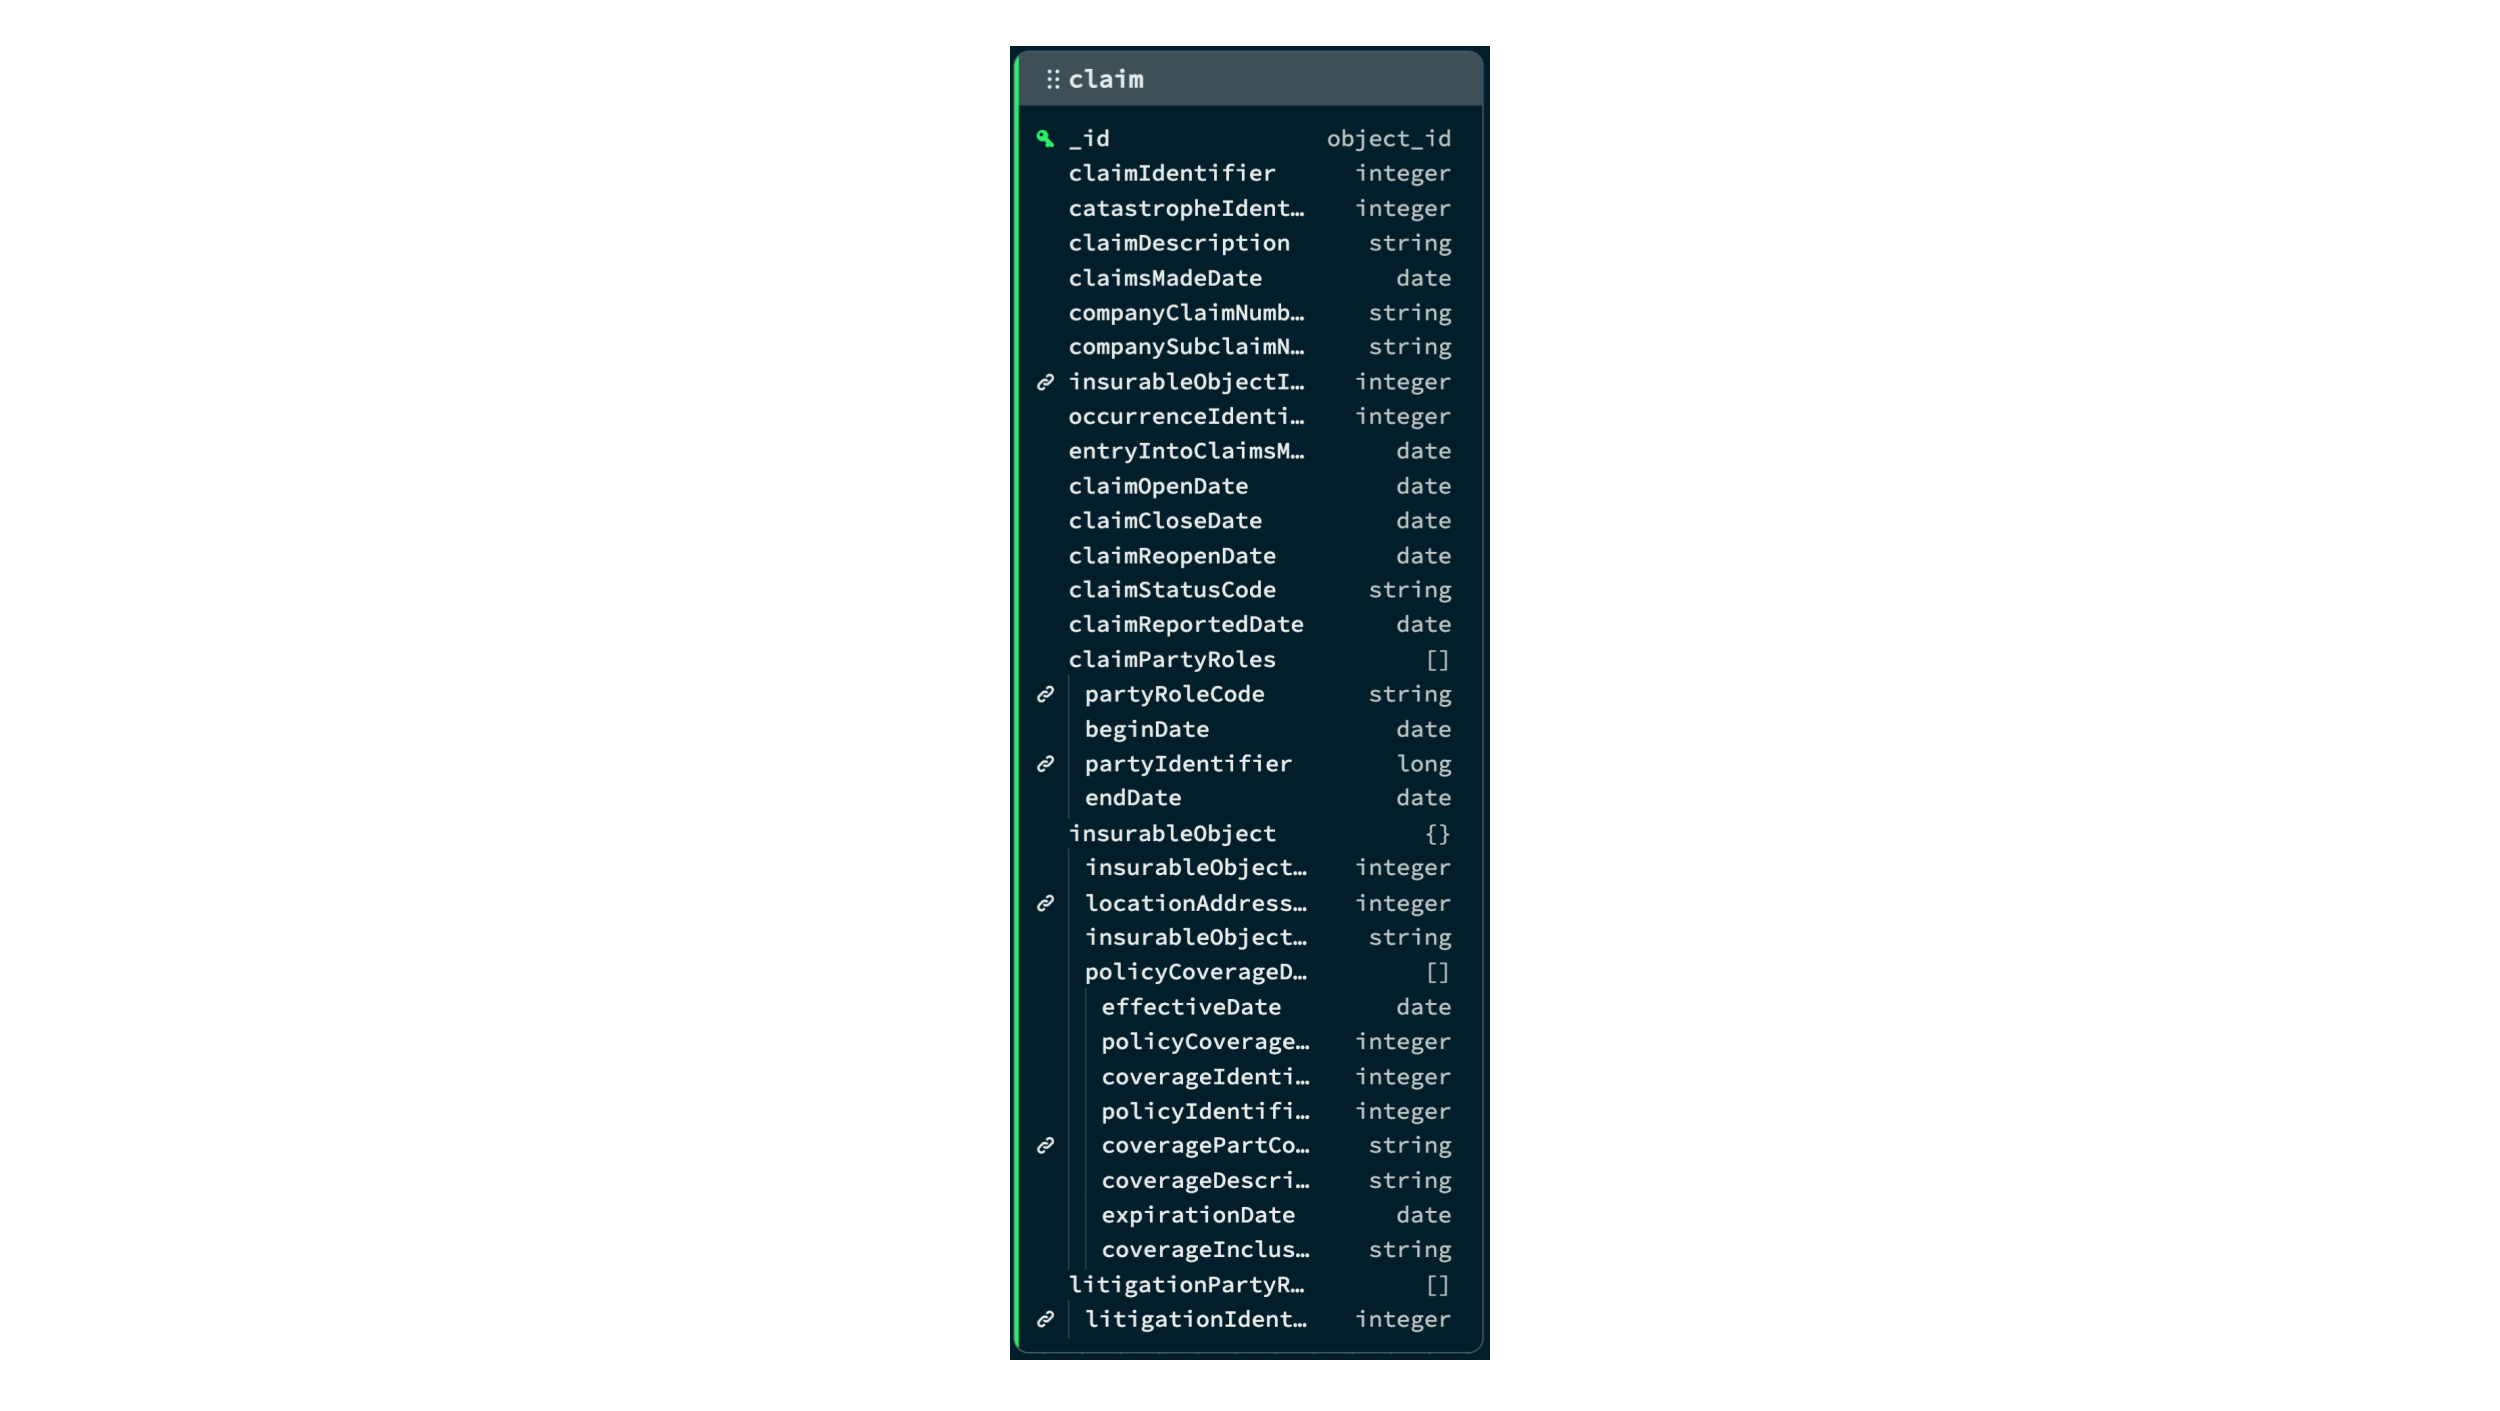
The claim model is ready to go. We can now remove the collection “claimPartyRole.”
Let’s continue with the litigation entity. Litigations may have several parties involved, each playing a specific role and with a particular associated claim. This relationship is facilitated through the “litigation_party_role” collection. We will represent it using an embedded array. Additionally, we will include some fields in the claim domain apart from its identifier. This is necessary so we can have a snapshot of the claim details at the time the litigation was made, so even if the claim details change, we won’t lose the original claim data associated with the litigation. To do so, follow the steps below:
From the “litigation” mapping menu, click on the “Add” button, select “Embedded array,” and pick “litigation_party_role” as the source table. Remove `litigationIdentifier` from the field list and click “Save and Close.”
In a similar way, add claim details by adding “claim” as an “Embedded document.”
Repeat the process again, but choose “insurable_object” as the source table for the embedded document. Make sure the root path prefix is set to `litigationPartyRoles.claim`.
Finally, add “insurable_object_party_role” as an “Embedded array.” The root path prefix should be `litigationPartyRoles.claim.insurableObject`.
Figure 13. Document representation of the Litigation entity.
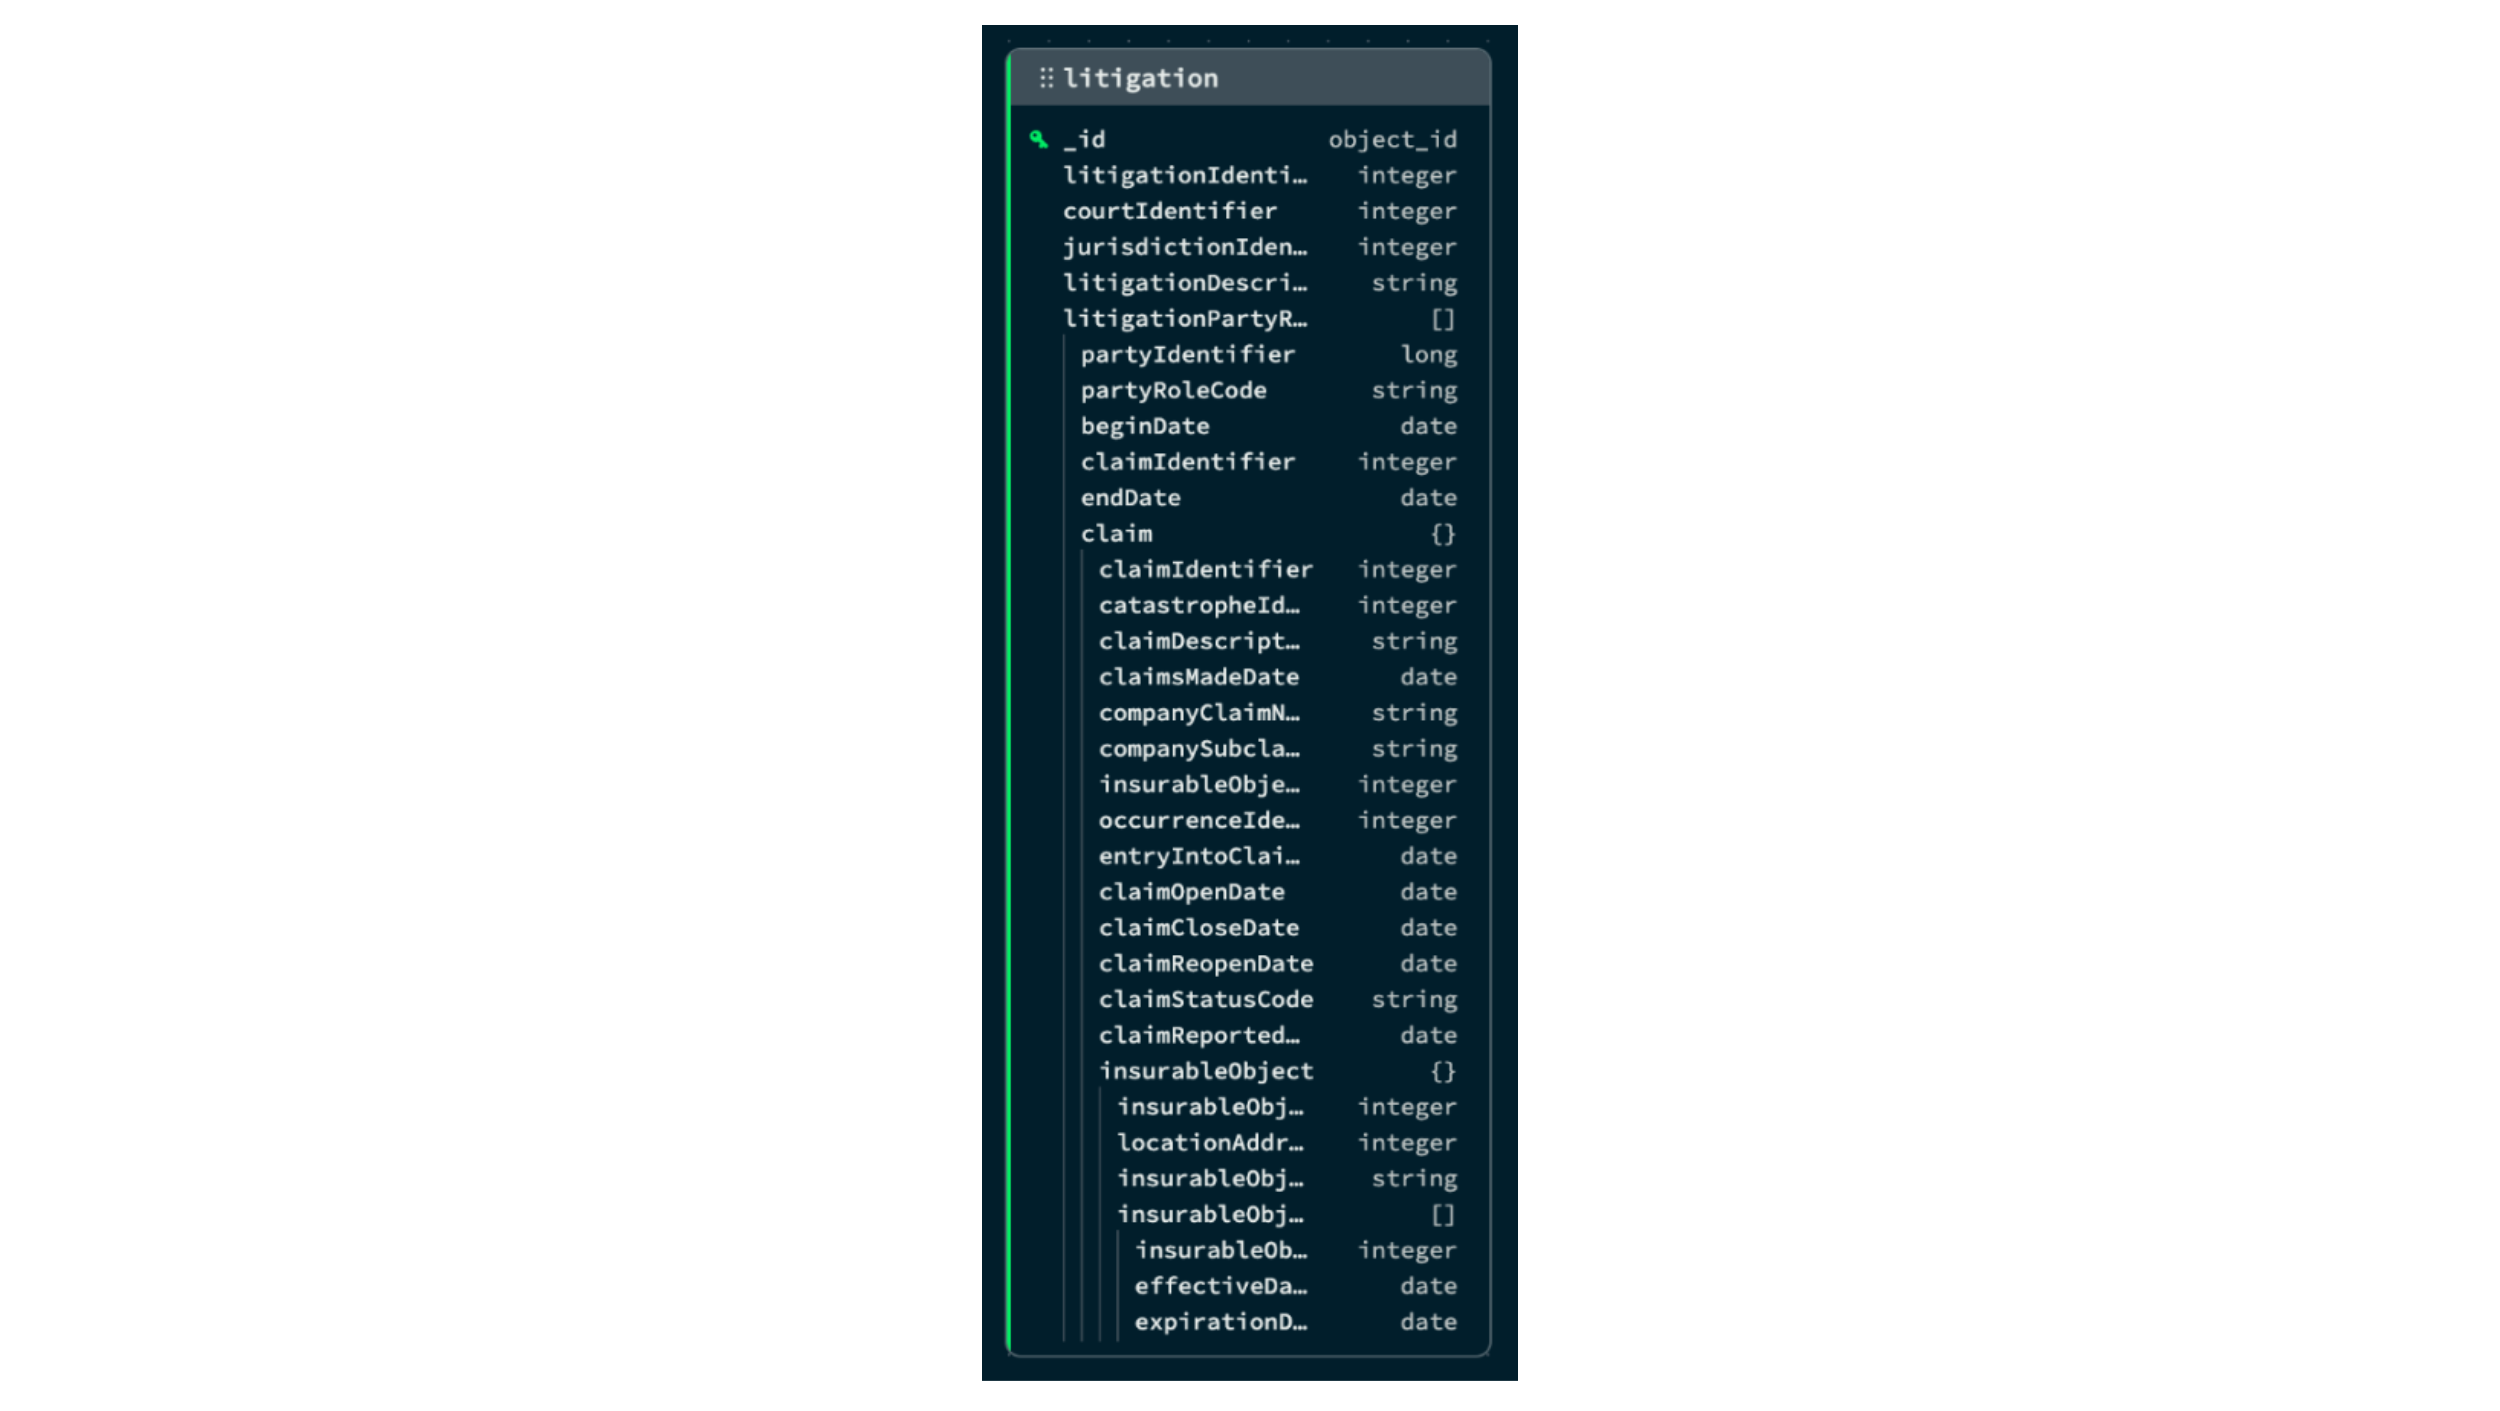
And that’s it. We have modeled the entire relationship schema in just five collections: “party,” “partyRole,” “policy,” “claim,” and “litigation.” You can remove the rest of the collections and compare the original tabular schema composed of 21 tables to the resulting five collections.
Migrate your data to MongoDB
Now that our model is complete, we just need to migrate the data to our MongoDB instance. First, verify that you have “dbAdmin” permissions in the destination OMG database. You can check and update permissions from the Atlas left-side security menu in the “Database Access” section.
Figure 14. New Migration Job, Connect Source DB menu.
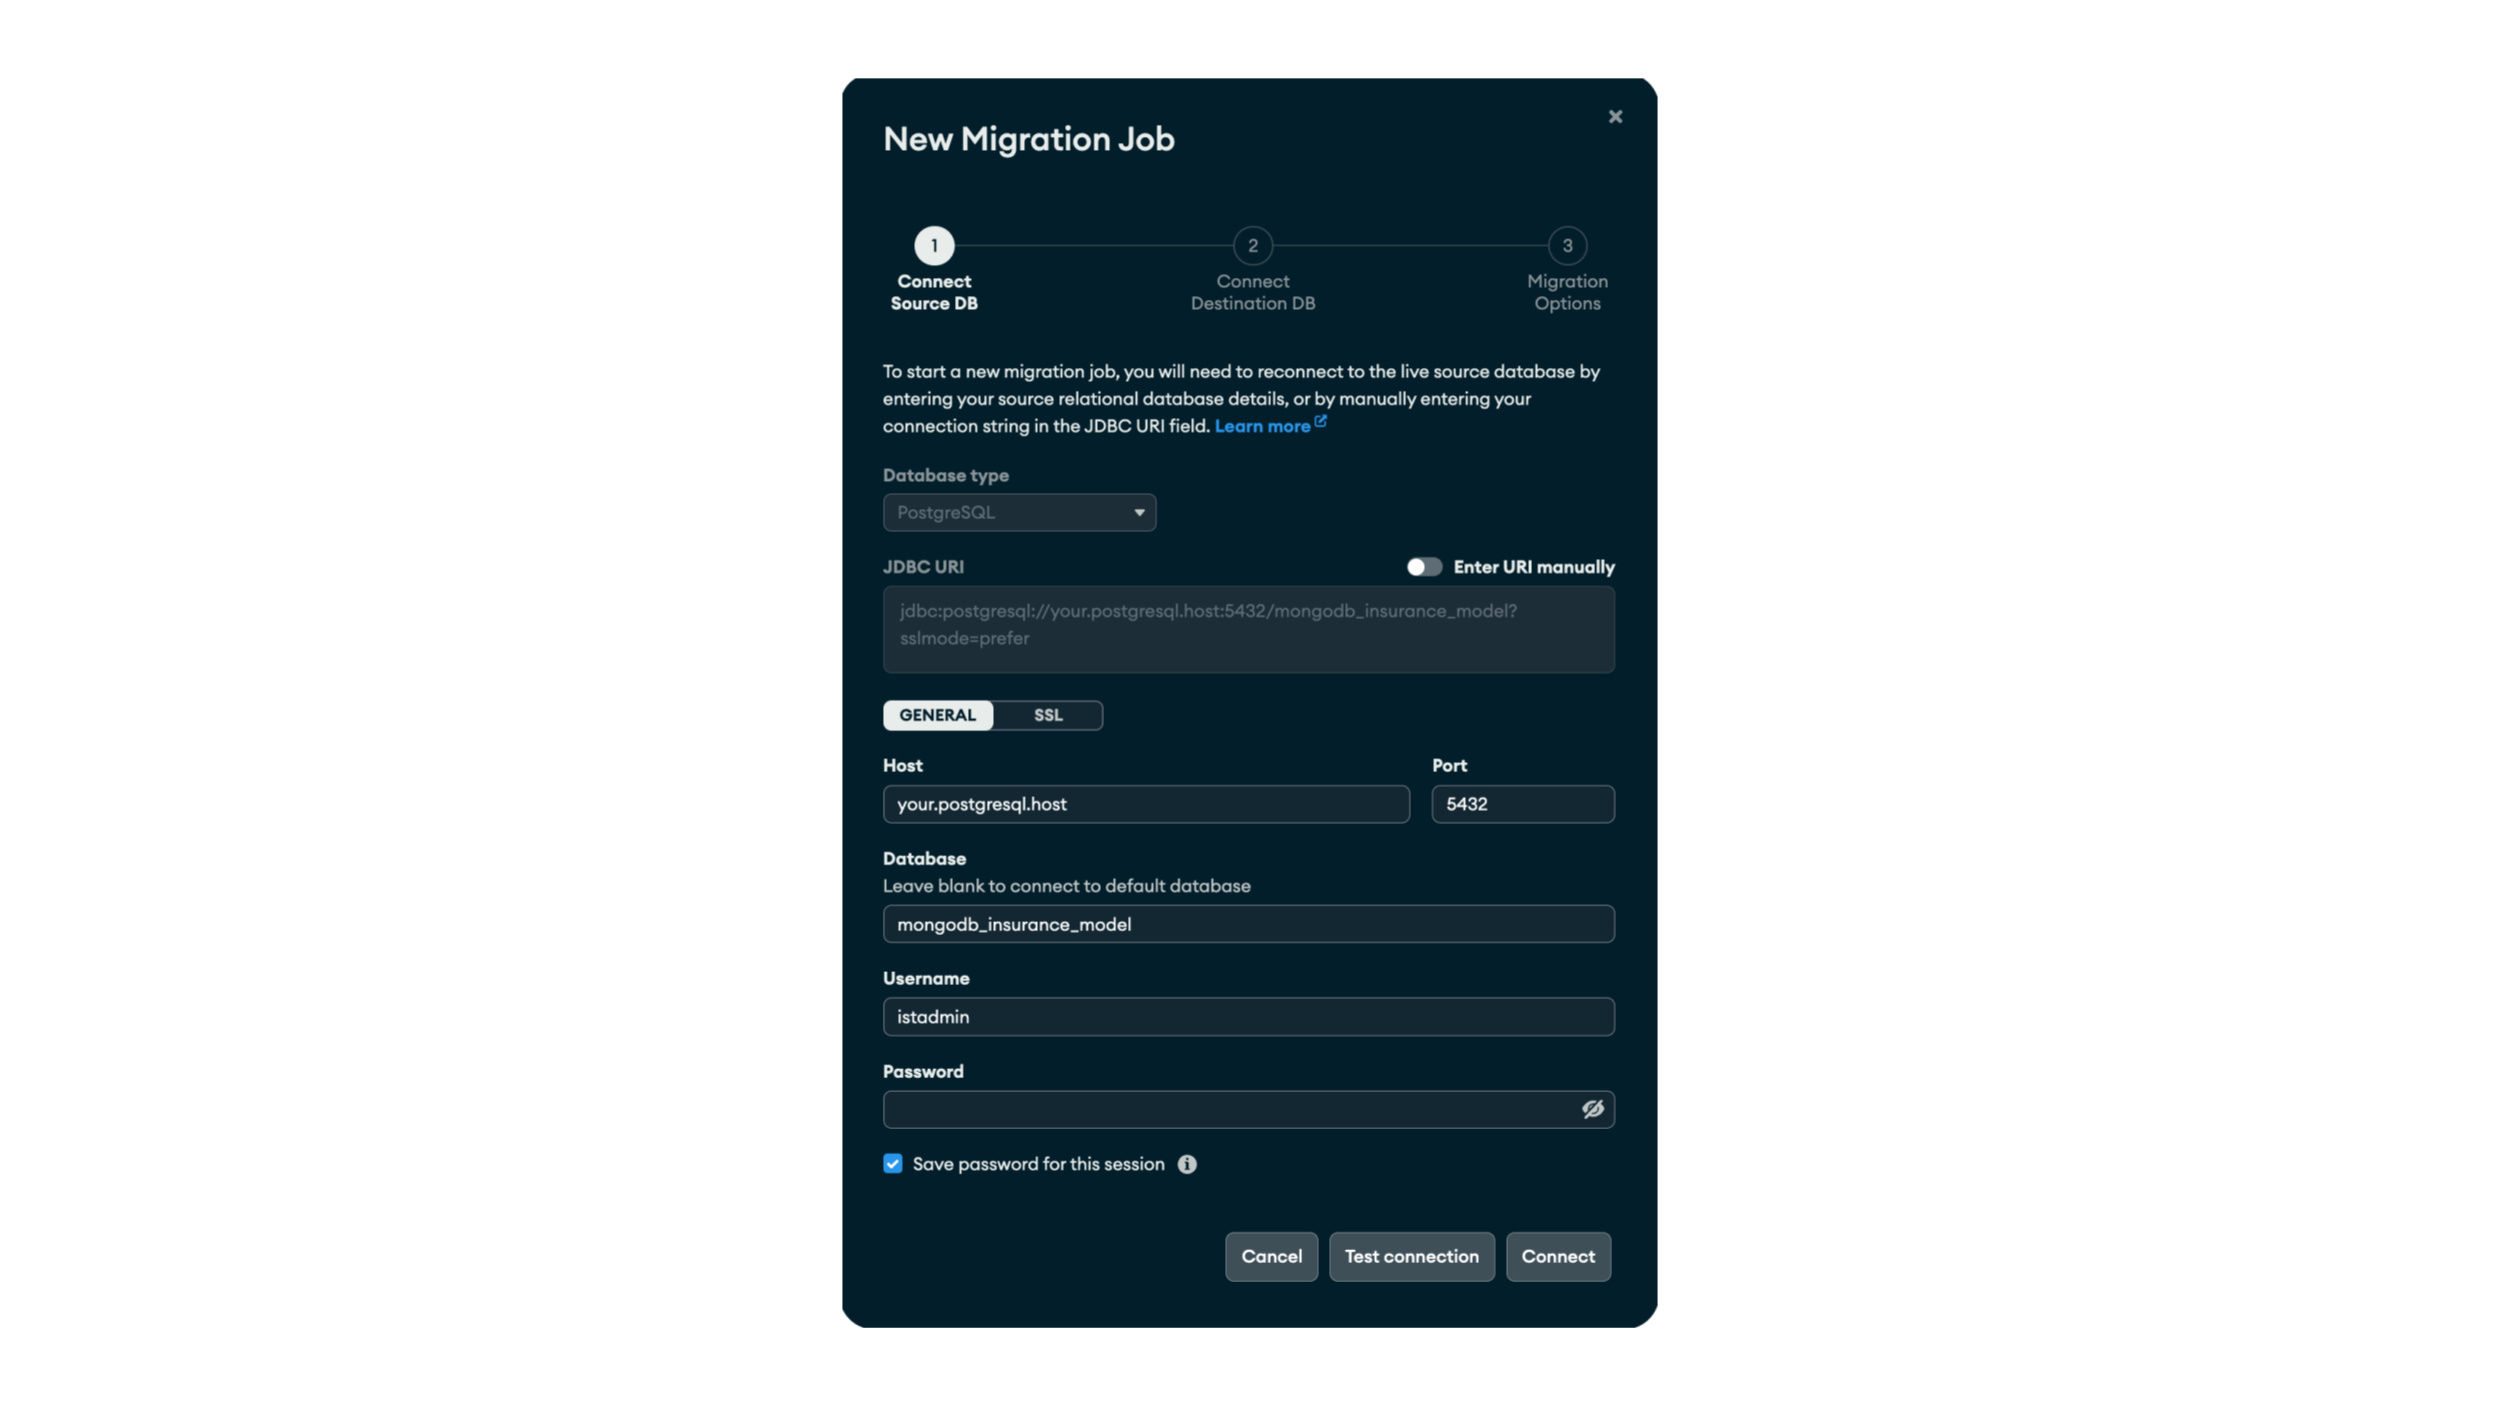
Once this is done, navigate to the “Data Migration” tab in the top navigation bar and click “Create sync job.” You will be prompted to add the source and destination database details. In our case, these are PostgreSQL and MongoDB, respectively. Fill in the details and click “Connect” in both steps until you get to the “Migration Options” step. In this menu, we will leave all options as default. This will migrate our data in snapshot mode, which means it will load all our data at once. Feel free to check our documentation for more sync job alternatives.
Figure 15. New migration job, migration options menu.
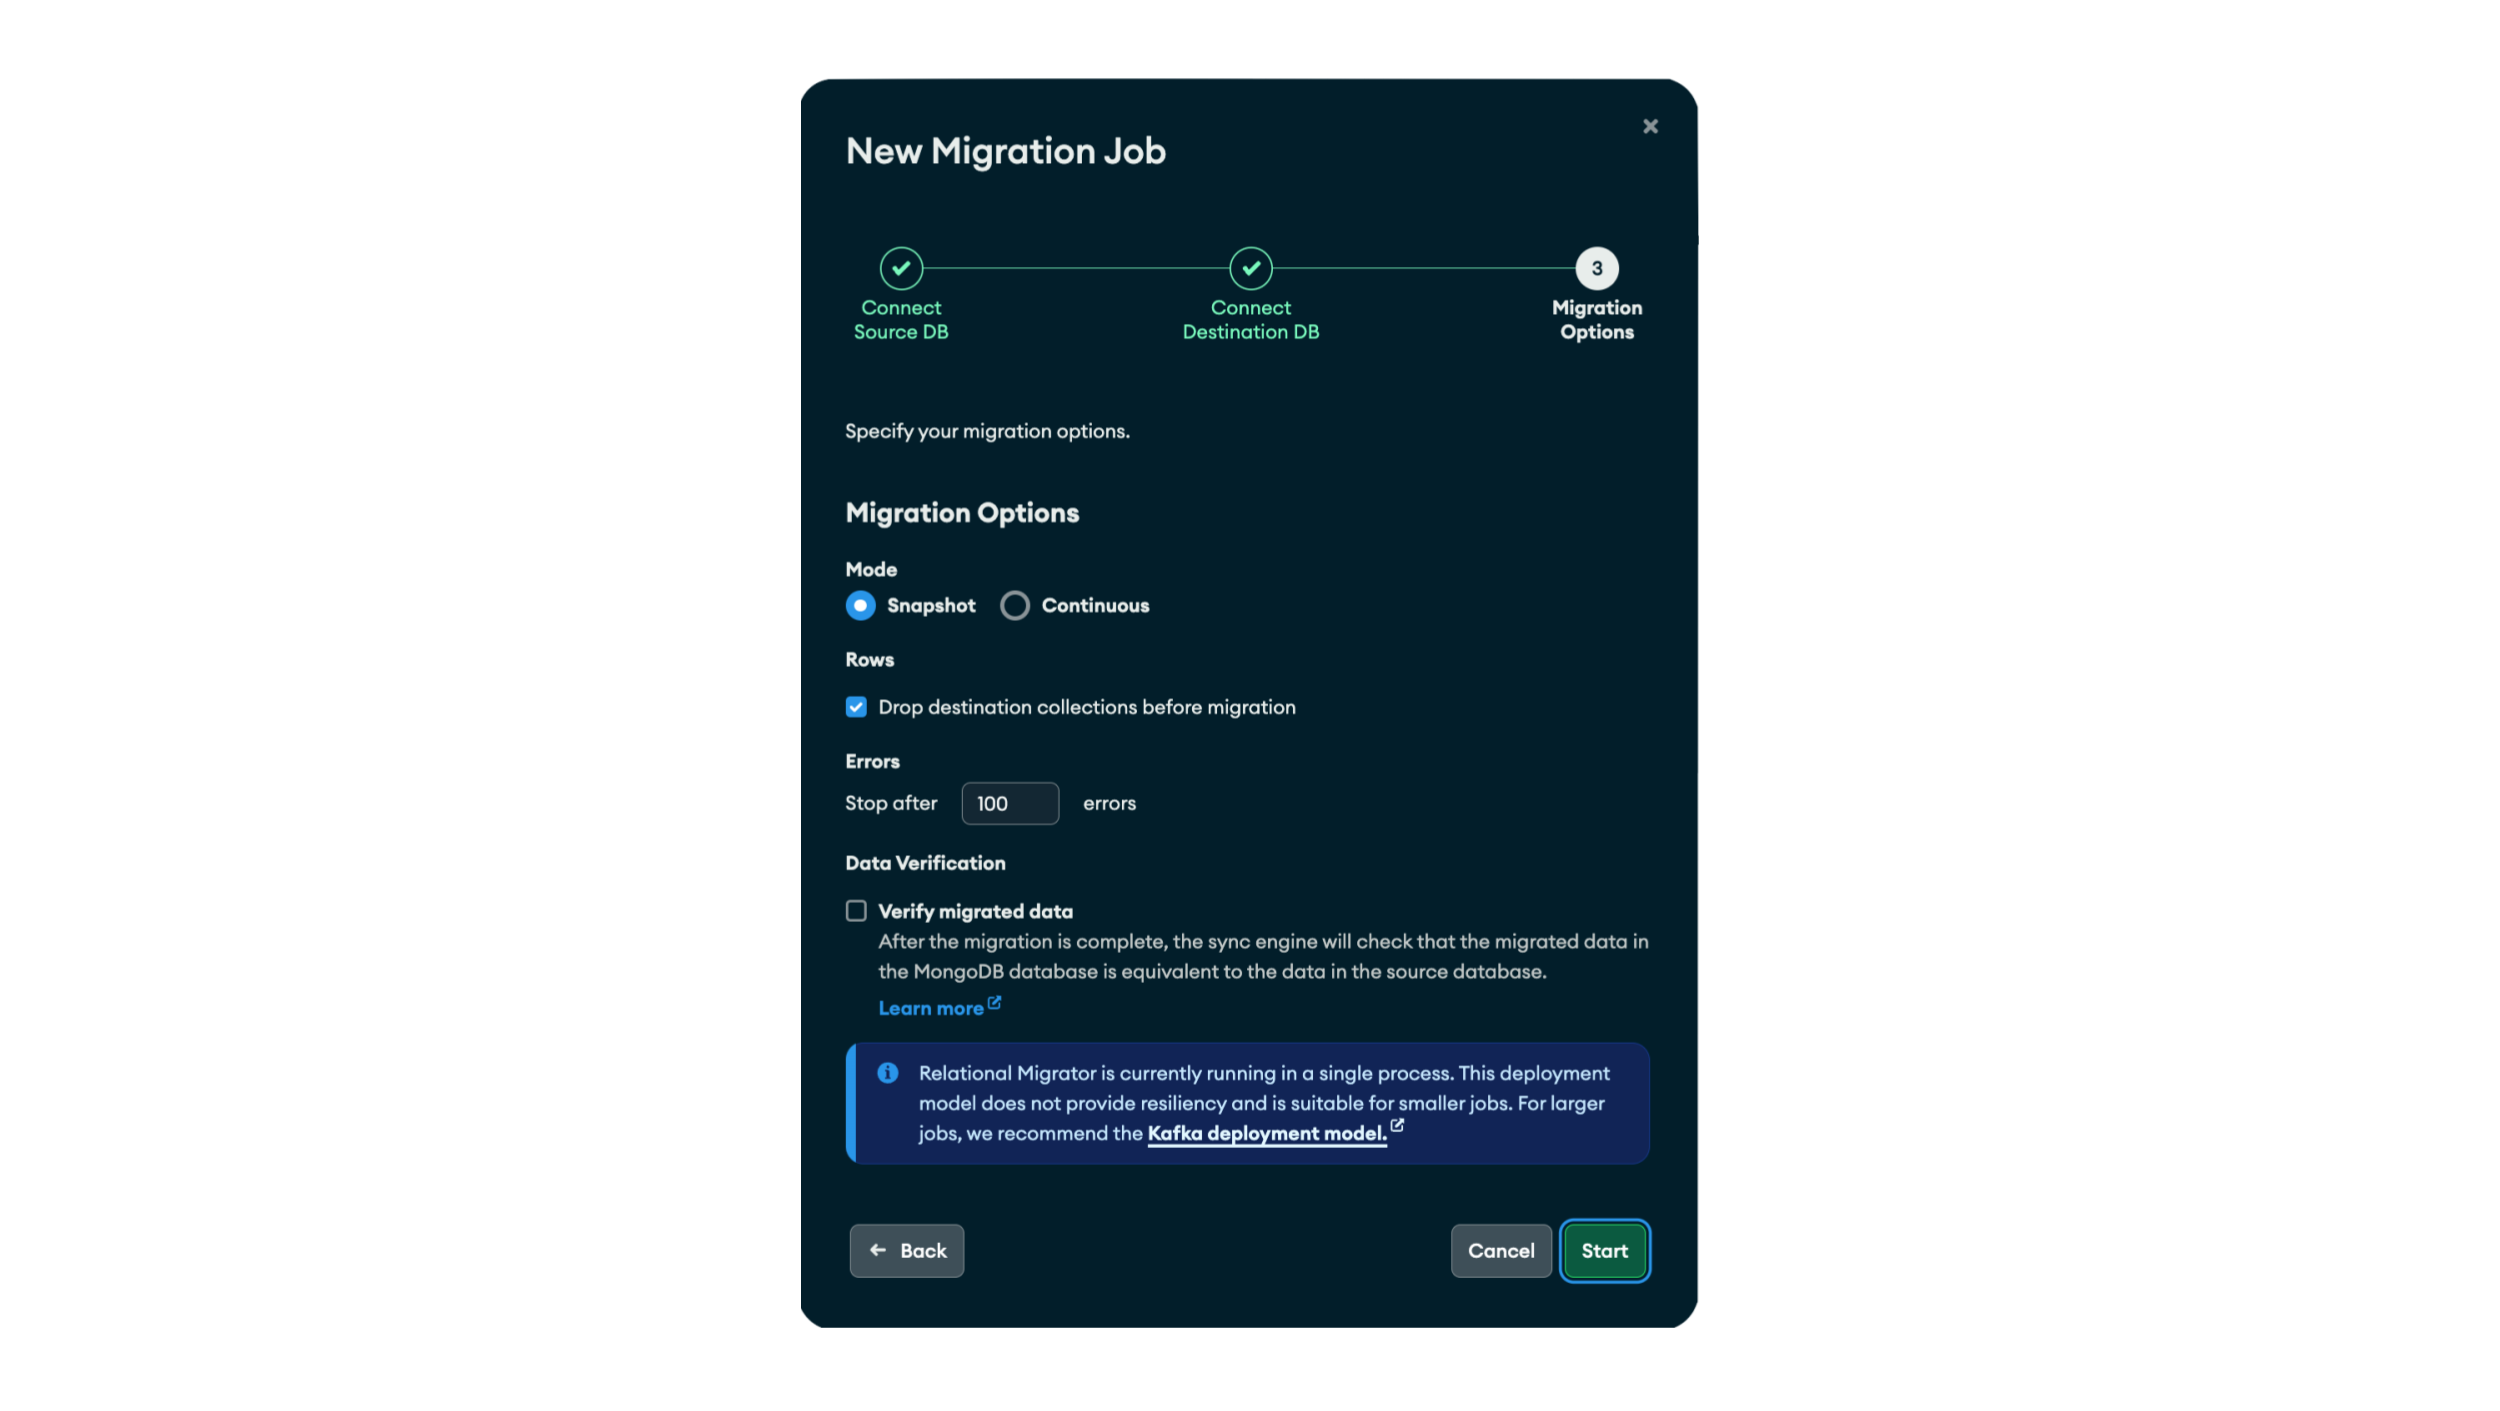
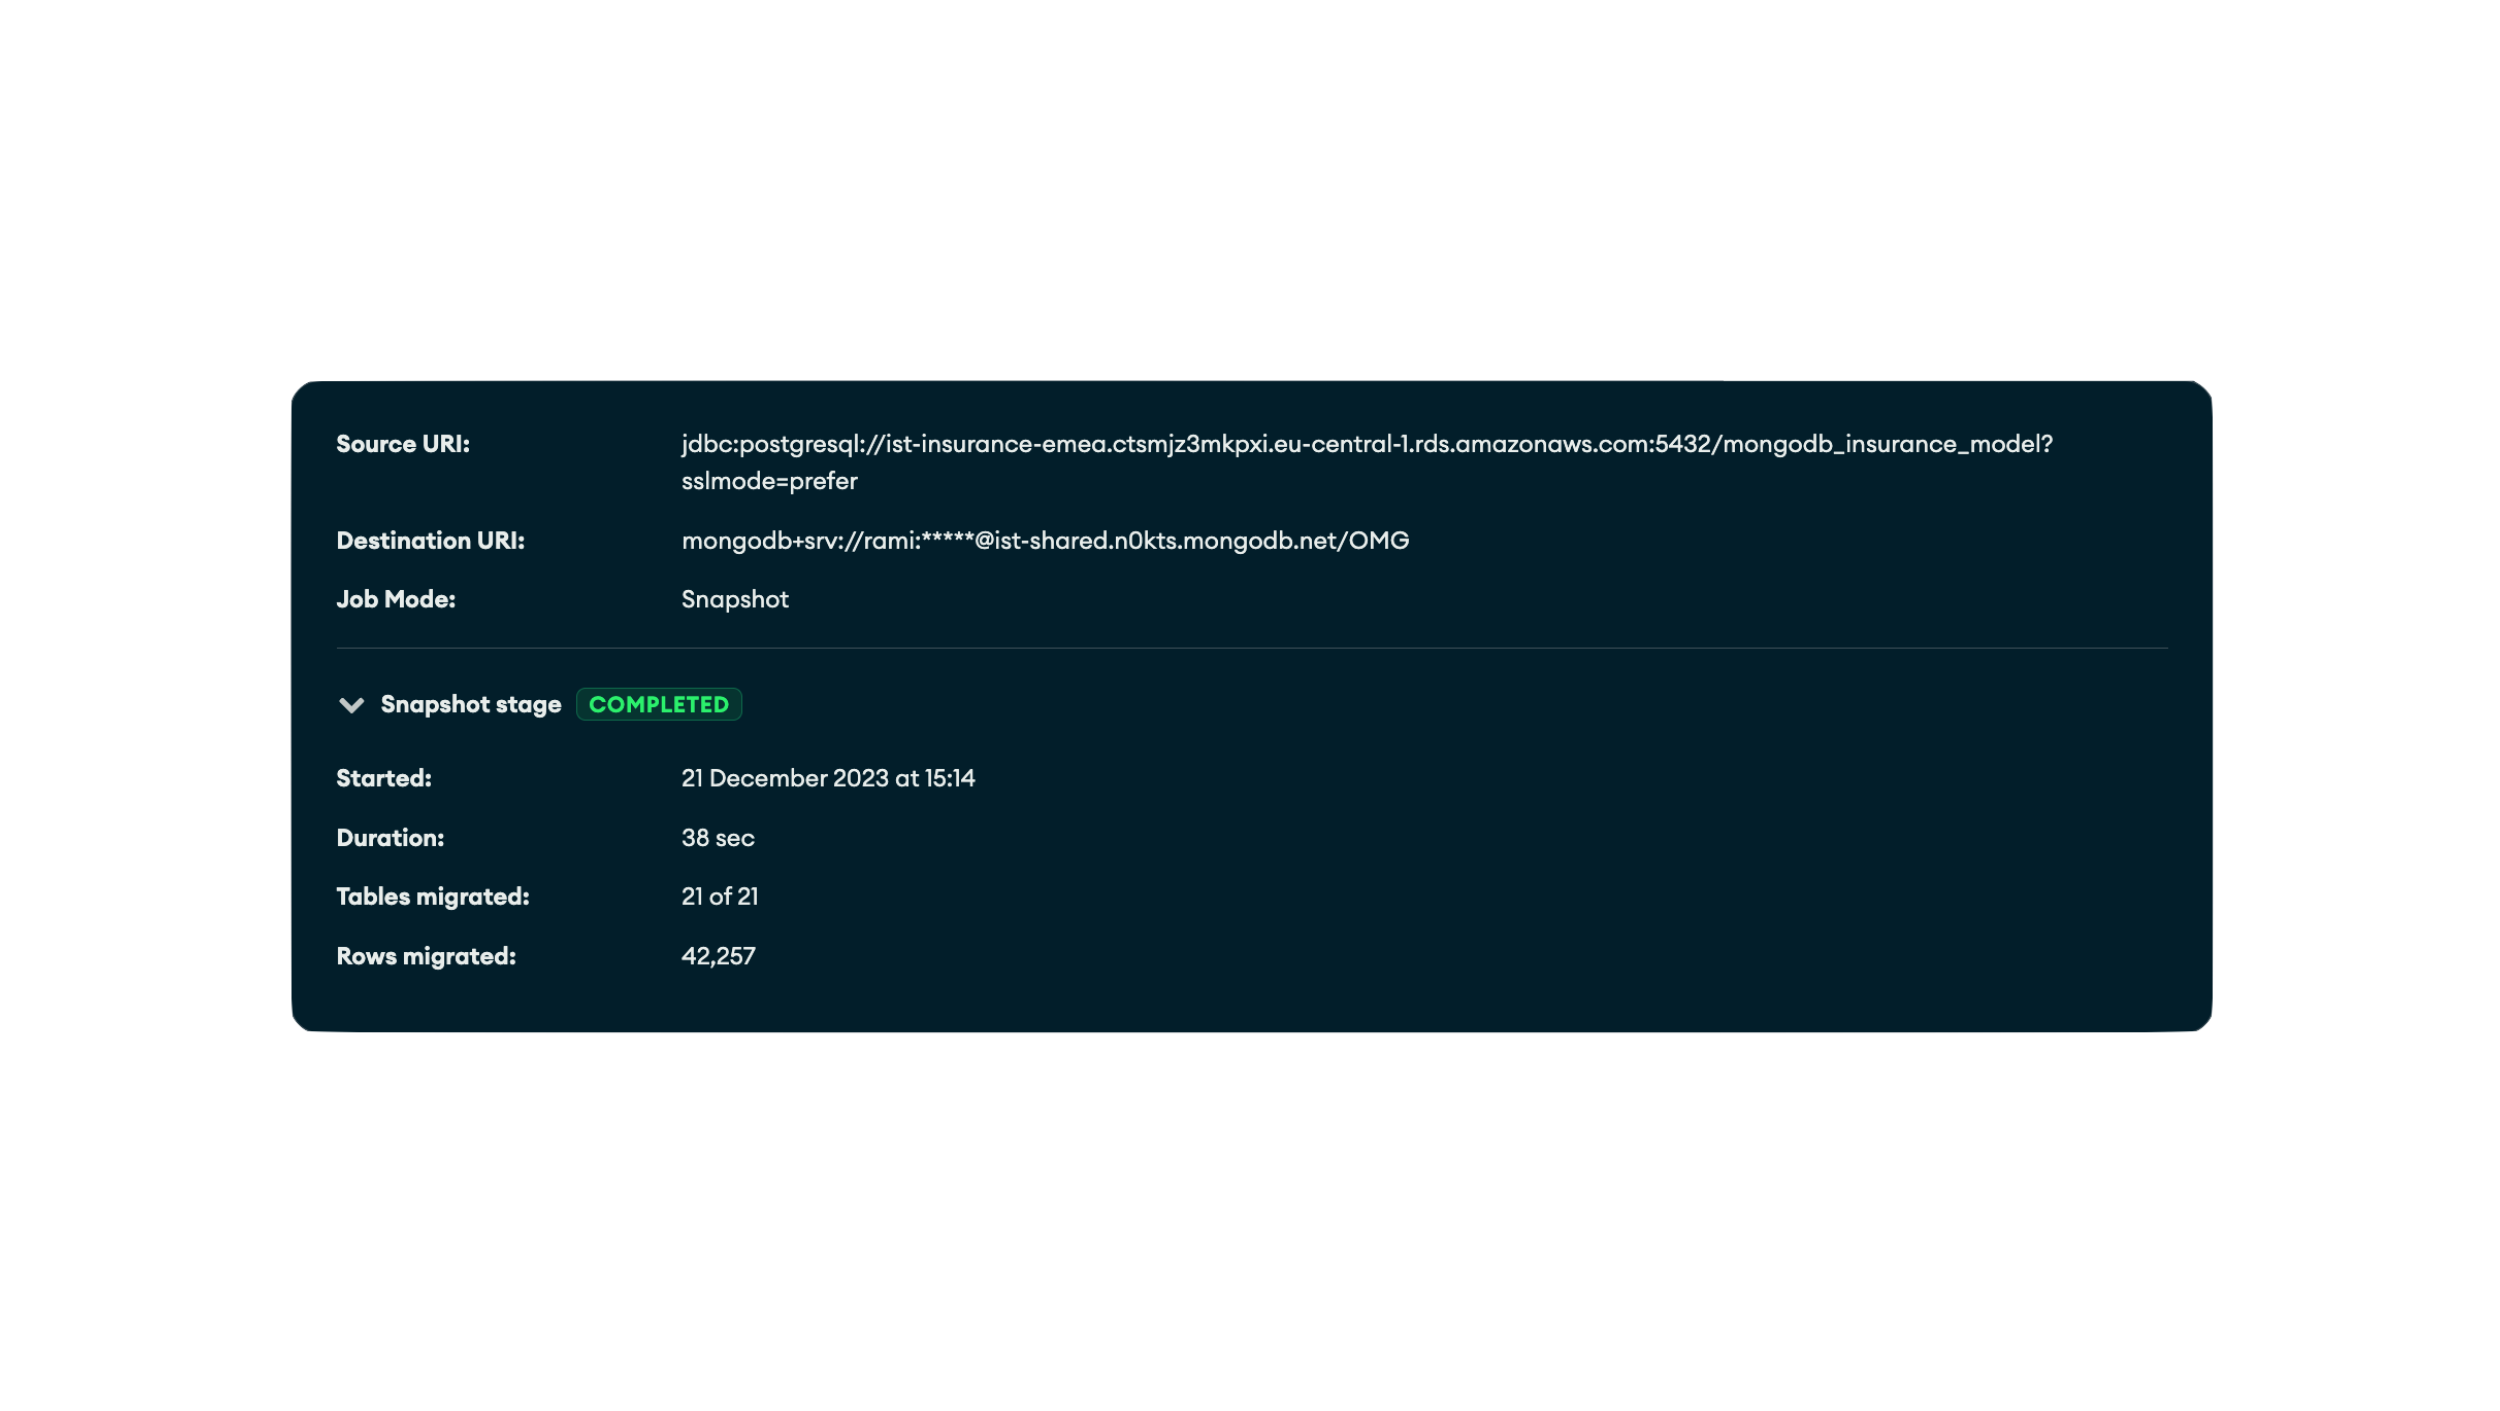
Finally, click the “Start” button and wait until the migration is complete. This can take a couple of minutes. Once ready, you will see the “Completed” tag in the snapshot state card. You can now connect to your database in MongoDB Atlas or Compass and check how all your data is now loaded in MongoDB, ready to leverage all the advantages of the document model.
Figure 16. Successful migration job message.
Additional resources
Congratulations, you’ve just completed your data migration! We've not just simplified the data model of a standard insurance system; we've significantly modernized how information flows in the industry.
On the technical side, MongoDB's Relational Migrator truly is a game-changer, effortlessly transforming an unwieldy 21-table schema into a lean five-collection MongoDB model. This translates to quicker, more efficient data operations, making it a dream for developers and administrators alike.
On the business side, imagine the agility gained—faster time-to-market for new insurance products, swift adaptation to regulatory changes, and enhanced customer experiences.
The bottom line? MongoDB's document model and Relational Migrator aren't just tools; they're the catalysts for a future-ready, nimble insurance landscape.
Next Steps
If you want to learn how MongoDB can help you modernize, move to any cloud, and embrace the AI-driven future of insurance, check the resources below. What will you build next?
Relational Migrator: Migrate to MongoDB with confidence
From RDBMS to NoSQL at Enterprise Scale
Access our GitHub repository for DDL scripts, Hackolade models, and more!