Overview
本指南演示了如何使用 TanStack Start 和MongoDB构建现代 Web应用程序。TanStack Start 是一个全栈框架,它使用React和来自 TanStack生态系统的“TanStack Router”和“TanStack Query”等流行库集成了前端和后端开发。
本教程中的应用程序由以下各层组成:
数据库层: MongoDB存储和检索数据。
服务器层:TanStack Start 提供将前端连接到 MongoDB 数据库的 API 终结点和逻辑。
数据管理层:TanStack Query 管理前端的服务器端状态,统一数据获取、加载状态和错误处理的逻辑。
表示层: React使用 TanStack 查询数据来实现用户界面。
为何在 TanStack Start 应用程序中使用MongoDB ?
MongoDB 的文档模型将数据存储为类似JSON 的文档,因此可以轻松使用JavaScript对象,而无需复杂的映射。这与 TanStack Start 的React组件和 TypeScript 接口保持一致。
TanStack Query 通过缓存MongoDB响应、管理加载状态和跨组件同步数据,有效地处理数据层。这样就消除了手动状态管理并减少了冗余数据库调用。
这种组合非常适合需要以下功能的应用程序:
可随时间演变的灵活数据结构
使用最少的客户端代码进行实时数据更新
从数据库到用户界面的类型安全
高效缓存和背景数据同步
快速入门教程
本教程将引导您构建与MongoDB集成的 TanStack Start应用程序。该应用程序访问示例餐厅数据并在本地托管站点上显示结果。其中包括有关连接MongoDB Atlas上托管的MongoDB 集群以及访问和显示数据库信息的说明。
提示
如果您希望使用 Node.js 驱动程序而不使用 TanStack Start 连接到MongoDB ,请参阅Node.js驱动程序入门指南。
设置您的项目
按照本节中的步骤安装项目依赖项、创建Atlas 集群并设立应用程序目录。
验证先决条件
要创建快速入门应用程序,请确保您已安装以下软件:
先决条件 | 注意 |
|---|---|
使用 20 或更高版本。 | |
代码编辑器 | 本教程使用Visual Studio Code,但你也可以使用自己选择的编辑器。 |
终端 | 对于 MacOS 用户,请使用 终端 或类似应用。对于Windows用户,请使用 PowerShell。 |
创建 MongoDB Atlas 集群
MongoDB Atlas is a fully managed cloud database service that hosts your MongoDB deployments. If you do not have a MongoDB deployment, create a free cluster (no credit card required) by completing the MongoDB Get Started tutorial. The MongoDB Get Started tutorial also demonstrates how to load sample databases into your cluster, including the sample_restaurants database that is used in this tutorial.
要连接到集群,必须使用连接 URI。要检索连接 URI,请按照Atlas文档中的连接到集群教程中的说明进行操作。
提示
将连接 URI 保存在安全位置。
创建项目框架
使用官方 TanStack Start CLI初始化项目框架。打开终端并导航到所需的项目目录。
运行初始化命令:
npm create @tanstack/start@latest
配置提示
安装向导将指导您完成设置。选择以下选项:
Prompt | 输入 | 操作 |
|---|---|---|
您希望如何命名您的项目? | 您所需的项目名称 | 输入名称,然后按 Enter 键 |
您想使用 Tailwind CSS 吗? | 是 | 输入 Y,然后按 Enter 键 |
选择工具链 | 默认(无) | 选择 None(无),按 Enter 键 |
选择您的部署适配器 | 默认值:(Nitro) | 按 Enter 键 |
您希望为您的项目添加哪些附加组件? | 无 | 按 Enter(TanStack Query 将手动安装) |
您想要一些例子吗? | 无 | 按 Enter 键 |
安装完成后,导航到项目目录。
配置 Vite 以兼容MongoDB
TanStack Start 使用 Vite 作为构建工具。默认下,Vite 会尝试捆绑浏览器的依赖项。但是,Node.js驱动程序依赖于服务器端原生模块 mongodb-client-encryption,当 Vite 将其捆绑到浏览器环境中时,该模块会导致错误。
为防止这种情况,请配置 Vite 以将 mongodb-client-encryption 模块排除在优化和服务器端渲染之外。
导航到项目根目录中的 vite.config.ts,并将内容替换为以下代码:
import { defineConfig } from 'vite' import { devtools } from '@tanstack/devtools-vite' import { tanstackStart } from '@tanstack/react-start/plugin/vite' import viteReact from '@vitejs/plugin-react' import viteTsConfigPaths from 'vite-tsconfig-paths' import tailwindcss from '@tailwindcss/vite' import { nitro } from 'nitro/vite' const config = defineConfig({ plugins: [ devtools(), nitro(), // this is the plugin that enables path aliases viteTsConfigPaths({ projects: ['./tsconfig.json'], }), tailwindcss(), tanstackStart(), viteReact(), ], optimizeDeps: { // Exclude this server-side dependency to avoid bundling errors exclude: ['mongodb-client-encryption'], }, ssr: { // Ensure this module is externalized during server-side rendering external: ['mongodb-client-encryption'], }, }) export default config
配置后端
设置项目结构后,请按照本节中的步骤设立后端。
创建数据库连接
创建专用 TypeScript文件来初始化MongoDB客户端。
在项目根目录中运行以下命令以创建文件结构:
mkdir -p src/lib touch src/lib/db.ts
打开 src/lib/db.ts 并粘贴以下代码:
import { MongoClient } from "mongodb" // Connection string from the MongoDB atlas dashboard const uri = process.env.MONGODB_URI let connected = false let client: MongoClient export async function connectToDatabase() { if (!uri) { throw new Error("MONGODB_URI is not defined in environment variables") } if (!connected) { try { client = new MongoClient(uri) await client.connect() connected = true } catch (error) { throw new Error(`Failed to connect to database: ${error instanceof Error ? error.message : 'Unknown error'}`) } } return client.db("sample_restaurants") }
此文件包含连接到MongoDB 集群和 sample_restaurants数据库的connectToDatabase() 函数。sample_restaurants数据库包含纽约市的餐厅数据,包括餐厅名称、菜系类型、行政区和解决信息等字段。
创建服务器函数
TanStack Start 使用服务器功能在服务器上安全地运行代码。创建专用文件来处理数据库查询。
在项目根目录中运行以下命令以创建 restaurants.ts文件:
mkdir -p src/server touch src/server/restaurants.ts
打开 src/server/restaurants.ts 并粘贴以下代码:
import { createServerFn } from "@tanstack/react-start" import { connectToDatabase } from "../lib/db" export interface Restaurant { _id: string address: { building: string coord: [number, number] street: string zipcode: string } borough: string cuisine: string name: string restaurant_id: string } // Gets a list of all restaurants from the database export const getAllRestaurants = createServerFn({ method: 'GET'}) .handler(async () => { const db = await connectToDatabase() const restaurants = await db .collection<Restaurant>("restaurants") .find({}) .limit(100) .toArray() return restaurants.map((restaurant) => ({ ...restaurant, _id: restaurant._id.toString(), })) }) // Gets a list of restaurants in Queens with "Moon" in the name export const getRestaurantsByBorough = createServerFn({ method: 'GET'}) .handler(async () => { const db = await connectToDatabase() const restaurants = await db .collection<Restaurant>("restaurants") .find({ borough: 'Queens', name: {$regex: 'Moon', $options: 'i'} // case-insensitive match }) .limit(100) .toArray() // Convert ObjectId to string for client-side serialization return restaurants.map((restaurant) => ({ ...restaurant, _id: restaurant._id.toString(), })) })
此文件包含两个函数:getAllRestaurants() 和 getRestaurantsByBorough()。这两个函数查询MongoDB 集群并返回请求的数据。
配置前端
设置数据库和服务器层后,请按照本节中的步骤完成数据管理和表示层。
创建标头组件
导航到 src/components/Header.tsx 并将内容替换为以下代码:
import { Link } from "@tanstack/react-router" export function Header() { return( <> <nav className="bg-white px-6 py-2 shadow-md"> <div className="flex justify-between items-center gap-8"> <Link to ="/"> <img alt="MongoDB logo" className="h-10 inline" src="https://d3cy9zhslanhfa.cloudfront.net/media/3800C044-6298-4575-A05D5C6B7623EE37/4B45D0EC-3482-4759-82DA37D8EA07D229/webimage-8A27671A-8A53-45DC-89D7BF8537F15A0D.png" width="120" height="40" loading="eager" style={{ maxHeight: '2.5rem', width: 'auto' }} /> </Link> <Link to ="/browse" className="text-lime-800 text-lg font-semibold hover:text-green-700"> Browse </Link> </div> </nav> </> ) }
该组件在餐厅结果上方渲染标题,并包含浏览链接和徽标。这些允许您在路线之间导航。
创建餐厅列表组件
从项目根目录运行以下命令以创建 RestaurantList 组件:
touch src/components/RestaurantList.tsx
将以下代码粘贴到 src/components/RestaurantList.tsx 中:
import {Restaurant} from "../server/restaurants" type Props = { restaurants: Restaurant[] } export function RestaurantList({restaurants}: Props) { return ( <div className="overflow-hidden rounded-lg border border-gray-200 shadow-md"> <table className="w-full"> <thead className="bg-gray-50"> <tr> <th className="px-4 py-3 text-left text-sm font-bold text-gray-700">Name</th> <th className="px-4 py-3 text-left text-sm font-bold text-gray-700">Borough</th> <th className="px-4 py-3 text-left text-sm font-bold text-gray-700">Cuisine</th> </tr> </thead> <tbody className="divide-y divide-gray-200"> {restaurants.map((restaurant) => ( <tr key={restaurant._id}> <td className="px-4 py-3">{restaurant.name}</td> <td className="px-4 py-3">{restaurant.borough}</td> <td className="px-4 py-3">{restaurant.cuisine}</td> </tr> ))} </tbody> </table> </div> ) }
该组件处理餐厅的显示。查询数据作为属性处理,并且属性显示在表中。
配置应用程序程序路由
导航至 src/routes/__root.tsx。将 __root.tsx 的内容替换为以下代码:
import { HeadContent, Scripts, createRootRoute, Outlet } from '@tanstack/react-router' import { QueryClient, QueryClientProvider } from '@tanstack/react-query' import '../styles.css' import {Header} from '../components/Header' //Configure TanStack Query Client with cache and retry options const queryClient = new QueryClient({ defaultOptions: { queries: { staleTime: 60 * 1000, // Data stays fresh for one minute retry: 1, // Retry failed requests once retryDelay: 1000 // Wait one second before retrying }, }, }) export const Route = createRootRoute({ component: () => ( <html lang="en"> <head> <HeadContent /> </head> <body> <QueryClientProvider client={queryClient}> <Header /> <main> <Outlet /> </main> </QueryClientProvider> <Scripts /> </body> </html> ), // Handle 404 errors for non-existent routes notFoundComponent: () => { return ( <div className="p-6"> <h1 className="text-2xl font-bold">404 - Page Not Found</h1> <p>The page you're looking for doesn't exist.</p> </div> ) } })
该文件是整个应用程序的包装器。该代码使用 QueryClientProvider 确保 TanStack Query 管理数据状态。
配置主页
导航至 src/routes/index.tsx。将 index.tsx 的内容替换为以下代码:
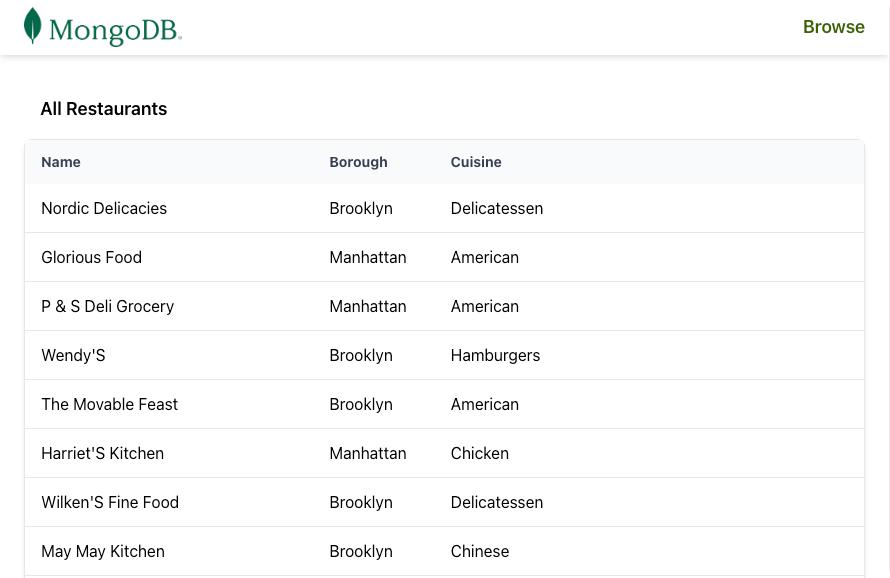
import { createFileRoute } from "@tanstack/react-router"; import {useSuspenseQuery} from '@tanstack/react-query' import { RestaurantList } from "../components/RestaurantList"; import { getAllRestaurants } from "../server/restaurants"; export const Route = createFileRoute('/')({ component: Home, pendingComponent: () => ( <div className="p-6 text-gray-500"> Loading restaurants... </div> ), errorComponent: ({error}) => ( <div className="p-6 text-red-600"> <h2 className="text-xl font-bold">Connection Error</h2> <p>{error.message}</p> <p className="text-sm mt-2">Please check your MongoDB connection string in your .env file</p> </div> ), }) function Home() { const{data: restaurants} = useSuspenseQuery({ queryKey:['restaurants'], queryFn: () => getAllRestaurants(), }) return ( <div className="w-full p-6"> <h2 className="text-lg font-semibold p-4">All Restaurants</h2> <RestaurantList restaurants={restaurants} /> </div> ) }
此路由使用 Header 和 RestaurantList 组件显示 getAllRestaurants() 的结果。
创建浏览页面
从项目根目录运行以下命令以创建 browse.tsx 路由。
touch src/routes/browse.tsx
将以下代码粘贴到 src/routes/browse.tsx 中:
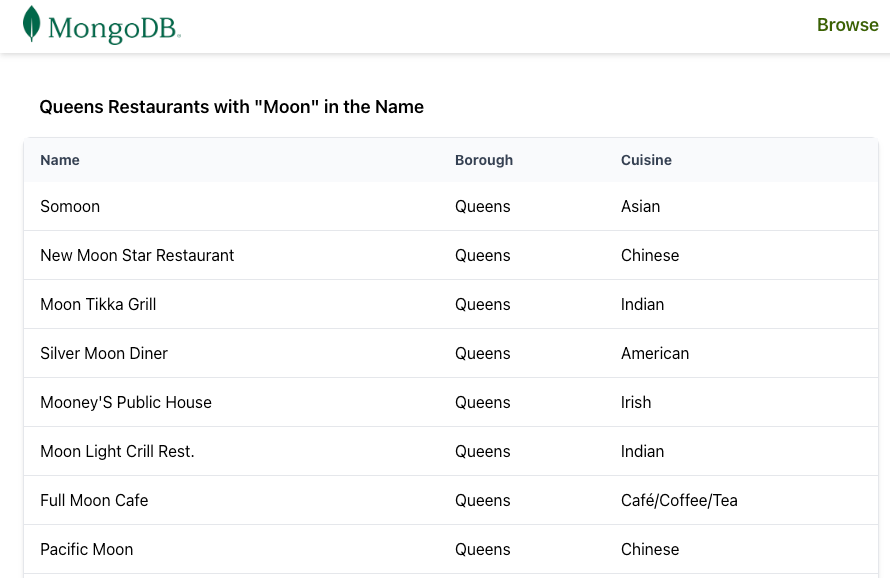
import { createFileRoute } from '@tanstack/react-router' import { useSuspenseQuery } from '@tanstack/react-query' import { RestaurantList } from '../components/RestaurantList' import { getRestaurantsByBorough } from '../server/restaurants' export const Route = createFileRoute('/browse')({ component: BrowsePage, // Display error UI if MongoDB connection or query fails errorComponent: ({ error }) => ( <div className="p-6 text-red-600"> <h2 className="text-xl font-bold">Connection Error</h2> <p>{error.message}</p> <p className="text-sm mt-2"> Please check your MongoDB connection string in your .env file </p> </div> ), }) function BrowsePage() { // Fetch filtered restaurants using TanStack Query // Query includes borough and search term in the key for proper caching const { data: restaurants } = useSuspenseQuery({ queryKey: ['restaurants', 'queens', 'moon'], // Unique cache key for this filtered query queryFn: () => getRestaurantsByBorough(), // Server function with MongoDB filter }) return ( <div className='w-full p-6'> <h2 className='text-lg font-semibold p-4'> Queens Restaurants with "Moon" in the Name </h2> <RestaurantList restaurants={restaurants} /> </div> ) }
此页面显示 sample_restaurants数据库的过滤器查询。它显示了皇后区名称中包含 Moon 的所有餐厅。它还使用 Header 和 RestaurantList 组件。
注意
在运行服务器之前,IDE 中的 createFileRoute 行可能会出现红色下划线警告。这很正常。当您首次使用 npm run dev运行应用程序时,TanStack Router 会为您的路由生成必要的 TypeScript 类型定义。服务器启动后,警告将消失。
验证文件结构
在继续之前,请确保您的文件树与以下结构密切匹配。您可以安全地忽略任何其他项目文件。
your-app/ ├─ node_modules/ ├─ public/ ├─ src/ │ ├─ components/ │ │ ├─ Header.tsx <-- Logo and browse link │ │ ├─ RestaurantList.tsx <-- Table that displays results of DB query │ ├─ routes/ │ │ ├─ __root.tsx <-- Application wrapper │ │ ├─ browse.tsx <-- Browse page, holds results of getRestaurantsByBorough() │ │ ├─ index.tsx <-- Home page, holds results of getAllRestaurants() │ ├─ server/ │ │ ├─ restaurants.ts <--- Server functions │ ├─ lib/ │ │ ├─ db.ts <--- Database connection ├─ .env <-- Connection URI
运行应用程序
按照其余步骤启动服务器并查看呈现的餐厅数据。
恭喜您完成快速入门教程!
完成这些步骤后,您将拥有一个 TanStack Start应用程序,它连接到您的MongoDB 部署,对示例餐厅数据运行查询,并通过实时反应性呈现结果。
其他资源
要学习有关 TanStack Start、TanStack 生态系统和 MongoDB 的更多信息,请查看以下资源:
TanStack 文档