Overview
本教程将指导您构建使用 Vue 并与MongoDB集成的 Nuxt应用程序。Nuxt 是一个 Vue框架,可通过其 Nitro服务器引擎提供基于文件的路由、服务器端渲染和内置API路由。Nuxt 与 Vue 相结合,可让您无需单独的后端服务器即可构建完整的应用程序。
本教程中的应用程序包含以下层:
数据库层:MongoDB提供数据存储和检索
服务器层:Nuxt服务器路由处理API逻辑和数据库交互
表示层:Vue 使用响应式数据绑定实现用户界面
为何将MongoDB与 Nuxt 和 Vue 结合使用?
Nuxt 基于 Vue 构建,为服务器路由提供带有 Node.js 运行时的全栈框架,非常适合MongoDB Node.js驱动程序。您可以直接从 Nuxt服务器路由或服务器端实用程序连接到MongoDB ,并将文档返回到 Vue 组件,而无需维护单独的后端服务或API层。
MongoDB 灵活的文档结构可轻松映射到JavaScript对象。因此,无论您使用的是 Options API还是 Composition API ,您都可以在 Vue 组件中无缝使用MongoDB数据。从MongoDB获取的文档可以直接传递到组件和模板中,从而减少了对复杂数据转换或额外对象关系映射 (ORM) 层的需求。
Nuxt 的服务器端渲染 (SSR) 和数据获取实用程序允许您在渲染页面之前查询服务器上的MongoDB 。这样,您就可以使用即用型数据来充实 Vue 组件,从而提高数据驱动型应用程序的感知性能和 SEO。
快速入门教程
本教程向您展示如何使用 Nuxt 和 Vue构建Web应用程序。该应用程序访问示例餐厅数据,查询数据,并在本地托管站点上显示结果。本教程还包括有关连接到MongoDB Atlas上托管的MongoDB 集群以及访问和显示数据库中的数据的说明。
提示
如果您希望使用 Node.js驱动程序而不使用 Nuxt 连接到MongoDB ,请参阅 Node.js驱动程序入门指南。
设置您的项目
按照本节中的步骤安装项目依赖项、创建Atlas集群并设立应用程序目录。
验证先决条件
要创建快速入门应用程序,请在开发环境中安装以下软件:
先决条件 | 注意 |
使用 20 或更高版本。 | |
代码编辑器 | 本教程使用Visual Studio Code,但你也可以使用自己选择的编辑器。 |
终端应用和shell | 对于 macOS 或Linux用户,请使用 终端 或类似应用。对于Windows用户,请使用 PowerShell。 |
创建 MongoDB Atlas 集群
MongoDB Atlas是一项完全托管云数据库服务,用于托管MongoDB部署。如果您没有MongoDB 部署,可以通过完成MongoDB入门教程免费创建MongoDB 集群(无需信用)。
提示
确保 sample_restaurants 数据集已加载到集群中。本教程查询该数据集中的数据。要学习;了解如何将 sample_restaurants 数据集加载到集群中,请参阅MongoDB入门教程。
要连接到MongoDB集群,您必须使用连接 URI。学习如何检索连接 URI,请参阅MongoDB入门教程的添加连接字符串部分。
提示
将MongoDB Atlas连接字符串保存在安全位置。您将在后续步骤中将其添加到 .env文件中。
安装 Nuxt 和 Vue
使用官方 Nuxt CLI使用 Vue 初始化新的 Nuxt项目。打开终端并导航到所需的项目目录。
运行初始化命令:
npm create nuxt@latest
配置提示
CLI会提示您配置项目。使用以下响应:
提示:需要安装以下软件包:create-nuxt@latest-number。确定要继续吗?
响应:键入
y并按 Enter 键。提示:您想使用哪个模板?
响应:选择
minimal - Minimal setup for Nuxt 4 (recommended)。提示:您想在哪里创建项目?
响应:按
Enter接受默认目录或键入其他路径。提示:您想使用哪个包管理器?
响应:选择
npm。提示:初始化 git存储库?
响应:根据您的偏好选择
Yes或No。提示:您想安装任何官方模块吗?
响应:选择
No。
配置后端
设置项目结构后,请按照本节中的步骤设立后端。
更新 Nuxt 配置
打开项目根目录中的 nuxt.config.ts文件,并将其内容替换为以下代码,以加载环境变量并配置 Tailwind CSS 模块:
// https://nuxt.com/docs/api/configuration/nuxt-config export default defineNuxtConfig({ compatibilityDate: '2025-07-15', devtools: { enabled: true }, future:{ compatibilityVersion: 4, }, runtimeConfig:{ // Server-side only config. Not exposed to the client mongoURI: process.env.MONGODB_URI, }, css:['@/assets/css/main.css'], modules: ['@nuxtjs/tailwindcss'], })
nuxt.config.ts文件从 .env文件加载环境变量,并配置 Tailwind支持以设置 Vue 组件的样式。
创建数据库连接
在项目根目录中运行以下命令,创建一个实用程序文件来保存MongoDB连接逻辑:
mkdir -p server/utils touch server/utils/mongodb.ts
打开 server/utils/mongodb.ts文件并添加以下代码:
import { MongoClient, type Db } from "mongodb"; let cachedClient: MongoClient | null = null; let cachedDb: Db | null = null; export async function connectToDatabase(){ if (cachedClient && cachedDb){ return { client: cachedClient, db: cachedDb }; } const config = useRuntimeConfig(); const uri = config.mongoURI; if (!uri){ throw new Error("Please define the MONGO_URI environment variable inside .env"); } const client = new MongoClient(uri); await client.connect(); const db = client.db("sample_restaurants"); cachedClient = client; cachedDb = db; console.log("Connected to MongoDB Atlas"); return { client, db }; }
此代码创建一个可重用的MongoDB客户端,该客户端使用存储在环境变量中的连接 URI 连接到Atlas 集群。客户端连接到 sample_restaurants数据库,其中包含有关纽约市各地餐馆的信息。
创建餐厅路线
Nuxt服务器路由处理API请求并与数据库交互。在项目根目录中运行以下命令,创建用于获取餐厅数据的服务器路由:
mkdir -p server/api/restaurants touch server/api/restaurants/index.get.ts
打开 server/api/restaurants/index.get.ts文件并添加以下代码:
import { connectToDatabase } from "~~/server/utils/mongodb"; export default defineEventHandler(async () =>{ const { db } = await connectToDatabase(); const collection = db.collection("restaurants"); const restaurants = await collection .find({}) .limit(50) .project({ name: 1, borough: 1, cuisine: 1, grades: 1}) .toArray(); return restaurants.map((doc) => ({ ...doc, _id: doc._id.toString(), })) })
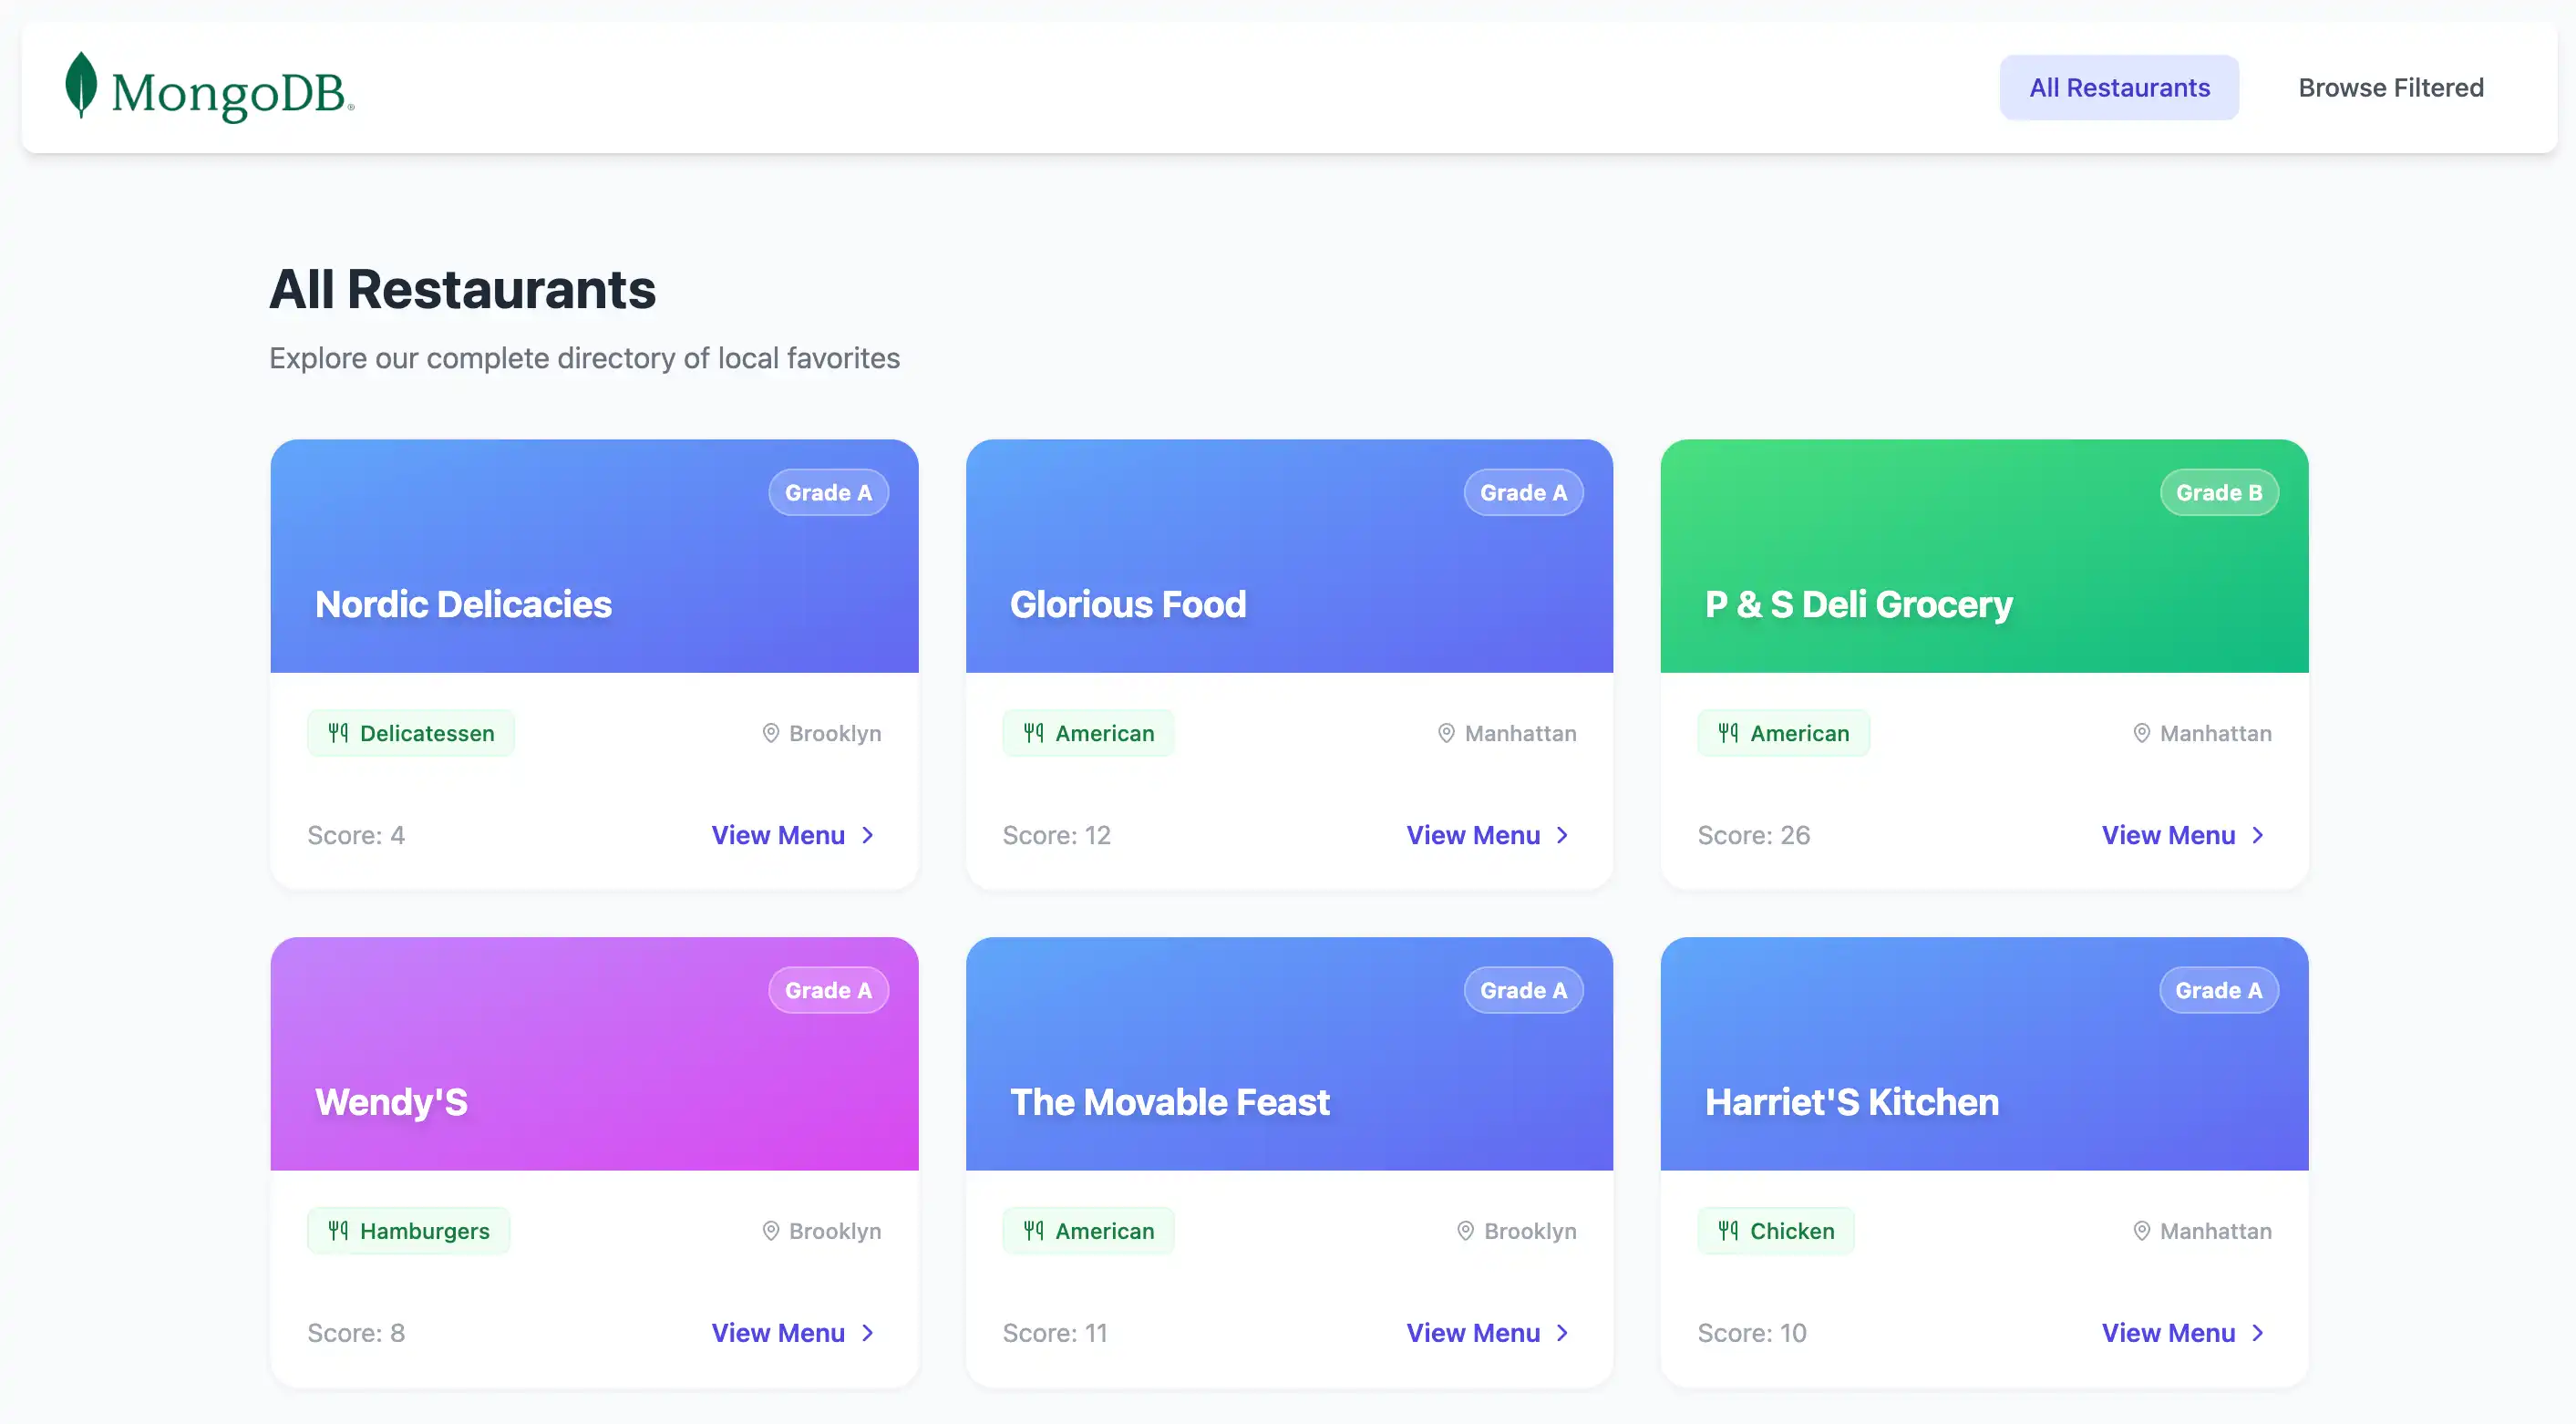
此文件定义查询 restaurants集合的服务器路由。它检索前 50 个餐厅文档,并将其作为JSON响应返回。
创建筛选的餐厅路线
在项目根目录中运行以下命令以创建新的路由文件:
touch server/api/restaurants/browse.get.ts
打开 server/api/restaurants/browse.get.ts文件并添加以下代码:
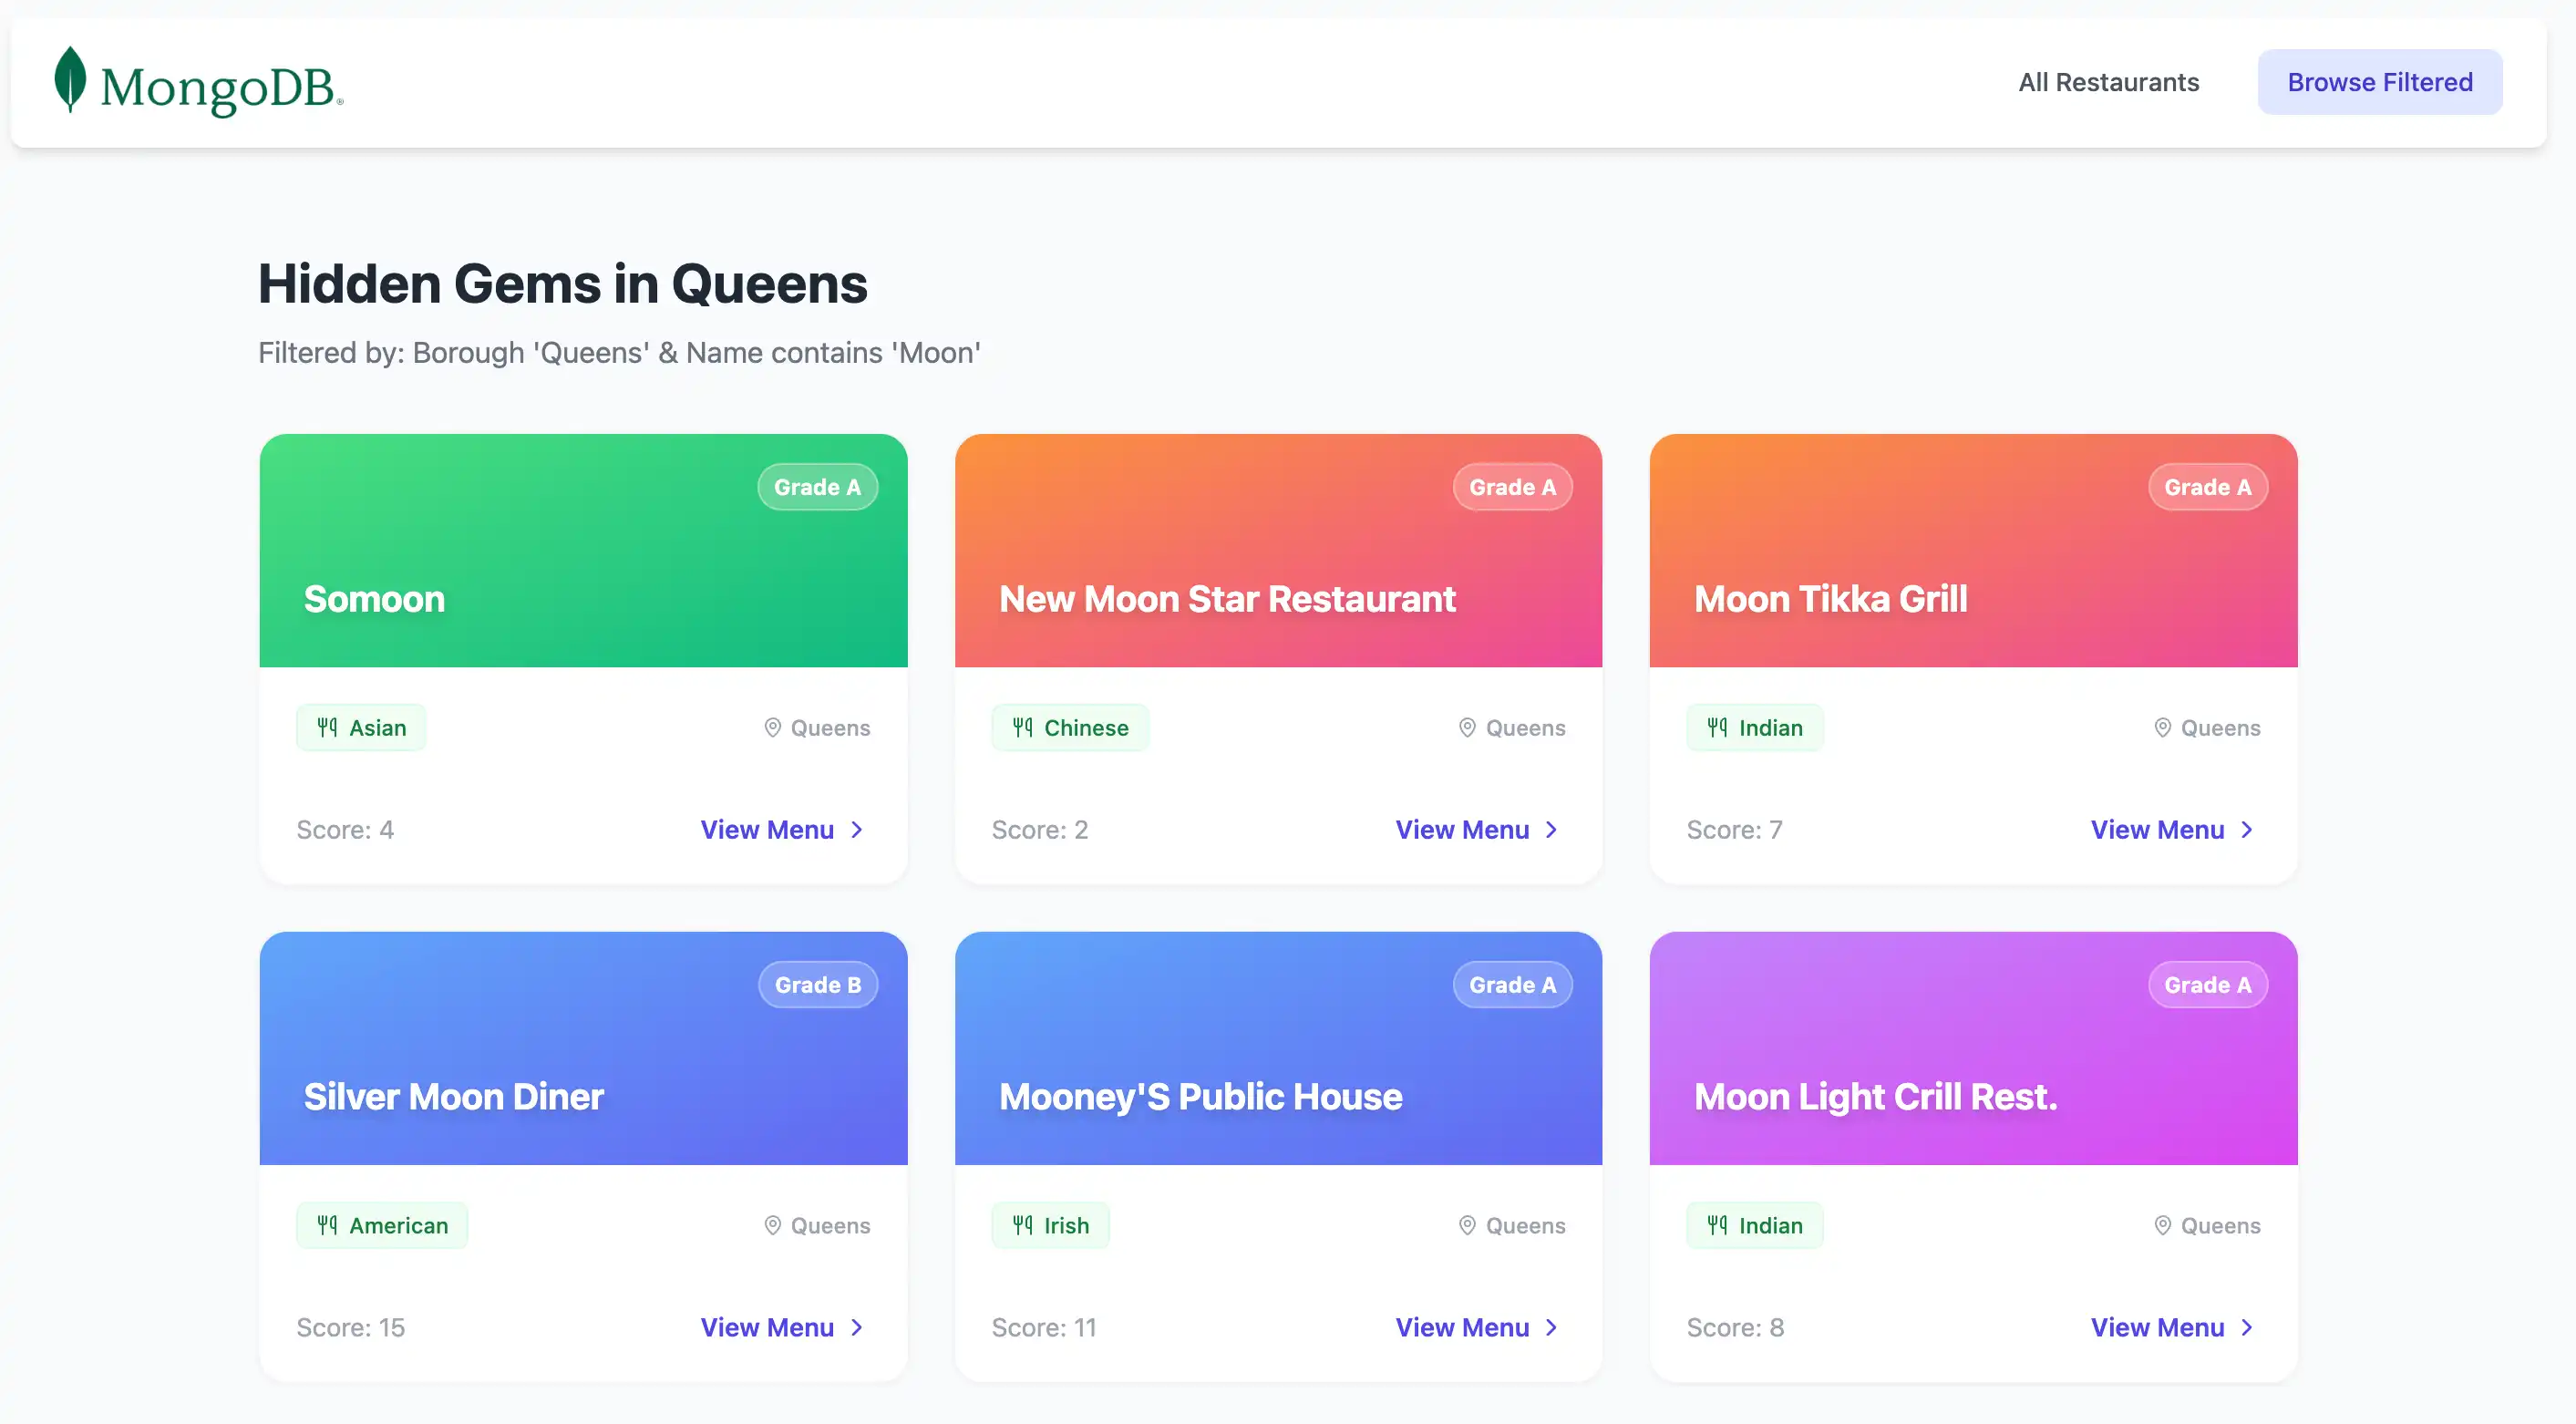
import { connectToDatabase } from '~~/server/utils/mongodb' export default defineEventHandler(async () => { const { db } = await connectToDatabase(); const collection = db.collection("restaurants"); // Filter: Queens borough + name contains "Moon" (case-insensitive) const query = { borough: 'Queens', name: { $regex: 'Moon', $options: 'i' }, } const restaurants = await collection .find(query) .project({ name: 1, borough: 1, cuisine: 1, grades: 1 }) .toArray() return restaurants.map((doc) => ({ ...doc, _id: doc._id.toString(), })) })
此文件定义一条服务器路由,用于查询 sample_restaurants数据库中位于 Queens 且其名称中包含单词 Moon 的餐厅,并以JSON响应的形式返回匹配文档。
配置前端
设置后端后,请按照本节中的步骤为应用程序设立表示层。
创建餐厅列表组件
在项目根目录中运行以下命令,创建用于显示餐厅数据的 Vue 组件:
mkdir -p app/components touch app/components/RestaurantList.vue
打开 app/components/RestaurantList.vue文件并添加以下代码:
<script setup lang="ts"> import { computed } from 'vue' import { MapPin, Utensils, ChevronRight } from 'lucide-vue-next' // Type definitions interface Grade { grade?: string score?: number } interface Restaurant { _id: string name: string borough?: string cuisine?: string grades?: Grade[] } // Determine endpoint based on current route const route = useRoute() const isBrowse = computed(() => route.path === '/browse') const endpoint = computed(() => isBrowse.value ? '/api/restaurants/browse' : '/api/restaurants' ) // Fetch data using Nuxt's useFetch composable // Automatically refetches when endpoint changes const { data: restaurants } = await useFetch<Restaurant[]>(endpoint, { watch: [endpoint], default: () => [], }) // Dynamic page content const pageTitle = computed(() => isBrowse.value ? 'Hidden Gems in Queens' : 'All Restaurants' ) const pageSubtitle = computed(() => isBrowse.value ? "Filtered by: Borough 'Queens' & Name contains 'Moon'" : 'Explore our complete directory of local favorites' ) // Deterministic gradient based on name length const getGradient = (name: string) => { const gradients = [ 'from-orange-400 to-pink-500', 'from-blue-400 to-indigo-500', 'from-green-400 to-emerald-500', 'from-purple-400 to-fuchsia-500', ] return gradients[name.length % gradients.length] } </script> <template> <div class="max-w-6xl mx-auto px-4 py-8"> <!-- Header --> <div class="mb-8"> <h3 class="text-3xl font-bold text-gray-800"> {{ pageTitle }} </h3> <p class="text-gray-500 mt-2"> {{ pageSubtitle }} </p> </div> <!-- Restaurant Grid --> <div class="grid grid-cols-1 md:grid-cols-2 lg:grid-cols-3 gap-6"> <div v-for="restaurant in restaurants" :key="restaurant._id" class="group bg-white rounded-2xl border border-gray-100 shadow-sm hover:shadow-xl hover:-translate-y-1 transition-all duration-300 overflow-hidden flex flex-col" > <!-- Gradient Header --> <div :class="[ 'h-32 bg-gradient-to-br p-6 flex items-end relative', getGradient(restaurant.name) ]" > <span class="absolute top-4 right-4 bg-white/20 backdrop-blur-md text-white text-xs font-bold px-2 py-1 rounded-full border border-white/30"> Grade {{ restaurant.grades?.[0]?.grade ?? 'N/A' }} </span> <h3 class="text-white text-xl font-bold drop-shadow-md line-clamp-2"> {{ restaurant.name }} </h3> </div> <!-- Card Body --> <div class="p-5 flex-1 flex flex-col"> <div class="flex items-center justify-between mb-4"> <span class="inline-flex items-center gap-1.5 px-2.5 py-1 rounded-md text-xs font-medium bg-green-50 text-green-700 border border-green-100"> <Utensils class="w-3 h-3" /> {{ restaurant.cuisine ?? 'Unknown' }} </span> <div class="flex items-center text-gray-400 text-xs font-medium"> <MapPin class="w-3 h-3 mr-1" /> {{ restaurant.borough ?? 'Unknown' }} </div> </div> <div class="mt-auto pt-4 border-t border-gray-50 flex items-center justify-between text-sm"> <span class="text-gray-400"> Score: {{ restaurant.grades?.[0]?.score ?? 0 }} </span> <button class="text-indigo-600 font-semibold group-hover:underline flex items-center gap-1"> View Menu <ChevronRight class="w-4 h-4" /> </button> </div> </div> </div> </div> <!-- Empty State --> <div v-if="restaurants?.length === 0" class="text-center py-12 text-gray-500"> <p>No restaurants found.</p> <p class="text-sm mt-2">Check your MongoDB connection and ensure the sample_restaurants database is loaded.</p> </div> </div> </template>
此 Vue 组件从 Nuxt服务器路由获取餐厅数据,并将其显示在响应式网格布局中。它会根据当前路线动态调整API终结点和页面内容,显示所有餐厅或筛选后的结果。
创建导航栏组件
在项目根目录中运行以下命令,为导航栏创建 Vue 组件:
touch app/components/Navbar.vue
打开 app/components/Navbar.vue文件并添加以下代码:
<template> <nav class="flex justify-between items-center mb-6 bg-white shadow-md px-6 py-4 rounded-lg"> <NuxtLink to="/"> <img alt="MongoDB logo" class="h-10" src="https://d3cy9zhslanhfa.cloudfront.net/media/3800C044-6298-4575-A05D5C6B7623EE37/4B45D0EC-3482-4759-82DA37D8EA07D229/webimage-8A27671A-8A53-45DC-89D7BF8537F15A0D.png" /> </NuxtLink> <div class="flex gap-4"> <NuxtLink to="/" class="px-4 py-2 rounded-lg text-sm font-medium transition-colors" :class="$route.path === '/' ? 'bg-indigo-100 text-indigo-700' : 'text-gray-600 hover:bg-gray-100'" > All Restaurants </NuxtLink> <NuxtLink to="/browse" class="px-4 py-2 rounded-lg text-sm font-medium transition-colors" :class="$route.path === '/browse' ? 'bg-indigo-100 text-indigo-700' : 'text-gray-600 hover:bg-gray-100'" > Browse Filtered </NuxtLink> </div> </nav> </template>
此 Vue 组件在餐厅结果上方呈现导航栏,并包含 All Restaurants 和 Filtered Restaurants 链接。这些允许您在路线之间导航。
验证文件结构
在继续之前,请确保您的文件树与以下结构密切匹配。您可以安全地忽略任何其他项目文件。
your-project-directory/ ├── .env <-- Environment variable file ├── app/ │ ├── app.vue <-- Main application component │ ├── assets/ │ │ └── css/ │ │ └── main.css <-- Tailwind config │ ├── components/ │ │ ├── Navbar.vue <-- All restaurants and filtered restaurants links │ │ └── RestaurantList.vue <-- Container for restaurant data │ └── pages/ │ ├── browse.vue <-- Filtered restaurants page │ └── index.vue <-- All restaurants page ├── server/ │ ├── api/ │ │ └── restaurants/ │ │ ├── browse.get.ts <-- Filtered restaurants route │ │ └── index.get.ts <-- All restaurants route │ └── utils/ │ └── mongodb.ts <-- MongoDB connection utility ├── nuxt.config.ts <-- Nuxt configuration file └── package.json
运行应用程序
执行以下步骤,启动服务器并查看渲染的餐厅数据。
启动服务器
在项目根目录中运行以下命令以启动开发服务器:
npm run dev
如果成功,该命令将在终端输出以下信息:
Nuxt 4.2.2 (with Nitro 2.13.1, Vite 7.3.1 and Vue 3.5.27) Local: http://localhost:3000/ Network: use --host to expose Using default Tailwind CSS file DevTools: press Shift + Option + D in the browser (v3.1.1) Vite client built in 22ms Vite server built in 19ms Nuxt Nitro server built in 247ms Vite server warmed up in 0ms Vite client warmed up in 1ms Connected to MongoDB Atlas

恭喜您完成快速入门教程!
完成这些步骤后,您就拥有了一个 Nuxt 和 Vue应用程序,它可以连接到MongoDB 部署、对示例餐厅数据运行查询,并在浏览器中渲染结果。
其他资源
要学习;了解有关使用MongoDB、 Nuxt 和 Vue 的更多信息,请查看以下资源: