Overview
在本指南中,您可以学习;了解如何创建与MongoDB集成的 Next.js Web应用程序。 Next.js 是一个React框架,可在单个应用程序中提供服务器端渲染、静态站点生成和API路由。本教程中的应用程序由以下各层组成:
数据库层:MongoDB提供数据存储和检索。
API层:Next.js API路由处理服务器端逻辑和数据库操作。
表示层: React组件实现用户界面和前端交互。
为何在 Next.js 应用程序中使用MongoDB ?
Next.js 是一个全栈React框架,使您能够在单个代码库中构建应用程序的前端和后端。通过将MongoDB与 Next.js 集成,您可以享受以下优势:
统一开发:用JavaScript /TypeScript 编写客户端和服务器代码
服务器端呈现:在服务器端呈现期间从MongoDB获取数据,以改进 SEO 和性能
API路由:创建直接连接到MongoDB的无服务器API端点
灵活的数据模型:MongoDB 的文档模型与JavaScript对象和React组件状态自然保持一致
Next.js with MongoDB非常适合需要动态内容、用户身份验证、实时更新和复杂数据关系的应用程序。
快速入门教程
本教程向您展示如何使用 Next.js 和MongoDB构建Web应用程序。该应用程序访问示例餐厅数据,查询数据,并在本地托管站点上显示结果。本教程还包括有关连接到MongoDB Atlas上托管的MongoDB 集群以及访问和显示数据库数据的说明。
提示
如果您更愿意使用 Node.js驾驶员而不是 Next.js 连接到MongoDB ,请参阅 Node.js驱动程序程序入门指南。
设置您的项目
按照本节中的步骤安装项目依赖项、创建Atlas集群并设立应用程序目录。
验证先决条件
要创建应用程序,您需要在开发环境中安装以下内容:
先决条件 | 注意 |
|---|---|
下载最新 LTS或最新版本。 | |
代码编辑器 | 本教程使用Visual Studio Code,但你也可以使用自己选择的编辑器。 |
终端应用或Shell | 对于 MacOS 用户,请使用终端或类似应用程序。对于 Windows 用户,请使用 PowerShell。 |
创建 MongoDB Atlas 集群
MongoDB Atlas是一项托管云数据库服务,用于托管您的MongoDB部署。如果您没有MongoDB 部署,可以通过完成MongoDB入门教程免费创建MongoDB 集群(无需信用)。MongoDB入门教程还演示了如何将示例数据集加载到集群中,包括本教程中使用的 sample_restaurants数据库。
要连接到MongoDB集群,您必须使用连接 URI。学习如何检索连接 URI,请参阅MongoDB入门教程的添加连接字符串部分。
重要
将连接string保存在安全位置。
配置数据库连接
设立项目结构和依赖项后,请按照本节中的步骤配置数据库连接。
设置环境变量
在 next-quickstart目录中,创建一个 .env.local文件来存储MongoDB连接 URI:
MONGODB_URI=<connection URI>
将 <connection URI> 占位符替换为您在上一个步骤。中保存的连接 URI。
注意
Next.js 会自动从 .env.local 文件加载环境变量。以 NEXT_PUBLIC_ 为前缀的变量会向浏览器公开,而其他变量仅在服务器上可用。
创建数据库连接实用程序
在根目录中,创建一个名为 lib 的新目录。将名为 mongodb.ts 的新文件添加到此目录并粘贴以下代码:
import { MongoClient } from "mongodb"; declare global { var _mongoClientPromise: Promise<MongoClient> | undefined; } const uri = process.env.MONGODB_URI; const options = {}; let client: MongoClient; let clientPromise: Promise<MongoClient>; if (!uri) { throw new Error("Please add your Mongo URI to .env.local"); } client = new MongoClient(uri, options); clientPromise = client.connect(); // Export a module-scoped MongoClient promise. By doing this in a // separate module, the client can be shared across functions. export default clientPromise;
此文件创建在应用程序中共享的可重用MongoDB客户端连接。该连接会被缓存,以防止在开发过程中 Next.js 热重载代码时创建多个连接。
创建API路由
设立数据库连接后,请按照本节中的步骤创建用于查询MongoDB并返回餐厅数据的API路由。
创建餐厅API路由
在 app目录中,创建新的 api/restaurants目录。将名为 route.ts 的新文件添加到此目录并粘贴以下代码:
import { NextResponse } from "next/server"; import clientPromise from "@/lib/mongodb"; export async function GET() { try { const client = await clientPromise; const db = client.db("sample_restaurants"); const restaurants = await db .collection("restaurants") .find({}) .toArray(); return NextResponse.json(restaurants); } catch { return NextResponse.json( { error: "Failed to fetch restaurants" }, { status: 500 } ); } }
此文件在 /api/restaurants 处定义了一个 GET 端点,用于从 sample_restaurants数据库中检索所有餐厅。
创建浏览API路由
在 app/api目录中,创建一个名为 browse 的新目录。在此目录中创建名为 route.ts 的新文件并粘贴以下代码:
import { NextResponse } from "next/server"; import clientPromise from "@/lib/mongodb"; export async function GET() { try { const client = await clientPromise; const db = client.db("sample_restaurants"); const query = { borough: "Queens", name: { $regex: "Moon", $options: "i" }, }; const restaurants = await db .collection("restaurants") .find(query) .toArray(); return NextResponse.json(restaurants); } catch { return NextResponse.json( { error: "Failed to fetch restaurants" }, { status: 500 } ); } }
此文件在 /api/browse 定义了一个 GET 端点,用于检索与特定查询条件匹配的餐厅。此查询筛选出位于皇后区且名称中包含 "Moon" 一词的餐厅。
配置前端
设立API路由后,请按照本节中的步骤创建显示餐厅数据的React组件。
创建导航栏组件
在根目录中,创建一个名为 components 的新目录。将名为 Navbar.tsx 的新文件添加到此目录并粘贴以下代码:
import Link from "next/link"; export default function Navbar() { return ( <nav className="bg-gray-800 p-4"> <div className="container mx-auto flex justify-between items-center"> <Link href="/" className="text-white text-xl font-bold"> MongoDB Restaurants </Link> <div className="space-x-4"> <Link href="/" className="text-gray-300 hover:text-white transition-colors" > All Restaurants </Link> <Link href="/browse" className="text-gray-300 hover:text-white transition-colors" > Filtered Restaurants </Link> </div> </div> </nav> ); }
此组件创建一个导航栏,其中包含用于查看所有餐厅和筛选餐厅的链接。
创建 RestaurantList 组件
在 components目录中,创建名为 RestaurantList.tsx 的新文件并粘贴以下代码:
"use client"; /* The above directive tells Next.js to render this component on the client side instead of the server side. Client components can use React hooks like useState and useEffect, while server components cannot. */ import { useEffect, useState } from "react"; import { ObjectId } from "mongodb"; interface Restaurant { _id: ObjectId; name: string; borough: string; cuisine: string; } interface RestaurantProps { restaurant: Restaurant; } const Restaurant = (props: RestaurantProps) => ( <tr className="border-b transition-colors hover:bg-muted/50 data-[state=selected]:bg-muted"> <td className="p-4 align-middle [&:has([role=checkbox])]:pr-0"> {props.restaurant.name} </td> <td className="p-4 align-middle [&:has([role=checkbox])]:pr-0"> {props.restaurant.borough} </td> <td className="p-4 align-middle [&:has([role=checkbox])]:pr-0"> {props.restaurant.cuisine} </td> </tr> ); interface RestaurantListProps { endpoint: string; title: string; } export default function RestaurantList({ endpoint, title }: RestaurantListProps) { const [restaurants, setRestaurants] = useState<Restaurant[]>([]); const [loading, setLoading] = useState(true); useEffect(() => { async function getRestaurants() { try { const response = await fetch(endpoint); if (!response.ok) { const message = `An error occurred: ${response.statusText}`; console.error(message); return; } const restaurants = await response.json(); setRestaurants(restaurants); } catch (error) { console.error("Error fetching restaurants:", error); } finally { setLoading(false); } } getRestaurants(); }, [endpoint]); function restaurantList() { return restaurants.map((restaurant) => { return <Restaurant restaurant={restaurant} key={restaurant._id.toString()} />; }); } if (loading) { return <div className="p-4">Loading...</div>; } return ( <> <h3 className="text-lg font-semibold p-4">{title}</h3> <div className="border rounded-lg overflow-hidden"> <div className="relative w-full overflow-auto"> <table className="w-full caption-bottom text-sm"> <thead className="[&_tr]:border-b"> <tr className="border-b transition-colors hover:bg-muted/50 data-[state=selected]:bg-muted"> <th className="h-12 px-4 text-left align-middle font-medium text-muted-foreground [&:has([role=checkbox])]:pr-0"> Name </th> <th className="h-12 px-4 text-left align-middle font-medium text-muted-foreground [&:has([role=checkbox])]:pr-0"> Borough </th> <th className="h-12 px-4 text-left align-middle font-medium text-muted-foreground [&:has([role=checkbox])]:pr-0"> Cuisine </th> </tr> </thead> <tbody className="[&_tr:last-child]:border-0"> {restaurantList()} </tbody> </table> </div> </div> </> ); }
该组件从API路由中获取并显示餐厅数据。它使用React钩子来管理状态并在组件安装时获取数据。
更新主页
导航到 app/page.tsx文件并将内容替换为以下代码:
import RestaurantList from "@/components/RestaurantList"; export default function Home() { return ( <main className="container mx-auto p-4"> <RestaurantList endpoint="/api/restaurants" title="All Restaurants" /> </main> ); }
此文件呈现主页,其中显示数据库中的所有餐厅。
创建浏览页面
在 app目录中,创建一个名为 browse 的新目录。将名为 page.tsx 的新文件添加到此目录并粘贴以下代码:
import RestaurantList from "@/components/RestaurantList"; export default function Browse() { return ( <main className="container mx-auto p-4"> <RestaurantList endpoint="/api/browse" title='Filtered Restaurants (Queens, containing "Moon")' /> </main> ); }
此文件呈现浏览页面,该页面显示根据查询条件筛选的餐厅。
更新布局
导航到 app/layout.tsx文件并将内容替换为以下代码:
import "./globals.css"; import Navbar from "@/components/Navbar"; import { Metadata } from "next"; export const metadata: Metadata = { title: "MongoDB Next.js App", description: "A Next.js application with MongoDB integration", }; export default function RootLayout({ children }: { children: React.ReactNode }) { return ( <html lang="en"> <body> <Navbar /> {children} </body> </html> ); }
此文件定义应用程序的根布局,其中包括导航栏并环绕所有页面。
运行应用程序
最后,按照本节中的步骤运行应用程序并查看呈现的餐厅数据。
打开应用程序站点
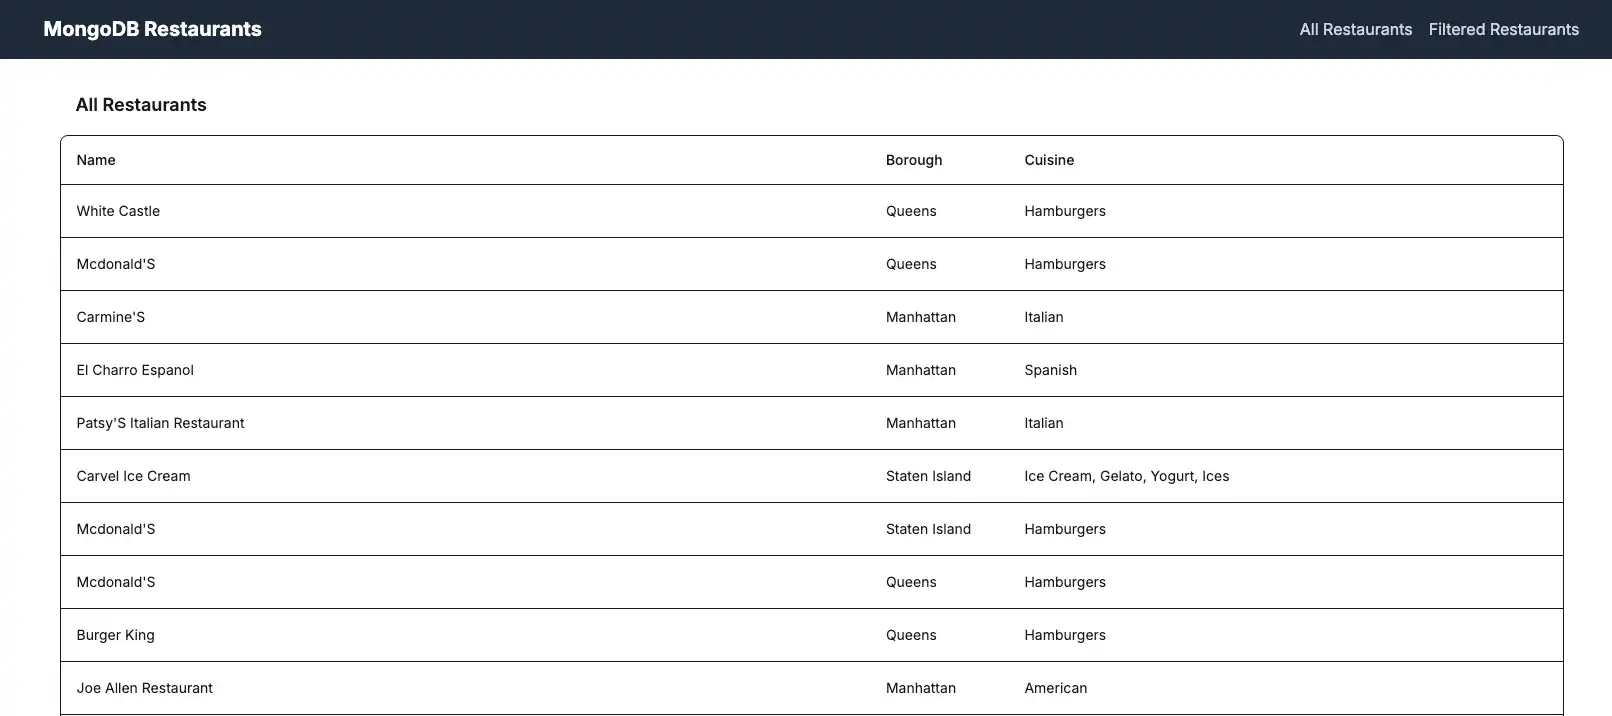
打开 http://localhost:3000 / URL。初始登陆页面显示sample_restaurants.restaurants 集合中所有餐厅的列表:

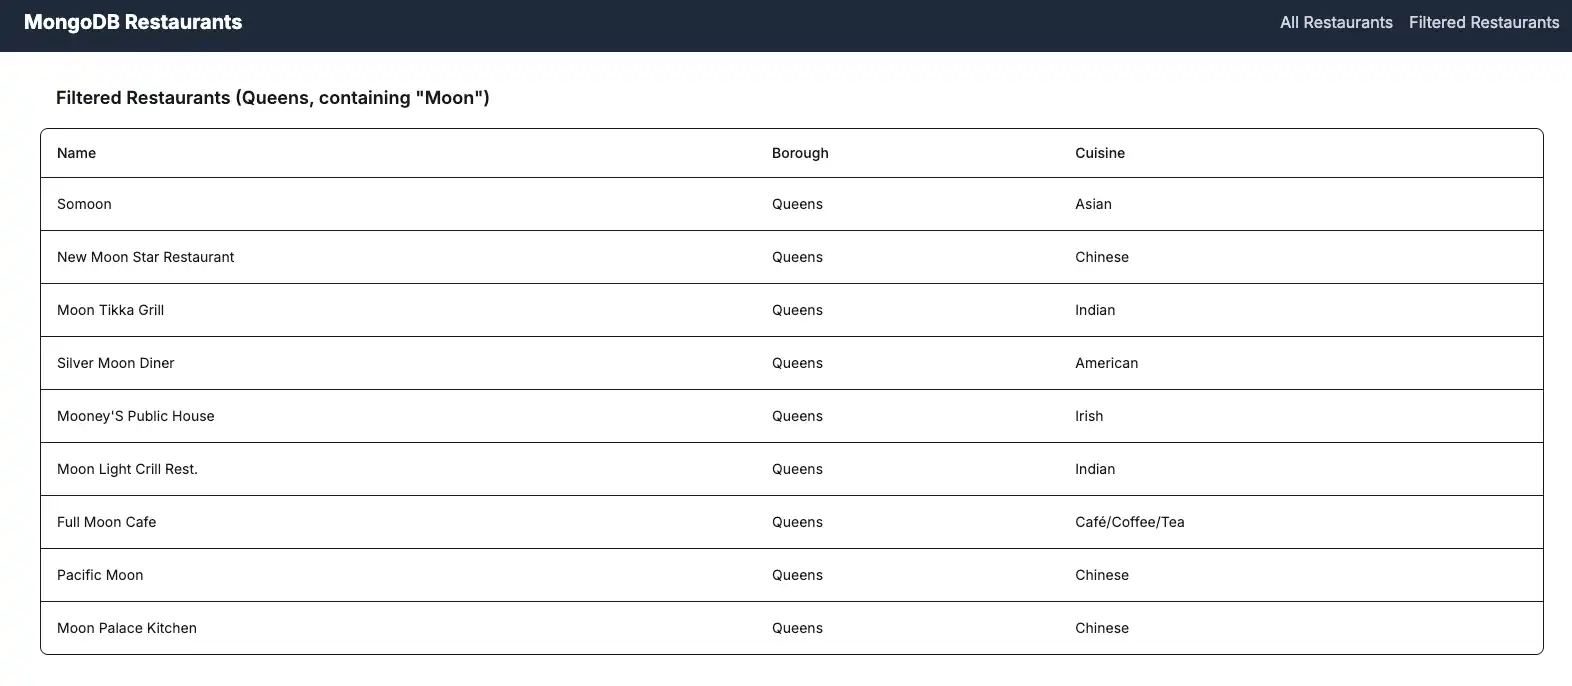
单击导航栏中的 Filtered Restaurants 链接,查看与 name 和 borough字段查询匹配的餐厅:

恭喜您完成快速入门教程!
完成这些步骤后,您将拥有一个 Next.js Web应用程序,它可连接到MongoDB 部署、对示例餐厅数据运行查询,并在本地托管网站上呈现结果。
其他资源
要学习;了解有关 Next.js 和MongoDB 的更多信息,请查看以下资源: