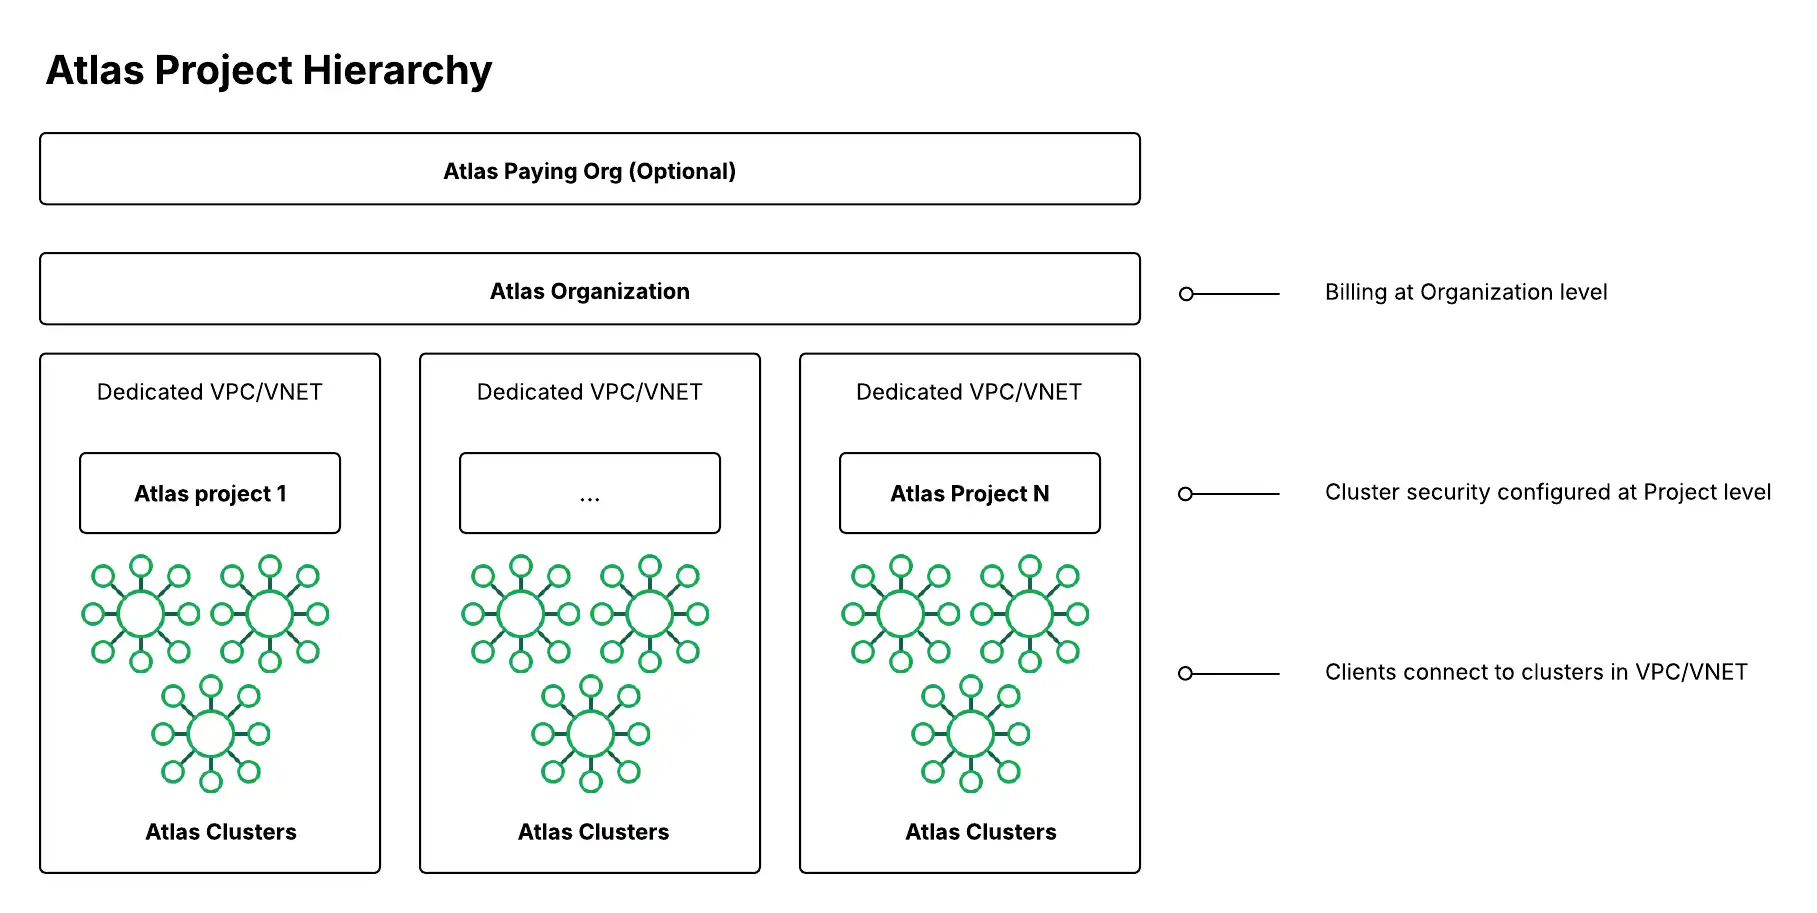
组织、项目和集群是 Atlas 企业版的基础构建基块:
在组织级别,您可以实现安全控制并创建跨一个或多个项目的用户。
项目提供更细粒度的安全隔离性和授权边界。
集群是Atlas中的云数据库。
使用此页面上的基础指导,根据贵公司的层次结构以及预期的集群和项目数量来设计组织、项目和集群的布局。本指导帮助您从一开始就优化安全性和性能,同时满足企业的计费和访问需求。
Atlas 组织、项目和集群的功能
您可以使用以下层次结构级别来定义Atlas企业资产的安全设置和管理:
Atlas 层次结构级别 | 说明 |
|---|---|
(可选)付款组织 | |
一个组织可以包含多个项目,并提供一个容器,以便在这些项目及其集群中应用共享的集成和安全设置。如果您管理多个 Atlas 组织,Atlas 联合管理控制台允许具有组织所有者角色的用户管理用于 SSO 的 IdP ,然后将它们链接到多个组织。一个组织通常映射到公司内的一个业务单元或部门。内置的 Atlas Cost Explorer 在组织级别汇总云支出,并在项目级别和集群级别细分行项目。您可以通过利用计费 API 进一步自定义。 | |
数据平面的安全配置(包括数据库集群、网络安全和其他数据服务)在项目级别进行。项目通常映射到应用程序和环境(例如:客户门户应用程序到生产环境)。对于每个项目,根据所选的云提供商,在 AWS 和 Azure 的每个区域都有一个专用的 VPC 或 VNet。 | |

Atlas 组织、项目和集群建议
多区域和多云部署建议
对于多区域和多云部署,请考虑以下附加建议,以优化跨地理边界的性能、安全性和合规性:
网络架构与延迟
在最接近您的应用程序用户的区域部署集群,以最大限度地减少延迟。
在每个项目中为每个区域使用专用 VPC/VNet 以保持网络隔离性。
在您部署集群的每个区域中配置私有端点,以确保安全、低延迟的连接。
数据驻留与合规
为不同的监管司法管辖区创建单独的项目(如符合 GDPR 的欧盟项目、符合 SOX 的美国项目),以确保满足数据驻留要求。
使用 Atlas 全球集群结合区域分片,根据分片键值自动将读取和写入路由到适当的地理区域。
使用数据分类和区域合规要求对项目和集群进行标签处理,以便用于审核和治理。
跨区域灾难恢复
在多个区域部署具有只读副本的集群,以启用故障转移功能。
在同一应用程序环境的所有区域中保持一致的备份计划。
定期在各个区域测试灾难恢复程序,以确保业务连续性。
多云环境注意事项
在各云提供商间使用一致的命名约定,以简化管理和监控。
在同一项目中标准化所有云环境的安全配置。
在规划跨云数据复制和网络连接时,请考虑特定云提供商的功能和限制。
所有部署范式建议
以下建议适用于所有部署范式。
开发、测试、暂存和生产环境
我们建议您使用以下四种环境,将沙盒和测试项目及集群与应用程序项目及集群隔离:
environment | 说明 |
|---|---|
开发 (Dev) | 允许开发者在安全的沙盒环境中自由尝试新事物。 |
测试(测试) | 测试在开发环境中创建的特定组件或功能。 |
暂存 | 将所有组件和功能放在一起,以确保整个应用程序在部署到生产环境之前按预期运行。暂存环境与测试环境类似,但确保新组件与现有组件良好配合。 |
生产 (Prod) | 您的应用程序的后端对您的最终用户是实时可用的。 |
本地Atlas部署
出于开发和测试目的,开发者可以使用 Atlas CLI 创建本地 Atlas 部署。通过在其计算机上本地工作,开发者可以减少外部开发和测试环境的成本。
开发者还可以通过Docker运行Atlas CLI命令,从而使用容器来构建、运行和管理本地Atlas部署。容器是标准化单元,包含运行应用程序所需的所有软件。容器化允许开发者在安全、可靠和可移植的测试环境中构建本地Atlas部署。要学习;了解更多信息,请参阅使用Docker创建本地Atlas部署。
组织和项目的层次结构
一般来说,我们建议设立一个集中管理的付款组织,并为每个业务单元或部门设立一个与付款组织关联的组织。然后,为下层(开发或测试)和上层环境各创建一个包含一个集群的项目;您可以在这些项目中创建集群。要了解更多信息,请参阅以下有关推荐的层次结构的信息。
如果您很容易达到每个组织的 250 个项目限制,我们建议为每个环境创建一个组织,例如为下层环境和上层环境各创建一个组织,或者为开发、测试、暂存和生产各一个。此设置的优点是具有额外的隔离性。您还可以提高限制。要学习;了解更多信息,请参阅Atlas服务限制。
网络和安全配置(例如允许的 IP 和 API 密钥)在项目级别是共享的,因此,如果需要为处理不同应用程序的团队提供细粒度的访问控制,我们建议您为每个应用程序创建单独的项目。
推荐的层次结构
如果您在整个BU中拥有通用团队和权限,并且低于每个组织250个项目的可募集限制,请考虑以下层次结构,它会创建较少的Atlas组织。

推荐的层次结构 2:去中心化业务单元/部门
如果贵组织高度分散,且没有中央职能部门作为合同和账单的统一管理者,请考虑采用以下层次结构。在此层次结构中,每个业务单元、部门或团队都有自己的 Atlas 组织。如果每个团队都相对独立,不在公司内部共享人员或权限,或者他们希望通过云提供商市场或直接使用自己的合同购买信用额度,那么这种层次结构将非常实用。此层次结构中没有付款组织。

Cluster Hierarchy
为了保持环境之间的隔离性,我们建议您将每个集群部署在其各自的项目中,如下图所示。这样,管理员就可以在不同环境之间维护不同的项目配置,并遵循最小权限原则,该原则指出用户应仅被授予其角色所需的最低访问权限。
特别是在生产环境中,我们建议您为每个应用程序和环境组合创建单独的项目。由于这些配置在项目级别进行管理,如果给定应用程序的这些需求发生变化,这种方法可以减少您在生产环境集群之间手动传输数据的必要性。
您可以在集群创建时使用自动化工具(如 Terraform)跨集群共享项目级配置,例如私有端点和 CMK。此外,自动创建集群可以通过标准化分别为生产环境和开发环境创建并行的高级环境和低级环境来节省费用。
如需了解更多信息,请参阅何时考虑为每个项目使用多个集群。

何时考虑为每个项目使用多个集群
下图显示了一个组织,其每个项目都包含多个Atlas集群,按环境分组。当一个应用程序使用多个后端集群,或者同一团队负责跨环境的多个应用程序时,在同一项目中部署多个集群可以简化管理。这降低了私有端点和客户托管密钥等功能的设置费用,因为同一项目中的所有集群股票相同的项目配置。
然而,此集群层次结构可能违反最小权限原则。
仅当以下两个条件为 true 时,才在同一项目中部署多个集群:
每个访问权限访问该项目的团队成员正在处理项目中的所有其他应用程序和集群。
您正在为开发和测试环境创建集群。在暂存和生产环境中,我们建议同一项目中的集群应属于同一应用程序并由同一团队管理。

资源标签
我们建议您使用以下详细信息标记集群或项目,以便轻松解析报告和集成:
BU 或部门
teamName
ApplicationName
environment
版本
电子邮件联系
关键性(指示存储在集群上的数据层级,包括任何敏感分类,例如 PII 或 PHI)
要了解更多关于使用标签解析计费数据的信息,请参阅 Atlas 计费数据的功能。
Atlas集群大小指南
在专用部署(集群大小 M10+)中,资源会由 Atlas 独占分配。我们建议在生产用例中使用专用部署,因为它们比共享集群提供更高的安全性和性能。
以下集群大小指南使用“T 恤大小调整”(软件开发和基础架构中常见的类比)来简化描述容量规划。仅使用 T 恤尺码建议作为尺码分析的大致起点。调整集群大小是一个迭代进程,需要根据不断变化的资源需求、性能要求、工作负载负载特征和增长预期来确定。
重要
本指导不包括关键任务应用程序、高内存工作负载和高 CPU 工作负载。对于这些使用案例,联系MongoDB支持部门获取定制指导。
您可以使用组织的大致数据大小和工作负载来估计部署所需的集群资源:
所需总存储空间:占原始数据总大小的 50%
所需总 RAM:占原始数据总大小的 10%
所需的 CPU 内核总数:每秒的预期峰值读取/写入数据库操作数 ÷ 4000
所需的总存储 IOPS:每秒预期的峰值读取/写入数据库操作数(最小 IOPS = 5%,最大 IOPS = 95%)
使用以下集群大小指南来选择可确保性能而不会过度预配的集群层。此表显示每个集群层的默认存储和性能功能,以及该集群层是否适合暂存和生产环境。
集群大小指南还包括集群总数据大小和默认 IOPS 的预期值,您可以通过附加配置来增强这些值。请注意,以下存储建议是针对每个分片的,而不是针对整个集群的。要了解更多信息,请参阅 Atlas 可扩展性指导。
T 恤尺码 | 集群层 | 存储范围:AWS/Google Cloud/Azure | CPUs (#) | 默认 RAM | 默认 IOPS | 预期中值数据大小 | 预期峰值读取/写入 | 适合于 |
|---|---|---|---|---|---|---|---|---|
小 |
| 2 GB 到 128 GB | 2 | 2 GB | 1000 | 1 GB 到 10 GB | 200 | 仅限开发/测试 |
Med |
| 8 GB 至 512 GB | 2 | 8 GB | 3000 | 20 GB 到 50 GB | 3000 | Prod |
大 |
| 8 GB 至 4 TB | 16 | 32 GB | 3000 | 360 GB 到 420 GB | 11000 | Prod |
超大 |
| 8 GB 至 4 TB | 32 | 128 GB | 3000 | 1200 GB 到 1750 GB | 39000 | Prod |
| [1] | M10 是共享 CPU层级。对于监管严格的行业或敏感数据,最小起始层级应为 M30。 |
示例:考虑一家虚构的金融科技公司 MongoFinance,该公司必须存储总共 400 GB 的处理数据。在活动高峰期,MongoFinance 的员工和客户每秒在 MongoFinance 数据库上执行多达 3000 次读写操作。大型集群层(M50)最能满足 MongoFinance 的存储和性能要求。
要了解更多关于集群层及其支持的区域的信息,请查看每个云提供商的 Atlas 文档:
自动化示例:Atlas 组织、项目和集群
提示
有关在所有支柱上实施我们建议的 Terraform 示例,请参阅Github中的以下示例之一:
以下示例使用Atlas 自动化工具创建组织、项目和集群。
这些示例还应用其他推荐的配置,包括:
注意
在使用 Atlas CLI 创建资源之前,您必须:
创建您的付款组织并为该付款组织创建一个 API 密钥。
通过使用 Programmatic Use 的步骤从 Atlas CLI 连接。
创建组织
为每个 BU 运行以下命令。更改 ID 和名称以使用实际值:
atlas organizations create ConsumerProducts --ownerId 508bb8f5f11b8e3488a0e99e --apiKeyRole ORG_OWNER --apiKeyDescription consumer-products-key
有关此示例的更多配置选项和信息,请参阅 Atlas 组织创建。
您可以使用 Atlas 管理 API 以编程方式创建一个组织,并将其与您的付费组织关联。要执行此操作,请向 https://cloud.mongodb.com/api/atlas/v2/orgs 终结点发送 POST 请求,并在 federationSettingsId 字段中指定付款组织 ID。请求的服务帐户或 API 密钥必须具有“组织所有者”角色,并且请求的组织必须是付费组织。
以下示例使用 cURL 来发送请求:
curl --location '/api/atlas/v2/orgs?envelope=false&pretty=false' \ --header 'Content-Type: application/vnd.atlas.2023-01-01+json' \ --header 'Accept: application/vnd.atlas.2023-01-01+json' \ --data '{ "name": "<organization name>", "apiKey": { "desc": "<organization description>", "roles": [ "ORG_MEMBER" ] }, "federationSettingsId": "<ID of org to link to>", "orgOwnerId": "<organization owners ID>", "skipDefaultAlertsSettings": false }'
要了解有关前述 API 调用的更多信息,请参阅 atlas 组织创建 API 文档。
要获取用户 ID 和组织 ID,请查看以下命令:
创建项目
为每个应用程序和环境对运行以下命令。更改 ID 和名称以使用您的值:
atlas projects create "Customer Portal - Prod" --tag environment=production --orgId 32b6e34b3d91647abb20e7b8
有关此示例的更多配置选项和信息,请参阅 Atlas 项目创建。
要获取项目 ID,请查看以下命令:
使用客户数密钥管理配置加密
对于预发布和生产环境,我们建议您在预配集群时启用客户密钥管理的加密功能。对于开发和测试,请考虑跳过使用客户密钥管理的加密以节省费用,除非您处于高度监管的行业或存储敏感数据。要了解更多信息,请参阅 Atlas 组织、项目和集群建议。
您不能使用Atlas CLI通过客户密钥管理来管理加密。请改用以下方法:
为每个项目创建一个集群
要为您的开发和测试环境创建单区域集群,请为您创建的每个项目运行以下命令。更改 ID 和名称以使用您的值:
注意
您还可以使用集群 Atlas 管理 API来创建集群。
此示例未启用自动伸缩,以帮助控制开发和测试环境中的费用。对于分阶段和生产环境,应启用自动伸缩功能。
atlas clusters create CustomerPortalDev \ --projectId 56fd11f25f23b33ef4c2a331 \ --region EASTERN_US \ --members 3 \ --tier M10 \ --provider GCP \ --mdbVersion 8.0 \ --diskSizeGB 30 \ --tag bu=ConsumerProducts \ --tag teamName=TeamA \ --tag appName=ProductManagementApp \ --tag env=Production \ --tag version=8.0 \ --tag email=marissa@example.com \ --watch
要配置多区域集群,请为您创建的每个项目创建以下 cluster.json 文件。更改 ID 和名称以使用您的值。
{ "name": "CustomerPortalDev", "projectId": "56fd11f25f23b33ef4c2a331", "clusterType": "REPLICASET", "diskSizeGB": 30, "mongoDBMajorVersion": "8.0", "backupEnabled": true, "replicationSpecs": [ { "numShards": 1, "regionConfigs": [ { "providerName": "GCP", "regionName": "EASTERN_US", "members": 3, "priority": 7, "autoScaling": { "compute": { "enabled": true, "scaleDownEnabled": true }, "diskGB": { "enabled": true } } }, { "providerName": "GCP", "regionName": "CENTRAL_US", "members": 2, "priority": 5, "autoScaling": { "compute": { "enabled": true, "scaleDownEnabled": true }, "diskGB": { "enabled": true } } }, { "providerName": "GCP", "regionName": "WESTERN_US", "members": 2, "priority": 4, "autoScaling": { "compute": { "enabled": true, "scaleDownEnabled": true }, "diskGB": { "enabled": true } } } ] } ], "tags": [ { "key": "bu", "value": "ConsumerProducts" }, { "key": "teamName", "value": "TeamA" }, { "key": "appName", "value": "ProductManagementApp" }, { "key": "env", "value": "Production" }, { "key": "version", "value": "8.0" }, { "key": "email", "value": "marissa@example.com" } ] }
在创建上述配置文件后,请运行以下命令以创建集群:
atlas clusters create --file <path to your configuration file>
要为您的暂存和生产环境创建单区域集群,请为您创建的每个项目创建以下 cluster.json 文件。更改 ID 和名称以使用您的值:
{ "clusterType": "REPLICASET", "links": [], "name": "CustomerPortalProd", "mongoDBMajorVersion": "8.0", "replicationSpecs": [ { "numShards": 1, "regionConfigs": [ { "electableSpecs": { "instanceSize": "M30", "nodeCount": 3 }, "priority": 7, "providerName": "GCP", "regionName": "EASTERN_US", "analyticsSpecs": { "nodeCount": 0, "instanceSize": "M30" }, "autoScaling": { "compute": { "enabled": true, "scaleDownEnabled": true }, "diskGB": { "enabled": true } }, "readOnlySpecs": { "nodeCount": 0, "instanceSize": "M30" } } ], "zoneName": "Zone 1" } ], "tag" : [{ "bu": "ConsumerProducts", "teamName": "TeamA", "appName": "ProductManagementApp", "env": "Production", "version": "8.0", "email": "marissa@example.com" }] }
在您创建 cluster.json 文件后,请为您创建的每个项目运行以下命令。该命令使用 cluster.json 文件来创建一个集群。
atlas cluster create --projectId 5e2211c17a3e5a48f5497de3 --file cluster.json
要配置多区域集群,请修改前面的 cluster.json 文件中的 replicationSpecs 数组以指定多个区域,如下面的示例所示:
{ … "replicationSpecs": [ { "numShards": 1, "regionConfigs": [ { "electableSpecs": { "instanceSize": "M30", "nodeCount": 3 }, "priority": 7, "providerName": "GCP", "regionName": "EASTERN_US", "analyticsSpecs": { "nodeCount": 0, "instanceSize": "M30" }, "autoScaling": { "compute": { "enabled": true, "scaleDownEnabled": true }, "diskGB": { "enabled": true } }, "readOnlySpecs": { "nodeCount": 0, "instanceSize": "M30" } }, { "electableSpecs": { "instanceSize": "M30", "nodeCount": 3 }, "priority": 5, "providerName": "GCP", "regionName": "CENTRAL_US", "analyticsSpecs": { "nodeCount": 0, "instanceSize": "M30" }, "autoScaling": { "compute": { "enabled": true, "scaleDownEnabled": true }, "diskGB": { "enabled": true } }, "readOnlySpecs": { "nodeCount": 0, "instanceSize": "M30" } }, { "electableSpecs": { "instanceSize": "M30", "nodeCount": 3 }, "priority": 6, "providerName": "GCP", "regionName": "WESTERN_US", "analyticsSpecs": { "nodeCount": 0, "instanceSize": "M30" }, "autoScaling": { "compute": { "enabled": true, "scaleDownEnabled": true }, "diskGB": { "enabled": true } }, "readOnlySpecs": { "nodeCount": 0, "instanceSize": "M30" } } ], "zoneName": "Zone 1" } ], … }
在创建上述配置文件后,请运行以下命令以创建集群:
atlas clusters create --file <path to your configuration file>
有关这些示例的更多配置选项和信息,请参阅 Atlas clusters create。
注意
在使用 Terraform 创建资源之前,您必须:
创建您的付款组织并为该付款组织创建一个 API 密钥。请在终端中运行以下命令,将您的 API 密钥存储为环境变量:
export MONGODB_ATLAS_PUBLIC_KEY="<insert your public key here>" export MONGODB_ATLAS_PRIVATE_KEY="<insert your private key here>"
重要
以下示例使用 MongoDB Atlas Terraform 提供商版本 2.x(~> 2.2)。如果您正在从提供商版本 1.x 升级,请参阅 2.0.0 升级指南 了解破坏性变更和迁移步骤。这些示例使用带 v2.x 语法的mongodbatlas_advanced_cluster 资源。
创建项目和部署
对于您的开发和测试环境,请为每个应用程序和环境对创建以下文件。将每个应用程序和环境对的文件放在各自的目录中。更改 ID 和名称以使用您的值:
main.tf
# Create a Project resource "mongodbatlas_project" "atlas-project" { org_id = var.atlas_org_id name = var.atlas_project_name } # Create an Atlas Advanced Cluster resource "mongodbatlas_advanced_cluster" "atlas-cluster" { project_id = mongodbatlas_project.atlas-project.id name = "ClusterPortalDev" cluster_type = "REPLICASET" mongo_db_major_version = var.mongodb_version # MongoDB recommends enabling auto-scaling # When auto-scaling is enabled, Atlas may change the instance size, and this use_effective_fields # block prevents Terraform from reverting Atlas auto-scaling changes use_effective_fields = true replication_specs = [ { region_configs = [ { electable_specs = { instance_size = var.cluster_instance_size_name node_count = 3 } auto_scaling = { compute_enabled = true compute_scale_down_enabled = true compute_max_instance_size = "M60" compute_min_instance_size = "M10" } priority = 7 provider_name = var.cloud_provider region_name = var.atlas_region } ] } ] tags = { BU = "ConsumerProducts" TeamName = "TeamA" AppName = "ProductManagementApp" Env = "Test" Version = "8.0" Email = "marissa@example.com" } } # Outputs to Display output "atlas_cluster_connection_string" { value = mongodbatlas_advanced_cluster.atlas-cluster.connection_strings.0.standard_srv } output "project_name" { value = mongodbatlas_project.atlas-project.name }
注意
要创建多区域集群,请在各自的 region_configs 对象中指定每个区域,并将它们嵌套在 replication_specs 对象中。priority 字段必须按降序排列,并且必须包含介于 7 和 1 之间的值,如下例所示:
replication_specs = [ { region_configs = [ { electable_specs = { instance_size = "M10" node_count = 2 } auto_scaling = { compute_enabled = true compute_scale_down_enabled = true compute_max_instance_size = "M60" compute_min_instance_size = "M10" } provider_name = "GCP" priority = 7 region_name = "NORTH_AMERICA_NORTHEAST_1" }, { electable_specs = { instance_size = "M10" node_count = 3 } auto_scaling = { compute_enabled = true compute_scale_down_enabled = true compute_max_instance_size = "M60" compute_min_instance_size = "M10" } provider_name = "GCP" priority = 6 region_name = "WESTERN_US" } ] } ]
variables.tf
# MongoDB Atlas Provider Authentication Variables # Legacy API key authentication (backward compatibility) variable "mongodbatlas_public_key" { type = string description = "MongoDB Atlas API public key" sensitive = true } variable "mongodbatlas_private_key" { type = string description = "MongoDB Atlas API private key" sensitive = true } # Recommended: Service account authentication variable "mongodb_service_account_id" { type = string description = "MongoDB service account ID for authentication" sensitive = true default = null } variable "mongodb_service_account_key_file" { type = string description = "Path to MongoDB service account private key file" sensitive = true default = null } # Atlas Organization ID variable "atlas_org_id" { type = string description = "Atlas Organization ID" } # Atlas Project Name variable "atlas_project_name" { type = string description = "Atlas Project Name" } # Atlas Project Environment variable "environment" { type = string description = "The environment to be built" } # Cluster Instance Size Name variable "cluster_instance_size_name" { type = string description = "Cluster instance size name" } # Cloud Provider to Host Atlas Cluster variable "cloud_provider" { type = string description = "AWS or GCP or Azure" } # Atlas Region variable "atlas_region" { type = string description = "Atlas region where resources will be created" } # MongoDB Version variable "mongodb_version" { type = string description = "MongoDB Version" } # Atlas Group Name variable "atlas_group_name" { type = string description = "Atlas Group Name" }
terraform.tfvars
atlas_org_id = "32b6e34b3d91647abb20e7b8" atlas_project_name = "Customer Portal - Dev" environment = "dev" cluster_instance_size_name = "M10" cloud_provider = "AWS" atlas_region = "US_WEST_2" mongodb_version = "8.0"
provider.tf
# Define the MongoDB Atlas Provider terraform { required_providers { mongodbatlas = { source = "mongodb/mongodbatlas" version = "~> 2.2" } } required_version = ">= 1.0" } # Configure the MongoDB Atlas Provider provider "mongodbatlas" { # Legacy API key authentication (backward compatibility) public_key = var.mongodbatlas_public_key private_key = var.mongodbatlas_private_key # Recommended: Service account authentication # Uncomment and configure the following for service account auth: # service_account_id = var.mongodb_service_account_id # private_key_file = var.mongodb_service_account_key_file }
对于您的暂存环境和生产环境,请为每个应用程序和环境对创建以下文件。将每个应用程序和环境对的文件放在各自的目录中。更改 ID 和名称以使用您自己的值:
main.tf
# Create a Group to Assign to Project resource "mongodbatlas_team" "project_group" { org_id = var.atlas_org_id name = var.atlas_group_name usernames = [ "user1@example.com", "user2@example.com" ] } # Create a Project resource "mongodbatlas_project" "atlas-project" { org_id = var.atlas_org_id name = var.atlas_project_name } # Assign the team to project with specific roles resource "mongodbatlas_team_project_assignment" "project_team" { project_id = mongodbatlas_project.atlas-project.id team_id = mongodbatlas_team.project_group.team_id role_names = ["GROUP_READ_ONLY", "GROUP_CLUSTER_MANAGER"] } # Create an Atlas Advanced Cluster resource "mongodbatlas_advanced_cluster" "atlas-cluster" { project_id = mongodbatlas_project.atlas-project.id name = "ClusterPortalProd" cluster_type = "REPLICASET" mongo_db_major_version = var.mongodb_version use_effective_fields = true replication_specs = [ { region_configs = [ { electable_specs = { instance_size = var.cluster_instance_size_name node_count = 3 disk_size_gb = var.disk_size_gb } auto_scaling = { disk_gb_enabled = var.auto_scaling_disk_gb_enabled compute_enabled = var.auto_scaling_compute_enabled compute_max_instance_size = var.compute_max_instance_size } priority = 7 provider_name = var.cloud_provider region_name = var.atlas_region } ] } ] tags = { BU = "ConsumerProducts" TeamName = "TeamA" AppName = "ProductManagementApp" Env = "Production" Version = "8.0" Email = "marissa@example.com" } } # Outputs to Display output "atlas_cluster_connection_string" { value = mongodbatlas_advanced_cluster.atlas-cluster.connection_strings.standard_srv } output "project_name" { value = mongodbatlas_project.atlas-project.name }
注意
要创建多区域集群,请在各自的 region_configs 对象中指定每个区域,并将它们嵌套在 replication_specs 对象中,如下例所示:
replication_specs = [ { region_configs = [ { electable_specs = { instance_size = "M10" node_count = 2 } provider_name = "GCP" priority = 7 region_name = "NORTH_AMERICA_NORTHEAST_1" }, { electable_specs = { instance_size = "M10" node_count = 3 } provider_name = "GCP" priority = 6 region_name = "WESTERN_US" } ] } ]
variables.tf
# MongoDB Atlas Provider Authentication Variables # Legacy API key authentication (backward compatibility) variable "mongodbatlas_public_key" { type = string description = "MongoDB Atlas API public key" sensitive = true } variable "mongodbatlas_private_key" { type = string description = "MongoDB Atlas API private key" sensitive = true } # Recommended: Service account authentication variable "mongodb_service_account_id" { type = string description = "MongoDB service account ID for authentication" sensitive = true default = null } variable "mongodb_service_account_key_file" { type = string description = "Path to MongoDB service account private key file" sensitive = true default = null } # Atlas Organization ID variable "atlas_org_id" { type = string description = "Atlas Organization ID" } # Atlas Project Name variable "atlas_project_name" { type = string description = "Atlas Project Name" } # Atlas Project Environment variable "environment" { type = string description = "The environment to be built" } # Cluster Instance Size Name variable "cluster_instance_size_name" { type = string description = "Cluster instance size name" } # Cloud Provider to Host Atlas Cluster variable "cloud_provider" { type = string description = "AWS or GCP or Azure" } # Atlas Region variable "atlas_region" { type = string description = "Atlas region where resources will be created" } # MongoDB Version variable "mongodb_version" { type = string description = "MongoDB Version" } # Atlas Group Name variable "atlas_group_name" { type = string description = "Atlas Group Name" }
terraform.tfvars
atlas_org_id = "32b6e34b3d91647abb20e7b8" atlas_project_name = "Customer Portal - Prod" environment = "prod" cluster_instance_size_name = "M30" cloud_provider = "AWS" atlas_region = "US_WEST_2" mongodb_version = "8.0" atlas_group_name = "Atlas Group"
provider.tf
# Define the MongoDB Atlas Provider terraform { required_providers { mongodbatlas = { source = "mongodb/mongodbatlas" version = "~> 2.2" } } required_version = ">= 1.0" } # Configure the MongoDB Atlas Provider provider "mongodbatlas" { # Legacy API key authentication (backward compatibility) public_key = var.mongodbatlas_public_key private_key = var.mongodbatlas_private_key # Recommended: Service account authentication # Uncomment and configure the following for service account auth: # service_account_id = var.mongodb_service_account_id # private_key_file = var.mongodb_service_account_key_file }
有关此示例的更多配置选项和信息,请参阅 MongoDB & HashiCorp Terraform 和 MongoDB Terraform 博客文章。
在您创建文件后,导航到每个应用程序和环境对的目录,并运行以下命令以初始化 Terraform:
terraform init
运行以下命令以查看 Terraform 计划:
terraform plan
运行以下命令,为应用程序和环境对创建一个项目和一个部署。该命令使用文件和 MongoDB & HashiCorp Terraform 来创建项目和集群:
terraform apply
当出现提示时,输入 yes,然后按 Enter 以应用配置。
后续步骤
在为您的组织、项目和集群规划层次结构和大小后,请查看以下建议的资源,或使用左侧导航查找每个 Well-Architected Framework 支柱的功能和最佳实践。