개요
이 튜토리얼에서는 Vue를 사용하고 MongoDB 와 통합되는 Nuxt 애플리케이션 빌드하는 과정을 안내합니다. Nuxt는 Nitro 서버 엔진 통해 파일 기반 라우팅, 서버 측 렌더링 및 내장 API 경로를 제공하는 Vue 프레임워크 입니다. Nuxt와 Vue를 결합하면 별도의 백엔드 서버 없이 완전한 애플리케이션을 빌드 할 수 있습니다.
이 튜토리얼의 애플리케이션 에는 다음과 같은 계층이 포함되어 있습니다.
데이터베이스 계층: MongoDB 데이터 저장 및 검색을 제공합니다.
서버 계층: Nuxt 서버 경로는 API 로직 및 데이터베이스 상호 작용을 처리하다 .
프레젠테이션 계층: Vue는 반응형 데이터 바인딩으로 사용자 인터페이스를 구현합니다.
MongoDB Nuxt 및 Vue와 함께 사용하는 이유
Nuxt는 Vue를 기반으로 서버 경로에 대한 Node.js 런타임이 포함된 풀 스택 프레임워크 제공하므로 MongoDB Node.js 운전자 에 자연스럽게 부합합니다. 별도의 백엔드 서비스나 API 계층을 유지 관리하지 않고도 Nuxt 서버 경로 또는 서버 측 유틸리티에서 직접 MongoDB 에 연결하고 문서를 Vue 구성 요소로 반환할 수 있습니다.
MongoDB의 유연한 문서 구조는 JavaScript 객체에 쉽게 매핑됩니다. 따라서 옵션 API 사용하든 컴퍼지션 API 사용하든 Vue 구성 요소에서 MongoDB 데이터로 원활하게 작업할 수 있습니다. MongoDB 에서 가져온 문서를 구성 요소와 템플릿으로 바로 전달할 수 있으므로 복잡한 데이터 변환이나 추가 객체 관계형 매핑(ORM) 계층의 필요성을 줄일 수 있습니다.
Nuxt의 서버 측 렌더링(SSR) 및 데이터 가져오기 유틸리티를 사용하면 페이지를 렌더링하기 전에 서버 에서 MongoDB 쿼리 수 있습니다. 이를 통해 Vue 구성 요소를 바로 사용할 수 있는 데이터로 수화하여 데이터 기반 애플리케이션에 대한 인식 성능과 검색 엔진 최적화(SEO)를 개선할 수 있습니다.
빠른 시작 튜토리얼
이 튜토리얼에서는 Nuxt와 Vue를 사용하여 웹 애플리케이션 빌드 방법을 보여줍니다. 애플리케이션 샘플 레스토랑 데이터에 액세스하고, 데이터를 쿼리하고, 로컬에서 호스팅되는 사이트 에 결과를 표시합니다. 이 튜토리얼에는 MongoDB Atlas 에서 호스팅되는 MongoDB cluster 에 연결하고 데이터베이스 의 데이터에 액세스하고 표시하는 방법에 대한 지침도 포함되어 있습니다.
프로젝트 설정
이 섹션의 단계에 따라 프로젝트 종속성을 설치하고, Atlas 클러스터를 만들고, 애플리케이션 디렉토리를 설정합니다.
전제 조건 확인
빠른 시작 애플리케이션 만들려면 개발 환경에 다음 소프트웨어를 설치하세요.
전제 조건 | 참고 사항 |
버전 20 이상을 사용하세요. | |
코드 편집기 | 이 튜토리얼에서는 Visual Studio Code를 사용하지만 원하는 편집기를 사용할 수 있습니다. |
터미널 앱 및 shell | macOS 또는 Linux 사용자의 경우 터미널 또는 유사한 앱 사용하세요. Windows 사용자의 경우 PowerShell을 사용하세요. |
MongoDB Atlas 클러스터 생성
MongoDB Atlas 는 MongoDB 배포를 호스팅하는 완전 관리형 클라우드 데이터베이스 서비스입니다. MongoDB deployment 없는 경우, MongoDB 시작하기 튜토리얼을 완료하여 무료로 MongoDB cluster 생성할 수 있습니다( 크레딧 카드 필요 없음).
팁
데이터 세트가 클러스터 에 로드되었는지 확인합니다. 이 튜토리얼에서는 해당 데이터 세트의 데이터를 쿼리합니다.sample_restaurants sample_restaurants 데이터 세트를 클러스터 에 로드하는 방법을 학습 MongoDB 시작하기 튜토리얼을 참조하세요.
MongoDB 클러스터에 연결하려면 연결 URI를 사용해야 합니다. 연결 URI를 조회 방법을 학습하려면 MongoDB 시작하기 튜토리얼의 연결 문자열 추가하기 섹션을 참조하세요.
팁
MongoDB Atlas 연결 문자열 안전한 위치 에 저장합니다. 이후 단계에서 .env 파일 에 추가합니다.
Nuxt 및 Vue 설치
공식 Nuxt CLI 사용하여 Vue로 새 Nuxt 프로젝트 초기화합니다. 터미널을 열고 원하는 프로젝트 디렉토리 로 이동합니다.
초기화 명령을 실행합니다.
npm create nuxt@latest
구성 프롬프트
CLI 에 프로젝트 구성하라는 메시지가 표시됩니다. 다음 응답을 사용합니다.
프롬프트: create-nuxt@latest-number 패키지를 설치해야 합니다. 계속하시겠습니까?
응답:
y을 입력하고 Enter 키를 누릅니다.프롬프트: 어떤 템플릿을 사용하시겠습니까?
응답:
minimal - Minimal setup for Nuxt 4 (recommended)을(를) 선택합니다.프롬프트: 어디에 프로젝트 생성하시겠습니까?
응답:
Enter을 눌러 기본값 디렉토리 수락하거나 다른 경로를 입력합니다.프롬프트: 어떤 패키지 관리자를 사용하시겠습니까?
응답:
npm을(를) 선택합니다.프롬프트: git 리포지토리 초기화 하시겠습니까?
응답:
YesNo기본 설정에 따라 또는 를 선택합니다.프롬프트: 공식 모듈을 설치하시겠습니까?
응답:
No을(를) 선택합니다.
백엔드 구성
프로젝트 구조를 설정한 후 이 섹션의 단계에 따라 백엔드를 설정하다 합니다.
Nuxt 구성 업데이트
프로젝트 루트에서 nuxt.config.ts 파일 열고 해당 내용을 다음 코드로 바꿔 환경 변수를 로드하고 Tailwind CSS 모듈을 구성합니다.
// https://nuxt.com/docs/api/configuration/nuxt-config export default defineNuxtConfig({ compatibilityDate: '2025-07-15', devtools: { enabled: true }, future:{ compatibilityVersion: 4, }, runtimeConfig:{ // Server-side only config. Not exposed to the client mongoURI: process.env.MONGODB_URI, }, css:['@/assets/css/main.css'], modules: ['@nuxtjs/tailwindcss'], })
nuxt.config.ts 파일 .env 파일 에서 환경 변수를 로드하고 Vue 구성 요소의 스타일 지정을 위한 Tailwind 지원 구성합니다.
데이터베이스 연결 만들기
프로젝트 루트에서 다음 명령을 실행하여 MongoDB 연결 로직을 저장할 유틸리티 파일 만듭니다.
mkdir -p server/utils touch server/utils/mongodb.ts
server/utils/mongodb.ts 파일 열고 다음 코드를 추가합니다.
import { MongoClient, type Db } from "mongodb"; let cachedClient: MongoClient | null = null; let cachedDb: Db | null = null; export async function connectToDatabase(){ if (cachedClient && cachedDb){ return { client: cachedClient, db: cachedDb }; } const config = useRuntimeConfig(); const uri = config.mongoURI; if (!uri){ throw new Error("Please define the MONGO_URI environment variable inside .env"); } const client = new MongoClient(uri); await client.connect(); const db = client.db("sample_restaurants"); cachedClient = client; cachedDb = db; console.log("Connected to MongoDB Atlas"); return { client, db }; }
이 코드는 환경 변수에 저장된 연결 URI를 사용하여 Atlas cluster 에 연결하는 재사용 가능한 MongoDB 클라이언트 만듭니다. 클라이언트 뉴욕시 주변 레스토랑에 대한 정보가 포함된 sample_restaurants 데이터베이스 에 연결합니다.
레스토랑 경로 만들기
Nuxt 서버 경로는 API 요청을 처리하다 하고 데이터베이스 와 상호 작용 . 프로젝트 루트에서 다음 명령어를 실행하여 레스토랑 데이터를 가져오기 위한 서버 경로를 만듭니다.
mkdir -p server/api/restaurants touch server/api/restaurants/index.get.ts
server/api/restaurants/index.get.ts 파일 열고 다음 코드를 추가합니다.
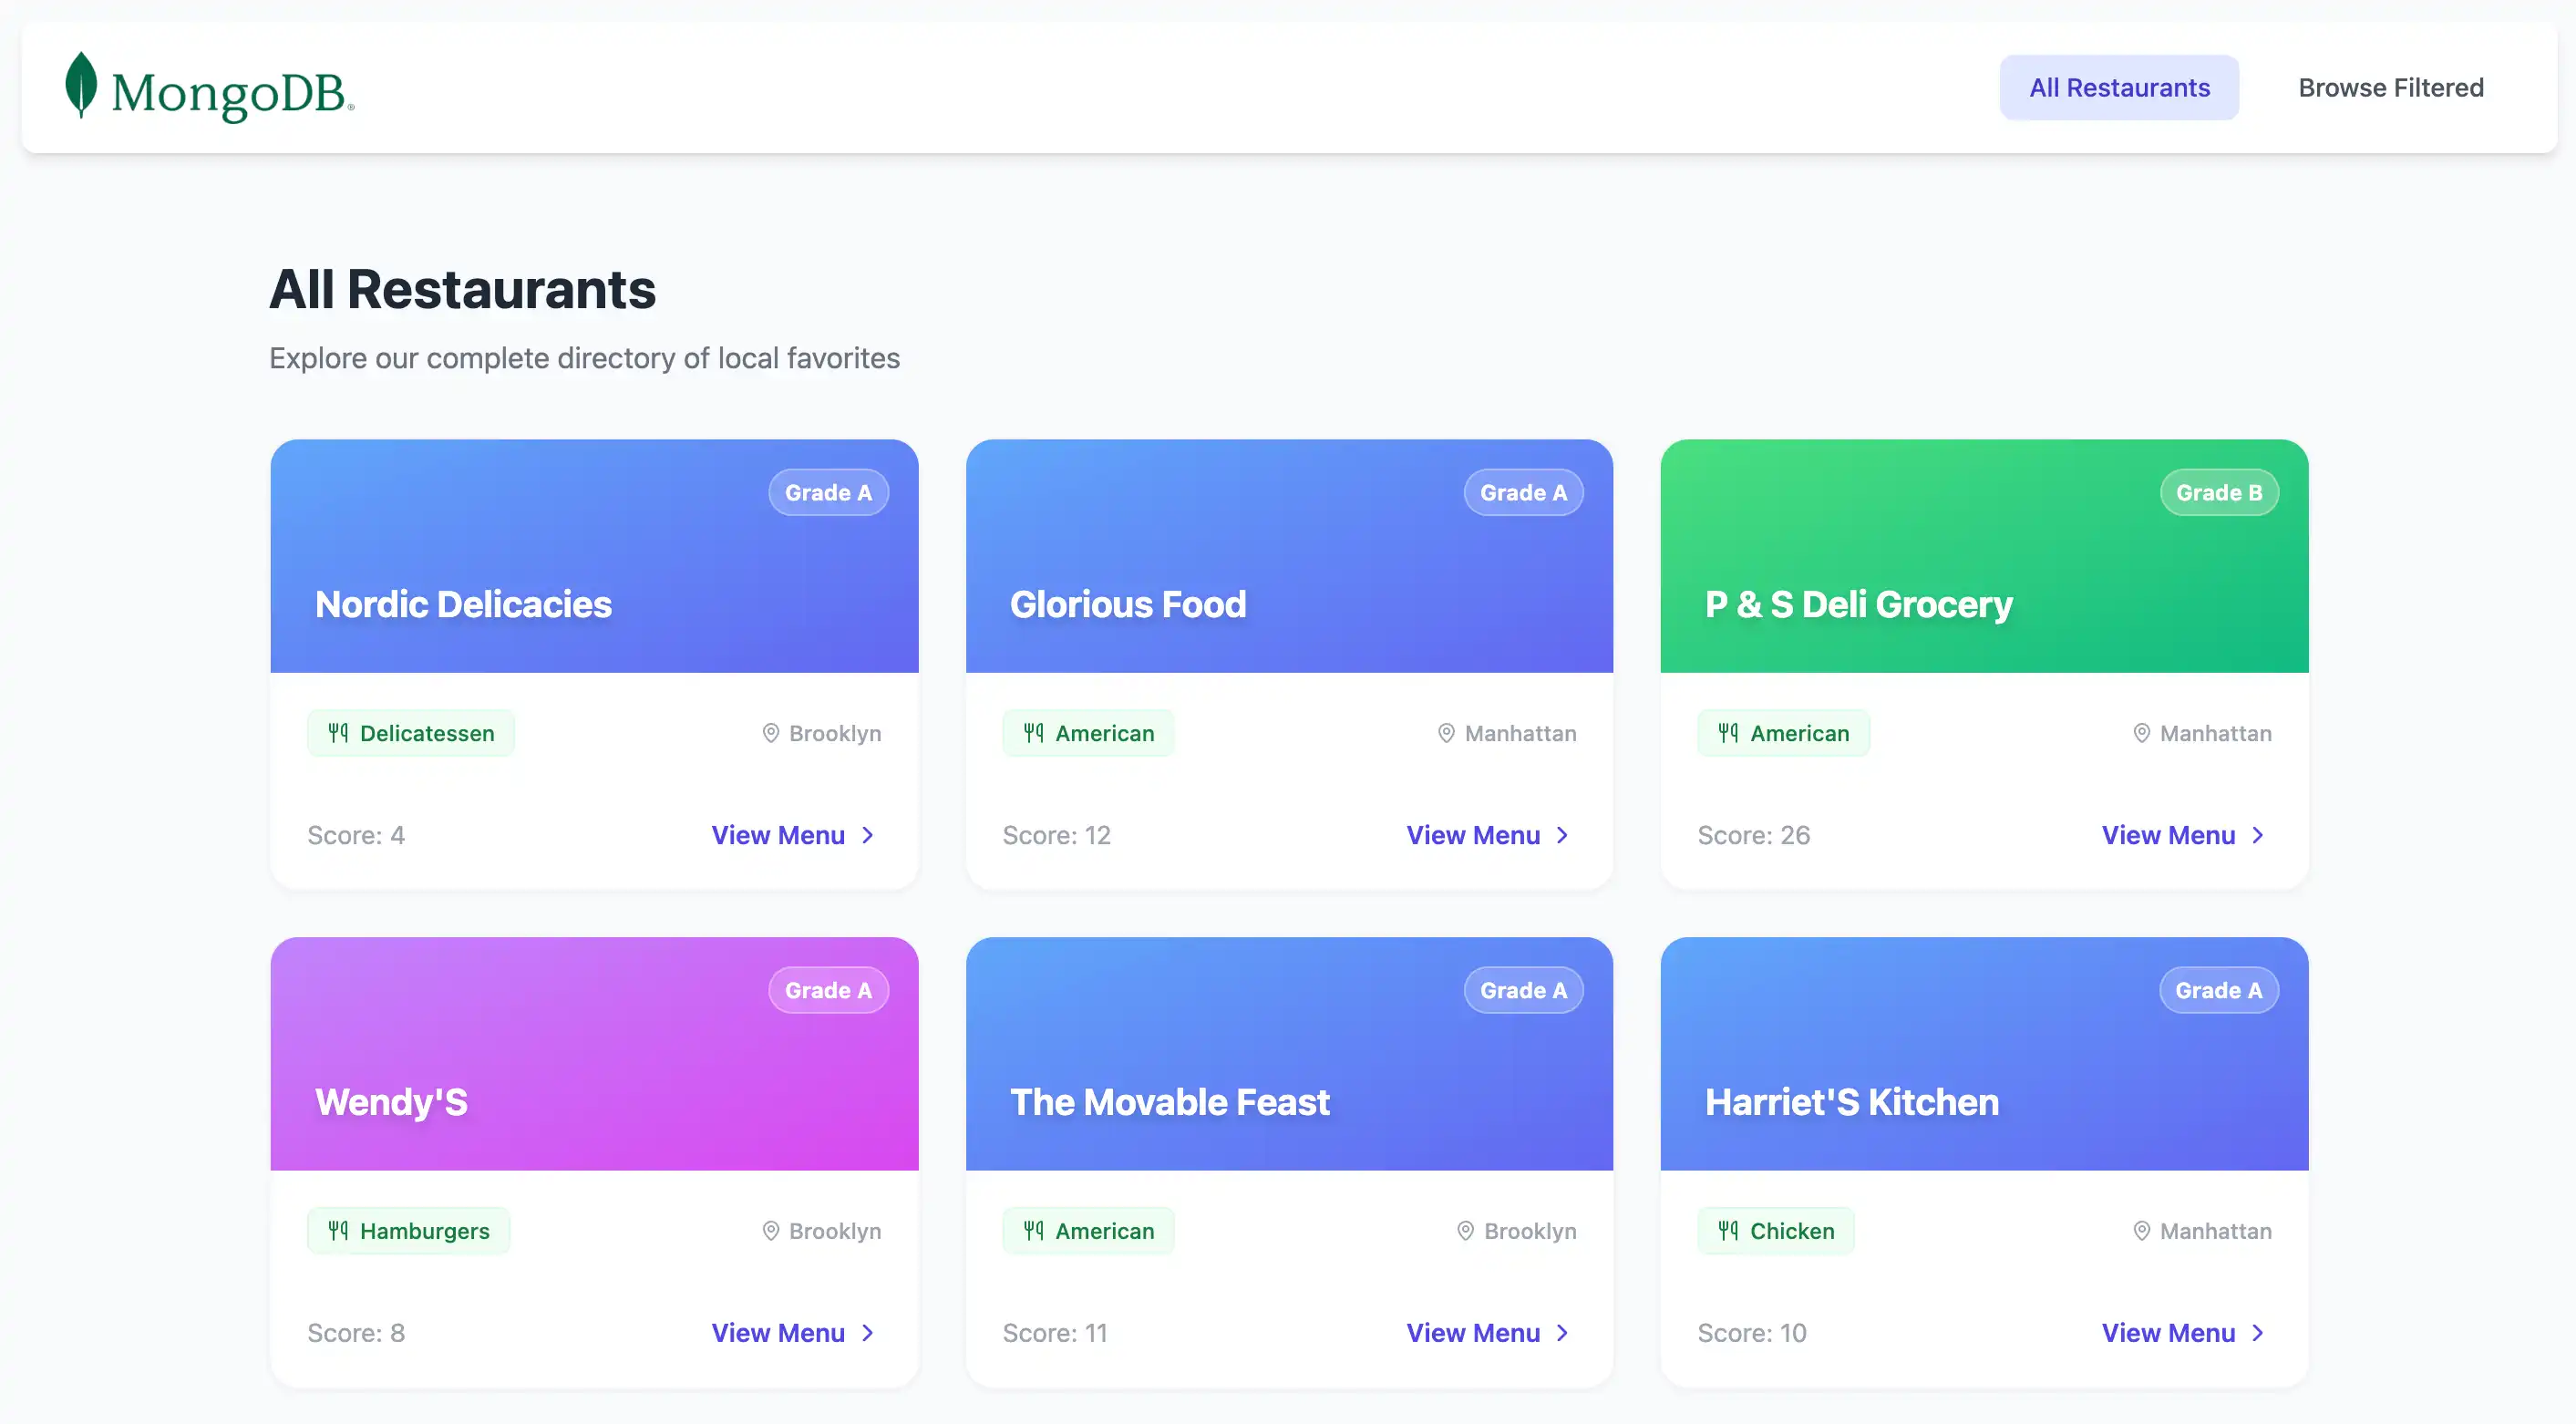
import { connectToDatabase } from "~~/server/utils/mongodb"; export default defineEventHandler(async () =>{ const { db } = await connectToDatabase(); const collection = db.collection("restaurants"); const restaurants = await collection .find({}) .limit(50) .project({ name: 1, borough: 1, cuisine: 1, grades: 1}) .toArray(); return restaurants.map((doc) => ({ ...doc, _id: doc._id.toString(), })) })
이 파일 restaurants 컬렉션 쿼리하는 서버 경로를 정의합니다. 첫 번째 50 레스토랑 문서를 검색하여 JSON 응답으로 반환합니다.
필터링된 레스토랑 경로 만들기
프로젝트 루트에서 다음 명령을 실행하여 새 경로 파일 만듭니다.
touch server/api/restaurants/browse.get.ts
server/api/restaurants/browse.get.ts 파일 열고 다음 코드를 추가합니다.
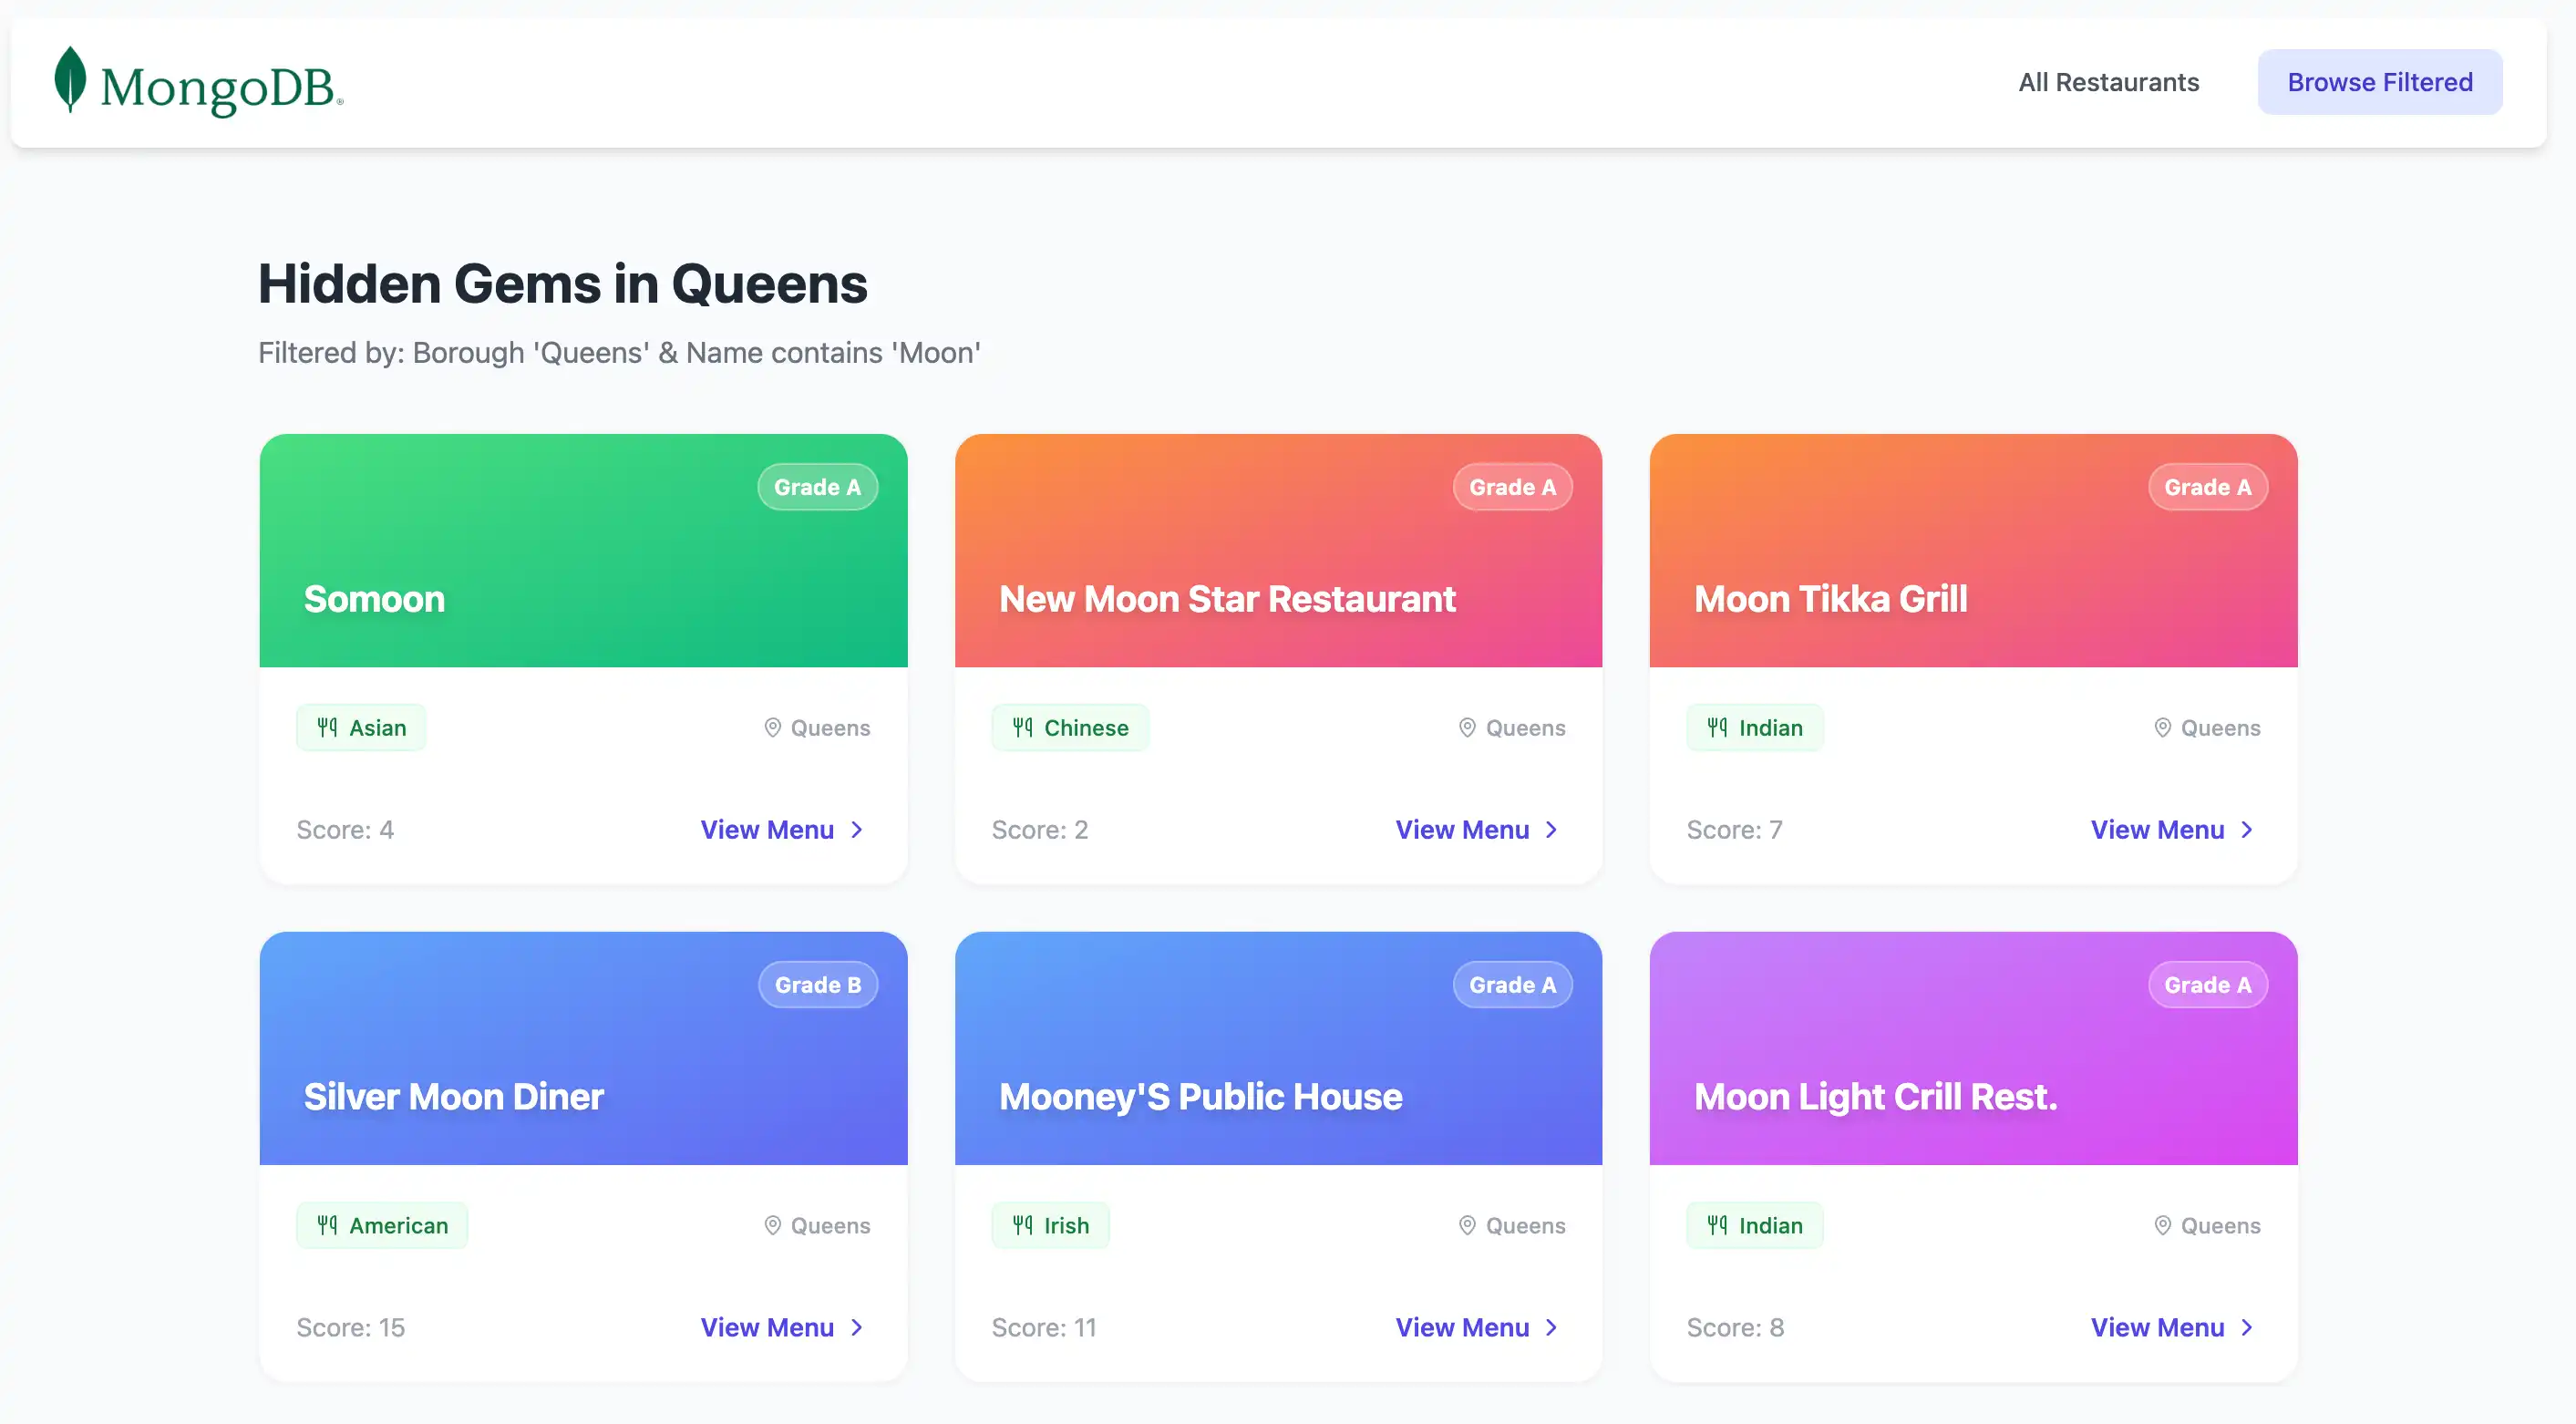
import { connectToDatabase } from '~~/server/utils/mongodb' export default defineEventHandler(async () => { const { db } = await connectToDatabase(); const collection = db.collection("restaurants"); // Filter: Queens borough + name contains "Moon" (case-insensitive) const query = { borough: 'Queens', name: { $regex: 'Moon', $options: 'i' }, } const restaurants = await collection .find(query) .project({ name: 1, borough: 1, cuisine: 1, grades: 1 }) .toArray() return restaurants.map((doc) => ({ ...doc, _id: doc._id.toString(), })) })
이 파일 이름에 Moon 단어가 포함된 Queens 의 레스토랑을 sample_restaurants 데이터베이스 에 쿼리하고 일치하는 문서를 JSON 응답으로 반환하는 서버 경로를 정의합니다.
프런트 엔드 구성
백엔드를 설정한 후 이 섹션의 단계에 따라 애플리케이션 의 프레젠테이션 계층을 설정하다 합니다.
main.css 파일 만들기
프로젝트 루트에서 다음 명령을 실행하여 글로벌 스타일에 대한 기본 CSS 파일 만듭니다.
mkdir -p app/assets/css touch app/assets/css/main.css
app/assets/css/main.css 파일 열고 다음 코드를 추가합니다.
@tailwind base; @tailwind components; @tailwind utilities;
이 파일 애플리케이션 스타일링을 위한 유틸리티 클래스를 생성하는 Tailwind CSS 지시문을 가져옵니다. Tailwind는 사용자 지정 CSS 없이도 레이아웃, 간격, 색상, 타이포그래피에 대한 포괄적인 사전 빌드 클래스 설정하다 를 제공합니다.
레스토랑 목록 구성 요소 만들기
프로젝트 루트에서 다음 명령을 실행하여 레스토랑 데이터를 표시하기 위한 Vue 구성 요소를 만듭니다.
mkdir -p app/components touch app/components/RestaurantList.vue
app/components/RestaurantList.vue 파일 열고 다음 코드를 추가합니다.
<script setup lang="ts"> import { computed } from 'vue' import { MapPin, Utensils, ChevronRight } from 'lucide-vue-next' // Type definitions interface Grade { grade?: string score?: number } interface Restaurant { _id: string name: string borough?: string cuisine?: string grades?: Grade[] } // Determine endpoint based on current route const route = useRoute() const isBrowse = computed(() => route.path === '/browse') const endpoint = computed(() => isBrowse.value ? '/api/restaurants/browse' : '/api/restaurants' ) // Fetch data using Nuxt's useFetch composable // Automatically refetches when endpoint changes const { data: restaurants } = await useFetch<Restaurant[]>(endpoint, { watch: [endpoint], default: () => [], }) // Dynamic page content const pageTitle = computed(() => isBrowse.value ? 'Hidden Gems in Queens' : 'All Restaurants' ) const pageSubtitle = computed(() => isBrowse.value ? "Filtered by: Borough 'Queens' & Name contains 'Moon'" : 'Explore our complete directory of local favorites' ) // Deterministic gradient based on name length const getGradient = (name: string) => { const gradients = [ 'from-orange-400 to-pink-500', 'from-blue-400 to-indigo-500', 'from-green-400 to-emerald-500', 'from-purple-400 to-fuchsia-500', ] return gradients[name.length % gradients.length] } </script> <template> <div class="max-w-6xl mx-auto px-4 py-8"> <!-- Header --> <div class="mb-8"> <h3 class="text-3xl font-bold text-gray-800"> {{ pageTitle }} </h3> <p class="text-gray-500 mt-2"> {{ pageSubtitle }} </p> </div> <!-- Restaurant Grid --> <div class="grid grid-cols-1 md:grid-cols-2 lg:grid-cols-3 gap-6"> <div v-for="restaurant in restaurants" :key="restaurant._id" class="group bg-white rounded-2xl border border-gray-100 shadow-sm hover:shadow-xl hover:-translate-y-1 transition-all duration-300 overflow-hidden flex flex-col" > <!-- Gradient Header --> <div :class="[ 'h-32 bg-gradient-to-br p-6 flex items-end relative', getGradient(restaurant.name) ]" > <span class="absolute top-4 right-4 bg-white/20 backdrop-blur-md text-white text-xs font-bold px-2 py-1 rounded-full border border-white/30"> Grade {{ restaurant.grades?.[0]?.grade ?? 'N/A' }} </span> <h3 class="text-white text-xl font-bold drop-shadow-md line-clamp-2"> {{ restaurant.name }} </h3> </div> <!-- Card Body --> <div class="p-5 flex-1 flex flex-col"> <div class="flex items-center justify-between mb-4"> <span class="inline-flex items-center gap-1.5 px-2.5 py-1 rounded-md text-xs font-medium bg-green-50 text-green-700 border border-green-100"> <Utensils class="w-3 h-3" /> {{ restaurant.cuisine ?? 'Unknown' }} </span> <div class="flex items-center text-gray-400 text-xs font-medium"> <MapPin class="w-3 h-3 mr-1" /> {{ restaurant.borough ?? 'Unknown' }} </div> </div> <div class="mt-auto pt-4 border-t border-gray-50 flex items-center justify-between text-sm"> <span class="text-gray-400"> Score: {{ restaurant.grades?.[0]?.score ?? 0 }} </span> <button class="text-indigo-600 font-semibold group-hover:underline flex items-center gap-1"> View Menu <ChevronRight class="w-4 h-4" /> </button> </div> </div> </div> </div> <!-- Empty State --> <div v-if="restaurants?.length === 0" class="text-center py-12 text-gray-500"> <p>No restaurants found.</p> <p class="text-sm mt-2">Check your MongoDB connection and ensure the sample_restaurants database is loaded.</p> </div> </div> </template>
이 Vue 구성 요소는 Nuxt 서버 경로에서 레스토랑 데이터를 가져와 반응형 그리드 레이아웃에 표시합니다. 현재 경로를 기반으로 API 엔드포인트와 페이지 콘텐츠를 동적으로 조정하여 모든 레스토랑 또는 필터링된 결과를 표시합니다.
navbar 구성 요소 만들기
프로젝트 루트에서 다음 명령을 실행하여 탐색 모음의 Vue 구성 요소를 만듭니다.
touch app/components/Navbar.vue
app/components/Navbar.vue 파일 열고 다음 코드를 추가합니다.
<template> <nav class="flex justify-between items-center mb-6 bg-white shadow-md px-6 py-4 rounded-lg"> <NuxtLink to="/"> <img alt="MongoDB logo" class="h-10" src="https://d3cy9zhslanhfa.cloudfront.net/media/3800C044-6298-4575-A05D5C6B7623EE37/4B45D0EC-3482-4759-82DA37D8EA07D229/webimage-8A27671A-8A53-45DC-89D7BF8537F15A0D.png" /> </NuxtLink> <div class="flex gap-4"> <NuxtLink to="/" class="px-4 py-2 rounded-lg text-sm font-medium transition-colors" :class="$route.path === '/' ? 'bg-indigo-100 text-indigo-700' : 'text-gray-600 hover:bg-gray-100'" > All Restaurants </NuxtLink> <NuxtLink to="/browse" class="px-4 py-2 rounded-lg text-sm font-medium transition-colors" :class="$route.path === '/browse' ? 'bg-indigo-100 text-indigo-700' : 'text-gray-600 hover:bg-gray-100'" > Browse Filtered </NuxtLink> </div> </nav> </template>
이 Vue 구성 요소는 레스토랑 결과 위에 탐색 모음을 렌더링하며 All Restaurants 및 Filtered Restaurants 링크를 포함합니다. 이를 통해 경로 간을 탐색할 수 있습니다.
필터링된 레스토랑 페이지 만들기
프로젝트 루트에서 다음 명령을 실행하여 필터링된 레스토랑 데이터를 표시하기 위한 새 Vue 페이지를 만듭니다.
touch app/pages/browse.vue
app/pages/browse.vue 파일 열고 다음 코드를 추가합니다.
<template> <RestaurantList /> </template>
이 파일 Queens 내 이름에 Moon 단어가 포함된 모든 레스토랑을 반환하는 sample_restaurants 데이터베이스 에 대한 필터링된 쿼리 의 결과를 표시합니다. 또한 RestaurantList 및 Navbar 구성 요소를 사용하여 페이지를 구성합니다.
파일 구조 확인
계속하기 전에 파일 트리가 아래 구조와 거의 일치하는지 확인하세요. 추가 프로젝트 파일은 모두 무시해도 됩니다.
your-project-directory/ ├── .env <-- Environment variable file ├── app/ │ ├── app.vue <-- Main application component │ ├── assets/ │ │ └── css/ │ │ └── main.css <-- Tailwind config │ ├── components/ │ │ ├── Navbar.vue <-- All restaurants and filtered restaurants links │ │ └── RestaurantList.vue <-- Container for restaurant data │ └── pages/ │ ├── browse.vue <-- Filtered restaurants page │ └── index.vue <-- All restaurants page ├── server/ │ ├── api/ │ │ └── restaurants/ │ │ ├── browse.get.ts <-- Filtered restaurants route │ │ └── index.get.ts <-- All restaurants route │ └── utils/ │ └── mongodb.ts <-- MongoDB connection utility ├── nuxt.config.ts <-- Nuxt configuration file └── package.json
애플리케이션 실행하기
다음 단계를 수행하여 서버 시작하고 렌더링된 레스토랑 데이터를 확인합니다.
서버 시작
프로젝트 루트에서 다음 명령을 실행하여 개발 서버 시작합니다.
npm run dev
성공하면 명령은 터미널에 다음 정보를 출력합니다.
Nuxt 4.2.2 (with Nitro 2.13.1, Vite 7.3.1 and Vue 3.5.27) Local: http://localhost:3000/ Network: use --host to expose Using default Tailwind CSS file DevTools: press Shift + Option + D in the browser (v3.1.1) Vite client built in 22ms Vite server built in 19ms Nuxt Nitro server built in 247ms Vite server warmed up in 0ms Vite client warmed up in 1ms Connected to MongoDB Atlas

빠른 시작 튜토리얼을 완료하신 것을 축하드립니다!
이 단계를 완료하면 MongoDB deployment 에 연결하고, 샘플 레스토랑 데이터에 대해 쿼리를 실행하고, 브라우저에 결과를 렌더링하는 Nuxt 및 Vue 애플리케이션 생성됩니다.
추가 리소스
MongoDB , Nuxt 및 Vue 사용에 대해 자세히 학습 다음 리소스를 참조하세요.
Nuxt 문서
Vue documentation
Node.js 운전자 문서