개요
이 가이드 에서는 MEAN 스택 사용하는 Angular 웹 애플리케이션 만드는 방법을 학습 수 있습니다. MEAN 스택 MongoDB, Express, Angular 및 Node.js를 사용하는 웹 개발 프레임워크 이며 다음과 같은 계층으로 구성되어 있습니다.
데이터베이스 계층: MongoDB 데이터 저장 및 검색을 제공합니다.
애플리케이션 계층: Express 와 노드.js는 서버 측 로직의 중간 계층 구성합니다.
프레젠테이션 계층: Angular 사용자 인터페이스와 프론트엔드 상호 작용을 구현합니다.
Angular 애플리케이션에서 MongoDB 사용하는 이유
Angular 는 동적 웹 애플리케이션을 만드는 데 사용되는 TypeScript 프레임워크 입니다. 범위 애플리케이션 기능에 대한 내장 패키지를 제공하며, 구성 요소 기반 아키텍처로 애플리케이션 재사용 가능성이 높습니다.
TypeScript는 JavaScript 기반으로 하므로 MEAN 스택 의 각 요소는 JavaScript 와 JSON 기반으로 합니다. 결과적으로 이러한 요소 간의 통합은 간단합니다. Angular 프런트 엔드는 MongoDB 바이너리 JSON 확장인 BSON 형식으로 직접 저장 수 있는 JSON 문서를 생성하며, Express JavaScript 사용하는 최소한의 프레임워크 제공합니다. MongoDB BSON 문서에 대한 고급 인덱싱 및 쿼리 기능을 제공하며 네이티브 Node.js 드라이버 포함하고 있어 JavaScript 애플리케이션에 이상적인 데이터 저장 입니다.
빠른 시작 튜토리얼
이 튜토리얼에서는 MEAN 스택 사용하여 웹 애플리케이션 빌드 방법을 보여줍니다. 애플리케이션 샘플 레스토랑 데이터에 액세스하고, 데이터를 쿼리하고, 로컬에서 호스팅되는 사이트 에 결과를 표시합니다. 이 튜토리얼에는 MongoDB Atlas 에서 호스팅된 MongoDB 클러스터 에 연결하고 데이터베이스 의 데이터에 액세스하고 표시하는 방법에 대한 지침도 포함되어 있습니다.
팁
Angular 없이 Node.js 드라이버 사용하여 MongoDB 에 연결하려는 경우 Node.js 드라이버 시작하기 가이드 참조하세요.
프로젝트 설정
이 섹션의 단계에 따라 프로젝트 종속성을 설치하고, Atlas 클러스터를 만들고, 애플리케이션 디렉토리를 설정합니다.
MongoDB Atlas 클러스터를 생성합니다.
MongoDB Atlas 는 MongoDB 배포서버를 호스팅하다 완전 관리형 클라우드 데이터베이스 서비스입니다. MongoDB 배포서버 없는 경우, MongoDB 시작하기 튜토리얼을 완료하여 MongoDB 클러스터 무료로 만들 수 있습니다. MongoDB 시작하기 튜토리얼에서는 이 튜토리얼에서 사용되는 sample_restaurants 데이터베이스 포함하여 샘플 데이터 세트를 클러스터 에 로드하는 방법도 보여줍니다.
MongoDB 클러스터에 연결하려면 연결 URI를 사용해야 합니다. 연결 URI를 조회 방법을 학습하려면 MongoDB 시작하기 튜토리얼의 연결 문자열 추가하기 섹션을 참조하세요.
중요
연결 string 을 안전한 위치 에 저장합니다.
package.json 파일 수정합니다.
angular-quickstart/server 디렉토리 의 package.json 파일 로 이동합니다. 재사용을 위해 JavaScript 코드를 패키징하는 표준 형식인 ECMAScript 모듈을 사용하려면 "type" 필드 지정하는 기존 줄을 다음 줄로 바꾸세요.
"type": "module",
종속성을 설치합니다.
다음 명령을 실행하여 mongodb, express, cors 및 dotenv 종속성을 설치합니다.
npm install mongodb express cors dotenv
이 명령은 환경 변수를 로드하기 위해 MongoDB, Express 웹 프레임워크 , 교차 출처 리소스 공유 위한 cors Node.js 패키지 및 Dotenv를 설치합니다.
다음으로, 다음 명령을 실행 TypeScript와 필요한 유형 정의를 설치합니다.
npm install -D typescript @types/node @types/cors @types/express tsx
이 명령은 TypeScript, 노드.js 및 Express 에 대한 유형 정의, TypeScript 파일을 직접 실행 위한 도구인 tsx를 설치합니다.
백엔드 구성
프로젝트 구조 및 종속성을 설정한 후 이 섹션의 단계에 따라 웹 서버 구성하고 MongoDB 에 연결합니다.
Express 웹 서버 구성합니다.
angular-quickstart/server 디렉토리 에 server.ts 라는 파일 만들고 다음 코드를 붙여넣습니다.
import express from "express"; import cors from "cors"; import restaurants from "./routes/restaurant.js"; const PORT = process.env.PORT || 5050; const app = express(); app.use(cors()); app.use(express.json()); app.use("/restaurant", restaurants); // start the Express server app.listen(PORT, () => { console.log(`Server listening on port ${PORT}`); });
환경 변수를 설정합니다.
server 디렉토리 에서 .env 파일 만들고 다음 코드를 붙여넣습니다.
MONGODB_URI=<connection string> PORT=5050
<connection string> 자리 표시자를 이전 단계에서 저장한 연결 문자열로 바꿉니다.
서버 를 데이터베이스 에 연결합니다.
server 디렉토리 에서 db이라는 하위 디렉토리를 만듭니다. 이 하위 디렉토리에 connection.ts 라는 새 파일 추가하고 다음 코드를 붙여넣습니다.
import "dotenv/config"; import { MongoClient, Db } from "mongodb"; const uri = process.env.MONGODB_URI || ""; const client = new MongoClient(uri); try { // Connects the client to the server await client.connect(); // Sends a ping to confirm a successful connection await client.db("admin").command({ ping: 1 }); console.log( "Pinged your deployment. You successfully connected to MongoDB!" ); } catch(err) { console.error(err); } const db: Db = client.db("sample_restaurants"); export default db;
이 파일 MongoDB 배포서버 에 연결하고, sample_restaurants 데이터베이스 에 액세스하고, 데이터베이스 연결을 테스트합니다.
서버 API 엔드포인트를 생성합니다.
server 디렉토리 에서 routes이라는 하위 디렉토리를 만듭니다. 이 하위 디렉토리에 restaurant.ts 라는 파일 만들고 다음 코드를 붙여넣습니다.
import express, { Request, Response } from "express"; import db from "../db/connection.js"; // Creates an instance of the Express router, used to define our routes const router = express.Router(); // Gets a list of all the restaurants router.get("/", async (req: Request, res: Response) => { let collection = db.collection("restaurants"); let results = await collection.find({}).toArray(); res.send(results).status(200); }); // Lists restaurants that match the query filter router.get("/browse", async (req: Request, res: Response) => { try { let collection = db.collection("restaurants"); let query = { borough: "Queens", name: { $regex: "Moon", $options: "i" }, }; let results = await collection.find(query).toArray(); res.send(results).status(200); } catch (err) { console.error(err); res.status(500).send("Error browsing restaurants"); } }); export default router;
이 파일 sample_restaurants 데이터베이스 의 restaurants 컬렉션 에 액세스하고 다음 GET 엔드포인트를 정의합니다.
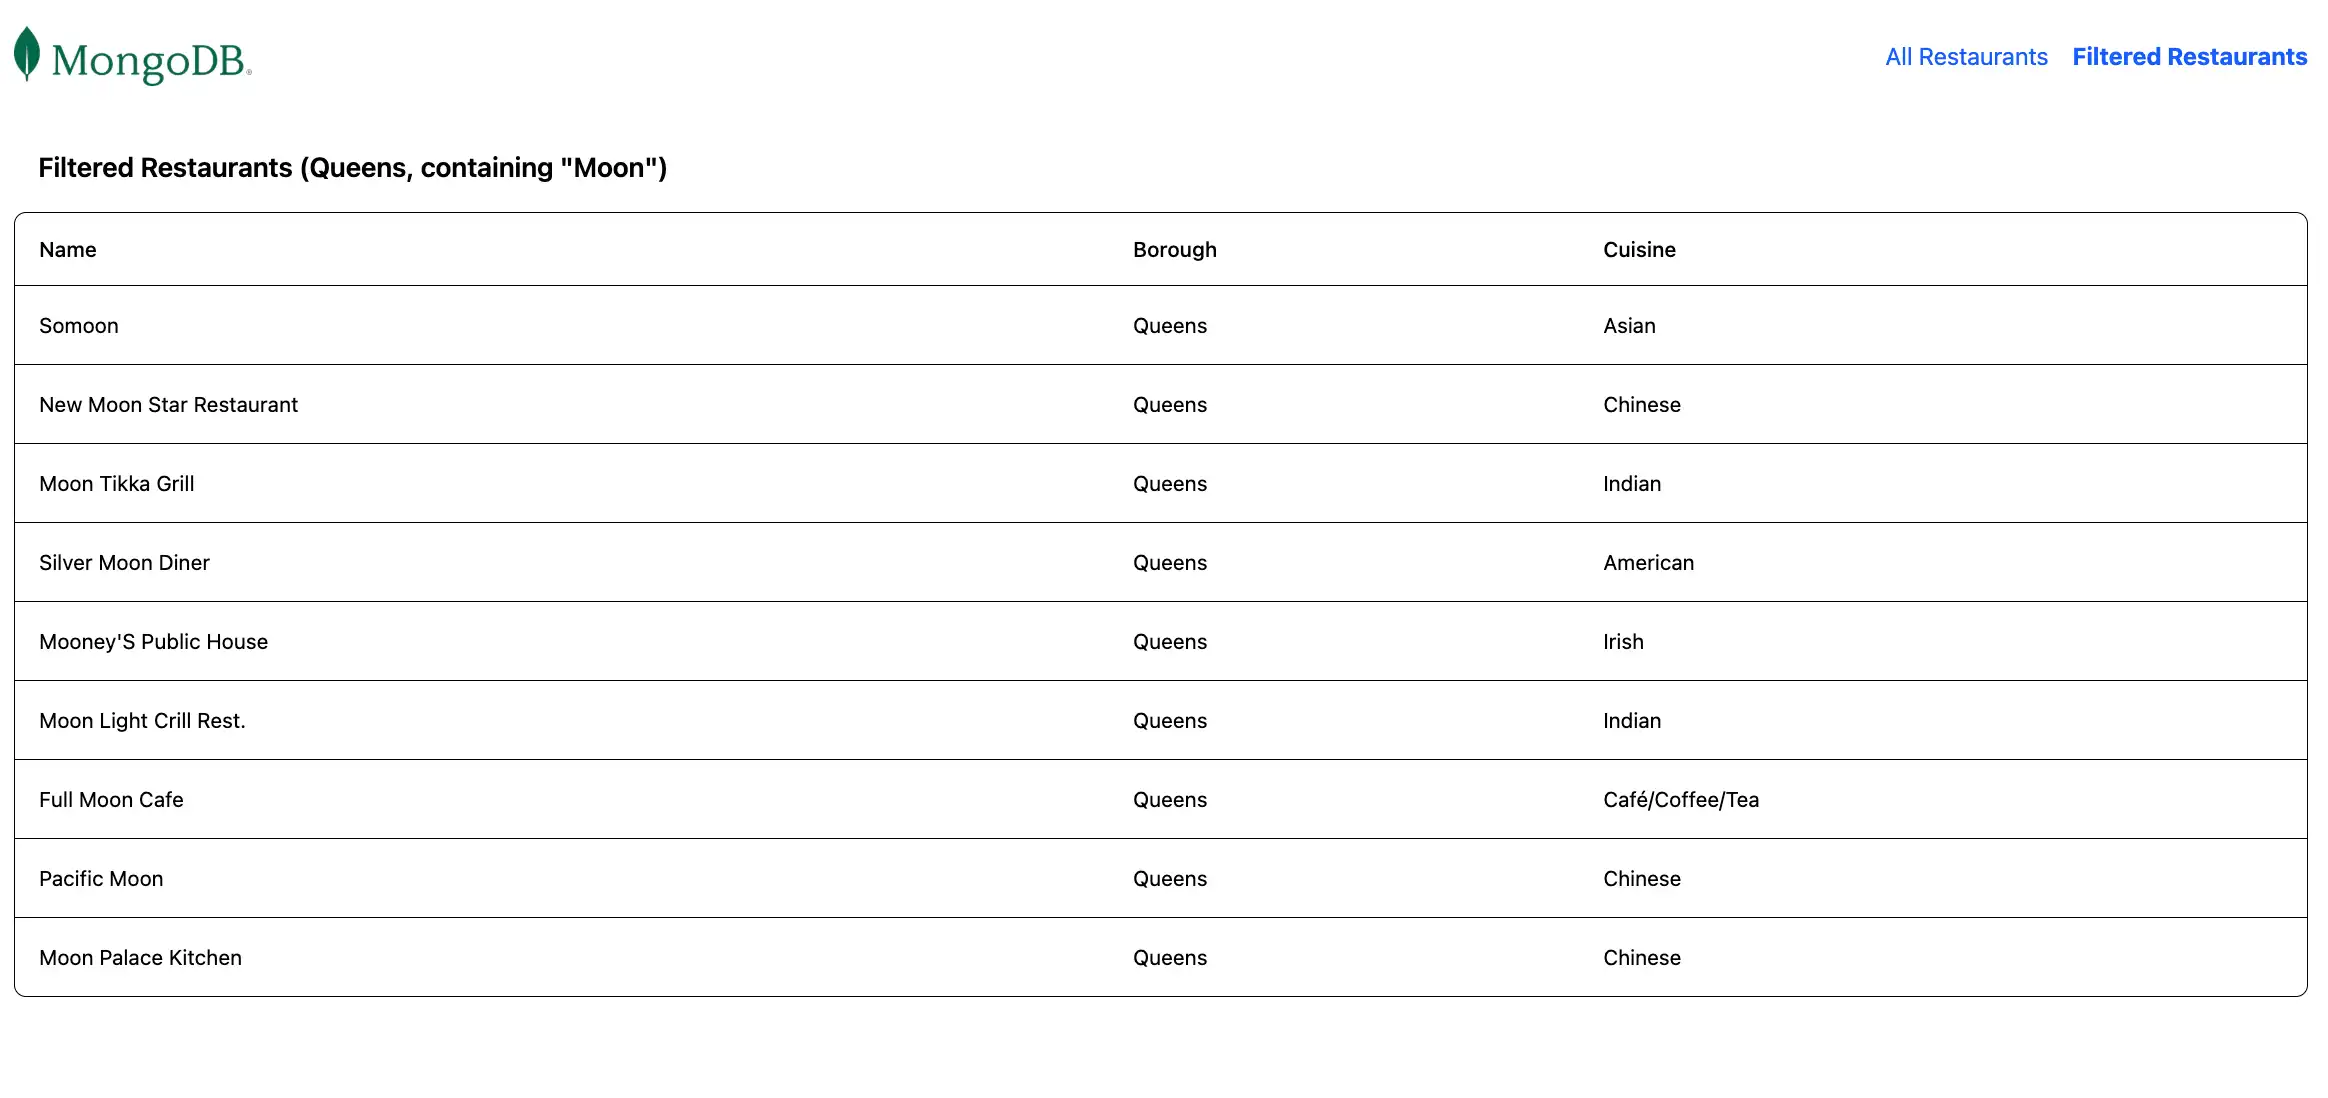
/: 샘플 컬렉션 에서 모든 레스토랑을 조회합니다./browse: 쿼리 기준과 일치하는 레스토랑을 조회하며, 이름에"Moon"라는 단어가 포함된 퀸즈의 레스토랑을 필터링합니다.
프런트 엔드 구성
애플리케이션의 백엔드를 설정한 후 이 섹션의 단계에 따라 Angular 구성하고 프런트엔드 구성 요소를 추가합니다.
Angular 애플리케이션 만듭니다.
angular-quickstart 디렉토리 로 이동하여 다음 명령을 실행 새 Angular 애플리케이션 만듭니다.
ng new client
이 명령은 일련의 구성 질문에 응답하라는 메시지를 표시합니다. 각 질문에 대해 다음 응답을 선택합니다.
어떤 스타일시트 시스템을 사용하시겠습니까? Tailwind CSS선택
서버 측 렌더링(SSR) 및 정적 사이트 생성(SSG/Prerendering)을 활성화 하시겠습니까?N 입력
Angular 권장사항 으로 구성하고 싶은 AI 도구는 무엇인가요? 원하는 도구 선택
명령을 실행 하면 프로젝트 에 프런트엔드 스캐폴딩이 포함된 client 디렉토리 생깁니다. 또한 이 명령은 UI 서식 지정을 위한 프레임워크 TailwindCSS를 사용하도록 프로젝트 구성합니다.
레스토랑 서비스를 만듭니다.
client 디렉토리 에서 다음 명령을 실행 백엔드에 대한 API 호출을 처리하는 서비스를 생성합니다.
ng generate service restaurant
client/src/app/restaurant.ts 파일 로 이동하여 내용을 다음 코드로 바꿉니다.
import { Injectable } from '@angular/core'; import { HttpClient } from '@angular/common/http'; import { Observable } from 'rxjs'; export interface Restaurant { _id: string; name: string; borough: string; cuisine: string; } ({ providedIn: 'root' }) export class RestaurantService { private apiUrl = 'http://localhost:5050/restaurant'; constructor(private http: HttpClient) {} getAllRestaurants(): Observable<Restaurant[]> { return this.http.get<Restaurant[]>(this.apiUrl); } getFilteredRestaurants(): Observable<Restaurant[]> { return this.http.get<Restaurant[]>(`${this.apiUrl}/browse`); } }
이 서비스는 Express API 에서 레스토랑 데이터를 가져오는 메서드를 정의합니다.
라우팅을 구성합니다.
client/src/app/app.routes.ts 파일 로 이동하여 내용을 다음 코드로 바꿉니다.
import { Routes } from '@angular/router'; import { RestaurantListComponent } from './restaurant-list/restaurant-list'; export const routes: Routes = [ { path: '', component: RestaurantListComponent }, { path: 'browse', component: RestaurantListComponent } ];
이 파일 클라이언트 사이드 라우팅을 구성하고 다음 경로를 정의합니다.
/:/restaurant/API 엔드포인트의 모든 레스토랑을 표시합니다./browse:/restaurant/browseAPI 엔드포인트에서 필터링된 레스토랑을 표시합니다.
애플리케이션 구성을 업데이트합니다.
client/src/app/app.config.ts 파일 로 이동하여 내용을 다음 코드로 바꿉니다.
import { ApplicationConfig, provideZoneChangeDetection } from '@angular/core'; import { provideRouter } from '@angular/router'; import { provideHttpClient } from '@angular/common/http'; import { routes } from './app.routes'; export const appConfig: ApplicationConfig = { providers: [ provideZoneChangeDetection({ eventCoalescing: true }), provideRouter(routes), provideHttpClient() ] };
이 구성은 API 요청을 위한 HTTP 클라이언트 기능을 활성화합니다.
레스토랑 목록 구성 요소를 만듭니다.
client 디렉토리 에서 다음 명령을 실행하여 레스토랑을 표시하기 위한 구성 요소를 생성합니다.
ng generate component restaurant-list
client/src/app/restaurant-list/restaurant-list.ts 파일 로 이동하여 내용을 다음 코드로 바꿉니다.
import { Component, OnInit } from '@angular/core'; import { CommonModule } from '@angular/common'; import { Router } from '@angular/router'; import { RestaurantService, Restaurant } from '../restaurant'; ({ selector: 'app-restaurant-list', standalone: true, imports: [CommonModule], templateUrl: './restaurant-list.html', styleUrl: './restaurant-list.css' }) export class RestaurantListComponent implements OnInit { restaurants: Restaurant[] = []; loading = true; error = ''; constructor( private restaurantService: RestaurantService, public router: Router ) {} ngOnInit(): void { this.loadRestaurants(); } loadRestaurants(): void { const isFiltered = this.router.url === '/browse'; const observable = isFiltered ? this.restaurantService.getFilteredRestaurants() : this.restaurantService.getAllRestaurants(); observable.subscribe({ next: (data) => { this.restaurants = data; this.loading = false; }, error: (err) => { this.error = 'Failed to load restaurants'; this.loading = false; console.error('Error loading restaurants:', err); } }); } }
그런 다음 client/src/app/restaurant-list/restaurant-list.html 파일 로 이동하여 내용을 다음 코드로 바꿉니다.
<div *ngIf="loading" class="text-center py-8"> <p class="text-gray-600">Loading restaurants...</p> </div> <div *ngIf="error" class="bg-red-100 border border-red-400 text-red-700 px-4 py-3 rounded"> {{ error }} </div> <div *ngIf="!loading && !error"> <h3 class="text-lg font-semibold p-4"> {{ router.url === '/browse' ? 'Filtered Restaurants (Queens, containing "Moon")' : 'All Restaurants' }} </h3> <div class="border rounded-lg overflow-hidden"> <div class="relative w-full overflow-auto"> <table class="w-full caption-bottom text-sm"> <thead class="[&_tr]:border-b"> <tr class="border-b transition-colors hover:bg-muted/50 data-[state=selected]:bg-muted"> <th class="h-12 px-4 text-left align-middle font-medium text-muted-foreground [&:has([role=checkbox])]:pr-0"> Name </th> <th class="h-12 px-4 text-left align-middle font-medium text-muted-foreground [&:has([role=checkbox])]:pr-0"> Borough </th> <th class="h-12 px-4 text-left align-middle font-medium text-muted-foreground [&:has([role=checkbox])]:pr-0"> Cuisine </th> </tr> </thead> <tbody class="[&_tr:last-child]:border-0"> @for (restaurant of restaurants; track restaurant._id) { <tr class="border-b transition-colors hover:bg-muted/50 data-[state=selected]:bg-muted"> <td class="p-4 align-middle [&:has([role=checkbox])]:pr-0"> {{ restaurant.name }} </td> <td class="p-4 align-middle [&:has([role=checkbox])]:pr-0"> {{ restaurant.borough }} </td> <td class="p-4 align-middle [&:has([role=checkbox])]:pr-0"> {{ restaurant.cuisine }} </td> </tr> } </tbody> </table> </div> </div> </div>
이 구성 요소는 현재 경로를 기반으로 레스토랑 정보를 조회하고 표시합니다.
기본 애플리케이션 구성 요소를 업데이트합니다.
client/src/app/app.ts 파일 로 이동하여 내용을 다음 코드로 바꿉니다.
import { Component } from '@angular/core'; import { RouterOutlet, RouterLink, RouterLinkActive } from '@angular/router'; ({ selector: 'app-root', standalone: true, imports: [RouterOutlet, RouterLink, RouterLinkActive], templateUrl: './app.html', styleUrl: './app.css' }) export class AppComponent { title = 'Restaurant Browser'; }
그런 다음 client/src/app/app.html 파일 로 이동하여 내용을 다음 코드로 바꿉니다.
<div class="w-full p-6"> <nav class="flex justify-between items-center mb-6"> <a routerLink="/"> <img alt="MongoDB logo" class="h-10 inline" src="https://d3cy9zhslanhfa.cloudfront.net/media/3800C044-6298-4575-A05D5C6B7623EE37/4B45D0EC-3482-4759-82DA37D8EA07D229/webimage-8A27671A-8A53-45DC-89D7BF8537F15A0D.png" /> </a> <div class="flex gap-4"> <a routerLink="/" routerLinkActive="font-bold" [routerLinkActiveOptions]="{exact: true}" class="text-blue-600 hover:underline"> All Restaurants </a> <a routerLink="/browse" routerLinkActive="font-bold" class="text-blue-600 hover:underline"> Filtered Restaurants </a> </div> </nav> <router-outlet></router-outlet> </div>
이는 탐색을 포함하고 현재 경로를 기반으로 적절한 하위 구성 요소를 렌더링하는 기본 애플리케이션 구성 요소입니다.
기본 파일 업데이트합니다.
client/src/main.ts 파일 로 이동하여 내용을 다음 코드로 바꿉니다.
import 'zone.js'; import { bootstrapApplication } from '@angular/platform-browser'; import { appConfig } from './app/app.config'; import { AppComponent } from './app/app'; bootstrapApplication(AppComponent, appConfig) .catch((err) => console.error(err));
이 파일 애플리케이션 의 진입 점 역할을 하며 구성을 적용하고 렌더링합니다.
애플리케이션 실행하기
마지막으로 이 섹션의 단계에 따라 애플리케이션 실행 하고 렌더링된 레스토랑 데이터를 확인합니다.
클라이언트 애플리케이션 실행합니다.
별도의 터미널 창 에서 client 디렉토리 로 이동합니다. 다음 명령을 실행하여 Angular 프런트 엔드를 시작합니다.
ng serve
성공적인 하면 이 명령은 다음 정보를 출력합니다.
Application bundle generation complete. Watch mode enabled. Watching for file changes... NOTE: Raw file sizes do not reflect development server per-request transformations. ➜ Local: http://localhost:4200/ ➜ press h + enter to show help
Angular 애플리케이션 은 데이터를 조회 하기 위해 포트 4200 에서 포트 5050 로 HTTP 요청을 수행합니다.
애플리케이션 사이트 엽니다.
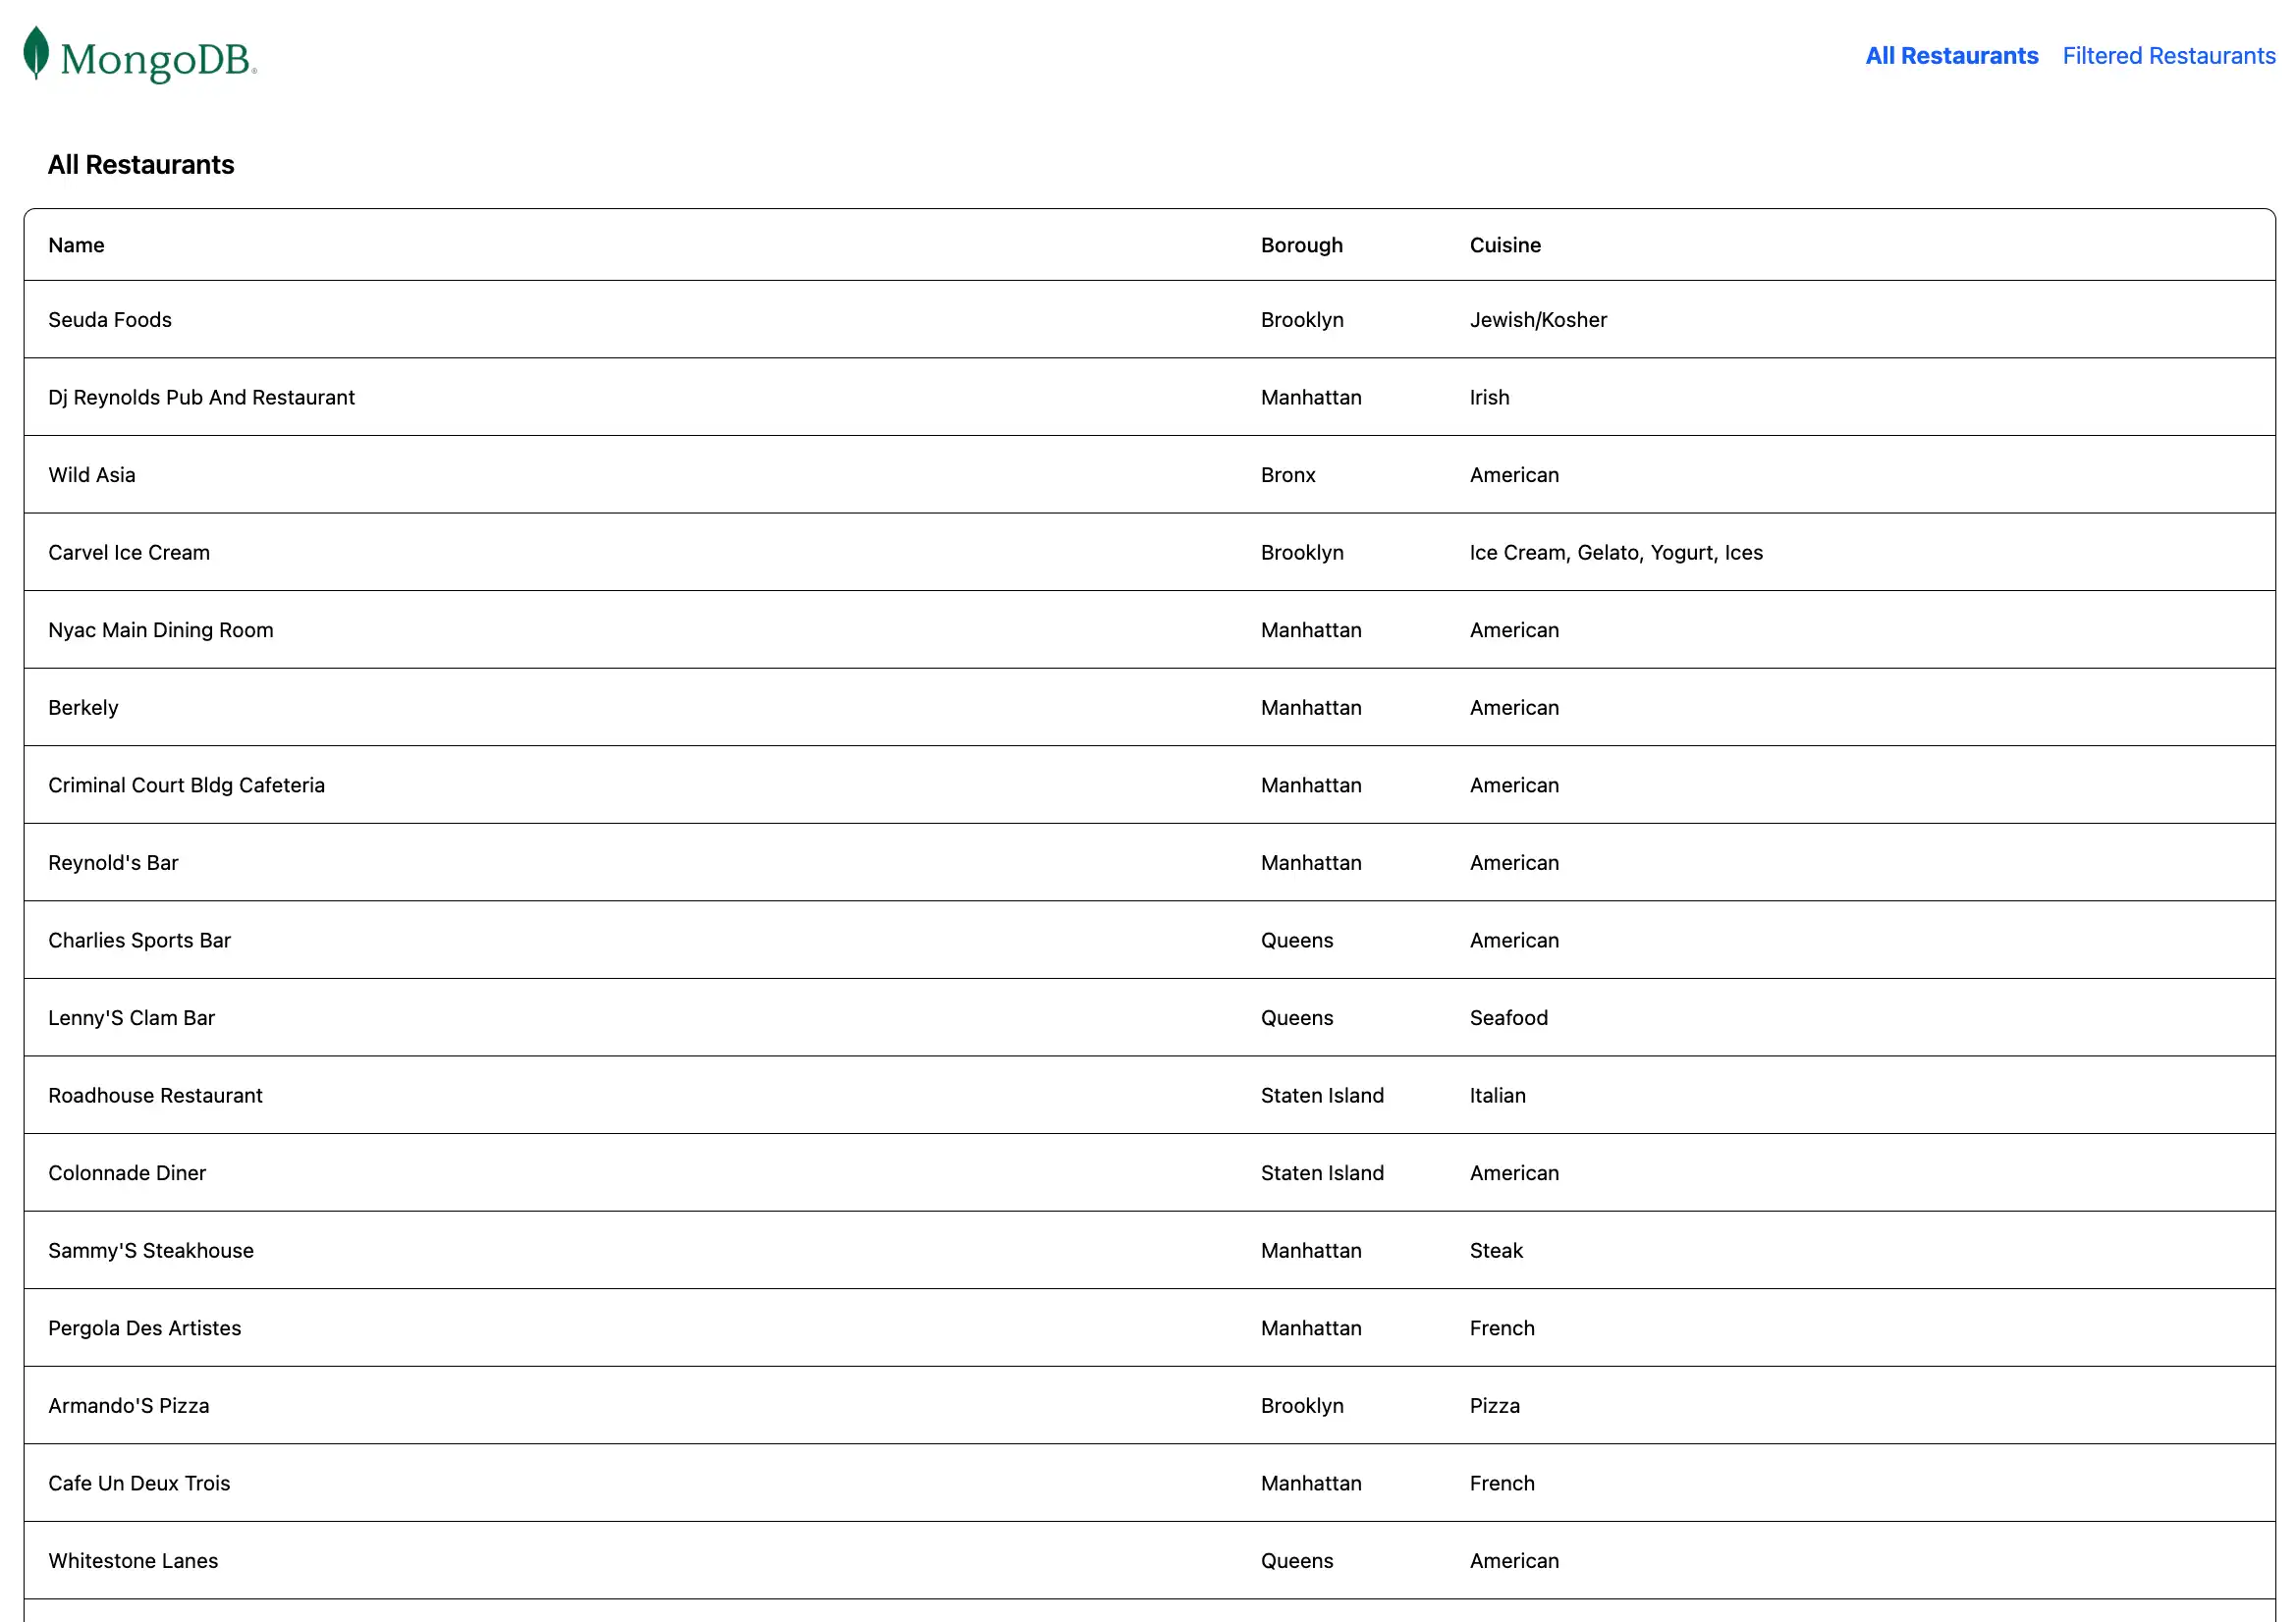
http://localhost:4200/ URL 엽니다. 초기 방문 페이지에는 sample_restaurants.restaurants 컬렉션 의 모든 레스토랑 목록이 표시됩니다.

그런 다음 탐색 모음에서 Filtered Restaurants 링크를 클릭하여 name 및 borough 필드 쿼리 와 일치하는 레스토랑을 확인합니다.

빠른 시작 튜토리얼을 완료하신 것을 축하드립니다!
이 단계를 완료하면 MongoDB 배포서버에 연결하고, 샘플 레스토랑 데이터에 대해 쿼리 실행하고, 로컬로 호스팅되는 웹사이트 에 결과를 렌더링하는 Angular 웹 애플리케이션 갖게 됩니다.
추가 리소스
Angular, MongoDB 및 MEAN 스택 에 대해 자세히 학습 다음 리소스를 참조하세요.
Angular documentation
Express 문서
Node.js 운전자 문서