Retrieval-augmented generation (RAG) is an architecture used to augment large language models (LLMs) with additional data so that they can generate more accurate responses. You can implement RAG in your generative AI applications by combining an LLM with a retrieval system powered by MongoDB Vector Search.
Get Started
To quickly try RAG with MongoDB Vector Search, use the Chatbot Demo Builder in the MongoDB Search Playground. To learn more, see Chatbot Demo Builder in Search Playground.
To implement your own RAG system with MongoDB Vector Search, see the tutorial on this page.
Why use RAG?
When working with LLMs, you might encounter the following limitations:
Stale data: LLMs are trained on a static dataset up to a certain point in time. This means that they have a limited knowledge base and might use outdated data.
No access to additional data: LLMs don't have access to local, personalized, or domain-specific data. Therefore, they can lack knowledge about specific domains.
Hallucinations: When grounded in incomplete or outdated data, LLMs can generate inaccurate responses.
You can address these limitations by taking the following steps to implement RAG:
Ingestion: Store your custom data as vector embeddings in a vector database, such as MongoDB. This allows you to create a knowledge base of up-to-date and personalized data.
Retrieval: Retrieve semantically similar documents from the database based on the user's question by using a search solution, such as MongoDB Vector Search. These documents augment the LLM with additional, relevant data.
Generation: Prompt the LLM. The LLM uses the retrieved documents as context to generate a more accurate and relevant response, reducing hallucinations.
RAG is an effective architecture for building AI chatbots, as it enables AI systems to provide personalized, domain-specific responses. To create production-ready chatbots, configure a server to route requests and build a user interface on top of your RAG implementation.
RAG with MongoDB Vector Search
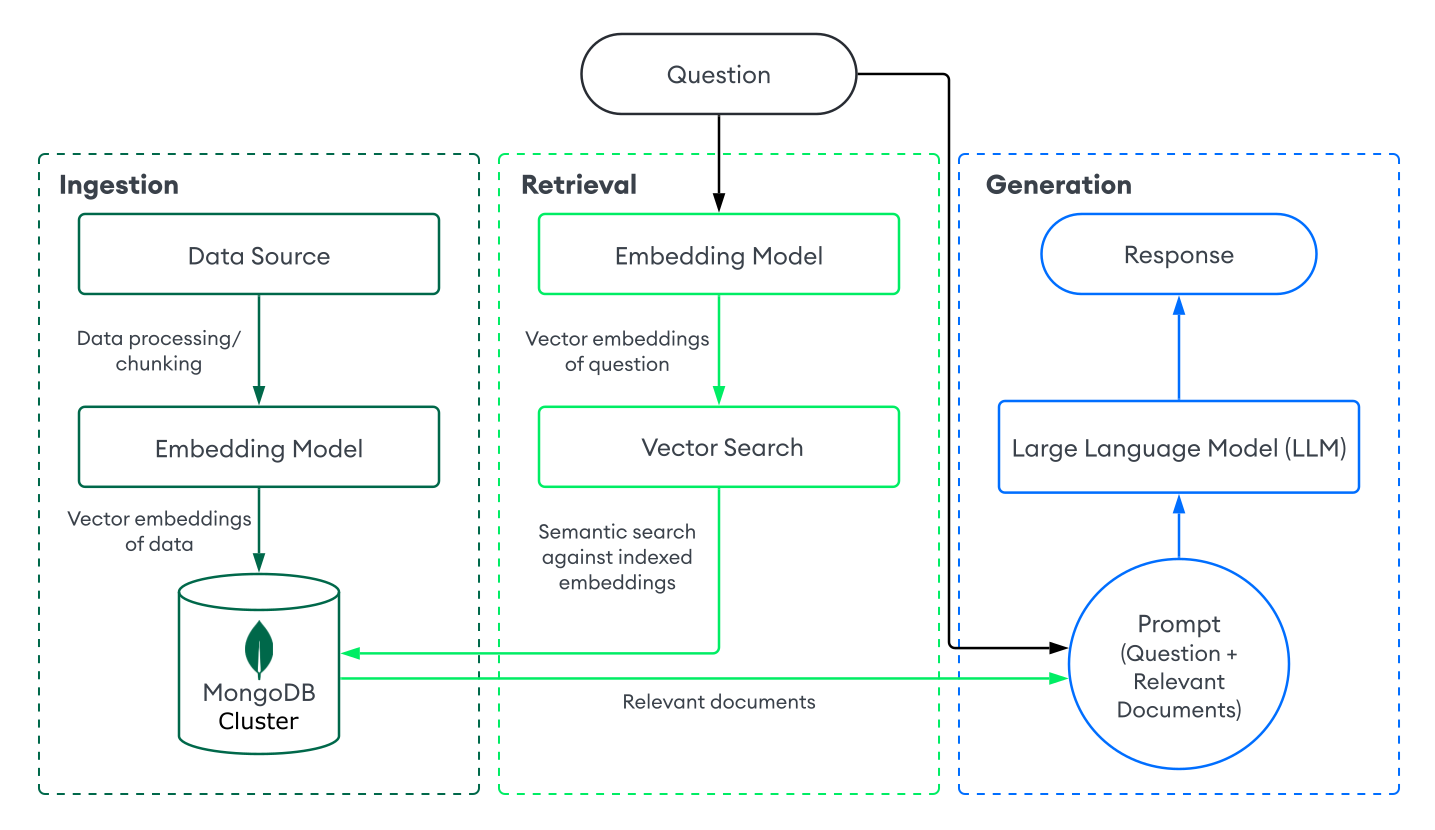
To implement RAG with MongoDB Vector Search, you ingest data into MongoDB, retrieve documents with MongoDB Vector Search, and generate responses using an LLM. This section describes the components of a basic, or naive, RAG implementation with MongoDB Vector Search. For step-by-step instructions, see Tutorial.
Duration: 5 Minutes
Ingestion
Data ingestion for RAG involves processing your custom data and storing it in a vector database to prepare it for retrieval. To create a basic ingestion pipeline with MongoDB as the vector database, do the following:
Prepare your data.
Load, process, and chunk, your data to prepare it for your RAG application. Chunking involves splitting your data into smaller parts for optimal retrieval.
Convert the data to vector embeddings.
Convert your data into vector embeddings by using an embedding model. To learn more, see How to Create Vector Embeddings Manually.
Store the data and embeddings in MongoDB.
Store these embeddings in your cluster. You store embeddings as a field alongside other data in your collection.
Retrieval
Building a retrieval system involves searching for and returning the most relevant documents from your vector database to augment the LLM with. To retrieve relevant documents with MongoDB Vector Search, you convert the user's question into vector embeddings and run a vector search query against the data in your MongoDB collection to find documents with the most similar embeddings.
To perform basic retrieval with MongoDB Vector Search, do the following:
Define an MongoDB Vector Search index on the collection that contains your vector embeddings.
Choose one of the following methods to retrieve documents based on the user's question:
Use an MongoDB Vector Search integration with a popular framework or service. These integrations include built-in libraries and tools that enable you to easily build retrieval systems with MongoDB Vector Search.
Build your own retrieval system. You can define your own functions and pipelines to run MongoDB Vector Search queries specific to your use case.
To learn how to build a basic retrieval system with MongoDB Vector Search, see Tutorial.
Generation
To generate responses, combine your retrieval system with an LLM. After you perform a vector search to retrieve relevant documents, you provide the user's question along with the relevant documents as context to the LLM so that it can generate a more accurate response.
Choose one of the following methods to connect to an LLM:
Use an MongoDB Vector Search integration with a popular framework or service. These integrations include built-in libraries and tools to help you connect to LLMs with minimal set-up.
Call the LLM's API. Most AI providers offer APIs to their generative models that you can use to generate responses.
Load an open-source LLM. If you don't have API keys or credits, you can use an open-source LLM by loading it locally from your application. For an example implementation, see the Build a Local RAG Implementation with MongoDB Vector Search tutorial.
Tutorial
The following example demonstrates how to implement RAG with a retrieval system powered by MongoDB Vector Search. Select your preferred embedding model, LLM, and programming language to get started:
Next Steps
For additional RAG tutorials, see the following resources:
To learn how to implement RAG with popular LLM frameworks and AI services, see MongoDB AI Integrations.
To learn how to implement RAG using a local Atlas deployment and local models, see Build a Local RAG Implementation with MongoDB Vector Search.
For use-case based tutorials and interactive Python notebooks, see Docs Notebooks Repository and Generative AI Use Cases Repository.
To build AI agents and implement agentic RAG, see Build AI Agents with MongoDB.
Improve Your Results
To optimize your RAG applications, ensure that you're using a powerful embedding model like Voyage AI to generate high-quality vector embeddings.
Additionally, MongoDB Vector Search supports advanced retrieval systems. You can seamlessly index vector data along with your other data in your cluster. This allows you to improve your results by pre-filtering on other fields in your collection or performing hybrid search that combine semantic search with full-text search results.
Chunking Strategies
Chunking breaks large documents into smaller segments before generating embeddings. The right chunking strategy can significantly improve retrieval quality for your RAG application.
A chunking strategy consists of the following key components:
Splitting technique: Determines where to place chunk boundaries, such as paragraph boundaries, programming language-specific separators, tokens, or semantic boundaries.
Chunk size: Maximum number of characters or tokens per chunk.
Chunk overlap: Number of overlapping characters or tokens between adjacent chunks. Overlap helps preserve context across chunk boundaries.
Common chunking strategies include:
Strategy | Best For |
|---|---|
Fixed token | Simple use cases with uniform content structure. |
Fixed token with overlap | General-purpose chunking where context spans chunk boundaries. |
Recursive | Text documents where you want to preserve paragraph and sentence boundaries. |
Language-specific recursive | Code or technical documentation with programming language snippets. |
Semantic | Documents without clear structural boundaries, such as essays or narrative content. |
To experiment with chunking strategies, use the Chatbot Demo Builder in the MongoDB Search Playground, which lets you try recursive chunking and fixed token chunking with overlap.
For a hands-on tutorial that evaluates different chunking strategies using the Ragas framework, see the Chunking Strategies notebook in the GenAI-Showcase repository.
You can also use the following resources: