Overview
FastAPI 是一个现代、高性能、可立即投入生产的异步Python Web框架,设计用于使用标准Python类型提示构建 API。在本教程中,您可以学习;了解如何构建集成MongoDB和 FastAPI 的完整增删改查应用程序。
非阻塞架构
FastAPI 的异步、非阻塞架构使其能够在不依赖多线程的情况下处理数千个并发请求。它使用 Python 的 asyncio事件循环通过协程管理并发。这允许应用程序在等待查询返回时暂停请求。这样可以减少内存使用量并减少延迟。
内置功能和集成
FastAPI 具有多个内置和功能,包括以下组件:
Pydantic,用于自动数据解析、验证和序列化
OpenAPI 和JSON schema,支持自动生成的交互式API文档
轻量级 Python 依赖注入系统,提供简洁且可测试的代码
支持 OAuth2 和JSON web token身份验证和授权
这些功能最大限度地减少了样板代码,从而简化了开发。有关 FastAPI 功能的更多信息,请参阅FastAPI网站。
Tutorial
您可以在MongoDB with FastAPI示例项目 Github存储库中找到本教程的完整示例应用。
先决条件
在开始本教程之前,确保已安装并设立以下组件:
Python v3.9 - 3.11
MongoDB Atlas 群集。要学习;了解如何设立集群,请参阅 入门指南以了解详情。
设置
安装依赖项,连接到MongoDB并启动 FastAPI服务器:
克隆示例示例
在终端中运行以下命令,从mongodb-pymongo-fastapi Github存储库库克隆代码:
git clone git@github.com:mongodb-developer/mongodb-pymongo-fastapi.git cd mongodb-pymongo-fastapi
检索连接字符串
按照查找您的MongoDB Atlas连接字符串指南检索连接字符串。
在终端中运行以下代码以创建环境变量来存储连接字符串:
export MONGODB_URL="mongodb+srv://<username>:<password>@<url>/<db>?retryWrites=true&w=majority"
将应用程序连接到集群
示例应用程序的所有代码都存储在 mongodb-pymongo-fastapi Github存储库的应用文件中。
使用此代码执行以下操作:
使用带有
MONGODB_URL环境变量的AsyncMongoClient()方法并指定名为college的数据库,连接到MongoDB Atlas 群集。创建指向
college数据库的指针。创建指向
students集合的指针
client = AsyncMongoClient(os.environ["MONGODB_URL"],server_api=pymongo.server_api.ServerApi(version="1", strict=True,deprecation_errors=True)) db = client.get_database("college") student_collection = db.get_collection("students")
AsyncMongoClient() 调用包含一个 server_api 参数,用于在您的连接上启用Stable API功能。确保您的部署使用版本为 5.0 或更高版本的MongoDB服务器。有关更多信息,请参阅本指南的稳定API部分。
查看数据库模型
此应用程序具有三个模型:StudentModel、UpdateStudentModel 和 StudentCollection。这些模型在 app.py文件中定义。
应用程序中的所有模型都基于Pydantic BaseModel构建,后者提供基本类型验证、 JSON解析和序列化以及基本错误处理。
StudentModel 类
StudentModel 是用作大多数端点响应模型的主节点 (primary node in the replica set)模型。
MongoDB使用 _id 作为文档的默认标识符。但是,在 Pydantic 中,以下划线开头的字段名称被视为私有属性,不能直接赋值。为了解决这个问题,我们可以在 Pydantic 模型中将字段命名为 id ,但别名为 _id ,以便它正确映射到MongoDB。
id字段的类型为 PyObjectId,这是一种带有 BeforeValidator 注释的自定义类型,可将值强制转换为字符串。 这确保了 MongoDB 的 ObjectId 可以被模型正确接受和序列化。
此设置需要以下 model_config 选项:
populate_by_name=True:允许使用字段名称 (id) 或其别名 (_id) 来初始化模型arbitrary_types_allowed=True:启用对自定义类型的支持,例如PyObjectId
id字段也定义为可选字段,默认值为 None,因此可以在不指定 id 的情况下创建新的 StudentModel实例。插入文档时, MongoDB会自动生成一个 _id,并在API响应中返回该值。
model_config 还包括 json_schema_extra 设置,用于定义 FastAPI 自动生成的 OpenAPI (Swagger) 文档中使用的示例数据。
您可以在 app.py文件中以下代码中查看 StudentModel 定义:
# Represents an ObjectId field in the database. # It will be represented as a `str` on the model so that it can be serialized to JSON. PyObjectId = Annotated[str, BeforeValidator(str)] class StudentModel(BaseModel): """ Container for a single student record. """ # The primary key for the StudentModel, stored as a `str` on the instance. # This will be aliased to ``_id`` when sent to MongoDB, # but provided as ``id`` in the API requests and responses. id: Optional[PyObjectId] = Field(alias="_id", default=None) name: str = Field(...) email: EmailStr = Field(...) course: str = Field(...) gpa: float = Field(..., le=4.0) model_config = ConfigDict( populate_by_name=True, arbitrary_types_allowed=True, json_schema_extra={ "example": { "name": "Jane Doe", "email": "jdoe@example.com", "course": "Experiments, Science, and Fashion in Nanophotonics", "gpa": 3.0, } }, )
UpdateStudentModel 类
UpdateStudentModel 与 StudentModel 有以下主要区别:
它没有
id属性,因为该属性无法修改所有字段都是可选的,因此您可以仅提供要更新的字段
mongo_config变量包括json_encoders={ObjectId: str}
FastAPI 将数据编码和解码为JSON字符串,这并不支持MongoDB 的BSON数据类型可以存储的所有数据类型。BSON支持更多非JSON原生数据类型,包括用于默认UUID 属性 _id 的 ObjectId。因此,必须将 ObjectId 对象转换为字符串,然后再将其存储在 _id字段中。json_encoders 设置指示 Pydantic 执行此操作。
有关BSON与JSON比较的更多信息,请参阅JSON和BSON MongoDB一文。
您可以在 app.py文件中以下代码中查看 UpdateStudentModel 定义:
class UpdateStudentModel(BaseModel): """ A set of optional updates to be made to a document in the database. """ name: Optional[str] = None email: Optional[EmailStr] = None course: Optional[str] = None gpa: Optional[float] = None model_config = ConfigDict( arbitrary_types_allowed=True, json_encoders={ObjectId: str}, json_schema_extra={ "example": { "name": "Jane Doe", "email": "jdoe@example.com", "course": "Experiments, Science, and Fashion in anophotonics", "gpa": 3.0, } }, )
StudentCollection 类
StudentCollection 类被定义为封装 StudentModel 实例列表。此端点的目的是提供一定程度的防范JSON劫持的保护,即恶意用户尝试利用浏览器处理JSON数组的方式来访问权限敏感数据。有关更多信息,您可以阅读 Haacked网站上的JSON劫持文章。
您可以在 app.py文件中以下代码中查看 StudentCollection 定义:
class StudentCollection(BaseModel): """ A container holding a list of `StudentModel` instances """ students: List[StudentModel]
查看应用程序路由
下表描述了此应用程序中定义的应用程序路由:
route | 操作 |
|---|---|
| 创建新学生 |
| 查看所有学生的列表 |
| 查看单个学生 |
| 更新学生 |
| 删除学生 |
这些路由在 app.py文件中定义,如以下部分所述:
学生路由
create_student 路由在 POST请求中接收JSON字符串形式的新学生数据。 它将JSON请求正文解码为Python字典,然后将其传递给MongoDB客户端。
insert_one 方法响应包括新创建的学生的 _id,以 id 形式提供,因为此端点在 post 装饰器调用中指定了 response_model_by_alias=False。插入新学生后,该方法使用 inserted_id 查找正确的文档并将其返回到 JSONResponse 中。
默认下,FastAPI 返回HTTP 200 状态代码,但此路由返回 201(“已创建”)以明确指示学生已创建。
您可以在 app.py文件中以下代码中查看 create_student 定义:
async def create_student(student: StudentModel = Body(...)): """ Insert a new student record. A unique ``id`` will be created and provided in the response. """ new_student = student.model_dump(by_alias=True, exclude=["id"]) result = await student_collection.insert_one(new_student) new_student["_id"] = result.inserted_id return new_student
读取路由
应用程序有一个路由用于查看所有学生,还有一个路由用于查看单个学生(由学生的 id 指定)。
您可以在 app.py文件中以下代码中查看 list_students 定义:
async def list_students(): """ List all the student data in the database. The response is unpaginated and limited to 1000 results. """ return StudentCollection(students=await student_collection.find().to_list(1000))
学生详细信息路由的路径参数为 id,FastAPI 将其作为参数传递给 show_student 函数。它使用 id 尝试在数据库中查找相应的学生。
如果具有指定 id 的文档不存在,则会引发状态为 404 的 HTTPException。
您可以在 app.py文件中以下代码中查看 show_students 定义:
async def show_student(id: str): """ Get the record for a specific student, looked up by ``id``. """ if ( student := await student_collection.find_one({"_id": ObjectId(id)}) ) is not None: return student raise HTTPException(status_code=404, detail="Student {id} not found")
更新路由
update_student 路由的功能类似于 create_student 和 show_student 路由的组合。它接收要更新的学生的 id 以及JSON正文中的新数据。
此路由遍历接收到的数据中的所有参数,仅修改提供的参数。它使用 find_one_and_update() to $设立 方法。
如果没有要更新的字段,则返回原始 StudentModel文档。如果找不到要更新或返回的匹配文档,则会引发 404 错误。
您可以在 app.py文件中以下代码中查看 update_student 定义:
async def update_student(id: str, student: UpdateStudentModel = Body(...)): """ Update individual fields of an existing student record. Only the provided fields will be updated. Any missing or `null` fields will be ignored. """ student = { k: v for k, v in student.model_dump(by_alias=True).items() if v is not None } if len(student) >= 1: update_result = await student_collection.find_one_and_update( {"_id": ObjectId(id)}, {"$set": student}, return_document=ReturnDocument.AFTER, ) if update_result is not None: return update_result else: raise HTTPException(status_code=404, detail=f"Student {id} not found") # The update is empty, so return the matching document: if (existing_student := await student_collection.find_one({"_id": ObjectId(id)})) is not None: return existing_student raise HTTPException(status_code=404, detail=f"Student {id} not found")
删除路由
delete_student 作用于单个文档,因此您必须在URL中提供 id。如果找到匹配的文档并成功删除,则会返回HTTP状态 204(“无内容”),并且不返回文档。如果找不到具有指定 id 的学生,则会返回 404 错误。
您可以在 app.py文件中以下代码中查看 delete_student 定义:
async def delete_student(id: str): """ Remove a single student record from the database. """ delete_result = await student_collection.delete_one({"_id": ObjectId(id)}) if delete_result.deleted_count == 1: return Response(status_code=status.HTTP_204_NO_CONTENT) raise HTTPException(status_code=404, detail=f"Student {id} not found")
测试API
现在您已了解应用程序的工作原理,可以开始使用端点了。使用以下步骤向端点发送请求并查看结果:
发送请求
导航到 http://127.0.0.1:8000/Docs。下图显示了 FastAPI服务器生成的接口。

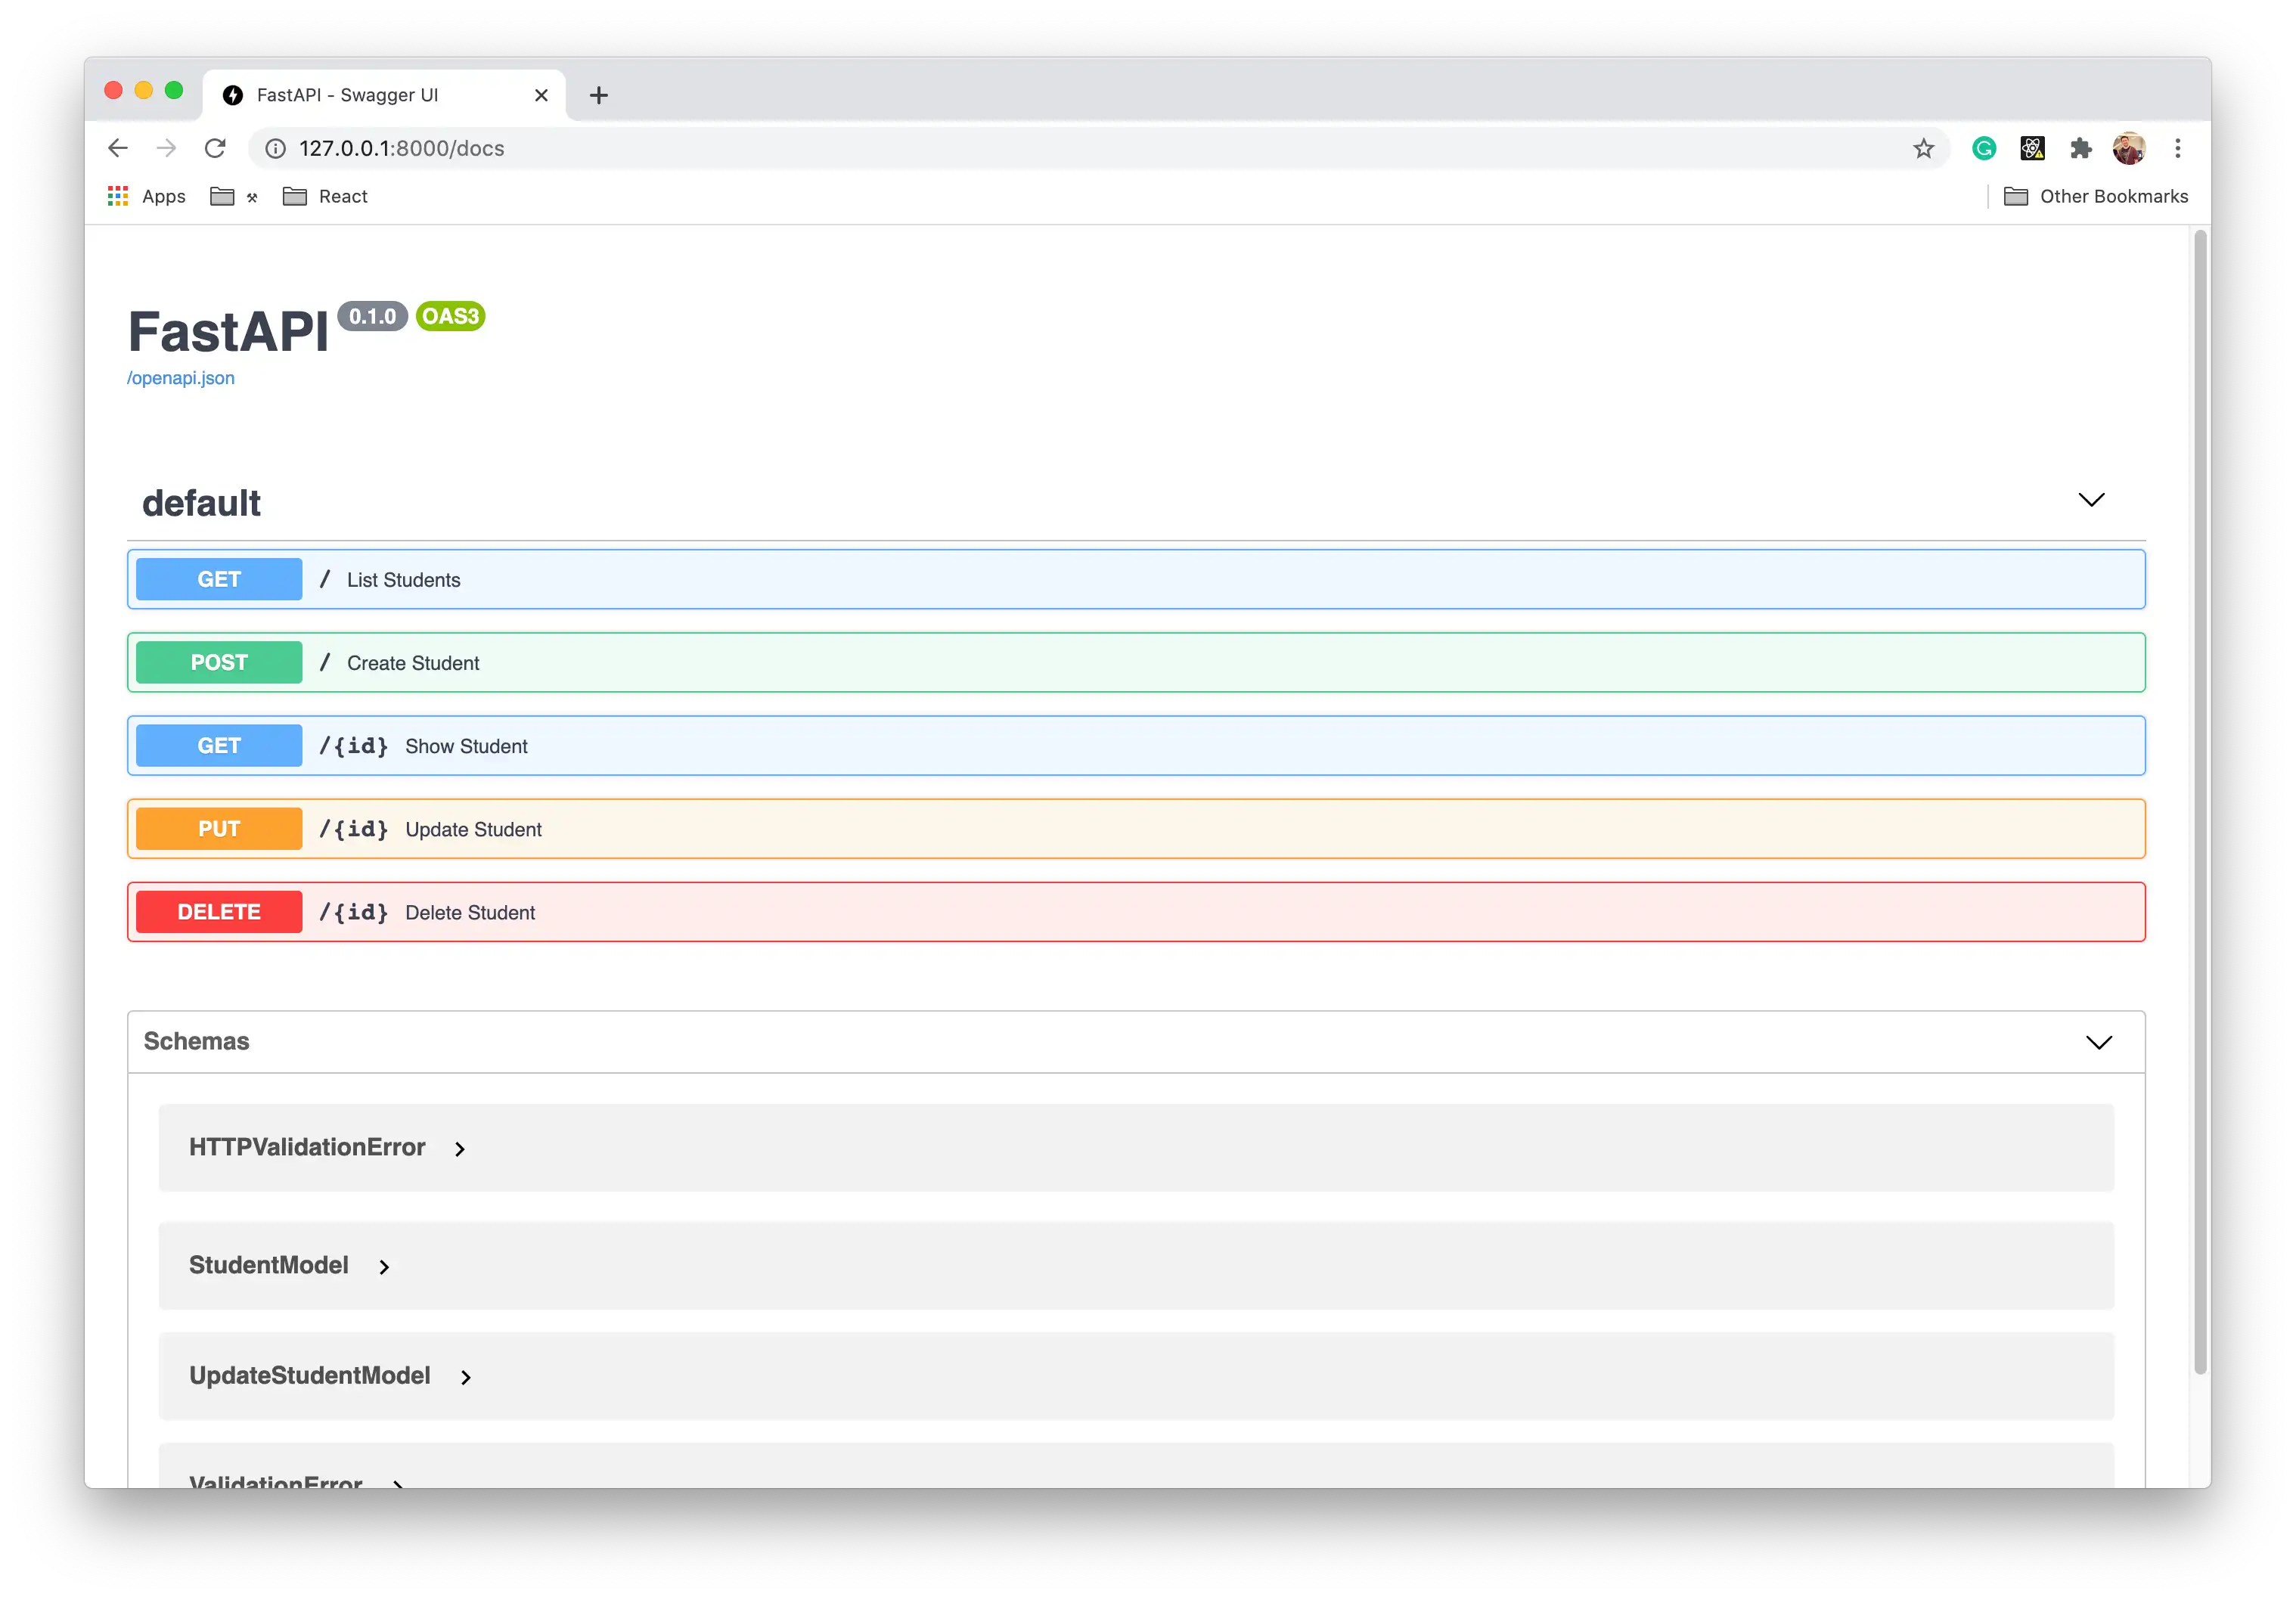
单击要向其发送请求的端点,填写所有必要的参数,然后单击 Execute。在 Show Student 端点中,您可以查看 StudentModel.model_config 变量中定义的示例数据。
提示
使用 curl 测试您的API
如果您更喜欢使用命令行,则可以使用 curl 命令发送请求,例如:
curl -X POST "http://127.0.0.1:8000/students/" \ -H "Content-Type: application/json" \ -d '{"name": "Jane Doe", "email": "jdoe@example.com", "course": "Physics", "gpa": 3.8}'
后续步骤
现在您已经基本了解了 FastAPI 如何与MongoDB和PyMongo异步驱动程序集成,您可以添加更多功能。以下列表包含一些有关如何向此应用程序添加内容的建议:
最佳实践
以下部分介绍将 FastAPI 与 MongoDB 和 PyMongo 异步驱动程序集成的一些最佳实践。
安全与环境
将敏感凭证直接存储在应用程序代码中可能会导致版本控制系统意外暴露。相反,请使用环境变量来存储连接字符串、 API密钥和其他敏感信息。
对于开发环境,您可以使用以下工具来管理环境变量:
direnv:进入目录时自动从
.envrc文件加载环境变量python-dotenv :从Python应用程序中的
.env文件加载环境变量envdir:从目录中的文件设置环境变量
Honcho:从配置文件加载环境变量
无论选择哪种环境变量控制工具,都请将任何包含密钥(例如 .env、.envrc 或类似文件)的文件添加到 .gitignore文件中,以防止将它们提交给版本控制。
对于生产部署,请使用密钥管理系统 (KMS)。您还可以在开发环境中使用KMS解决方案以增强安全性。
数据库连接生命周期
通过初始化和关闭客户端连接以响应 FastAPI应用程序初创企业和关闭事件,正确管理MongoDB连接生命周期。这种方法比在模块级别初始化连接更稳健。
将MongoDB客户端附加到 FastAPI应用程序对象,使其可供代码库中的所有路径操作函数访问。这样就无需使用全局变量并简化了依赖项管理。
使用 FastAPI 的生命周期事件来处理连接管理:
import os from contextlib import asynccontextmanager from logging import info from fastapi import FastAPI from pymongo import AsyncMongoClient async def db_lifespan(app: FastAPI): # Startup app.mongodb_client = AsyncMongoClient(os.environ["MONGODB_URL"]) app.database = app.mongodb_client.get_default_database() ping_response = await app.database.command("ping") if int(ping_response["ok"]) != 1: raise Exception("Problem connecting to database cluster.") else: info("Connected to database cluster.") yield # Shutdown await app.mongodb_client.close() app: FastAPI = FastAPI(lifespan=db_lifespan)
BSON与JSON类型处理
向MongoDB提供JSON数据的 FastAPI 端点可能包含JSON原生不支持的 ObjectId 和 Binary 类型。
您可以通过多种方式序列化 ObjectId:
使用基于字符串的 ID:将
_id字段的ObjectId替换为与 JSON 兼容的字符串值。此方法非常适合新应用程序,但如果您有现有数据,则可能不适合。自动转换:在序列化为JSON时将
ObjectId值转换为字符串表示形式,并在处理传入数据时将字符串解析回ObjectId。Pydantic 集成:使用 Pydantic 的类型注解处理自动转换,如本教程的
PyObjectId类型所示。对象文档映射器 (ODM):使用 Beanie 等 ODM,它假定
_id字段默认使用ObjectId,并自动处理序列化和反序列化。
数据建模
将数据库模式与API模式分开,以保持灵活性。这样,您就可以在不更改API接口的情况下修改MongoDB文档结构。
提供 Pydantic 类作为路径操作的 response_model,以转换、验证、文档和过滤返回的BSON数据的字段。以下代码示例展示了如何实现此技术:
# A Pydantic class modelling the *response* schema. class Profile(BaseModel): """ A profile for a single user. """ id: Optional[str] = Field( default=None, description="MongoDB document ObjectID", alias="_id" ) username: str residence: str current_location: List[float] # A path operation that returns a Profile object as JSON. app = FastAPI() async def get_profile(profile_id: str) -> Mapping[str, Any]: # Uses response_model to automatically convert, validate, and document # the returned dict without manual Profile object creation. profile = await app.profiles.find_one({"_id": profile_id}) if profile is not None: # Return BSON document. FastAPI converts it automatically. return profile else: raise HTTPException( status_code=404, detail=f"No profile with id '{profile_id}'" )
更多资源
有关 FastAPI 集成的更多信息,请参阅以下资源:
- MongoDB 的全栈 FastAPI 应用生成器
如需支持或为MongoDB Community做出贡献,请参阅MongoDB开发者社区。