This tutorial will show you how to build a full-stack MERN application with the most current tools available. The application you’ll be building is an employee management system. Before you begin, make sure that you are familiar with Node.js and React.js basics. You will also need access to a MongoDB Atlas database for this tutorial. The full code is available in the GitHub repo.
Table of contents
- What is the MERN stack?
- How to get started with the MERN stack
- Option A: Start the finished app in GitHub Codespaces (no setup required)
- Option B: Build the app locally from scratch
- Setting up the project
- Connecting to MongoDB Atlas
- Server API endpoints
- Setting up the React application
- Setting up the React router
- Creating React components
- Running the application
- Conclusion
What is the MERN stack?
MERN is a full-stack JavaScript technology stack composed of MongoDB, Express, React, and Node.js. It is one of several variants of the MEAN stack.
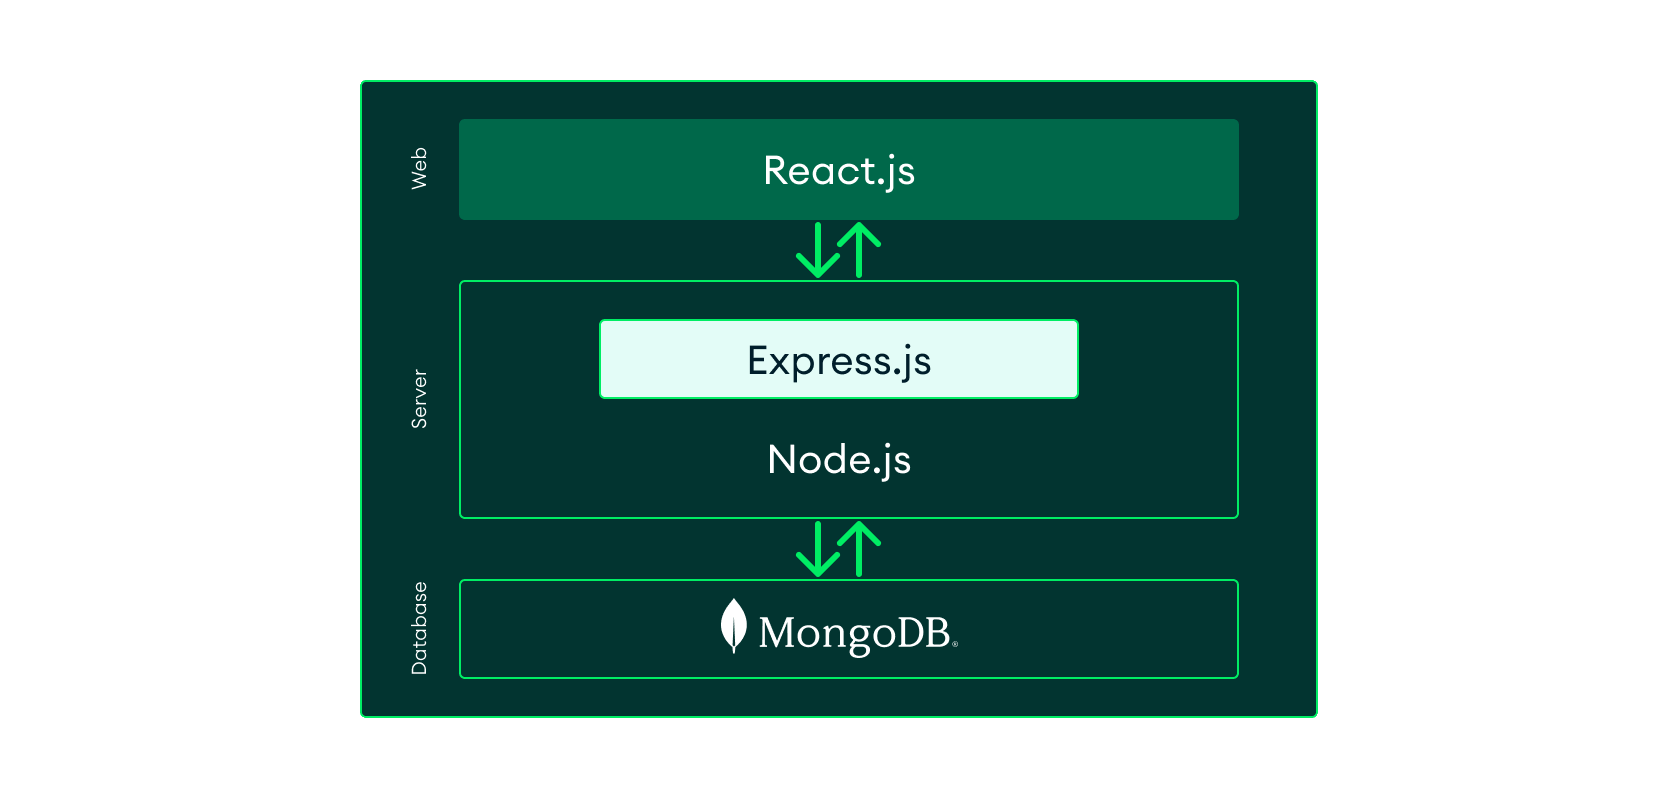
When you use the MERN stack, you work with React to implement the presentation layer, Express and Node.js to make up the middle or application layer, and MongoDB to create the database layer.
In this MERN stack tutorial, we will use these four technologies to develop a basic application that can record employee information and display it using a React front-end.
How to get started with the MERN stack
You can either run the completed app in GitHub Codespaces with no local setup or build it from scratch locally by following the rest of this tutorial.
Option A: Start the finished app in GitHub Codespaces (no setup required)
The GitHub repository for this tutorial is set up as a Dev Container. You can start the complete application in the cloud without installing Node.js, React, or MongoDB.
Create a Codespace for this project. If you’re not already signed in to GitHub, you’ll be prompted to log in. Once signed in, click Create codespace.
The Codespace automatically builds the environment and starts MongoDB with seeded sample data, the React app, and the Express API.
Once the client finishes compiling, a preview of the app opens automatically. If it doesn’t, open the Ports tab and click the 🌐 icon next to port 5173.
You will see the finished employee application. You can explore the code in the code editor. If you make any changes to the code, the app will rebuild automatically, and you can see them instantly.
Option B: Build the app locally from scratch
Alternatively, you can follow the tutorial step by step to build the app. To get started, you will need to install Node.js, register for MongoDB Atlas, and deploy a free database cluster.
Install Node.js
Install Node.js by downloading either the LTS version or the current version. Avoid installing odd-numbered versions, such as 25.9.0. They become unsupported after six months.
Note: The version used in this tutorial is v24.20.0.
To verify you have Node.js installed correctly, open a terminal window and run the following:
Deploy a free MongoDB Atlas database cluster
Follow the Get Started with Atlas guide to create your free MongoDB Atlas cluster. Be sure to complete all the steps and copy your cluster’s connection string. You’ll need it later when you connect the application to your database.
Setting up the project
MERN lets us create full-stack solutions. So, to leverage its full potential, we will be creating a MERN stack project. For this project, we will create both a back end and a front end. The front end will be implemented with React, and the back end will be implemented with MongoDB, Node.js, and Express. We will call the front-end client and the back-end server.
Let’s start by creating an empty directory: mern. This folder will contain our client and server folders.
Throughout the tutorial, we’ll use shell commands to create directories and files. Feel free to use whichever method you prefer.
Next, create a folder for the back-end, named server, and navigate into it.
Then, initialize the package.json file using npm init. To use ECMAScript Modules, you need to configure the init-type to module.
Next, install the dependencies.
The command above installs three different packages:
mongodb - the MongoDB database driver that allows your Node.js applications to connect to the database and work with data
express - the web framework for Node.js that simplifies creating a RESTful API
cors - a Node.js package that allows cross-origin resource sharing
You can check out the installed dependencies in the package.json file. It should list the packages along with their versions.
After you have ensured that dependencies were installed successfully, create a file called server.js with the following code:
mern/server/server.js
Here, you are importing the express and cors packages. Then, you read the port environment variable if configured, and finally, start the express server with app.listen().
Connecting to MongoDB Atlas
It’s time to connect the server to the database. You will use MongoDB Atlas as the database. MongoDB Atlas is a cloud-based database service that provides robust data security and reliability. MongoDB Atlas provides a free-tier cluster that never expires and lets you access a subset of Atlas features and functionality.
If you haven’t done so already, follow the Get Started with Atlas guide to create a free account, deploy your first cluster, and locate your cluster’s connection string.
Now that you have the connection string, go back to the server directory and create a config.env file. There, assign the connection string to a new ATLAS_URI variable. Once finished, your file should look similar to the one below. Replace < username >, < password >, < clusterName >, and < projectId > with your database username, password, cluster name, and project ID.
mern/server/config.env
Important: Never commit the config.env file to Git or any other source control system.
Create a folder under the server directory named db, and inside it, a file named connection.js.
There, add the following code to connect to the database:
mern/server/db/connection.js
Server API endpoints
Database done. Server done. Now, it's time for the API endpoints. Start by creating a routes folder and adding record.js in it. Navigate back to your server directory and create the new directory and file:
The routes/record.js file will also have the following lines of code in it:
mern/server/routes/record.js
If you run the application at this point, you will see the following message in your terminal as the connection is established. Notice that you’re using the built-in environment variable functionality of the latest versions of Node.js.
You should see the following output:
That’s it for the back-end. Now let’s start working on the front-end.
Setting up the React application
For the front end, you’ll use Vite, a modern way to create a React application. In a new terminal within the mern directory, run the following to set up the client app:
You will be prompted with a few options to configure the application. Choose “ESLint” for the linter, and select “Yes” when asked if you would like to “install with npm and start now”.
Open the application at http://localhost:5173/ in the browser to verify that it’s running successfully.
There are some additional dependencies that will be used in our project. Let’s start with Tailwind CSS.
Setting up Tailwind CSS
Tailwind is a utility-first CSS framework that allows you to add CSS styles by utilizing predefined class names.
Open a new terminal window and run the following in the mern/client directory:
After Tailwind is installed, you need to register the Tailwind plugin in the Vite config. Additionally, since you’re modifying the config, let’s take the chance to register a proxy that routes all requests to /record to the backend dev server that you started earlier.
mern/client/vite.config.js
Finally, add the Tailwind directive to the main CSS file and delete everything else.
mern/client/src/index.css
Setting up the React router
React Router adds client-side page routing to React. Install by running the following in the client directory:
Replace the implementation of src/main.jsx with the following code:
mern/client/src/main.jsx
You have set up the application page routes in the router variable and used RouterProvider to keep our UI in sync with the URL. RouterProvider keeps the UI in sync with the current URL and renders the route elements that match it. When users navigate between routes, React Router updates the relevant parts of the interface without performing a traditional full-page reload.
React Router isn’t required for a React application, but it becomes useful when your application has multiple views that should be represented by distinct URLs.
Creating React components
Next, you’ll create the components you defined in the routes. Create a components folder inside the client/src folder. For each component you create, you will add a new .jsx file inside the components folder. In this case, you will add Navbar.jsx, RecordList.jsx, and Record.jsx.
Navbar.jsx
In the Navbar.jsx component, you will create a navigation bar that links to the other components. Open the file and paste the following code.
mern/client/src/components/Navbar.jsx
Record list component
The following code will serve as a viewing component for our records. It fetches all records from the database using a GET method.
mern/client/src/components/RecordList.jsx
Record component
The following code serves as a form component for creating or updating records. This component will submit either a create or an update command to our server.
mern/client/src/components/Record.jsx
Now, replace the contents of src/App.jsx with the following:
mern/client/src/App.jsx
This is the main layout component. The Navbar will always be at the top of every page, and the Outlet will accept the children components, defined in the routes in the main.jsx file.
You have completed the component creation process. You also connected the React app to the back-end using fetch, which provides cleaner and easier ways to handle HTTP requests.
Running the application
To start the app, follow the steps below:
Ensure that the server app is still running. If it’s not, start it by executing the following command in the server directory:
- Ensure that the client is also still running. If not, run the following in the client directory:
Open the client application in your browser - http://localhost:5173/.
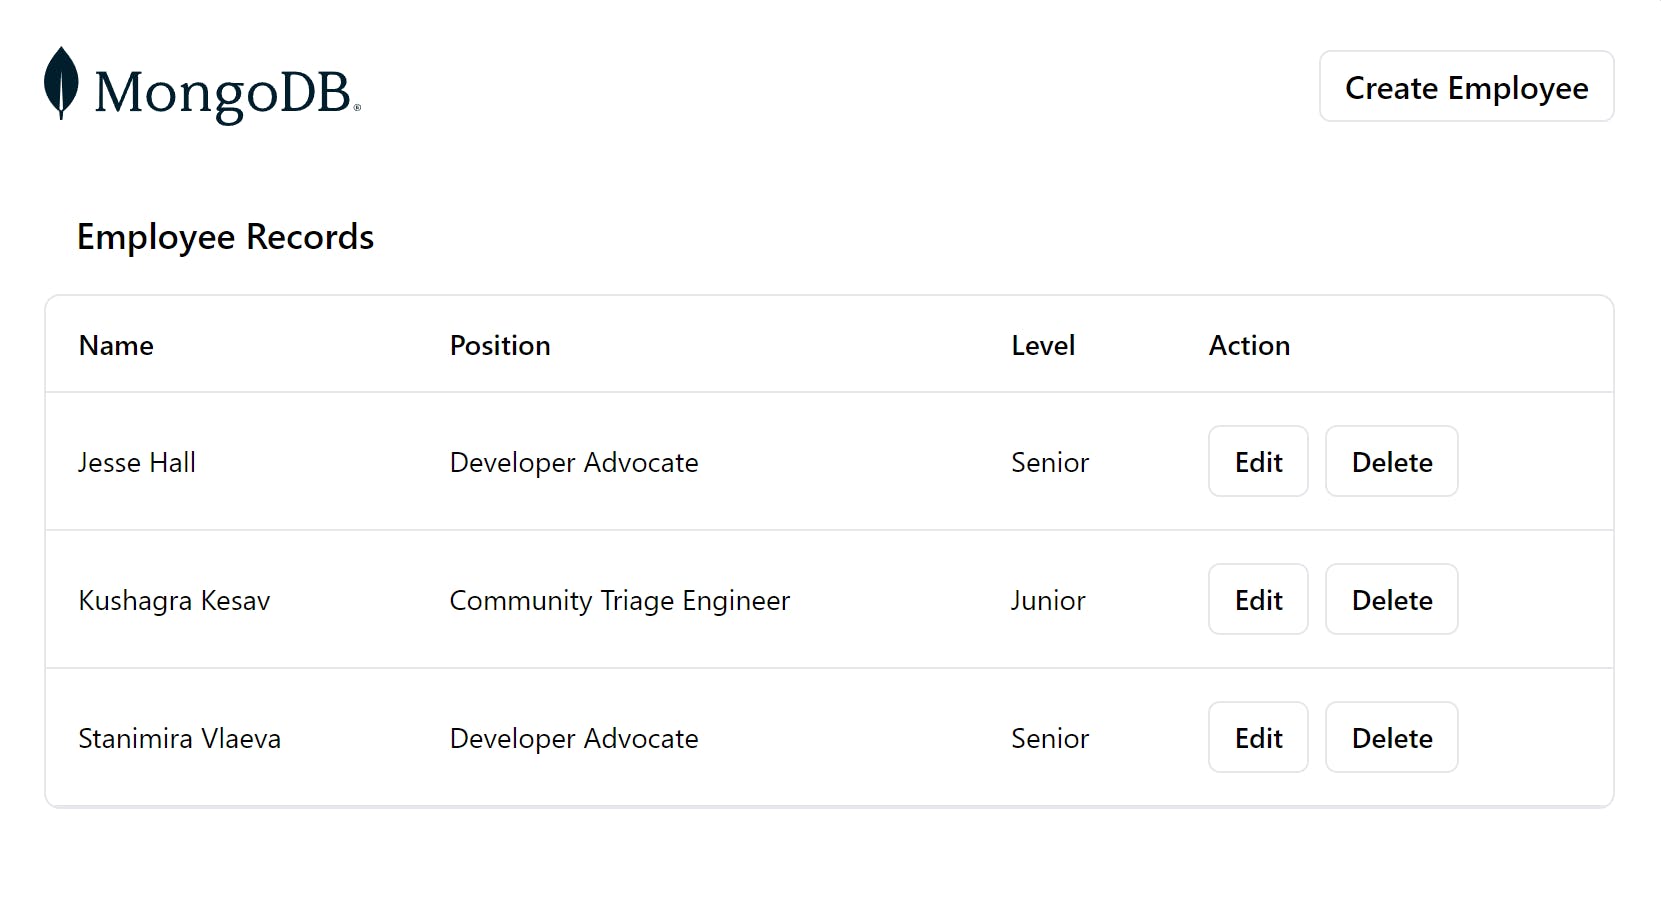
This is what the landing page of the record component will look like after we’ve added records via the “Create Employee” button.
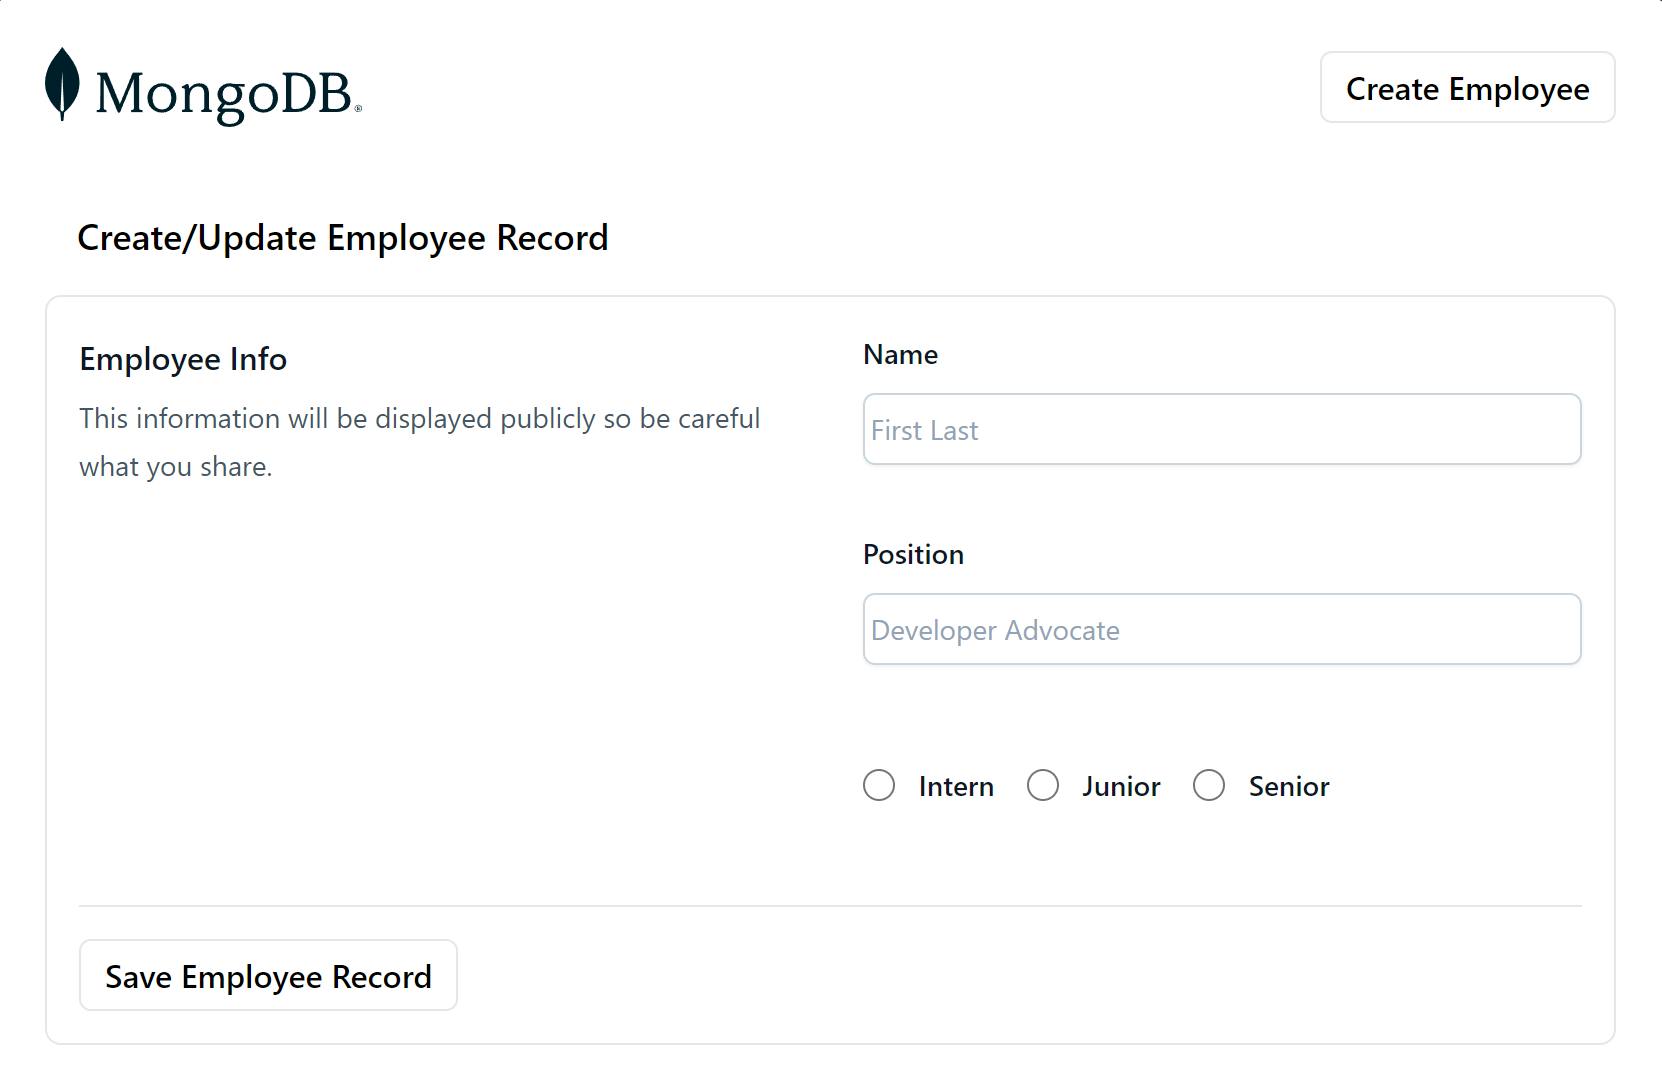
This is what the screen that lets you add an employee will look like:
Conclusion
Thank you for joining me on this journey and following along! I hope you enjoyed it and learned a lot along the way.
The MERN stack makes it easy to get started building scalable applications. You can use JavaScript across the entire stack, while MongoDB's document model makes it natural to map data to objects. With MongoDB Atlas’s forever-free cluster, you can also host your data without worrying about costs.
Ready to keep learning? Earn the free MongoDB CRUD Operations skill badge to continue building your MongoDB skills.