Migrating Parse with Microsoft Azure and MongoDB Cloud Manager
- Configure Subnets and Network Security Groups
- Provision Ubuntu 14.04 Servers with Azure
- Configure MongoDB with Cloud Manager
- Deploy Parse Server to Azure VM
- Test Parse Server
- Migrate From Parse API
- Configure Subnets and Network Security Groups
Requirements
- Credit Card
- Phone Number
- Azure Subscription
Overview
Using Azure, we will want to first create the networks that we will be provisioning, as well as configure the traffic between them in a way that keeps our database deployments secure. Conceptually, we will be configuring our deployment to reflect the diagram below.
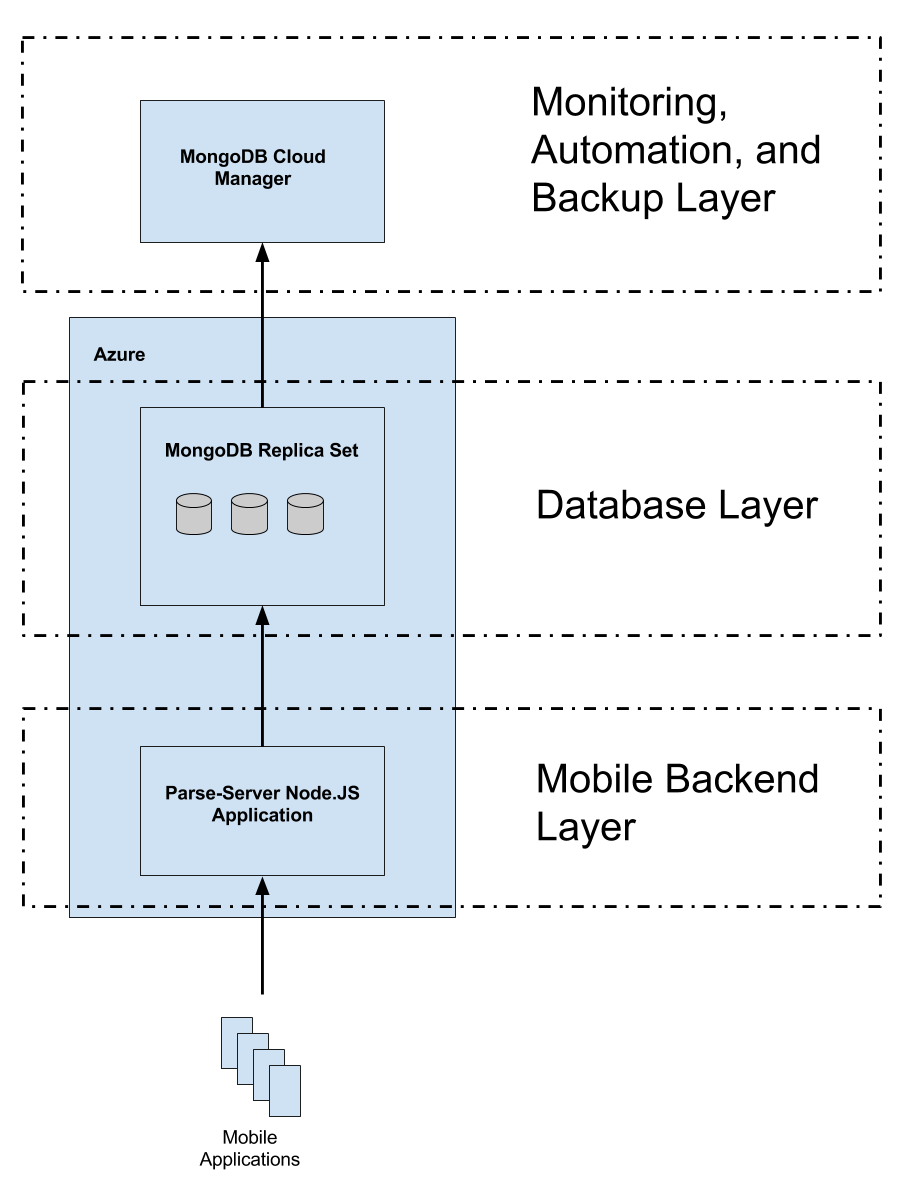
The specifications we recommend for running MongoDB on Azure will exceed the core quota restrictions imposed by Microsoft on their Azure free trial subscription. To provision machines suitable for migrating Parse to a performant system, consider purchasing a paid Azure subscription.
Instructions
- Create a virtual network in Azure (mongo-resource-group)
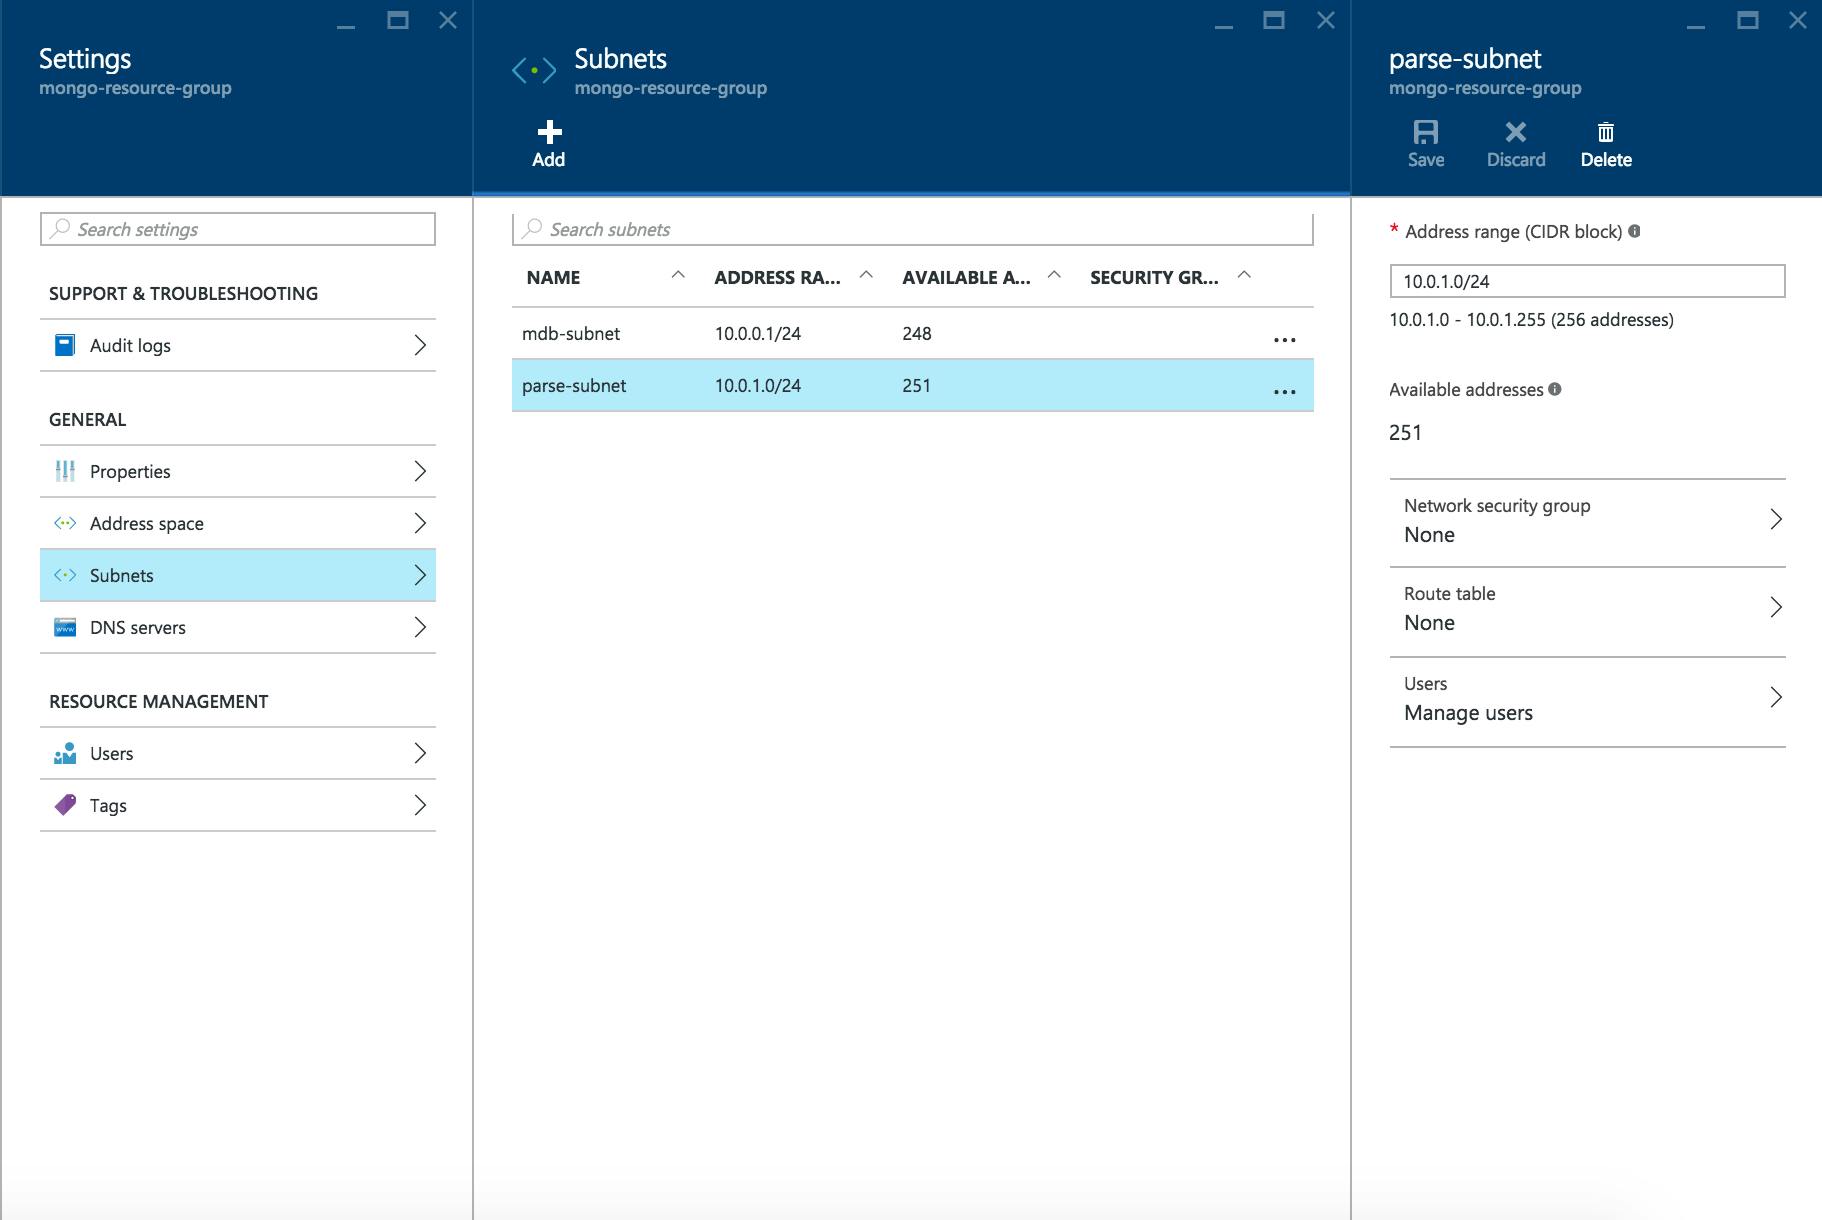
- Create two subnets in the virtual network with address ranges as below
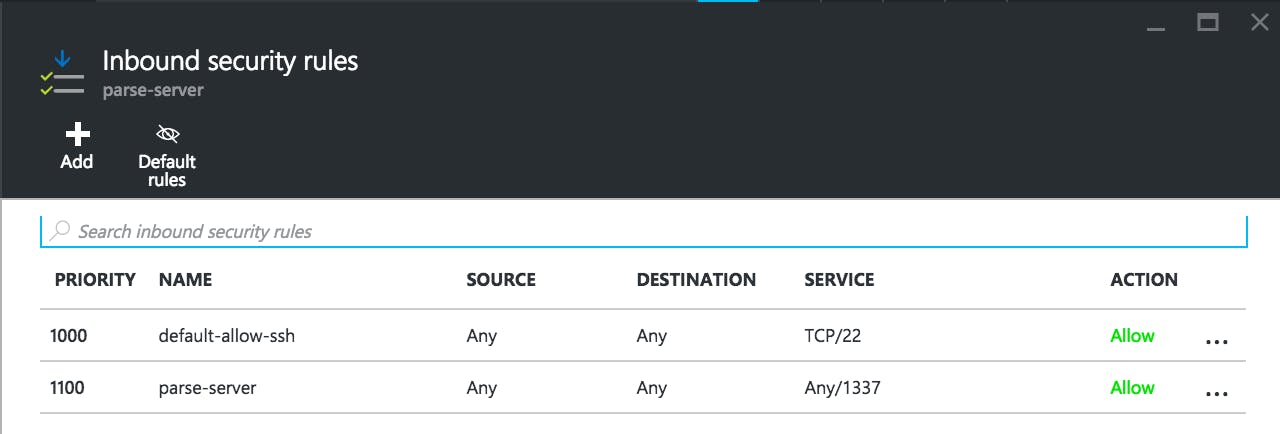
- Create two Network Security Groups (
parse-serverandmdb-parse) and configure inbound rules for each one as per the diagrams below.
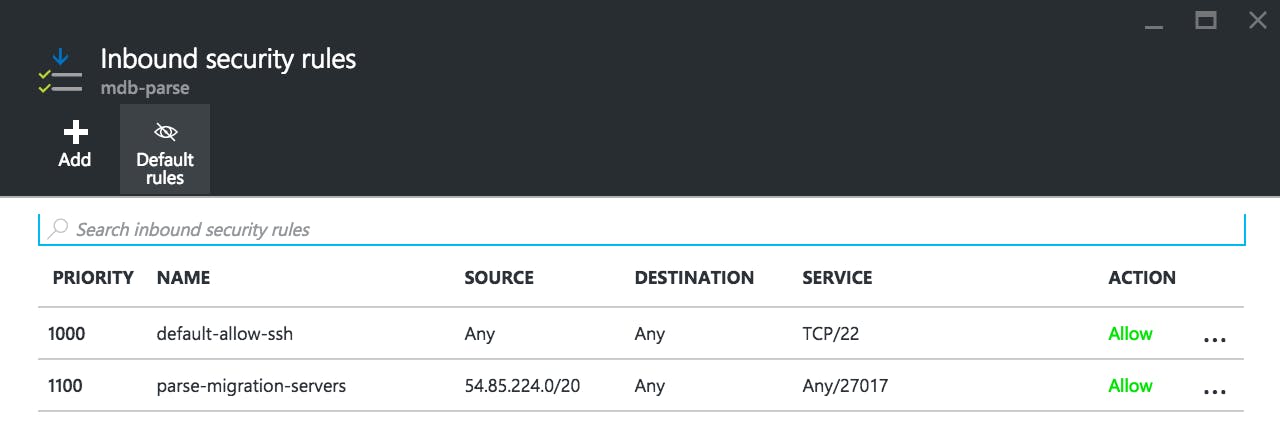 - Note that
 54.85.224.0/20 corresponds to the public IP range of the Parse migration servers. Allowing traffic from this address space is required for the Parse migration process.
Under mongo-resource-group > Settings > Subnets associate your two subnets with the appropriate network security groups as below.
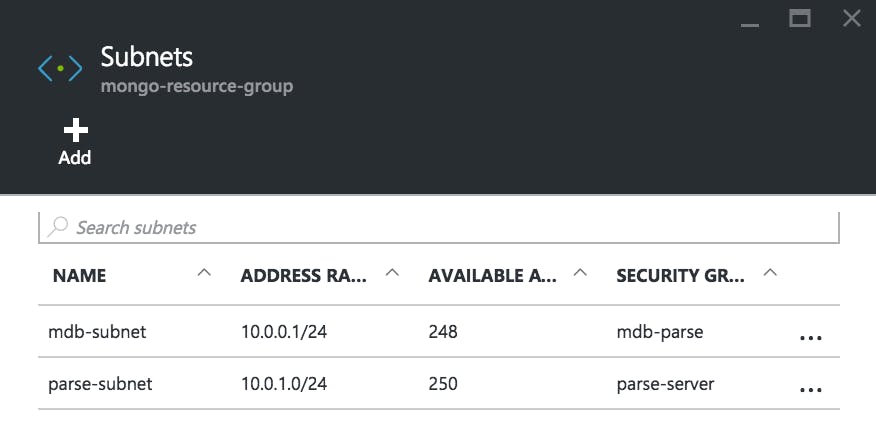
You have now configured your virtual network and created two subnets into which we will be provisioning our servers with Azure.
- Provision Ubuntu 14.04 Servers with Azure
Requirements
- File Storage, Data Storage, and Data Transfer Rate from Parse dashboard
Before you begin
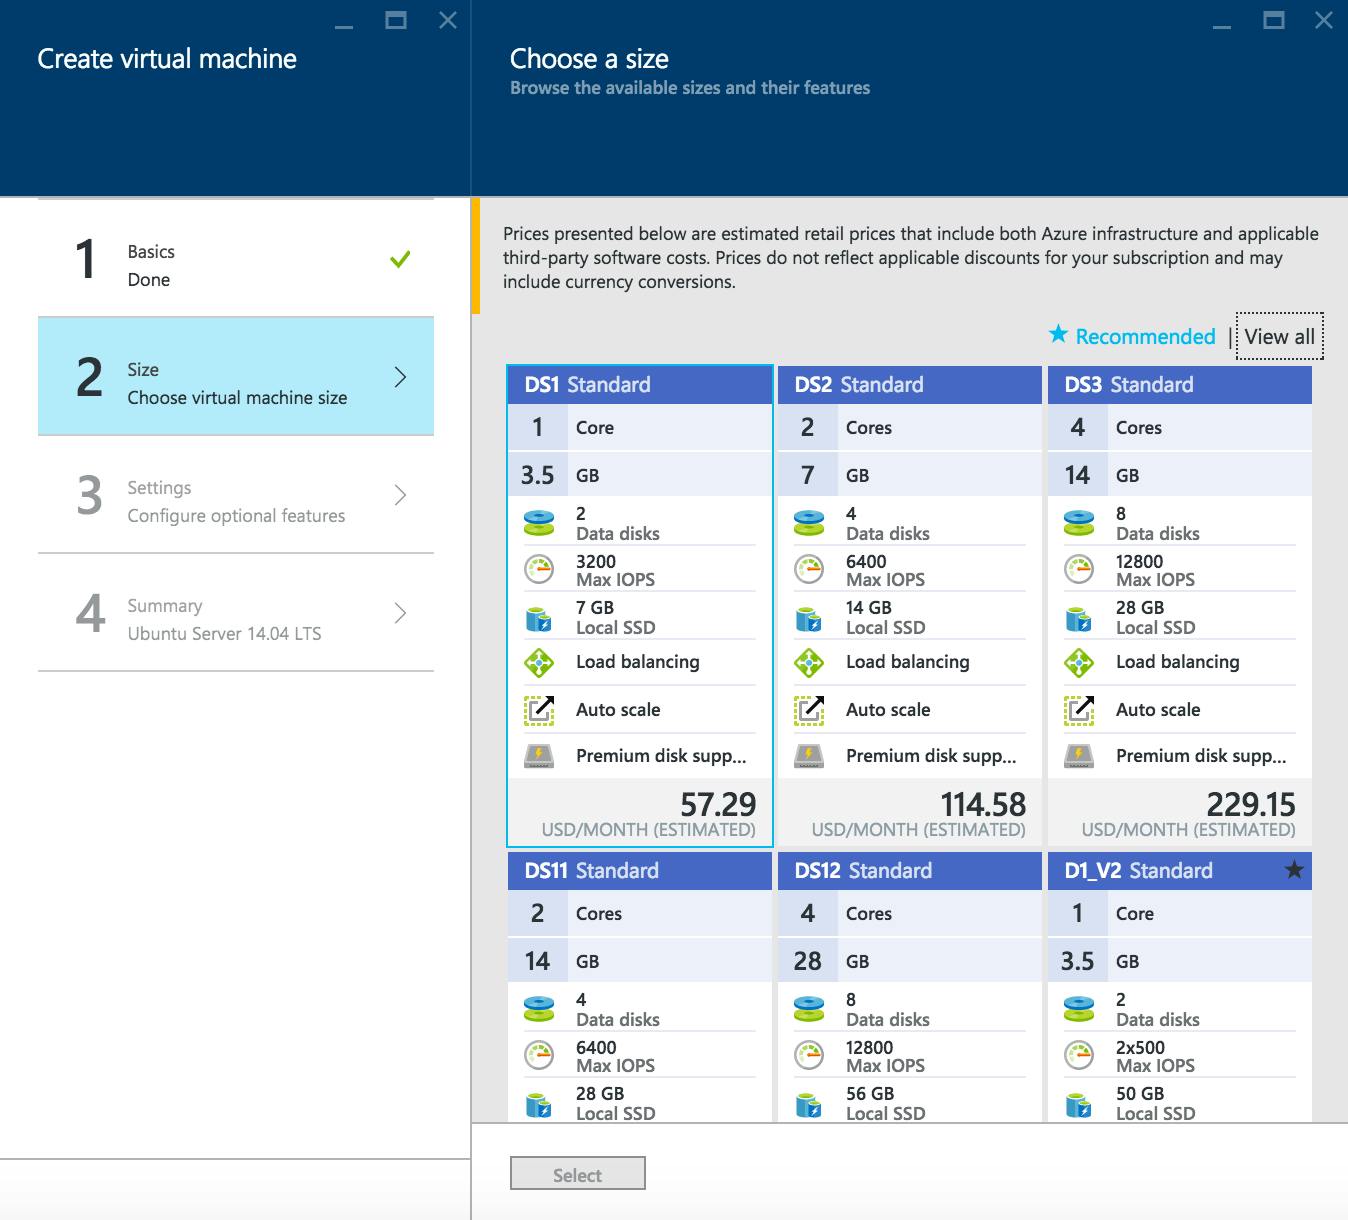
Size your InstancesDuring this stage, you will provision Microsoft Azure instances to run your database processes. To help you best size your deployment, we have created a sizing chart. To use the worksheet, first get your Data Storage, and Data Transfer Rate per month from the Parse dashboard.
Choose the cell in the sizing chart that matches your usage profile. Note this down, as we will use it later in the instructions to determine which machine to provision. All sizes in this chart correspond to the size of the premium storage disk to be attached to your VM.
| Low Data Transfer Rate | High Data Transfer Rate | |
| Parse Data Storage < 4GB | DS3, 128GB | DS4, 512GB |
| Parse Data Storage > 4GB | DS3, 512GB | DS4, 512GB |
Instructions
- Sign in to portal.azure.com
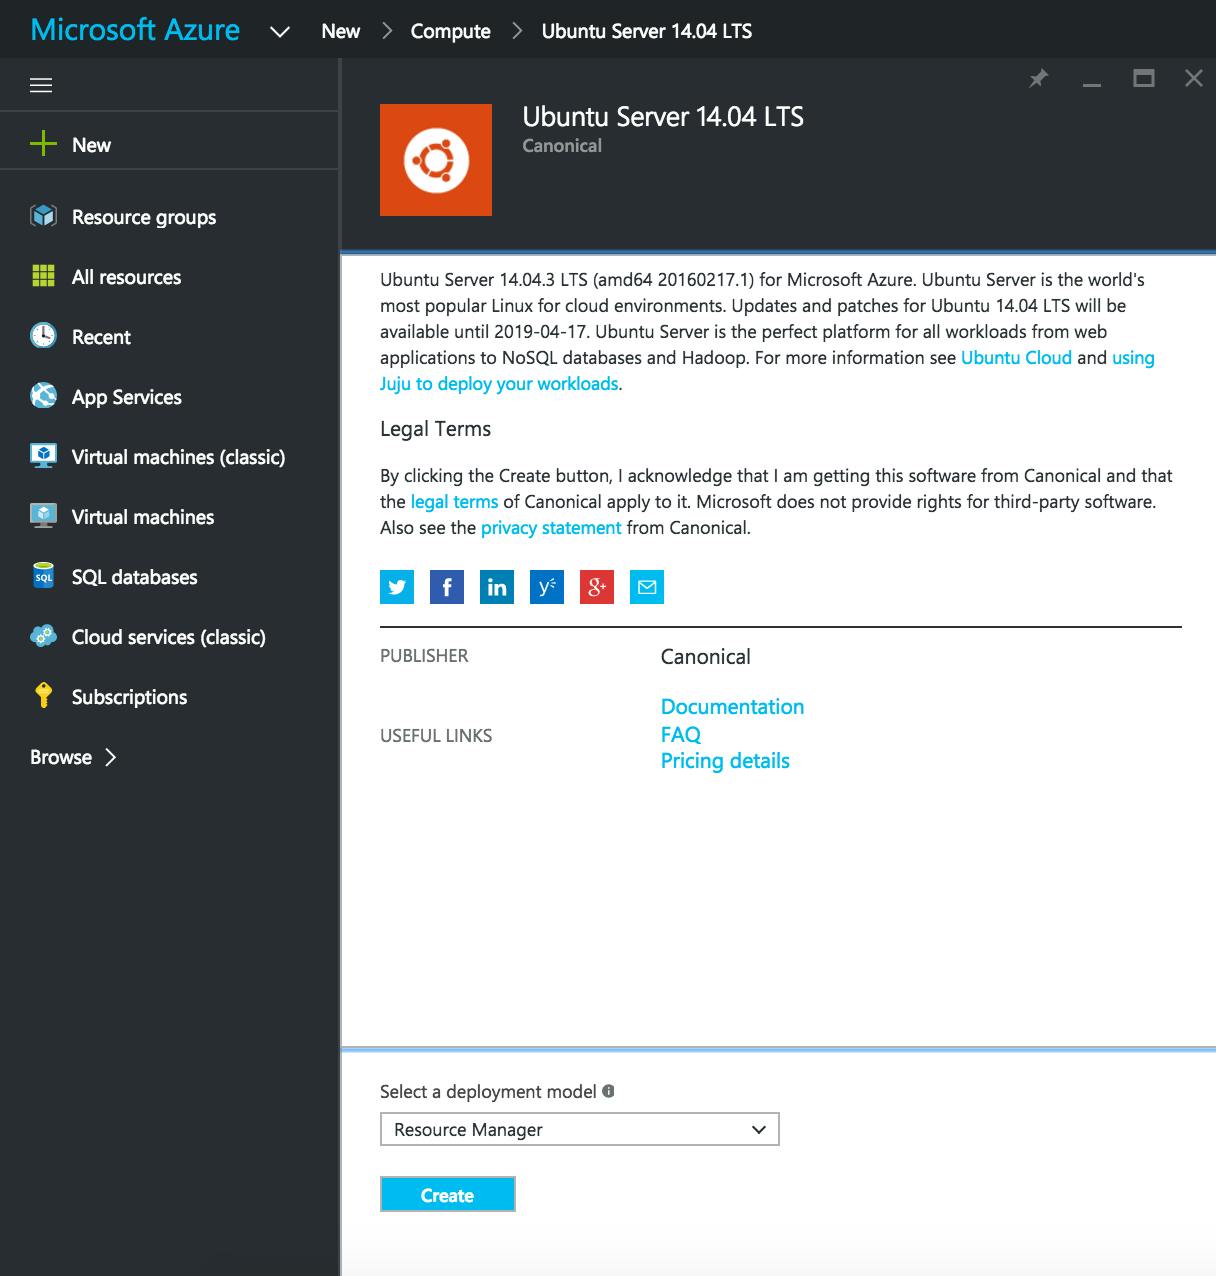
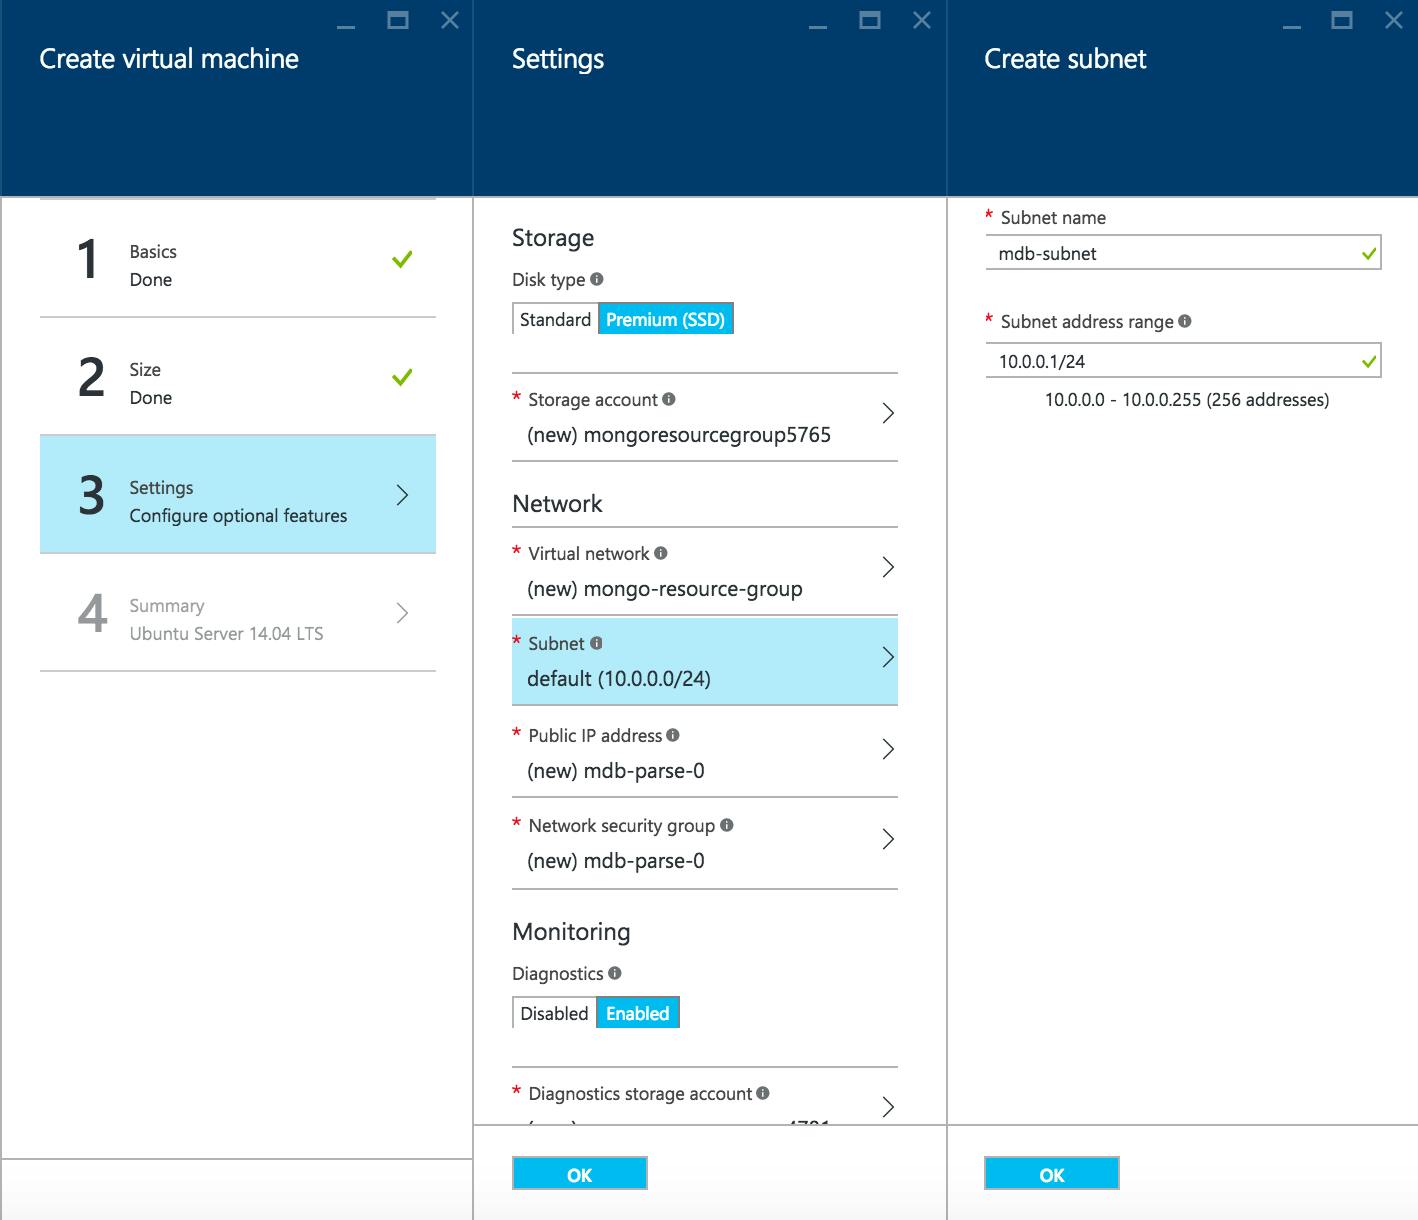
- Under New > Compute > Ubuntu Server 14.04 LTS create a new virtual machine using Resource manager
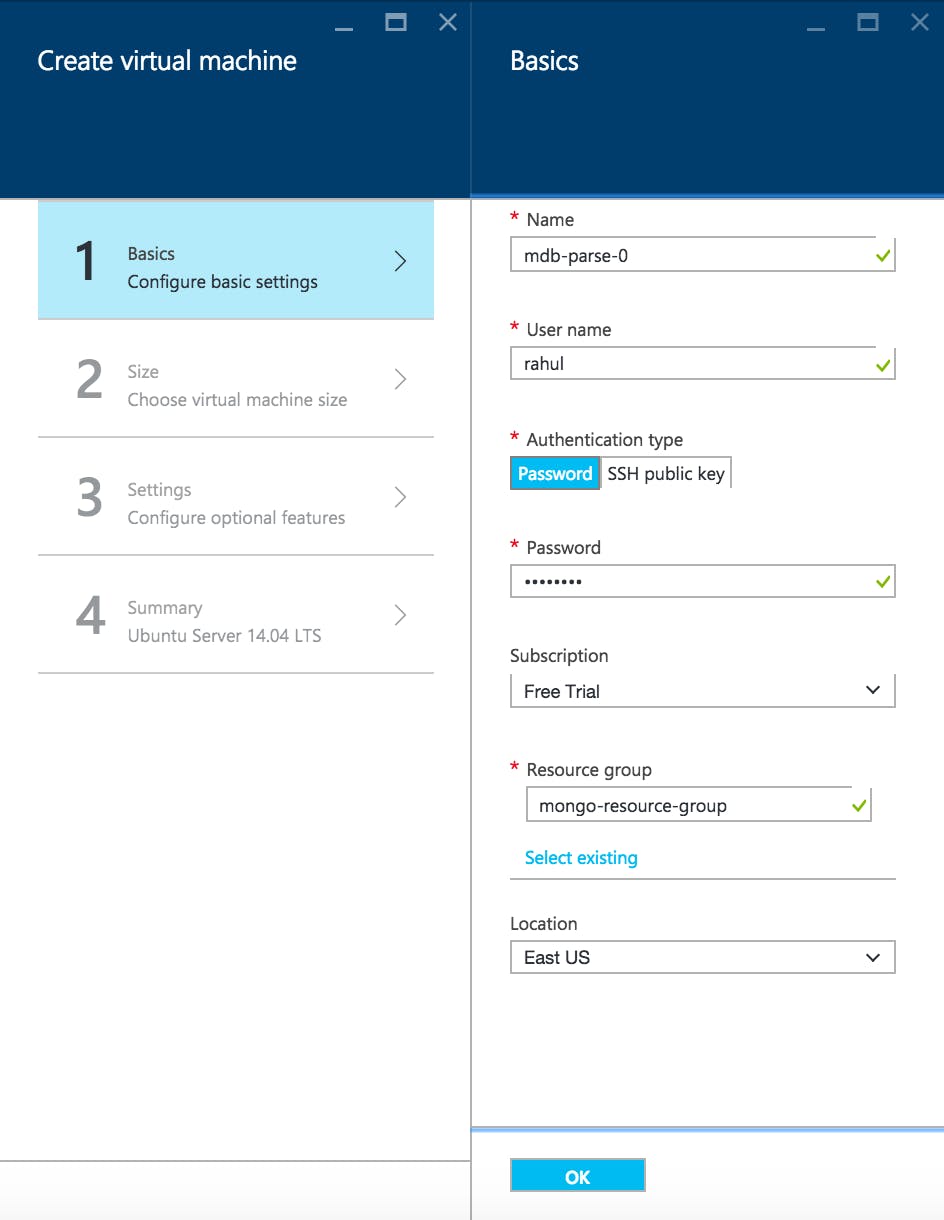
- Configure the machine, using the Azure Instance Sizing Guide to determine which instance type to launch, and which storage to attach.
- Ensure that you deploy your instances into the
mdb-subnetas configured in the previous stage of the guide.
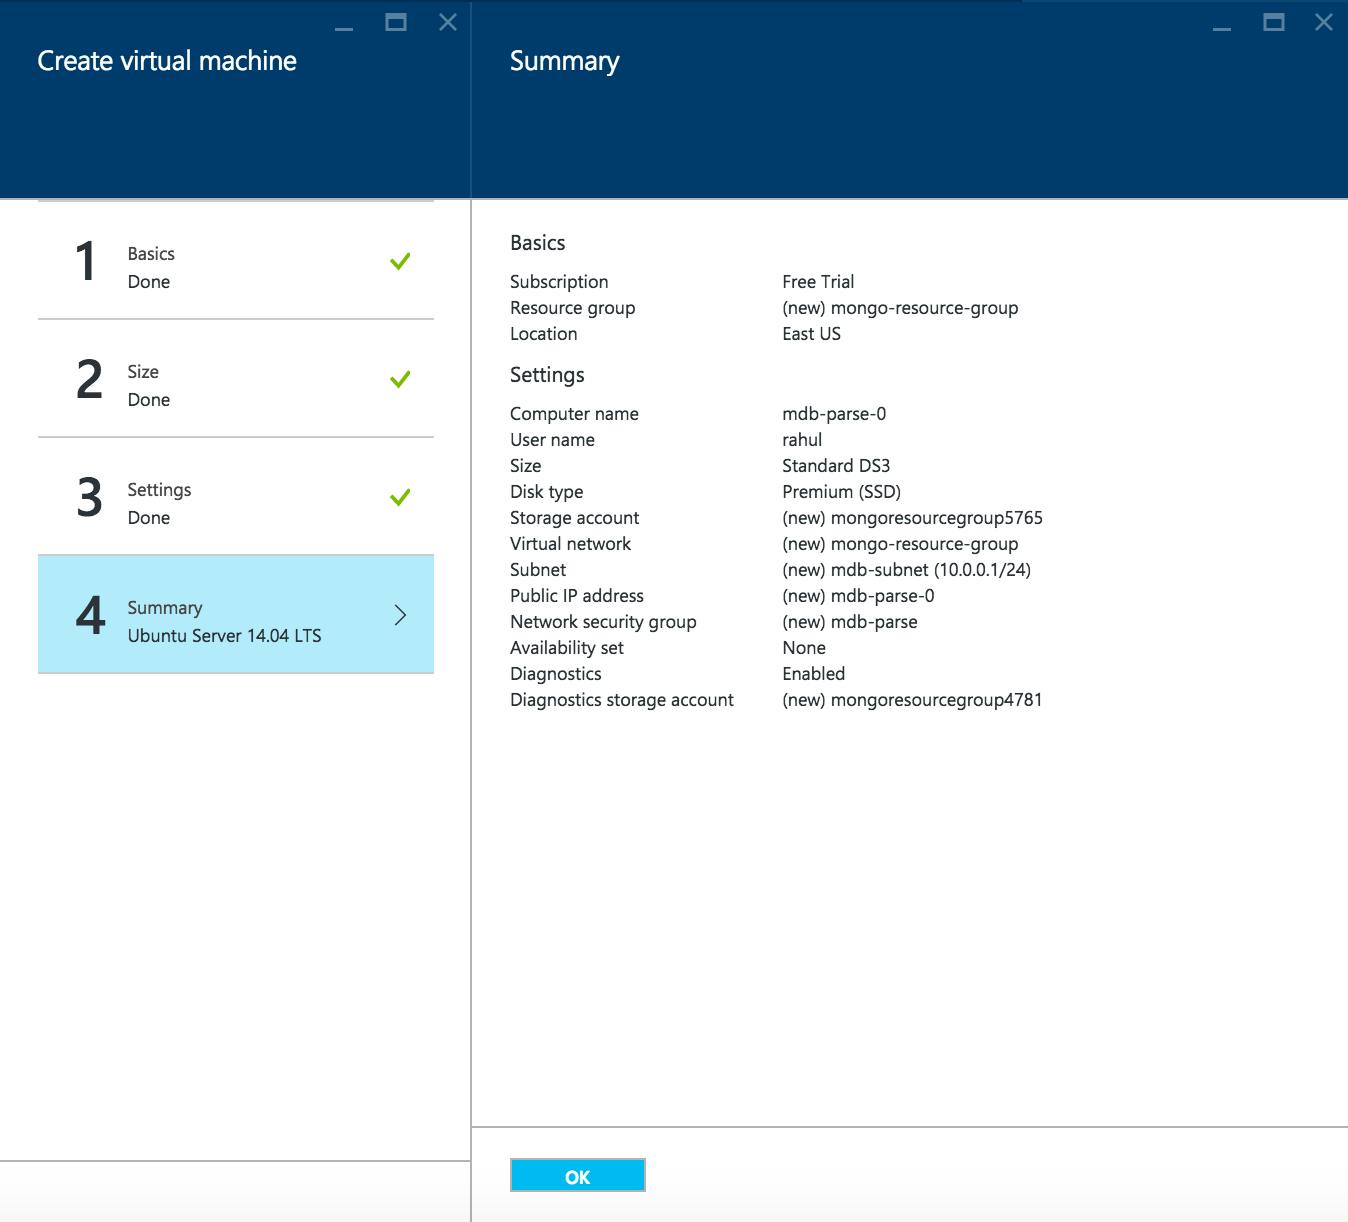
- Review and deploy the instance.
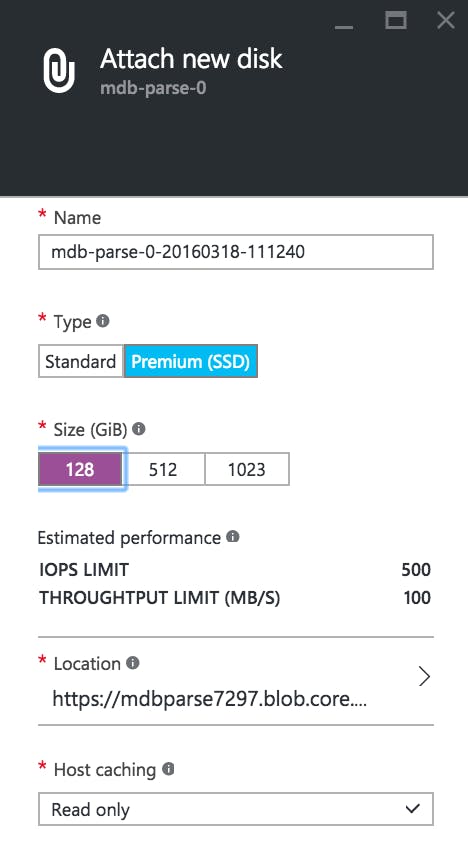
- We will now need to attach a premium storage disk and mount it on our Ubuntu VM. Navigate to All resources > mdb-parse-0 > Settings > Disks and select Attach new.
- Choose a disk size corresponding to your deployment on the Azure Instance Sizing Chart above.
8. ssh into your newly provisioned Azure instance using the username and password provided during creation.
9. Initialize the disk on your VM
sudo fdisk /dev/sdc
# when prompted enter 'n' for new partition
# then enter          'p' for primary
# then enter          '1' for 1st partition
# then enter          ''  for default first sector
# then enter          ''  for default last sector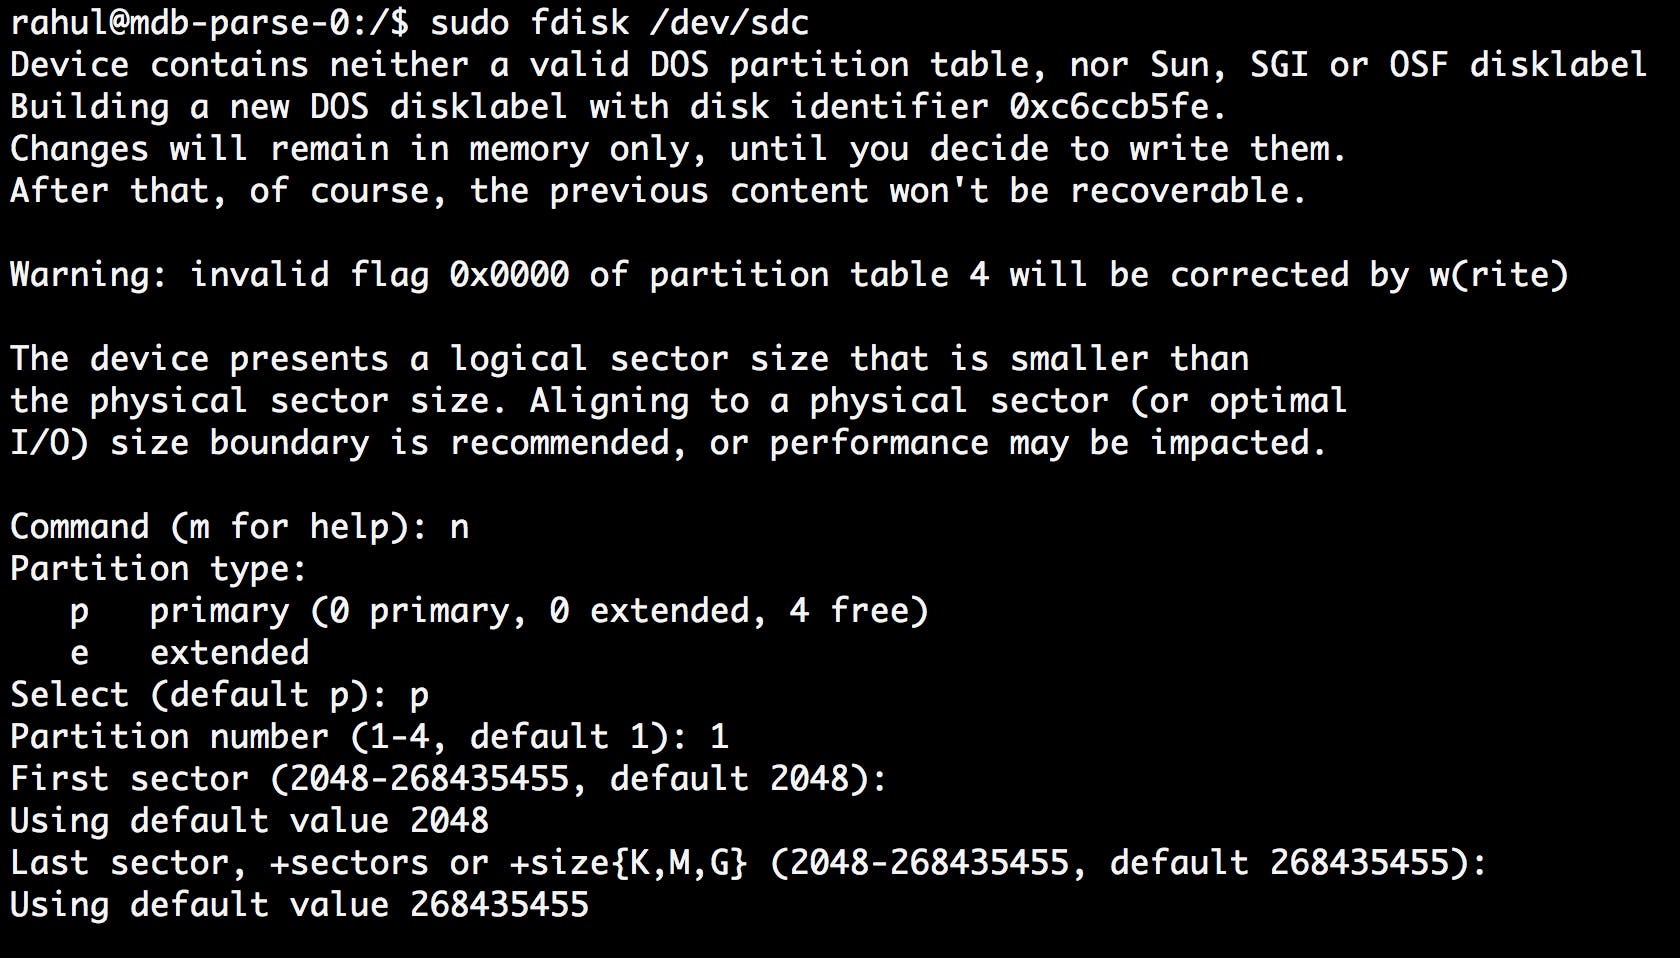
# then enter          'p' to review new partition
# then enter          'w' to finalize and write your changes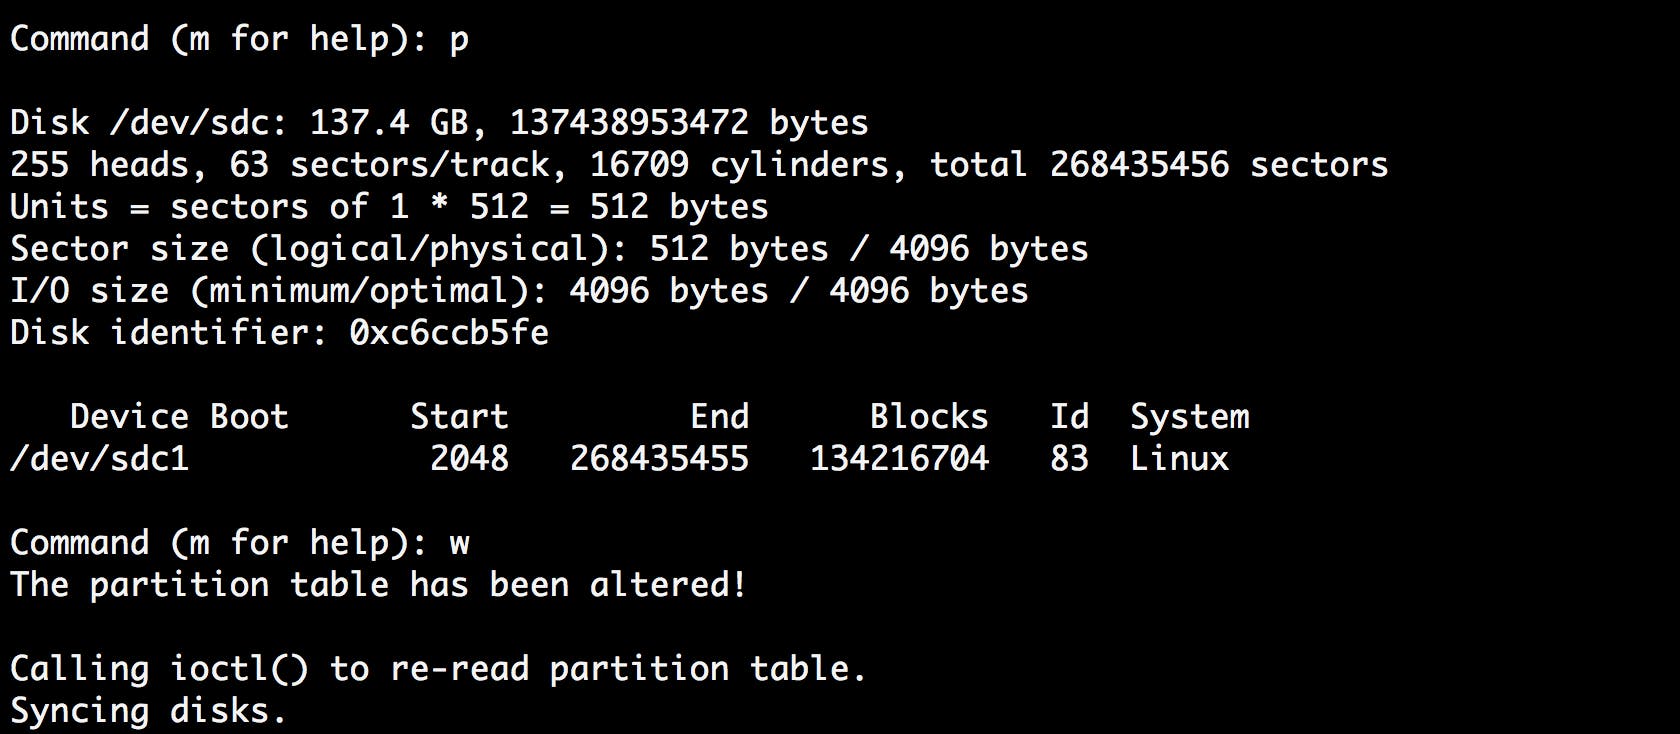
- Make the file system on the device.
sudo mkfs -t ext4 /dev/sdc1 # note partition number appended to device id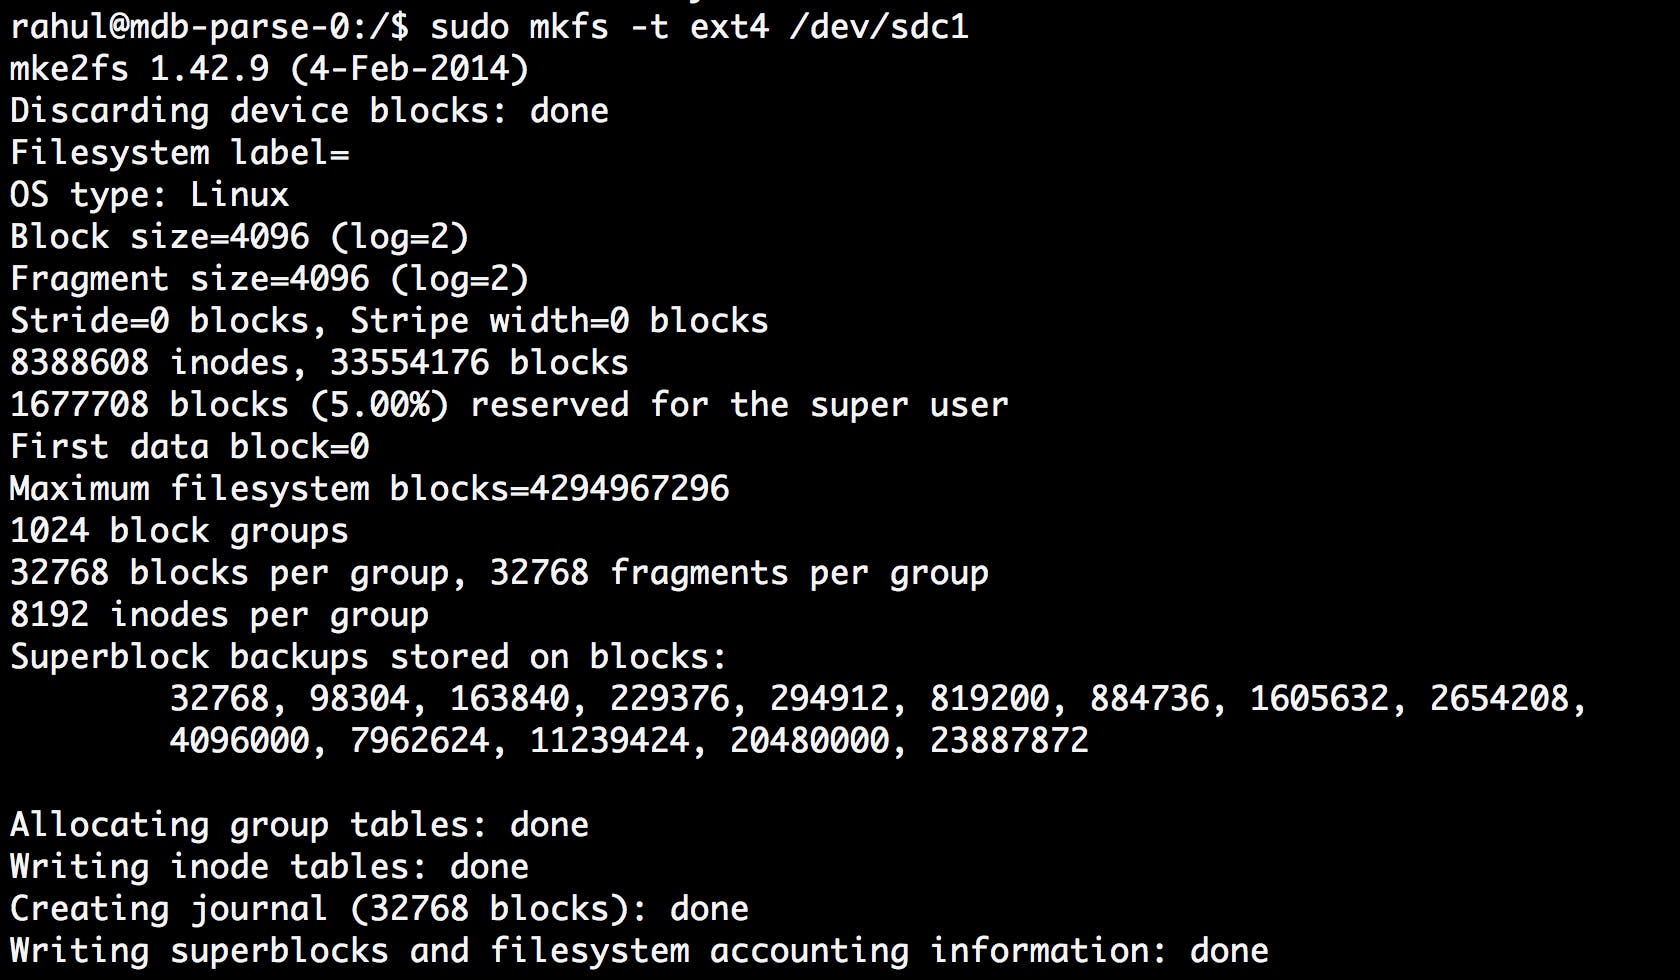 11. Create the data directory and mount the premium storage disk there.
sudo mkdir /data
sudo mount /dev/sdc1 /data
Use
sudo -i blkidto determine the UUID associated with your device
Modify
/etc/fstabto automatically mount disk on reboot.
sudo sed -i -e "\$aUUID=<SDC1-UUID> /data ext4 defaults 1 2" /etc/fstab- Mount and unmount the device to make sure the configuration is properly set-up. If everything is properly configured, there should be no errors.
sudo umount /data
sudo mount /data- Repeat steps 2-14 to provision 2 more instances, named “mdb-parse-1” and “mdb-parse-2” respectively.
- Configure MongoDB with Cloud Manager
Requirements
- SSL Certificate from trusted Certificate Authority (for secure deployment)
- MongoDB Cloud Manager Account
Before you begin
Generate SSL Certificates
For a secure deployment, one should enable TLS/SSL for traffic between the MongoDB database and the application server, as well as for traffic between the members of a MongoDB replica set.
For development purposes, you can configure a local certificate authority and generate your own certificates with openssl for the hosts provisioned by Cloud Manager.
Self-signed certificates, however, are still vulnerable to man-in-the-middle attacks and secure deployments should use an SSL/TLS certificate from a trusted Certificate Authority.
Instructions
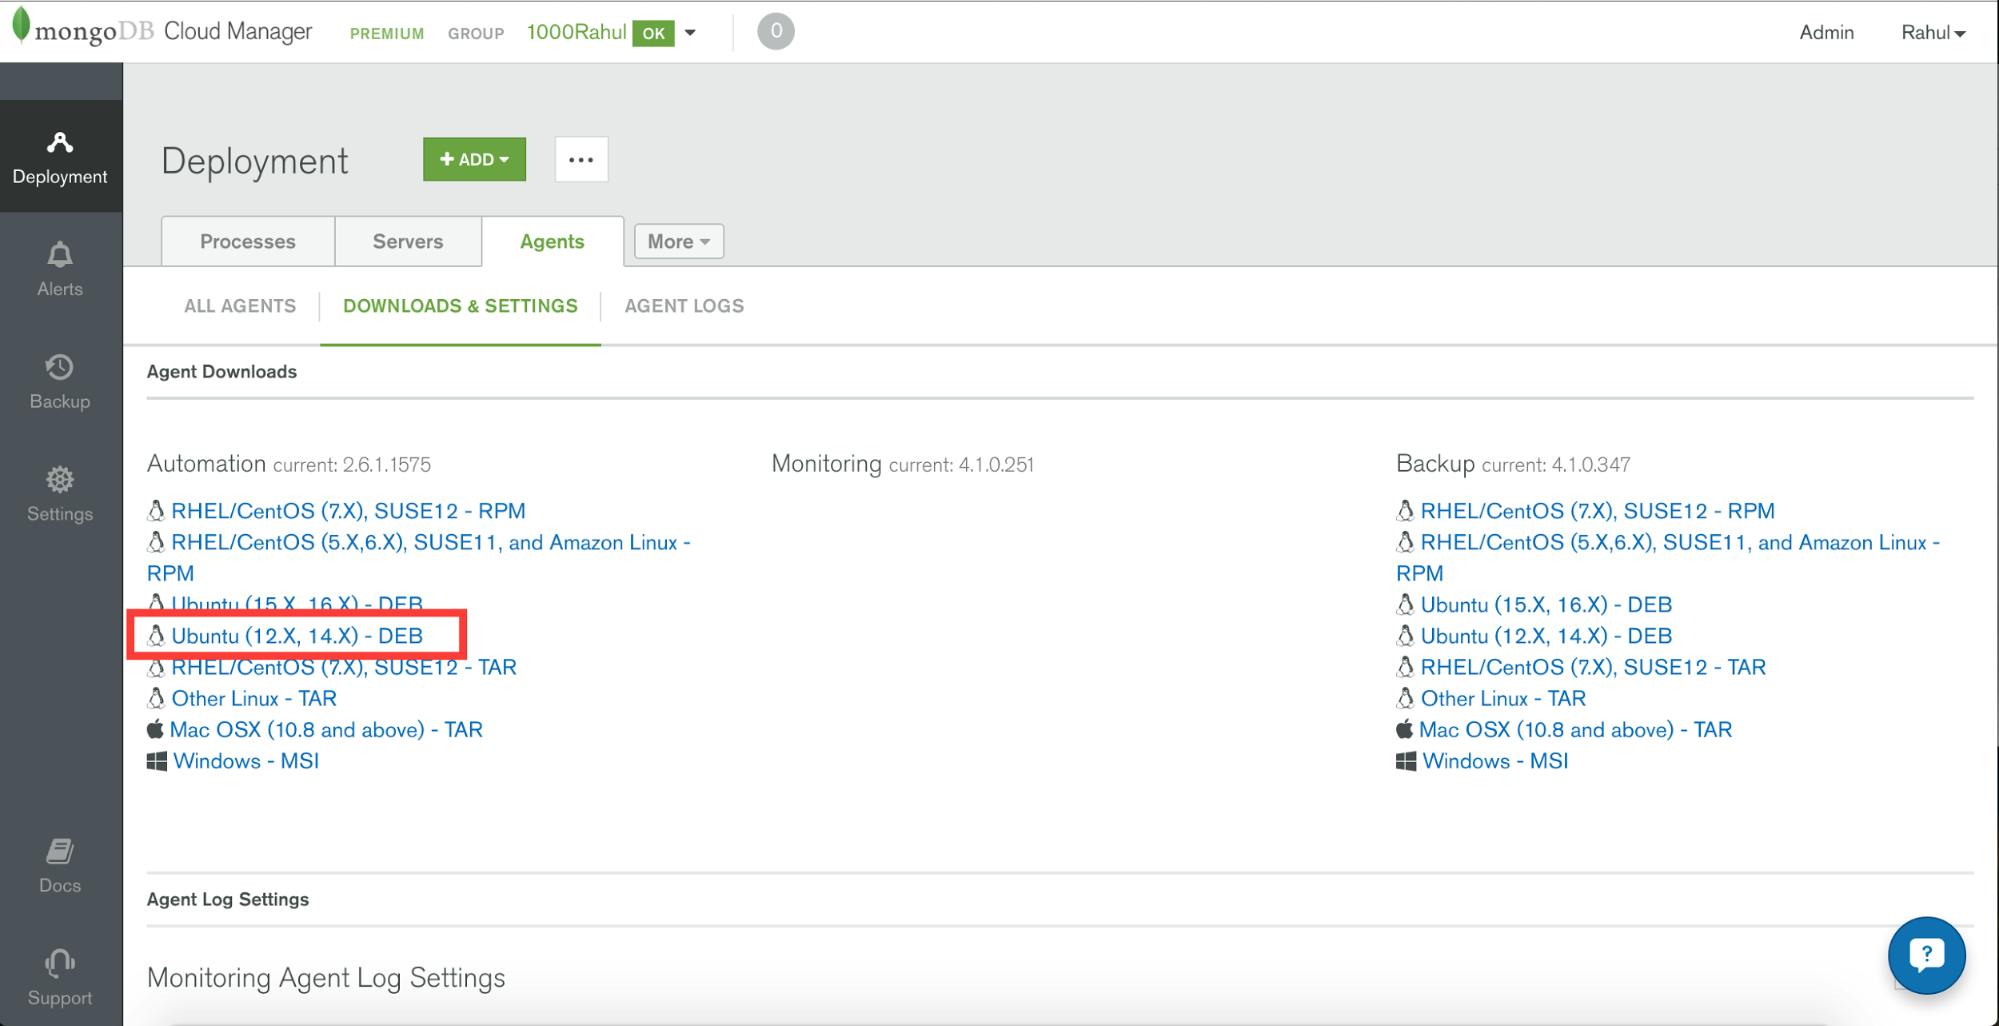
- Log into Cloud Manager and navigate to Deployment > Agents > Downloads & Settings from the main dashboard.
- Under Automation click the link for Ubuntu (12.X, 14.X) - DEB and follow the instructions to install an automation agent on each of the virtual machines provisioned in the previous step.
- Change ownership of the
/datadirectory to the mongodb user on all virtual machines to allow automation to provision correctly
sudo chown mongodb:mongodb /data- Once all agents have been installed, navigate to Deployment > Servers, and verify that you see the three servers which you installed the automation agents on.
- Click the ellipses on one of your servers and click Install Monitoring Agent.

- Click Review & Deploy, then Confirm & Deploy.
- Click +Add and select New Replica Set.
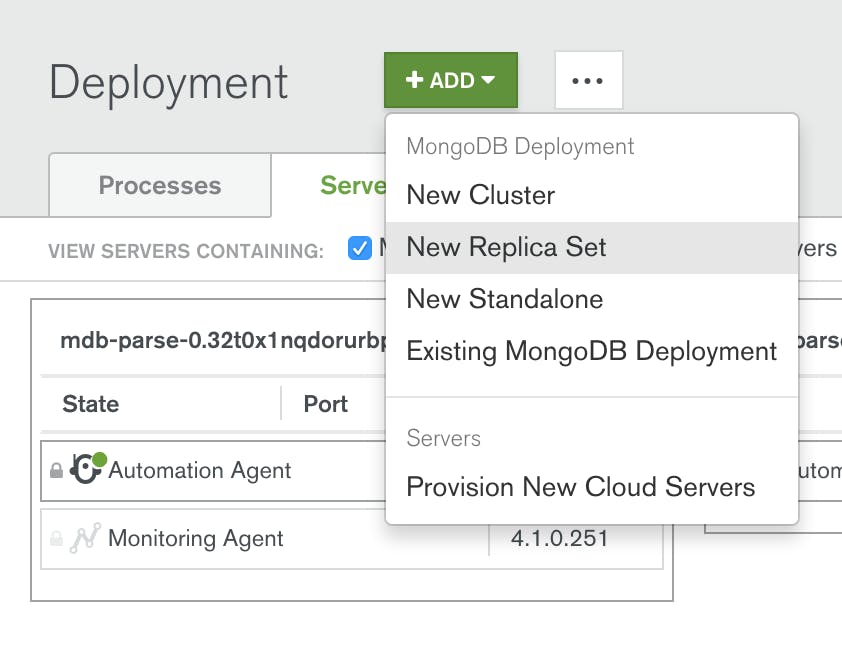
- Configure your replica set as below:
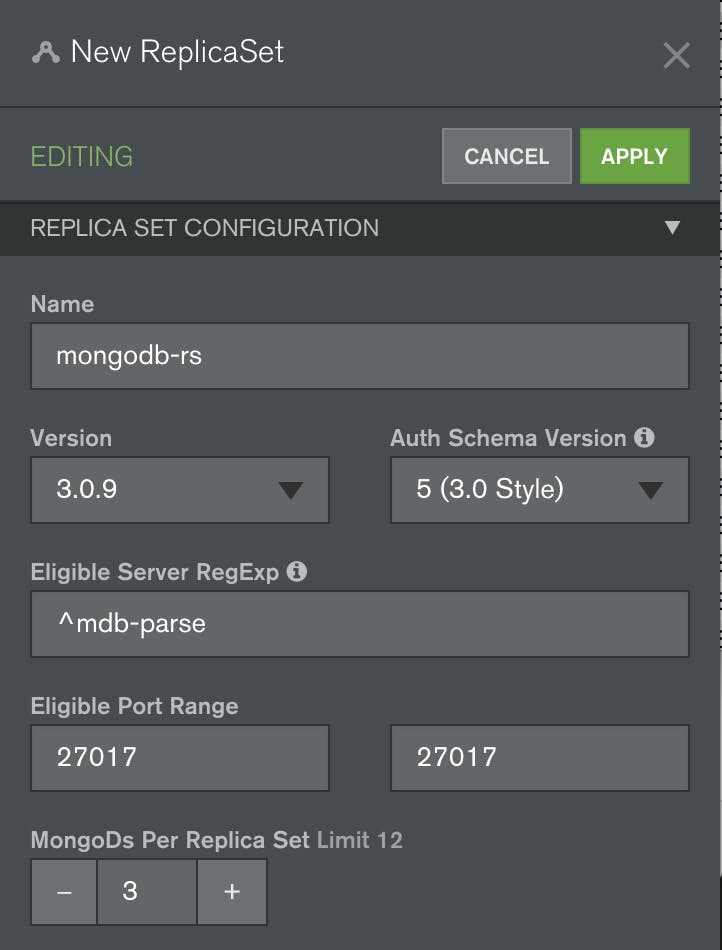
- Ensure that each server contains one mongodb-rs member
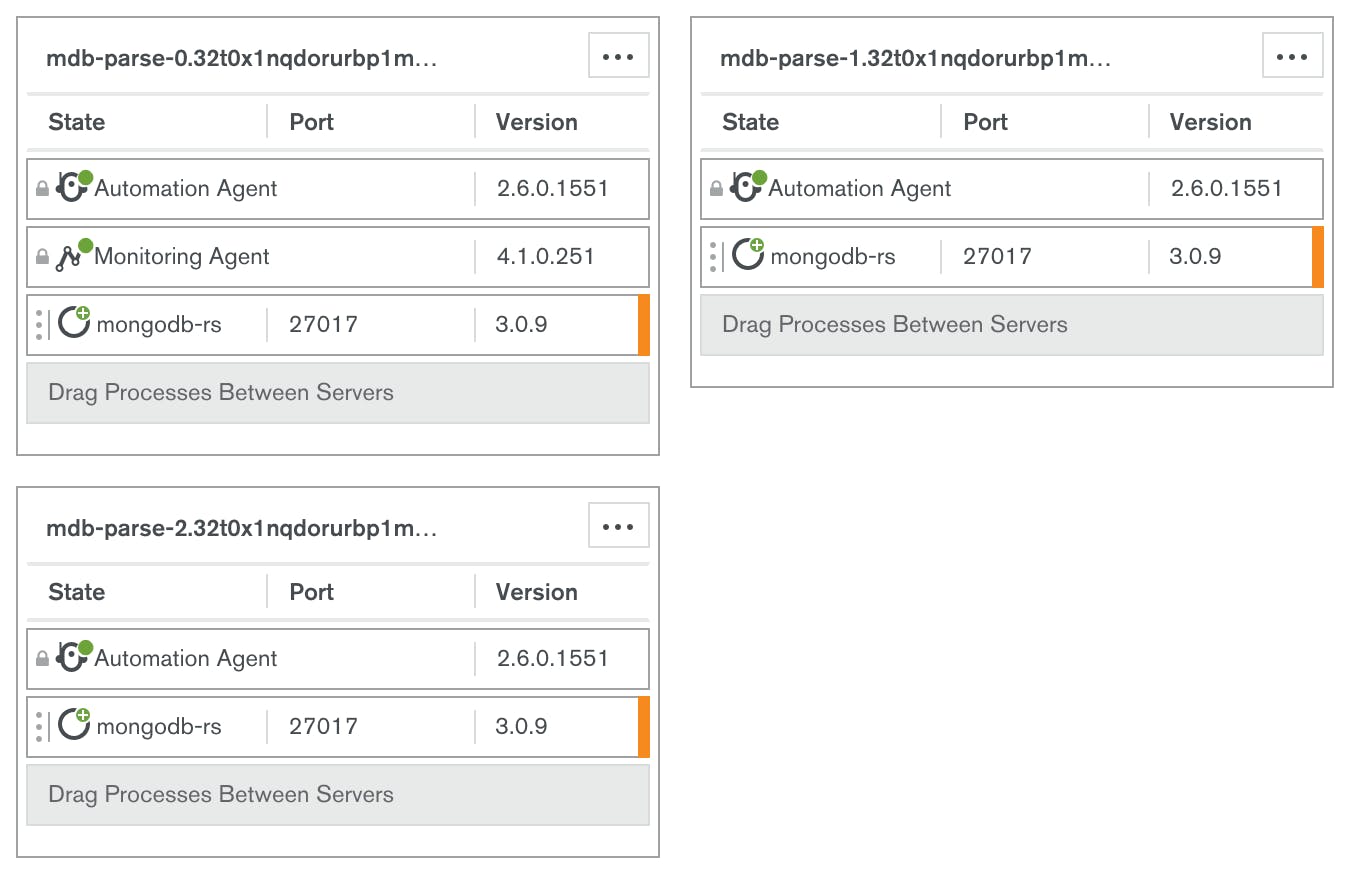
- Click Review & Deploy, then Confirm & Deploy.
- Click the Modify wrench icon to open the Replica Set editor.
- Expand Advanced Options, and click the Add Option button.
- Add the option:
- Startup Option: “failIndexKeyTooLong”
- Value: false
- It is strongly recommended that you configure TLS/SSL for your deployment before migrating from Parse. Instructions on how to do this can be found in the Cloud Manager documentation.
- Click Apply, and again Review & Deploy your changes.
- We will now configure a user for you to connect to your database with. Click on Authentication & Users on the left side of the UI.
- Click Add user and create a new user with the specs below. Don't forget to save the password!
- database: “admin”
- username: “testuser”
- roles: root@admin
- Construct an internally usable MongoDB Connection String. First, record the three replica set members’ hostnames and ports visible in Cloud Manager. We will then combine the hostnames with their respective ports, separated by commas, along with the username and password, replica set name (replicaSet) and SSL parameters as below:
mongodb://testuser:testpass@<HOSTNAME-0>:27017,<HOSTNAME-1>:27017,<HOSTNAME-2>:27017/parse?replicaSet=mongodb-rs&ssl=trueMore detailed information on the connection string format can be found in the MongoDB documentation.
- Deploy Parse Server to Azure VM
Requirements
- Internally visible MongoDB connection string as constructed in previous section
Instructions
- Provision a Ubuntu Server 14.04 Azure VM with the D1 instance size.
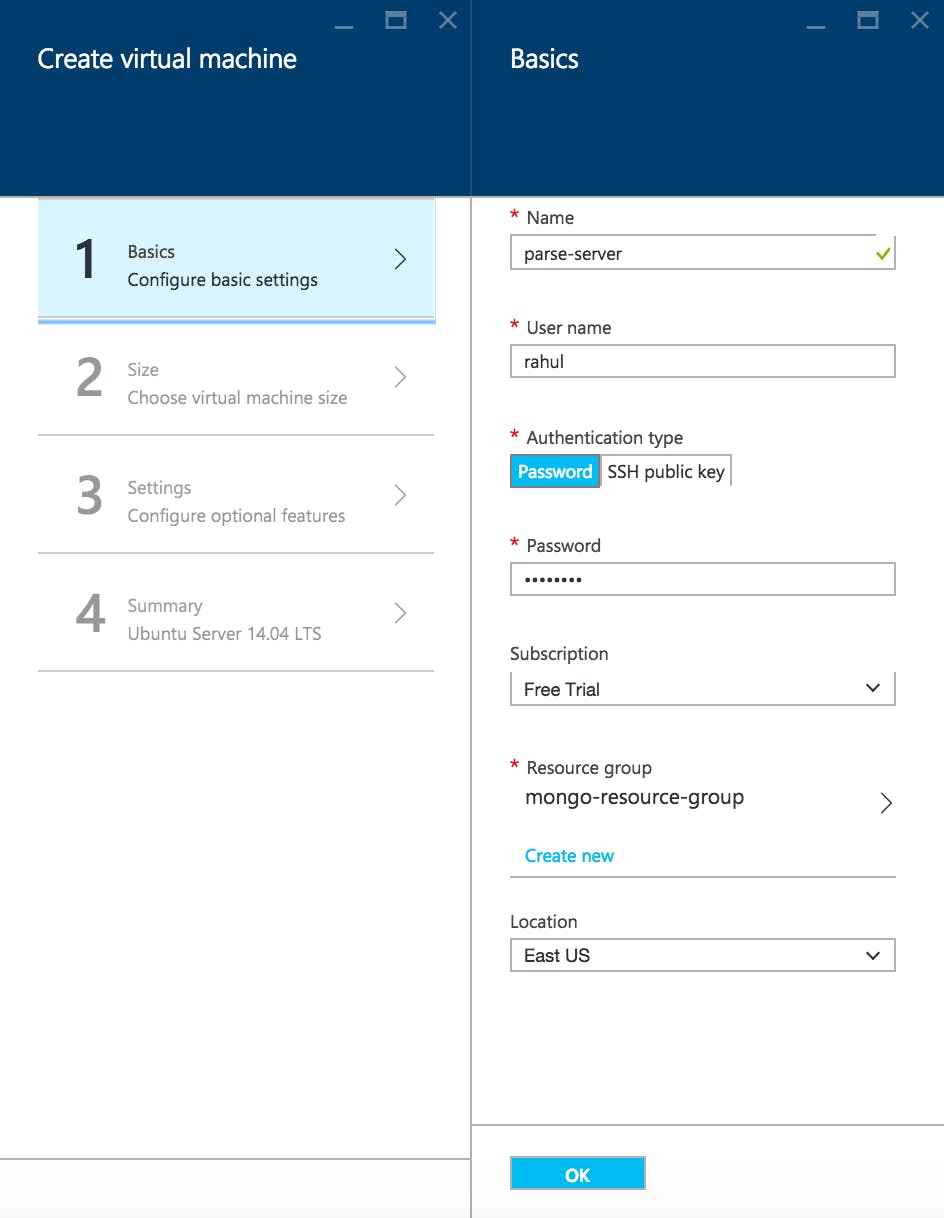
- Ensure that the new parse-server virtual machine is provisioned on the “parse-subnet” subnet configured earlier.
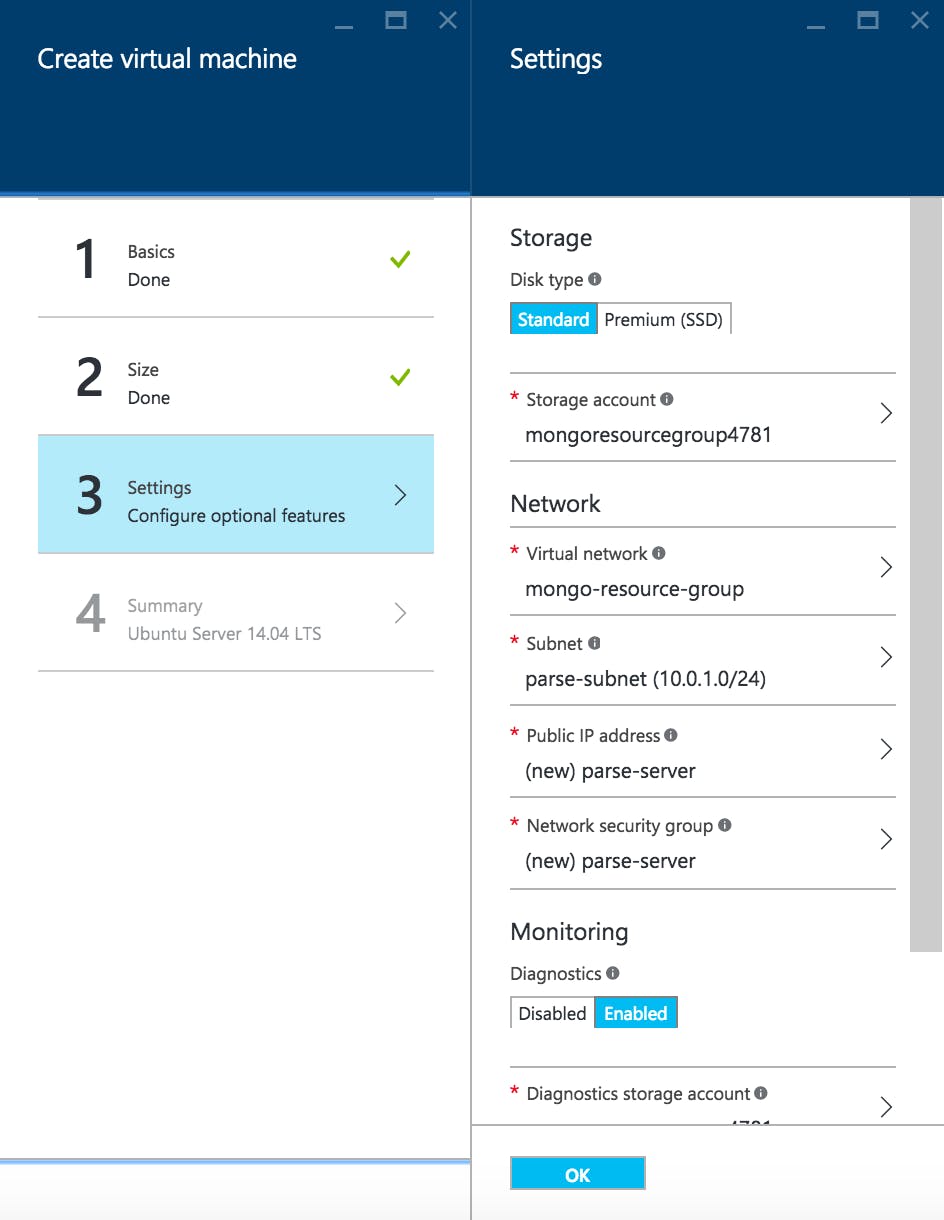
sshinto newly provisioned machine and install Node.JS and git.
curl -sL https://deb.nodesource.com/setup_5.x | sudo -E bash -
sudo apt-get install -y nodejs
sudo apt-get install -y git- Clone the parse-server github repository for the latest code.
git clone https://github.com/ParsePlatform/parse-server.git- Configure environment variables for run. Replace <MONGO-CONNECTION-STRING> with the connection string obtained earlier, and replace <APP-ID> and <MASTER-KEY> with the appropriate values for your deployment.
# configure environment variables and run.
export PARSE_SERVER_DATABASE_URI='<MONGO-CONNECTION-STRING>'
export PARSE_SERVER_APPLICATION_ID='<APP-ID>'
export PARSE_SERVER_MASTER_KEY='<MASTER-KEY>'- Run the Node.JS application
npm install
npm start- Get the public IP address of your parse-server instance from the Azure portal and use
curlto test that everything is functioning properly.
curl -X POST \
  -H "X-Parse-Application-Id: ${MY_PARSE_APP_ID}" \
  -H "X-Parse-Master-Key: ${MY_PARSE_MASTER_KEY}" \
  -H "Content-Type: application/json" \
  -d '{"score":1337,"playerName":"Sean Plott","cheatMode":false}' \
  http://<PARSE-SERVER-PUBLIC-IP>:1337/parse/classes/GameScore
curl -X GET \
-H "X-Parse-Application-Id: ${MY_PARSE_APP_ID}" \
-H "X-Parse-Master-Key: ${MY_PARSE_MASTER_KEY}" \
http://<PARSE-SERVER-PUBLIC-IP>:1337/parse/classes/GameScore- Test Parse Server
Please use your standard application tests to ensure all functionality works on your new, open source Parse infrastructure. The open source parse-server package does not cover the complete feature set offered by Parse, and your application may not function exactly the same as before. The Parse migration guide has more details on the differences between Parse and parse-server in "Section 8 - Compatibility Issues". We urge users to read these sections carefully and test their apps thoroughly before moving forward with a full migration. If you are interested in getting help with this process, or learning more about your options for running your own MongoDB deployment, our professional services team is here to speak with you.
- Migrate From Parse API
Requirements
- MongoDB replica set on Azure
- Access to Parse admin dashboard
- User with admin privileges on MongoDB replica set
Instructions
Go to the new Parse dashboard, navigate to App Settings and click on Migrate to external database.
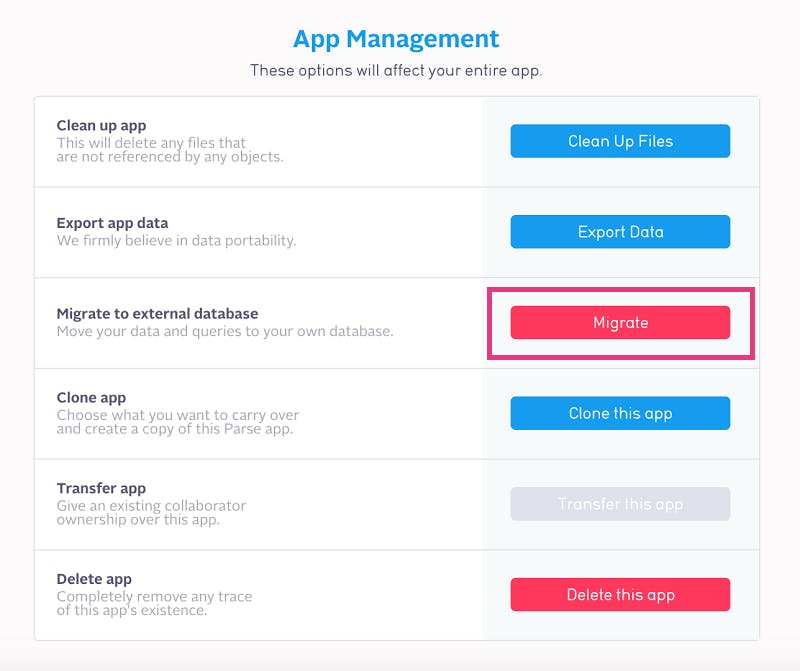
Provide the MongoDB connection string which we constructed earlier, but replace the internally resolvable hostnames with publicly resolvable IP addresses as below. Ensure that the database pointed to by your connection string is empty.
mongodb://testuser:testpass@<HOST-IP-0>:27017,<HOST-IP-1>:27017,<HOST-IP-2>:27017/parse?replicaSet=mongodb-rs&ssl=true- Click the Begin the migration button.

- Ensure that data is written to your MongoDB Replica Set.