개요
이 가이드 에서는 Ruby on Rails 8 를 웹 프레임워크 로 사용하는 Ruby 웹 애플리케이션 만드는 방법을 학습 수 있습니다. Ruby on Rails는 애플리케이션 빌드를 위해 모델-뷰-컨트롤러(MVC) 아키텍처 패턴 따르는 Ruby 용 풀스택 웹 애플리케이션 프레임워크 입니다.
이 튜토리얼의 애플리케이션 다음과 같은 계층으로 구성되어 있습니다.
데이터베이스 계층: MongoDB 데이터 저장 및 검색을 제공합니다.
애플리케이션 계층: Rails는 HTTP 요청, 라우팅 및 로직 처리 처리합니다.
프레젠테이션 계층: Emebdded Ruby 템플릿과 CSS는 웹 페이지에 레스토랑 데이터를 렌더링합니다.
팁
Mongoid를 기존 애플리케이션 에 통합하는 방법을 학습 기존 애플리케이션에 Mongoid 추가 가이드 를 참조하세요.
Ruby 및 Rails와 함께 MongoDB 사용하는 이유
MongoDB Ruby 및 Rails와 통합하면 Mongoid의 ODM(Object-Document Mapper)을 사용하여 MongoDB의 유연한 document model 과 상호 작용 수 있습니다. Mongoid는 Rails의 기본값 Active Record ORM을 대체하며, Rails를 사용하여 데이터의 모델링 및 표시 방식을 쉽게 제어하는 동시에 MongoDB의 스키마 유연성을 활용할 수 있습니다.
빠른 시작 튜토리얼
이 튜토리얼에서는 Ruby 와 Rails를 사용하여 웹 애플리케이션 빌드 방법을 보여줍니다. 애플리케이션 샘플 레스토랑 데이터에 액세스하고, 데이터를 쿼리하고, 로컬에서 호스팅되는 사이트 에 결과를 표시합니다. 이 튜토리얼에는 MongoDB Atlas 에서 호스팅된 MongoDB 클러스터 에 연결하고 데이터베이스 의 데이터에 액세스하고 표시하는 방법에 대한 지침도 포함되어 있습니다.
팁
Mongoid 없이 Ruby 운전자 사용하여 MongoDB 에 연결하려는 경우 Ruby 드라이버 시작하기 튜토리얼을 따르세요.
프로젝트 설정
이 섹션의 단계에 따라 프로젝트 종속성을 설치하고, Atlas 클러스터를 만들고, 애플리케이션 구조를 설정하세요.
전제 조건을 확인합니다.
빠른 시작 애플리케이션 만들기 전에 개발 환경에 다음 소프트웨어를 설치하세요.
전제 조건 | 참고 사항 |
|---|---|
버전 3.1 이상을 사용하세요. | |
Ruby 용 패키지 관리자입니다. | |
코드 편집기 | 이 튜토리얼에서는 Visual Studio Code 를 Ruby 확장과 함께 사용하지만 원하는 편집기를 사용할 수 있습니다. |
터미널 앱 및 shell | MacOS 사용자의 경우 터미널 또는 유사한 앱을 사용하세요. Windows 사용자의 경우 PowerShell을 사용하세요. |
MongoDB Atlas 클러스터를 생성합니다.
MongoDB Atlas 는 MongoDB 배포서버를 호스팅하는 완전 관리형 클라우드 데이터베이스 서비스입니다. MongoDB 배포서버 없는 경우, MongoDB 시작하기 튜토리얼을 완료하여 무료로 MongoDB 클러스터 생성할 수 있습니다( 크레딧 카드 필요 없음). MongoDB 시작하기 튜토리얼에서는 이 튜토리얼에서 사용되는 sample_restaurants 데이터베이스 포함하여 샘플 데이터 세트를 클러스터 에 로드하는 방법도 보여줍니다.
MongoDB 클러스터에 연결하려면 연결 URI를 사용해야 합니다. 연결 URI를 조회 방법을 학습하려면 MongoDB 시작하기 튜토리얼의 연결 문자열 추가하기 섹션을 참조하세요.
중요
연결 string 을 안전한 위치 에 저장합니다.
백엔드 구성
프로젝트 구조 및 종속성을 설정한 후 이 섹션의 단계에 따라 MongoDB 에 연결하고 데이터 모델을 설정하다 합니다.
MongoDB 연결을 구성합니다.
config/mongoid.yml 파일 로 이동하여 해당 내용을 다음 코드로 바꿉니다.
development: clients: default: uri: <connection_URI>
<connection_URI> 자리 표시자를 이전 단계에서 저장한 연결 URI로 바꿉니다. URI에 sample_restaurants 데이터베이스 이름이 포함되어 있는지 확인합니다.
데이터 모델 만듭니다.
다음 명령을 실행 하여 name, cuisine 및 borough 필드가 있는 Restaurant 모델을 생성합니다.
bin/rails g scaffold Restaurant name:string cuisine:string borough:string
Restaurant 모델은 sample_restaurants 데이터베이스 의 restaurants 컬렉션 나타냅니다. 앞의 명령은 Restaurant 모델에 대한 컨트롤러 및 보기 파일도 생성합니다. 이러한 파일이 포함된 디렉토리는 애플리케이션 의 app 디렉토리 에서 찾을 수 있습니다.
경로를 구성하고 사용자 지정 조치를 추가합니다.
config/routes.rb 파일 로 이동하여 해당 내용을 다음 코드로 바꿉니다.
Rails.application.routes.draw do resources :restaurants get "browse" => "restaurants#browse" # Defines the root path route ("/") root "restaurants#index" end
그런 다음 app/controllers/restaurants_controller.rb 파일 에 다음 메서드를 추가합니다.
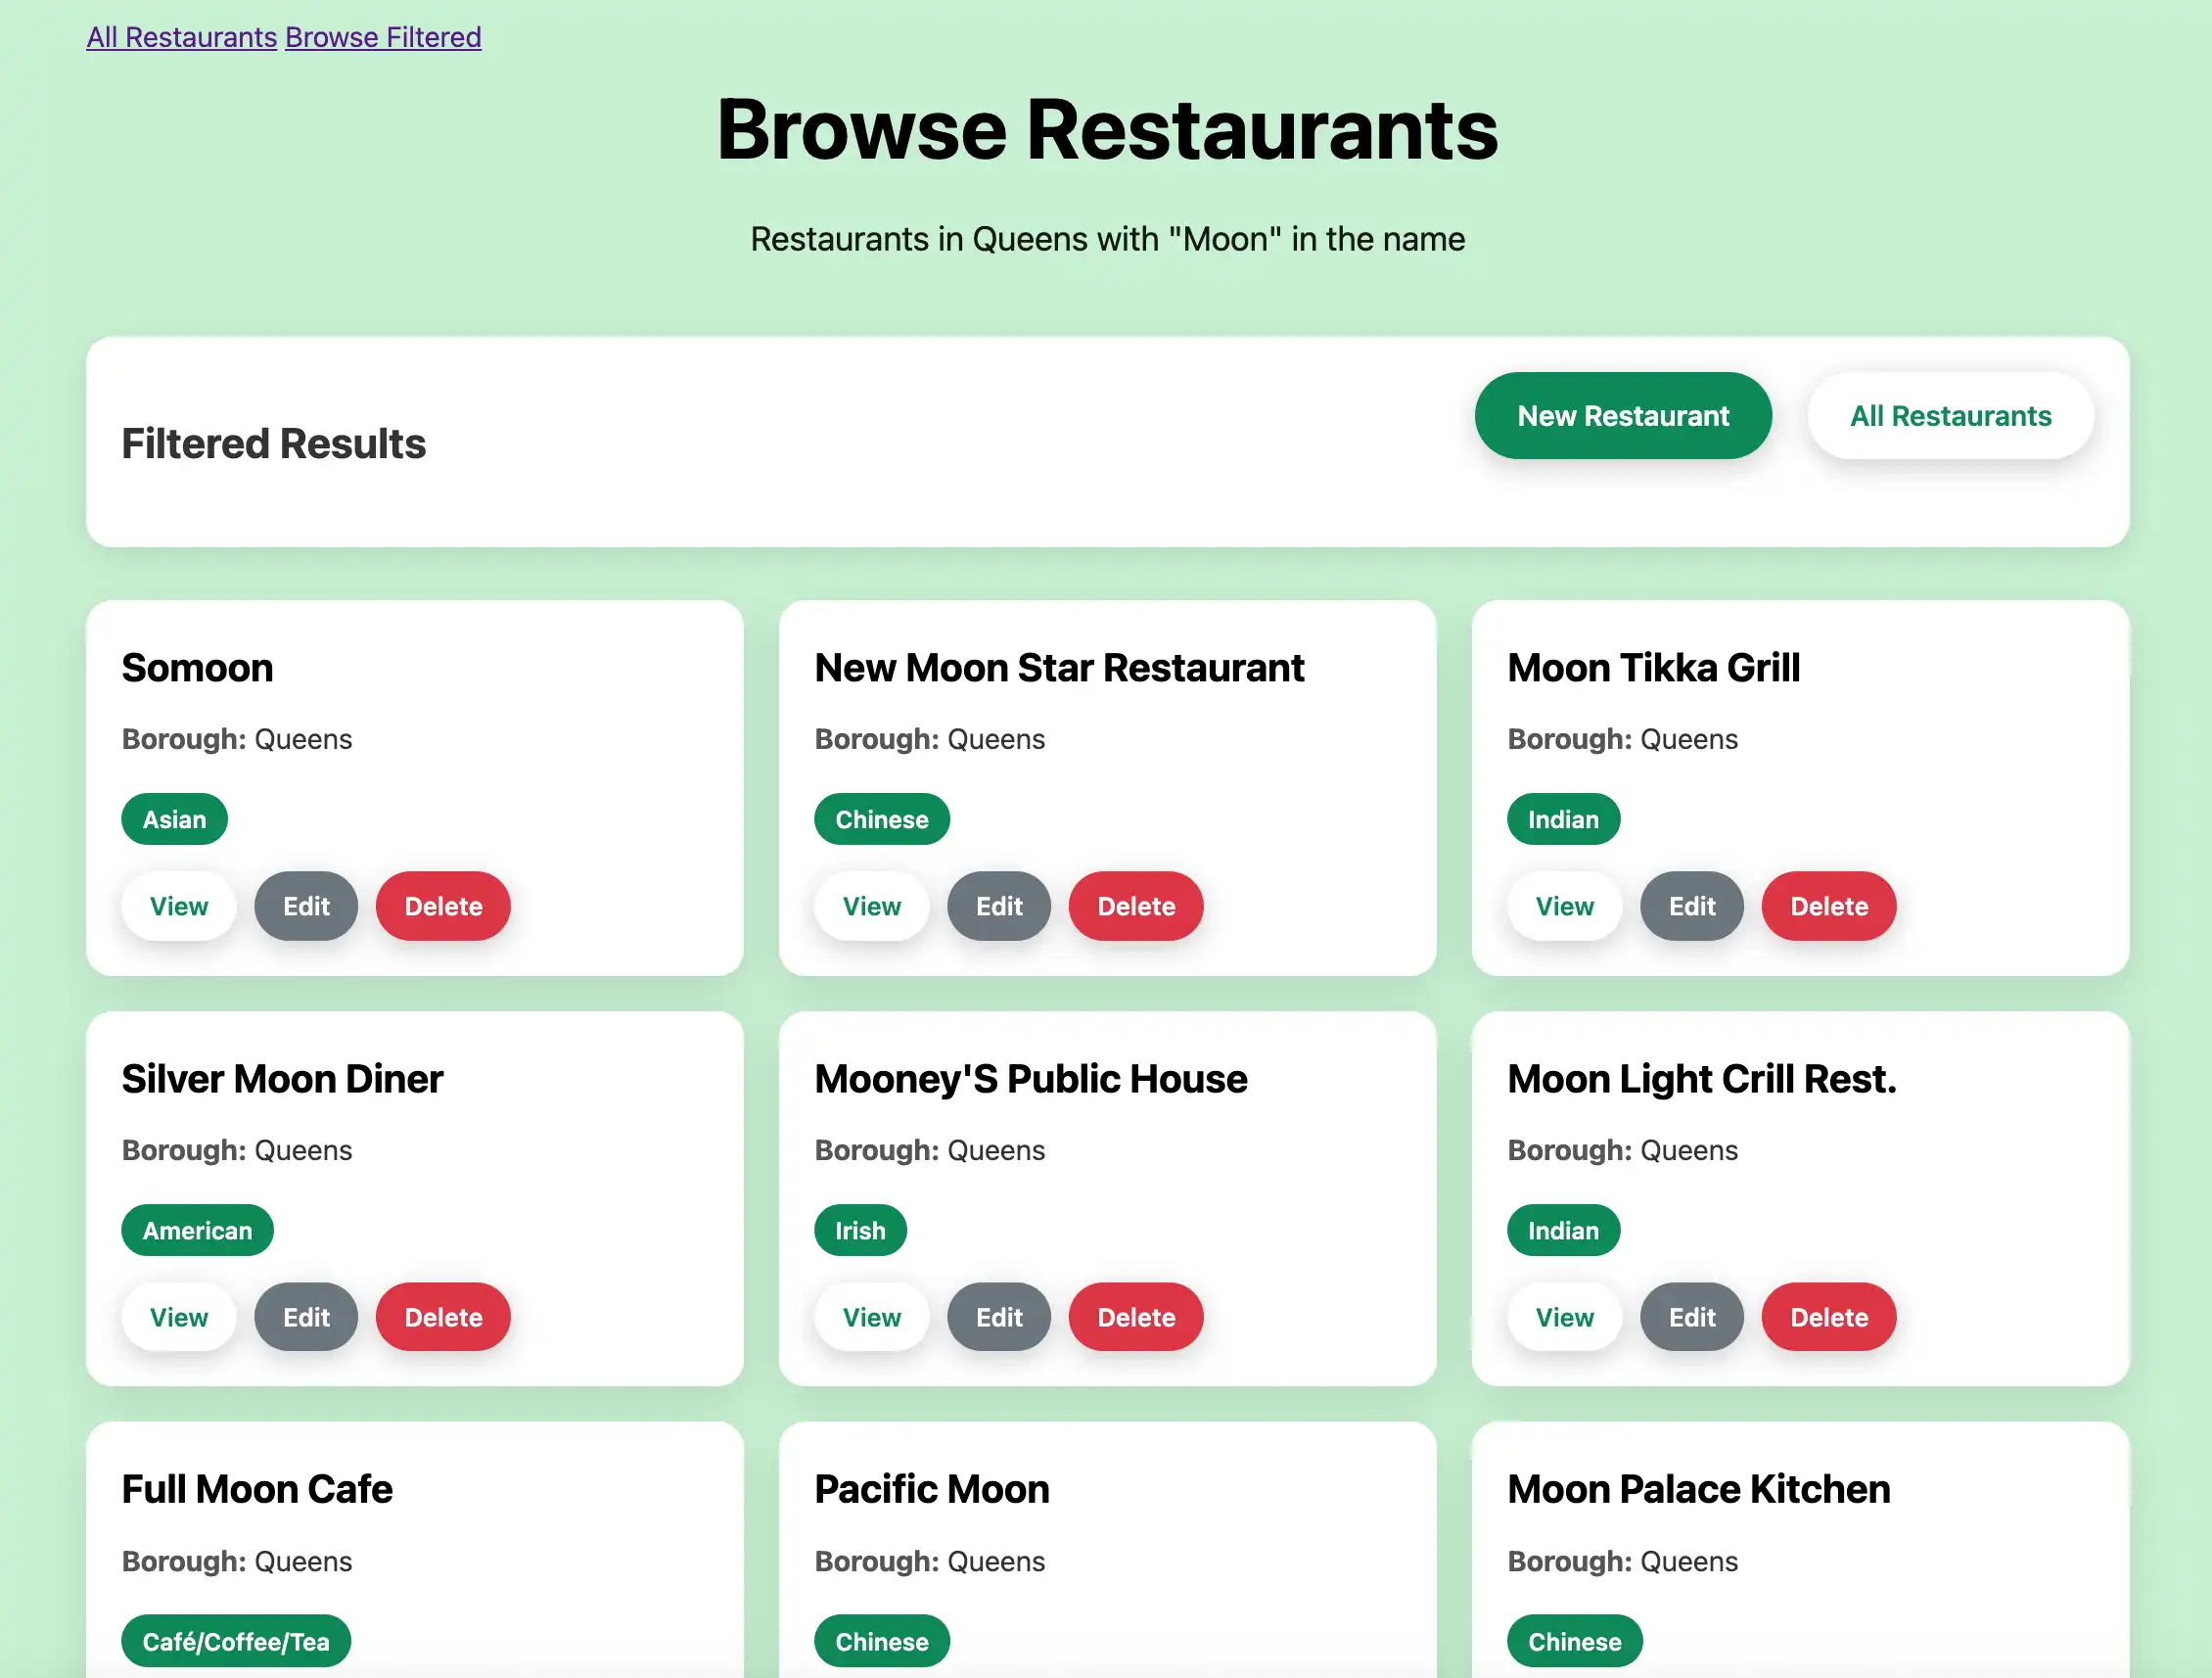
# GET /browse def browse @restaurants = Restaurant .where(name: /Moon/i).and(borough: "Queens") end
이 메서드는 대소문자를 구분하지 않는 정규 표현식 일치를 사용하여 이름에 "Moon" 가 포함된 퀸즈의 레스토랑을 쿼리합니다.
프런트 엔드 구성
데이터 영역을 설정한 후 이 섹션의 단계에 따라 사용자 인터페이스에 대한 템플릿과 스타일을 생성합니다.
기본 레이아웃을 업데이트합니다.
app/views/layouts/application.html.erb 파일 로 이동하여 해당 내용을 다음 코드로 바꿉니다.
<!DOCTYPE html> <html> <head> <title><%= content_for(:title) || "Restaurant Directory" %></title> <meta name="viewport" content="width=device-width,initial-scale=1"> <%= csrf_meta_tags %> <%= csp_meta_tag %> <%= stylesheet_link_tag :app, "data-turbo-track": "reload" %> <%= javascript_importmap_tags %> </head> <body> <div class="container"> <nav class="navigation"> <%= link_to "All Restaurants", root_path, class: "nav-link" %> <%= link_to "Browse Filtered", browse_path, class: "nav-link" %> </nav> <%= yield %> </div> </body> </html>
이 파일 애플리케이션 의 모든 페이지에 대한 기본 템플릿 래퍼입니다. 여기에는 탐색 링크, 페이지 제목, 보안 및 자산 로딩에 필요한 Rails 헬퍼 태그가 포함됩니다.
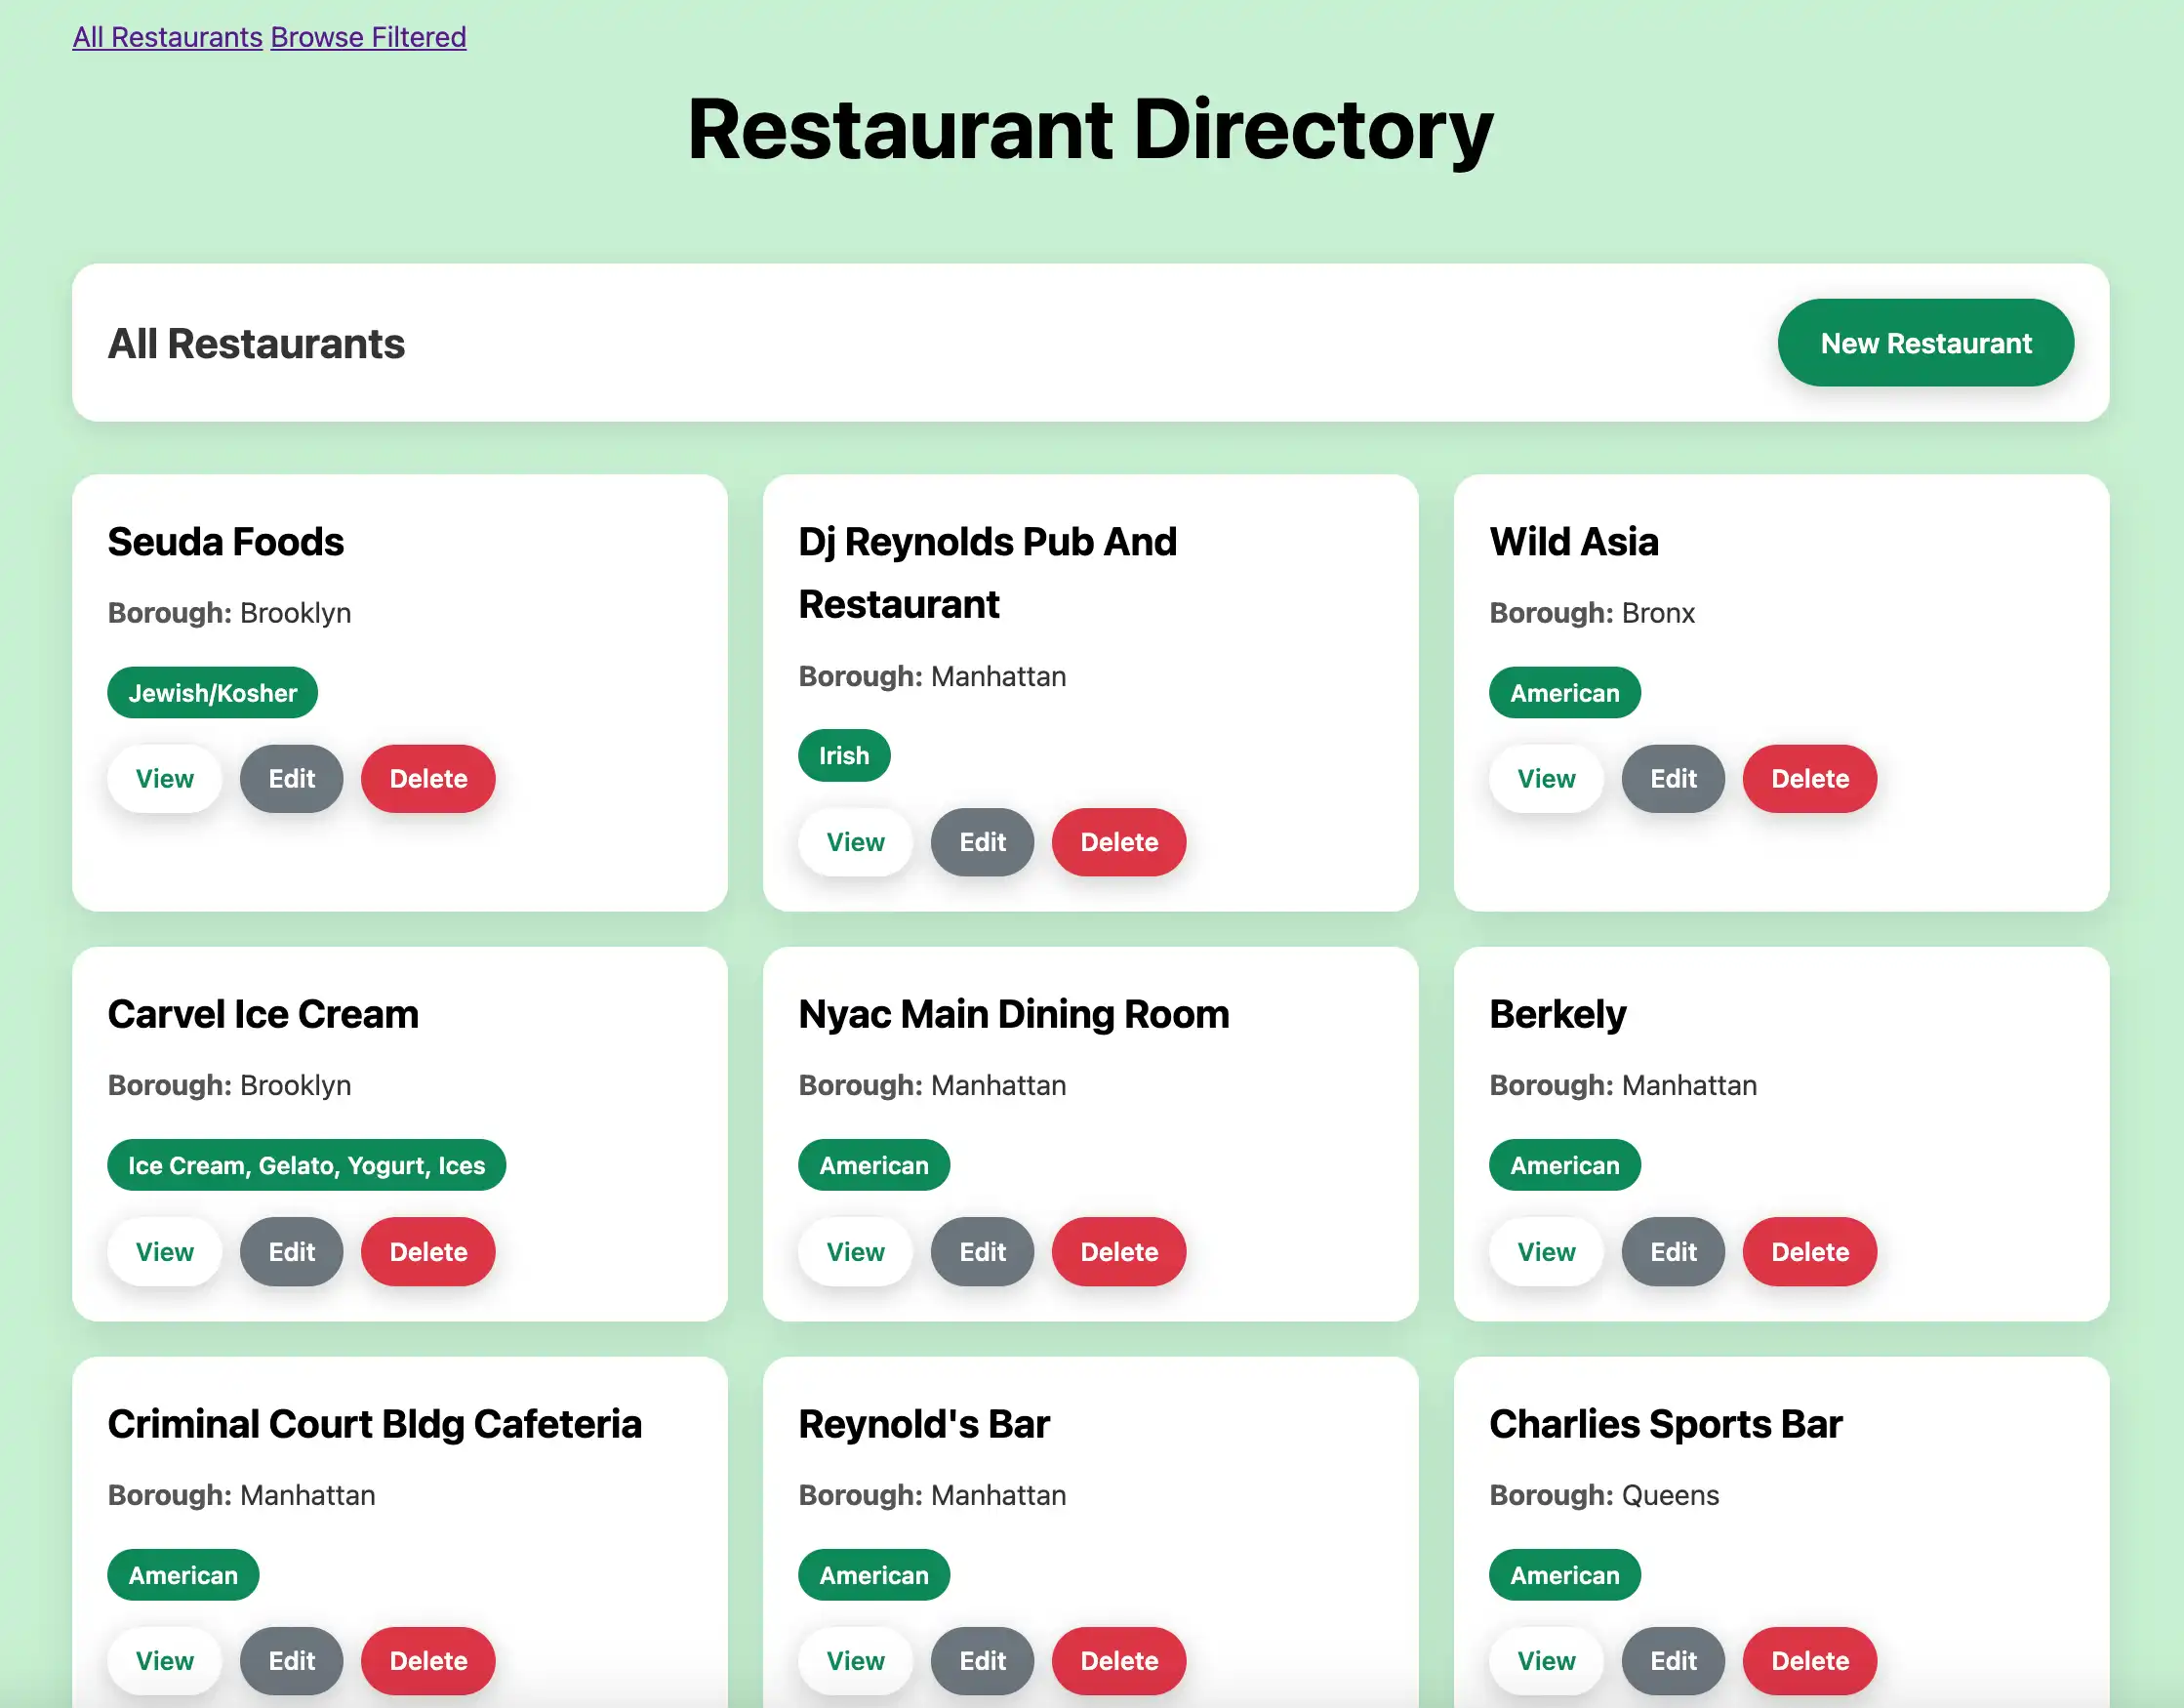
레스토랑 목록 보기를 만듭니다.
app/views/restaurants/index.html.erb 파일 로 이동하여 해당 내용을 다음 코드로 바꿉니다.
<% content_for :title, "Restaurant Directory" %> <header> <h1>Restaurant Directory</h1> </header> <div class="actions-header"> <h2>All Restaurants</h2> <%= link_to "New Restaurant", new_restaurant_path, class: "btn btn-success" %> </div> <div class="restaurants-grid"> <% @restaurants.each do |restaurant| %> <div class="restaurant-card"> <div class="restaurant-name"><%= restaurant.name %></div> <div class="restaurant-info"> <strong>Borough:</strong> <%= restaurant.borough %> </div> <div class="cuisine-tag"><%= restaurant.cuisine %></div> <div class="btn-group"> <%= link_to "View", restaurant, class: "btn" %> <%= link_to "Edit", edit_restaurant_path(restaurant), class: "btn btn-secondary" %> <%= link_to "Delete", restaurant_path(restaurant), method: :delete, confirm: "Are you sure?", class: "btn btn-danger" %> </div> </div> <% end %> </div>
이 보기 파일 모든 레스토랑이 격자 레이아웃으로 표시되며 각 레스토랑을 보고, 편집하고, 삭제할 수 있는 조치 버튼이 포함되어 있습니다.
필터링된 뷰를 만듭니다.
app/views/restaurants/browse.html.erb라는 이름의 새 파일을 만들고 다음 코드를 붙여넣습니다.
<% content_for :title, "Browse Restaurants" %> <header> <h1>Browse Restaurants</h1> <div class="subtitle">Restaurants in Queens with "Moon" in the name</div> </header> <div class="actions-header"> <h2>Filtered Results</h2> <div class="controls"> <%= link_to "New Restaurant", new_restaurant_path, class: "btn btn-success" %> <%= link_to "All Restaurants", root_path, class: "btn" %> </div> </div> <div class="restaurants-grid"> <% @restaurants.each do |restaurant| %> <div class="restaurant-card"> <div class="restaurant-name"><%= restaurant.name %></div> <div class="restaurant-info"> <strong>Borough:</strong> <%= restaurant.borough %> </div> <div class="cuisine-tag"><%= restaurant.cuisine %></div> <div class="btn-group"> <%= link_to "View", restaurant, class: "btn" %> <%= link_to "Edit", edit_restaurant_path(restaurant), class: "btn btn-secondary" %> <%= link_to "Delete", restaurant_path(restaurant), method: :delete, confirm: "Are you sure?", class: "btn btn-danger" %> </div> </div> <% end %> </div>
이 보기 파일 필터링된 레스토랑 결과를 표시하며 사용자 지정 browse 컨트롤러 조치 의 레스토랑만 표시합니다.
Add CSS styling.
app/assets/stylesheets/application.css 파일에 다음 코드를 추가합니다.
* { margin: 0; padding: 0; box-sizing: border-box; } body { font-family: -apple-system, BlinkMacSystemFont, 'Segoe UI', Roboto, Oxygen, Ubuntu, Cantarell, sans-serif; line-height: 1.6; color: #333; background: rgb(198, 240, 209); min-height: 100vh; } .container { max-width: 1200px; margin: 0 auto; padding: 20px; } header { text-align: center; margin-bottom: 40px; color: rgb(0, 0, 0); } h1 { font-size: 3rem; margin-bottom: 10px; } .subtitle { font-size: 1.2rem; opacity: 0.9; } .controls { display: flex; justify-content: center; gap: 20px; margin-bottom: 30px; } .btn { background: white; color: #0d8958; border: none; padding: 12px 24px; border-radius: 25px; font-weight: 600; text-decoration: none; cursor: pointer; transition: all 0.3s ease; box-shadow: 0 4px 15px rgba(0,0,0,0.2); display: inline-block; } .btn:hover { transform: translateY(-2px); box-shadow: 0 6px 20px rgba(0,0,0,0.3); color: #0d8958; text-decoration: none; } .btn.btn-success { background: #0d8958; color: white; } .btn.btn-success:hover { background: #0a6b44; color: white; } .btn.btn-danger { background: #dc3545; color: white; } .btn.btn-danger:hover { background: #c82333; color: white; } .btn.btn-secondary { background: #6c757d; color: white; } .btn.btn-secondary:hover { background: #5a6268; color: white; } .restaurants-grid { display: grid; grid-template-columns: repeat(auto-fill, minmax(350px, 1fr)); gap: 20px; margin-top: 20px; } .restaurant-card { background: white; border-radius: 15px; padding: 20px; box-shadow: 0 8px 25px rgba(0,0,0,0.1); transition: transform 0.3s ease, box-shadow 0.3s ease; } .restaurant-card:hover { transform: translateY(-5px); box-shadow: 0 12px 35px rgba(0,0,0,0.15); } .restaurant-name { font-size: 1.4rem; font-weight: 700; color: #000000; margin-bottom: 10px; } .restaurant-info { margin-bottom: 8px; } .restaurant-info strong { color: #555; } .cuisine-tag { display: inline-block; background: #0d8958; color: white; padding: 4px 12px; border-radius: 15px; font-size: 0.85rem; font-weight: 600; margin-top: 10px; } .btn-group { display: flex; gap: 10px; margin-top: 15px; } .btn-group .btn { padding: 8px 16px; font-size: 0.9rem; } .notice { background: white; color: #0d8958; padding: 15px 20px; border-radius: 15px; margin-bottom: 20px; box-shadow: 0 4px 15px rgba(0,0,0,0.1); text-align: center; font-weight: 600; } .form-container { background: white; border-radius: 15px; padding: 30px; box-shadow: 0 8px 25px rgba(0,0,0,0.1); max-width: 600px; margin: 0 auto; } .form-group { margin-bottom: 20px; } .form-label { display: block; margin-bottom: 8px; font-weight: 600; color: #333; } .form-input { width: 100%; padding: 12px 16px; border: 2px solid #e9ecef; border-radius: 12px; font-size: 1rem; transition: border-color 0.3s ease; } .form-input:focus { outline: none; border-color: #0d8958; } .form-actions { display: flex; gap: 15px; justify-content: center; margin-top: 25px; } .page-header { text-align: center; margin-bottom: 30px; } .actions-header { display: flex; justify-content: space-between; align-items: center; margin-bottom: 30px; background: white; padding: 20px; border-radius: 15px; box-shadow: 0 4px 15px rgba(0,0,0,0.1); } .actions-header h1 { font-size: 2rem; color: #0d8958; margin: 0; } @media (max-width: 768px) { .container { padding: 10px; } h1 { font-size: 2rem; } .controls { flex-direction: column; align-items: center; } .restaurants-grid { grid-template-columns: 1fr; } .actions-header { flex-direction: column; gap: 15px; } .form-actions { flex-direction: column; } }
이 CSS 파일 사이트의 격자 레이아웃에 스타일을 추가합니다.
애플리케이션 실행하기
마지막으로 이 섹션의 단계에 따라 웹 애플리케이션 실행 하고 브라우저 인터페이스를 사용하여 레스토랑 데이터를 탐색합니다.
Rails 애플리케이션 시작합니다.
프로젝트 디렉토리 로 이동하여 다음 명령을 실행 .
bin/rails s
성공적인 하면 명령 출력은 다음 예시 와 유사합니다.
=> Booting Puma => Rails 8.0.1 application starting in development => Run `bin/rails server --help` for more startup options Puma starting in single mode... * Puma version: 6.4.3 (ruby 3.2.5-p208) ("The Eagle of Durango") * Min threads: 3 * Max threads: 3 * Environment: development * PID: 66973 * Listening on http://127.0.0.1:3000 * Listening on http://[::1]:3000 * Listening on http://127.0.2.2:3000 * Listening on http://127.0.2.3:3000 Use Ctrl-C to stop
웹 애플리케이션 엽니다.
웹 브라우저에서 http://127.0.0.1:3000 를 엽니다. 초기 방문 페이지에는 sample_restaurants.restaurants 컬렉션 의 모든 레스토랑이 표시됩니다.

그런 다음 Browse Filtered 버튼을 클릭하여 이름에 "Moon" 가 포함된 퀸즈의 레스토랑을 확인합니다.

빠른 시작 튜토리얼을 완료한 것을 축하합니다! 이 단계를 완료하면 MongoDB 배포서버에 연결하고, 샘플 레스토랑 데이터에 대해 쿼리를 실행하고, 전체 CRUD 기능을 갖춘 로컬로 호스팅되는 웹 인터페이스에 결과를 표시하는 Ruby and Rails 웹 애플리케이션 갖게 됩니다.
추가 리소스
Ruby, Rails, Mongoid 및 MongoDB 에 대해 자세히 학습 다음 리소스를 참조하세요.
Ruby 언어 문서