Overview
このガイドでは、 Action Web とMongoDBを使用して Webアプリケーションをビルドする方法を説明します。Actionx は、 Rust用の強力な非同期 Webフレームワークであり、高速でタイプセーフなHTTPサービスを簡単にビルドできます。
このチュートリアルのアプリケーションは、次のレイヤーで構成されています。
データベースレイヤー: MongoDB ( MongoDB Atlasでホストされている )は、データを保存および検索します。
サーバー層: Actix Web は、フロントエンドをMongoDBデータベースに接続するためのHTTPサーバー、ルーティング、およびAPIエンドポイントを提供します。
データ管理レイヤー: Rust のタイプ システムと非同期/await により、コンパイル時が保証された安全なデータ処理が提供されます。
プレゼンテーション レイヤー: サーバーでレンダリングされた HTML ページで、tailwind CSS でスタイルされている場合は、レストランのサンプルデータを表に表示します。
次のような小規模なアプリケーションを構築します。
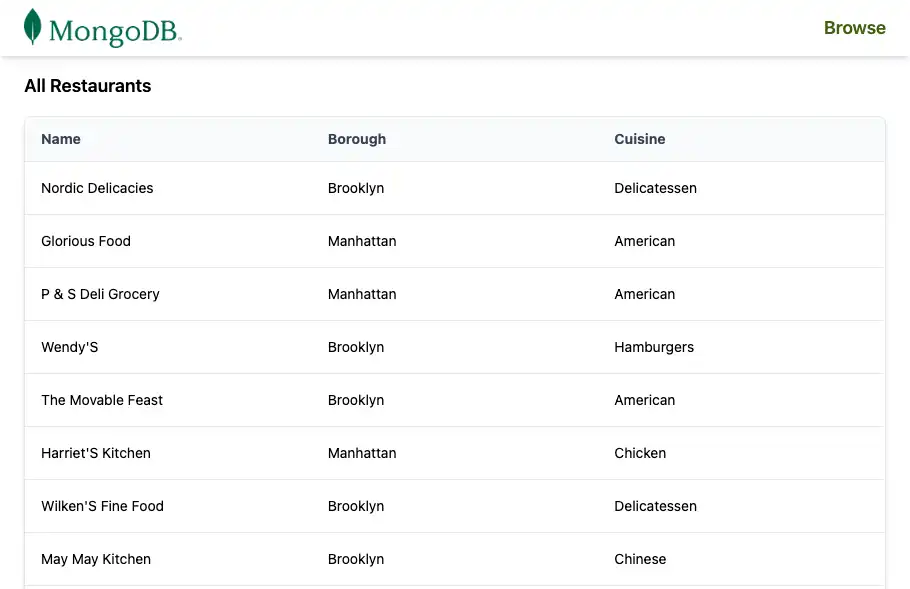
sample_restaurantsデータセットを含むMongoDB Atlasクラスターに接続しますすべてのレストランを一覧表示する
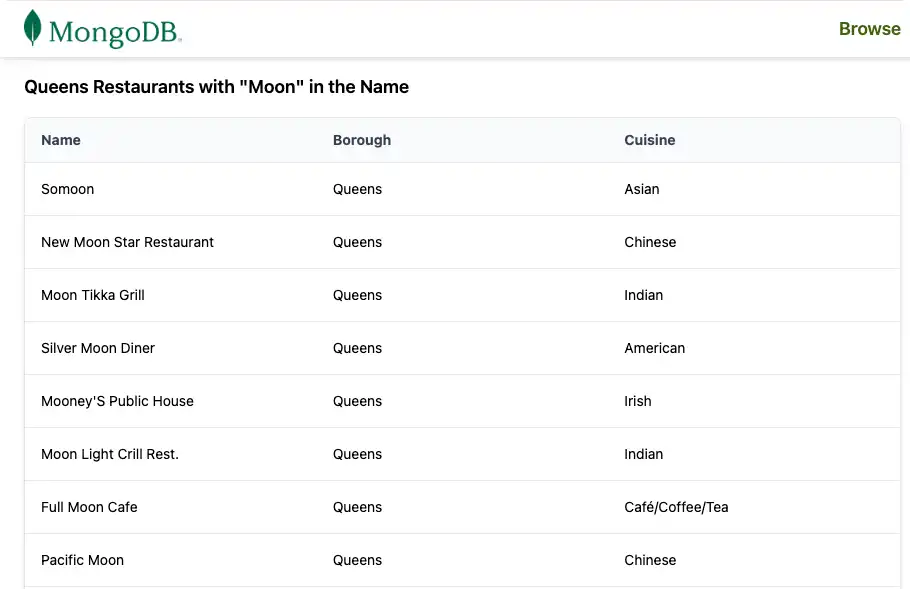
/restaurantsエンドポイントとなる接続されたデバイスを公開します名前が
"Moon"となるクイーンズのレストランを一覧表示する/browseエンドポイントとなる接続されたデバイスを公開します共有ナビゲーション バーを使用して結果を HTML テーブルとしてレンダー
ActiveX アプリケーションでMongoDBを使用する理由
MongoDB の柔軟なドキュメントモデルは、 BSON/ JSONのようなドキュメントとしてデータを保存します。これは、複雑な ORM レイヤーやスキーマ移行なしで、データをモデル化するRust構造体で自然に機能します。
Action Web と非同期MongoDB Rustドライバーを組み合わせると、このスタックは次の機能を提供します。
コストの移行なしで変化する柔軟なデータ構造
高同時実行性とパフォーマンス API のための非同期、非ブロッキング I/O
ハンドラーとモデルを通じてデータベースレイヤーから強力な型安全性
Web ビューとの簡単な統合(このチュートリアルのように HTML テンプレートまたは手動文字列ビルド)
この組み合わせは、次の必要があるアプリケーションで機能します。
時間の経過とともに変化するスキーマ
高スループットと同時実行性
データの形状に関する強力なコンパイル時間保証
クイック スタート チュートリアル
このチュートリアルでは、 MongoDBと統合する Actionx Webアプリケーションを作成する方法についてガイドします。アプリケーションはMongoDB Atlasクラスター内のサンプルレストラン データにアクセスし、その結果をブラウザに表示します。
Tip
Actix Web なしでRustドライバーを使用してMongoDBに接続する場合は、Rustドライバー クイック スタートガイドを参照してください。
プロジェクトを設定する
このセクションの手順に従って、前提条件のインストール、 MongoDB Atlasクラスターの作成、 Rustプロジェクトの足場
前提条件を確認します
クイック スタートアプリケーションを作成するには、以下がインストールされていることを確認します。
前提条件 | ノート |
|---|---|
Rust | |
コードエディター | このチュートリアルでは Visual Studio Code と Rust 拡張機能を使用しますが、お好みのエディターを使用できます。 |
ターミナル | MacOS 用のターミナルまたは類似アプリを使用します。Windowsでは PowerShell を使用します。 |
MongoDB Atlasクラスターを作成する
MongoDB Atlas は、 MongoDB配置をホストするフルマネージドクラウドデータベースサービスです。 MongoDBデプロイいない 場合は、 「 MongoDBを使い始める 」チュートリアルを完了して、無料のMongoDBクラスター(クレジットカードは不要)を作成してください。 MongoDBを使い始める sample_restaurantsチュートリアルでは、このチュートリアルで使用する データベースなど、サンプルデータセット をクラスターにロードする方法も説明します。
重要
続行する前に、 sample_restaurants データセット がクラスターにロードされていることを確認してください。sample_restaurants データセットがない場合、サンプルには空のレストラン リストが表示されます。
MongoDBクラスターに接続するには、接続 URI を使用します。接続 URI を取得する方法については、 MongoDBを使い始める チュートリアルの「接続文字列の追加」セクションを参照してください。
Tip
接続 URI を安全なロケーションに保存します。後で .envファイルに追加します。
プロジェクトの依存関係を設定する
Cargo.toml を開き、[dependencies] セクションを次のように置き換えます。
[package] name = "actix_quickstart" version = "0.1.0" edition = "2024" [dependencies] actix-web = "4" actix-files = "0.6" actix-cors = "0.7" mongodb = "3.4.1" tokio = { version = "1", features = ["rt-multi-thread", "macros"] } serde = { version = "1.0", features = ["derive"] } serde_json = "1.0" dotenv = "0.15" futures = "0.3"
ターミナルで次のコマンドを実行中し、新しい依存関係をインストールします。
cargo build
これらの依存関係は、次の機能を提供します。
actix-web: HTTPサーバー、ルーティング、リクエスト/応答のタイプ。mongodb: Rust用の公式非同期MongoDBドライバー。tokio: Activex Web とMongoDBドライバーで使用される非同期ランタイム。serde/serde_json: JSONとBSONデータの直列化と逆直列化。dotenv: ローカル開発用に .envファイルから環境変数を読み込みます。futures:非同期ストリーム( MongoDBカーソルに使用)を操作するためのユーティリティ。
バックエンドの設定
プロジェクトを設定したら、このセクションの手順に従って、環境変数の構成、 MongoDB接続の設定、データモデルの定義、データベースクエリ サービスを実装します。
データベース接続モジュールを作成する
MongoDB接続を管理するために、srcディレクトリに db.rs という名前の新しいファイルを作成します。
プロジェクトルートで次のコマンドを実行します。
touch src/db.rs
db.rs を開き、次のコードを追加して、 MongoDBクライアントとデータベースの接続を設定します。
use mongodb::{options::ClientOptions, Client, Database}; pub async fn init_db(mongo_uri: &str) -> Database { let mut client_options = ClientOptions::parse(mongo_uri) .await .expect("Failed to parse MongoDB connection string"); client_options.app_name = Some("actix_quickstart".to_string()); let client = Client::with_options(client_options) .expect("Failed to initialize MongoDB client"); client.database("sample_restaurants") }
このモジュールは:
環境からMongoDB接続文字列を解析します。
可視性を容易にするためにドライバーの app_name を構成します。
クライアントを作成し、
sample_restaurantsデータベースのデータベース ハンドルを返します。
レストランのデータモデルを定義する
レストランデータモデルを定義するには、srcディレクトリに models.rs という名前の新しいファイルを作成します。
プロジェクトルートで次のコマンドを実行します。
touch src/models.rs
models.rs を開き、次のコードを追加してレストラン 構造を定義します。
use mongodb::bson::oid::ObjectId; use serde::{Deserialize, Serialize}; pub struct RestaurantRow{ pub name: Option<String>, pub borough: Option<String>, pub cuisine: Option<String>, pub id: Option<ObjectId>, }
この構造体は、 MongoDBコレクション内のレストランのドキュメントを表します。BSONフィールドをRust構造体フィールドにマッピングするために、Serde 注釈を使用します。
レストラン クエリ サービスを作成する
MongoDBクエリ ロジックをHTTPハンドラーから分離するサービス モジュールを作成します。
プロジェクトルートで次のコマンドを実行します。
mkdir -p src/services touch src/services/restaurant_queries.rs
restaurant_queries.rs を開き、次のコードを追加します。
use futures::stream::TryStreamExt; use mongodb::{ bson::doc, Collection, }; use crate::models::RestaurantRow; pub async fn fetch_all(restaurants: &Collection<RestaurantRow>) -> Result<Vec<RestaurantRow>, mongodb::error::Error> { let cursor = restaurants .find(doc! {}) .projection(doc! { "name": 1, "borough": 1, "cuisine": 1, "_id": 1, }) .await?; cursor.try_collect().await } pub async fn fetch_by_borough( restaurants: &Collection<RestaurantRow>, borough: &str, name: &str, ) -> Result<Vec<RestaurantRow>, mongodb::error::Error> { let filter = doc! { "borough": borough, "name": { "$regex": name, "$options": "i" } }; let cursor = restaurants .find(filter) .projection(doc! { "name": 1, "borough": 1, "cuisine": 1, "_id": 1, }) .await?; cursor.try_collect().await }
このファイルには、2 つの非同期関数が含まれています。
fetch_all():フィールドプロジェクションを持つすべてのレストランを返します。fetch_by_borough(): 地区、および大文字と小文字を区別しない名前正規表現でフィルタリングされたレストランを返します。
どちらの関数も Vec<RestaurantRow> を返すため、プレゼンテーションレイヤーは未加工のBSONを処理する必要がありません。
フロントエンドの設定
データベースレイヤーとサービスレイヤーが用意できたら、Atlas Web を次のように構成します。
MongoDB接続を初期化する
共有アプリケーションの状態を定義する
/restaurantsと/browseエンドポイントを公開するtailwind CSS を使用した HTML ページのレンダーの
HTTPルート ハンドラーを作成する
Action Web HTTPルート ハンドラーと HTML レンダリング ロジックを保持するモジュールを作成します。
プロジェクトルートから、次のコマンドを実行します。
touch src/pages.rs
pages.rs を開き、次のコードを追加します。
use actix_web::{get, web, HttpResponse, Responder}; use crate::{ AppState, models::RestaurantRow, services::restaurant_queries, }; // Test endpoint to fetch all restaurants async fn get_restaurants(data: web::Data<AppState>) -> impl Responder { let result = restaurant_queries::fetch_all(&data.restaurants).await; match result { Ok(rows) => { let html = render_table_page("All Restaurants", &rows); HttpResponse::Ok() .content_type("text/html; charset=utf-8") .body(html) } Err(e) => HttpResponse::InternalServerError().body(format!("DB error: {e}")), } } // Endpoint to fetch restaurants by borough. Queens is used as an example. async fn get_restaurants_by_borough(data: web::Data<AppState>) -> impl Responder { let borough = "Queens"; // For demonstration, we use a fixed borough. This could be made dynamic. let name = "Moon"; // For demonstration, we use a fixed name filter. This could be made dynamic. let result = restaurant_queries::fetch_by_borough(&data.restaurants, borough, name).await; match result { Ok(rows) => { let title = format!(r#"{} Restaurants with "{}" in the Name"#, borough, name); let html = render_table_page(&title, &rows); HttpResponse::Ok() .content_type("text/html; charset=utf-8") .body(html) } Err(e) => HttpResponse::InternalServerError().body(format!("DB error: {e}")), } } // HTML Renderer fn render_table_page(title: &str, rows: &[RestaurantRow]) -> String { let mut html = String::new(); html.push_str(r#" <!DOCTYPE html> <html lang="en"> <head> <meta charset="UTF-8"> <meta name="viewport" content="width=device-width, initial-scale=1.0"> <script src="https://cdn.tailwindcss.com"></script> <title>"#); html.push_str(title); html.push_str(r#"</title> </head> <body class="w-full"> "#); // Navigation Bar html.push_str(r#" <nav class="bg-white px-6 py-2 shadow-md w-full"> <div class="flex justify-between items-center"> <a href="/restaurants"> <img alt="MongoDB Logo" class="h-10 inline" src="https://d3cy9zhslanhfa.cloudfront.net/media/3800C044-6298-4575-A05D5C6B7623EE37/4B45D0EC-3482-4759-82DA37D8EA07D229/webimage-8A27671A-8A53-45DC-89D7BF8537F15A0D.png" /> </a> <a href="/browse" class="text-lime-800 text-lg font-semibold hover:text-lime-700"> Browse </a> </div> </nav> "#); // Page Title html.push_str(r#"<h2 class="text-lg font-semibold px-6 py-4">"#); html.push_str(title); html.push_str("</h2>"); // Table Wrapper html.push_str( r#"<div class="border border-gray-200 shadow-md rounded-lg overflow-hidden mx-6 mb-6"> <div class="relative w-full overflow-auto"> <table class="w-full caption-bottom text-sm"> <thead class="[&_tr]:border-b bg-gray-50"> <tr class="border-b transition-colors hover:bg-muted/50"> <th class="px-4 py-3 text-left text-sm font-bold text-gray-700 w-1/3"> Name </th> <th class="px-4 py-3 text-left text-sm font-bold text-gray-700 w-1/3"> Borough </th> <th class="px-4 py-3 text-left text-sm font-bold text-gray-700 w-1/3"> Cuisine </th> </tr> </thead> <tbody class="[&_tr:last_child]:border-0"> "#, ); // Table Rows for row in rows { html.push_str(r#"<tr class="border-b transition-colors hover:bg-gray-50">"#); html.push_str(r#"<td class="p-4 align-middle">"#); html.push_str(row.name.as_deref().unwrap_or("")); html.push_str("</td>"); html.push_str(r#"<td class="p-4 align-middle">"#); html.push_str(row.borough.as_deref().unwrap_or("")); html.push_str("</td>"); html.push_str(r#"<td class="p-4 align-middle">"#); html.push_str(row.cuisine.as_deref().unwrap_or("")); html.push_str("</td>"); html.push_str("</tr>"); } // Closing tags html.push_str(r#" </tbody> </table> </div> </div> "#); html.push_str("</body></html>"); html }
このモジュールは:
/restaurantsと/browseエンドポイントとなる接続されたデバイスを定義します。データベースクエリ サービス
fetch_allとfetch_by_boroughを呼び出します。tailwind CSS と再利用可能なナビゲーション バーを使用して完全な HTML ページをレンダーします。
メインのアプリケーションファイルを更新する
main.rs の内容を次のコードで置き換えます。
mod db; mod models; mod services; mod pages; use actix_web::{get, web, App, HttpResponse, HttpServer, Responder}; use dotenv::dotenv; use mongodb::bson::doc; use mongodb::Collection; use std::env; use crate::models::RestaurantRow; // Shared state to hold the MongoDB collection #[derive(Clone)] struct AppState { restaurants: Collection<RestaurantRow>, } #[get("/health")] async fn health_check() -> impl Responder { HttpResponse::Ok().body("Healthy") } #[actix_web::main] async fn main() -> std::io::Result<()> { dotenv().ok(); let mongo_uri = env::var("MONGO_URI").expect("MONGO_URI must be set in .env file"); let port: u16 = env::var("PORT") .unwrap_or_else(|_| "5050".to_string()) .parse() .expect("PORT must be a valid u16 number"); print!("Starting server on port {port}...\n"); let db = db::init_db(&mongo_uri).await; let restaurants: Collection<RestaurantRow> = db.collection::<RestaurantRow>("restaurants"); // Extra ping to be sure connection is working let ping_result = db.run_command(doc! {"ping": 1},).await; print!("MongoDB ping result: {ping_result:?}\n"); let state = AppState {restaurants}; HttpServer::new(move || { App::new() .app_data(web::Data::new(state.clone())) .service(health_check) .service(pages::get_restaurants) .service(pages::get_restaurants_by_borough) }) .bind(("127.0.0.1", port))? .run() .await }
このファイル:
アプリで使用されるモジュールを宣言します(
db、models、services、pages)。ハンドラー間で共有されるレストランコレクションを保持する
AppState構造体を定義します。/healthエンドポイントとなる接続されたデバイスを実装します。環境から
MONGO_URIとPORTを読み取ります。MongoDBデータベースと
restaurantsコレクション を初期化します。MongoDBクラスターに ping して接続を確認します。
Actionもの Web HTTPサーバーを起動し、ルートを登録します。
/health/restaurants/browse
ファイル構造を確認します
アプリケーションを実行する前に、ファイルのツリーが次のように構成されていることを確認してください。
actix-quickstart ├── Cargo.toml <-- Project config + dependencies> ├── .env <-- Environment variables> └── src ├── main.rs <-- Application entry point> ├── db.rs <-- MongoDB connection module> ├── models.rs <-- RestaurantRow model + BSON mapping> ├── pages.rs <-- HTTP route handlers + HTML rendering> └── services ├── mod.rs <-- Service module exports> └── restaurant_queries.rs <-- MongoDB query services>
Rustツールでは、ビルド時に target/ などの追加ファイルが作成されます。これらのファイルは無視しても問題ありません。
アプリケーションの実行
残りの手順に従ってサーバーを起動し、レンダリングされたレストラン データを表示します。

クイック スタート チュートリアルが完了しました。
これらの手順を完了すると、 MongoDB配置に接続し、サンプルレストラン データに対してクエリを実行する、結果をレンダリングする Activeix Webアプリケーションが作成されます。
追加リソース
Activeix Web、 MongoDB、および関連ツールの詳細については、以下を参照してください。
Action Web ドキュメント
MongoDB Rustドライバー ドキュメント