Overview
このガイドでは、Meteor をフロントエンドフレームワークとして使用するフルスタック Vue アプリケーションを作成する方法を学習します。Meteor は、ウェブとモバイル アプリケーションを作成するためのJavaScriptフレームワークです。このフレームワークは、Vue を含むユーザー インターフェースを構築するためのフロントエンド ライブラリの範囲をサポートしています。
このチュートリアルのアプリケーションは、次のレイヤーで構成されています。
データベースレイヤー: MongoDB は、データのストレージと取得を提供します
アプリケーションレイヤー: 統合ビルドする ツールを使用してクライアントとサーバーの両方のロジックを取り扱う
プレゼンテーションレイヤー: Vue は、リアクティブなデータ バインディングを持つユーザー インターフェイスを実装します
Meteor と Vue でMongoDB を使用する理由
Meteor は MongoDB の document model 上に構築されており、Meteor アプリケーションはデフォルトでMongoDBを構成します。最小限の依存関係インストールまたはレイテンシ コードで、 MongoDBにデータを保存するフルスタックアプリケーションをすばやく作成できます。
MongoDB の柔軟なドキュメント構造はJavaScriptオブジェクトと自然に整合します。その結果、Vue コンポーネント内のMongoDBデータをシームレスに操作できます。メタデータ を使用してMongoDB をクエリすると、受け取ったドキュメントは、複雑なデータ変換なしで Vue テンプレートで直接使用できます。
さらに、Meteor は組み込みのリアルタイムデータ同期機能を提供し、 MongoDBでデータが変更されたときに Vue コンポーネントを自動的に更新します。あるユーザーがデータを変更すると、接続されたすべてのユーザーは、手動更新やポーリングなしで、Vue インターフェイスに変更を直ちに表示します。MongoDB をMeteor および Vue と併用することで、Vue のリアクティブ コンポーネント システムと並行して、Meteor のリアルタイムデータ同期機能を活用できます。
クイック スタート チュートリアル
このチュートリアルでは、Meteor と Vue を使用して Webアプリケーションをビルドする方法を説明します。アプリケーションはサンプルレストラン データにアクセスし、データをクエリし、その結果をローカルでホストされているサイトに表示します。このチュートリアルには、 MongoDB AtlasでホストされているMongoDBクラスターに接続し、データベースからのデータにアクセスして表示する手順も含まれています。
Tip
Meteor なしでNode.jsドライバーを使用してMongoDBに接続する場合は、Node.jsドライバーを使い始めるガイドを参照してください。
プロジェクトを設定する
このセクションの手順に従って、プロジェクトの依存関係のインストール、Atlas クラスターの作成、アプリケーションディレクトリの設定を行います。
前提条件を確認します
クイック スタートアプリケーションを作成するには、開発環境に次のソフトウェアをインストールします。
前提条件 | ノート |
|---|---|
バージョン 20 以降を使用します。 | |
コードエディター | このチュートリアルでは Visual Studio Code を使用しますが、お好みのエディターを使用できます。 |
ターミナルアプリとシェル | MacOS ユーザーの場合は、 ターミナル または 類似アプリを使用します。Windowsユーザーの場合は、 PowerShell を使用します。 |
MongoDB Atlasクラスターを作成する
MongoDB Atlas は、MongoDB配置をホストするマネージドクラウドデータベースサービスです。MongoDB配置がない場合は、MongoDBを使い始めるチュートリアルを完了することで、MongoDBクラスターを無料で作成できます(クレジットは不要)。MongoDBを使い始めるチュートリアルでは、このチュートリアルで使用されるsample_restaurantsデータベースなどのサンプルデータセットをクラスターにロードする方法も説明します。
MongoDBクラスターに接続するには、接続 URI を使用する必要があります。接続文字列を検索する方法については、MongoDBを使い始めるチュートリアルの接続文字列の追加セクションを参照してください。
Tip
接続stringを安全な場所に保存します。
インストール Meteor
ターミナルで次のコマンドを実行中て、Meteor をインストールします。
npx meteor
問題が発生した場合は、 Meteor インストールガイド を参照してください。
MongoDB Node.jsドライバーをインストール
Node.jsドライバーをインストールするには、ターミナルで次のコマンドを実行してください。
npm install mongodb
ドライバーのインストールの詳細については、 Node.jsドライバーを使い始める ガイドを参照してください。
MongoDB 接続の構成
プロジェクト構造を設定したら、このセクションの手順に従って、MeteorアプリケーションをMongoDBに接続します。
接続 URI を指定する
sample_restaurantsデータベースにアクセスするには、接続 URI を変更してデータベース名を含めます。次の形式を使用して URI を更新します。
mongodb+srv://<username>:<password>@<cluster>/sample_restaurants?<options>
次に、meteor-vue-quickstartディレクトリから次のコマンドを実行中て、MONGO_URL 環境変数をこの変更された接続 URI に設定します。
export MONGO_URL="<connection URI>"
<connection URI> プレースホルダーを接続 URI に置き換えます。
restaurantsコレクションにアクセスする
imports/apiディレクトリに、restaurantsCollection.js という名前のファイルを作成し、次のコードを貼り付けます。
import { Mongo } from 'meteor/mongo'; export const RestaurantsCollection = new Mongo.Collection('restaurants');
このファイルは、sample_restaurants.restaurantsコレクションにアクセスしてエクスポートします。
データ公開を設定する
imports/apiディレクトリに restaurantsPublications.js という名前のファイルを作成し、次のコードを貼り付けます。
import { Meteor } from 'meteor/meteor'; import { RestaurantsCollection } from './restaurantsCollection'; // Publishes all restaurants Meteor.publish('restaurants', function publishRestaurants() { console.log('Publishing all restaurants...'); const cursor = RestaurantsCollection.find({}, { limit: 200 }); // Limit for performance console.log('Publication cursor created for all restaurants'); return cursor; }); // Publishes restaurants that match the "borough" and "name" filters Meteor.publish('restaurants.filtered', function publishFilteredRestaurants() { console.log('Publishing filtered restaurants...'); const query = { borough: 'Queens', name: { $regex: 'Moon', $options: 'i' } }; const cursor = RestaurantsCollection.find(query); console.log('Publication cursor created for filtered restaurants'); return cursor; });
このファイルは、クライアントがレストランのデータをサブスクライブできるようにするMeteor公開を定義します。これには、次の文書が含まれます。
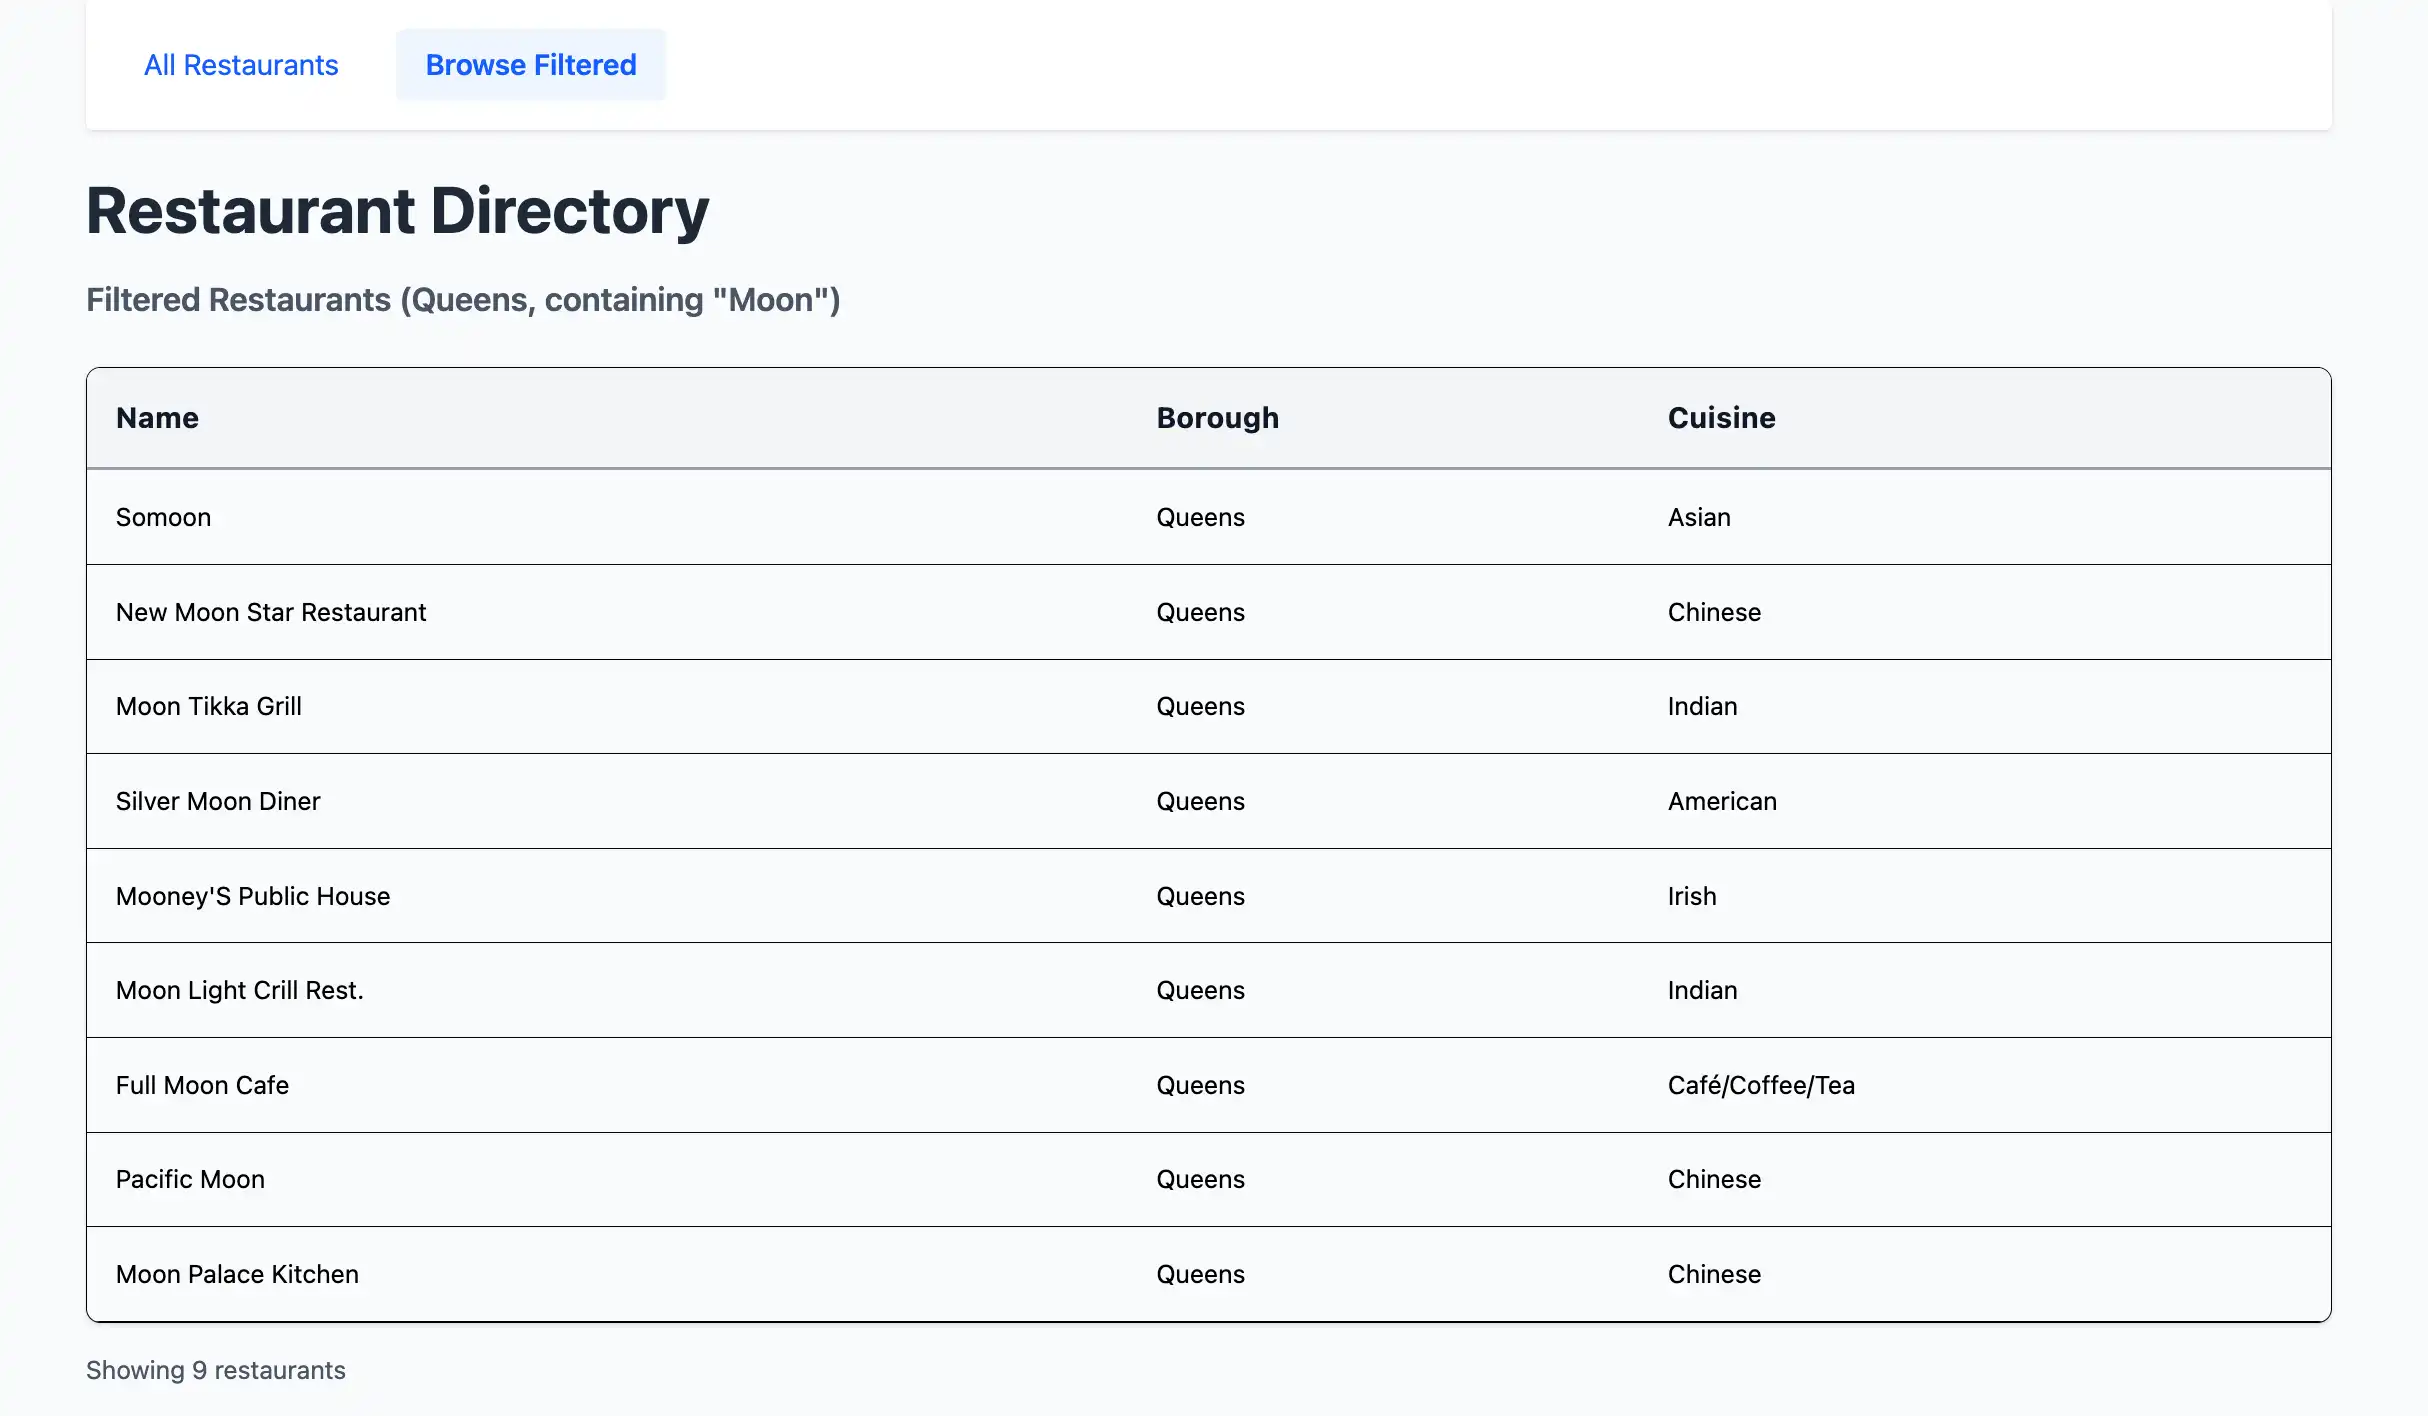
restaurants: すべてのレストランを公開しますが、パフォーマンスの問題を回避するために200に制限しますrestaurants.filtered: 名前に"Moon"が含まれるクイーンズのレストランを公開します。$options引数は、この正規表現文字列の一致が大文字と小文字を区別しないことを指定します。
挿入操作を定義する
scripts という名前の新しいディレクトリを作成し、このディレクトリに insertDemo.js というファイルを作成します。次のコードを insertDemo.js に貼り付けます。
const { MongoClient } = require('mongodb'); const MONGO_URL = process.env.MONGO_URL; async function insertSampleRestaurant() { const client = new MongoClient(MONGO_URL); try { await client.connect(); const db = client.db(); const collection = db.collection('restaurants'); const doc = { name: "Honey Moon Coffee Shop", borough: "Queens", cuisine: "Café/Coffee/Tea", }; const result = await collection.insertOne(doc); console.log('Inserted restaurant with ID:', result.insertedId); } catch (error) { console.error('Error:', error); } finally { await client.close(); } } insertSampleRestaurant();
このファイルでは、次のフィールドを保存するドキュメントを挿入する insertSampleRestaurant() という名前のメソッドが定義されています。
name:"Honey Moon Coffee Shop"borough:"Queens"cuisine:"Café/Coffee/Tea"
後のステップで、このファイルを使用して、Meteor のリアルタイムデータ同期機能をデモンストレーションします。
サーバー構成の更新
server/main.js の内容を次のコードで置き換えます。
import { Meteor } from 'meteor/meteor'; import { RestaurantsCollection } from '../imports/api/restaurantsCollection'; import '../imports/api/restaurantsPublications'; Meteor.startup(async () => { // Check connection to restaurants collection try { const restaurantCount = await RestaurantsCollection.find().countAsync(); console.log(`Connected to MongoDB Atlas. Found ${restaurantCount} restaurants in the collection`); } catch (error) { console.error('Error connecting to restaurants collection:', error); } });
このファイルは、必要なコレクションとジャーナリングをインポートします。また、restaurantsコレクション内のドキュメント数を出力してMongoDB接続を検証するスタートアップ関数も作成します。
Vue コンポーネントの構成
データレイヤーを設定した後、このセクションの手順に従って、レストラン データを表示する Vue コンポーネントを作成します。
ルーティングを設定する
imports/ui/router.jsファイルに移動し、次のコードを貼り付けます。
import { createRouter, createWebHistory } from 'vue-router'; import RestaurantList from './views/RestaurantList.vue'; export const router = createRouter({ history: createWebHistory(), routes: [ { path: '/', name: 'home', component: RestaurantList, meta: { filter: false } }, { path: '/browse', name: 'browse', component: RestaurantList, meta: { filter: true } } ], });
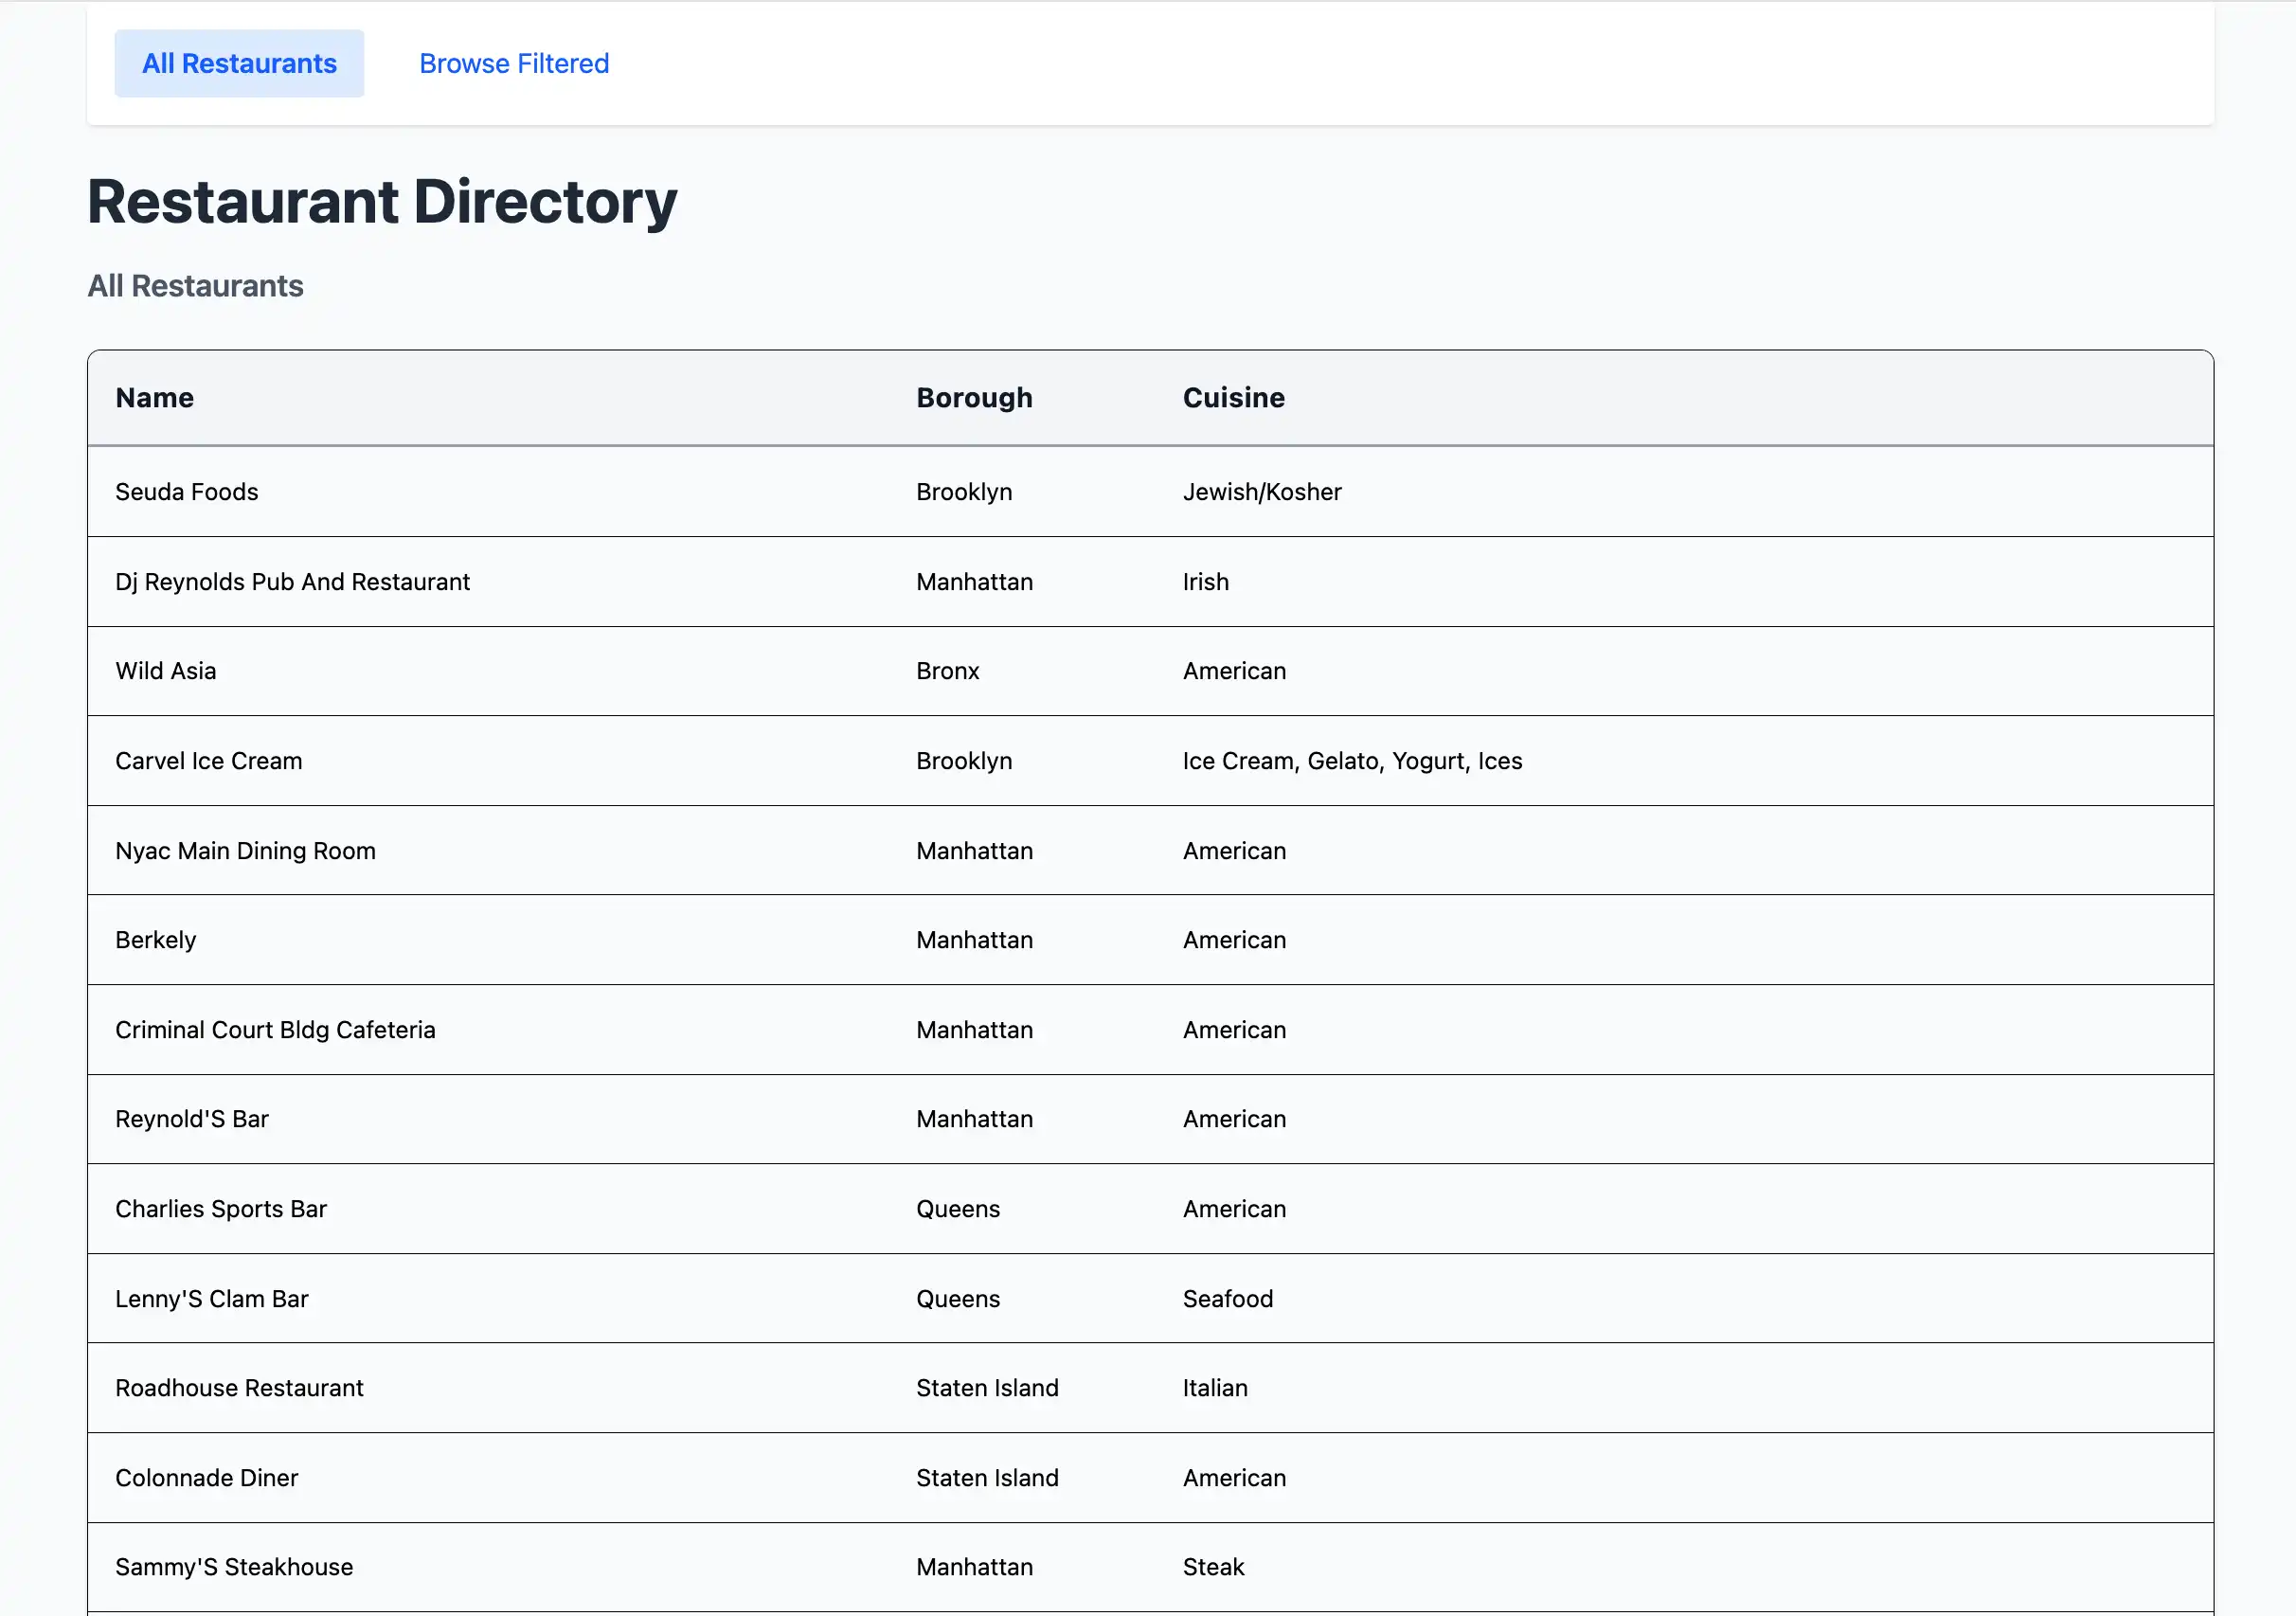
このファイルは、Vue ルートを構成し、それぞれに対してレンダーする内容を決定します。/ ルートにはすべてのレストラン データが表示され、/browse ルートにはフィルタリングされたレストラン データが表示されます。
Restaurant コンポーネントの作成
imports/ui/componentsディレクトリには、次のコードを含む Restaurant.vue という名前のファイルを作成します。
<script setup> defineProps({ restaurant: { type: Object, required: true, }, }); </script> <template> <tr class="border-b transition-colors hover:bg-gray-50"> <td class="p-4 align-middle">{{ restaurant.name }}</td> <td class="p-4 align-middle">{{ restaurant.borough }}</td> <td class="p-4 align-middle">{{ restaurant.cuisine }}</td> </tr> </template>
このコンポーネントは、個々のレストラン情報を表の行として表示します。
RestaurantList ビューを作成する
imports/ui/viewsディレクトリには、次のコードを含む RestaurantList.vue という名前のファイルを作成します。
<script setup> import Restaurant from '../components/Restaurant.vue'; import { subscribe, autorun } from 'vue-meteor-tracker'; import { RestaurantsCollection } from '../../api/restaurantsCollection'; import { useRoute, RouterLink } from 'vue-router'; import { computed } from 'vue'; const route = useRoute(); // Determines whether to show filtered results const isFiltered = computed(() => route.path === '/browse'); // Subscribes to both publications to avoid switching issues subscribe('restaurants'); subscribe('restaurants.filtered'); // Retrieves restaurants based on current route with client-side filtering as backup const restaurants = autorun(() => { let docs; if (isFiltered.value) { docs = RestaurantsCollection.find({ borough: 'Queens', name: { $regex: 'Moon', $options: 'i' } }).fetch(); console.log('Filtered restaurants found:', docs.length); } else { docs = RestaurantsCollection.find({}, { limit: 200 }).fetch(); console.log('All restaurants found:', docs.length); } return docs; }).result; // Determines the title based on the route const getTitle = computed(() => { return isFiltered.value ? 'Filtered Restaurants (Queens, containing "Moon")' : 'All Restaurants'; }); </script> <template> <div class="container mx-auto px-4"> <!-- Navigation --> <nav class="flex justify-between items-center mb-6 p-4 bg-white shadow rounded"> <div class="flex space-x-4"> <RouterLink to="/" class="px-4 py-2 text-blue-600 hover:bg-blue-50 rounded transition-colors" :class="{ 'bg-blue-100 font-semibold': !isFiltered }" > All Restaurants </RouterLink> <RouterLink to="/browse" class="px-4 py-2 text-blue-600 hover:bg-blue-50 rounded transition-colors" :class="{ 'bg-blue-100 font-semibold': isFiltered }" > Browse Filtered </RouterLink> </div> </nav> <!-- Header --> <header class="mb-6"> <h1 class="text-4xl font-bold text-gray-800 my-4">Restaurant Directory</h1> <h3 class="text-lg font-semibold text-gray-600">{{ getTitle }}</h3> </header> <!-- Restaurant Table --> <div class="border rounded-lg overflow-hidden shadow"> <div class="relative w-full overflow-auto"> <table class="w-full text-sm"> <thead class="bg-gray-100 border-b-2 border-gray-300"> <tr class="border-b-2 border-gray-400"> <th class="h-14 px-4 text-left align-middle font-bold text-gray-900 text-base tracking-wide"> Name </th> <th class="h-14 px-4 text-left align-middle font-bold text-gray-900 text-base tracking-wide"> Borough </th> <th class="h-14 px-4 text-left align-middle font-bold text-gray-900 text-base tracking-wide"> Cuisine </th> </tr> </thead> <tbody> <Restaurant v-for="restaurant in restaurants" :key="restaurant._id" :restaurant="restaurant" /> </tbody> </table> <!-- Empty state --> <div v-if="restaurants.length === 0" class="p-8 text-center text-gray-500"> <p>No restaurants found. Ensure that your connection URI is correct and includes the sample_restaurants database name.</p> <p v-if="isFiltered" class="text-sm mt-2"> Try the "All Restaurants" tab to see all available restaurants. </p> </div> </div> </div> <!-- Restaurant count --> <div class="mt-4 text-sm text-gray-600"> Showing {{ restaurants.length }} restaurant{{ restaurants.length !== 1 ? 's' : '' }} </div> </div> </template>
このコンポーネントはレストラン リスト表示を取り扱い、現在のルートに基づいてすべてのレストランを表示するか、フィルタリングされた結果を表示するかを自動的に切り替えます。
アプリケーションの実行
最後に、このセクションの手順に従ってアプリケーションを実行し、レンダリングされたレストラン データを表示します。
Meteorアプリケーションの起動
プロジェクトディレクトリに移動し、ターミナルから次のコマンドを実行します。
meteor npm run start
成功させた場合、コマンド出力は次の例のようになります。
[[[[[ ~/meteor-vue-quickstart ]]]]] => Started proxy. => Started HMR server. ... Connected to MongoDB Atlas. Found 25368 restaurants in the collection => Started your app. => App running at: http://localhost:3000/
ブラウザでアプリケーションを開きます
ウェブ ブラウザで http://localhost:3000/ を開きます。最初のランディング ページには、sample_restaurants.restaurantsコレクション内の 200 のフィルタリングされていないレストランのリストが表示されます。

ページ上部の [Browse Filtered] ボタンをクリックすると、名前に "Moon" が含まれるクイーンズのレストランが表示されます。

リアルタイムデータの変更の表示
サンプルドキュメントを挿入し、アプリケーションのフロントエンドで変更を表示することで、Meteor のリアルタイムデータ同期機能を調べることができます。
2 つ目のターミナルウィンドウを開き、プロジェクトディレクトリに移動します。前の手順と同じコマンドを実行中て、 MongoDB接続 URI をエクスポートします。
export MONGO_URL="<connection URI>"
次に、次のコマンドを実行して、name 値が "Honey Moon Coffee Shop" であるサンプルドキュメントを挿入します。
node scripts/insertDemo.js
新しいドキュメントは、http://localhost:3000/browse URLの Filtered Restaurants テーブルにあります。
クイック スタート チュートリアルが完了しました。
これらの手順を完了すると、 MongoDBの配置に接続し、サンプルレストラン データに対してクエリを実行し、結果をリアルタイムの応答性でレンダーするMeteor と Vue のウェブアプリケーションが作成されます。
追加リソース
Meteor、Vue、 MongoDBの詳細については、次のリソースを表示します。
メタデータのドキュメント
Vue 3 documentation
vue-meteor-tracker package
ノード.jsドライバーのドキュメント