Overview
このガイドでは、 MEANスタックを使用するAngular Webアプリケーションを作成する方法を学習できます。MEANスタックは、 MongoDB、 Express、 Angular、 Node.jsを使用する Web 開発フレームワークであり、次のレイヤーで構成されています。
データベースレイヤー: MongoDB は、データのストレージと検索を提供します。
アプリケーション階層: Expressとノード.js は、サーバー側ロジックの中間階層を構成します。
プレゼンテーションレイヤー: ユーザー インターフェイスとAngularエンド インタラクションを実装します。
AngularアプリケーションでMongoDBを使用する理由
Angular は、動的 Web アプリケーションの作成に使用される TypeScriptフレームワークです。一連のアプリケーション機能用の組み込みパッケージを提供し、コンポーネントベースのアーキテクチャにより、アプリケーションの再利用可能性が非常に高くなります。
TypeScript はJavaScriptでビルドされているため、 MEANスタックの各要素はJavaScriptとJSONに基づいています。その結果、これらの要素間の統合は簡単です。Angularフロントエンドは、 MongoDB がBSON形式、バイナリJSON拡張機能、およびExpressで直接保存できるJSONドキュメントを作成し、 JavaScript を使用する最小限のフレームワークを提供します。MongoDB は、 BSONドキュメント向けの高度なインデックスの作成とクエリ機能を提供し、ネイティブNode.jsドライバーを備えているため、 JavaScriptアプリケーションに最適なデータ ストアになります。
クイック スタート チュートリアル
このチュートリアルでは、 MEANスタックを使用して Webアプリケーションを構築する方法を説明します。アプリケーションはサンプルレストラン データにアクセスし、データをクエリし、その結果をローカルでホストされているサイトに表示します。このチュートリアルには、 MongoDB AtlasでホストされているMongoDBクラスターに接続し、データベースのデータにアクセスして表示する手順も含まれています。
Tip
AngularなしでNode.jsドライバーを使用してMongoDBに接続する場合は、Node.jsドライバーを使い始めるガイドを参照してください。
プロジェクトを設定する
このセクションの手順に従って、プロジェクトの依存関係のインストール、Atlas クラスターの作成、アプリケーションディレクトリの設定を行います。
MongoDB Atlas クラスターを作成します。
MongoDB Atlas は、 MongoDB配置をホストするフルマネージドクラウドデータベースサービスです。MongoDBの配置がない場合は、MongoDBを使い始める チュートリアルを完了することで、 MongoDBクラスターを無料で作成できます。MongoDBを使い始める チュートリアルでは、このチュートリアルで使用される sample_restaurantsデータベースなど、サンプルデータセット をクラスターにロードする方法も説明します。
MongoDBクラスターに接続するには、接続 URI を使用する必要があります。接続文字列を検索する方法については、MongoDBを使い始めるチュートリアルの接続文字列の追加セクションを参照してください。
重要
接続stringを安全な場所に保存します。
package.jsonファイルを変更します。
angular-quickstart/serverディレクトリ内の package.jsonファイルに移動します。再利用するためにJavaScriptコードをパッケージ化するための標準形式であるECMAScript モジュールを使用するには、"type"フィールドを指定する既存の行を次の行に置き換えます。
"type": "module",
依存関係をインストールします。
次のコマンドを実行して、mongodb、express、cors、dotenv の依存関係をインストールします。
npm install mongodb express cors dotenv
このコマンドは、 MongoDB、 Expressウェブフレームワーク、クロスオリジンリソース共有用の cors ノード.jsパッケージ、 環境変数をロードするための Dotenv をインストールします。
次に、次のコマンドを実行して、TypeScript と必要な型定義をインストールします。
npm install -D typescript @types/node @types/cors @types/express tsx
このコマンドは、 TypeScript 、 ノード.jsおよびExpressのタイプ定義、および TypeScript ファイルを直接実行中ためのツールである tsx をインストールします。
バックエンドの設定
プロジェクト構造と依存関係を設定したら、このセクションの手順に従ってサーバーを構成し、MongoDBに接続します。
Expressの Webサーバーを構成します。
angular-quickstart/serverディレクトリに server.ts という名前のファイルを作成し、次のコードを貼り付けます。
import express from "express"; import cors from "cors"; import restaurants from "./routes/restaurant.js"; const PORT = process.env.PORT || 5050; const app = express(); app.use(cors()); app.use(express.json()); app.use("/restaurant", restaurants); // start the Express server app.listen(PORT, () => { console.log(`Server listening on port ${PORT}`); });
環境変数を設定してください。
serverディレクトリで、.envファイルを作成し、次のコードを貼り付けます。
MONGODB_URI=<connection string> PORT=5050
<connection string> プレースホルダーを、前の手順で保存した接続文字列に置き換えます。
サーバーをデータベースに接続します 。
serverディレクトリに、db という名前のサブディレクトリを作成します。connection.ts という名前の新しいファイルをこのサブディレクトリに追加し、次のコードを貼り付けます。
import "dotenv/config"; import { MongoClient, Db } from "mongodb"; const uri = process.env.MONGODB_URI || ""; const client = new MongoClient(uri); try { // Connects the client to the server await client.connect(); // Sends a ping to confirm a successful connection await client.db("admin").command({ ping: 1 }); console.log( "Pinged your deployment. You successfully connected to MongoDB!" ); } catch(err) { console.error(err); } const db: Db = client.db("sample_restaurants"); export default db;
このファイルはMongoDB配置に接続し、sample_restaurantsデータベースにアクセスして、データベース接続をテストします。
サーバーAPIエンドポイントを作成します。
serverディレクトリに、routes という名前のサブディレクトリを作成します。このサブディレクトリに restaurant.ts という名前のファイルを作成し、次のコードを貼り付けます。
import express, { Request, Response } from "express"; import db from "../db/connection.js"; // Creates an instance of the Express router, used to define our routes const router = express.Router(); // Gets a list of all the restaurants router.get("/", async (req: Request, res: Response) => { let collection = db.collection("restaurants"); let results = await collection.find({}).toArray(); res.send(results).status(200); }); // Lists restaurants that match the query filter router.get("/browse", async (req: Request, res: Response) => { try { let collection = db.collection("restaurants"); let query = { borough: "Queens", name: { $regex: "Moon", $options: "i" }, }; let results = await collection.find(query).toArray(); res.send(results).status(200); } catch (err) { console.error(err); res.status(500).send("Error browsing restaurants"); } }); export default router;
このファイルは、sample_restaurantsデータベース内の restaurantsコレクションにアクセスし、次の GET エンドポイントとなる接続されたデバイスを定義します。
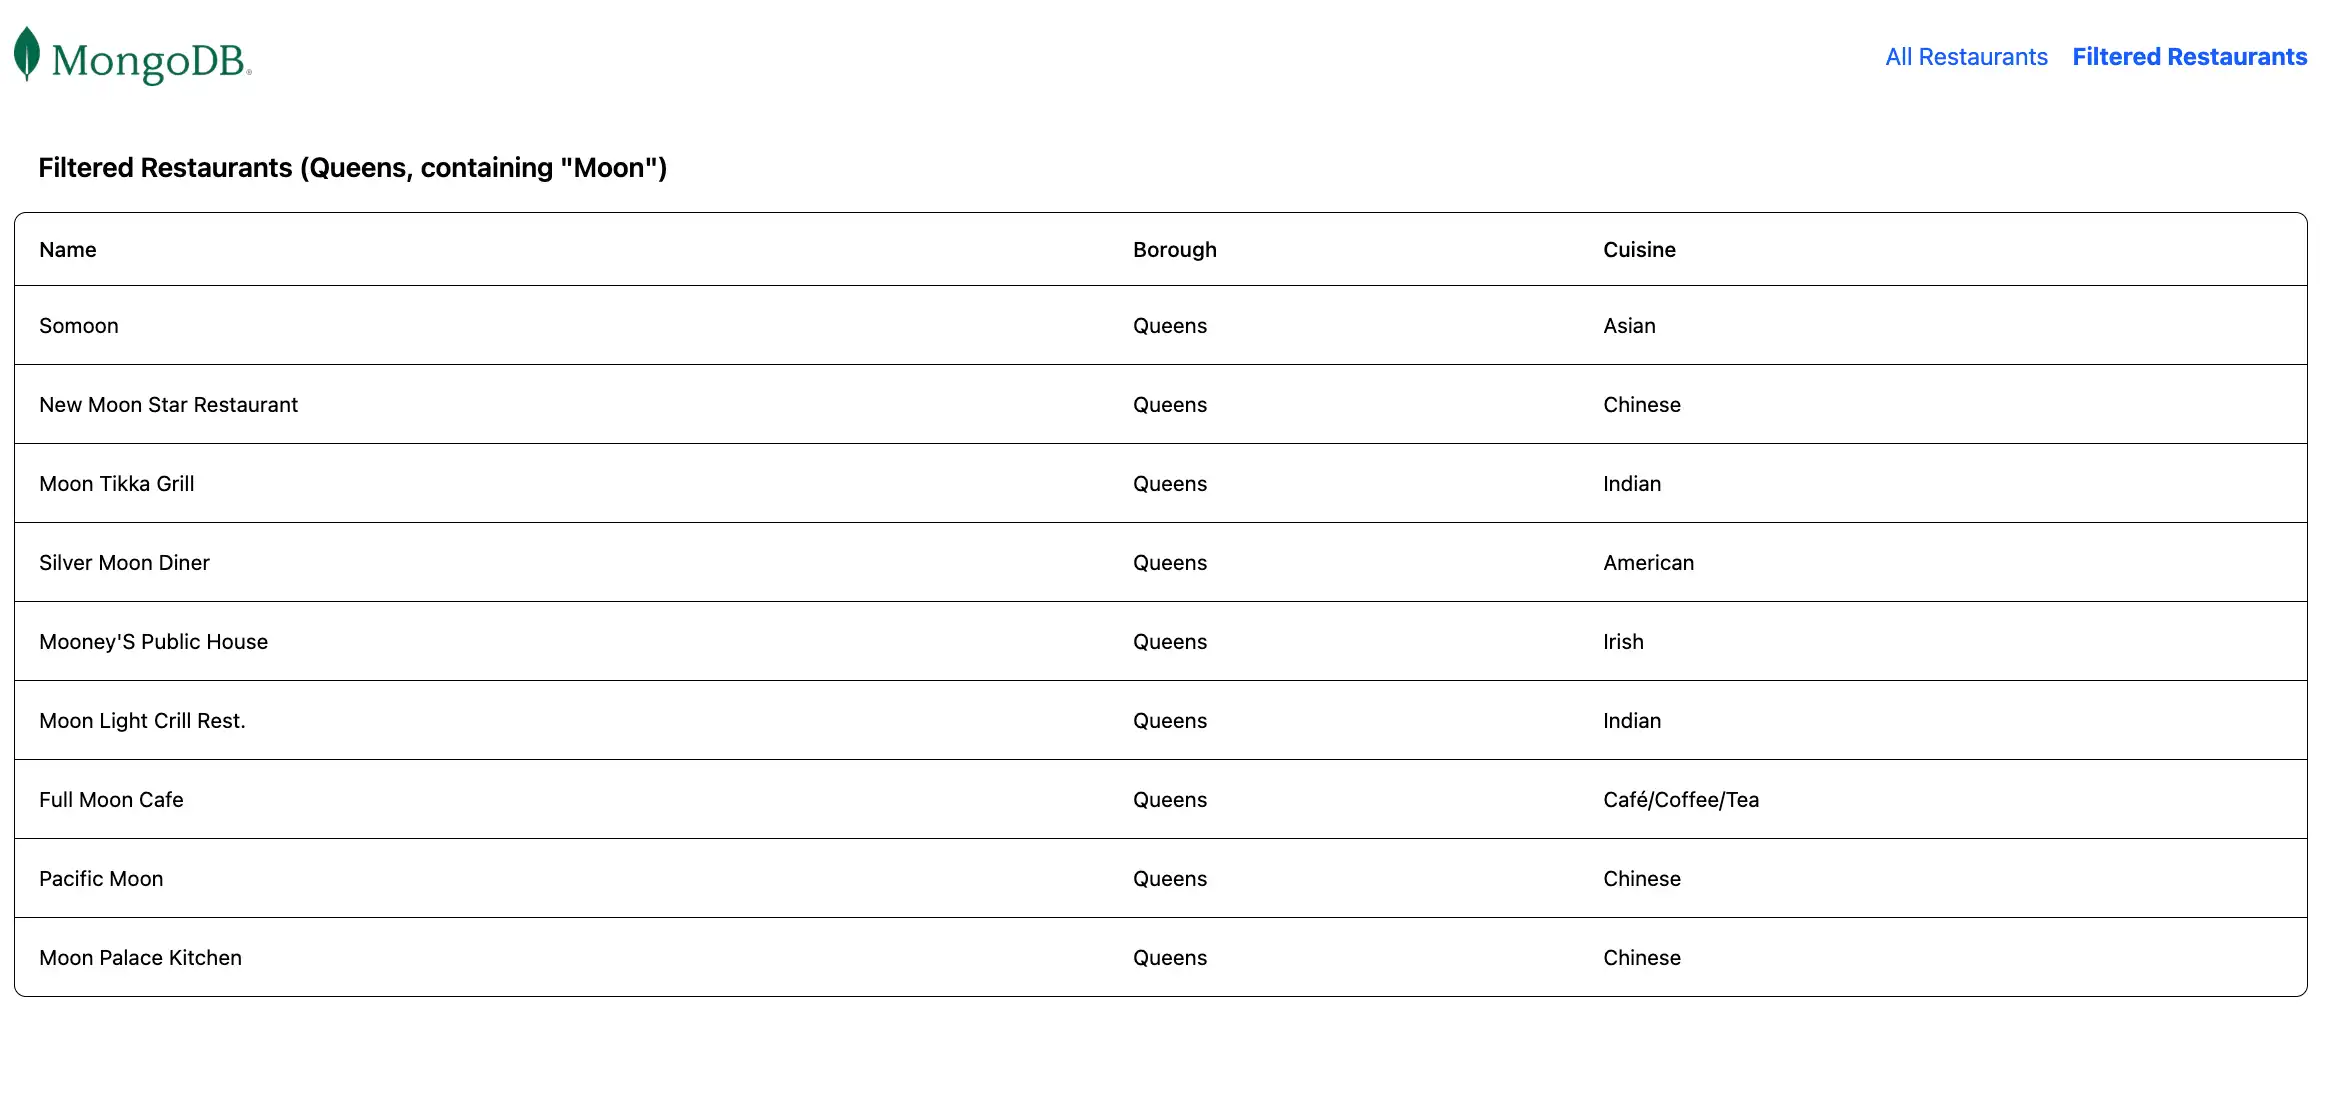
/:サンプルコレクションからすべてのレストランを検索します/browse: クエリ条件に一致するレストランを検索します。これにより、名前に"Moon"という単語が含まれるクイーンズのレストランがフィルターされます。
フロントエンドの設定
アプリケーションのバックエンドを設定した後、このセクションの手順に従ってAngularを構成し、フロントエンド コンポーネントを追加します。
Angularアプリケーションを作成します。
angular-quickstartディレクトリに移動し、次のコマンドを実行して新しいAngularアプリケーションを作成します。
ng new client
このコマンドは、一連の設定質問に応答するように要求します。質問ごとに、次の応答を選択します。
どのスタイルシート システムを使用しますか。追尾可能 CSS を選択します
サーバー側レンダリング(SSR)と静的サイト生成(SSG/プレレンダリング)を有効にしますか。 N を入力
Angular のベストプラクティスでどのAIツールを構成しますか。好みのツールを選択します
コマンドの実行中後、プロジェクトにはフロントエンド スキャフォールディングを含む clientディレクトリが作成されます。コマンドは、 UI形式のフレームワークである RailwindCSS を使用するようにプロジェクトを構成します。
レストラン サービスを作成します。
clientディレクトリから、次のコマンドを実行して、バックエンドへのAPI呼び出しを処理するサービスを生成します。
ng generate service restaurant
client/src/app/restaurant.tsファイルに移動し、内容を次のコードで置き換えます。
import { Injectable } from '@angular/core'; import { HttpClient } from '@angular/common/http'; import { Observable } from 'rxjs'; export interface Restaurant { _id: string; name: string; borough: string; cuisine: string; } ({ providedIn: 'root' }) export class RestaurantService { private apiUrl = 'http://localhost:5050/restaurant'; constructor(private http: HttpClient) {} getAllRestaurants(): Observable<Restaurant[]> { return this.http.get<Restaurant[]>(this.apiUrl); } getFilteredRestaurants(): Observable<Restaurant[]> { return this.http.get<Restaurant[]>(`${this.apiUrl}/browse`); } }
このサービスは、 Express APIからレストランのデータを取得するためのメソッドを定義します。
ルーティングを構成します。
client/src/app/app.routes.tsファイルに移動し、内容を次のコードで置き換えます。
import { Routes } from '@angular/router'; import { RestaurantListComponent } from './restaurant-list/restaurant-list'; export const routes: Routes = [ { path: '', component: RestaurantListComponent }, { path: 'browse', component: RestaurantListComponent } ];
このファイルは、クライアント側ルーティングを構成し、次のルートを定義します。
/:/restaurant/APIエンドポイントからのすべてのレストランを表示/browse:/restaurant/browseAPIエンドポイントからフィルタリングされたレストランを表示
アプリケーション構成を更新します。
client/src/app/app.config.tsファイルに移動し、内容を次のコードで置き換えます。
import { ApplicationConfig, provideZoneChangeDetection } from '@angular/core'; import { provideRouter } from '@angular/router'; import { provideHttpClient } from '@angular/common/http'; import { routes } from './app.routes'; export const appConfig: ApplicationConfig = { providers: [ provideZoneChangeDetection({ eventCoalescing: true }), provideRouter(routes), provideHttpClient() ] };
この構成により、 APIリクエストを行うためのHTTPクライアント機能が有効になります。
レストラン リスト コンポーネントを作成します。
clientディレクトリから次のコマンドを実行して、レストランを表示するためのコンポーネントを生成します。
ng generate component restaurant-list
client/src/app/restaurant-list/restaurant-list.tsファイルに移動し、内容を次のコードで置き換えます。
import { Component, OnInit } from '@angular/core'; import { CommonModule } from '@angular/common'; import { Router } from '@angular/router'; import { RestaurantService, Restaurant } from '../restaurant'; ({ selector: 'app-restaurant-list', standalone: true, imports: [CommonModule], templateUrl: './restaurant-list.html', styleUrl: './restaurant-list.css' }) export class RestaurantListComponent implements OnInit { restaurants: Restaurant[] = []; loading = true; error = ''; constructor( private restaurantService: RestaurantService, public router: Router ) {} ngOnInit(): void { this.loadRestaurants(); } loadRestaurants(): void { const isFiltered = this.router.url === '/browse'; const observable = isFiltered ? this.restaurantService.getFilteredRestaurants() : this.restaurantService.getAllRestaurants(); observable.subscribe({ next: (data) => { this.restaurants = data; this.loading = false; }, error: (err) => { this.error = 'Failed to load restaurants'; this.loading = false; console.error('Error loading restaurants:', err); } }); } }
次に、client/src/app/restaurant-list/restaurant-list.htmlファイルに移動し、内容を次のコードで置き換えます。
<div *ngIf="loading" class="text-center py-8"> <p class="text-gray-600">Loading restaurants...</p> </div> <div *ngIf="error" class="bg-red-100 border border-red-400 text-red-700 px-4 py-3 rounded"> {{ error }} </div> <div *ngIf="!loading && !error"> <h3 class="text-lg font-semibold p-4"> {{ router.url === '/browse' ? 'Filtered Restaurants (Queens, containing "Moon")' : 'All Restaurants' }} </h3> <div class="border rounded-lg overflow-hidden"> <div class="relative w-full overflow-auto"> <table class="w-full caption-bottom text-sm"> <thead class="[&_tr]:border-b"> <tr class="border-b transition-colors hover:bg-muted/50 data-[state=selected]:bg-muted"> <th class="h-12 px-4 text-left align-middle font-medium text-muted-foreground [&:has([role=checkbox])]:pr-0"> Name </th> <th class="h-12 px-4 text-left align-middle font-medium text-muted-foreground [&:has([role=checkbox])]:pr-0"> Borough </th> <th class="h-12 px-4 text-left align-middle font-medium text-muted-foreground [&:has([role=checkbox])]:pr-0"> Cuisine </th> </tr> </thead> <tbody class="[&_tr:last-child]:border-0"> @for (restaurant of restaurants; track restaurant._id) { <tr class="border-b transition-colors hover:bg-muted/50 data-[state=selected]:bg-muted"> <td class="p-4 align-middle [&:has([role=checkbox])]:pr-0"> {{ restaurant.name }} </td> <td class="p-4 align-middle [&:has([role=checkbox])]:pr-0"> {{ restaurant.borough }} </td> <td class="p-4 align-middle [&:has([role=checkbox])]:pr-0"> {{ restaurant.cuisine }} </td> </tr> } </tbody> </table> </div> </div> </div>
このコンポーネントは、現在のルートに基づいてレストラン情報を検索して表示します。
メインのアプリケーションコンポーネントを更新します。
client/src/app/app.tsファイルに移動し、内容を次のコードで置き換えます。
import { Component } from '@angular/core'; import { RouterOutlet, RouterLink, RouterLinkActive } from '@angular/router'; ({ selector: 'app-root', standalone: true, imports: [RouterOutlet, RouterLink, RouterLinkActive], templateUrl: './app.html', styleUrl: './app.css' }) export class AppComponent { title = 'Restaurant Browser'; }
次に、client/src/app/app.htmlファイルに移動し、内容を次のコードで置き換えます。
<div class="w-full p-6"> <nav class="flex justify-between items-center mb-6"> <a routerLink="/"> <img alt="MongoDB logo" class="h-10 inline" src="https://d3cy9zhslanhfa.cloudfront.net/media/3800C044-6298-4575-A05D5C6B7623EE37/4B45D0EC-3482-4759-82DA37D8EA07D229/webimage-8A27671A-8A53-45DC-89D7BF8537F15A0D.png" /> </a> <div class="flex gap-4"> <a routerLink="/" routerLinkActive="font-bold" [routerLinkActiveOptions]="{exact: true}" class="text-blue-600 hover:underline"> All Restaurants </a> <a routerLink="/browse" routerLinkActive="font-bold" class="text-blue-600 hover:underline"> Filtered Restaurants </a> </div> </nav> <router-outlet></router-outlet> </div>
これは、ナビゲーションを含み、現在のルートに基づいて適切な子コンポーネントをレンダーするメインのアプリケーションコンポーネントです。
メインファイルを更新します。
client/src/main.tsファイルに移動し、内容を次のコードで置き換えます。
import 'zone.js'; import { bootstrapApplication } from '@angular/platform-browser'; import { appConfig } from './app/app.config'; import { AppComponent } from './app/app'; bootstrapApplication(AppComponent, appConfig) .catch((err) => console.error(err));
このファイルは、アプリケーションへのエントリ点として機能し、構成を適用してレンダリングします。
アプリケーションの実行
最後に、このセクションの手順に従ってアプリケーションを実行し、レンダリングされたレストラン データを表示します。
クライアントアプリケーションを実行します。
別のターミナルウィンドウで、clientディレクトリに移動します。次のコマンドを実行して、 Angularフロントエンドを起動します。
ng serve
成功させた場合、このコマンドは次の情報を出力します。
Application bundle generation complete. Watch mode enabled. Watching for file changes... NOTE: Raw file sizes do not reflect development server per-request transformations. ➜ Local: http://localhost:4200/ ➜ press h + enter to show help
Angularアプリケーションは、データを検索するためにポート 4200 からポート 5050 にHTTPリクエストを送信します。
アプリケーションサイトを開きます。
http://localhost:4200/ URLを開きます。最初のランディング ページには、sample_restaurants.restaurantsコレクション内のすべてのレストランのリストが表示されます。

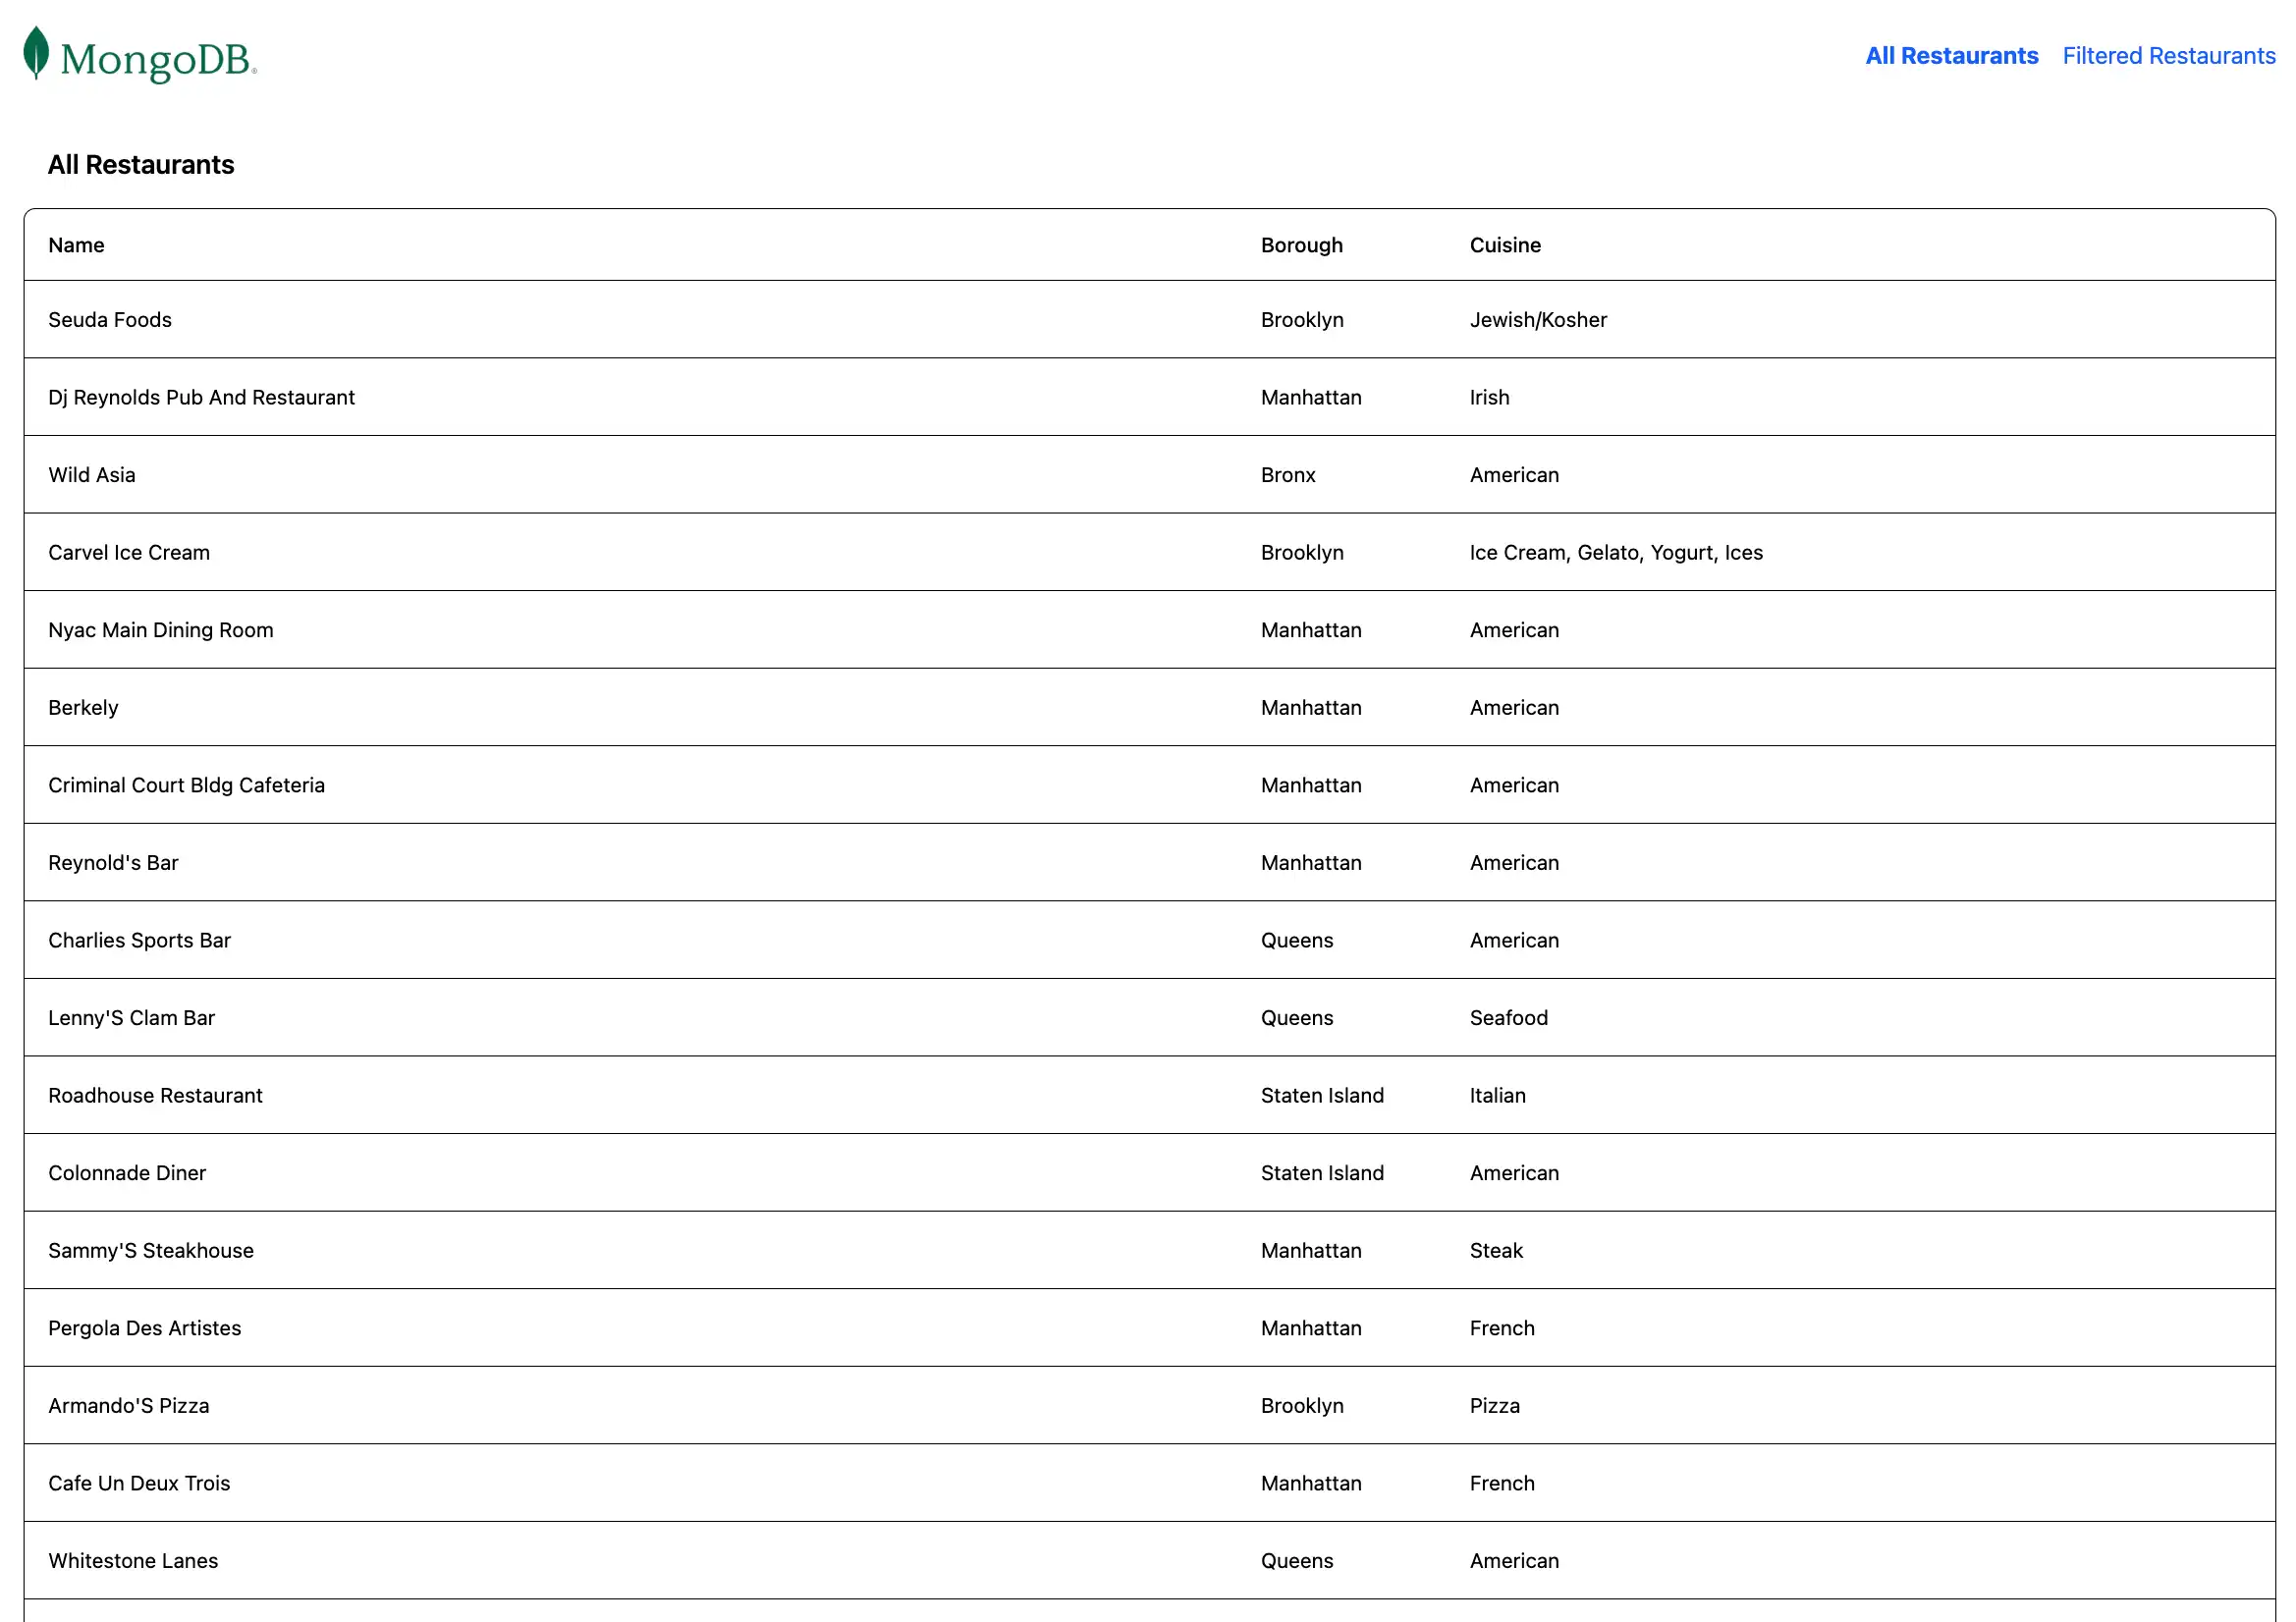
次に、ナビゲーション バーの Filtered Restaurants リンクをクリックして、name と boroughフィールドクエリに一致するレストランを表示します。

クイック スタート チュートリアルが完了しました。
これらの手順を完了すると、 MongoDB配置に接続し、サンプルレストラン データに対してクエリを実行し、ローカルでホストされているウェブサイトで結果をレンダーするAngular Webアプリケーションが作成されます。
追加リソース
Angular、 MongoDB、 MEANスタックの詳細については、次のリソースを表示します。
Angular documentation
Express ドキュメント
ノード.jsドライバーのドキュメント