Once you connect to your deployment using VS Code Extension, use the left navigation to:
Explore your databases, collections, read-only views, and documents.
Create new databases and collections.
Drop databases and collections.
Note
If your deployment requires authentication, your database user privileges may affect the actions you can perform using VS Code Extension.
View Databases and Collections
When you expand an active connection, VS Code Extension shows the databases in that deployment.
Click the name of a database to view the collections it contains.
Click the name of a collection to view its documents, schema, and indexes.
Note
VS Code Extension closes all documents when you close Visual Studio Code.
View and Manage Documents
Important
Users must have the listCollections permission in
order to view a collection's documents.
To browse your documents, expand your collection and click Documents. VS Code Extension opens a new tab for your collection with a paginated view to browse your documents. In this view, you can:
Customize document sort order.
Customize the number of documents that appear on each page.
Bulk delete documents.
Insert a document.
When you hover over an individual document, you can:
Click the Edit Document icon to open the edit document view.
Click the Copy Document icon to copy the document to your clipboard.
Click the Clone Document icon to add a duplicate document to your collection.
Click the Delete Document icon to delete the document from your collection.
Note
You can open a JavaScript Playground pre-configured to search a collection by hovering over the Documents label in the navigation panel and clicking the icon that appears.
Bulk Delete Documents
To delete all the documents in your collection, either:
In the side navigation bar, right-click Documents and click Delete All Documents.
Expand the Bulk Actions dropdown and click Delete All Documents.
Insert Documents
To insert a document into your collection, click Insert Document. Paste your document in the new window and click Insert to add the new document to your collection.
Edit Documents
To edit a document:
Open the document browsing view.
Hover over the document that you want to edit.
Click the icon.
VS Code Extension opens a new, editable tab with your document in shell syntax format. Here, you can make edits to your document and save the file as usual.
Note
The VS Code Extension edit document view defaults to shell syntax format. To change it to EJSON format, use the Document View and Edit Format setting in Visual Studio Code Settings.
Schema
Your collection's schema defines the fields and data types within the collection. Due to MongoDB's flexible schema model, different documents in a collection may contain different fields, and data types may vary within a field. MongoDB can enforce schema validation to ensure your collection documents have the same shape.
When you expand a collection's schema, VS Code Extension lists the fields which appear in that collection's documents. If a field exists in all documents and its type is consistent throughout the collection, VS Code Extension displays an icon indicating that field's data type. Hover over the field name for a text description of the field's data type.
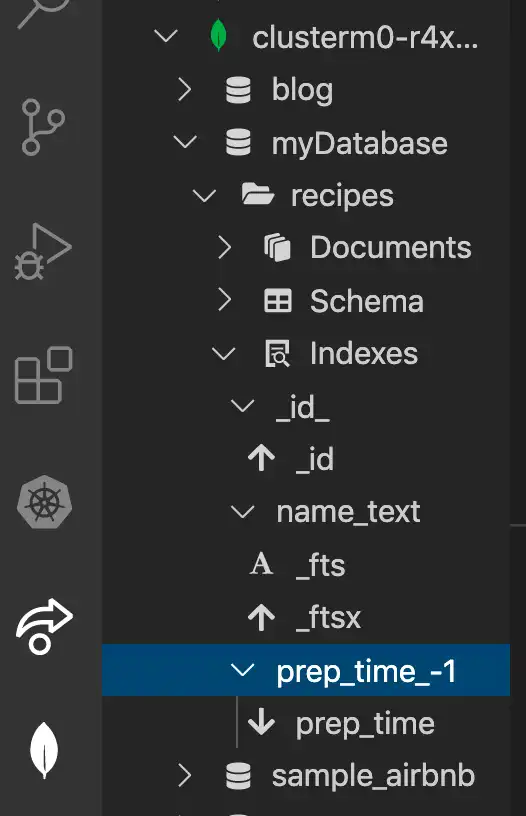
Manage Indexes
Your collections's indexes are listed under the Indexes heading. When you expand an index, each index key appears with an icon designating its type. Index key types include:
Ascending
Descending
Geospatial (2d, 2dsphere, geoHaystack)
Text
Hashed
Note
You can open a MongoDB Playground pre-configured to create an index by hovering over the Indexes label in the navigation panel and clicking the icon that appears.
Tip
To learn more about MongoDB indexes, see the server manual.
Create a New Database
When you create a new database, you must populate it with an initial collection.
Hover over the connection for the deployment where you want your database to exist.
Click the icon or right-click and select Add Database. VS Code Extension opens a new tab with
constvariables for database and collection names.Update the
databaseandcollectionvariables with the names for your database and collection.Click the button located at the top right of the tab to execute the script. If the database and collection do not already exist, they are created.
Create a New Collection
Hover over the database name where you want your collection to exist.
Right-click the database name and select Add Collection. VS Code Extension opens a new tab with
constvariables for database and collection names.Update the
collectionvariable with your new collection name.Click the button located at the top right of the tab to execute the script. The collection is created in the specified database.
Drop a Database or Collection
Important
Dropping data from MongoDB is an irreversible process. Take caution to only drop data you are sure you want to delete, and backup your data as necessary.
Dropping a database also drops all collections and documents within that database.
To drop a database or collection:
Right-click the target database or collection.
Click Drop Database or Drop Collection.
In the prompt, type the name of the target database or collection.
Press the enter key.
Refresh Data
You can refresh a deployment, database, or collection at any time to re-query your deployment and populate VS Code Extension with the most up-to-date data.
To refresh:
Right-click the target deployment, database, or collection.
Click Refresh.