Overview
Hibernate ORM enables you to use Java objects to perform database operations, and you can use the MongoDB Extension for Hibernate ORM to simplify your application's interactions with MongoDB data. This guide shows how to install the Hibernate ORM extension, set up a MongoDB deployment, and create a Java application that defines classes mapped to MongoDB collections.
Tip
MongoDB Atlas is a fully managed cloud database service that hosts your MongoDB deployments. You can create your own free (no credit card required) MongoDB Atlas deployment by following the steps in this guide.
Download and Install
Install dependencies
Before you begin developing, ensure that you have the following dependencies installed on your local machine:
Java version 17 or later
Integrated development environment (IDE), such as IntelliJ IDEA or Eclipse
Note
This tutorial shows how to create an application by using Maven or Gradle in an IDE. If you do not use an IDE, see Building Maven or Creating New Gradle Builds to learn how to set up your project.
Install the extension
In your IDE, create a new Maven or Gradle project named MongoHibernateQuickstart.
For Maven projects, add the following dependency to your pom.xml file:
<dependencies> <dependency> <groupId>org.mongodb</groupId> <artifactId>mongodb-hibernate</artifactId> <version>1.0.0-alpha0</version> </dependency> </dependencies>
For Gradle projects, add the following dependency to your build.gradle file:
dependencies { implementation("org.mongodb:mongodb-hibernate:1.0.0-alpha0") }
In your IDE, ensure that you reload or sync your project to complete the Hibernate ORM extension installation.
After you complete these steps, you have the Hibernate ORM extension installed and a new Maven or Gradle project set up in your IDE.
Create a MongoDB Deployment
You can create a free tier MongoDB deployment on MongoDB Atlas to store and manage your data. MongoDB Atlas hosts and manages your MongoDB database in the cloud.
Create a free MongoDB deployment on Atlas
Complete the MongoDB Get Started guide to set up a new Atlas account and load sample data into a new free tier MongoDB deployment. Follow the instructions in the Cloud Deployment tabs to create your MongoDB Atlas deployment in the cloud.
After you complete these steps, you have a new free tier MongoDB deployment on Atlas, database user credentials, and sample data loaded into your database.
Create a Connection String
You can connect to your MongoDB deployment by providing a connection URI, also called a connection string, which instructs the driver on how to connect to a MongoDB deployment and how to behave while connected.
The connection string includes the hostname or IP address and port of your deployment, the authentication mechanism, user credentials when applicable, and connection options.
Find your MongoDB Atlas connection string
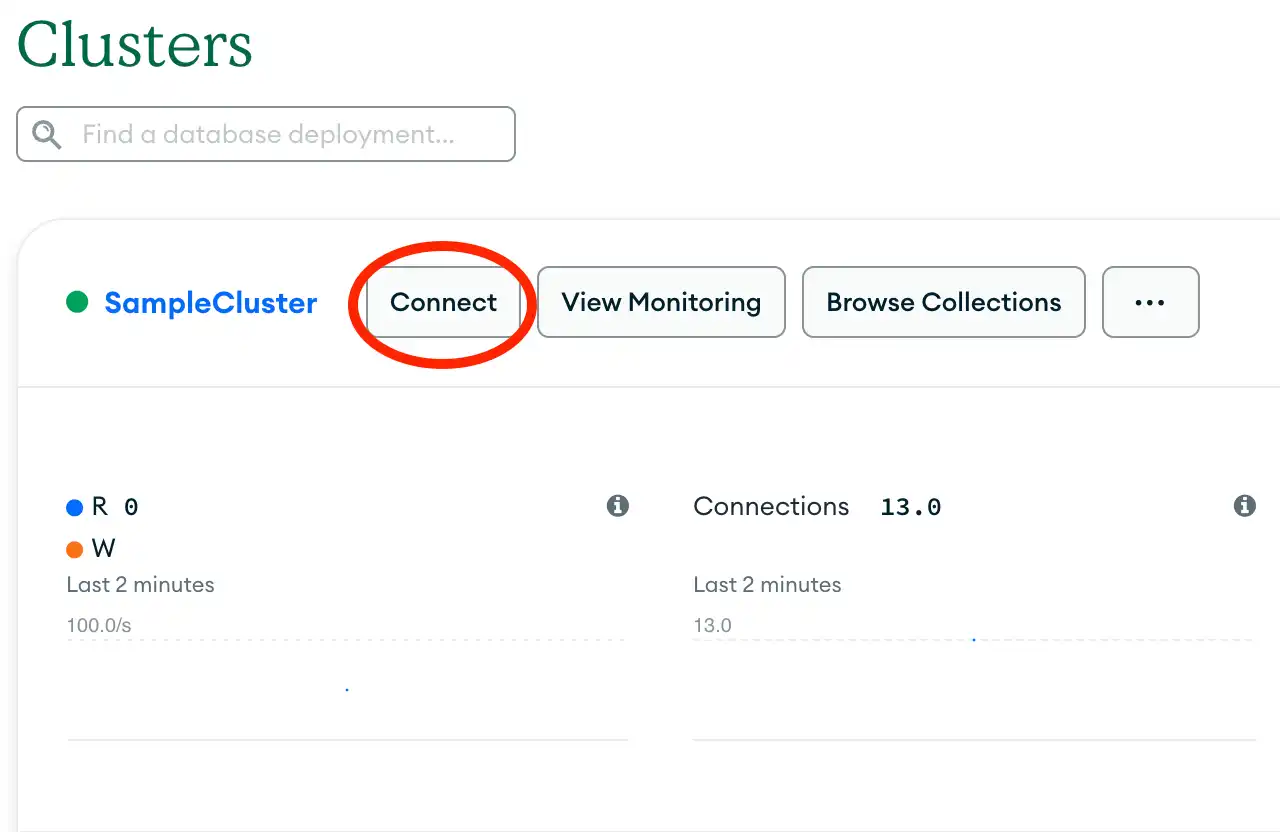
To retrieve your connection string for the deployment that you created in the previous step, log into your Atlas account and navigate to the Clusters section. Click the Connect button for your new deployment, as shown in the following screenshot:

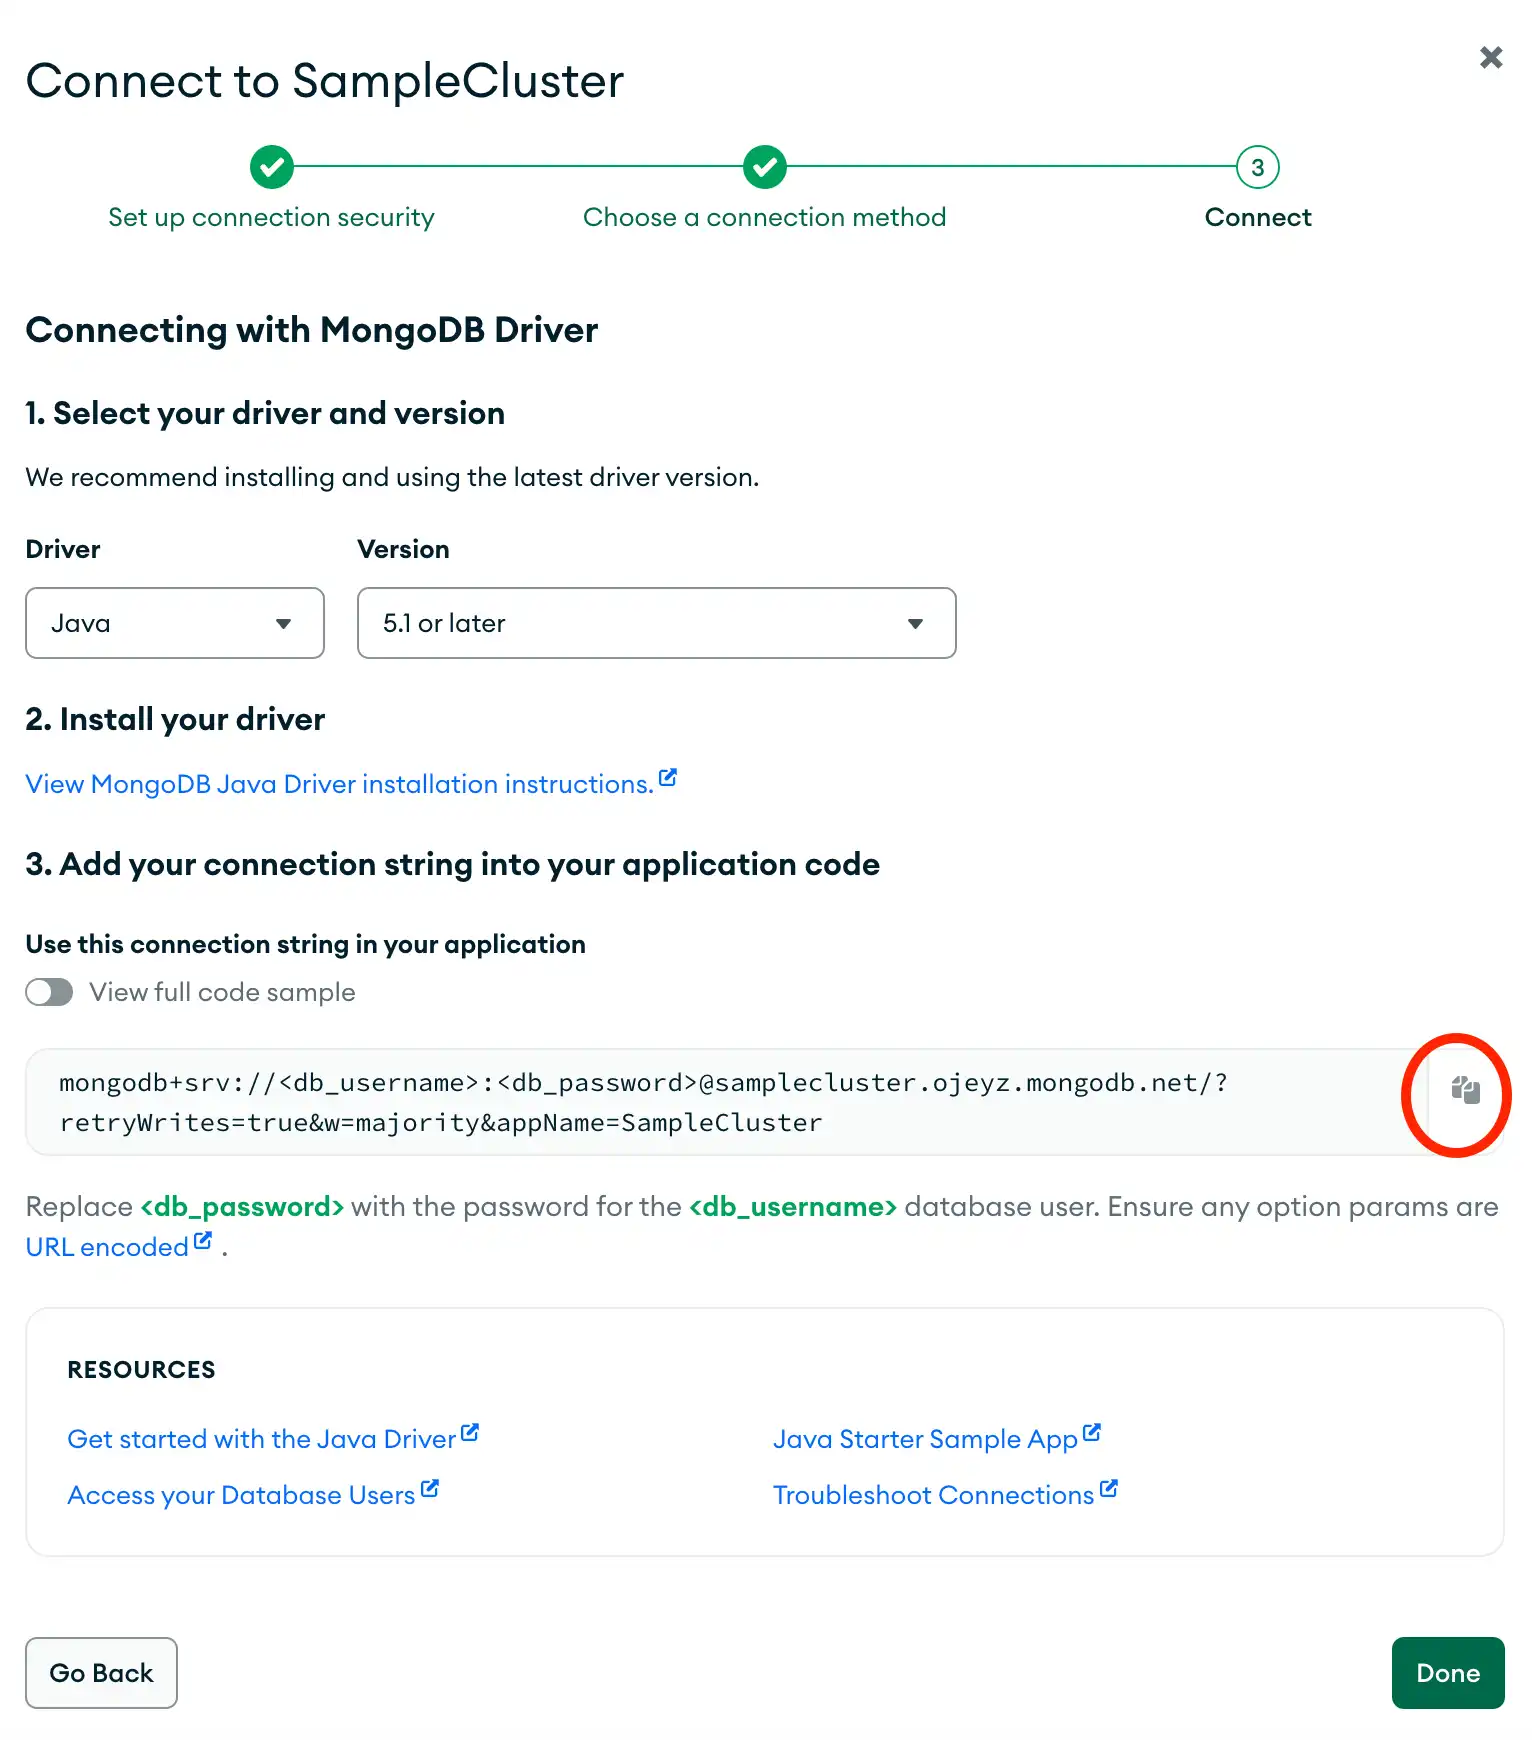
Then, proceed to the Connect your application section. Select "Java" from the Driver selection menu and the version that best matches the version you installed from the Version selection menu.

Add a database to your connection string
To connect to the sample_mflix sample database, which your application
uses in upcoming steps, add the database name to your connection string.
Your connection string should resemble the following example:
mongodb+srv://<db_username>:<db_password>@<cluster>/sample_mflix?<options>
After completing these steps, you have a connection string that contains your username, password, and database.
Configure your Application
After installing the Hibernate ORM extension and creating a MongoDB Atlas cluster, you can create a Java application that connects to MongoDB.
Connect your application to MongoDB
Navigate to your MongoHibernateQuickstart project's src/main/resources directory
and create a new file named hibernate.properties, which stores your application's
configuration settings.
Copy the following code into this file:
hibernate.dialect=com.mongodb.hibernate.dialect.MongoDialect hibernate.connection.provider_class=com.mongodb.hibernate.jdbc.MongoConnectionProvider jakarta.persistence.jdbc.url=<connection string>
In the jakarta.persistence.jdbc.url property, replace the <connection string>
placeholder with the connection string that you created in the previous step.
Create a utility class to manage sessions
Note
Default Package Directory
This tutorial uses Maven and Gradle's default org.example package
and adds application files to the src/main/java/org/example directory.
If you use a different package name, ensure that you create your files in its
corresponding directory.
In your project's src/main/java/org/example directory, create a new file called HibernateUtil.java.
This utility class creates a SessionFactory based on your configuration file.
Copy the following code into this file:
package org.example; import org.hibernate.SessionFactory; import org.hibernate.cfg.Configuration; public final class HibernateUtil { private static final SessionFactory SESSION_FACTORY = new Configuration() .addAnnotatedClass(Movie.class) .buildSessionFactory(); private HibernateUtil() {} public static SessionFactory getSessionFactory() { return SESSION_FACTORY; } }
Define your Movie entity
In your project's org/example directory, create a new file called Movie.java.
This file contains your Movie entity, which represents the sample_mflix.movies
sample collection from the Atlas sample datasets.
Copy the following code into this file:
package org.example; import com.mongodb.hibernate.annotations.ObjectIdGenerator; import org.bson.types.ObjectId; import java.util.List; import jakarta.persistence.Entity; import jakarta.persistence.Id; import jakarta.persistence.Table; public class Movie { private ObjectId id; private String title; private String plot; private int year; private List<String> cast; public Movie(String title, String plot, int year, List<String> cast) { this.title = title; this.plot = plot; this.year = year; this.cast = cast; } public Movie() { } public ObjectId getId() { return id; } public String getTitle() { return title; } public void setTitle(String title) { this.title = title; } public String getPlot() { return plot; } public void setPlot(String plot) { this.plot = plot; } public int getYear() { return year; } public void setYear(int year) { this.year = year; } public List<String> getCast() { return cast; } public void setCast(List<String> cast) { this.cast = cast; } }
This file defines a Movie entity with the following fields:
id: The movie's unique identifier, mapped to the MongoDB_idfield.title: The movie's title.year: The year the movie was released.cast: A list of strings representing the movie's cast members.
Define your main application class
In your project's org/example directory, create a new file called Main.java.
This file contains your main application class, which stores your application's logic.
Copy the following code into this file:
package org.example; import org.hibernate.Transaction; import org.hibernate.Session; import java.util.ArrayList; import java.util.List; public class Main { public static void main(String[] args) { var sf = HibernateUtil.getSessionFactory(); Session session = sf.openSession(); Transaction tx = session.beginTransaction(); // Add CRUD operations here tx.commit(); session.close(); sf.close(); } }
After completing these steps, you have a Java application configured to use the Hibernate ORM extension and connect to your MongoDB deployment. Your application has the following file structure:
MongoHibernateQuickstart ├── src │ └── main │ ├── java │ │ └── org/example │ │ ├── HibernateUtil.java │ │ ├── Main.java │ │ └── Movie.java │ └── resources │ └── hibernate.properties ├── .gitignore ├── pom.xml (for Maven projects) └── build.gradle (for Gradle projects)
Run a Sample Query
You can run queries on your Movie objects, which the extension
translates into MongoDB queries.
Run a query on the title field
Navigate to your Main.java file and paste the following code
below the // Add CRUD operations here comment:
var searchTitle = "Little Women"; var results = session.createQuery("from Movie m where m.title = :t", Movie.class) .setParameter("t", searchTitle) .getResultList(); for (var m : results) { System.out.println("Title: " + m.getTitle() + ", Year: " + m.getYear()); }
This code uses Hibernate ORM's Hibernate Query Language (HQL) to retrieve
sample_mflix.movies documents that have a title value of
"Little Women". Then, it prints the title and year values
of each result.
Tip
To learn more about HQL, see Hibernate Query Language in the Hibernate ORM user guide.
Write Data to MongoDB
You can write data to your MongoDB deployment by creating and modifying
your Movie objects.
Insert a document into the movies collection
In your Main.java file, add the following code to create a
Movie entity instance called myMovie and save it to the database:
var title = "A Real Pain"; var plot = "Mismatched cousins David and Benji tour Poland to honor their grandmother. " + "Their adventure becomes complicated as old tensions resurface while exploring their family history."; var year = 2024; var cast = new ArrayList<>(List.of("Jesse Eisenberg", "Kieran Culkin", "Will Sharpe")); var myMovie = new Movie(title, plot, year, cast); session.persist(myMovie); System.out.println("Movie created with ID: " + myMovie.getId());
This code creates a new Movie entity instance and uses the session.persist()
method to save it to the database.
Update a document
Add the following code to your Main.java file to update the Movie
instance that you created in the previous step:
myMovie.getCast().add("Jennifer Grey"); System.out.println("Movie updated with new cast: " + myMovie.getCast());
This code retrieves the current cast value and adds a new cast member to it.
The Hibernate ORM extension applies this change to the corresponding document
in the database.
Next Steps
Congratulations on completing the tutorial!
Note
If you run into issues in this tutorial, submit feedback by using the Rate this page tab on the right side of this page.
You can find support for general questions by using the MongoDB Stack Overflow tag or the MongoDB Reddit community.
In this tutorial, you created a Java application that connects to a MongoDB deployment hosted on MongoDB Atlas and uses the Hibernate ORM extension to interact with your data.
To learn more about the Hibernate ORM extension, see the following resources:
Hibernate ORM extension API documentation
mongo-hibernate source code on GitHub
Hibernate ORM documentation
Jakarta Persistence documentation
To view a Getting Started tutorial that shows how to install the Hibernate ORM extension and interact with book data, see the Getting Started With Hibernate ORM and MongoDB Foojay blog post.