Overview
This tutorial guides you through building a Nuxt application that uses Vue and integrates with MongoDB. Nuxt is a Vue framework that provides file-based routing, server-side rendering, and built-in API routes through its Nitro server engine. Nuxt combined with Vue allows you to build complete applications without a separate back-end server.
The application in this tutorial contains the following layers:
Database layer: MongoDB provides data storage and retrieval
Server layer: Nuxt server routes handle API logic and database interactions
Presentation layer: Vue implements the user interface with reactive data binding
Why Use MongoDB with Nuxt and Vue?
Nuxt builds on Vue to provide a full-stack framework with a Node.js runtime for server routes, making it a natural fit for the MongoDB Node.js driver. You can connect to MongoDB directly from your Nuxt server routes or server-side utilities and return documents to your Vue components without maintaining a separate back-end service or API layer.
MongoDB's flexible document structure maps easily to JavaScript objects. As a result, you can work seamlessly with MongoDB data in your Vue components, whether you are using the Options API or the Composition API. The documents you fetch from MongoDB can be passed straight into your components and templates, reducing the need for complex data transformation or an additional object-relational mapping (ORM) layer.
Nuxt's server-side rendering (SSR) and data-fetching utilities let you query MongoDB on the server before rendering pages. This lets you hydrate your Vue components with ready-to-use data, improving perceived performance and SEO for data-driven applications.
Quick Start Tutorial
This tutorial shows you how to build a web application by using Nuxt and Vue. The application accesses sample restaurant data, queries the data, and displays the results on a locally hosted site. The tutorial also includes instructions on connecting to a MongoDB cluster hosted on MongoDB Atlas and accessing and displaying data from your database.
Tip
If you prefer to connect to MongoDB by using the Node.js driver without Nuxt, see the Get Started with the Node.js Driver guide.
Set Up Your Project
Follow the steps in this section to install the project dependencies, create an Atlas cluster, and set up the application directories.
Verify the prerequisites
To create the Quick Start application, install the following software in your development environment:
Prerequisite | Notes |
Use version 20 or later. | |
Code editor | This tutorial uses Visual Studio Code, but you can use the editor of your choice. |
Terminal app and shell | For macOS or Linux users, use Terminal or a similar app. For Windows users, use PowerShell. |
Create a MongoDB Atlas cluster
MongoDB Atlas is a fully managed cloud database service that hosts your MongoDB deployments. If you do not have a MongoDB deployment, you can create a MongoDB cluster for free (no credit card required) by completing the MongoDB Get Started tutorial.
Tip
Ensure that the sample_restaurants dataset is loaded into your cluster.
This tutorial queries data from that dataset. To learn how to load the
sample_restaurants dataset into your cluster, see the MongoDB Get Started tutorial.
To connect to your MongoDB cluster, you must use a connection URI. To learn how to retrieve your connection URI, see the Add your connection string section of the MongoDB Get Started tutorial.
Tip
Save your MongoDB Atlas connection string in a secure location. You will
add it to your .env file in a later step.
Install Nuxt and Vue
Use the official Nuxt CLI to initialize a new Nuxt project with Vue. Open your terminal and navigate to your desired project directory.
Run the initialization command:
npm create nuxt@latest
Configuration Prompts
The CLI prompts you to configure your project. Use the following responses:
Prompt: Need to install the following packages: create-nuxt@latest-number. Ok to proceed?
Response: Type
yand press Enter.Prompt: Which template would you like to use?
Response: Select
minimal - Minimal setup for Nuxt 4 (recommended).Prompt: Where would you like to create your project?
Response: Press
Enterto accept the default directory or type a different path.Prompt: Which package manager would you like to use?
Response: Select
npm.Prompt: Initialize git repository?
Response: Select
YesorNobased on your preference.Prompt: Would you like to install any of the official modules?
Response: Select
No.
Install dependencies
Navigate to your project directory and install the MongoDB driver, Lucide icons, Tailwind, and related dependencies by running the following commands:
npm install mongodb lucide-vue-next npm install -D @types/node @nuxtjs/tailwindcss
You can safely ignore any warnings about deprecated packages from the Tailwind installation.
Configure the Back End
After setting up the project structure, follow the steps in this section to set up the back end.
Configure your environment variable
Create a .env file at the root of your project to securely store your
connection URI by running the following command in your project root:
touch .env
Open the .env file and add your connection URI:
MONGODB_URI=<Your Connection URI>
Note
Replace <Your Connection URI> with the connection URI you
received from MongoDB Atlas.
Update your Nuxt configuration
Open the nuxt.config.ts file in your project root and replace its
contents with the following code to load environment variables
and configure the Tailwind CSS module:
// https://nuxt.com/docs/api/configuration/nuxt-config export default defineNuxtConfig({ compatibilityDate: '2025-07-15', devtools: { enabled: true }, future:{ compatibilityVersion: 4, }, runtimeConfig:{ // Server-side only config. Not exposed to the client mongoURI: process.env.MONGODB_URI, }, css:['@/assets/css/main.css'], modules: ['@nuxtjs/tailwindcss'], })
The nuxt.config.ts file loads environment variables from the
.env file and configures Tailwind support for styling your Vue
components.
Create a database connection
Run the following commands in your project root to create a utility file to hold the MongoDB connection logic:
mkdir -p server/utils touch server/utils/mongodb.ts
Open the server/utils/mongodb.ts file and add the following code:
import { MongoClient, type Db } from "mongodb"; let cachedClient: MongoClient | null = null; let cachedDb: Db | null = null; export async function connectToDatabase(){ if (cachedClient && cachedDb){ return { client: cachedClient, db: cachedDb }; } const config = useRuntimeConfig(); const uri = config.mongoURI; if (!uri){ throw new Error("Please define the MONGO_URI environment variable inside .env"); } const client = new MongoClient(uri); await client.connect(); const db = client.db("sample_restaurants"); cachedClient = client; cachedDb = db; console.log("Connected to MongoDB Atlas"); return { client, db }; }
This code creates a reusable MongoDB client that connects to your
Atlas cluster by using the connection URI stored in your environment
variable. The client connects to the sample_restaurants database,
which contains information about restaurants around New York City.
Create restaurant route
Nuxt server routes handle API requests and interact with the database. Run the following commands in your project root to create a server route for fetching restaurant data:
mkdir -p server/api/restaurants touch server/api/restaurants/index.get.ts
Open the server/api/restaurants/index.get.ts
file and add the following code:
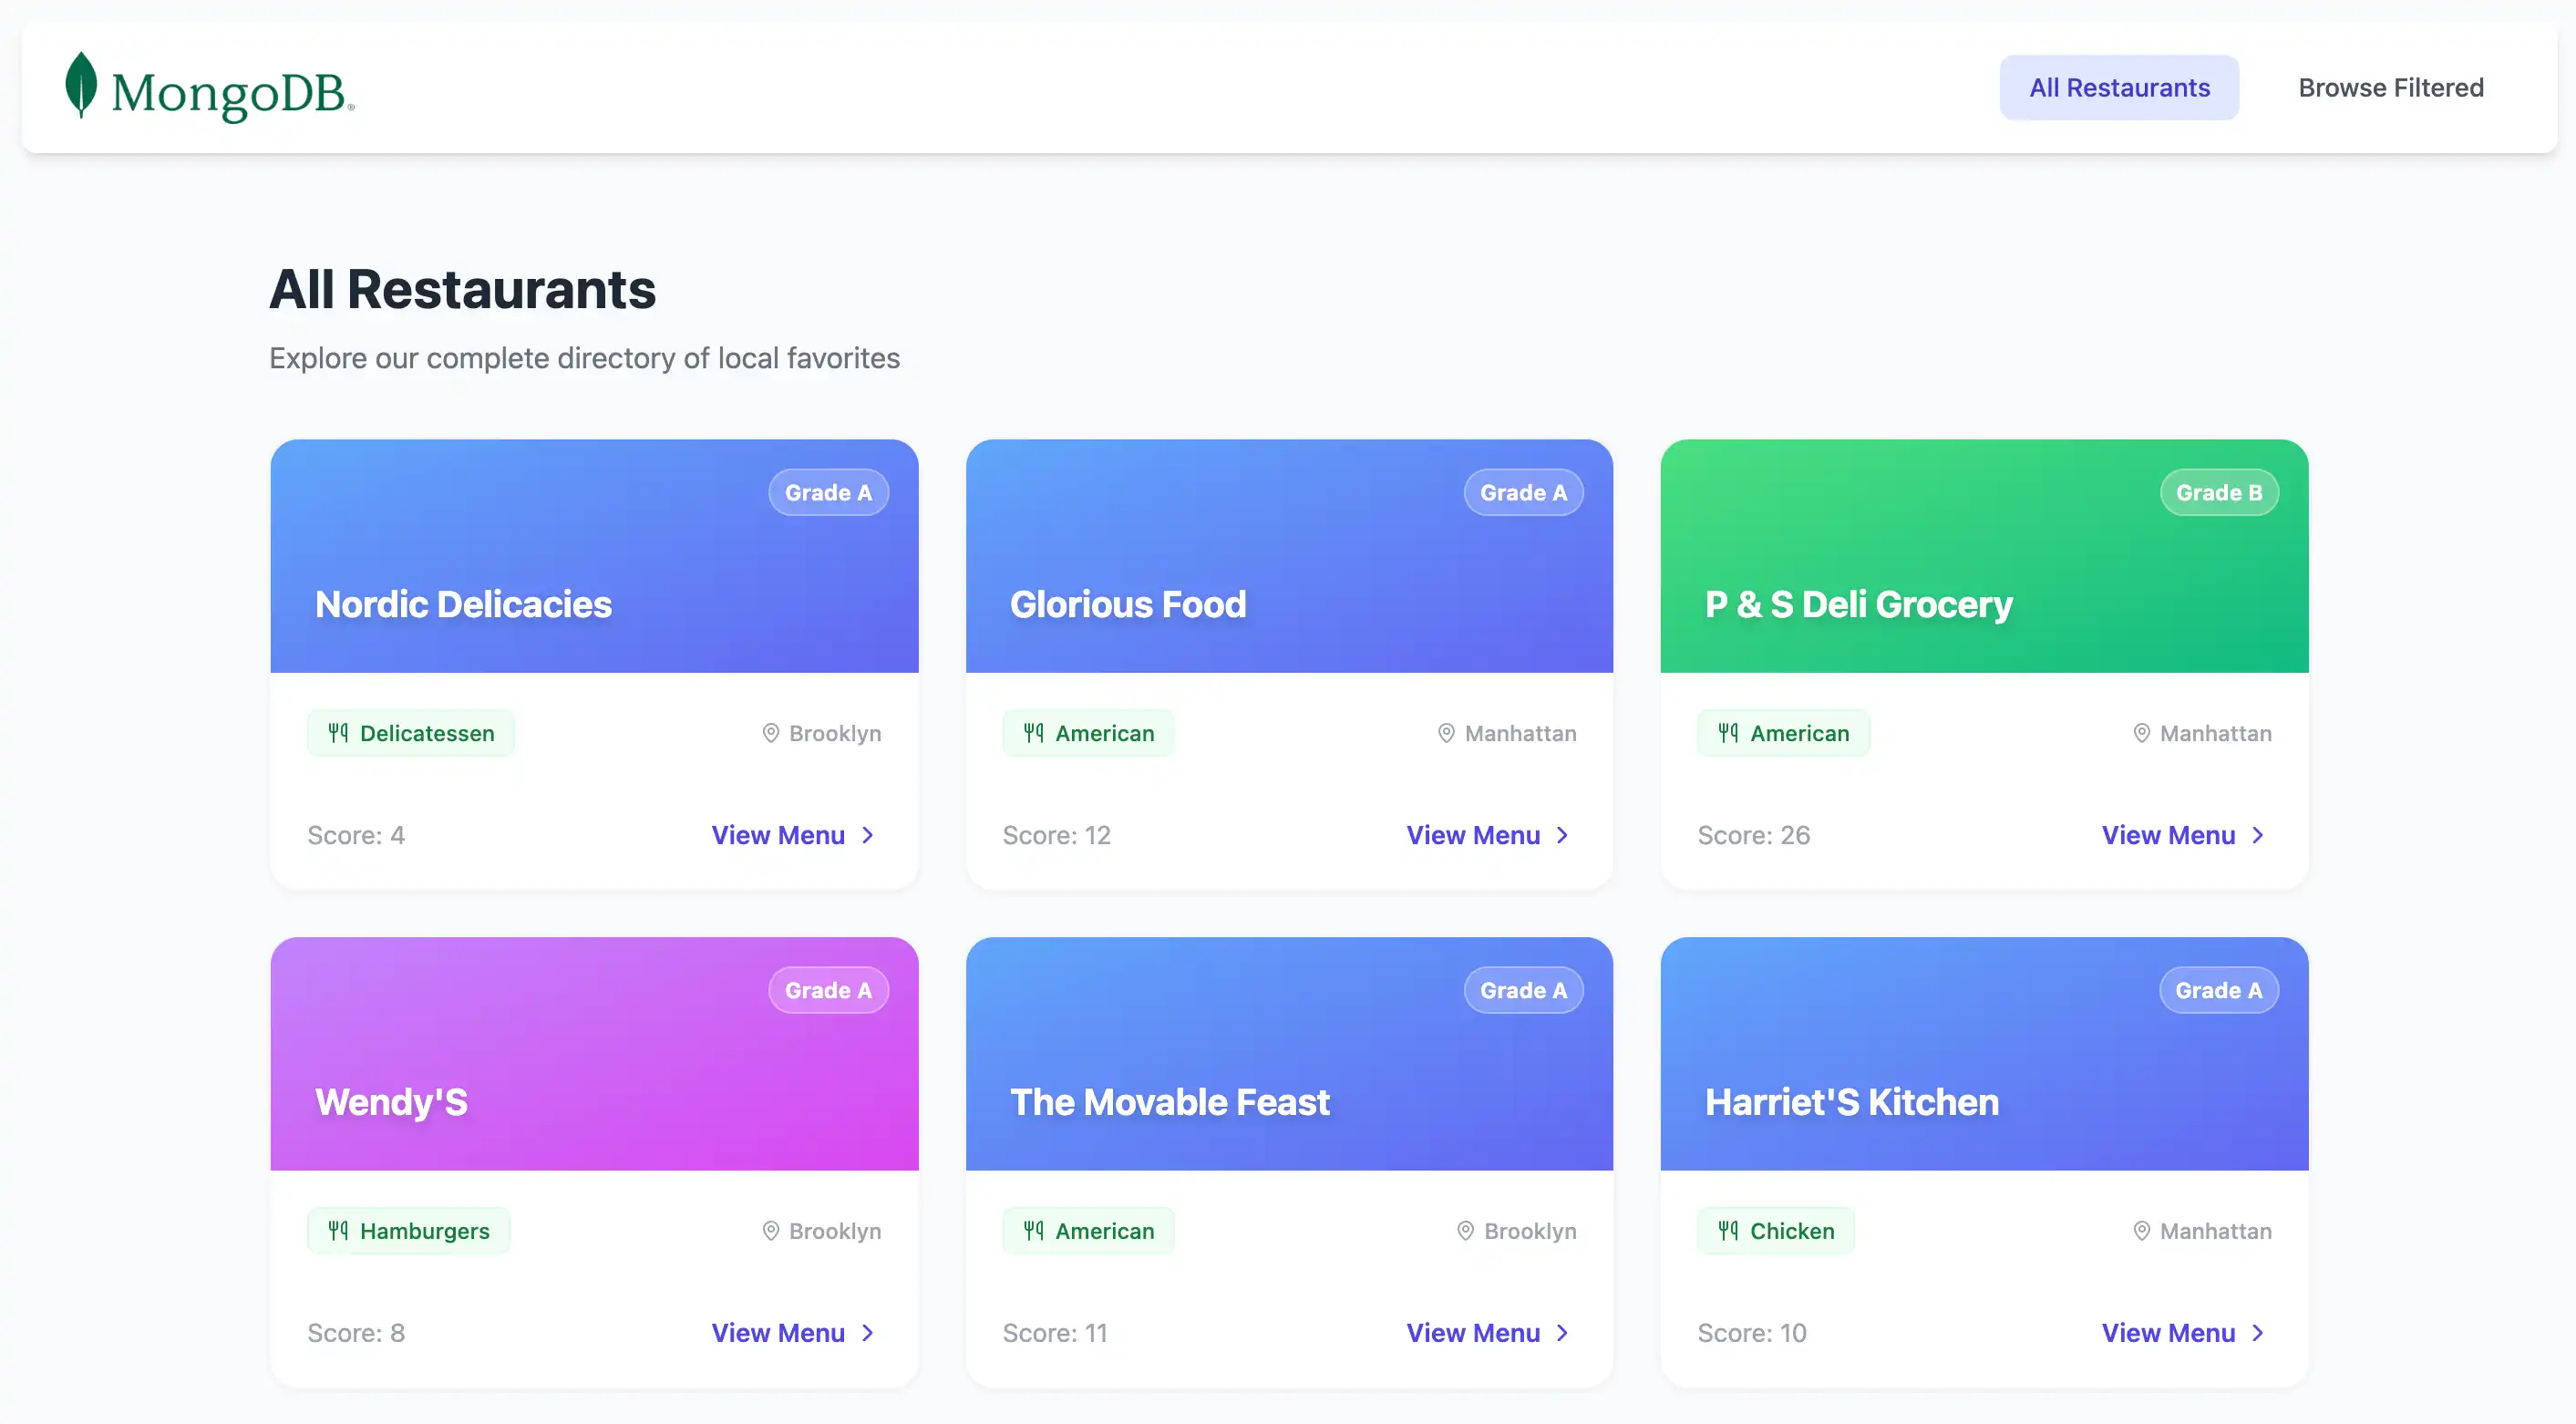
import { connectToDatabase } from "~~/server/utils/mongodb"; export default defineEventHandler(async () =>{ const { db } = await connectToDatabase(); const collection = db.collection("restaurants"); const restaurants = await collection .find({}) .limit(50) .project({ name: 1, borough: 1, cuisine: 1, grades: 1}) .toArray(); return restaurants.map((doc) => ({ ...doc, _id: doc._id.toString(), })) })
This file defines a server route that queries the restaurants
collection. It retrieves the first 50 restaurant documents and returns
them as a JSON response.
Create filtered restaurant route
Run the following command in your project root to create the new route file:
touch server/api/restaurants/browse.get.ts
Open the server/api/restaurants/browse.get.ts file
and add the following code:
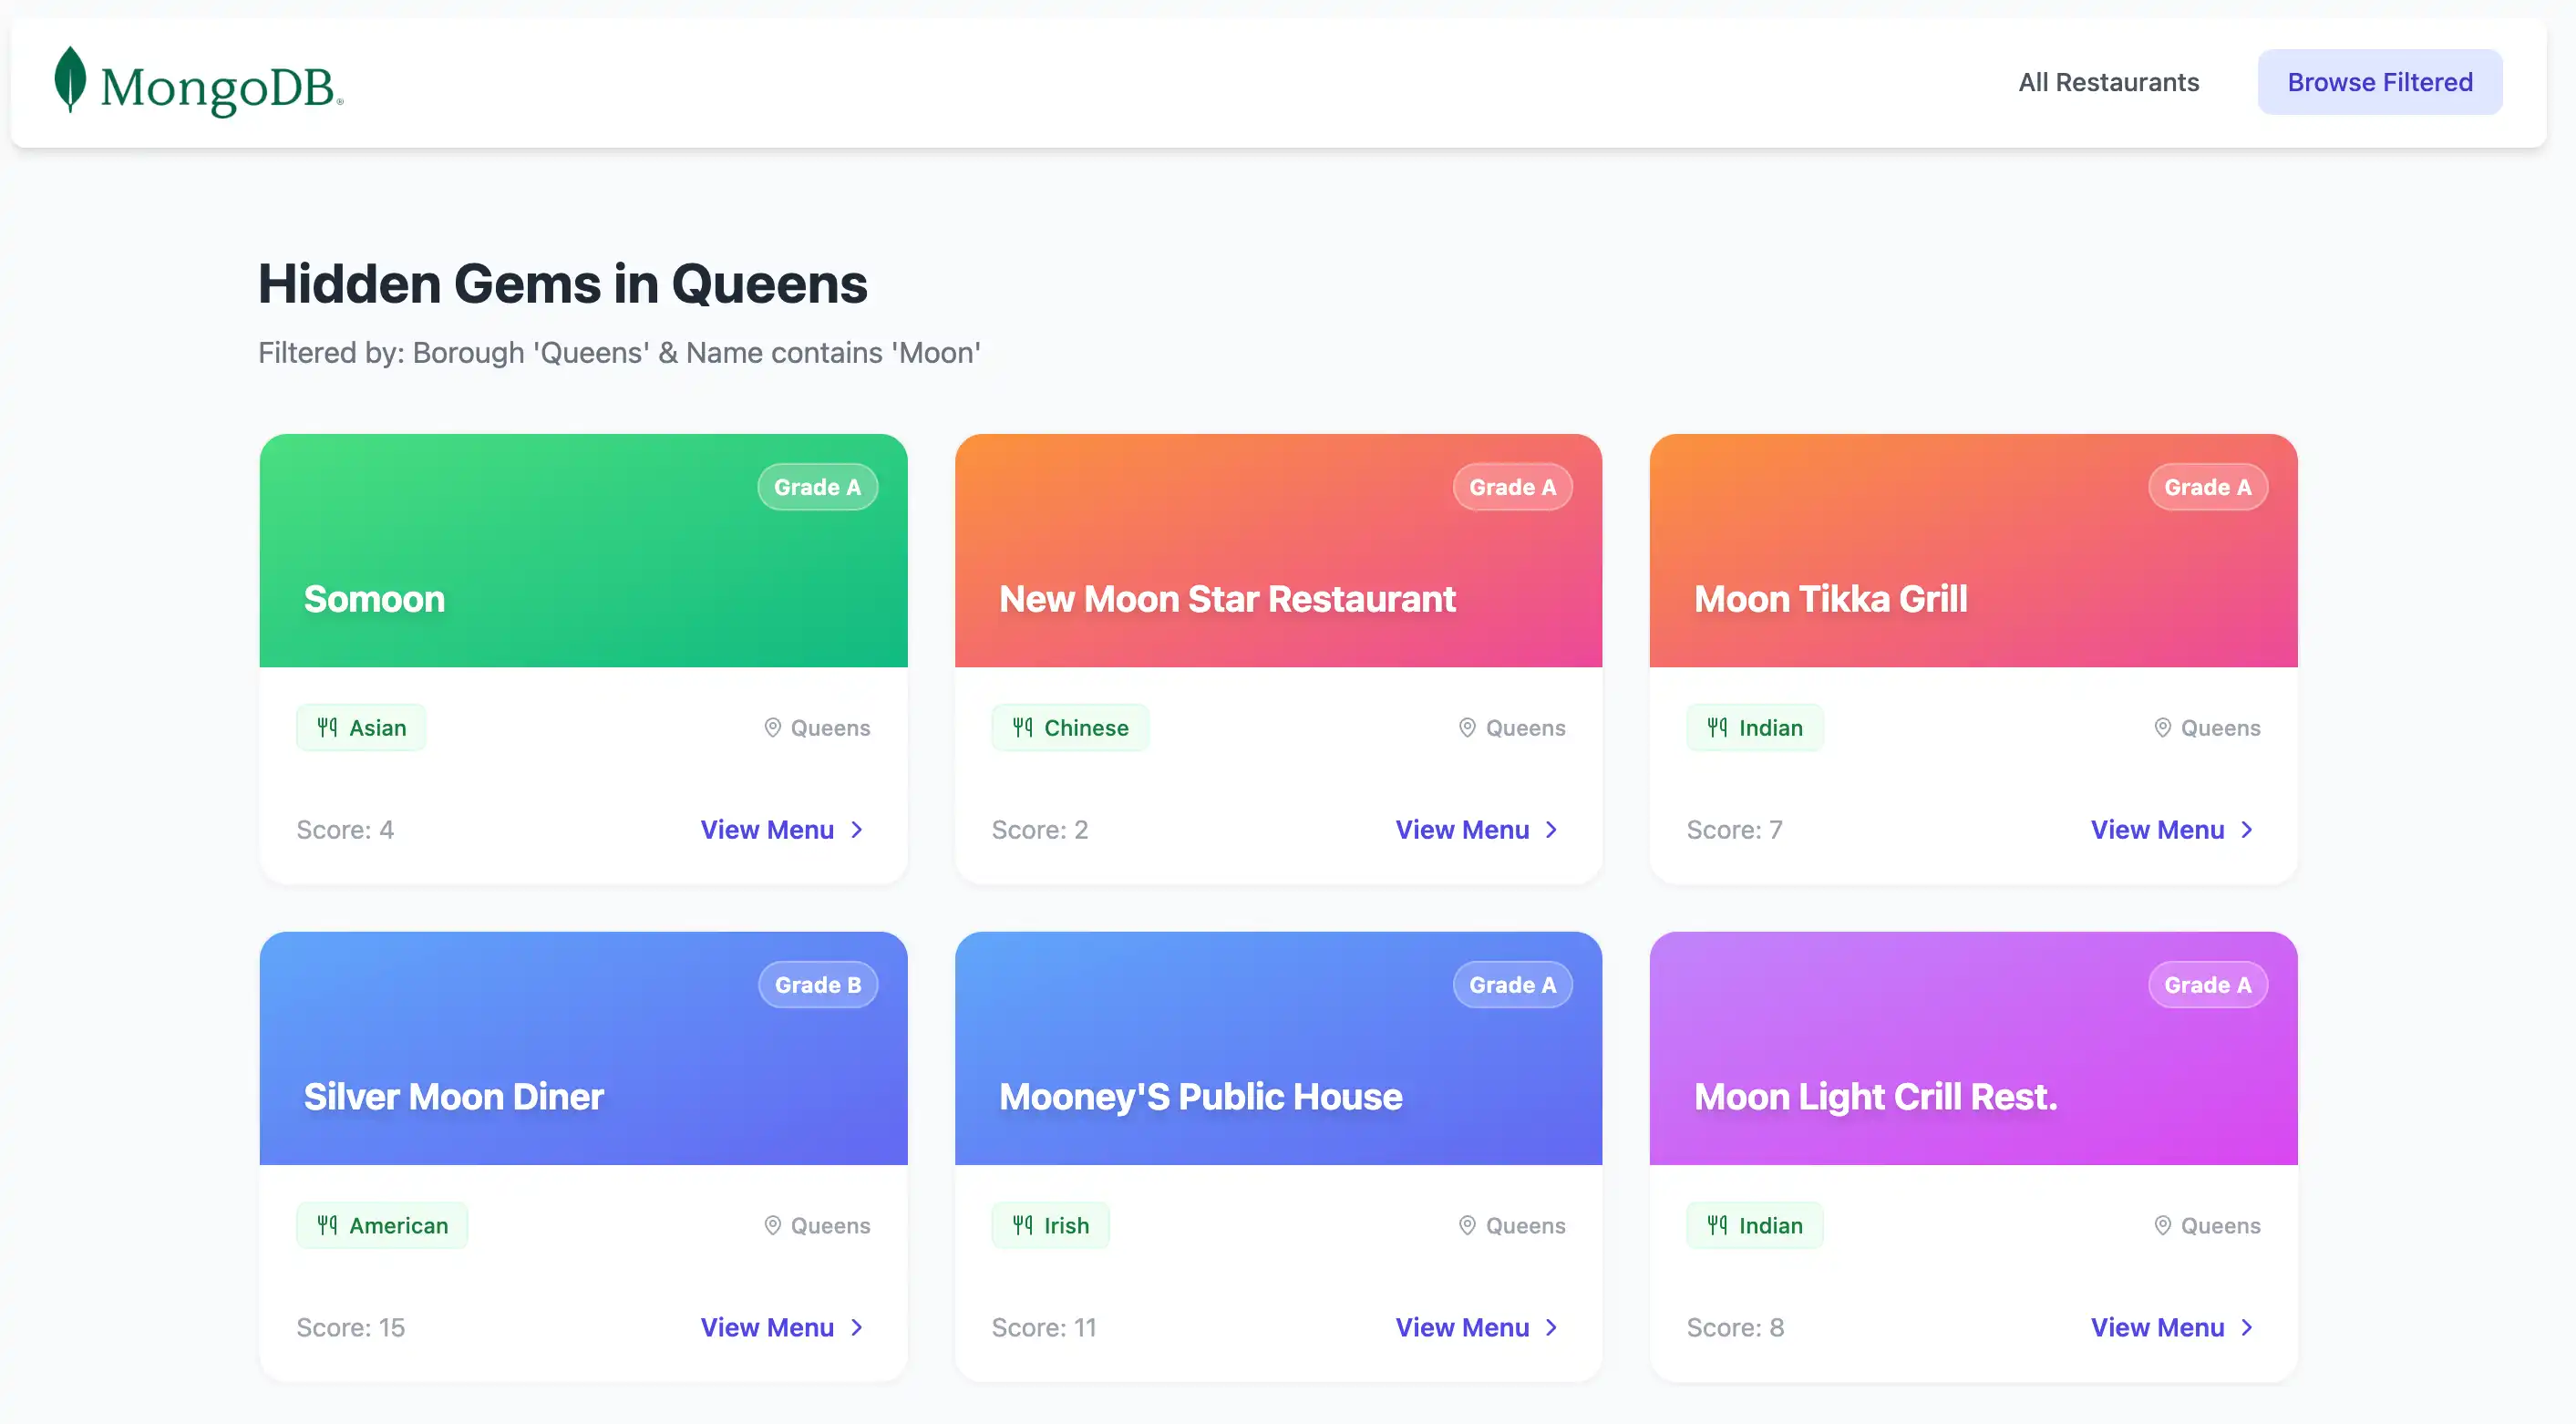
import { connectToDatabase } from '~~/server/utils/mongodb' export default defineEventHandler(async () => { const { db } = await connectToDatabase(); const collection = db.collection("restaurants"); // Filter: Queens borough + name contains "Moon" (case-insensitive) const query = { borough: 'Queens', name: { $regex: 'Moon', $options: 'i' }, } const restaurants = await collection .find(query) .project({ name: 1, borough: 1, cuisine: 1, grades: 1 }) .toArray() return restaurants.map((doc) => ({ ...doc, _id: doc._id.toString(), })) })
This file defines a server route that queries the sample_restaurants
database for restaurants in Queens whose names contain the word
Moon and returns the matching documents as a JSON response.
Configure the Front End
After setting up the back end, follow the steps in this section to set up the presentation layer for your application.
Create a main.css file
Run the following command in your project root to create a main CSS file for global styles:
mkdir -p app/assets/css touch app/assets/css/main.css
Open the app/assets/css/main.css file and add the following code:
@tailwind base; @tailwind components; @tailwind utilities;
This file imports Tailwind CSS directives that generate utility classes for styling your application. Tailwind provides a comprehensive set of pre-built classes for layout, spacing, colors, and typography without requiring custom CSS.
Create restaurant list component
Run the following commands in your project root to create a Vue component for displaying restaurant data:
mkdir -p app/components touch app/components/RestaurantList.vue
Open the app/components/RestaurantList.vue file and add the following code:
<script setup lang="ts"> import { computed } from 'vue' import { MapPin, Utensils, ChevronRight } from 'lucide-vue-next' // Type definitions interface Grade { grade?: string score?: number } interface Restaurant { _id: string name: string borough?: string cuisine?: string grades?: Grade[] } // Determine endpoint based on current route const route = useRoute() const isBrowse = computed(() => route.path === '/browse') const endpoint = computed(() => isBrowse.value ? '/api/restaurants/browse' : '/api/restaurants' ) // Fetch data using Nuxt's useFetch composable // Automatically refetches when endpoint changes const { data: restaurants } = await useFetch<Restaurant[]>(endpoint, { watch: [endpoint], default: () => [], }) // Dynamic page content const pageTitle = computed(() => isBrowse.value ? 'Hidden Gems in Queens' : 'All Restaurants' ) const pageSubtitle = computed(() => isBrowse.value ? "Filtered by: Borough 'Queens' & Name contains 'Moon'" : 'Explore our complete directory of local favorites' ) // Deterministic gradient based on name length const getGradient = (name: string) => { const gradients = [ 'from-orange-400 to-pink-500', 'from-blue-400 to-indigo-500', 'from-green-400 to-emerald-500', 'from-purple-400 to-fuchsia-500', ] return gradients[name.length % gradients.length] } </script> <template> <div class="max-w-6xl mx-auto px-4 py-8"> <!-- Header --> <div class="mb-8"> <h3 class="text-3xl font-bold text-gray-800"> {{ pageTitle }} </h3> <p class="text-gray-500 mt-2"> {{ pageSubtitle }} </p> </div> <!-- Restaurant Grid --> <div class="grid grid-cols-1 md:grid-cols-2 lg:grid-cols-3 gap-6"> <div v-for="restaurant in restaurants" :key="restaurant._id" class="group bg-white rounded-2xl border border-gray-100 shadow-sm hover:shadow-xl hover:-translate-y-1 transition-all duration-300 overflow-hidden flex flex-col" > <!-- Gradient Header --> <div :class="[ 'h-32 bg-gradient-to-br p-6 flex items-end relative', getGradient(restaurant.name) ]" > <span class="absolute top-4 right-4 bg-white/20 backdrop-blur-md text-white text-xs font-bold px-2 py-1 rounded-full border border-white/30"> Grade {{ restaurant.grades?.[0]?.grade ?? 'N/A' }} </span> <h3 class="text-white text-xl font-bold drop-shadow-md line-clamp-2"> {{ restaurant.name }} </h3> </div> <!-- Card Body --> <div class="p-5 flex-1 flex flex-col"> <div class="flex items-center justify-between mb-4"> <span class="inline-flex items-center gap-1.5 px-2.5 py-1 rounded-md text-xs font-medium bg-green-50 text-green-700 border border-green-100"> <Utensils class="w-3 h-3" /> {{ restaurant.cuisine ?? 'Unknown' }} </span> <div class="flex items-center text-gray-400 text-xs font-medium"> <MapPin class="w-3 h-3 mr-1" /> {{ restaurant.borough ?? 'Unknown' }} </div> </div> <div class="mt-auto pt-4 border-t border-gray-50 flex items-center justify-between text-sm"> <span class="text-gray-400"> Score: {{ restaurant.grades?.[0]?.score ?? 0 }} </span> <button class="text-indigo-600 font-semibold group-hover:underline flex items-center gap-1"> View Menu <ChevronRight class="w-4 h-4" /> </button> </div> </div> </div> </div> <!-- Empty State --> <div v-if="restaurants?.length === 0" class="text-center py-12 text-gray-500"> <p>No restaurants found.</p> <p class="text-sm mt-2">Check your MongoDB connection and ensure the sample_restaurants database is loaded.</p> </div> </div> </template>
This Vue component fetches restaurant data from your Nuxt server route and displays it in a responsive grid layout. It dynamically adapts the API endpoint and page content based on the current route, showing either all restaurants or filtered results.
Create the navbar component
Run the following command in your project root to create a Vue component for the navigation bar:
touch app/components/Navbar.vue
Open the app/components/Navbar.vue file and add the following code:
<template> <nav class="flex justify-between items-center mb-6 bg-white shadow-md px-6 py-4 rounded-lg"> <NuxtLink to="/"> <img alt="MongoDB logo" class="h-10" src="https://d3cy9zhslanhfa.cloudfront.net/media/3800C044-6298-4575-A05D5C6B7623EE37/4B45D0EC-3482-4759-82DA37D8EA07D229/webimage-8A27671A-8A53-45DC-89D7BF8537F15A0D.png" /> </NuxtLink> <div class="flex gap-4"> <NuxtLink to="/" class="px-4 py-2 rounded-lg text-sm font-medium transition-colors" :class="$route.path === '/' ? 'bg-indigo-100 text-indigo-700' : 'text-gray-600 hover:bg-gray-100'" > All Restaurants </NuxtLink> <NuxtLink to="/browse" class="px-4 py-2 rounded-lg text-sm font-medium transition-colors" :class="$route.path === '/browse' ? 'bg-indigo-100 text-indigo-700' : 'text-gray-600 hover:bg-gray-100'" > Browse Filtered </NuxtLink> </div> </nav> </template>
This Vue component renders the navbar above the restaurant results, and contains the All Restaurants and Filtered Restaurants links. These allow you to navigate between the routes.
Create the index page
Run the following command in your project root to create an index page for the application:
mkdir -p app/pages touch app/pages/index.vue
Open the app/pages/index.vue file and add the following code:
<template> <RestaurantList /> </template>
This file displays the results from the index.get.ts server route
by using the RestaurantList and Navbar components.
Create the filtered restaurants page
Run the following command in your project root to create a new Vue page for displaying filtered restaurant data:
touch app/pages/browse.vue
Open the app/pages/browse.vue file and add the following code:
<template> <RestaurantList /> </template>
This file displays the results of a filtered query on the
sample_restaurants database that returns all restaurants in
Queens with names that contain the word Moon. It also uses
the RestaurantList and Navbar components to construct the page.
Verify your file structure
Before continuing, ensure your file tree closely matches the structure below. You can safely ignore any additional project files.
your-project-directory/ ├── .env <-- Environment variable file ├── app/ │ ├── app.vue <-- Main application component │ ├── assets/ │ │ └── css/ │ │ └── main.css <-- Tailwind config │ ├── components/ │ │ ├── Navbar.vue <-- All restaurants and filtered restaurants links │ │ └── RestaurantList.vue <-- Container for restaurant data │ └── pages/ │ ├── browse.vue <-- Filtered restaurants page │ └── index.vue <-- All restaurants page ├── server/ │ ├── api/ │ │ └── restaurants/ │ │ ├── browse.get.ts <-- Filtered restaurants route │ │ └── index.get.ts <-- All restaurants route │ └── utils/ │ └── mongodb.ts <-- MongoDB connection utility ├── nuxt.config.ts <-- Nuxt configuration file └── package.json
Run Your Application
Perform the following steps to start the server and view the rendered restaurant data.
Start the server
Run the following command in your project root to start the development server:
npm run dev
If successful, the command outputs the following information in the terminal:
Nuxt 4.2.2 (with Nitro 2.13.1, Vite 7.3.1 and Vue 3.5.27) Local: http://localhost:3000/ Network: use --host to expose Using default Tailwind CSS file DevTools: press Shift + Option + D in the browser (v3.1.1) Vite client built in 22ms Vite server built in 19ms Nuxt Nitro server built in 247ms Vite server warmed up in 0ms Vite client warmed up in 1ms Connected to MongoDB Atlas

Congratulations on completing the Quick Start tutorial!
After you complete these steps, you have a Nuxt and Vue application that connects to your MongoDB deployment, runs queries on sample restaurant data, and renders the results in your browser.
Additional Resources
To learn more about using MongoDB, Nuxt, and Vue, view the following resources:
Nuxt documentation
Vue documentation
Node.js driver documentation