Overview
In this guide, you can learn how to create an Angular web application that uses the MEAN stack. The MEAN stack is a web development framework that uses MongoDB, Express, Angular, and Node.js and consists of the following layers:
Database layer: MongoDB provides data storage and retrieval.
Application layer: Express and Node.js make up the middle tier for server-side logic.
Presentation layer: Angular implements the user interface and front-end interactions.
Why Use MongoDB in an Angular Application?
Angular is a TypeScript framework used to create dynamic web applications. It provides built-in packages for a range of application features, and its component-based architecture makes applications highly reusable.
Since TypeScript is built on JavaScript, each element of the MEAN stack is based on JavaScript and JSON. As a result, the integration between these elements is straightforward. The Angular front end creates JSON documents that MongoDB can store directly in BSON format, a binary JSON extension, and Express provides a minimalist framework that uses JavaScript. MongoDB provides advanced indexing and querying features for BSON documents and includes a native Node.js driver, which makes it an ideal data store for JavaScript applications.
Quick Start Tutorial
This tutorial shows you how to build a web application by using the MEAN stack. The application accesses sample restaurant data, queries the data, and displays the results on a locally hosted site. The tutorial also includes instructions for connecting to a MongoDB cluster hosted on MongoDB Atlas and accessing and displaying data from your database.
Tip
If you prefer to connect to MongoDB by using the Node.js driver without Angular, see the Get Started with the Node.js Driver guide.
Set Up Your Project
Follow the steps in this section to install the project dependencies, create an Atlas cluster, and set up the application directories.
Verify the prerequisites.
To create the Quick Start application, install the following software in your development environment:
Prerequisite | Notes |
|---|---|
Download either the Latest LTS or Latest Release version. | |
Install globally by running | |
Code editor | Use the editor of your choice. |
Terminal app and shell | For MacOS users, use Terminal or a similar app. For Windows users, use PowerShell. |
Create a MongoDB Atlas cluster.
MongoDB Atlas is a fully managed cloud database service that hosts your
MongoDB deployments. If you do not have a MongoDB deployment, you can create a MongoDB
cluster for free by completing the
MongoDB Get Started
tutorial. The MongoDB Get Started tutorial also demonstrates how to load sample
datasets into your cluster, including the sample_restaurants database
that is used in this tutorial.
To connect to your MongoDB cluster, you must use a connection URI. To learn how to retrieve your connection URI, see the Add your connection string section of the MongoDB Get Started tutorial.
Important
Save your connection string in a secure location.
Create your project directories.
Run the following commands in your terminal to create a directory for
your project named angular-quickstart:
mkdir angular-quickstart cd angular-quickstart
Then, run the following commands from the angular-quickstart directory
to create a folder for the back end named server and initialize the
package.json file:
mkdir server cd server npm init -y
Modify your package.json file.
Navigate to the package.json file in the angular-quickstart/server
directory. To use ECMAScript modules,
the standard format for packaging JavaScript code for reuse, replace the
existing line that specifies the "type" field with the following line:
"type": "module",
Install the dependencies.
Run the following command to install the mongodb, express, cors,
and dotenv dependencies:
npm install mongodb express cors dotenv
This command installs MongoDB, the Express web framework, the
cors Node.js package for cross-origin resource sharing, and
Dotenv to load environment variables.
Next, run the following command to install TypeScript and the required type definitions:
npm install -D typescript @types/node @types/cors @types/express tsx
This command installs TypeScript, type definitions for Node.js and Express,
and tsx, a tool for running TypeScript files directly.
Configure the Back End
After setting up the project structure and dependencies, follow the steps in this section to configure your web server and connect to MongoDB.
Configure your Express web server.
Create a file named server.ts in your angular-quickstart/server directory
and paste the following code:
import express from "express"; import cors from "cors"; import restaurants from "./routes/restaurant.js"; const PORT = process.env.PORT || 5050; const app = express(); app.use(cors()); app.use(express.json()); app.use("/restaurant", restaurants); // start the Express server app.listen(PORT, () => { console.log(`Server listening on port ${PORT}`); });
Set environment variables.
In the server directory, create an .env file and paste the
following code:
MONGODB_URI=<connection string> PORT=5050
Replace the <connection string> placeholder with the connection
string that you saved in a previous step.
Connect your server to the database.
In the server directory, create a subdirectory named db.
Add a new file named connection.ts to this subdirectory and paste
the following code:
import "dotenv/config"; import { MongoClient, Db } from "mongodb"; const uri = process.env.MONGODB_URI || ""; const client = new MongoClient(uri); try { // Connects the client to the server await client.connect(); // Sends a ping to confirm a successful connection await client.db("admin").command({ ping: 1 }); console.log( "Pinged your deployment. You successfully connected to MongoDB!" ); } catch(err) { console.error(err); } const db: Db = client.db("sample_restaurants"); export default db;
This file connects to your MongoDB deployment, accesses the
sample_restaurants database, and tests the
database connection.
Create server API endpoints.
In the server directory, create a subdirectory named routes.
Create a file named restaurant.ts in this subdirectory and
paste the following code:
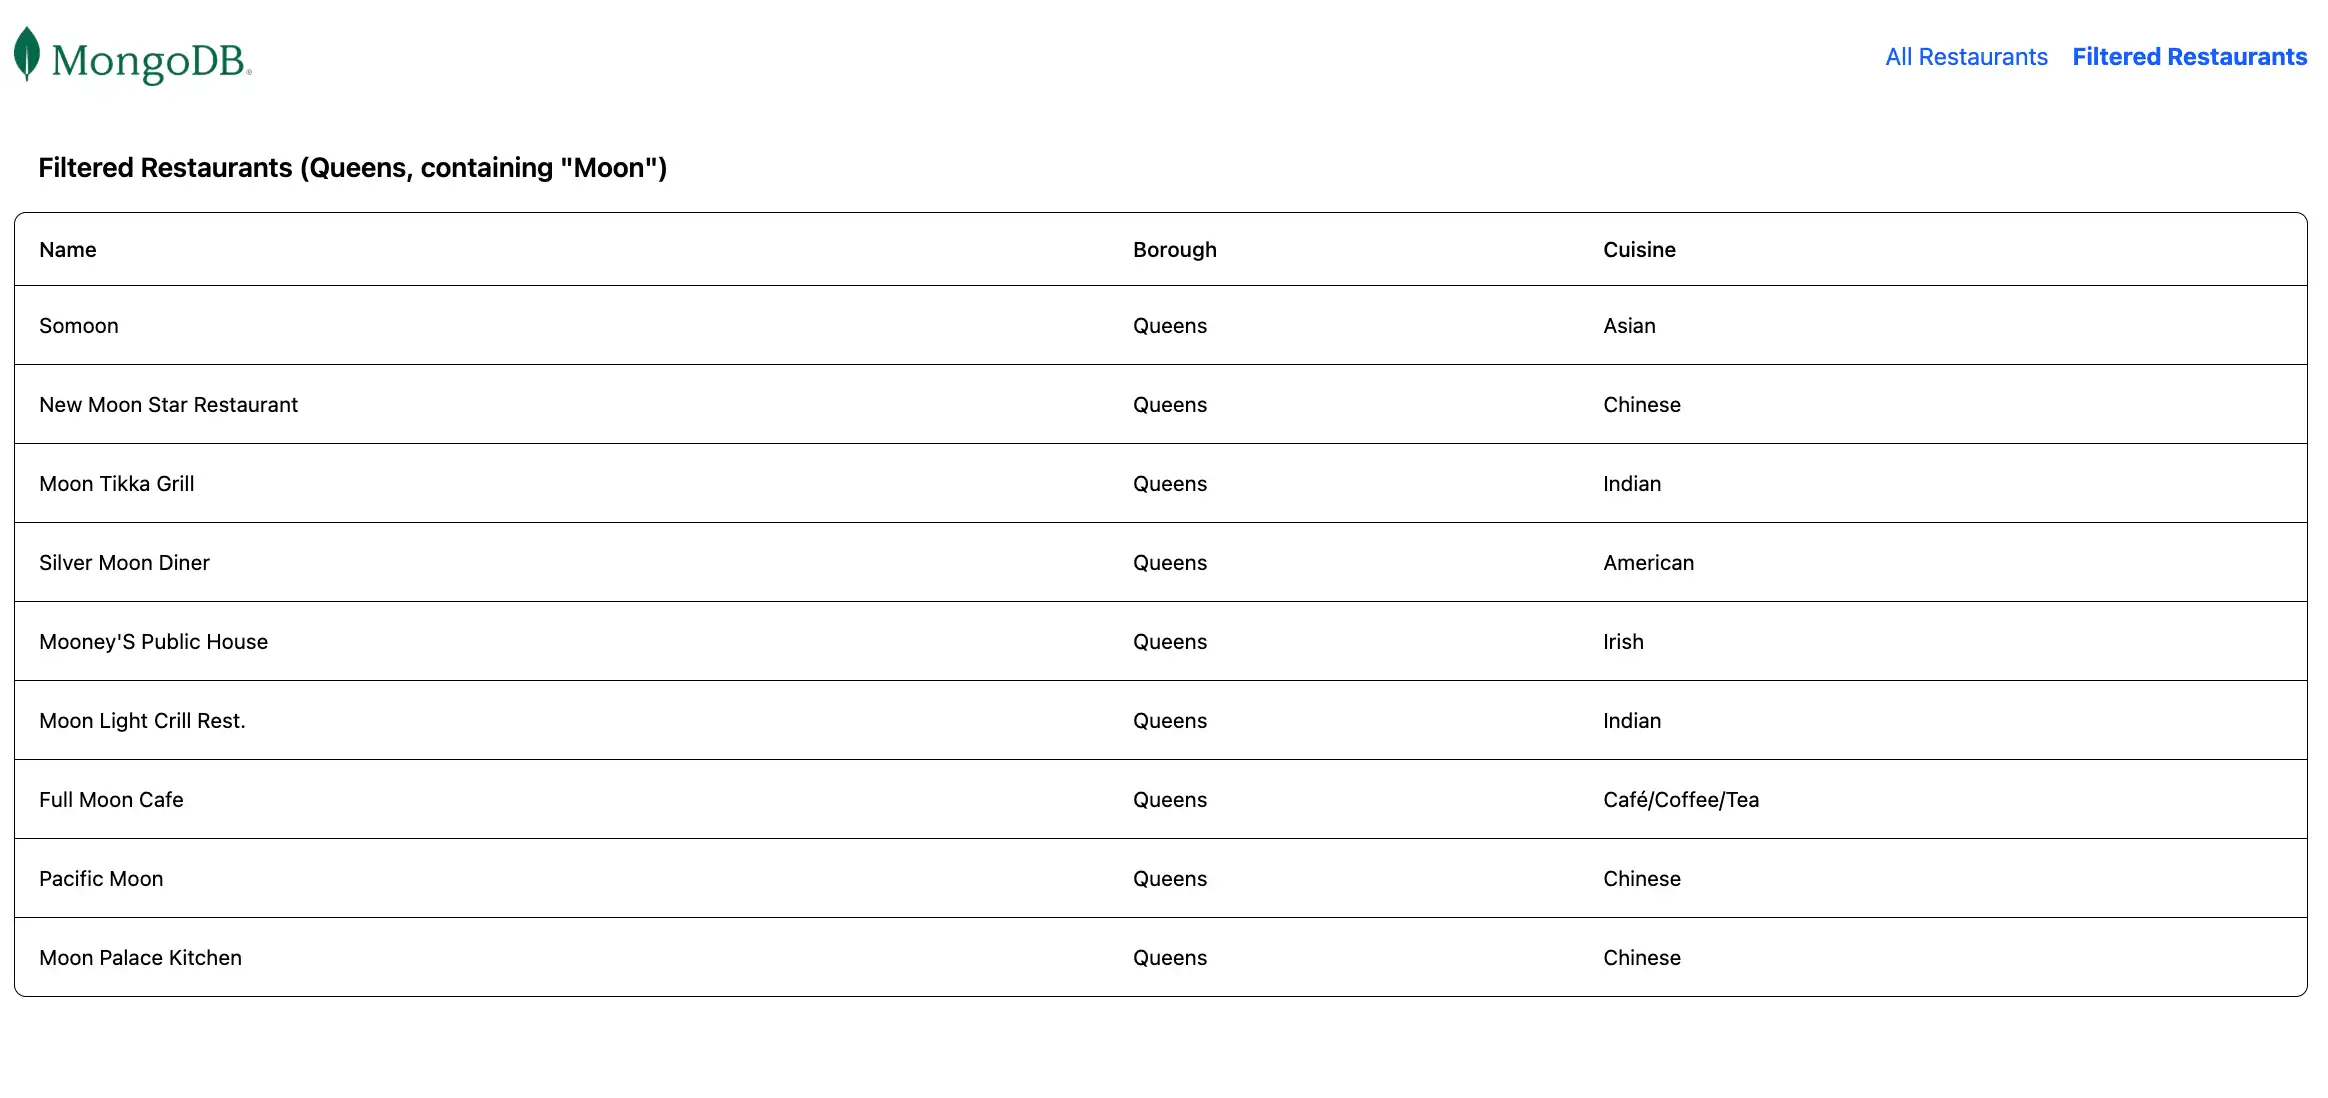
import express, { Request, Response } from "express"; import db from "../db/connection.js"; // Creates an instance of the Express router, used to define our routes const router = express.Router(); // Gets a list of all the restaurants router.get("/", async (req: Request, res: Response) => { let collection = db.collection("restaurants"); let results = await collection.find({}).toArray(); res.send(results).status(200); }); // Lists restaurants that match the query filter router.get("/browse", async (req: Request, res: Response) => { try { let collection = db.collection("restaurants"); let query = { borough: "Queens", name: { $regex: "Moon", $options: "i" }, }; let results = await collection.find(query).toArray(); res.send(results).status(200); } catch (err) { console.error(err); res.status(500).send("Error browsing restaurants"); } }); export default router;
This file accesses the restaurants collection in the
sample_restaurants database and defines the following GET
endpoints:
/: Retrieves all restaurants from the sample collection/browse: Retrieves restaurants that match the query criteria, which filters for restaurants in Queens that contain the word"Moon"in the name
Configure the Front End
After setting up the application's back end, follow the steps in this section to configure Angular and add the front end components.
Create the Angular application.
Navigate to the angular-quickstart directory and run the following command
to create a new Angular application:
ng new client
This command prompts you to respond to a series of configuration questions. For each question, choose the following responses:
Which stylesheet system would you like to use? Select Tailwind CSS
Do you want to enable Server-Side Rendering (SSR) and Static Site Generation (SSG/Prerendering)? Enter N
Which AI tools do you want to configure with Angular best practices? Select the tools of your choice
After running the command, your project has a client directory
that contains front-end scaffolding. The command also configures your
project to use TailwindCSS, a framework for UI formatting.
Create the restaurant service.
From the client directory, run the following command to generate
a service that handles API calls to your back end:
ng generate service restaurant
Navigate to the client/src/app/restaurant.ts file and replace
the contents with the following code:
import { Injectable } from '@angular/core'; import { HttpClient } from '@angular/common/http'; import { Observable } from 'rxjs'; export interface Restaurant { _id: string; name: string; borough: string; cuisine: string; } ({ providedIn: 'root' }) export class RestaurantService { private apiUrl = 'http://localhost:5050/restaurant'; constructor(private http: HttpClient) {} getAllRestaurants(): Observable<Restaurant[]> { return this.http.get<Restaurant[]>(this.apiUrl); } getFilteredRestaurants(): Observable<Restaurant[]> { return this.http.get<Restaurant[]>(`${this.apiUrl}/browse`); } }
This service defines methods to fetch restaurant data from your Express API.
Configure routing.
Navigate to the client/src/app/app.routes.ts file and replace the
contents with the following code:
import { Routes } from '@angular/router'; import { RestaurantListComponent } from './restaurant-list/restaurant-list'; export const routes: Routes = [ { path: '', component: RestaurantListComponent }, { path: 'browse', component: RestaurantListComponent } ];
This file configures client-side routing and defines the following routes:
/: Displays all restaurants from the/restaurant/API endpoint/browse: Displays filtered restaurants from the/restaurant/browseAPI endpoint
Update the application configuration.
Navigate to the client/src/app/app.config.ts file and replace the
contents with the following code:
import { ApplicationConfig, provideZoneChangeDetection } from '@angular/core'; import { provideRouter } from '@angular/router'; import { provideHttpClient } from '@angular/common/http'; import { routes } from './app.routes'; export const appConfig: ApplicationConfig = { providers: [ provideZoneChangeDetection({ eventCoalescing: true }), provideRouter(routes), provideHttpClient() ] };
This configuration enables HTTP client functionality for making API requests.
Create the restaurant list component.
Run the following command from the client directory to generate
a component for displaying restaurants:
ng generate component restaurant-list
Navigate to the client/src/app/restaurant-list/restaurant-list.ts
file and replace the contents with the following code:
import { Component, OnInit } from '@angular/core'; import { CommonModule } from '@angular/common'; import { Router } from '@angular/router'; import { RestaurantService, Restaurant } from '../restaurant'; ({ selector: 'app-restaurant-list', standalone: true, imports: [CommonModule], templateUrl: './restaurant-list.html', styleUrl: './restaurant-list.css' }) export class RestaurantListComponent implements OnInit { restaurants: Restaurant[] = []; loading = true; error = ''; constructor( private restaurantService: RestaurantService, public router: Router ) {} ngOnInit(): void { this.loadRestaurants(); } loadRestaurants(): void { const isFiltered = this.router.url === '/browse'; const observable = isFiltered ? this.restaurantService.getFilteredRestaurants() : this.restaurantService.getAllRestaurants(); observable.subscribe({ next: (data) => { this.restaurants = data; this.loading = false; }, error: (err) => { this.error = 'Failed to load restaurants'; this.loading = false; console.error('Error loading restaurants:', err); } }); } }
Then, navigate to the client/src/app/restaurant-list/restaurant-list.html
file and replace the contents with the following code:
<div *ngIf="loading" class="text-center py-8"> <p class="text-gray-600">Loading restaurants...</p> </div> <div *ngIf="error" class="bg-red-100 border border-red-400 text-red-700 px-4 py-3 rounded"> {{ error }} </div> <div *ngIf="!loading && !error"> <h3 class="text-lg font-semibold p-4"> {{ router.url === '/browse' ? 'Filtered Restaurants (Queens, containing "Moon")' : 'All Restaurants' }} </h3> <div class="border rounded-lg overflow-hidden"> <div class="relative w-full overflow-auto"> <table class="w-full caption-bottom text-sm"> <thead class="[&_tr]:border-b"> <tr class="border-b transition-colors hover:bg-muted/50 data-[state=selected]:bg-muted"> <th class="h-12 px-4 text-left align-middle font-medium text-muted-foreground [&:has([role=checkbox])]:pr-0"> Name </th> <th class="h-12 px-4 text-left align-middle font-medium text-muted-foreground [&:has([role=checkbox])]:pr-0"> Borough </th> <th class="h-12 px-4 text-left align-middle font-medium text-muted-foreground [&:has([role=checkbox])]:pr-0"> Cuisine </th> </tr> </thead> <tbody class="[&_tr:last-child]:border-0"> @for (restaurant of restaurants; track restaurant._id) { <tr class="border-b transition-colors hover:bg-muted/50 data-[state=selected]:bg-muted"> <td class="p-4 align-middle [&:has([role=checkbox])]:pr-0"> {{ restaurant.name }} </td> <td class="p-4 align-middle [&:has([role=checkbox])]:pr-0"> {{ restaurant.borough }} </td> <td class="p-4 align-middle [&:has([role=checkbox])]:pr-0"> {{ restaurant.cuisine }} </td> </tr> } </tbody> </table> </div> </div> </div>
This component retrieves and displays the restaurant information based on the current route.
Update the main application component.
Navigate to the client/src/app/app.ts file and replace
the contents with the following code:
import { Component } from '@angular/core'; import { RouterOutlet, RouterLink, RouterLinkActive } from '@angular/router'; ({ selector: 'app-root', standalone: true, imports: [RouterOutlet, RouterLink, RouterLinkActive], templateUrl: './app.html', styleUrl: './app.css' }) export class AppComponent { title = 'Restaurant Browser'; }
Then, navigate to the client/src/app/app.html file and replace
the contents with the following code:
<div class="w-full p-6"> <nav class="flex justify-between items-center mb-6"> <a routerLink="/"> <img alt="MongoDB logo" class="h-10 inline" src="https://d3cy9zhslanhfa.cloudfront.net/media/3800C044-6298-4575-A05D5C6B7623EE37/4B45D0EC-3482-4759-82DA37D8EA07D229/webimage-8A27671A-8A53-45DC-89D7BF8537F15A0D.png" /> </a> <div class="flex gap-4"> <a routerLink="/" routerLinkActive="font-bold" [routerLinkActiveOptions]="{exact: true}" class="text-blue-600 hover:underline"> All Restaurants </a> <a routerLink="/browse" routerLinkActive="font-bold" class="text-blue-600 hover:underline"> Filtered Restaurants </a> </div> </nav> <router-outlet></router-outlet> </div>
This is the main application component that includes navigation and renders the appropriate child components based on the current route.
Update your main file.
Navigate to the client/src/main.ts file and replace
the contents with the following code:
import 'zone.js'; import { bootstrapApplication } from '@angular/platform-browser'; import { appConfig } from './app/app.config'; import { AppComponent } from './app/app'; bootstrapApplication(AppComponent, appConfig) .catch((err) => console.error(err));
This file acts as the entry point to your application, and it applies and renders your configuration.
Run Your Application
Finally, follow the steps in this section to run your application and view the rendered restaurant data.
Run the client application.
In a separate terminal window, navigate to the client
directory. Run the following command to start the Angular front end:
ng serve
If successful, this command outputs the following information:
Application bundle generation complete. Watch mode enabled. Watching for file changes... NOTE: Raw file sizes do not reflect development server per-request transformations. ➜ Local: http://localhost:4200/ ➜ press h + enter to show help
Your Angular application makes HTTP requests from port 4200 to
port 5050 to retrieve data.
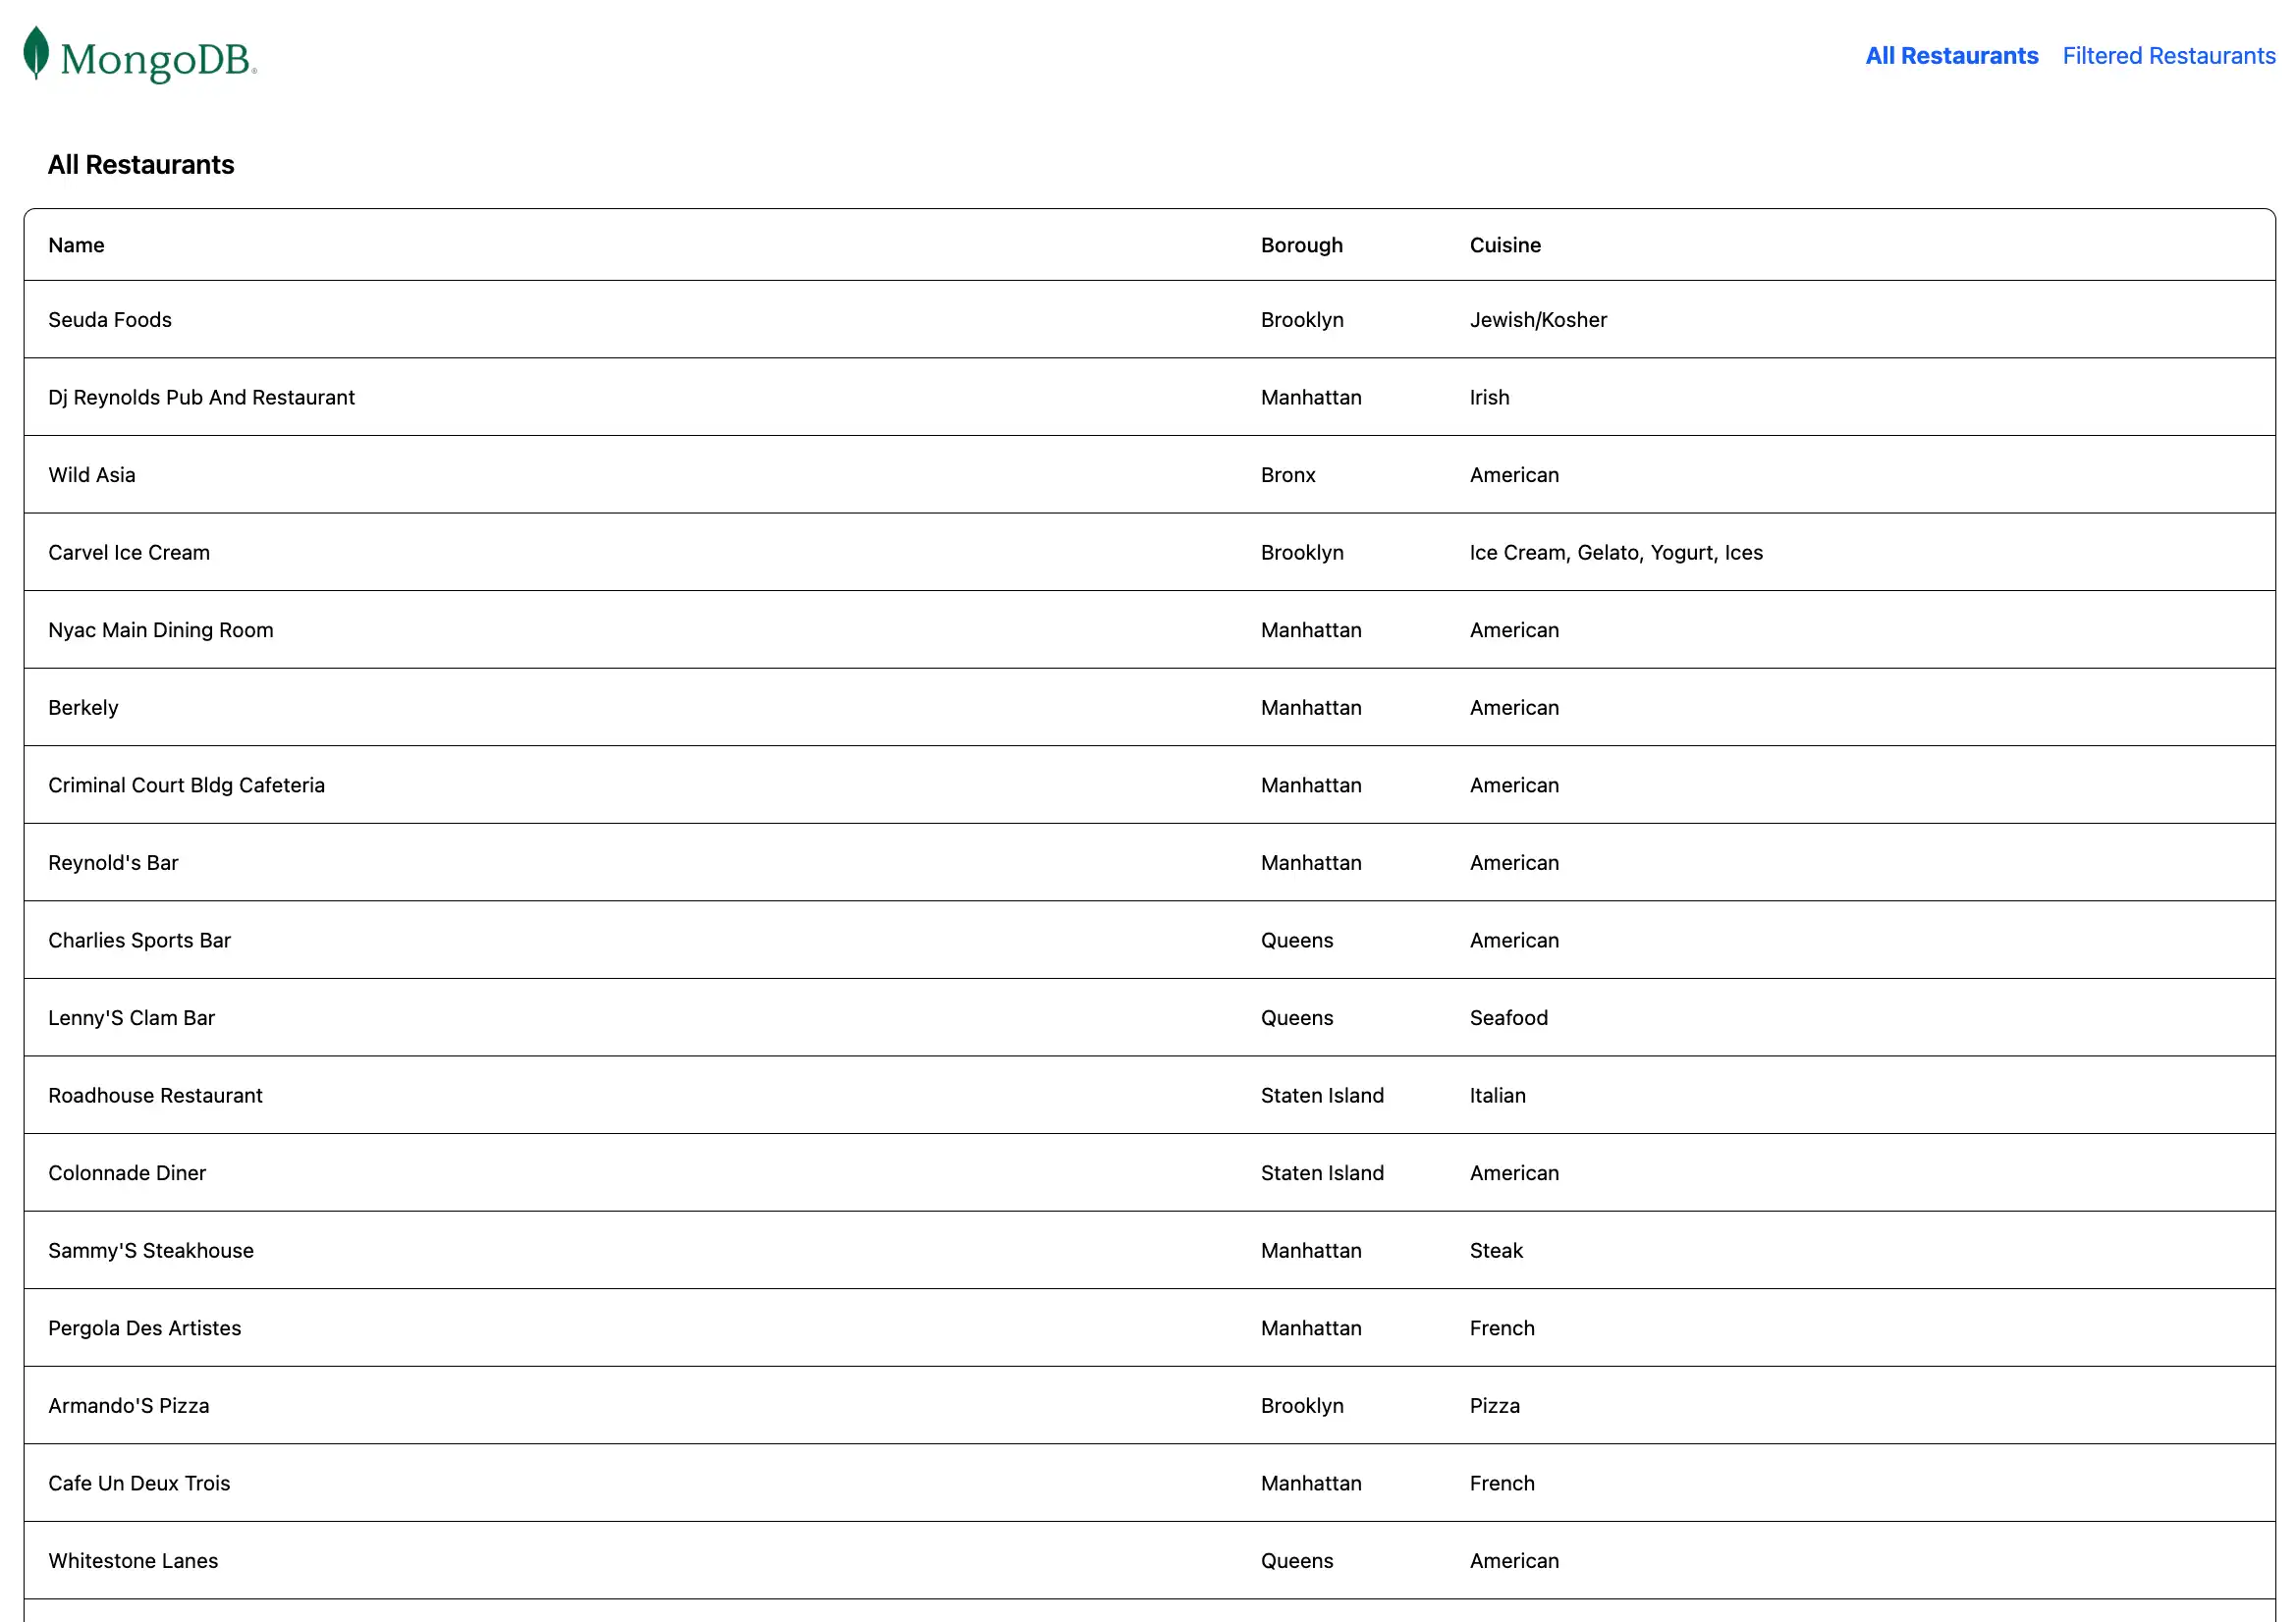
Open the application site.
Open the http://localhost:4200/ URL. The initial
landing page displays a list of all restaurants in the sample_restaurants.restaurants
collection:

Then, click the Filtered Restaurants link in the navigation bar
to view the restaurants that match the name and borough field query:

Congratulations on completing the Quick Start tutorial!
After you complete these steps, you have an Angular web application that connects to your MongoDB deployment, runs a query on sample restaurant data, and renders the results on a locally hosted website.
Additional Resources
To learn more about Angular, MongoDB, and the MEAN stack, view the following resources:
Angular documentation
Express documentation
Node.js driver documentation
What is the MEAN stack? article