Get Hyped: Synonyms in Atlas Search
Nic Raboy, Anaiya Raisinghani9 min read • Published Aug 03, 2021 • Updated Feb 27, 2023
Rate this tutorial
Sometimes, the word you’re looking for is on the tip of your tongue, but you can’t quite grasp it. For example, when you’re trying to find a really funny tweet you saw last night to show your friends. If you’re sitting there reading this and thinking, "Wow, Anaiya and Nic, you’re so right. I wish there was a fix for this," strap on in! We have just the solution for those days when your precise linguistic abilities fail you, but you have an idea of what you’re looking for: Synonyms in Atlas Search.
In this tutorial, we are going to be showing you how to index a MongoDB collection to capture searches for words that mean similar things. For the specifics, we’re going to search through content written with Generation Z (Gen-Z) slang. The slang will be mapped to common words with synonyms and as a result, you’ll get a quick Gen-Z lesson without having to ever open TikTok.
If you’re in the mood to learn a few new words, alongside how effortlessly synonym mappings can be integrated into Atlas Search, this is the tutorial for you.
There are a few requirements that must be met to be successful with this tutorial:
- MongoDB Atlas M0 (or higher) cluster running MongoDB version 4.4 (or higher)
- Node.js
- A Twitter developer account
We’ll be using Node.js to load our Twitter data, but a Twitter developer account is required for accessing the APIs that contain Tweets.
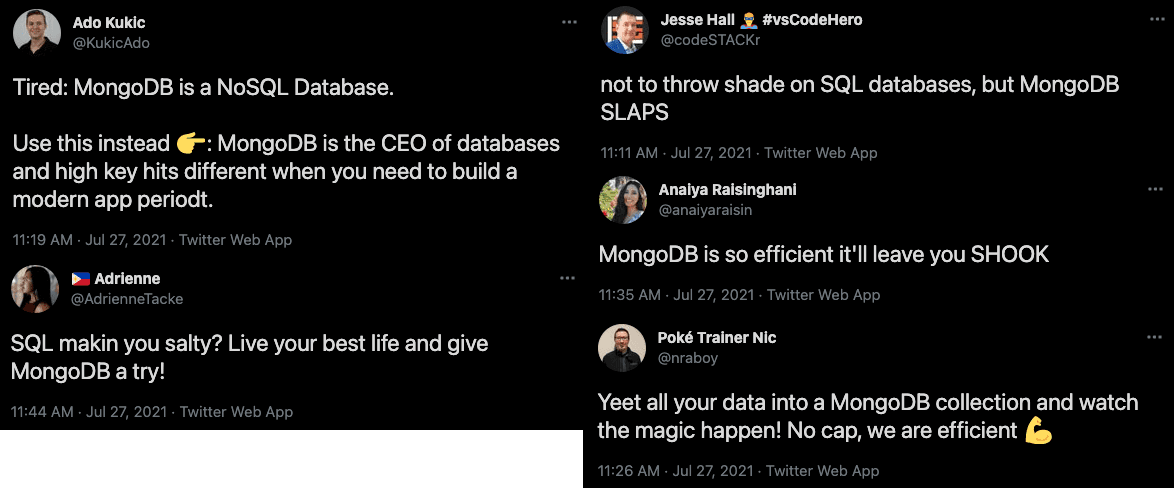
Before starting this section of the tutorial, you’re going to need to have your Twitter API Key and API Secret handy. These can both be generated from the Twitter Developer Portal.
The idea is that we want to store a bunch of tweets in MongoDB that contain Gen-Z slang that we can later make sense of using Atlas Search and properly defined synonyms. Each tweet will be stored as a single document within MongoDB and will look something like this:
1 { 2 "_id": 1420091624621629400, 3 "created_at": "Tue Jul 27 18:40:01 +0000 2021", 4 "id": 1420091624621629400, 5 "id_str": "1420091624621629443", 6 "full_text": "Don't settle for a cheugy database, choose MongoDB instead 💪", 7 "truncated": false, 8 "entities": { 9 "hashtags": [], 10 "symbols": [], 11 "user_mentions": [], 12 "urls": [] 13 }, 14 "metadata": { 15 "iso_language_code": "en", 16 "result_type": "recent" 17 }, 18 "source": "<a href=\"https://mobile.twitter.com\" rel=\"nofollow\">Twitter Web App</a>", 19 "in_reply_to_status_id": null, 20 "in_reply_to_status_id_str": null, 21 "in_reply_to_user_id": null, 22 "in_reply_to_user_id_str": null, 23 "in_reply_to_screen_name": null, 24 "user": { 25 "id": 1400935623238643700, 26 "id_str": "1400935623238643716", 27 "name": "Anaiya Raisinghani", 28 "screen_name": "anaiyaraisin", 29 "location": "", 30 "description": "Developer Advocacy Intern @MongoDB. Opinions are my own!", 31 "url": null, 32 "entities": { 33 "description": { 34 "urls": [] 35 } 36 }, 37 "protected": false, 38 "followers_count": 11, 39 "friends_count": 29, 40 "listed_count": 1, 41 "created_at": "Fri Jun 04 22:01:07 +0000 2021", 42 "favourites_count": 8, 43 "utc_offset": null, 44 "time_zone": null, 45 "geo_enabled": false, 46 "verified": false, 47 "statuses_count": 7, 48 "lang": null, 49 "contributors_enabled": false, 50 "is_translator": false, 51 "is_translation_enabled": false, 52 "profile_background_color": "F5F8FA", 53 "profile_background_image_url": null, 54 "profile_background_image_url_https": null, 55 "profile_background_tile": false, 56 "profile_image_url": "http://pbs.twimg.com/profile_images/1400935746593202176/-pgS_IUo_normal.jpg", 57 "profile_image_url_https": "https://pbs.twimg.com/profile_images/1400935746593202176/-pgS_IUo_normal.jpg", 58 "profile_banner_url": "https://pbs.twimg.com/profile_banners/1400935623238643716/1622845231", 59 "profile_link_color": "1DA1F2", 60 "profile_sidebar_border_color": "C0DEED", 61 "profile_sidebar_fill_color": "DDEEF6", 62 "profile_text_color": "333333", 63 "profile_use_background_image": true, 64 "has_extended_profile": true, 65 "default_profile": true, 66 "default_profile_image": false, 67 "following": null, 68 "follow_request_sent": null, 69 "notifications": null, 70 "translator_type": "none", 71 "withheld_in_countries": [] 72 }, 73 "geo": null, 74 "coordinates": null, 75 "place": null, 76 "contributors": null, 77 "is_quote_status": false, 78 "retweet_count": 0, 79 "favorite_count": 1, 80 "favorited": false, 81 "retweeted": false, 82 "lang": "en" 83 }
The above document model is more extravagant than we need. In reality, we’re only going to be paying attention to the
full_text field, but it’s still useful to know what exists for any given tweet.Now that we know what the document model is going to look like, we just need to consume it from Twitter.
We’re going to use two different Twitter APIs with our API Key and API Secret. The first API is the authentication API and it will give us our access token. With the access token we can get tweet data based on a Twitter query.
Since we’re using Node.js, we need to install our dependencies. Within a new directory on your computer, execute the following commands from the command line:
1 npm init -y 2 npm install mongodb axios --save
The above commands will create a new package.json file and install the MongoDB Node.js driver as well as Axios for making HTTP requests.
Take a look at the following Node.js code which can be added to a main.js file within your project:
1 const { MongoClient } = require("mongodb"); 2 const axios = require("axios"); 3 4 require("dotenv").config(); 5 6 const mongoClient = new MongoClient(process.env.MONGODB_URI); 7 8 (async () => { 9 try { 10 await mongoClient.connect(); 11 const tokenResponse = await axios({ 12 "method": "POST", 13 "url": "https://api.twitter.com/oauth2/token", 14 "headers": { 15 "Authorization": "Basic " + Buffer.from(`${process.env.API_KEY}:${process.env.API_SECRET}`).toString("base64"), 16 "Content-Type": "application/x-www-form-urlencoded" 17 }, 18 "data": "grant_type=client_credentials" 19 }); 20 const tweetResponse = await axios({ 21 "method": "GET", 22 "url": "https://api.twitter.com/1.1/search/tweets.json", 23 "headers": { 24 "Authorization": "Bearer " + tokenResponse.data.access_token 25 }, 26 "params": { 27 "q": "mongodb -filter:retweets filter:safe (from:codeSTACKr OR from:nraboy OR from:kukicado OR from:judy2k OR from:adriennetacke OR from:anaiyaraisin OR from:lauren_schaefer)", 28 "lang": "en", 29 "count": 100, 30 "tweet_mode": "extended" 31 } 32 }); 33 console.log(`Next Results: ${tweetResponse.data.search_metadata.next_results}`) 34 const collection = mongoClient.db(process.env.MONGODB_DATABASE).collection(process.env.MONGODB_COLLECTION); 35 tweetResponse.data.statuses = tweetResponse.data.statuses.map(status => { 36 status._id = status.id; 37 return status; 38 }); 39 const result = await collection.insertMany(tweetResponse.data.statuses); 40 console.log(result); 41 } finally { 42 await mongoClient.close(); 43 } 44 })();
There’s quite a bit happening in the above code so we’re going to break it down. However, before we break it down, it's important to note that we’re using environment variables for a lot of the sensitive information like tokens, usernames, and passwords. For security reasons, you really shouldn’t hard-code these values.
Inside the asynchronous function, we attempt to establish a connection to MongoDB. If successful, no error is thrown, and we make our first HTTP request.
1 const tokenResponse = await axios({ 2 "method": "POST", 3 "url": "https://api.twitter.com/oauth2/token", 4 "headers": { 5 "Authorization": "Basic " + Buffer.from(`${process.env.API_KEY}:${process.env.API_SECRET}`).toString("base64"), 6 "Content-Type": "application/x-www-form-urlencoded" 7 }, 8 "data": "grant_type=client_credentials" 9 });
Once again, in this first HTTP request, we are exchanging our API Key and API Secret with an access token to be used in future requests.
Using the access token from the response, we can make our second request to the tweets API endpoint:
1 const tweetResponse = await axios({ 2 "method": "GET", 3 "url": "https://api.twitter.com/1.1/search/tweets.json", 4 "headers": { 5 "Authorization": "Bearer " + tokenResponse.data.access_token 6 }, 7 "params": { 8 "q": "mongodb -filter:retweets filter:safe", 9 "lang": "en", 10 "count": 100, 11 "tweet_mode": "extended" 12 } 13 });
The tweets API endpoint expects a Twitter specific query and some other optional parameters like the language of the tweets or the expected result count. You can check the query language in the Twitter documentation.
At this point, we have an array of tweets to work with.
The next step is to pick the database and collection we plan to use and insert the array of tweets as documents. We can use a simple
insertMany operation like this:1 const result = await collection.insertMany(tweetResponse.data.statuses);
The
insertMany takes an array of objects, which we already have. We have an array of tweets, so each tweet will be inserted as a new document within the database.If you have the MongoDB shell handy, you can validate the data that was inserted by executing the following:
1 use("synonyms"); 2 db.tweets.find({ });
Now that there’s data to work with, we can start to search it using slang synonyms.
While we’re using a
tweets collection for our actual searchable data, the synonym information needs to exist in a separate source collection in the same database.You have two options for how you want your synonyms to be mapped–explicit or equivalent. You are not stuck with choosing just one type. You can have a combination of both explicit and equivalent as synonym documents in your collection. Choose the explicit format for when you need a set of terms to show up as a result of your inputted term, and choose equivalent if you want all terms to show up bidirectionally regardless of your queried term.
For example, the word "basic" means "regular" or "boring." If we decide on an explicit (one-way) mapping for "basic," we are telling Atlas Search that if someone searches for "basic," we want to return all documents that include the words "basic," "regular," and "boring." But! If we query the word "regular," we would not get any documents that include "basic" because "regular" is not explicitly mapped to "basic."
If we decide to map "basic" equivalently to "regular" and "boring," whenever we query any of these words, all the documents containing "basic," "regular," and "boring" will show up regardless of the initial queried word.
For our demo, we decided to make all of our synonyms equivalent and formatted our synonym data like this:
1 [ 2 { 3 "mappingType": "equivalent", 4 "synonyms": ["basic", "regular", "boring"] 5 }, 6 { 7 "mappingType": "equivalent", 8 "synonyms": ["bet", "agree", "concur"] 9 }, 10 { 11 "mappingType": "equivalent", 12 "synonyms": ["yikes", "embarrassing", "bad", "awkward"] 13 }, 14 { 15 "mappingType": "equivalent", 16 "synonyms": ["fam", "family", "friends"] 17 } 18 ]
Each object in the above array will exist as a separate document within MongoDB. Each of these documents contains information for a particular set of synonyms.
To insert your synonym documents into your MongoDB collection, you can use the ‘insertMany()’ MongoDB raw function to put all your documents into the collection of your choice.
1 use("synonyms"); 2 3 db.slang.insertMany([ 4 { 5 "mappingType": "equivalent", 6 "synonyms": ["basic", "regular", "boring"] 7 }, 8 { 9 "mappingType": "equivalent", 10 "synonyms": ["bet", "agree", "concur"] 11 } 12 ]);
The
use("synonyms"); line is to ensure you’re in the correct database before inserting your documents. We’re using the slang collection to store our synonyms and it doesn’t need to exist in our database prior to running our query.Once you have your collection of synonyms handy and uploaded, it's time to create your search index! A search index is crucial because it allows you to use full-text search to find the inputted queries in that collection.
We have included screenshots below of what your MongoDB Atlas Search user interface will look like so you can follow along:
The first step is to click on the "Search" tab, located on your cluster page in between the "Collections" and "Profiler" tabs.
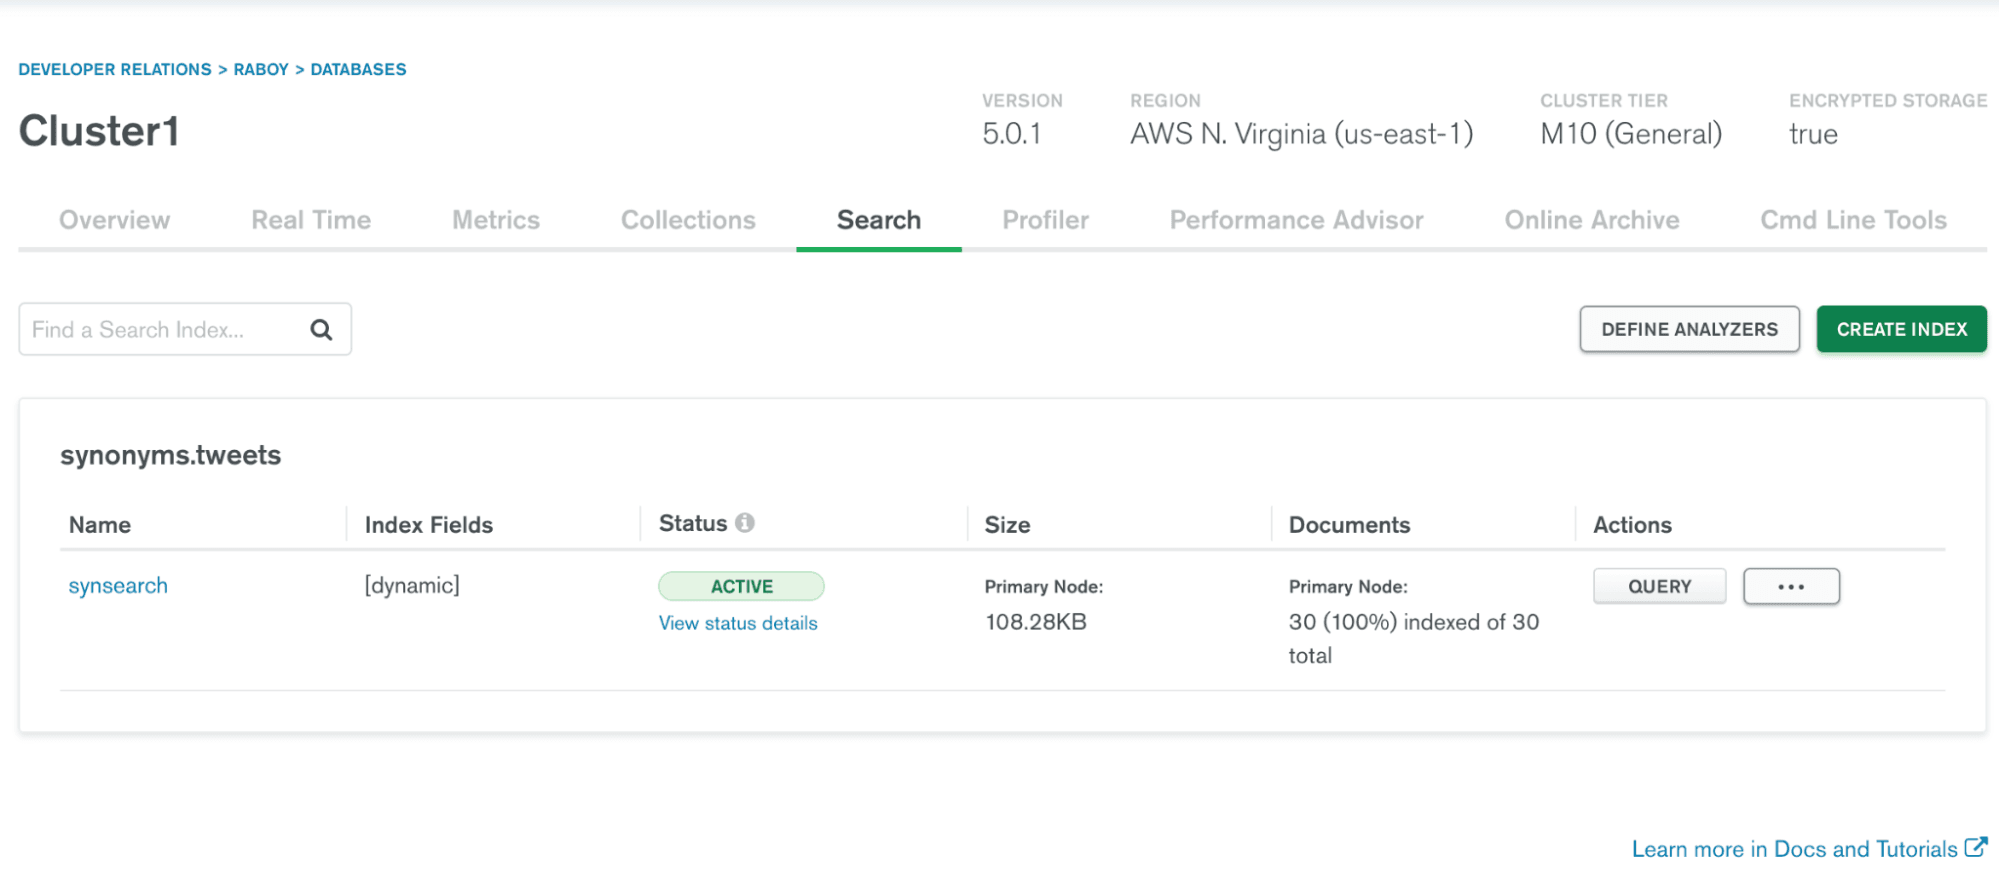
The second step is to click on the "Create Index" button in the upper right hand corner, or if this is your first Index, it will be located in the middle of the page.
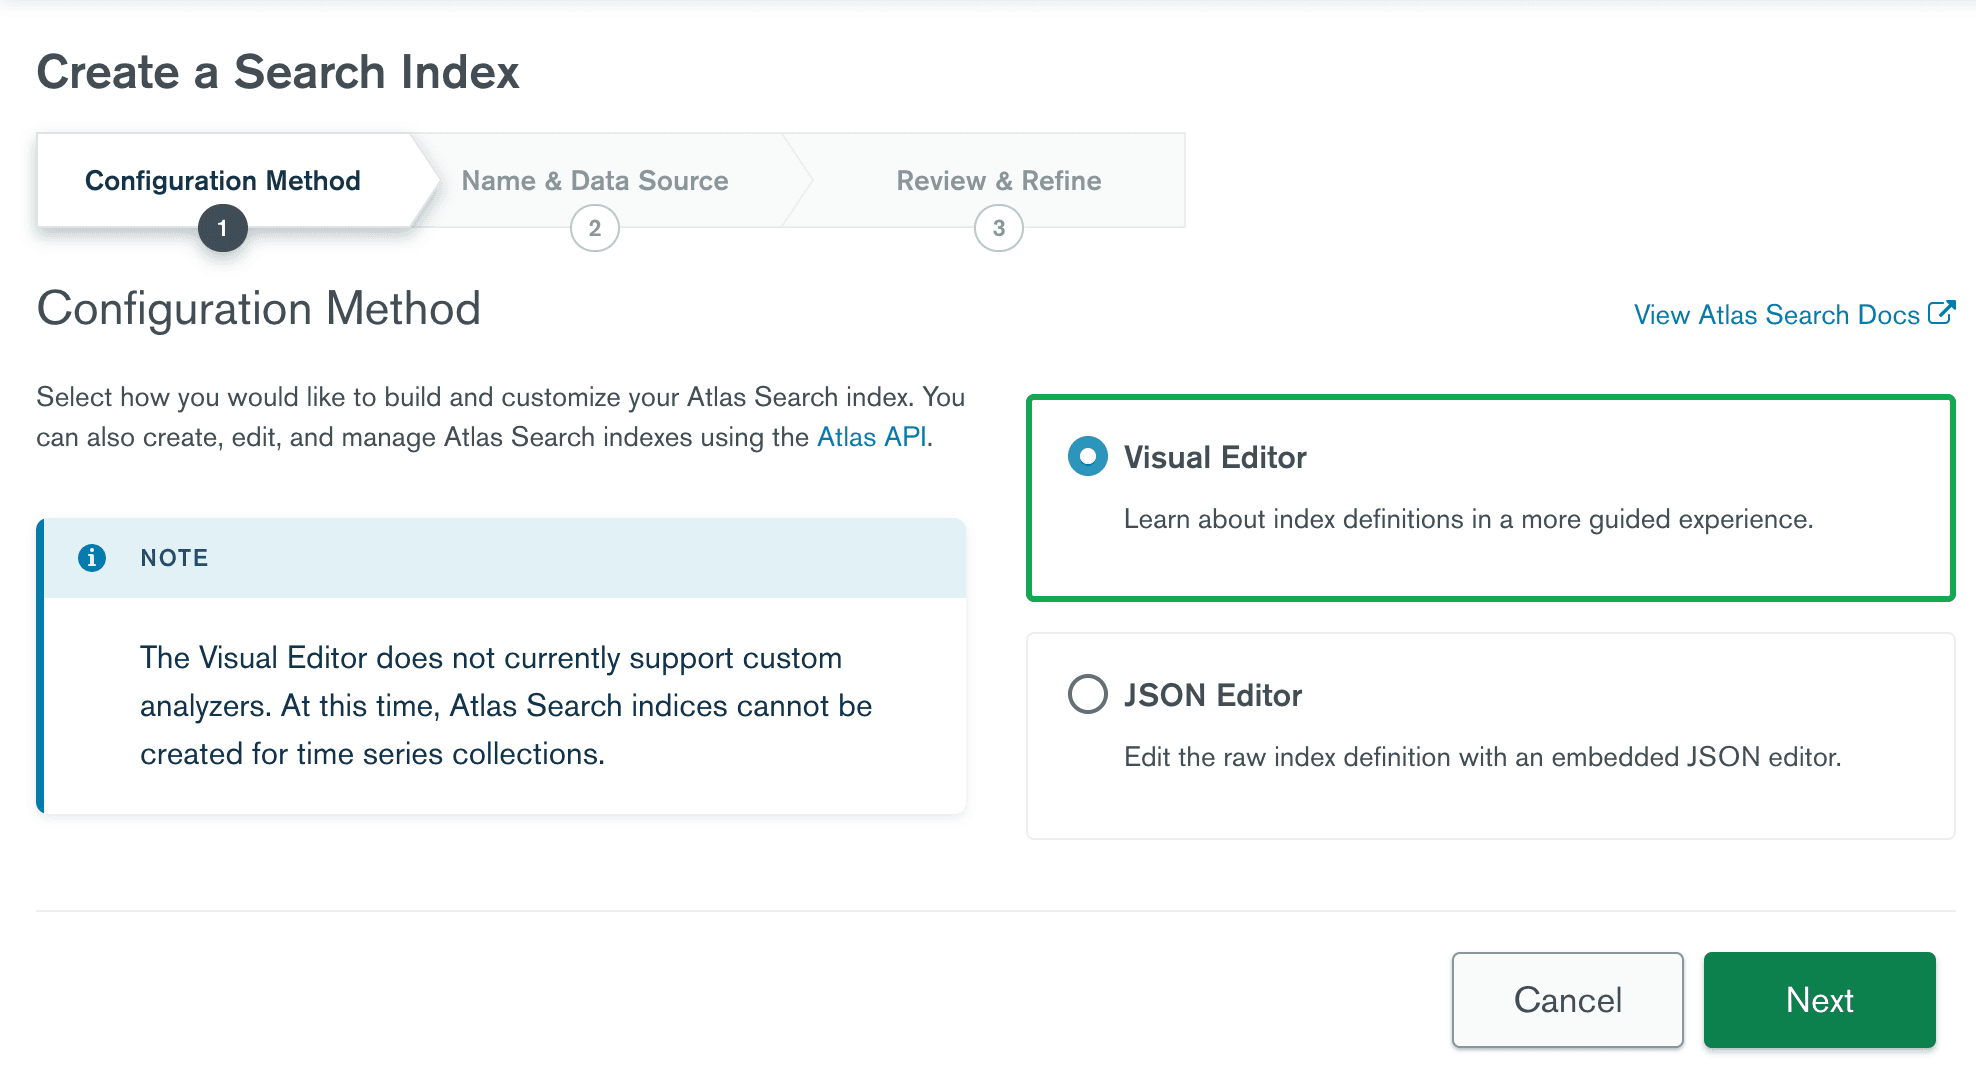
Once you reach this page, go ahead and click "Next" and continue on to the page where you will name your Index and set it all up!
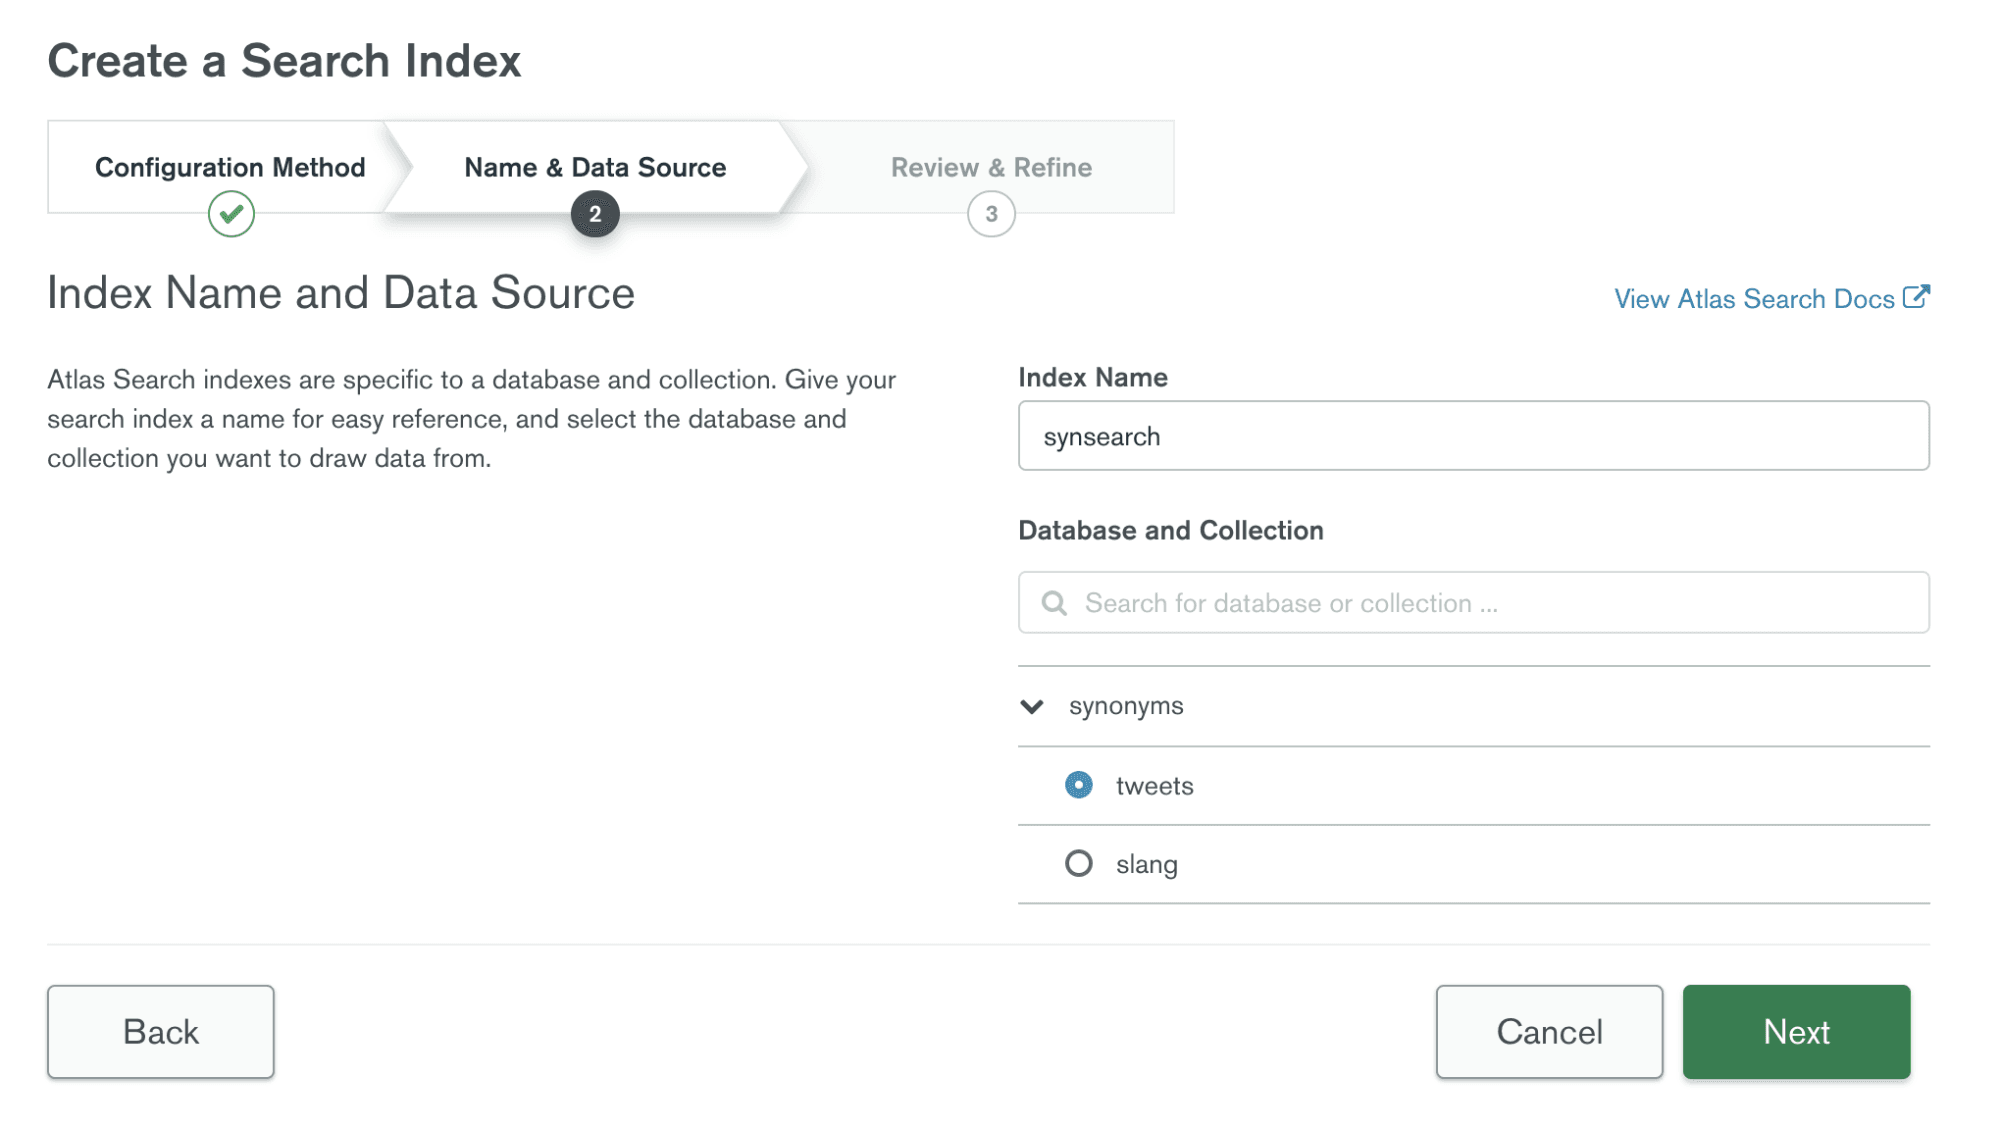
Click "Next" and you’ll be able to create your very own search index!
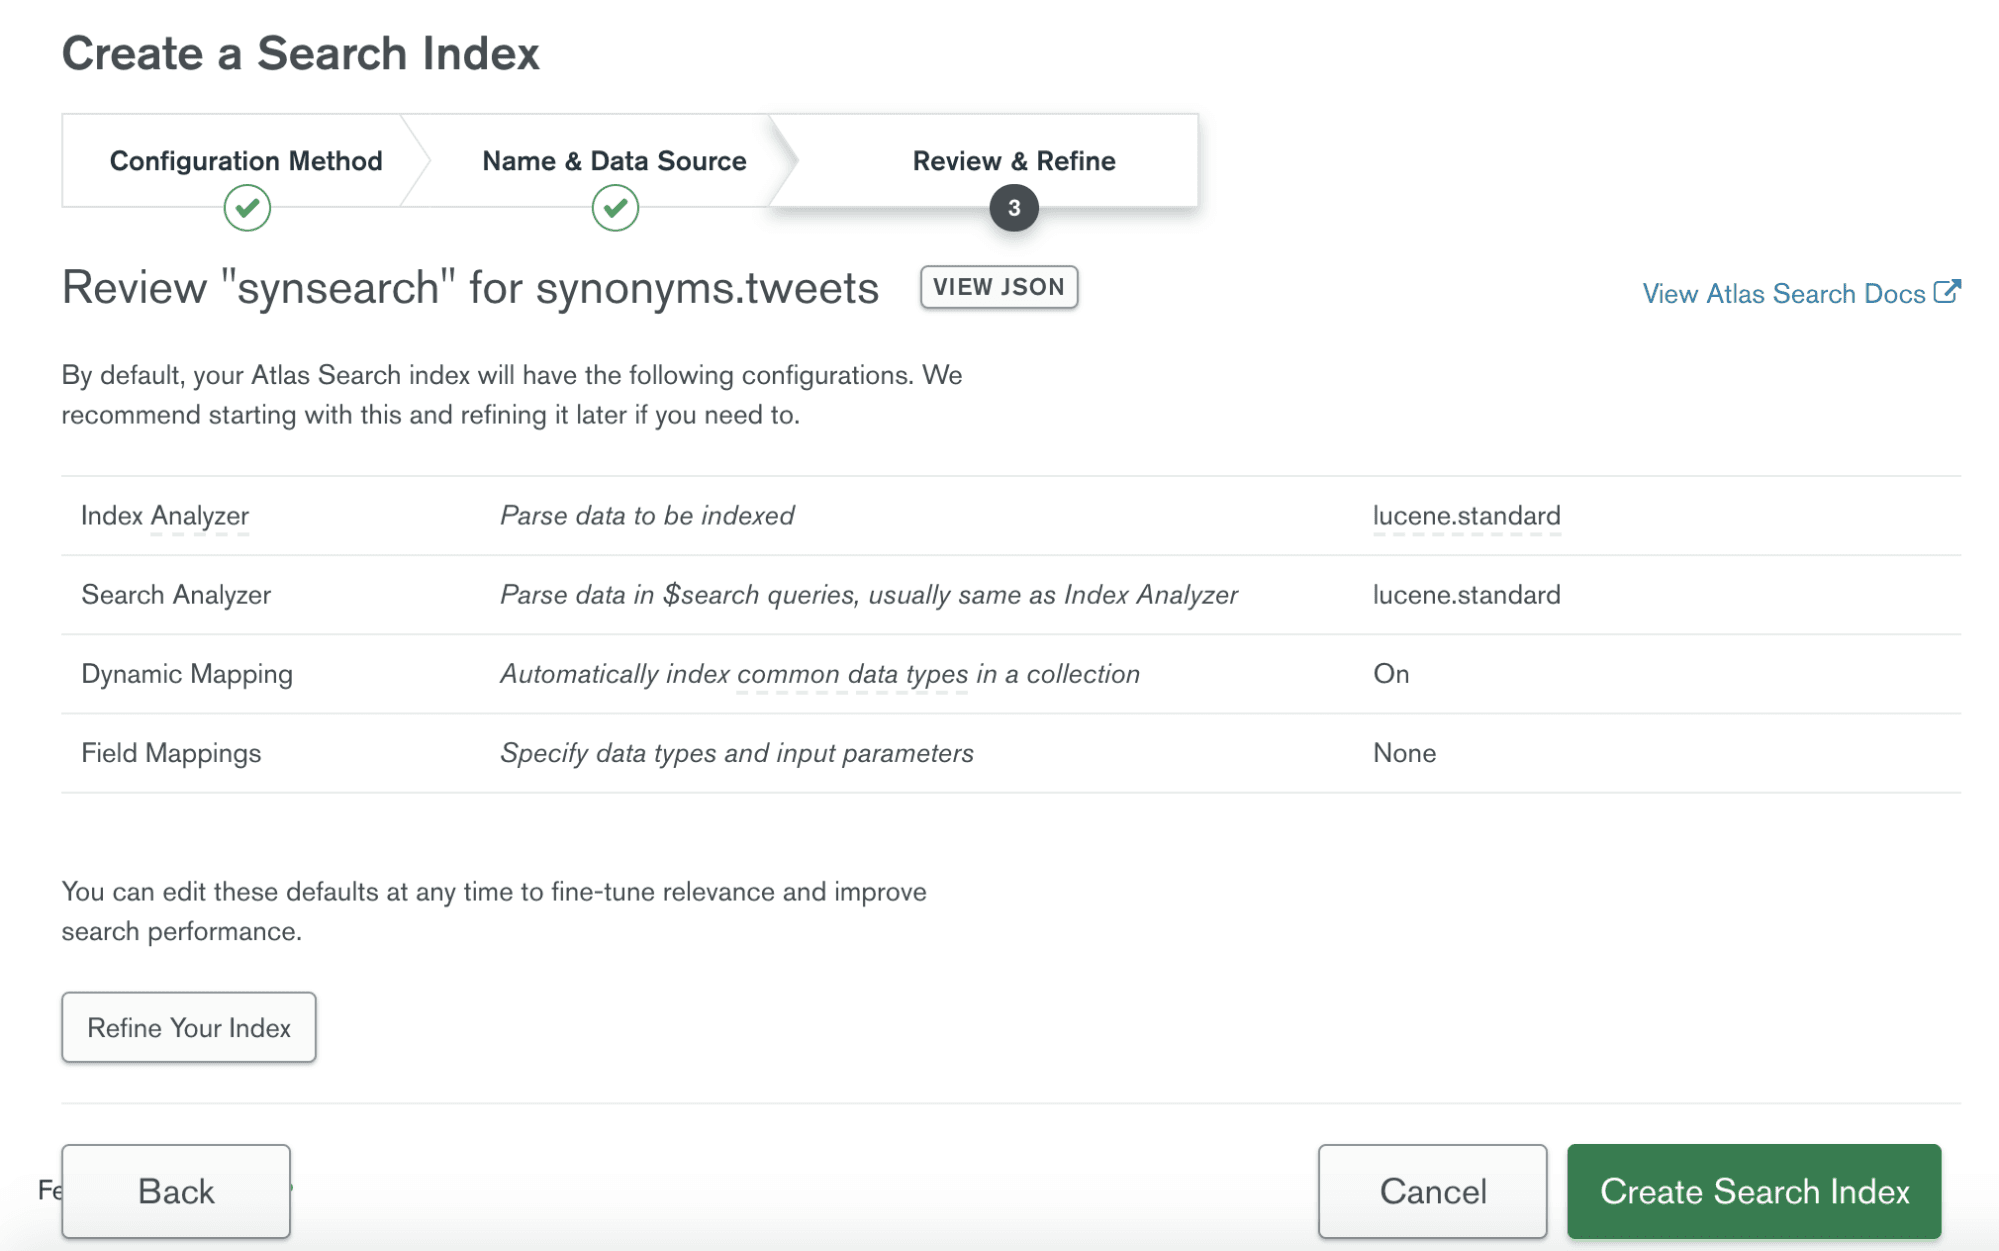
Once you create your search index, you can go back into it and then edit your index definition using the JSON editor to include what you need. The index we wrote for this tutorial is below:
1 { 2 "mappings": { 3 "dynamic": true 4 }, 5 "synonyms": [ 6 { 7 "analyzer": "lucene.standard", 8 "name": "slang", 9 "source": { 10 "collection": "slang" 11 } 12 } 13 ] 14 }
Let’s run through this!
1 { 2 "mappings": { 3 "dynamic": true 4 },
You have the option of choosing between dynamic and static for your search index, and this can be up to your discretion. To find more information on the difference between dynamic and static mappings, check out the documentation.
1 "synonyms": [ 2 { 3 "analyzer": "lucene.standard", 4 "name": "slang", 5 "source": { 6 "collection": "slang" 7 } 8 } 9 ]
This section refers to the synonyms associated with the search index. In this example, we’re giving this synonym mapping a name of "slang," and we’re using the default index analyzer on the synonym data, which can be found in the slang collection.
Our next step is to put together the search query that will actually filter through your tweet collection and find the tweets you want using synonyms!
The code we used for this part is below:
1 use("synonyms"); 2 3 db.tweets.aggregate([ 4 { 5 "$search": { 6 "index": "synsearch", 7 "text": { 8 "query": "throw", 9 "path": "full_text", 10 "synonyms": "slang" 11 } 12 } 13 } 14 ]);
We want to search through our tweets and find the documents containing synonyms for our query "throw." This is the synonym document for "throw":
1 { 2 "mappingType": "equivalent", 3 "synonyms": ["yeet", "throw", "agree"] 4 },
Remember to include the name of your search index from earlier (synsearch). Then, the query we’re specifying is "throw." This means we want to see tweets that include "yeet," "throw," and "agree" once we run this script.
The ‘path’ represents the field we want to search within, and in this case, we are searching for "throw" only within the ‘full_text’ field of the documents and no other field. Last but not least, we want to use synonyms found in the collection we have named "slang."
Based on this query, any matches found will include the entire document in the result-set. To better streamline this, we can use a
$project aggregation stage to specify the fields we’re interested in. This transforms our query into the following aggregation pipeline:1 db.tweets.aggregate([ 2 { 3 "$search": { 4 "index": "synsearch", 5 "text": { 6 "query": "throw", 7 "path": "full_text", 8 "synonyms": "slang" 9 } 10 } 11 }, 12 { 13 "$project": { 14 "_id": 1, 15 "full_text": 1, 16 "username": "$user.screen_name" 17 } 18 } 19 ]);
And these are our results!
1 [ 2 { 3 "_id": 1420084484922347500, 4 "full_text": "not to throw shade on SQL databases, but MongoDB SLAPS", 5 "username": "codeSTACKr" 6 }, 7 { 8 "_id": 1420088203499884500, 9 "full_text": "Yeet all your data into a MongoDB collection and watch the magic happen! No cap, we are efficient 💪", 10 "username": "nraboy" 11 } 12 ]
Just as we wanted, we have tweets that include the word "throw" and the word "yeet!"
We’ve accomplished a ton in this tutorial, and we hope you’ve enjoyed following along. Now, you are set with the knowledge to load in data from external sources, create your list of explicit or equivalent synonyms and insert it into a collection, and write your own index search script. Synonyms can be useful in a multitude of ways, not just isolated to Gen-Z slang. From figuring out regional variations (e.g., soda = pop), to finding typos that cannot be easily caught with autocomplete, incorporating synonyms will help save you time and a thesaurus.
Using synonyms in Atlas Search will improve your app’s search functionality and will allow you to find the data you’re looking for, even when you can’t quite put your finger on it.
If you want to take a look at the code, queries, and indexes used in this blog post, check out the project on GitHub. If you want to learn more about synonyms in Atlas Search, check out the documentation.
If you have questions, please head to our developer community website where the MongoDB engineers and the MongoDB community will help you build your next big idea with MongoDB.