Overview
The Java driver is a synchronous API that you can use to interact with MongoDB from your Java application. This guide shows you how to create an application that uses the Java driver to connect to a MongoDB cluster hosted on MongoDB Atlas and query data in your cluster.
Tip
MongoDB Atlas is a fully managed cloud database service that hosts your MongoDB deployments. You can create your own free (no credit card required) MongoDB Atlas deployment by following the steps in this guide.
Follow this tutorial to connect a sample Java application to a MongoDB Atlas deployment. The tutorial includes the following sections:
Download and Install: Learn how to install the Java driver.
Create a MongoDB Deployment: Learn how to create a free MongoDB deployment on Atlas.
Create a Connection String: Learn how to retrieve your Atlas deployment's connection string.
Create a MongoClient: Learn how to create an application that connects to MongoDB and queries data stored in your deployment.
If you prefer to connect to MongoDB using a different driver or programming language, see our list of official drivers.
Download and Install
Complete the following steps to install the Java driver and its dependencies in your development environment.
Install the driver dependencies.
Before you begin this tutorial, ensure that you install the following dependencies:
JDK version 8 or later
Integrated development environment (IDE), such as IntelliJ IDEA or Eclipse
Note
This tutorial shows how to install the Java driver by using Maven or Gradle in an IDE. If you do not use an IDE, visit Building Maven or Creating New Gradle Builds to learn how to set up your project.
Add the Java driver Bill of Materials.
In your IDE, create a new Maven or Gradle project. Add the Bill of Materials (BOM) for MongoDB JVM artifacts to your project to organize dependency versions. The BOM simplifies dependency management by ensuring that you maintain consistent and compatible versions of dependencies, such as between the Java driver and the core driver library. Use the BOM to avoid version conflicts and simplify upgrades.
Select from the following Maven and Gradle tabs to view instructions for adding the BOM for each dependency manager:
Add the following code to the dependencyManagement list in your
pom.xml file:
<dependencyManagement> <dependencies> <dependency> <groupId>org.mongodb</groupId> <artifactId>mongodb-driver-bom</artifactId> <version>5.7.0</version> <type>pom</type> <scope>import</scope> </dependency> </dependencies> </dependencyManagement>
Add the following code to the dependencies list in your
build.gradle.kts file. The code examples in this guide use the
Kotlin domain-specific language (DSL) for Gradle:
dependencies { implementation(platform("org.mongodb:mongodb-driver-bom:5.7.0")) }
To view a list of dependencies that the BOM manages, see the mongodb-driver-bom dependency listing on the Maven Repository website.
Install the Java driver.
If you use Maven, add the following code to your pom.xml dependencies list:
<dependencies> ... <dependency> <groupId>org.mongodb</groupId> <artifactId>mongodb-driver-sync</artifactId> </dependency> </dependencies>
If you use Gradle, add the following code to your build.gradle.kts dependencies list:
dependencies { ... implementation("org.mongodb:mongodb-driver-sync") }
Because you installed the BOM, you can omit a version in the Java driver dependency entry. The version you specify in the BOM determines the dependency versions to install.
After you configure your dependencies, ensure they are available to your project by running your dependency manager and refreshing the project in your IDE.
After you complete these steps, you have a new project and the driver dependencies installed.
Create a MongoDB Deployment
You can create a free tier MongoDB deployment on MongoDB Atlas to store and manage your data. MongoDB Atlas hosts and manages your MongoDB database in the cloud.
Create a free MongoDB deployment on Atlas.
Complete the MongoDB Get Started guide to set up a new Atlas account and a free tier MongoDB deployment. Ensure that you load sample data and add your IP address to the IP access list.
After you complete these steps, you have a new free tier MongoDB deployment on Atlas, database user credentials, and sample data loaded in your database.
Create a Connection String
You can connect to your MongoDB deployment by providing a connection URI, also called a connection string, which instructs the driver on how to connect to a MongoDB deployment and how to behave while connected.
The connection string includes the hostname or IP address and port of your deployment, the authentication mechanism, user credentials when applicable, and connection options.
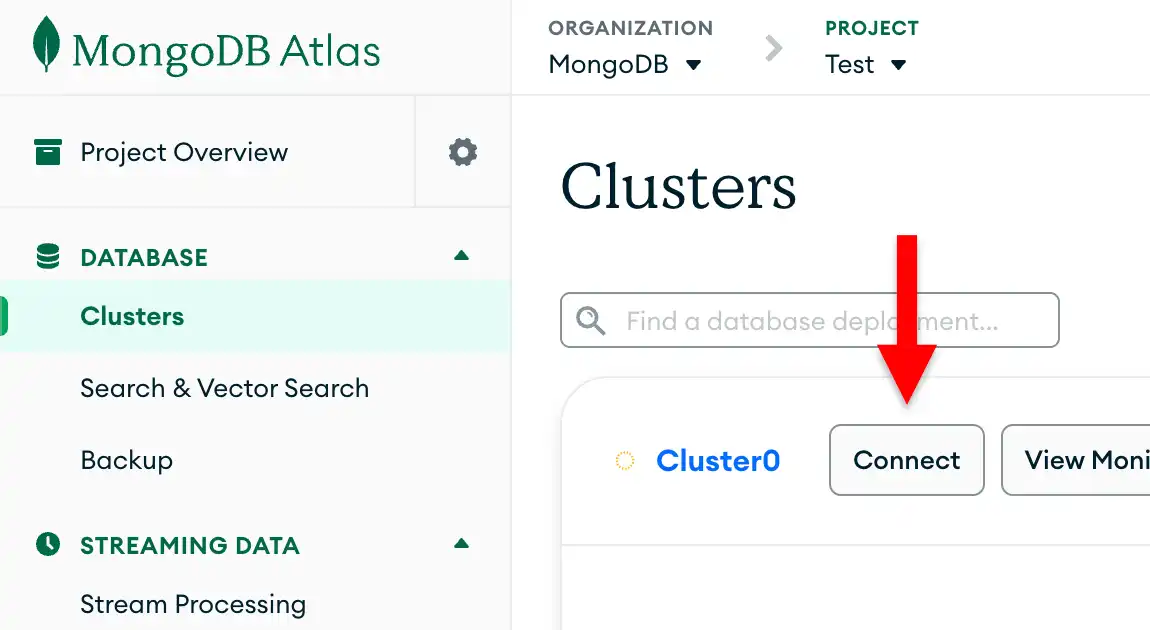
Find your MongoDB Atlas connection string.
To retrieve your connection string for the deployment that you created in the previous step, log into your Atlas account and navigate to the Clusters page under the Database section. Click the Connect button for your new deployment.

If you do not already have a database user configured, MongoDB will prompt you to create and configure a new user.
Click the Drivers button under Connect to your application and select "Java" from the Driver selection menu and the version that best matches the version you installed from the Version selection menu.
Ensure the View full code sample option is deselected to view only the connection string.

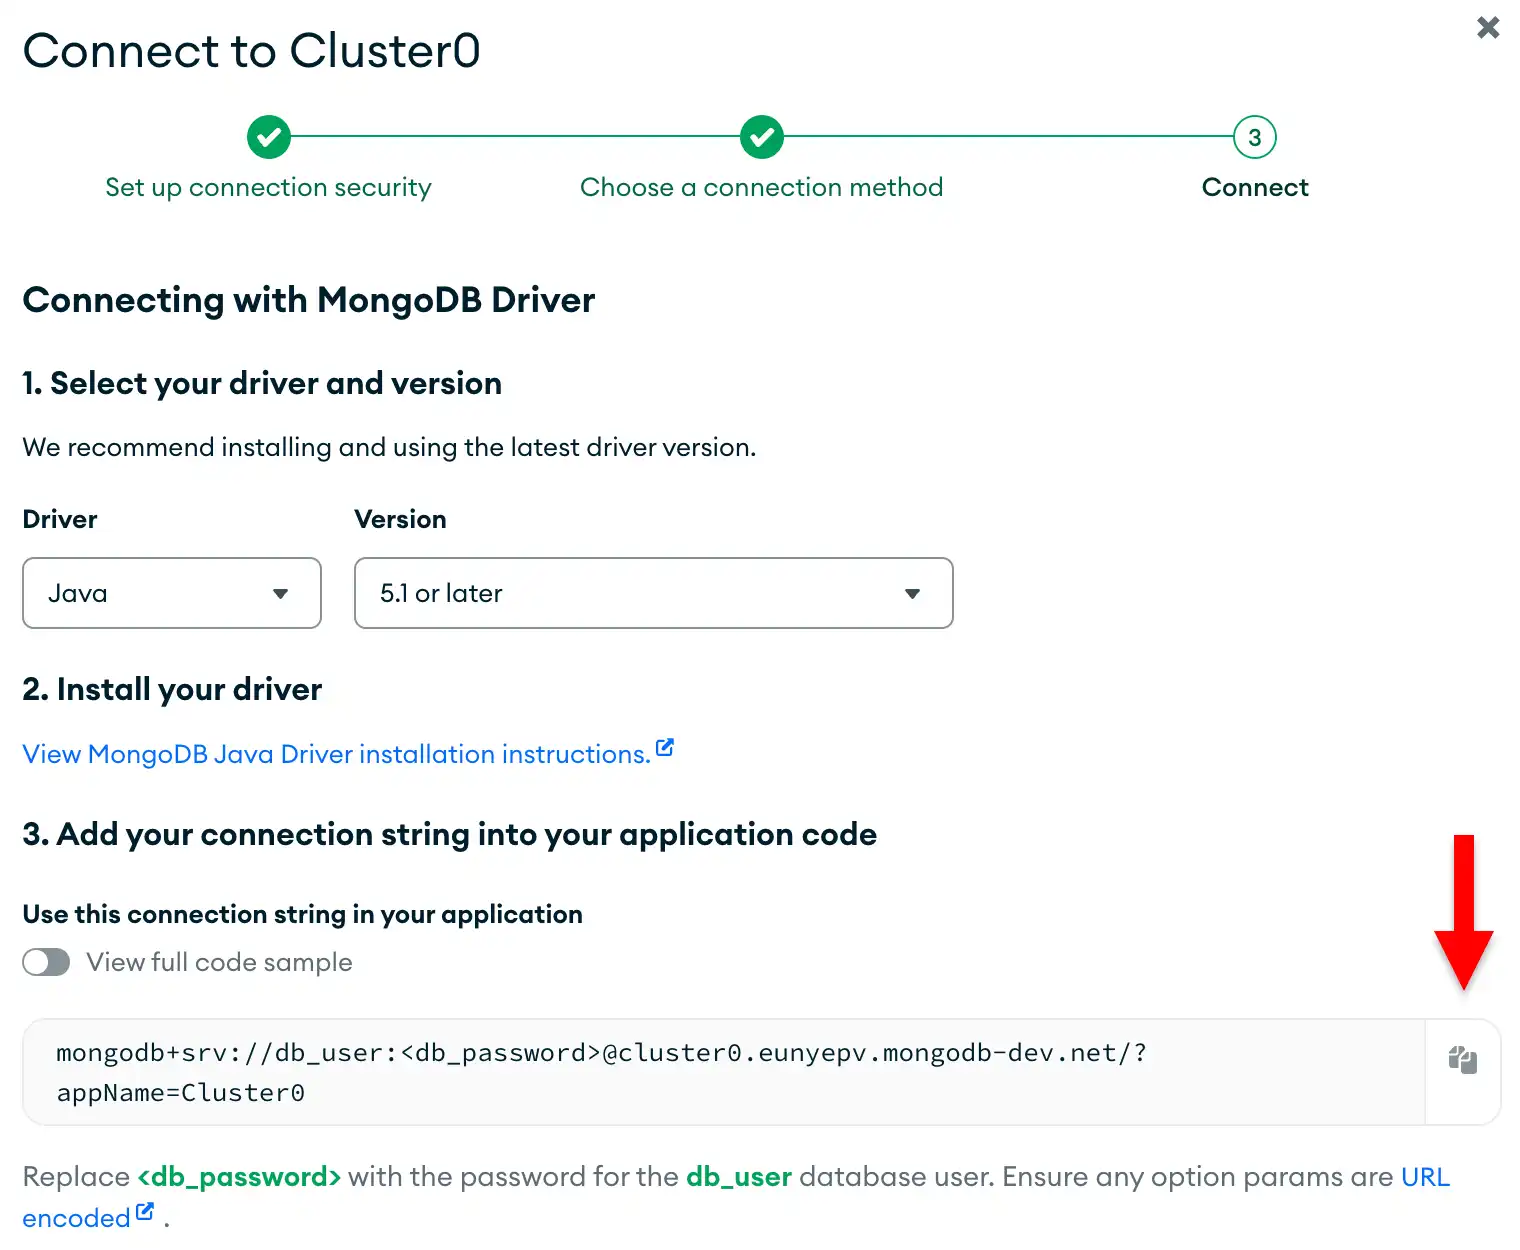
Update the password placeholder.
Paste this connection string into a file in your preferred text editor
and replace the <db_password> placeholder with your database user's
password. The connection string is already populated with your database
user's username.
Save this file to a safe location for use in the next step.
After completing these steps, you have a connection string that contains your database username and password.
Run a Sample Query
After retrieving the connection string for your MongoDB Atlas deployment, you can connect to the deployment from your Java application and query the Atlas sample datasets.
Create your Java application file.
In your project's base package directory, create a file called
QuickStart.java. Copy and paste the following code into this file,
which queries the movies collection in the sample_mflix database:
import static com.mongodb.client.model.Filters.eq; import org.bson.Document; import com.mongodb.client.MongoClient; import com.mongodb.client.MongoClients; import com.mongodb.client.MongoCollection; import com.mongodb.client.MongoDatabase; public class QuickStart { public static void main( String[] args ) { // Replace the placeholder with your MongoDB deployment's connection string String uri = "<connection string uri>"; try (MongoClient mongoClient = MongoClients.create(uri)) { MongoDatabase database = mongoClient.getDatabase("sample_mflix"); MongoCollection<Document> collection = database.getCollection("movies"); Document doc = collection.find(eq("title", "Back to the Future")).first(); if (doc != null) { System.out.println(doc.toJson()); } else { System.out.println("No matching documents found."); } } } }
Assign the connection string.
Replace the <connection string uri> placeholder with the connection string
that you copied from the Create a Connection String step of this
guide.
Run your Java application.
Run your application in your IDE or your shell. Your output contains details about the retrieved movie document:
{ _id: ..., plot: 'A young man is accidentally sent 30 years into the past...', genres: [ 'Adventure', 'Comedy', 'Sci-Fi' ], ... title: 'Back to the Future', ... }
If you encounter an error or see no output, ensure that you specified the correct connection string and that you loaded the sample data.
Important
TLS v1.3 Connection Error
If your application generates an error that resembles the following code, you might need to update your JDK to the latest patch release:
javax.net.ssl.SSLHandshakeException: extension (5) should not be presented in certificate_request
This exception is a known issue when using the TLS 1.3 protocol with some JDK versions. To resolve the error, update your JDK to one of the following versions, or a newer version:
JDK 11.0.7
JDK 13.0.3
JDK 14.0.2
After you complete these steps, you have a Java application that connects to your MongoDB deployment, runs a query on the sample data, and returns a matching document.
Next Steps
Congratulations on completing the tutorial!
Note
If you run into issues on this step, submit feedback by using the Rate this page tab on the right or bottom right side of this page.
You can find support for general questions by using the MongoDB Stack Overflow tag or the MongoDB Reddit community.
In this tutorial, you created a Java driver application that connects to a MongoDB deployment hosted on MongoDB Atlas and retrieves a document that matches a query.
You can continue to develop your sample application by visiting the following guides:
Databases and Collections: Learn more about interacting with MongoDB databases and collections.
Third-Party Integrations: Learn about the third-party integrations that you can use with the Java driver.