Welcome to the “Exercise Tracker: MERN” tutorial.
The MERN stack is a popular stack of technologies for building a modern single-page application. In this tutorial, you will learn the MERN stack by building an exercise tracker.
The MERN stack consists of the following technologies:
- MongoDB: A document-based database.
- Express: A web application framework for Node.js.
- React: A JavaScript front-end library for building user interfaces.
- Node.js: JavaScript run-time environment that executes JavaScript code outside of a browser (such as a server).
It is also common to use Mongoose, which is a simple, schema-based solution to model application data.
We’ll be hosting our database in the cloud using MongoDB Atlas and Google Cloud Platform, although these instructions will work pretty much without modification on Amazon Web Services and Microsoft Azure.
The plan for the tutorial is as follows:
- First we’ll review MongoDB and create a MongoDB Atlas account
- Then we’ll code the app
MongoDB Overview
In the tabular, or relational world, we think of things like databases, tables and rows. MongoDB has similar concepts that use different terms (see the table below).
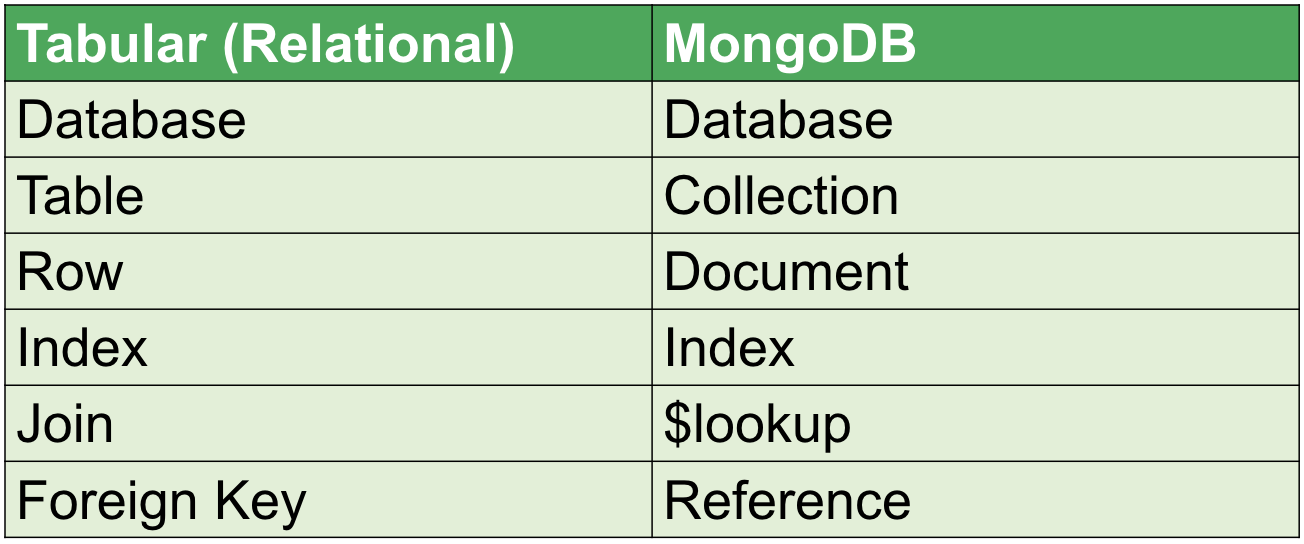
Instead of tables, in MongoDB we have collections. Instead of rows, we have documents. We can do JOIN operations with the $lookup operator. And instead of foreign keys we utilize references.
MongoDB is very well suited for handling data with a wide variety of relationships. Let’s have a quick look at the document model to see.
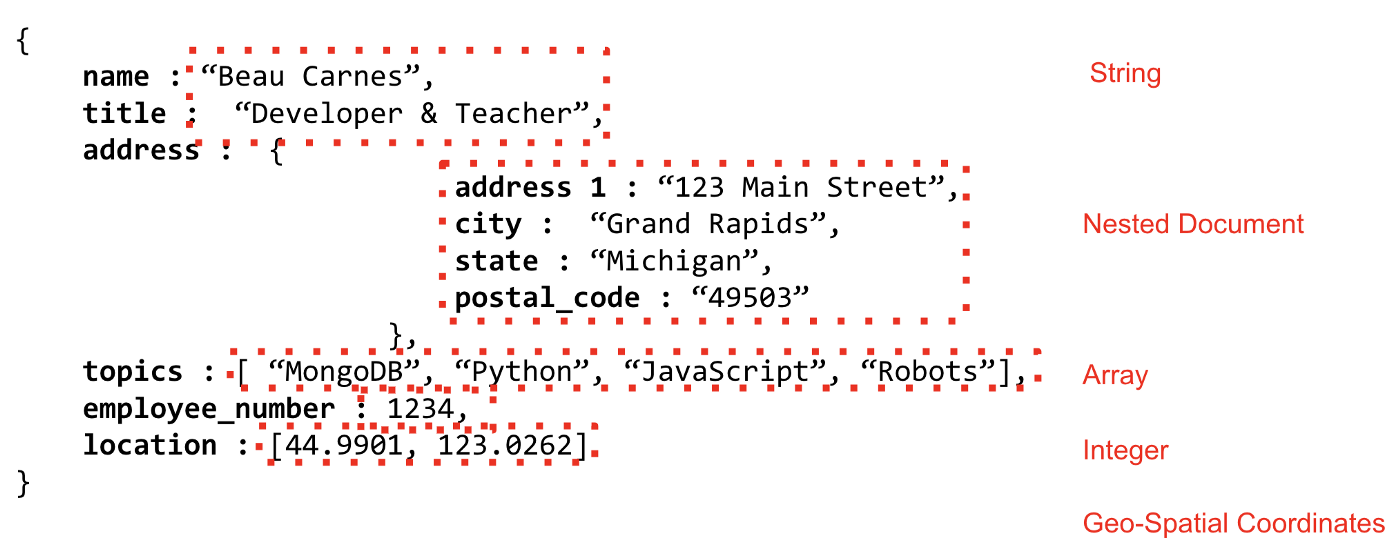
MongoDB stores data on disk in BSON, or Binary JSON. This provides a wide variety of support for data types, far beyond those supported by JSON, like Decimal128, ISODates, and more. BSON is powerful, but it is important to realize that this is internal to MongoDB: creating a MERN stack app, you only need to think in JSON.
The document model allows for nesting documents inside each other. These sub-documents are one of the great things about the document model. It allows us to apply the concept of “Data that’s accessed together is stored together" to our application.
We also have the ability to store information inside arrays, which is another powerful feature of the document model.
These documents are JSON structured objects. Which is how most modern developers think of things. A person is an object that has various attributes, like a job title, address, etc.
This allows modern development practices to use the document model in a very intuitive way without having to break the data apart to put it into tables and "normalize" things.
MongoDB Atlas
You can host your MongoDB database locally but I’ve found that it is easier to host the database using MongoDB Atlas.
We will be using the free tier on MongoDB Atlas in this tutorial. The first step is to make an account at the MongoDB Atlas website.
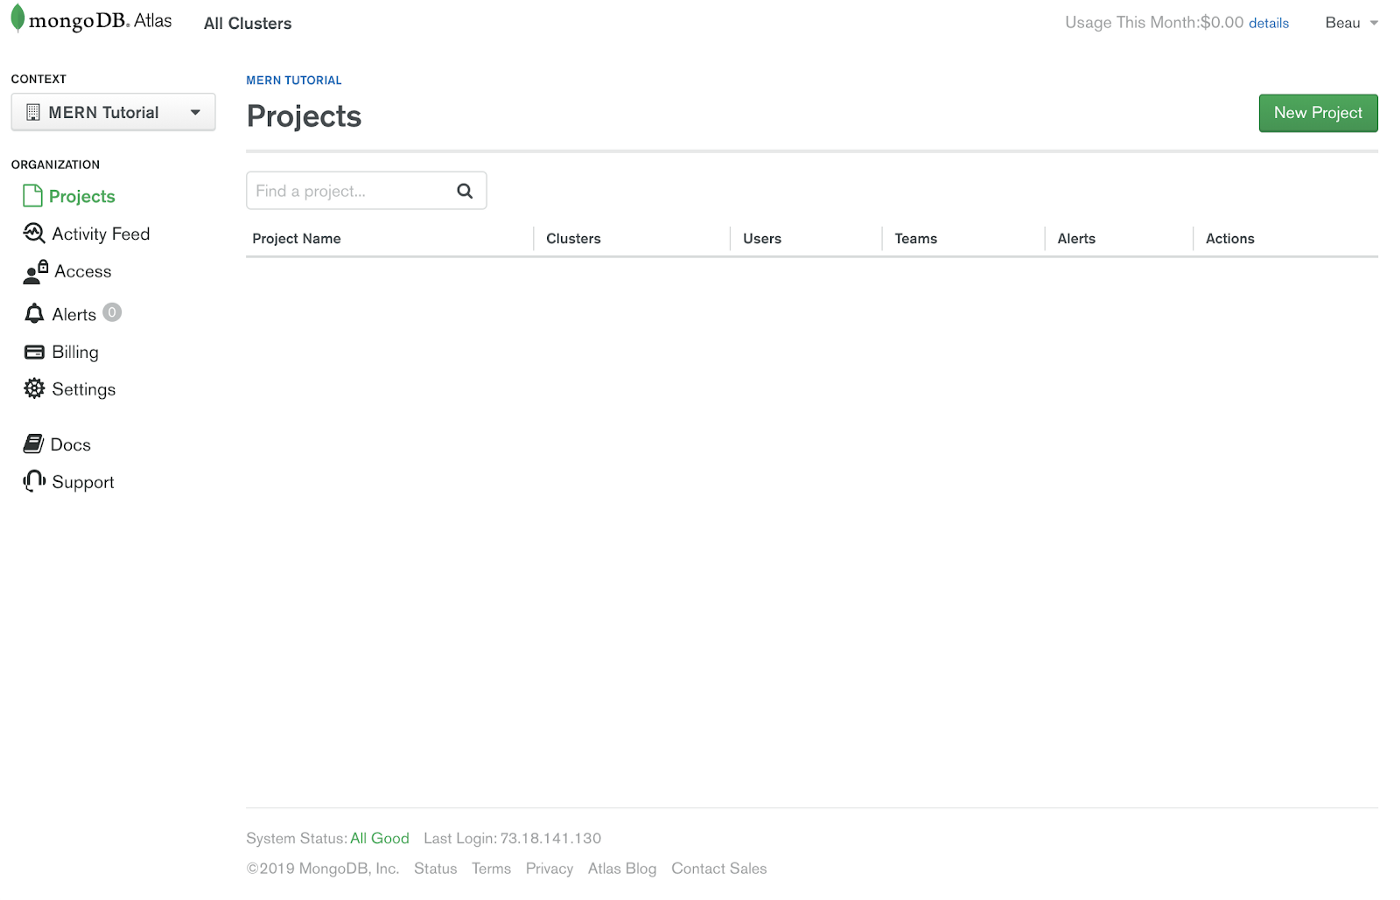
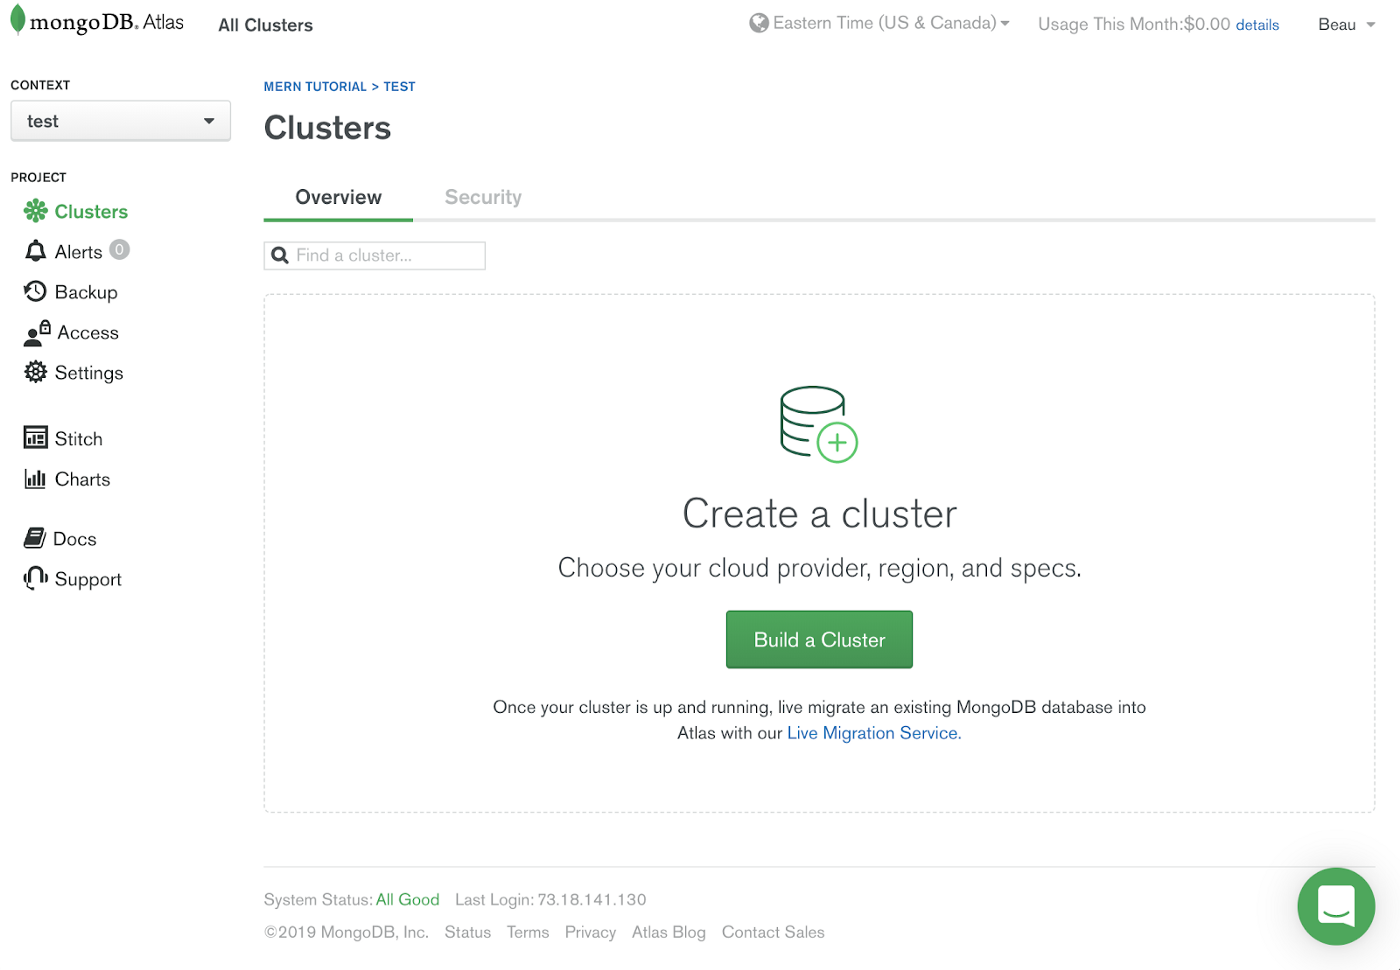
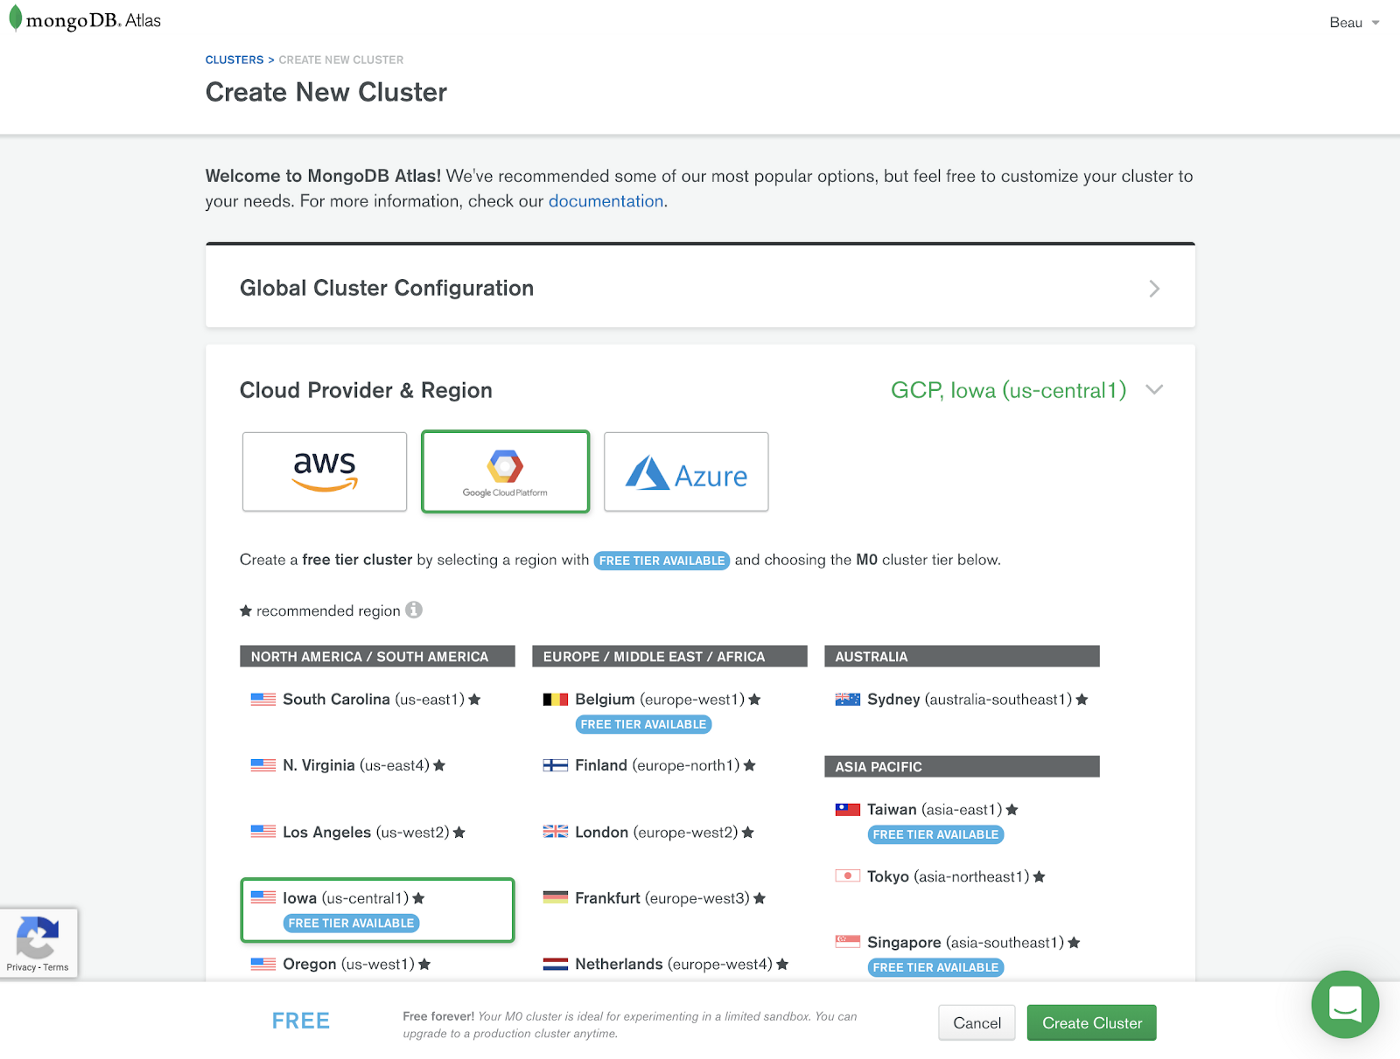
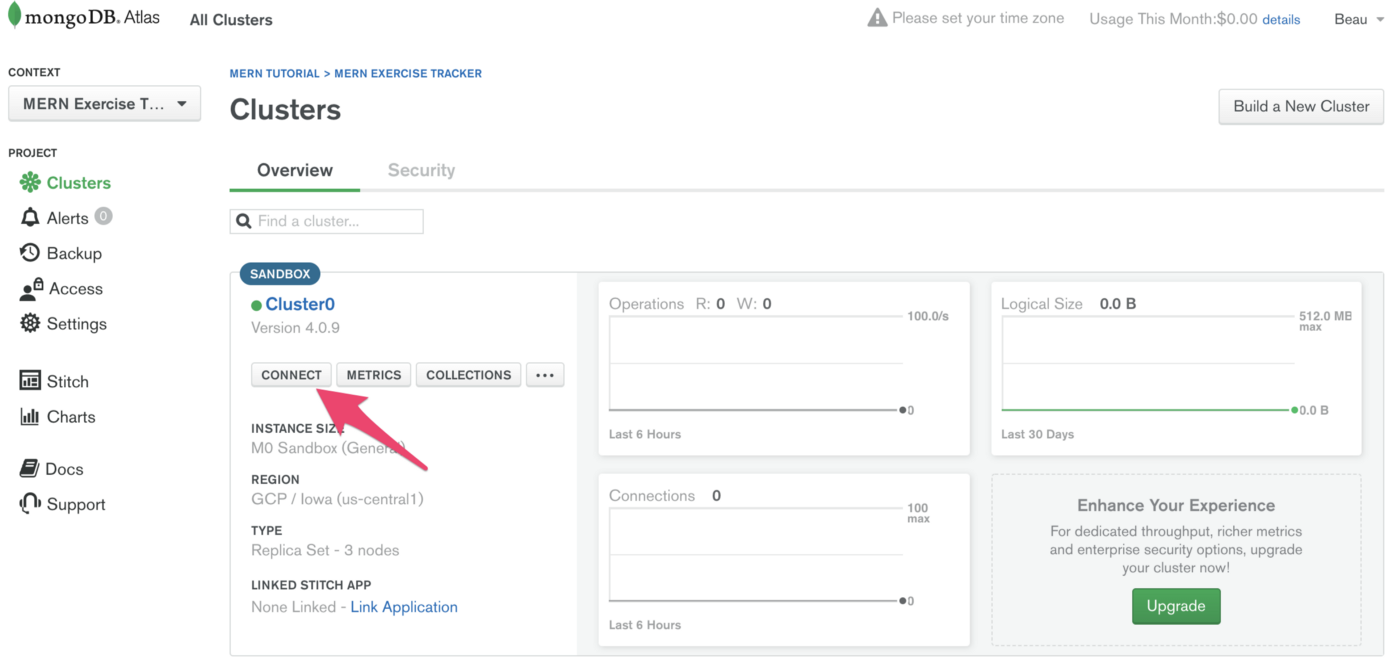
After you get logged in, click the green button to create a new project and then the green button to build a new cluster. The following screenshots show what the screens should look like.
The first step to configure the new cluster is to choose your Cloud Provider, the zone or region you want your data to be stored in.
Notice that some of the regions offer a Free Tier which is great for a sandbox environment.
After the cluster is created, you will have to configure your security. The two things we are required to setup from a security standpoint are IP Whitelist addresses and a database user. For the IP Whitelist, just add your current IP address.
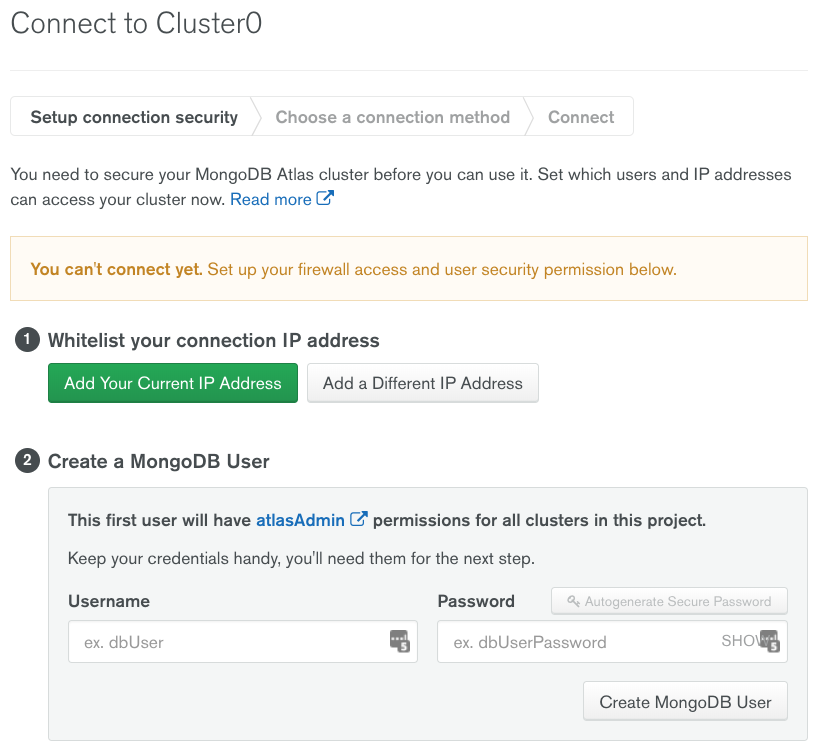
Once those steps have been completed, we can move on and get our connection information.
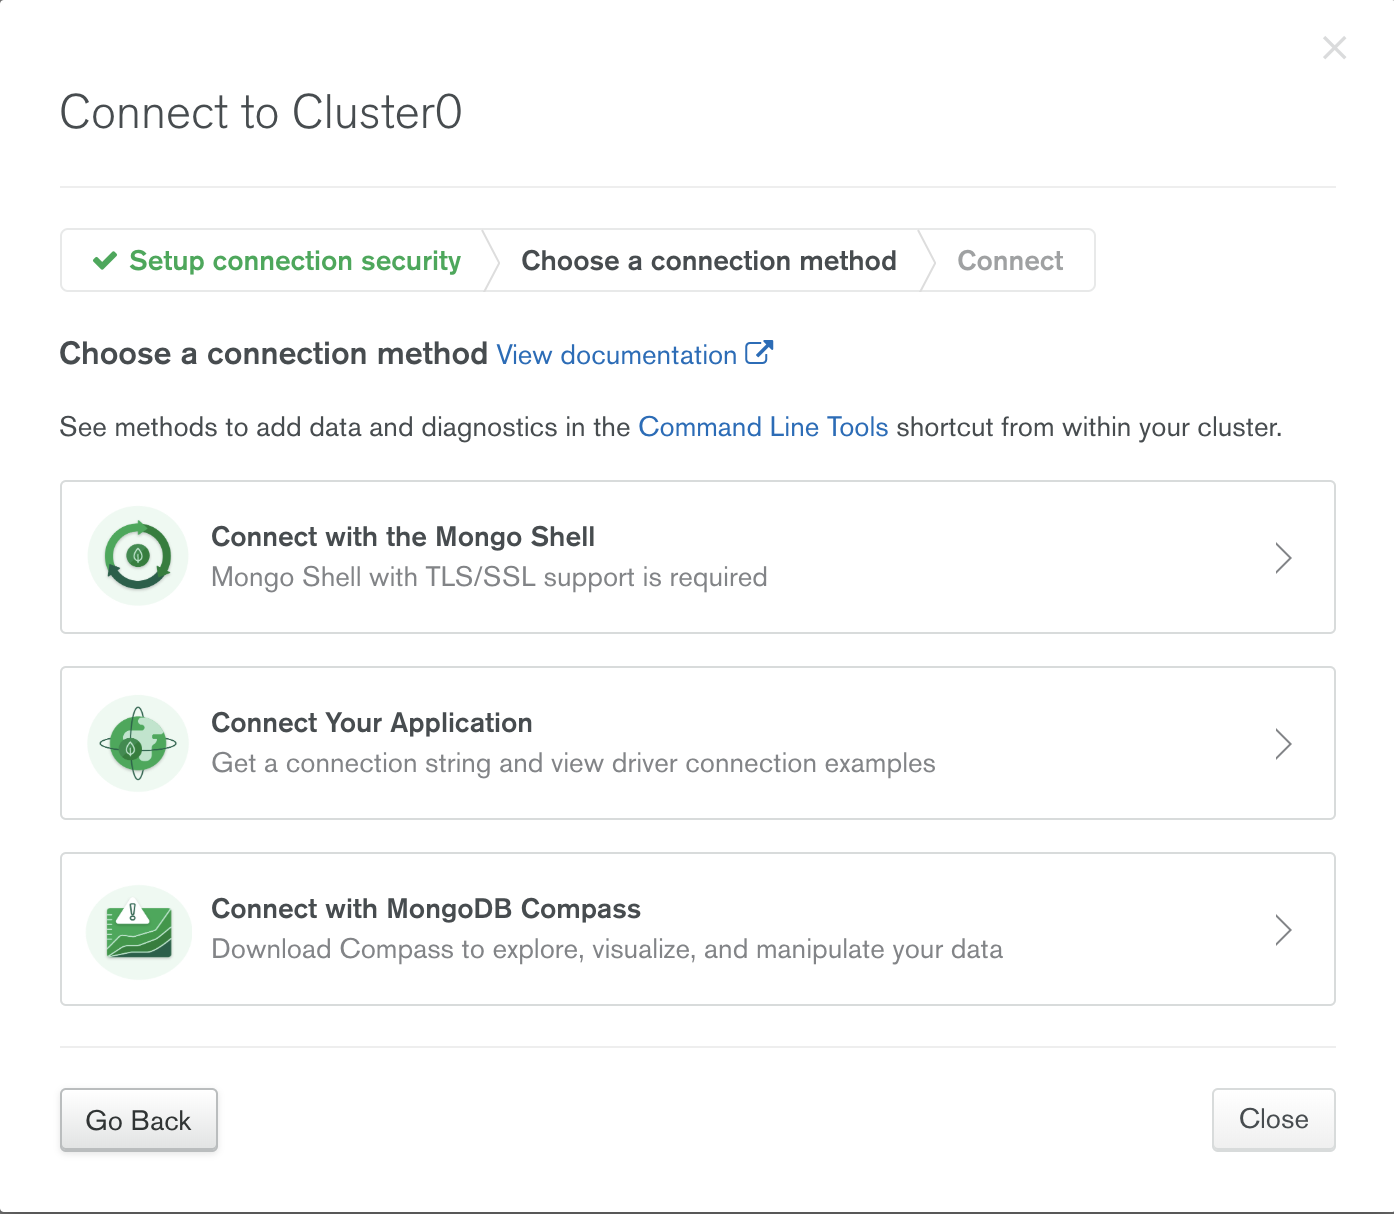
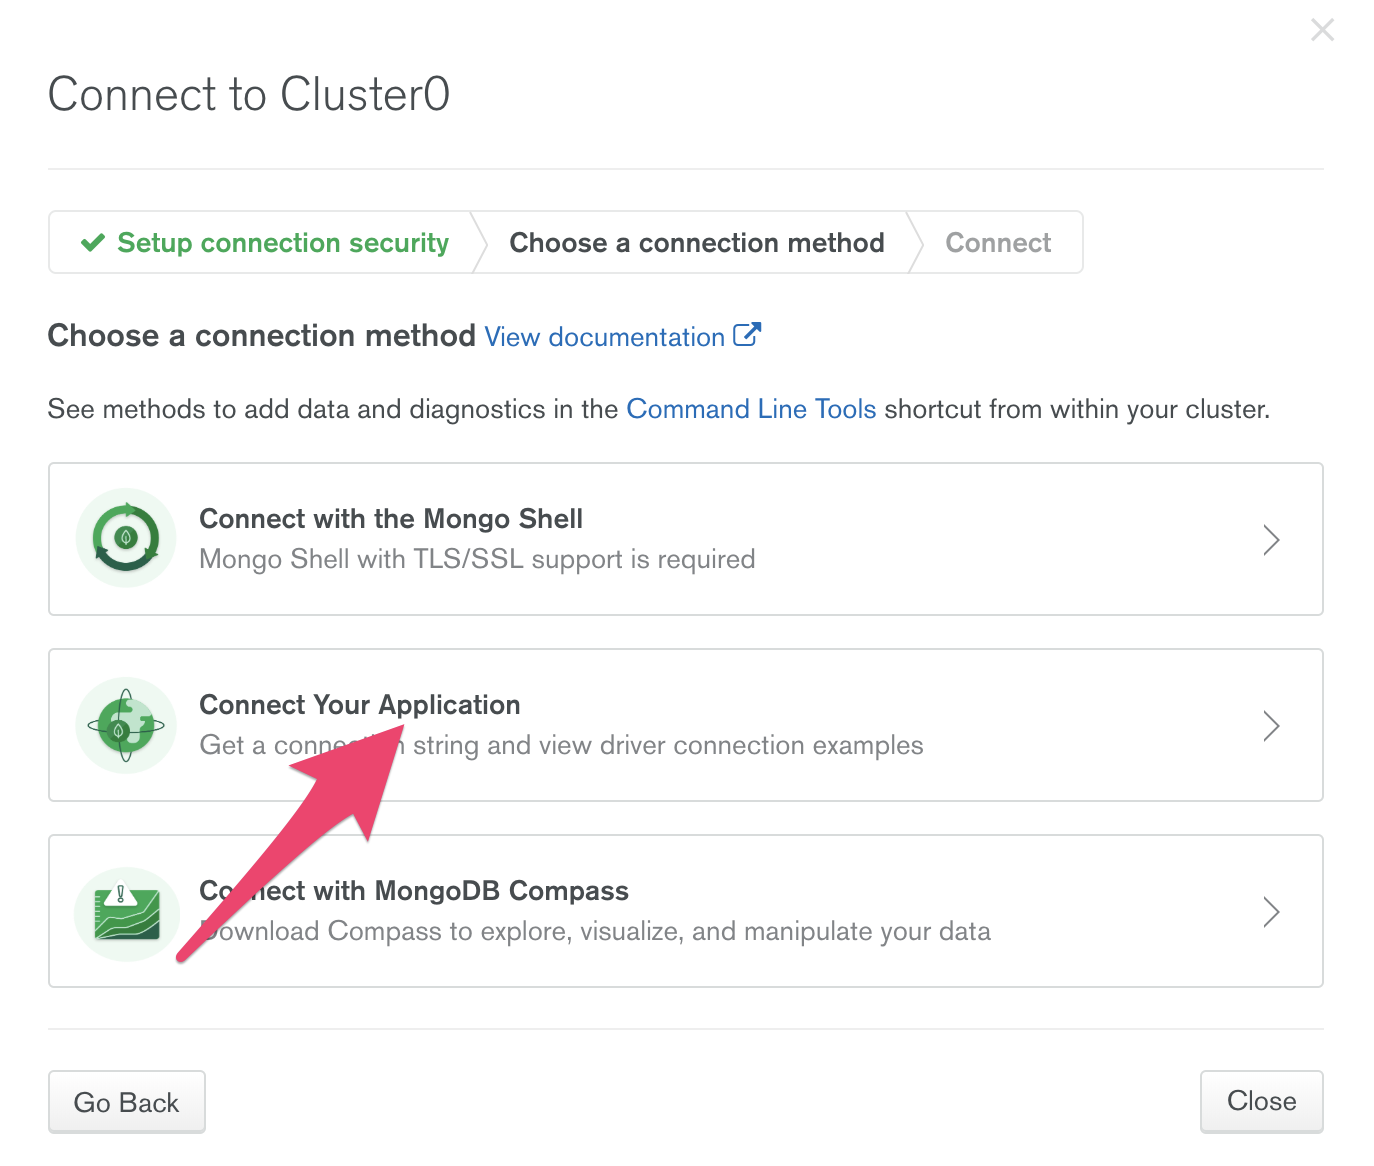
There are a few different ways that we provide information to connect to MongoDB Atlas.
- Through the MongoDB Shell, which is a command line interface.
- With an application connection string, which is what we’ll use.
- Through MongoDB Compass which is a GUI tool for interacting with data stored in MongoDB.
Click the “Connect Your Application” button. You will see information on getting a connection string and then some connection examples for different languages.
Initial set-up
Time to code! In this tutorial we’ll be building up the code a little bit at a time, but you can see the completed code here: https://github.com/beaucarnes/mern-exercise-tracker-mongodb
Verify you have Node.js installed on your system by typing the following at the operating system command line:
Note: Throughout this tutorial, any line that starts with $ means you should type everything after the $ at the command prompt in a terminal window. Do not type the $. So for the previous line, just type node -v . (Of course, your command line prompt may vary depending on your OS and the shell you are using.)
”This command shows what version of Node.js you have installed. If you do not have Node.js installed, make sure to install it before moving on.
Next, we’ll create the initial React project by using create-react-app. The npx command allows us to run create-react-app without installing it first. Run this command:
This creates a directory containing the default React project template with all dependencies installed.
Change into the newly created folder:
Start the development web server by running the following command:
This starts the development server for the front end of the app. But before we work more on the front end, we’ll create the back end and connect it to MongoDB Atlas.
Backend
Inside the root folder (mern-exercise-tracker), create a new folder and change into the folder by running the following commands in the terminal:
We’ll create a package.json file inside the folder by running:
Now we can install a few dependencies:
So what are these four packages?
We mentioned express (the E in MERN) earlier. Express is a fast and lightweight web framework for Node.js.
cors stands for cross-origin resource sharing; it allows AJAX requests to skip the Same-origin policy and access resources from remote hosts. The cors package provides an Express middleware that can enable CORS with different options.
And we already mentioned mongoose. It makes interacting with MongoDB through Node.js simpler.
dotenv loads environment variables from a .env file into process.env. This makes development simpler. Instead of setting environment variables on our development machine, they can be stored in a file. (We’ll create the .env file later.)
We’ll install one final package globally. Run:
nodemon makes development easier. It is a tool that helps create and update Node.js based applications. It automatically restarts the application when it detects file changes in the directory, so it’s one less step for us to remember as we iterate.
Time to create the backend server! In the server.js file, we’ll create an Express server, attach the cors and express.json middleware (since we will be sending and receiving json), and make the server listen on port 5000. Make a file named server.js inside the backend directory and add the following code to that file create a basic Node.js / Express server:
Now we can start the server by using nodemon:
You should be able to see the server running in the terminal.
It’s finally time to connect to our database in MongoDB Atlas. At the top of server.js, after the line cont cors = require('cors');, add the following line to require mongoose:
Now, after the line app.use(express.json());, add:
The section useNewUrlParser: true is added because the MongoDB Node.js driver rewrote the tool it uses to parse MongoDB connection strings. Because this is such a big change, they put the new connection string parser behind a flag. The section useCreateIndex: true is similar. It is to deal with MongoDB deprecating the ensureIndex() function.
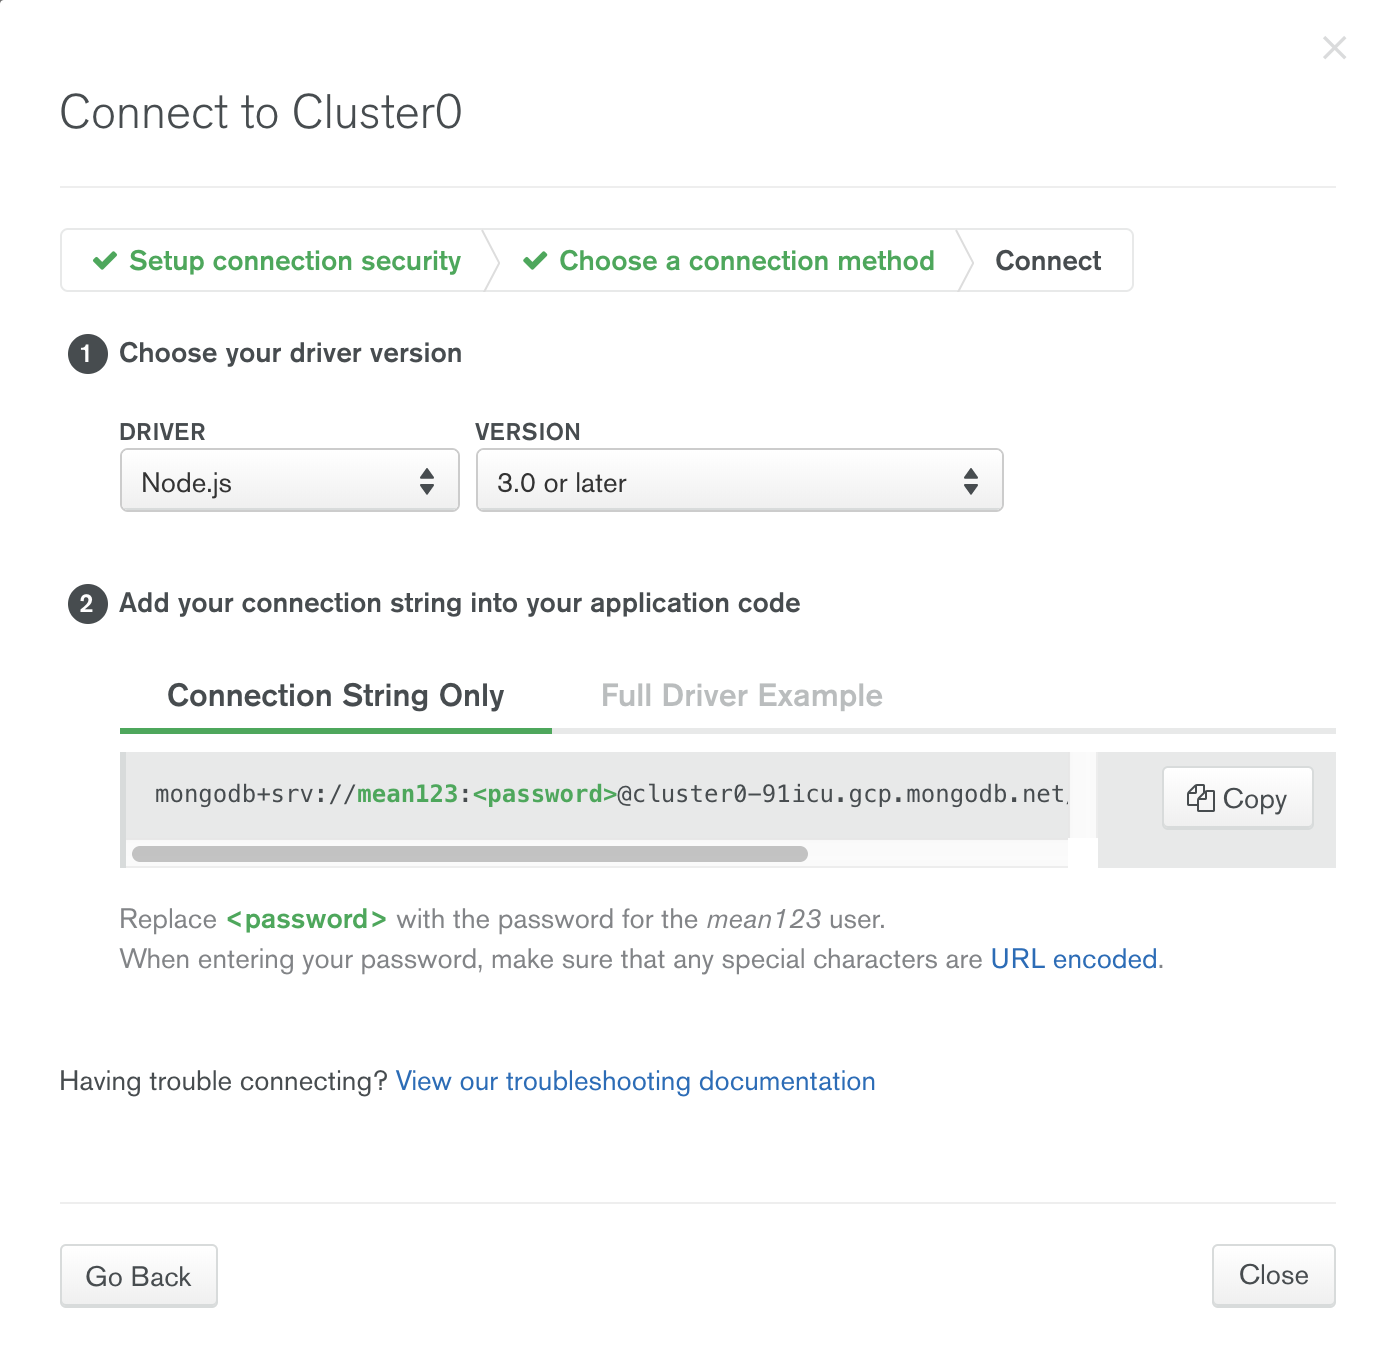
For the connection to work, we’ll need to add the correct ATLAS_URI environment variable.
In the server directory, create a file named .env. Now, we need to get the uri. This is the connection string from MongoDB Atlas that was mentioned earlier. Here is how to get back to it from the MongoDB Atlas dashboard:
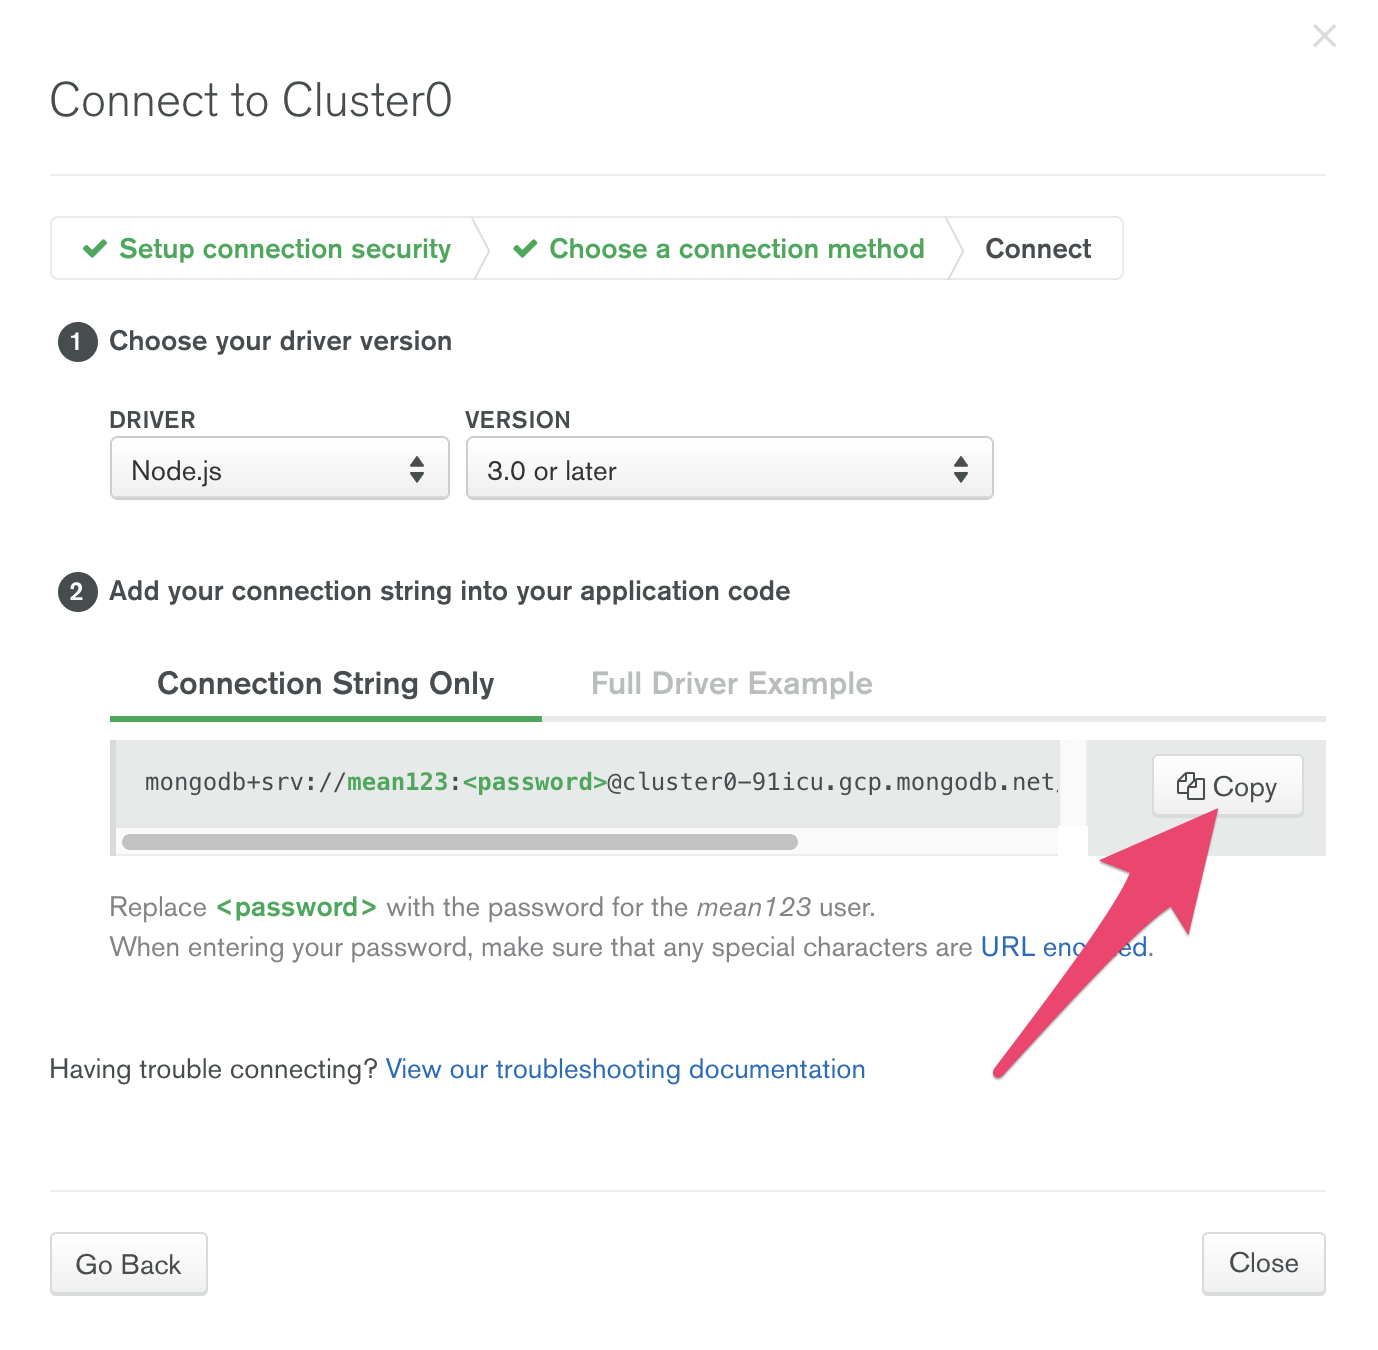
In the .env file, type “ATLAS_URI=” and then paste in the uri / connection string you just copied. It should look something like this:
Replace < password > with the password you set up for your user.
In the terminal running your server you should now see the line “MongoDB database connection established successfully”. You may have to restart the server first.
Database Schema
Next we’ll create our database schema using Mongoose. We’ll have two entities: Exercises and Users.
Inside the backend folder, create a new folder named “models”. Inside that folder create two files named exercise.model.js and user.model.js.
Add the following code for the user model:
The User Schema only contains a single field: username. We added some validations to the username field. It is required, it must be unique, and it must be at least 3 characters long. Also, white space is trimmed off the end.
Now add the following code to the exercise model:
In the Exercise Schema, there are four fields. Since we don’t use as much validation, each fits on its own line.
Server API Endpoints
We now need to add the API endpoint routes so the server can be used to perform CRUD operations.
Inside the backend folder, create a new folder named “routes”. Inside that folder create two files named exercises.js and users.js.
We’ll come back to those files. First we’ll tell the server to use the files we just created. Toward the end of server.js, right before the line app.listen(port, _function_() {, add:
The first two lines load the routers from other files. Then the routers are added as middleware.
The server URL is [https://localhost:5000](https://localhost:5000/). Now if you add “/exercises” or “/users” on the end it will load the endpoints defined in the corresponding router files. So let’s build out those router files.
In the “users.js” file you just created, add the following code:
The first endpoint handles incoming HTTP GET requests on the /users/ URL path. We call Users.find() to get a list of all the users from the database. The find method returns a promise. The results are returned in JSON format with res.json(users).
The second endpoint handles incoming HTTP POST requests on the /users/add/ URL path. The new username is part of the request body. After getting the username, we create a new instance of User. Finally, the new user is saved to the database with the save() method and we return “User added!”
Add these same two endpoints to “exercises.js”. You will notice that this time we break out all four fields from the submitted data.
Testing the server API
We’ll add some more API endpoints soon. But first let’s test the server API. We’ll be using a tool called Insomnia. Another popular tool for this purpose is Postman.
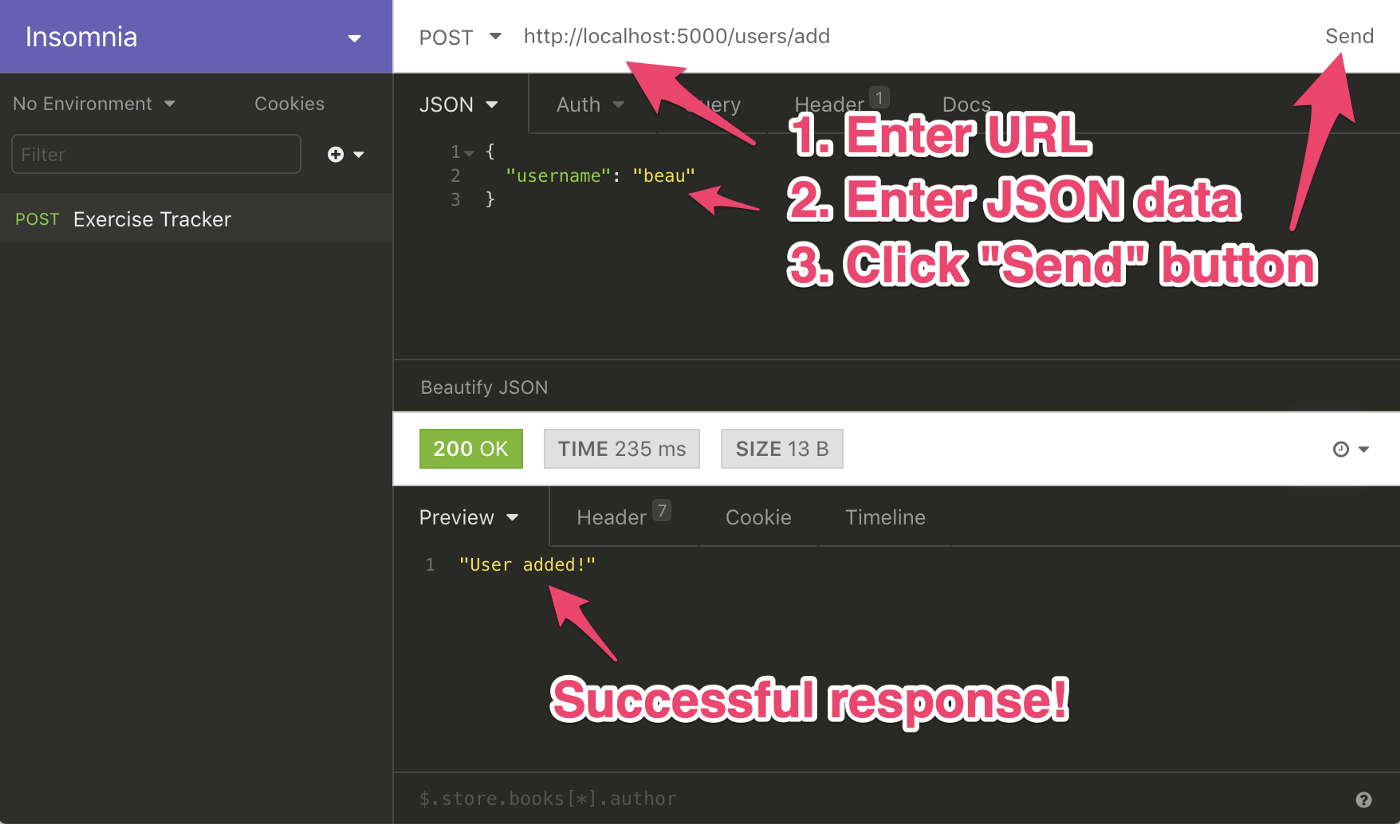
Once you get Insomnia installed, create a new POST request using JSON.
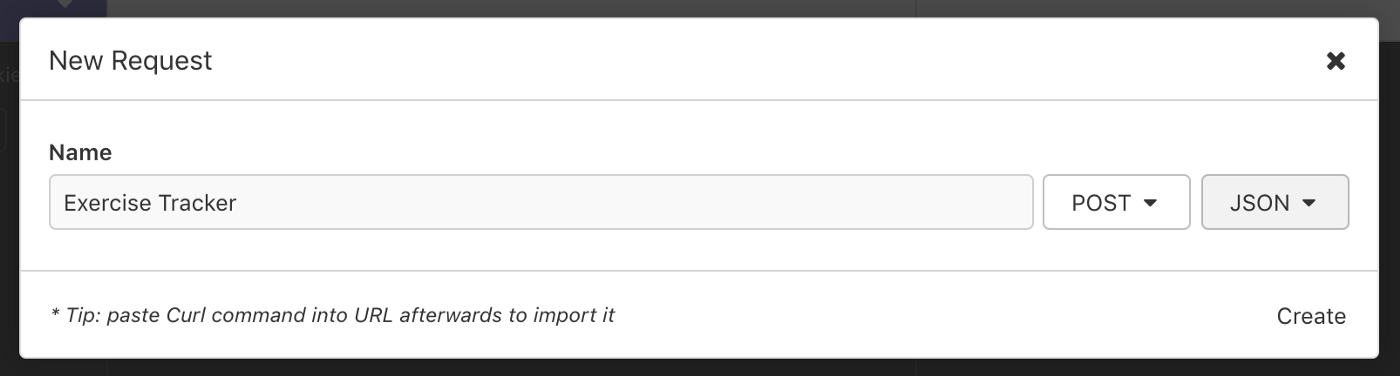
Click Create. Near the top of the next screen enter the URL http://localhost:5000/users/add. In the JSON section, enter these three lines of JSON (using your own name):
Finally, click “Send”. You should see the response “User added!”
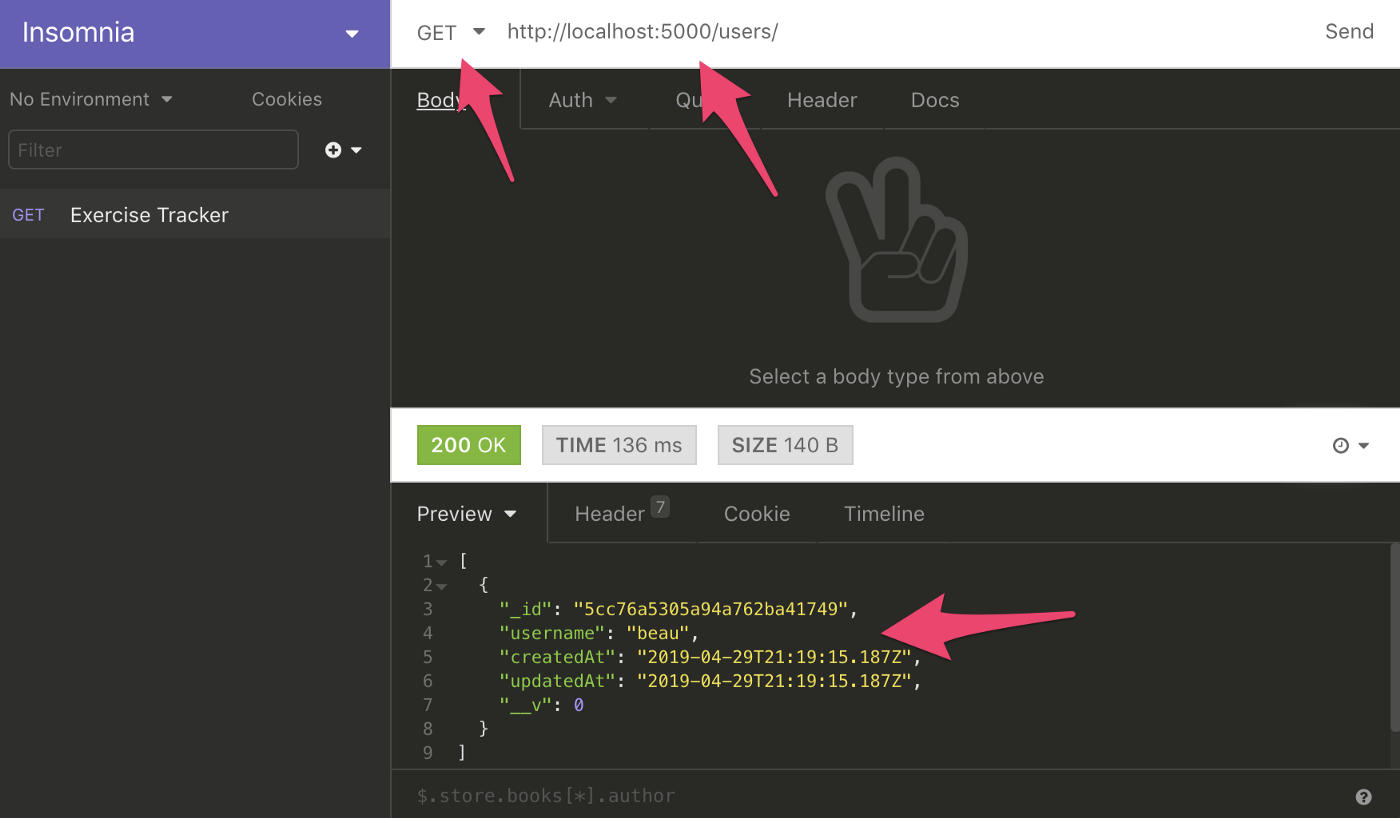
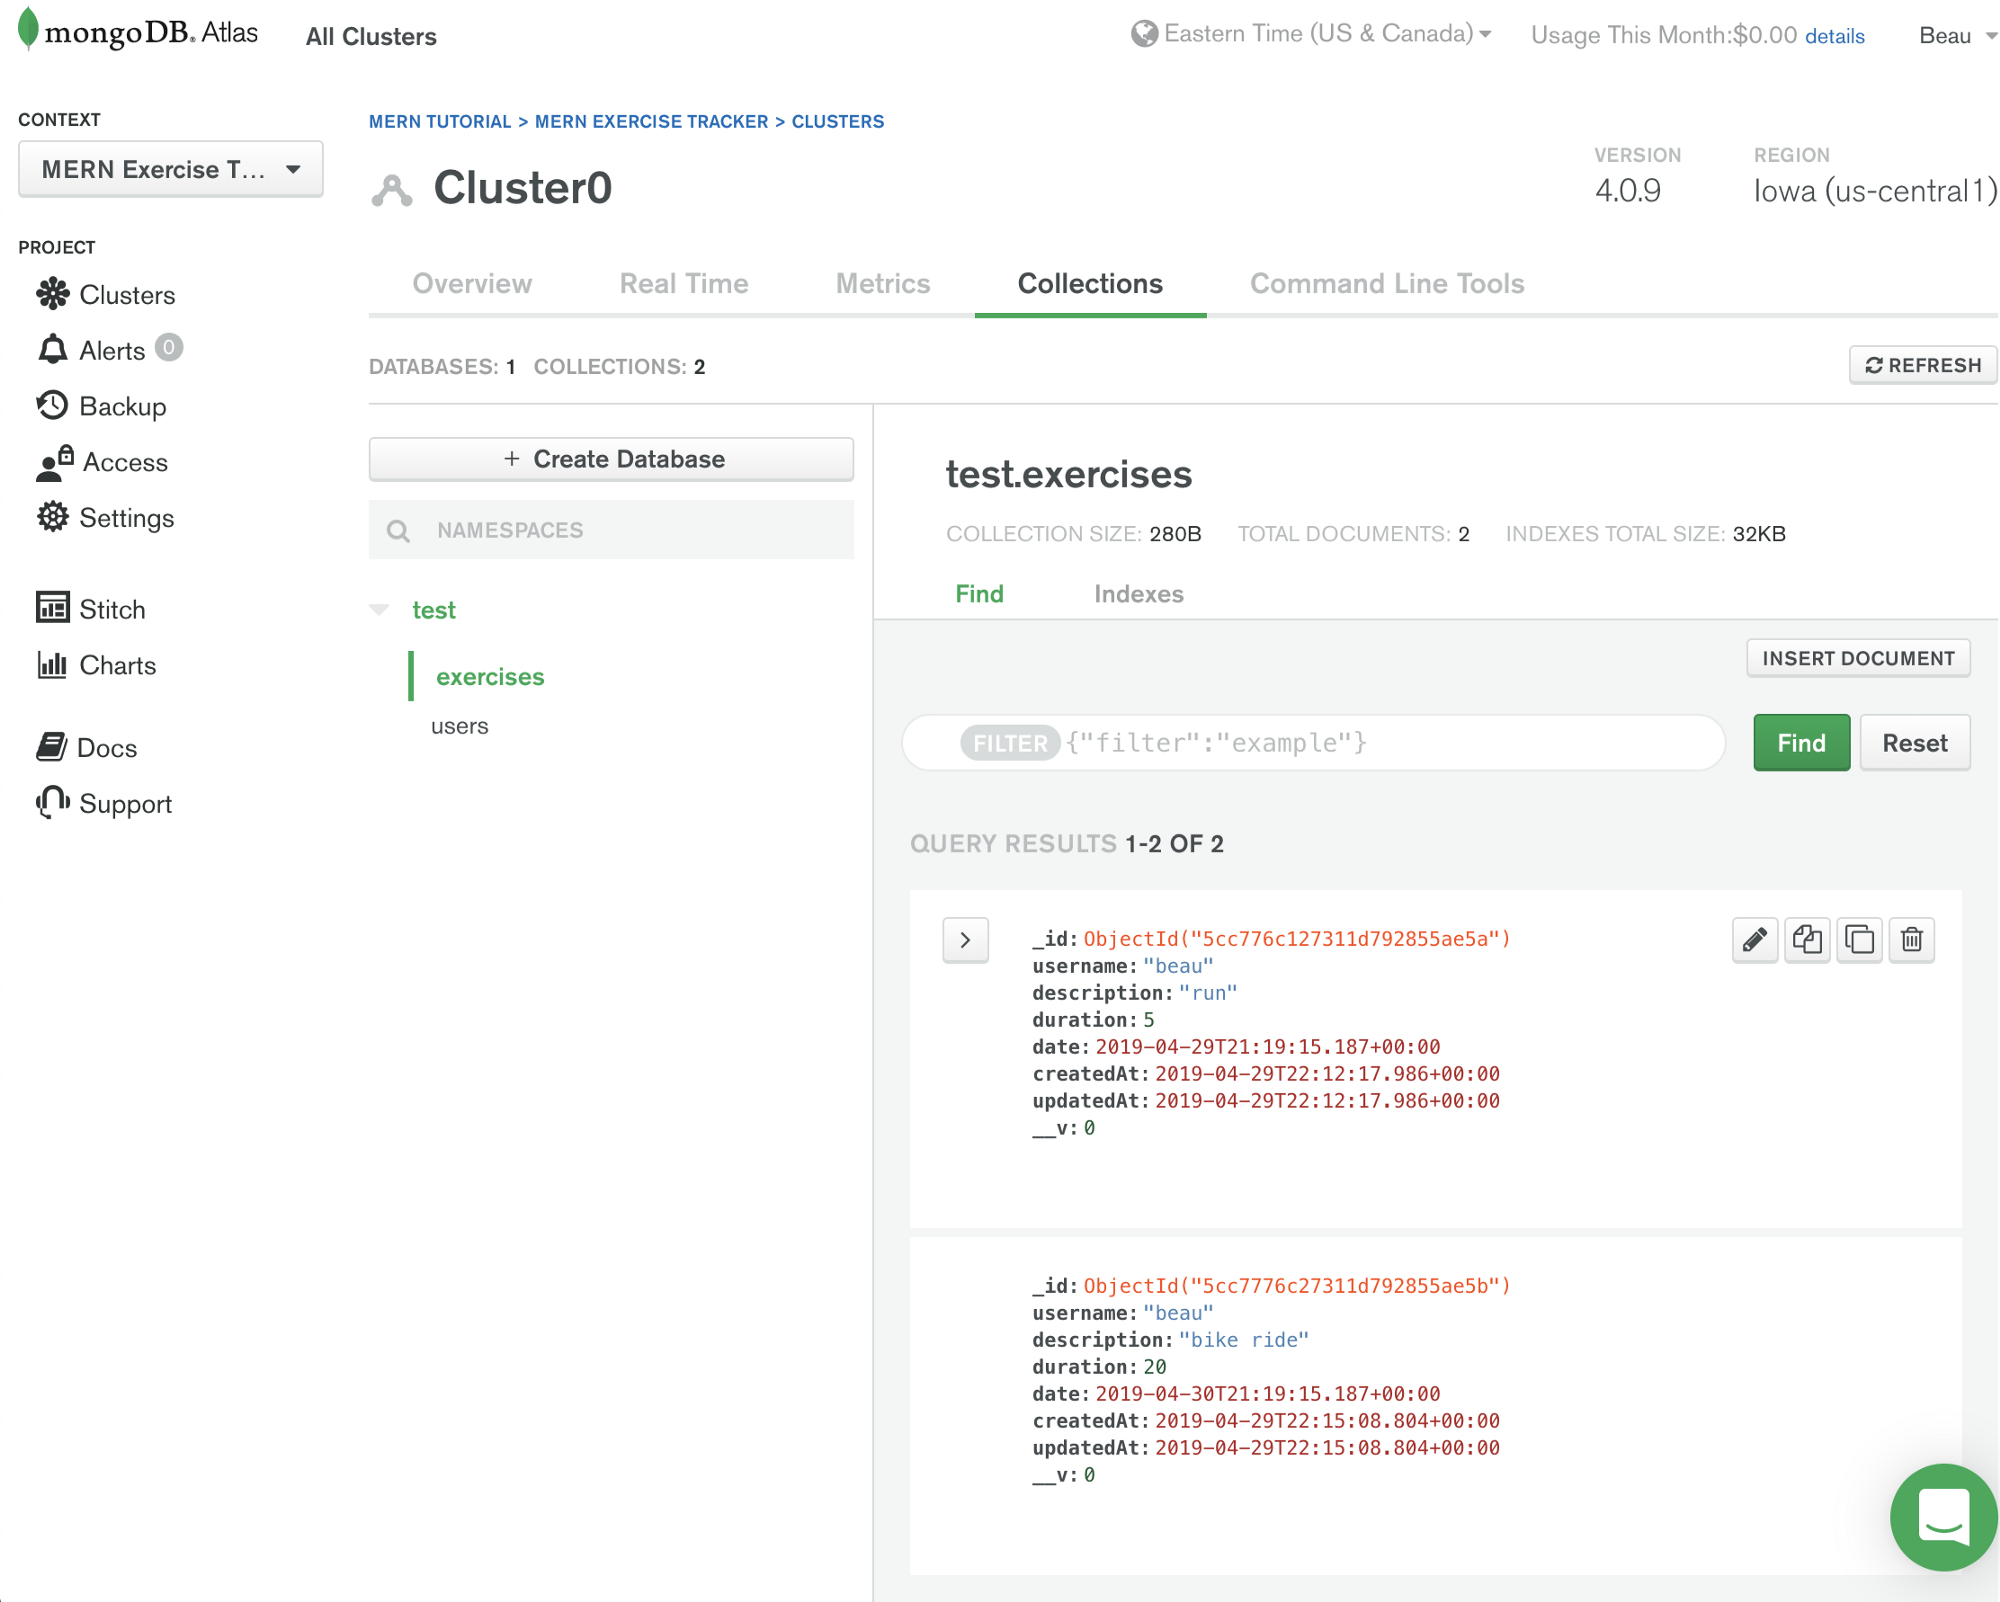
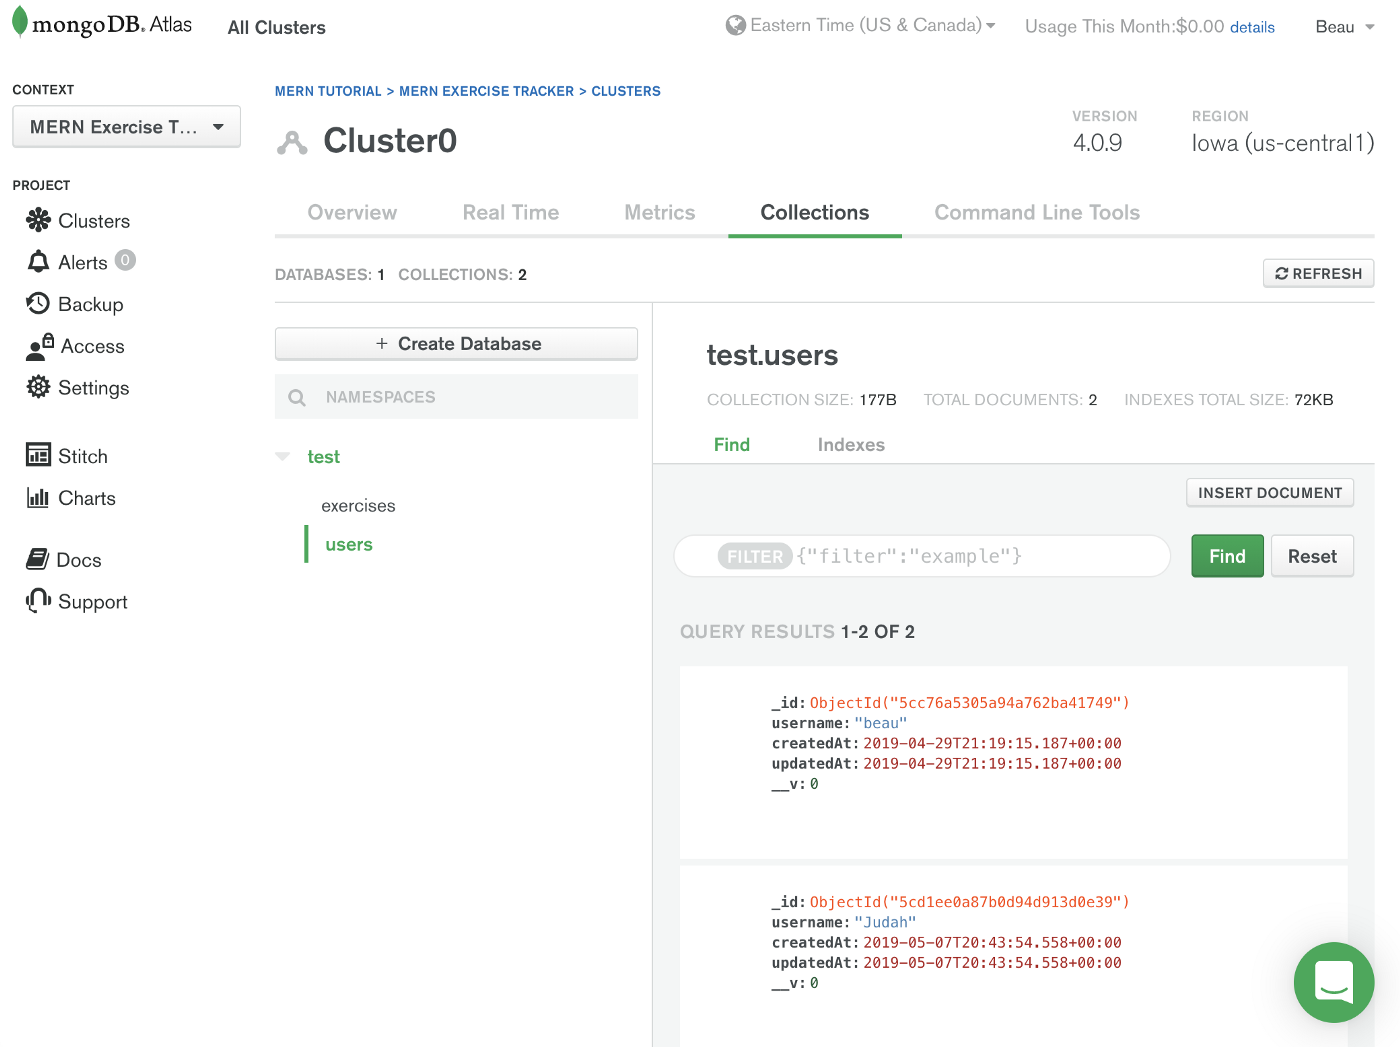
We can send a GET request to “https://localhost:5000/users/” and get a list of users back. It should return the user we just added, with some additional metadata.
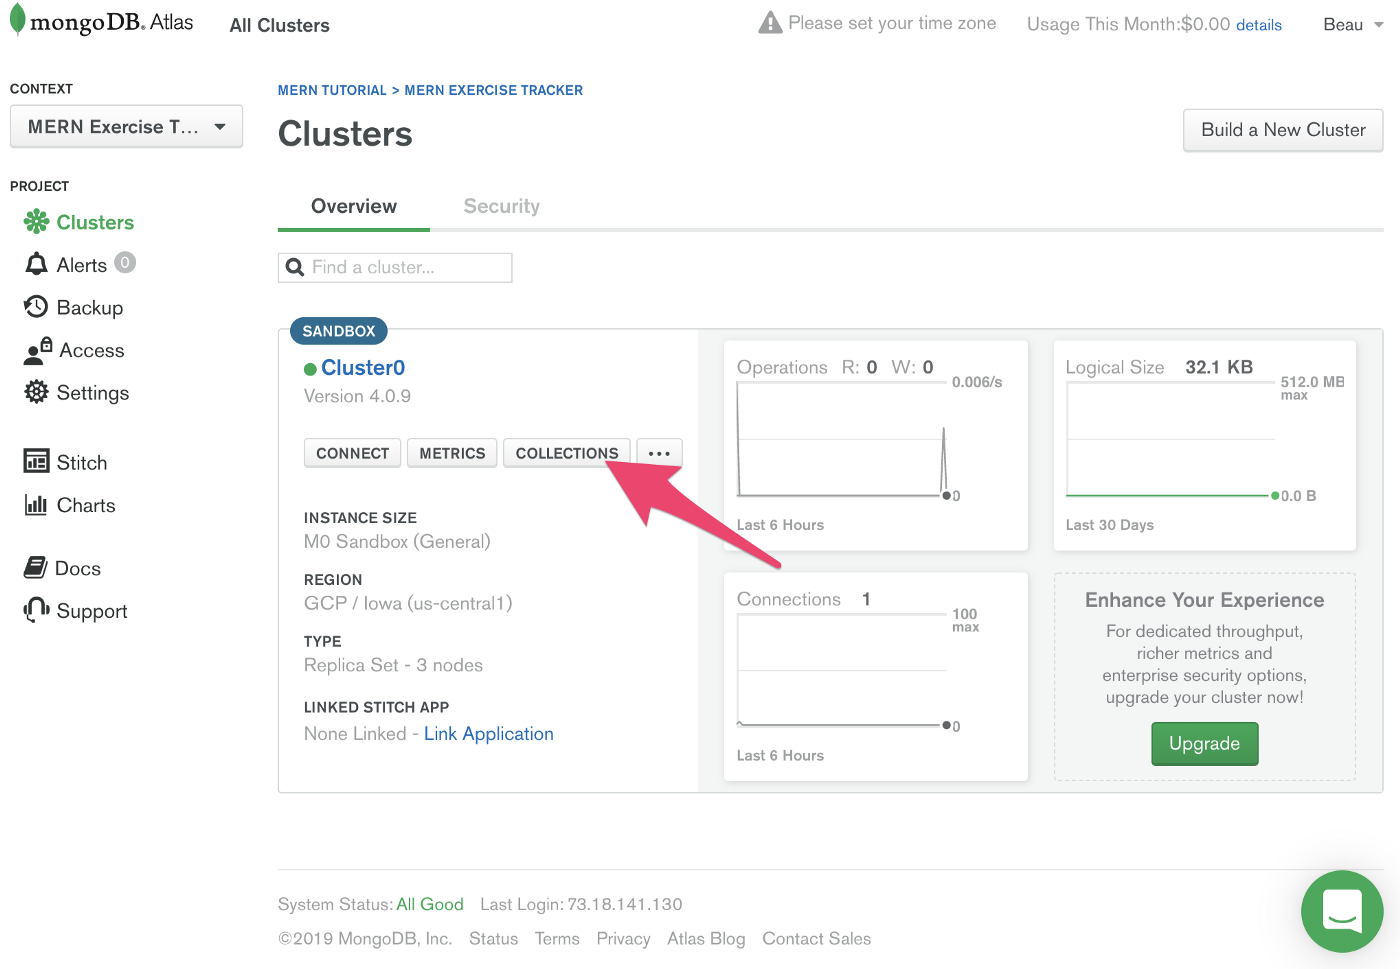
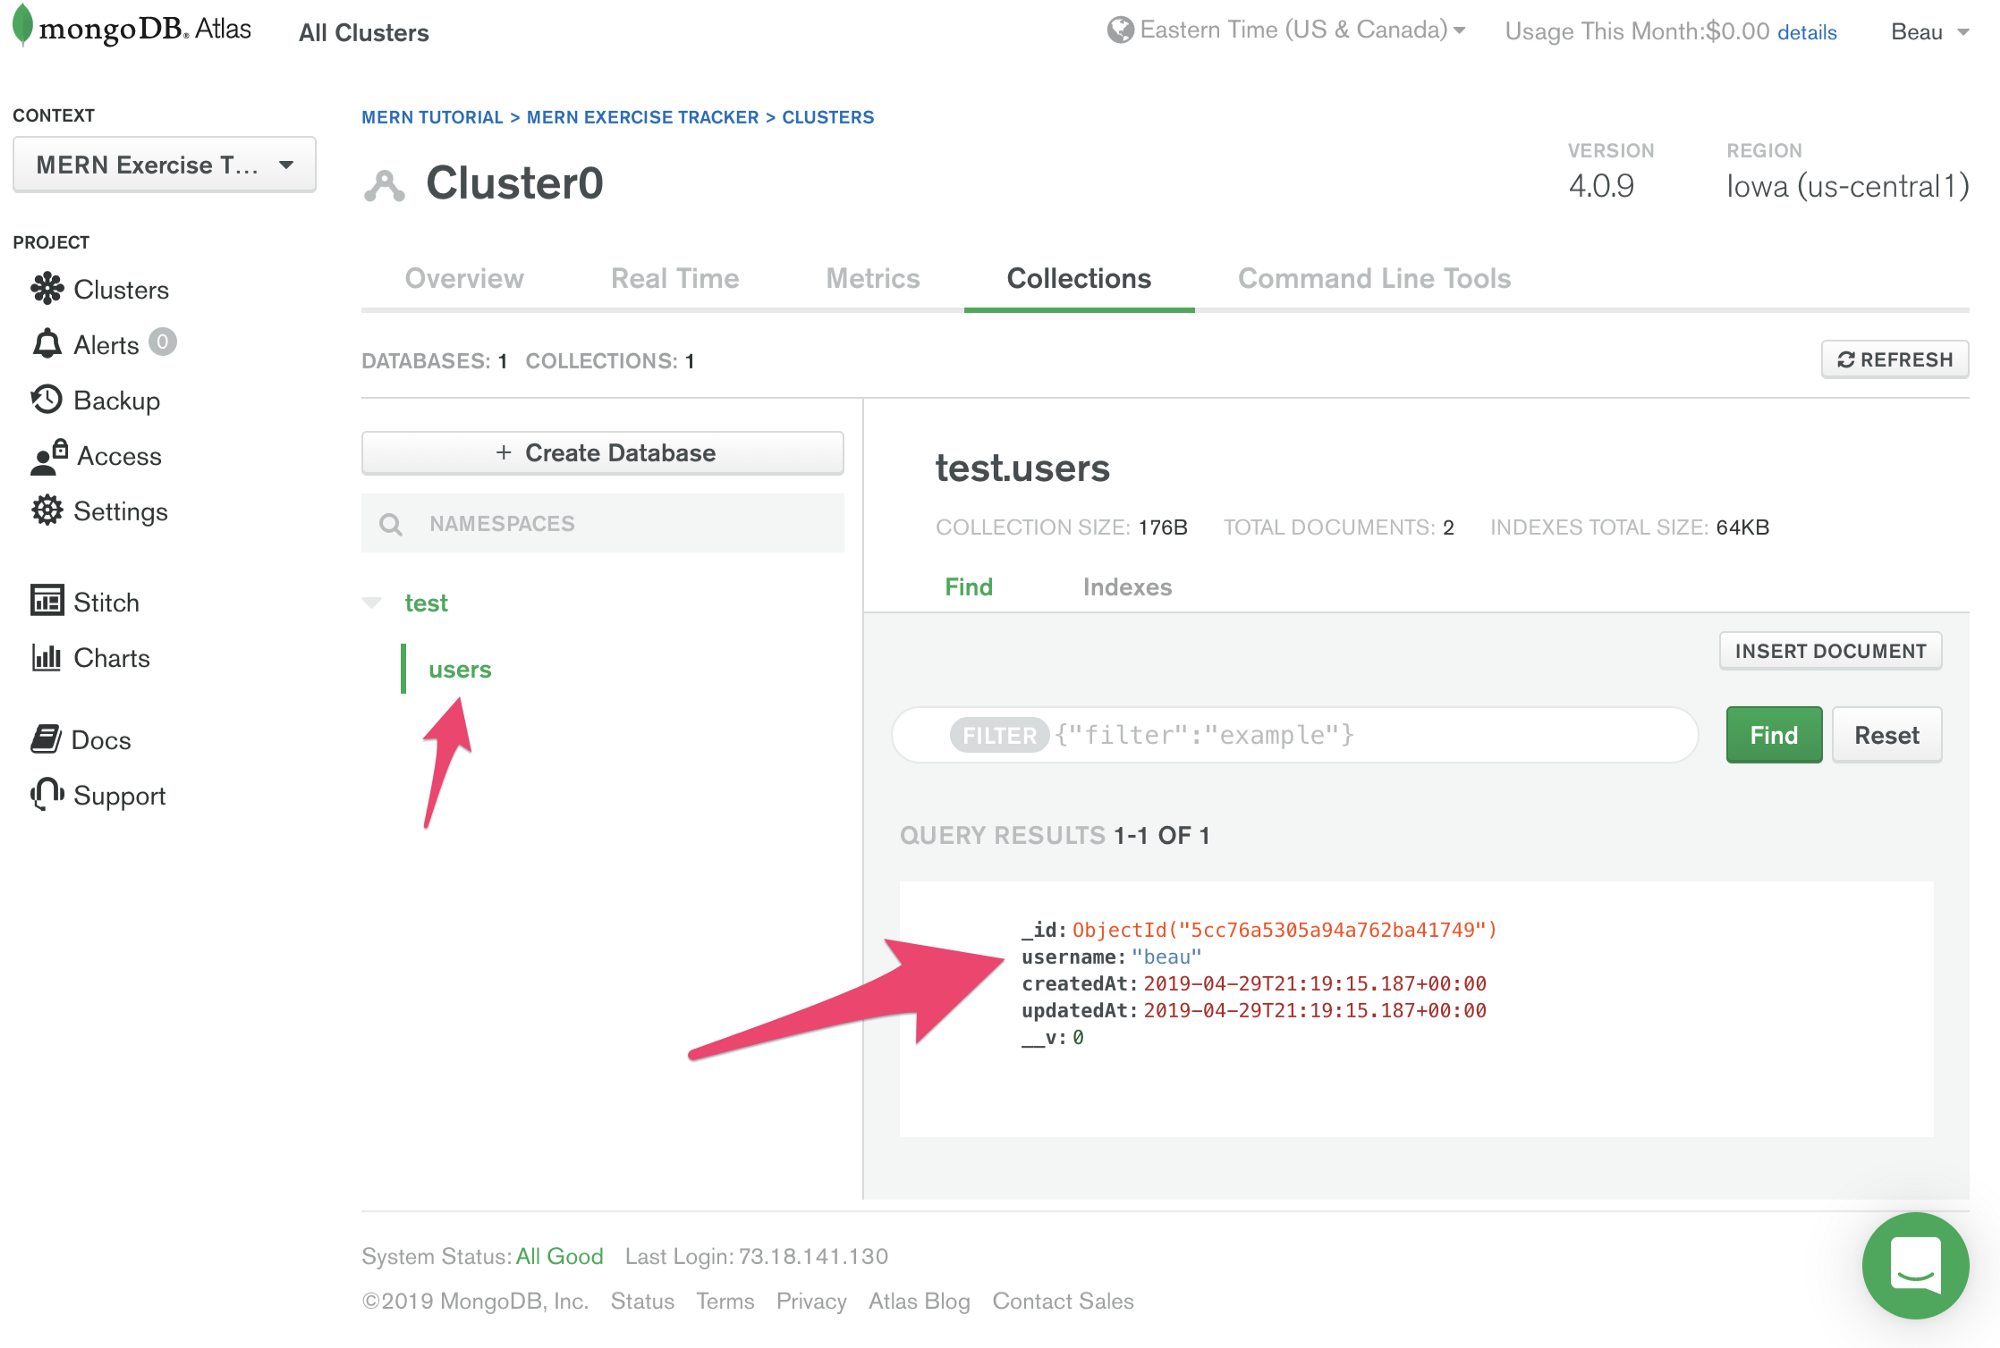
We can also see the user we just added on the MongoDB Atlas dashboard.
Let’s add a few exercises. Use Insomnia to POST the following data to “http://localhost:5000/exercises/add” (update the username to the one you used).
Then POST another exercise:
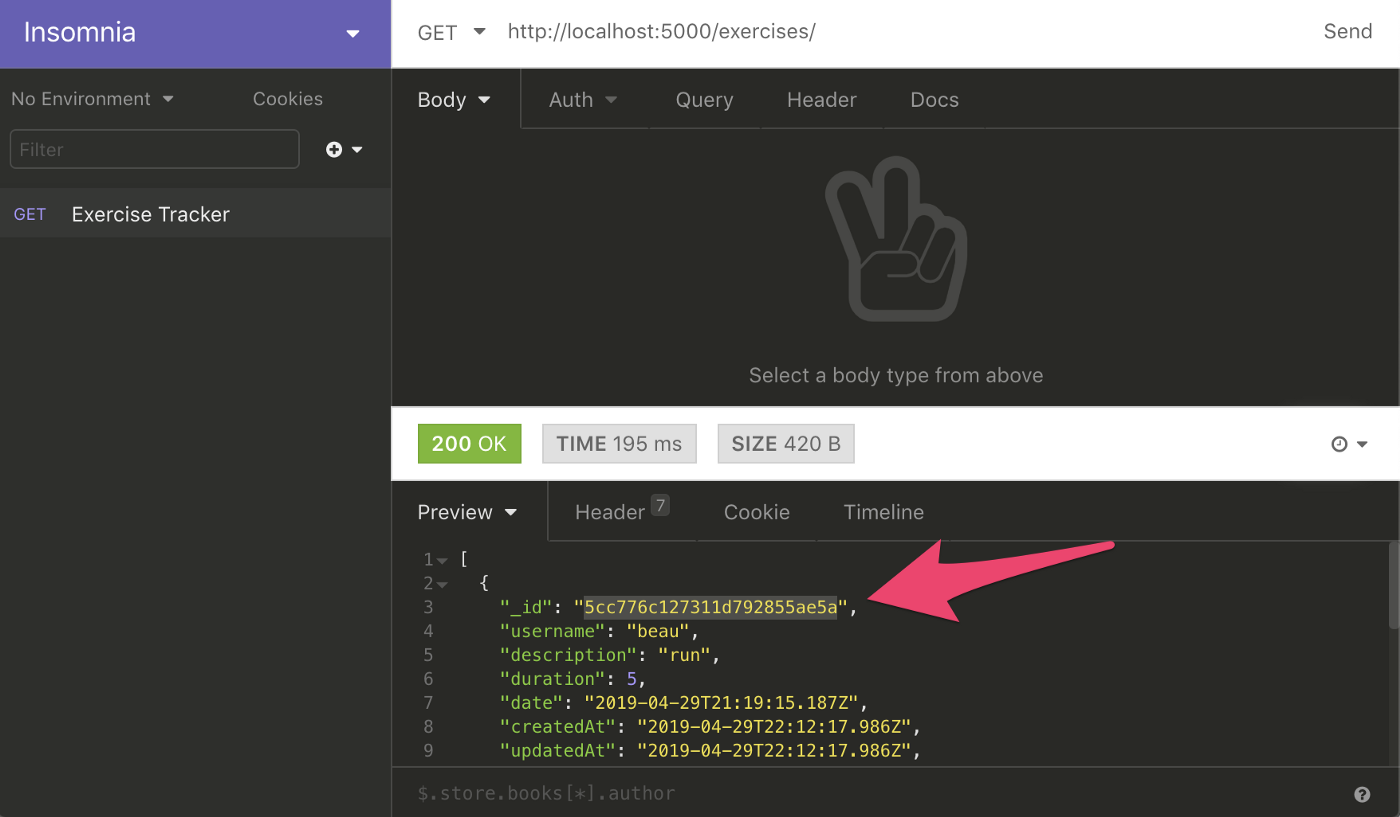
You should be able to see the data you just entered by sending a GET request to “http://localhost:5000/exercises/”. Or check the MongoDB Atlas dashboard.
Now that we’ve tested everything, we will finish up the exercise routes. Add this code after the routes you already added in “exercises.js”.
The /:id GET endpoint returns an exercise item given an id. The /:id DELETE endpoint deletes an exercise item given an id.
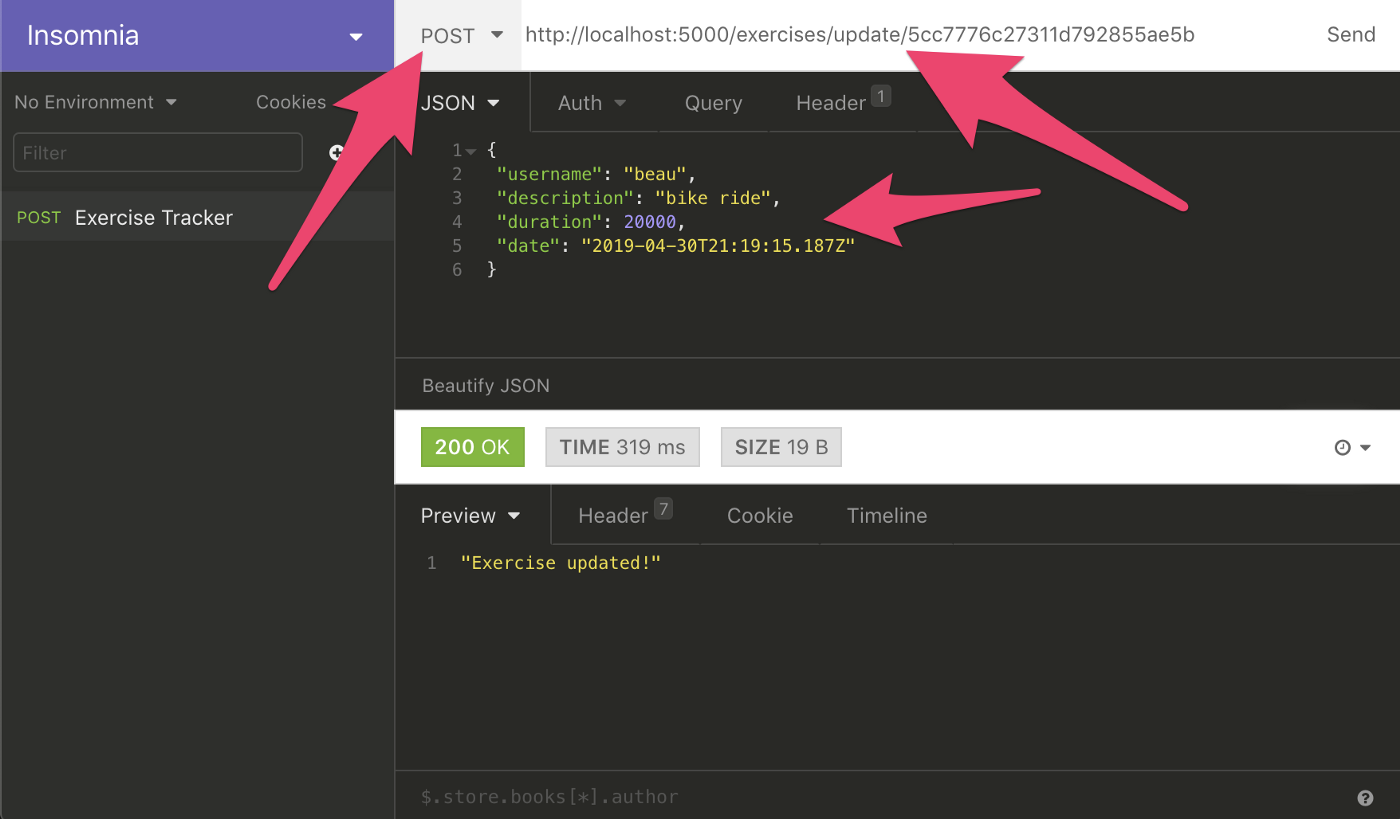
Finally, the /update/:id POST endpoint updates an existing exercise item. For this endpoint, we first retrieve the old exercise item from the database based on the id. Then, we set the exercise property values to what’s available in the request body. Finally, we call exercise.save to save the updated object in the database.
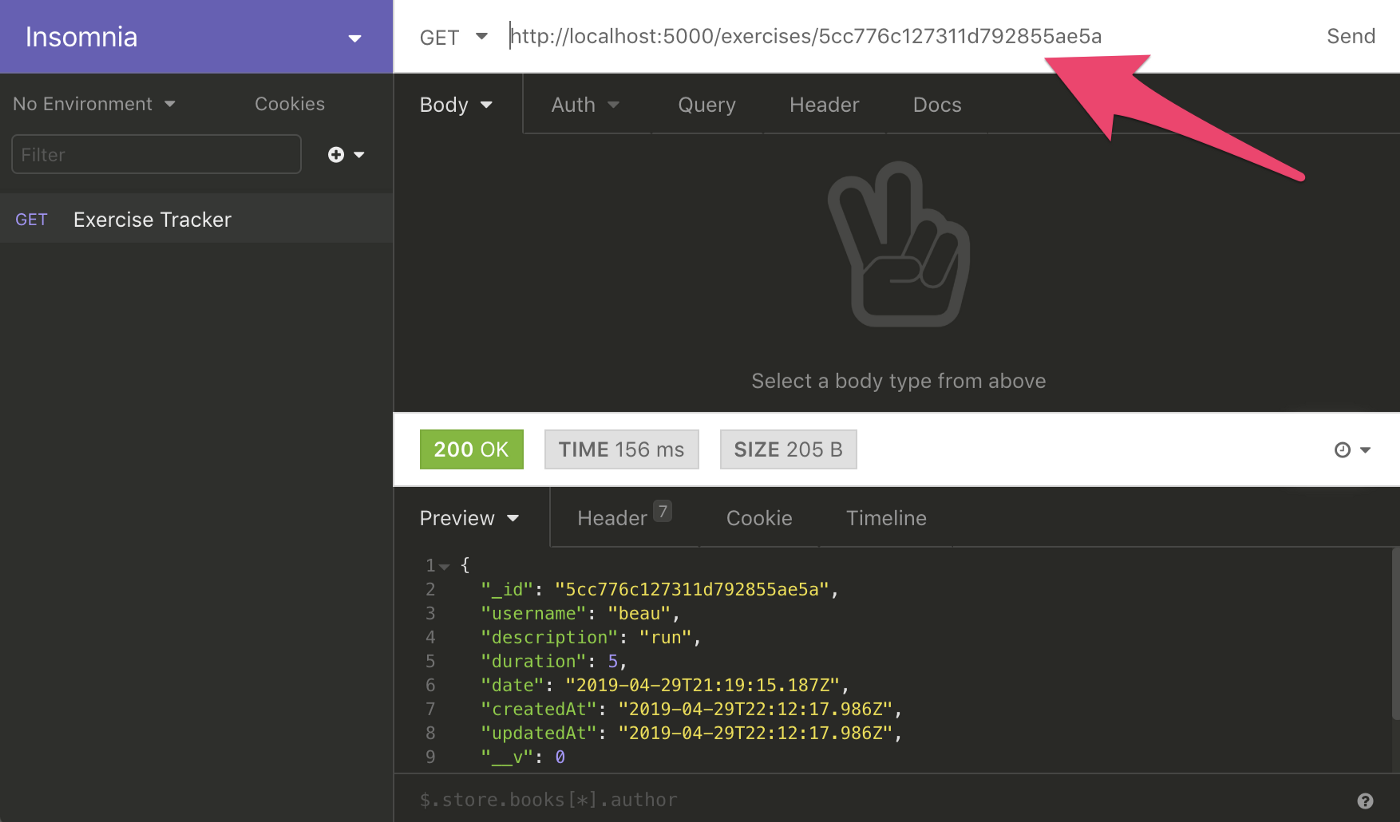
We can now test these endpoints with Insomnia. To test the first endpoint we just added, we need an id. Get the first id by sending a GET request to https://localhost:5000/exercises/. Copy the first id.
To test the/:id GET endpoint, paste that id to the end of the URL and send another GET request. You will see the exercise returned.
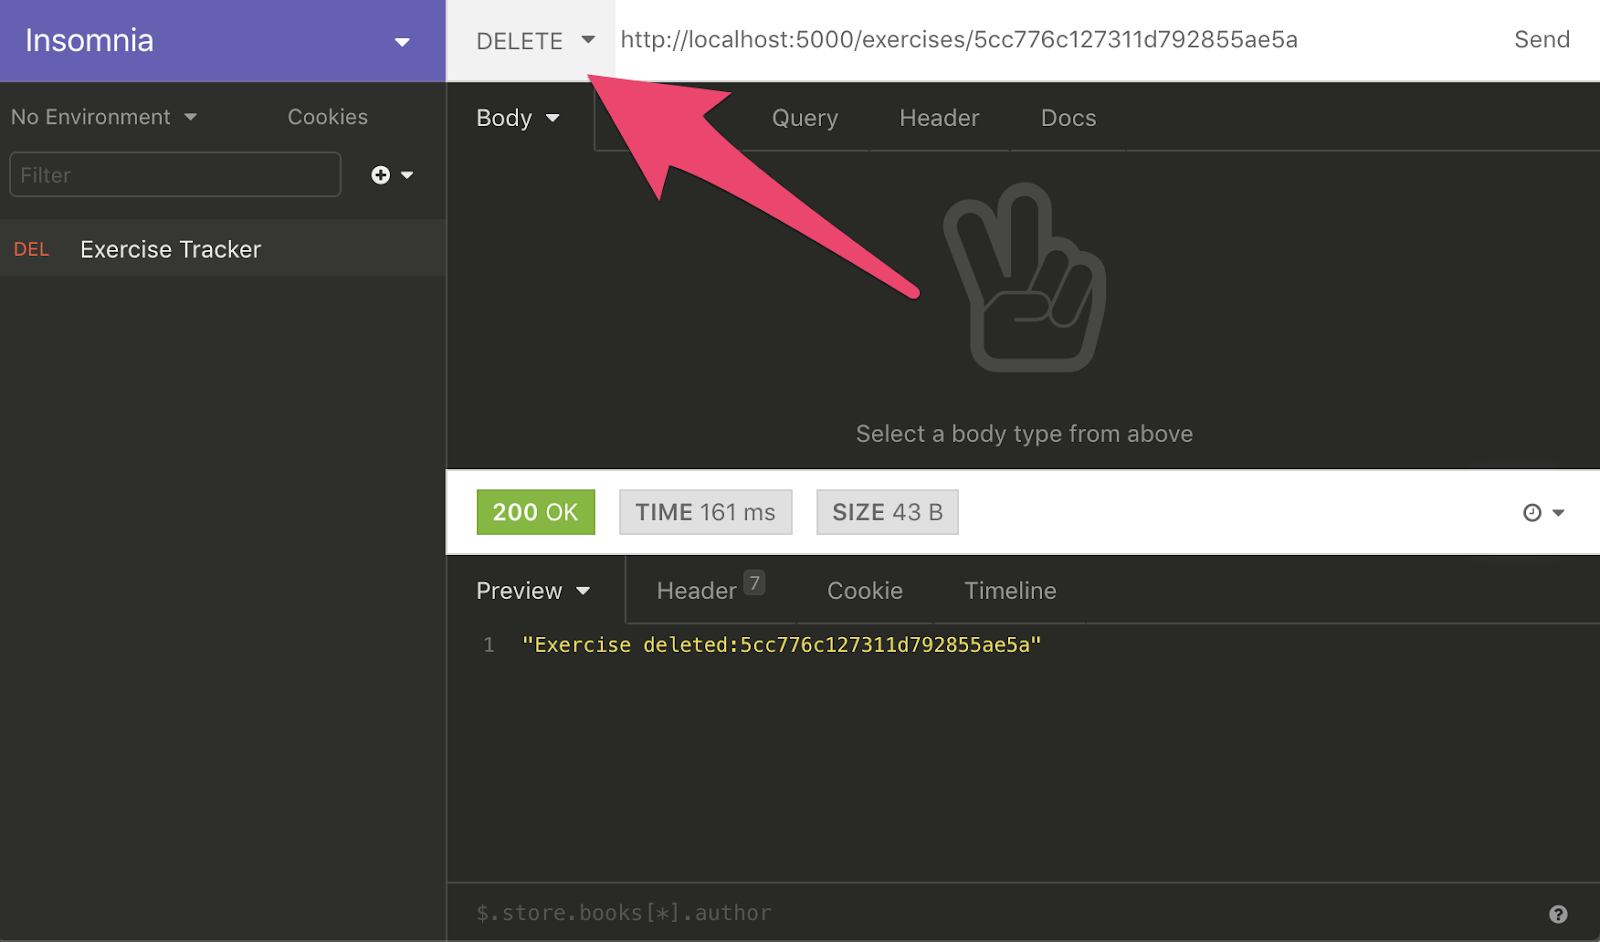
To delete the exercise, change GET to DELETE and send the request again.
Frontend
The backend is complete and now it is time to start the frontend!
As was mentioned earlier, we’ll use React for the frontend. I’ll give a very brief overview of React components and JSX. To learn more about React, watch this free 5 hour React course.
React is a declarative, efficient, and flexible JavaScript library for building user interfaces. It lets you compose complex UIs from small and isolated pieces of code called “components”. Our project isn’t too complex but it will still give you a good introduction to React.
We use components to tell React what we want to see on the screen. When our data changes, React will efficiently update and re-render our components.
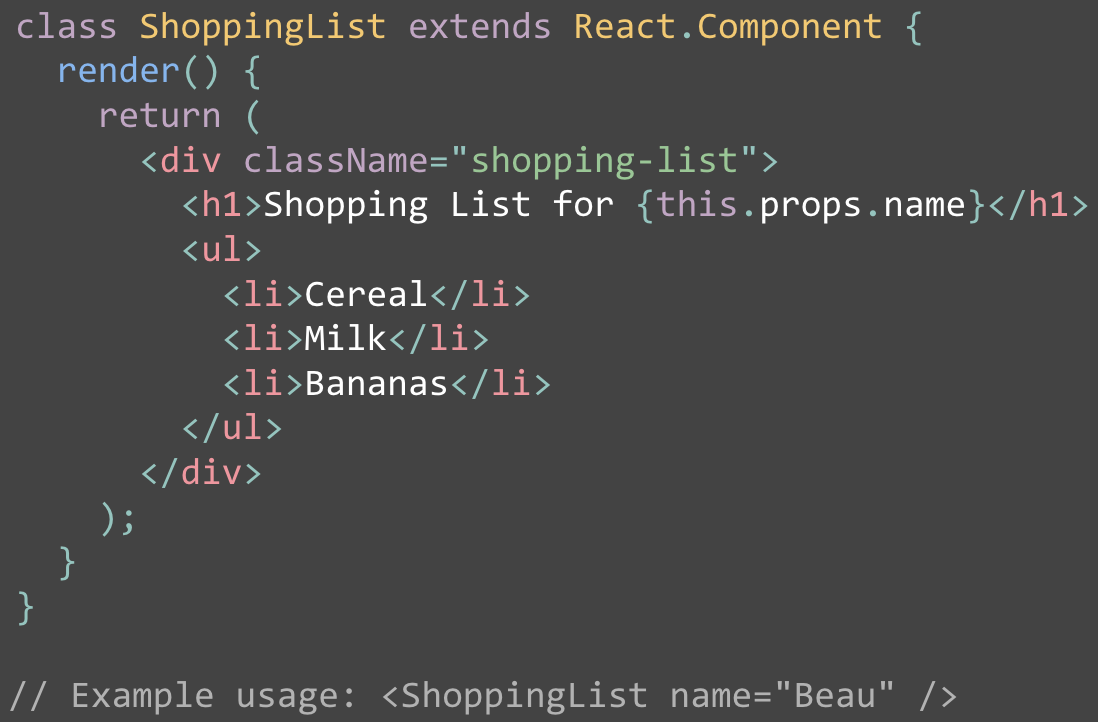
In the code image above, ShoppingList is a React component class. A component takes in parameters, called props (short for “properties”), and returns a hierarchy of views to display through the render method.
The render method returns a description of what you want to see on the screen. React takes the description and displays the result. In particular, render returns a React element, which is a lightweight description of what to render.
Most React developers use a special syntax called “JSX” which makes these structures easier to write. The
JSX comes with the full power of JavaScript. You can put any JavaScript expressions within braces inside JSX. Each React element is a JavaScript object that you can store in a variable or pass around in your program.
Now let’s get back to our project.
Make sure the frontend development web server is running. If it’s not, you can start it with the following command in a terminal:
Next, we need to add the Bootstrap CSS framework to our project to make styling easier. Inside the project folder run the following command in a terminal:
Now need to make sure that Bootstrap’s CSS file is imported in App.js by adding the following line of code after the “import React” line:
We can get rid of most of the default code in App.js. All we need is:
Now let’s set up React Router. Run the following command in a terminal:
Import React Router in App.js by adding this as the second line in the file:
Next, let’s embed the JSX code in a
Inside the
There is a
We now need to create five components: one for the Navbar and four for the routes. We’ll actually create them in separate files.
But first let’s import the files we will create into App.js right after the import for bootstrap. Here is the full code of App.js after the imports are added:
In the same directory as App.js, create a new directory called ‘components’. Inside that directory create a file called ‘navbar.component.js’. Here is the code for that file:
This is just the navbar from the Bootstrap documentation converted to work for our purposes.
Next, create four more files in the components directory with the following names:
- exercises-list.component.js
- edit-exercise.component.js
- create-exercise.component.js
- create-user.component.js
At this point we will create stubs for these components so we can see if everything works so far.
exercises-list.component.js:
edit-exercise.component.js:
create-exercise.component.js:
create-user.component.js:
Now you should be able to test the project in the browser. When you click the buttons in the navigation bar, you should see different text appear.
The Create Exercise Component
We’ll create the Create Exercise Component now. This will allow us to add exercises into the database. Add a constructor to create-exercise.component.js.
In JavaScript classes, you need to always call super when defining the constructor of a subclass. All React component classes that have a constructor should start it with a super(props) call.
We’ll set the initial state of the component by assigning an object to this.state. The properties of state will correspond to the fields in the MongoDB document. Here is how to setup the constructor:
Now we need to add methods which can be used to update the state properties:
You will notice the onChangeDate method looks a little different than the others. This is because of the date picker library we will be adding later.
After those methods, we’ll add one to handle the submit event of the form which we will add later:
The e.preventDefault() prevents the default HTML form submit behavior from taking place.
Right now, we’re just logging the exercise to the console. But once we create the backend, we’ll update this to interact with the backend server.
After the form is submitted, the location is updated so the user is taken back to the home page.
Now we’ll make sure this works properly in our methods, we need to bind the methods to this. Add these lines to the constructor:
We are just about to add the form that will allow people to enter exercises. But first we must add one final method. People filling out the form must select the user associated with the exercise from a drop down list.
Eventually, the user list will come directly from the MongoDB database. For now, though, we’ll hardcode a single user. Add the following method, right after the constructor:
The componentDidMount() method is part of the React life cycle and is invoked immediately after a component is mounted.
The final thing we’ll do in this file for now is add the form code. Here is the complete file so far, including the code for the form:
Notice there is an onChange event for all the form elements that calls the corresponding methods.
Also notice that the final form element has a DatePicker component. At the top of the file we import the DatePicker component and the associated CSS. For the DatePicker component to work, we need to install the package via NPM. Run this in the terminal:
You can now test out the app so far. If you add an exercise, you will see it logged to the console.
Now that we’ve created that component, we’ll create create-user.component.js. That one is much simpler.
First, after the line export default class CreateUser extends Component { add the constructor with this bindings:
Now add the methods to change the username and submit the form:
Finally, at the end in the return statement, delete the current code and add:
You can now submit new users and the name will show up in the console.
Connecting Front to Back
So far, the frontend and backend of our app are separate. We are now going to connect the two by causing our frontend to send HTTP request to the server endpoints on the backend.
We’ll use the Axios library to send HTTP requests to our backend. Install it with the following command in your terminal:
Now we’ll complete the implementation of the CreateUser component and send data to the backend.
In create-user.component.js, after the “import React…” line, add:
To connect our code to the backend, we just need to add a single line to the onSubmit method. After console.log(newUser); add:
The axios.post method sends an HTTP POST request to the backend endpoint http://localhost:5000/users/add. This endpoint is expecting a JSON object in the request body so we passed in the newUser object as a second argument.
Now we can test things out.
If your backend server is not still running, start it with the following command in the backend directory.
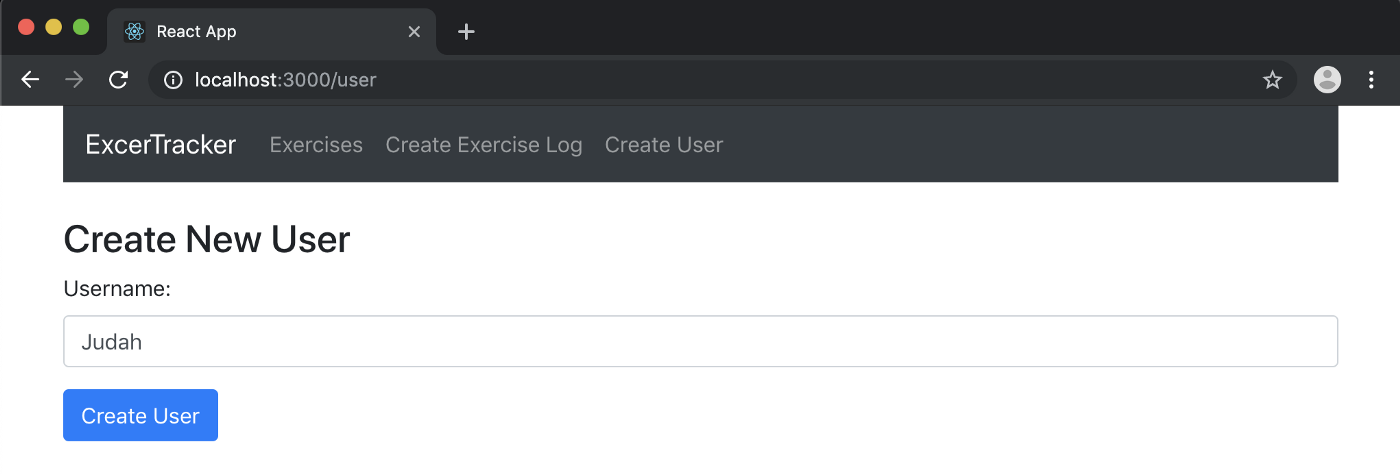
Point your web browser to localhost:3000/user and try adding a new username.
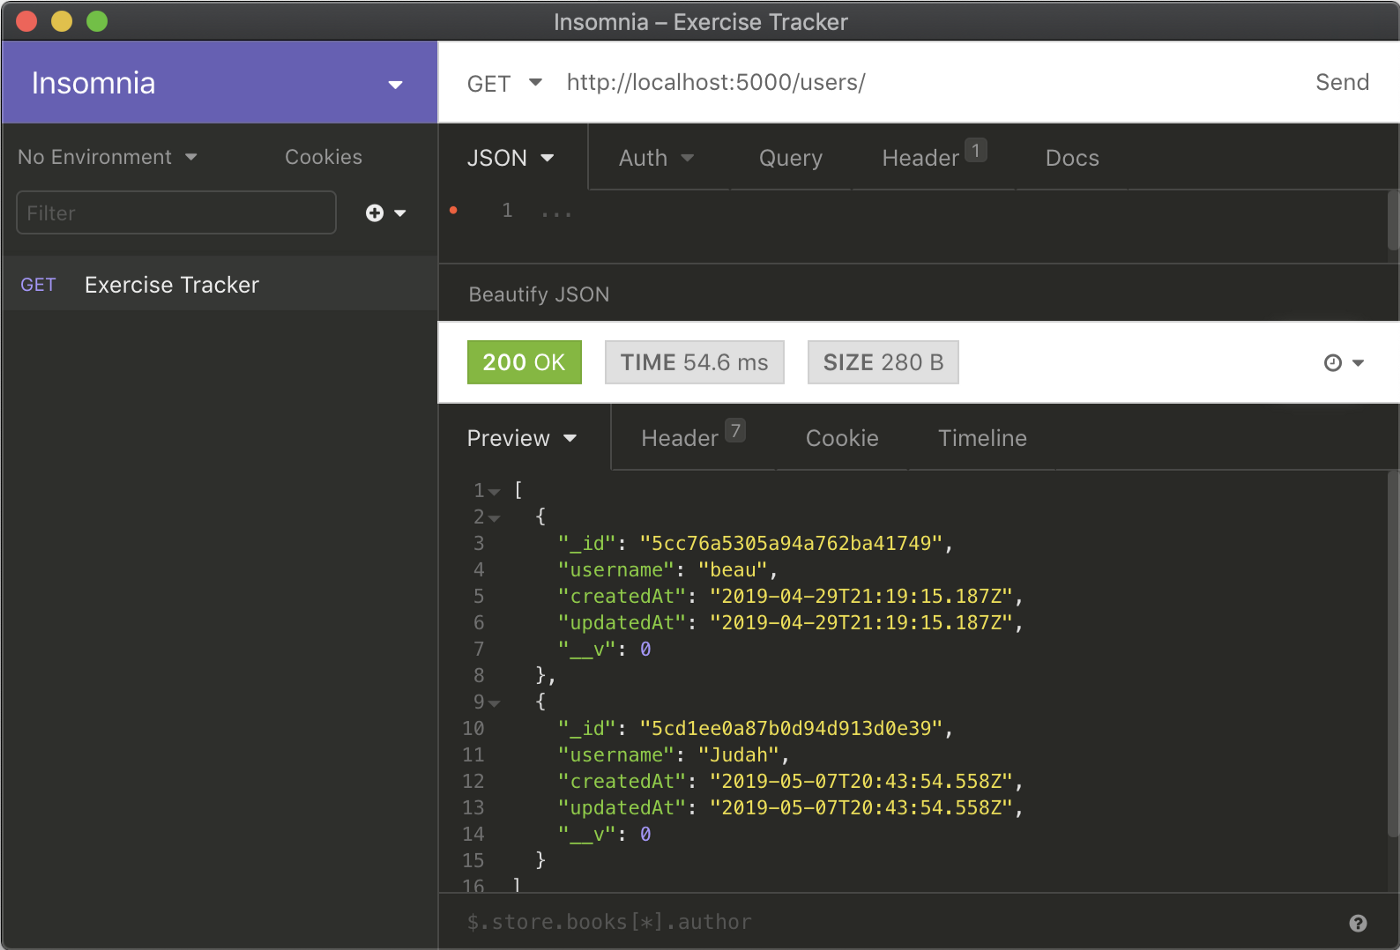
You can now see the new user using Insomnia or the MongoDB Atlas dashboard.
Now we’ll complete the implementation of the CreateExercise component to send data to the backend.
In create-exercise.component.js, after the “import React…” line, add:
To connect our code to the backend, we just need to add a single line to the onSubmit method. After console.log(exercise); add:
In this file, we must also update the componentWillMount() method. We will get the list of users from the database to add to the users dropdown menu in the form. Delete the current contents and add the following code:
You will see that we use the data returned from the database to set the state of users and username. username is automatically set to the first user in the database.
You can now test things out by adding an exercise and checking Insomnia or the MongoDB dashboard to see if it shows up.

Now we’ll complete the ExercisesList component. At the beginning of exercises_-list.component.js_, after the import React… line, add:
After the line export default class ExercisesList extends Component {, add a constructor to initialize the state with an empty exercises array and to bind this to the method we are about to create.
Get the list of exercises from the database by adding this after the constructor:
The code will run before the page is rendered and add the list of exercises to the state. The axios.get method accesses the /exercises endpoint. Then we assign response.data to the exercises property of the component’s state object with the this.setState method.
This component will allow users to delete exercises. Add the method for that feature:
We use the axios.delete method, then we update the state of exercises and filter out the exercise that was deleted.
Now change the return statement of the render function with the following JSX code:
The exercises will appear in a table on the page. You’ll notice that the body of the table just calls the exerciseList() method. We need to implement that method to return the rows of the table. Directly above the render function add:
This method iterates through the list of exercise items by using the map function. Each exercise item is output with the Exercise component. We’ll implement the exercise component next. The current exercise item is assigned to the exercise property of this component.
At the top of the file, after the import statements, add:
The Exercise component is implemented as a functional React component. The key thing that makes this type of component different from a class component is the lack of state and lifecycle methods. If all you need to do is to accept props and return JSX, use a functional component instead of a class component.
It outputs a table row with the values of the properties of the exercise item passed into the component. You’ll notice that in the ‘actions’ column w output two links. One link goes to the edit route and the other calls the deleteExercise method.
We just linked to the Edit route. The final thing we need to do is to implement the EditExercise component. It is very similar to the CreateExercise component with just a few minor changes.
Update all the code in edit-exercise.component.js to the following code. The main differences from the CreateExercise component are the componentDidMount and onSubmit methods.
In the componentDidMount method we use axios.get to get the current exercise from the database and load the data into the state variables. The only difference in the onSubmit method is that the data is posted to the update route.
Conclusion
We’re done! We now have a fully functional MERN exercise tracker app using MongoDB Atlas. Test it and consider doing some refactoring.
As a reminder, you can access the completed code here: https://github.com/beaucarnes/mern-exercise-tracker-mongodb
WRITTEN BY
Beau Carnes
Follow Teacher and software developer @freeCodeCamp. http://carnes.cc My algorithms course: https://is.gd/algmot My deep learning course: https://is.gd/deeple