In my last post, we started preparing an application built on Node.js and MongoDB Atlas for simple CRUD operations. We've completed the initial configuration of the code and are now ready to launch this into production.
As mentioned in part one, I want to minimize the long-term maintenance of this app's hosting environment. Much like we used MongoDB Atlas to offload many of the operational responsibilities for our database, we can make use of Amazon EC2 Container Service to deploy our Docker apps on AWS. By reducing the amount of patching, systems maintenance, and long term security concerns for both our database and our application front-end, we’re able to dedicate more time to application development.
Ready Docker and coldbrew-cli for deploy
Docker and coldbrew-cli have simple configuration files we'll review and write in our repo's root directory.
Docker
Let's take a look at the Dockerfile:
This file will tell Docker to follow the instructions to use the "boron" LTS version of Node.js, meaning we won't need to install it manually to work with our application. After establishing the appropriate version of Node.js to use, we'll then make a working directory on the container telling it where the app will live. The app will be copied into the working directory, "/usr/src/app", and finally be started using the npm start command stated in our package.json file.
Place the contents of the Dockerfile in the root of the code repository and save it.
Next, we'll start working with coldbrew-cli. Much like Docker, we’ll create a plain text config file that will contain basic instructions on how to configure our infrastructure for our app.
coldbrew-cli
Let’s create a file called coldbrew.conf in the root of our repository directory and then store the following contents in it:
For a full breakdown of all the terms in this file, have a look at the coldbrew-cli docs. I have provided a simple configuration file that will set up our elastic load balancing (ELB) with a compute instance for our container and 500 MB of available memory per app. We can even configure a simple health check for our ELB to ensure our instances are online.
We can now create our environment with coldbrew-cli. For the purposes of this walkthrough, let’s say we want to deploy our ECS cluster in the us-east-2 region and that we don’t need to access our nodes via SSH; we can launch using the following command:
Once executing this, we'll be shown a list of resources that will be created:
Answer “Yes”, and your resources will start building in the background.
We can query the status with the following command:
Here is the command output similar to what we would get:
Wow, that's a lot of saved work. Everything from our VPC all the way to the ELB was created for us. See the public IP for our compute instance? Let's make sure it's whitelisted in our Atlas cluster so our data can be saved.
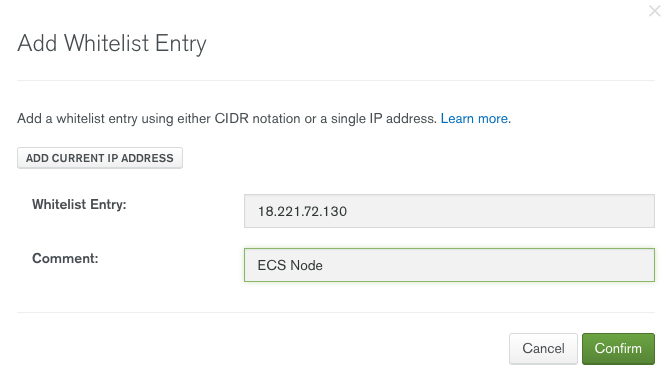
If you were to replace the M0 free cluster with one of Atlas’s dedicated clusters, you'd have access to our VPC peering module for AWS, giving you the ability to whitelist the entire range of host servers via a security group entry in the whitelist.
Now it's time to build our Docker image with coldbrew-cli and deploy our app.
First a Docker image is created and saved:
Then the image is pushed to the appropriate nodes in the cluster:
Our app is now deployed. Let's get the ELB and verify:
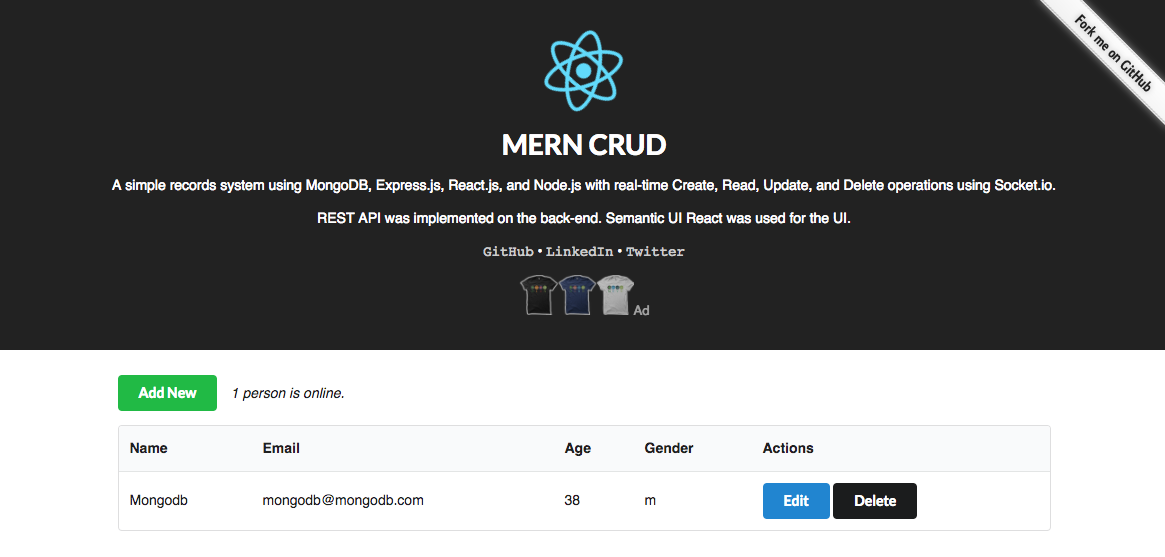
The ELB now provides us with an http endpoint to access our app. There's no need to use nginx or any other http server to reverse proxy the Node.js port. The coldbrew-cli deploy process will set up your port forwarding based on the information in the coldbrew.conf file. The cluster creation and deployment takes about five minutes. To test that we're online and running, simply go to the URL provided by coldbrew and add a record to our app (first load may take a minute):
Congratulations, we now have all the tools to build and configure our own ECS cluster using MongoDB Atlas! Destroying the app is pretty simple as well — just run these two commands to terminate all the resources associated with ECS.
After we answer “yes”, the created resources will begin terminating:
And now delete the remaining cluster elements:
Answer “yes” and we'll see the remaining compute cluster elements terminated:
What's next?
Try this process out with your own application or even with a dedicated MongoDB Atlas cluster to enable VPC peering. You can get a full tutorial on how to configure VPC Peering in MongoDB Atlas by viewing the "Peering your MongoDB Atlas Cluster to AWS" video. You'll be able to use a completely service-based deployment of your application that requires no operating systems to be managed, no kernels to update, and less overall manual work.
If you'd like to sign up for a free MongoDB Atlas cluster, check out our signup page here!