MongoDB is a general-purpose document database designed for modern application development and for the cloud. Its scale-out architecture allows you to meet the increasing demand for your system by adding more nodes to share the load.
Looking for a setup guide on the fully managed cloud database MongoDB Atlas? Check out our Atlas setup guide.
Key Aspects of MongoDB
Here are some of the key concepts and terms you will encounter as you learn about MongoDB.
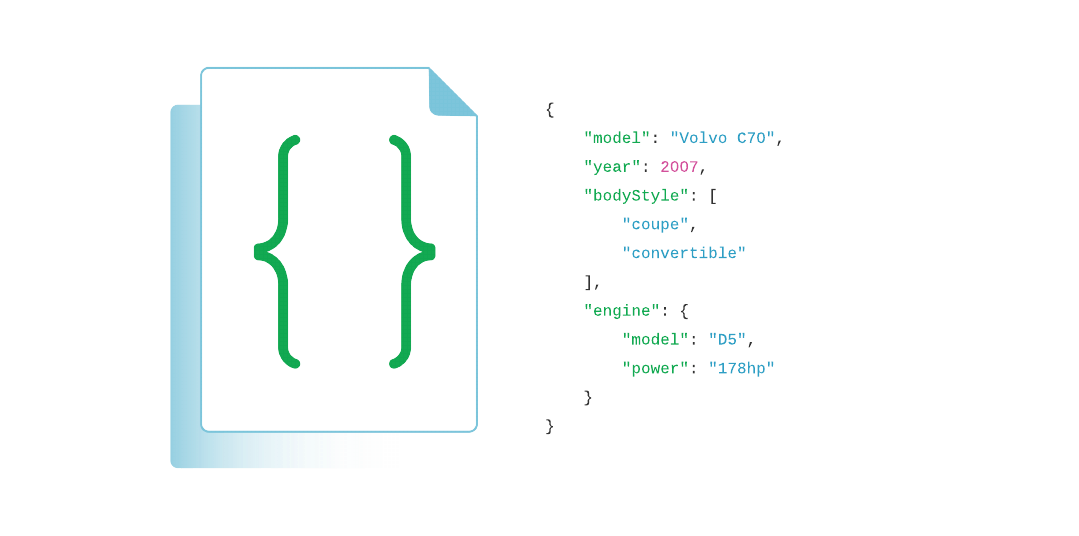
The document data model maps naturally to objects in application code, making it simple for developers to learn and use.
The fields in a JSON document can vary from document to document. Compare that to a traditional relational database table, where adding a field means adding a column to the database table itself and therefore to every record in the database.
Documents can be nested to express hierarchical relationships and store structures such as arrays.
The document model provides flexibility to work with complex, fast-changing, messy data from numerous sources. It enables developers to quickly deliver new application functionality.
For faster access internally and to support more data types, MongoDB converts documents into a format called Binary JSON or BSON. But from a developer perspective, MongoDB is a JSON database.
Collections: Grouping Documents
In MongoDB, a collection is a group of documents.
If you are familiar with relational databases, you can think of a collection as a table. But collections in MongoDB are far more flexible. Collections do not enforce a schema unless you configure them to, and documents in the same collection can have different fields.
Each collection is associated with one MongoDB database. To show which collections are in a particular database, use the command listCollections.
Replica sets: Ensuring high availability
An important way to ensure high availability is by keeping more than one copy of your data. With MongoDB, high availability is built right into the design.
When you create a database in MongoDB, the system automatically creates at least two more copies of the data, referred to as a replica set. A replica set is a group of at least three MongoDB instances that continuously replicate data between them, offering redundancy and protection against downtime in the face of a system failure or planned maintenance.
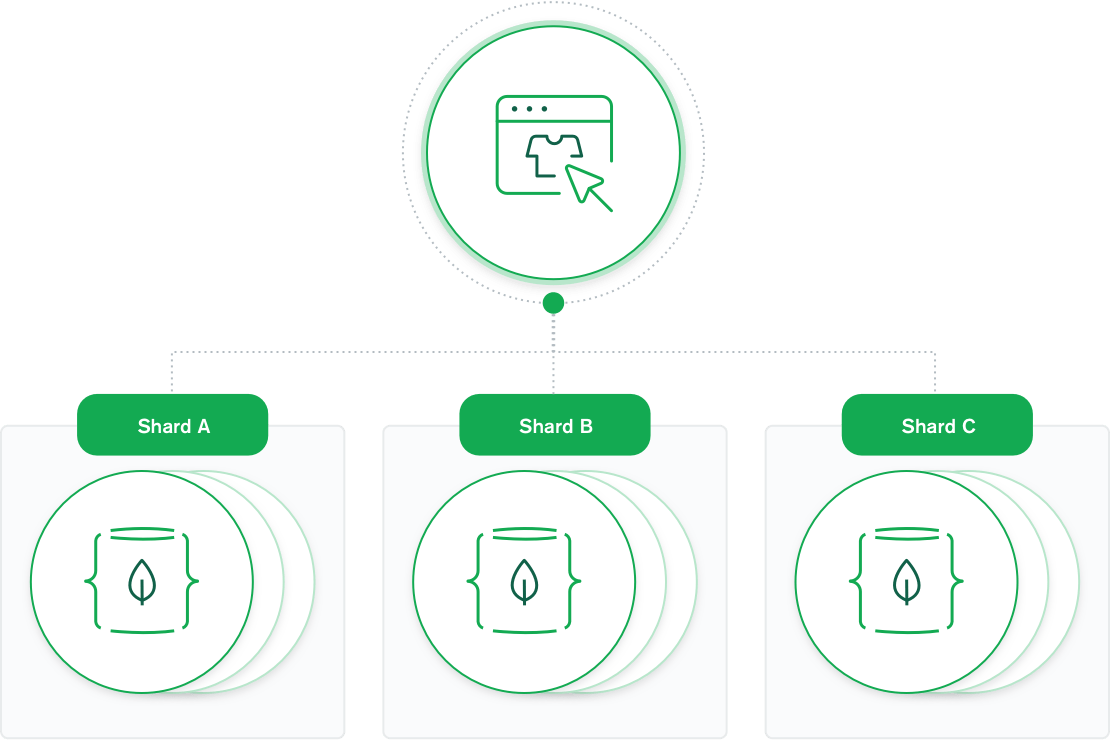
Sharding: Scalability to handle massive data growth
A modern data platform needs to be able to handle very fast queries and massive datasets using ever bigger clusters of small machines. Sharding is the term for distributing data intelligently across multiple machines.
How does sharding work in MongoDB? MongoDB shards data at the collection level, distributing documents in a collection across the shards in a cluster. The result is a scale-out architecture that supports even the largest applications.
Indexes: Improving query speed
Indexes support the efficient execution of queries. MongoDB offers a variety of different indexing strategies, including compound indexes on multiple fields. Chosen carefully, indexes speed up queries because queries scan the index instead of reading every document in the collection.
There is still work to do to analyze which queries could benefit from adding an index. One tool that does this analysis for you is Performance Advisor, which analyzes queries and suggests indexes that would improve query performance.
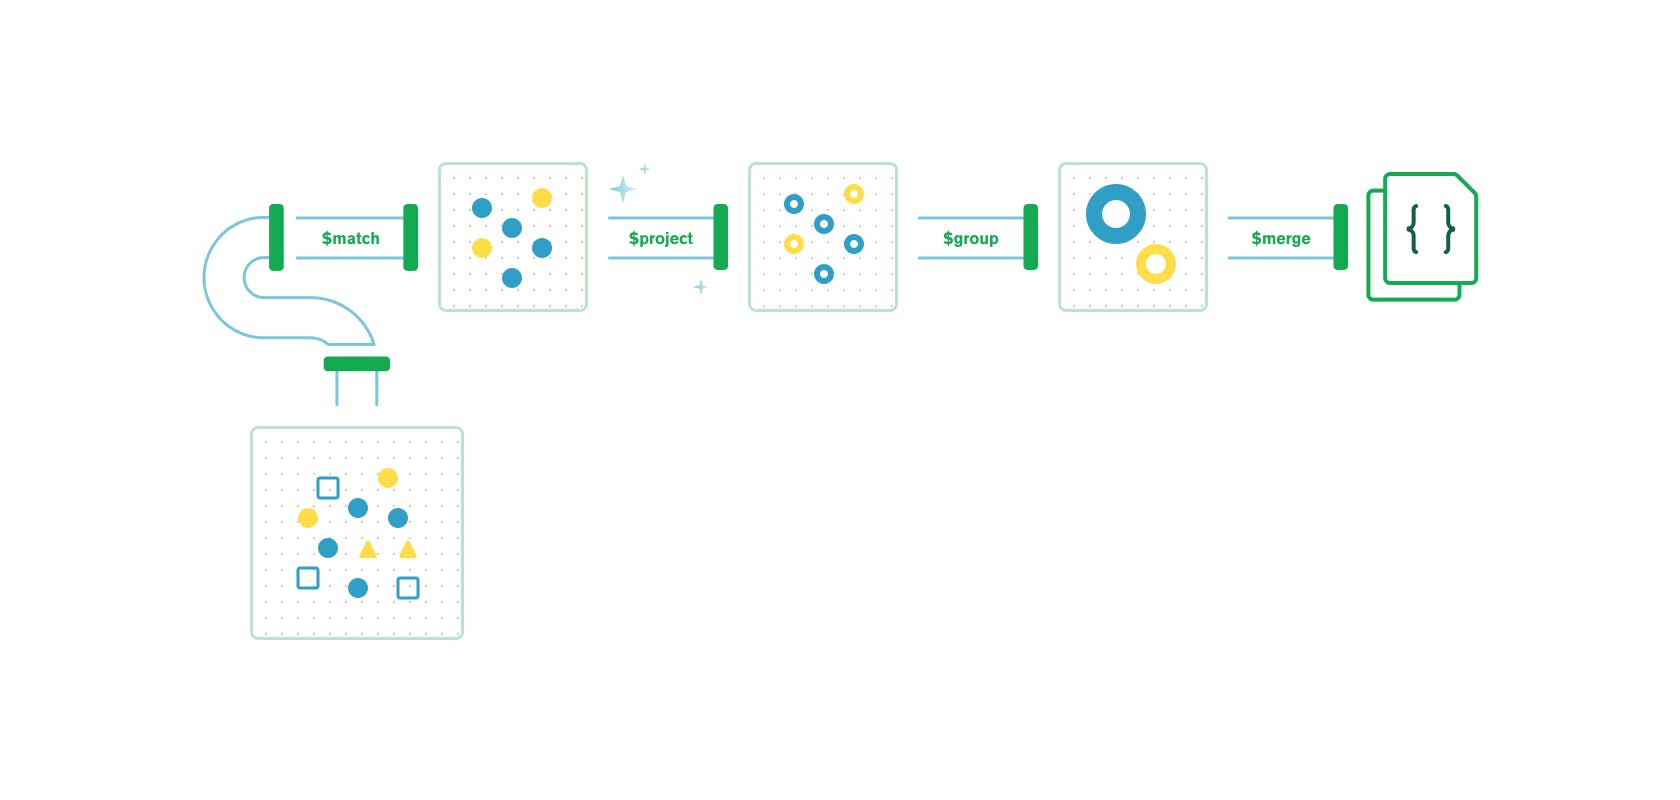
Aggregation pipelines: Fast data flows
MongoDB offers a flexible framework for creating data processing pipelines called aggregation pipelines. It features dozens of stages and over 150 operators and expressions, enabling you to process, transform, and analyze data of any structure at scale. One recent addition is the , which flexibly aggregates results from multiple collections.
Programming languages: Does MongoDB speak your language?
What languages can you use with MongoDB? The list of supported languages includes Node.js, C, C++, C#, Perl, PHP, Ruby, Rust, Scala, Swift and many more. The library for each language is actively maintained, which means that it is updated with new features, bug fixes, security patches, and performance enhancements.
How to monitor MongoDB
You can monitor your cluster's health and performance by checking instance status, cluster operations and connections metrics, hardware metrics, and more with just a few utilities and commands. Monitoring can help you detect and react to real-time issues before they become significant.
MongoDB cloud
MongoDB started out as an open source database and it still can be used that way through the MongoDB Community Edition.
In MongoDB Enterprise Edition, advanced features are available through a commercial license.
MongoDB Atlas is a database-as-a-service (DBaaS) version of MongoDB Enterprise Edition that is offered on all public clouds.
MongoDB Atlas has been extended in a variety of ways with built-in, tightly integrated functionality such as Atlas Search, Atlas Vector Search, and other advanced features for geo-locating data and making backups.
Learn More: Beyond the Basics
Now that you’re versed in some of the terminology you’ll encounter when learning about MongoDB, why not get started right away using MongoDB Atlas? While you’re at it, join the MongoDB community, which offers everything from forums to webinars to free courses from MongoDB University. A good place to start is the introductory M001: MongoDB Basics course.
MongoDB is a general-purpose database, with a wide variety of use cases. If you’re still wondering if MongoDB is the right choice for your application, check out the Why Use MongoDB? article.