Overview
在本教程中,您可以学习;了解如何在 Spring Boot应用程序中使用 Spring Session MongoDB 。Spring Session MongoDB是由MongoDB维护的开源集成,它使应用程序能够在MongoDB中存储Spring Session 数据。
按照本教程将示例Spring Boot应用程序连接到MongoDB Atlas部署以进行会话存储。
提示
本教程修改在 Spring Data Framework 集成教程中创建的 Spring Boot应用程序。本页上的步骤展示了如何更新该应用程序以使用 Spring Session MongoDB。
设置您的项目
完成以下步骤,设立Spring Boot应用程序,并在开发环境中安装 Spring Session MongoDB 。
验证先决条件。
在开始本教程之前,请确保安装并设立以下先决条件:
JDK 版本 17 或更高版本
集成开发环境 (IDE),例如 IntelliJ IDEA 或 Eclipse
注意
本教程介绍如何在 IDE 中使用 Maven 安装 Spring Session MongoDB 。如果您不使用 IDE,请访问 构建 Maven 以学习;了解如何设立项目。
创建一个新的 Spring Boot项目。
完成 Spring Data Framework 集成教程以创建新的 Spring Boot 应用程序。您还可以通过访问 GitHub 上的SpringDataMongoBulkInsert存储库来查看和克隆应用程序代码。
完成本先决条件教程后,您将拥有一个新应用程序,它使用 Spring Data MongoDB对MongoDB集合执行批量插入操作。
更新项目依赖项。
在 pom.xml文件中,将 spring-boot-starter-parent 依赖项替换为以下代码:
<parent> <groupId>org.springframework.boot</groupId> <artifactId>spring-boot-starter-parent</artifactId> <version>4.0.0</version> <relativePath/> <!-- Lookup parent from repository --> </parent>
这可确保您的应用程序使用与 Spring 会话 4.0 兼容的 Spring Boot 4.0。
然后,将以下依赖项添加到文件的依赖项列表中以使用 Spring Session MongoDB:
<dependency> <groupId>org.mongodb</groupId> <artifactId>mongodb-spring-session</artifactId> <version>4.0.0-rc0</version> </dependency>
配置依赖项后,运行依赖项管理器并在 IDE 中刷新项目,确保它们可用于您的项目。
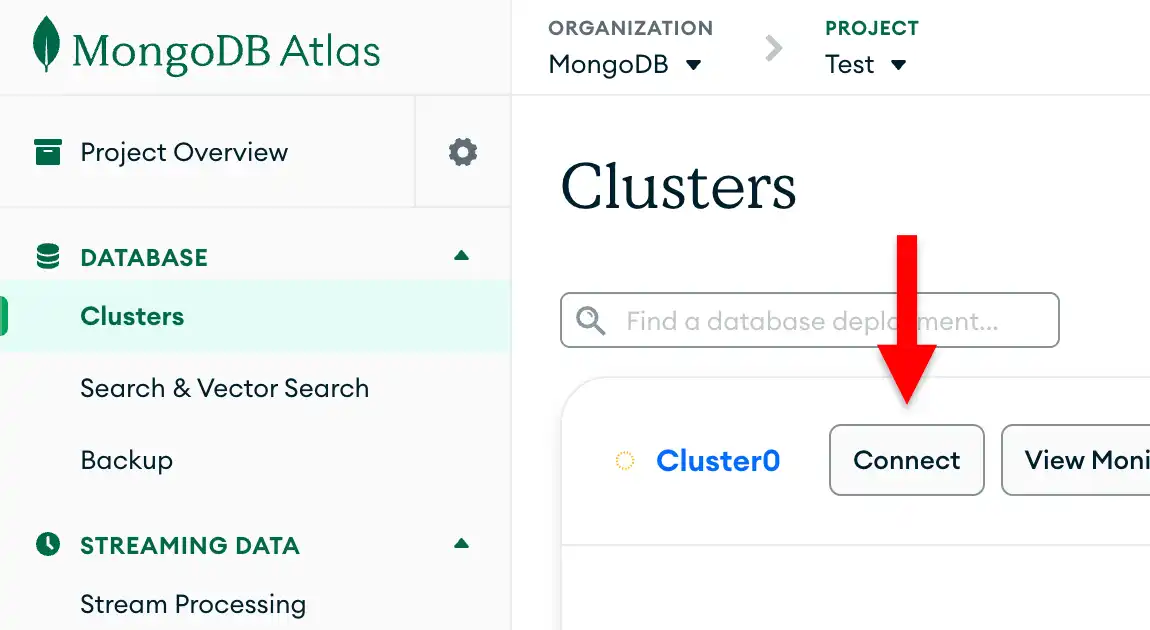
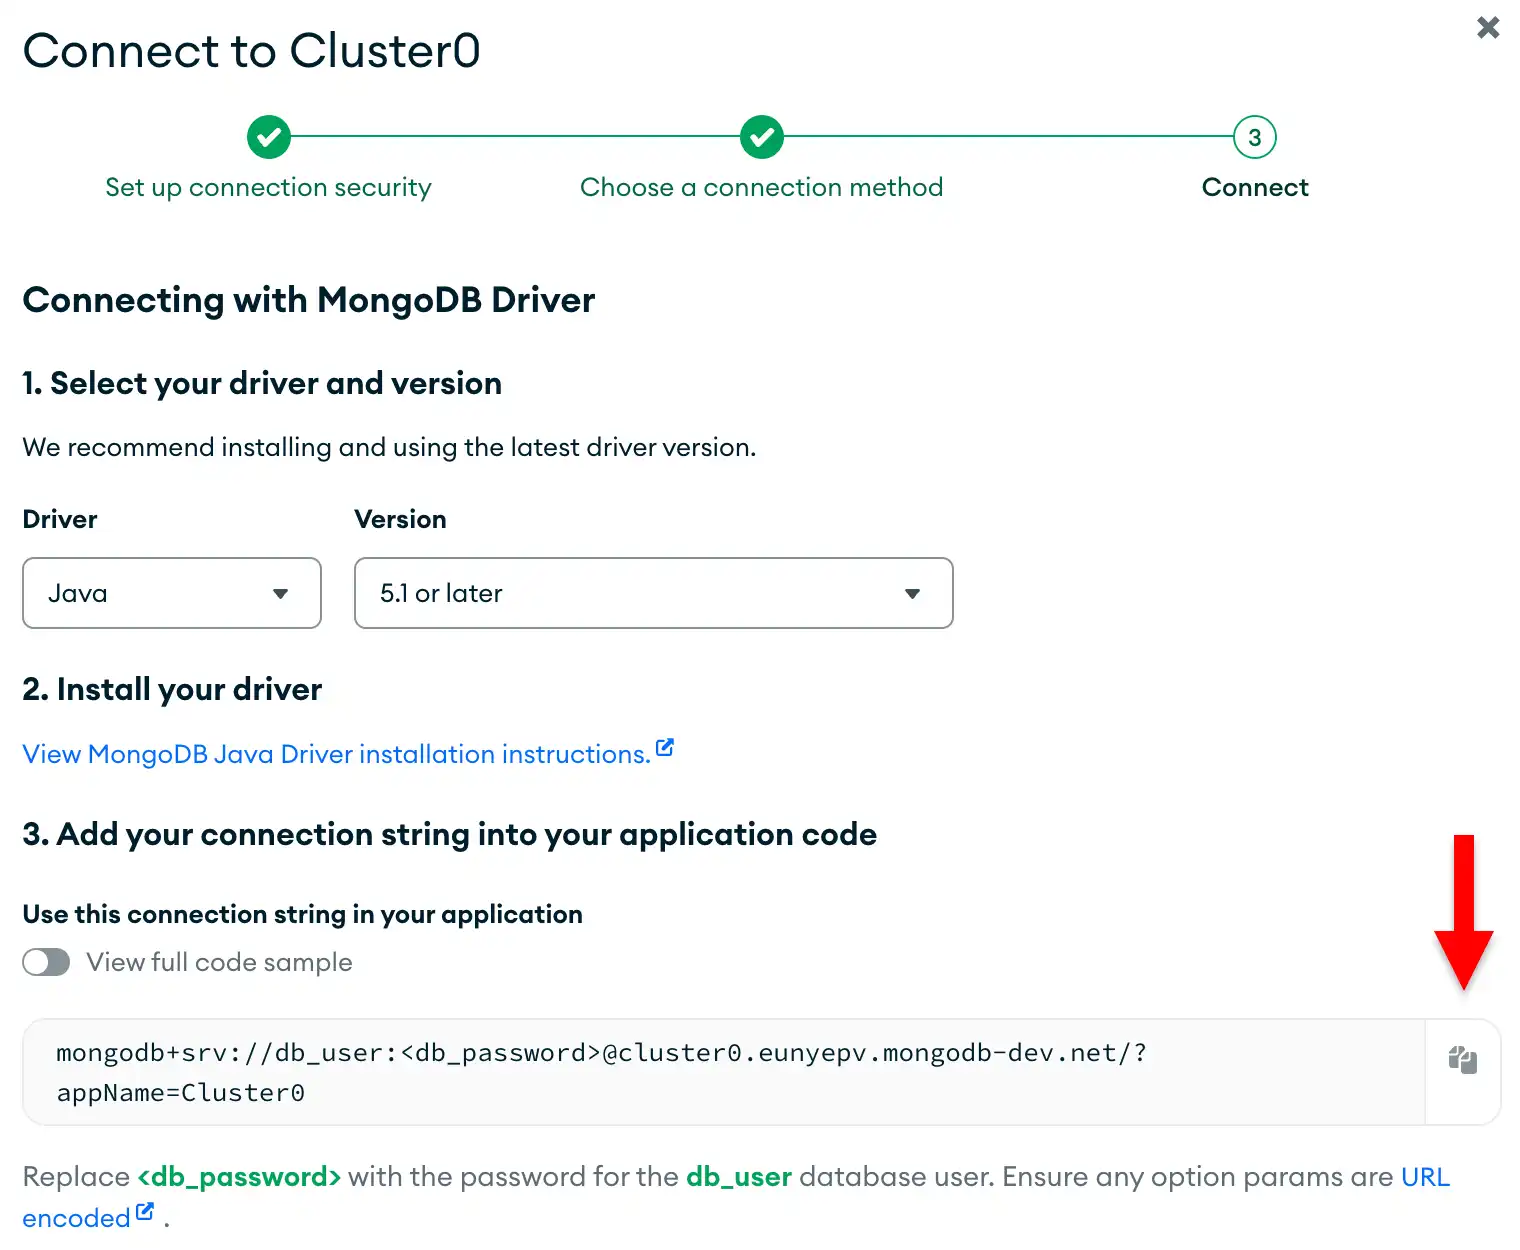
连接到 MongoDB 部署
通过检索连接 URI(也称为连接字符串)完成以下步骤,连接到MongoDB 部署。连接 URI 指示驱动程序如何连接到MongoDB 部署以及连接时如何表现。


配置 Spring 会话MongoDB
完成Spring Data教程并访问连接 URI 后,您可以将 Spring Session MongoDB添加到应用程序以启用会话管理。
验证您的MongoDB连接。
导航到 src/main/resources目录中的 application.properties文件。确保此文件指定您的 MongoDB 数据库、连接 URI 以及要插入的文档数量,如 Spring Data 教程的配置 MongoClient部分中所述。如果配置正确,您的文件将包含以下代码:
mongodb.database=bulk mongodb.uri=<connection URI> documentCount=25000
<connection URI>将 占位符替换为您在上一节中保存的连接 URI。
创建 Spring 会话配置类。
在项目的基础包目录中创建一个名为 SessionConfig.java 的新文件,然后粘贴以下代码:
package com.mongodb.examples.springdatabulkinsert; import org.mongodb.spring.session.config.annotation.web.http.EnableMongoHttpSession; import org.springframework.context.annotation.Configuration; public class SessionConfig { }
此配置类为您的 Spring Boot应用程序启用MongoDB支持的HTTP会话管理。
添加会话感知的 Web 终结点
接下来,添加 Web 终结点,以演示处理来自 Spring Data MongoDB应用程序的产品数据时的会话管理。
创建 Web 控制器。
在项目的基础包目录中创建一个名为 ProductWebController.java 的文件,然后粘贴以下代码:
package com.mongodb.examples.springdatabulkinsert; import org.springframework.beans.factory.annotation.Autowired; import org.springframework.data.mongodb.core.MongoTemplate; import org.springframework.data.mongodb.core.query.Criteria; import org.springframework.data.mongodb.core.query.Query; import org.springframework.web.bind.annotation.GetMapping; import org.springframework.web.bind.annotation.RequestParam; import org.springframework.web.bind.annotation.RestController; import jakarta.servlet.http.HttpSession; import java.util.ArrayList; import java.util.List; import java.util.Map; public class ProductWebController { private MongoTemplate mongoTemplate; public Map<String, Object> searchProducts( String name, HttpSession session) { List<String> searchHistory = (List<String>) session.getAttribute("searchHistory"); if (searchHistory == null) { searchHistory = new ArrayList<>(); } // Defines the default search if no name is provided if (name == null || name.trim().isEmpty()) { name = "product"; } // Adds the current search to history searchHistory.add(name); session.setAttribute("searchHistory", searchHistory); // Queries the "name" field in the "products" collection Query query = new Query(Criteria.where("name").regex(name, "i")); List<Product> products = mongoTemplate.find(query, Product.class, "products"); return Map.of( "products", products, "sessionId", session.getId() ); } public Map<String, Object> getSearchHistory(HttpSession session) { // Retrieves the search history from the session List<String> searchHistory = (List<String>) session.getAttribute("searchHistory"); if (searchHistory == null) { searchHistory = new ArrayList<>(); } return Map.of( "searchHistory", searchHistory, "sessionId", session.getId(), "searchCount", searchHistory.size() ); } }
ProductWebController.java 是一个 REST 控制器,它通过与现有产品数据交互来演示会话功能。此文件定义了以下 Web 终结点:
/products/search:搜索bulk.products集合中的产品并将每个搜索术语存储在用户会话中/products/history:从MongoDB中存储的用户会话中检索搜索历史数据
更新主应用程序类。
在测试新的 Web 终结点之前,更新主应用程序类以使应用程序保持运行并输出有关终结点的信息。将 SpringDataBulkInsertApplication.java 的内容替换为以下代码:
package com.mongodb.examples.springdatabulkinsert; import org.slf4j.Logger; import org.slf4j.LoggerFactory; import org.springframework.beans.factory.annotation.Autowired; import org.springframework.beans.factory.annotation.Value; import org.springframework.boot.CommandLineRunner; import org.springframework.boot.SpringApplication; import org.springframework.boot.autoconfigure.SpringBootApplication; public class SpringDataBulkInsertApplication implements CommandLineRunner { private int count; private static final Logger LOG = LoggerFactory .getLogger(SpringDataBulkInsertApplication.class); private ProductRepository repository; public static void main(String[] args) { SpringApplication.run(SpringDataBulkInsertApplication.class, args); } public void run(String... args) throws Exception { repository.bulkInsertProducts(count); LOG.info("Bulk insert completed. Web endpoints are now available."); LOG.info("You can visit these URLs:"); LOG.info(" http://localhost:8080/products/search?name=goose"); LOG.info(" http://localhost:8080/products/history"); } }
运行应用程序
最后,按照本节中的步骤运行应用程序并探索会话存储功能。
测试会话功能。
打开 Web 浏览器或使用 curl 等工具测试以下启用会话的终结点:
搜索产品:要查询插入
bulk.products集合的文档,请访问http://localhost:8080/products/search?name=并将产品名称附加到URL。示例,您可以通过访问name"goose"http://localhost:8080 /products/ 搜索 ?name=goose搜索 值为 的文档。输出包含您的会话ID以及与您的
name字段查询匹配的文档列表,如以下示例输出所示:{ "sessionId": "...", "products": [ { "name": "goose", "qty": 788, "price": 9680, "available": "...", "unavailable": "...", "skuId": "276-68-7836" }, { "name": "goose", "qty": 984, "price": 2307, "available": "...", "unavailable": "...", "skuId": "068-88-9345" }, ... ] } 查看搜索历史记录:要查看搜索历史记录,请访问 http://localhost:8080/products/history。
输出包含您的 会话ID、您搜索的产品名称列表以及总搜索次数,如以下示例输出所示:
{ "sessionId": "...", "searchHistory": [ "goose", "bear" ], "searchCount": 2 }
重新启动您的应用程序。
如果您停止应用程序并再次运行它, MongoDB会保留您的会话数据。
- 在 IDE 或终端中停止应用程序。然后重新启动
- 在 IDE 中运行,或在终端中运行以下命令:
./mvnw spring-boot:run
如果访问 http://localhost:8080 /products/history URL ,则即使应用程序重新启动,仍可查看以前的搜索历史记录。此数据仍然可用,因为它存储在MongoDB中而不是内存中。
注意
会话超时
春季会话 MongoDB 的默认会话超时为 30 分钟。如果应用程序在不活动 30 分钟后重新启动,会话将过期, MongoDB不再存储以前的会话数据。
后续步骤
恭喜您完成本教程!
注意
如果您在本教程中运行问题,请使用此页面右侧或右下角的 Rate this page标签页提交反馈。
您可以使用MongoDB Stack Overflow标签 或MongoDB Reddit Community 寻求一般问题的支持。
在本教程中,您更新了 Spring Data MongoDB应用程序以使用 Spring Session MongoDB ,并将用户会话存储在包含产品数据的同一MongoDB 部署中。该应用程序演示了会话管理与批量操作和数据查询的协同工作。
要继续开发应用程序,请查看以下资源: