Why migrate to a modern database?
For over five decades, relational database management systems (RDBMS) have been the cornerstone of data storage in software applications. These systems excel at handling structured data, organized in rigid schemas with rows and columns stored in tables. This approach has served traditional applications well, providing a solid foundation for data management and retrieval.
However, the digital landscape has evolved dramatically in recent years. The rise of unstructured and semi-structured data, along with the growing importance of embedding artificial intelligence in modern applications, has exposed limitations in traditional relational databases like MySQL. Developers now require greater schema flexibility, improved scalability, and advanced features like vector search to build modern, AI-powered applications.
MongoDB meets the demands of modern development by providing a flexible document-based data model, horizontal scaling, and built-in support for storing and searching vector embeddings. Its advanced data platform allows developers to handle various data types and create adaptable data structures efficiently. This flexibility enables the seamless integration of AI features into applications, empowering developers to create innovative solutions, streamline the development process, and delight customers.
Learn more about the key differences between MySQL and MongoDB.
Migrating from MySQL to MongoDB
Migrating from MySQL to MongoDB can feel like an open-ended process. You're likely grappling with many questions: Which data should you prioritize for migration? How do you effectively map and model your relational database schemas to MongoDB's document model? What's the best approach to convert your existing application code, queries, and stored procedures to work with MongoDB? And perhaps most crucially, how do you actually execute the data migration without compromising security or losing your data?
With the right approach and tools, you can turn this challenging task into an exciting opportunity and migrate to a modern database to unlock new possibilities for your applications.
Introduction to MongoDB Relational Migrator
MongoDB's Relational Migrator simplifies database migration by automating the most complex aspects of migrating from legacy relational databases to MongoDB. Leveraging intelligent algorithms and generative AI (gen AI), the tool significantly reduces the time and effort required for migration while minimizing associated risks. This automation frees up development teams to focus on modernizing applications and driving innovation, rather than getting bogged down in technical migration details.
Overview of Relational Migrator's key features
Here are its features and how they help:
Read more about Relational Migrator or watch a demo.
Preparing for a test migration
When migrating from MySQL to MongoDB, it is important to first perform a test migration in a sandbox environment. The test can help you identify potential problems and fine-tune your migration strategy accordingly. We do not recommend migrating directly to a production environment.
Before starting, make sure you have:
- Access: Credentials and connection information for your MySQL database
- MongoDB Instance: A MongoDB database (e.g., Atlas) with connection string URI and a user with read/write permissions
- Sign up for Atlas free here: MongoDB Atlas
Installing Relational Migrator
Visit MongoDB Relational Migrator Download to download the tool. Make sure you download the correct installer for your operating system.
We have installers available for four platforms:
- Windows users should use the .msi package.
- Mac users should use the .dmg package.
- Debian Linux (e.g. Ubuntu) users should use the .deb package.
- Centos Linux (e.g. Red Hat) users should use the .rpm package.
Start, access, and exit Relational Migrator
To start Relational Migrator, double-click the MongoDB Relational Migrator icon from your system launcher. Once started, your web browser will automatically open the Relational Migrator UI from the URL http://127.0.0.1:8278.
Note:
- If you close the browser, you can reopen Relational Migrator by navigating back to this URL. You can also click the Relational Migrator icon in your system notification tray and choose the Show UI option.
- To shut down Relational Migrator, you need to click the Migrator icon in your system notification tray and choose the Exit Migrator option. Closing the browser will not fully shut down Relational Migrator.
Other installation options
If you prefer you can also run Relational Migrator via Docker:
docker run -p 8080:8080 public.ecr.aws/v4d7k6c9/relational-migrator:latest
More installation help
Refer to the Relational Migrator Installation instructions if you need help: Installation - Relational Migrator
Create a new migration project and connect to your MySQL database
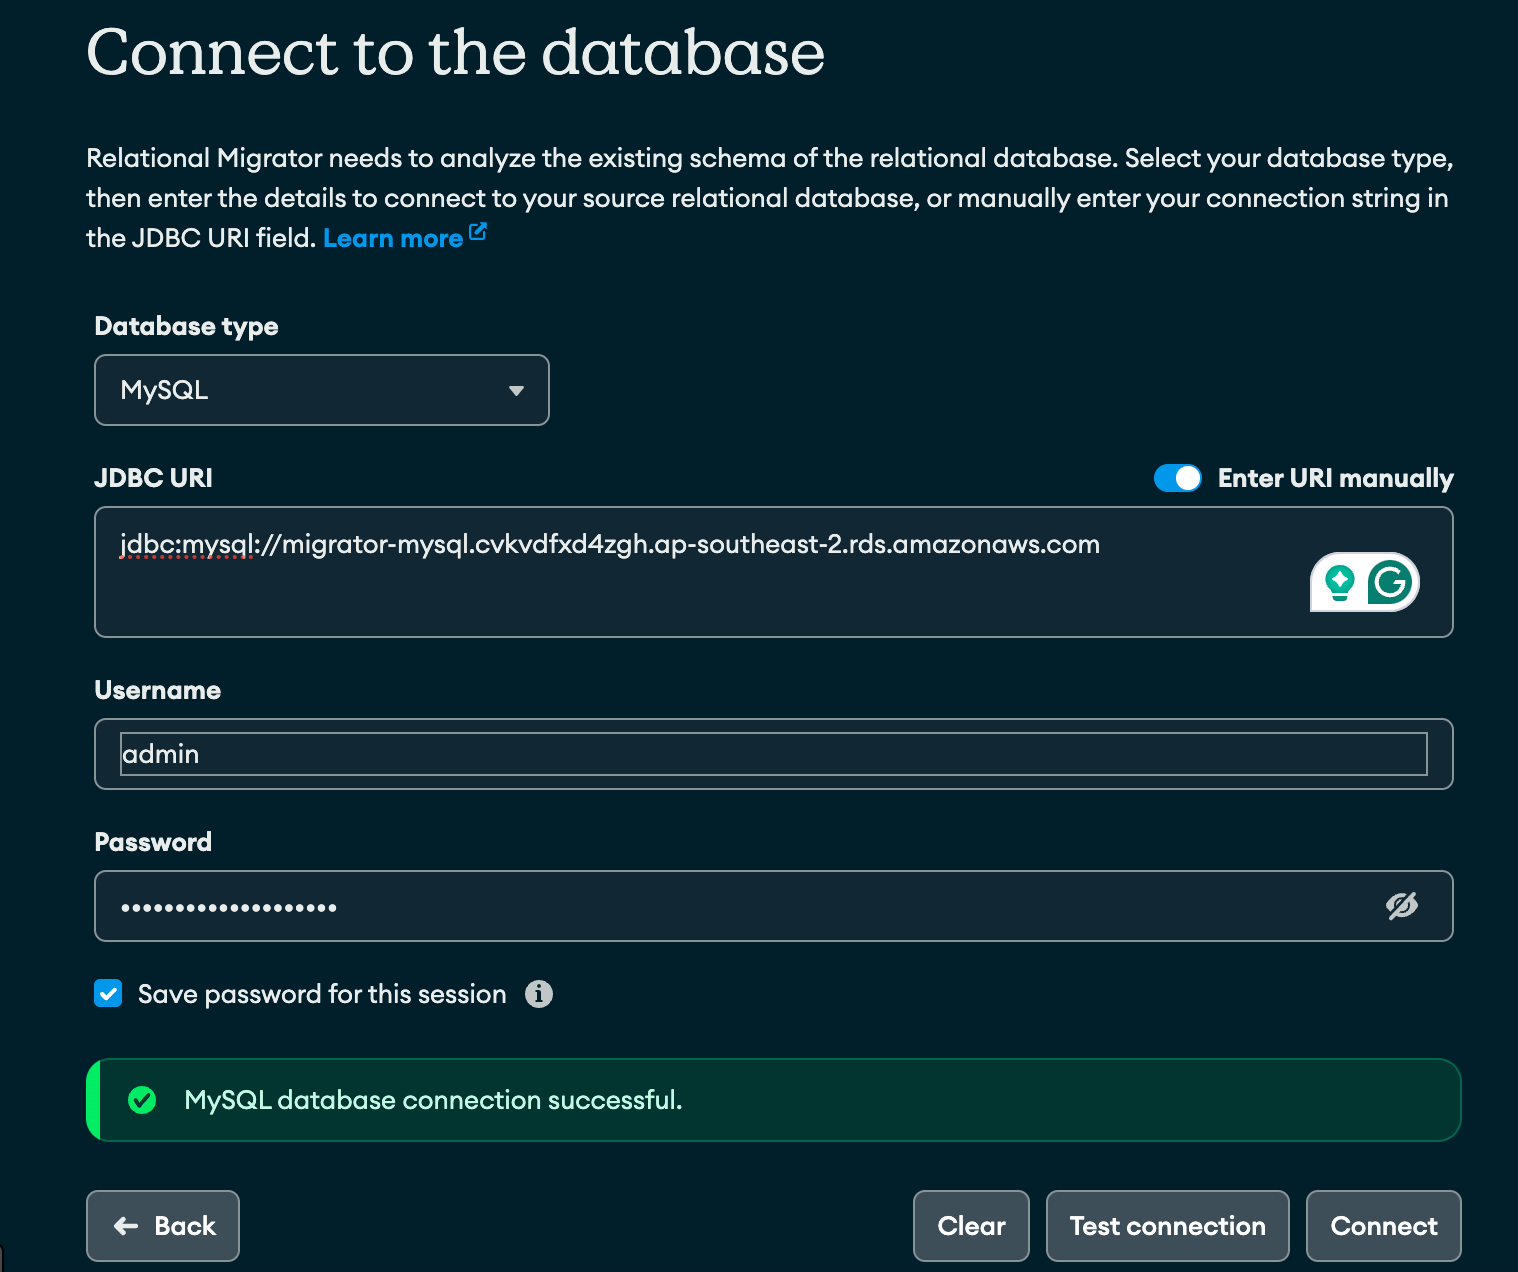
This is the Relational Migrator web UI:
- Click on New Project
- Click on Connect Database
- Select MySQL from the DB type field
- If you need to install MySQL JDBC drivers, download them here
- Enter URI, Username, and Password
- Click on Connect
Congrats! Your MySQL database is now connected to Relational Migrator. You have completed the first step to migrating from MySQL to MongoDB.
Define your MongoDB schema
After connecting, select the tables you want to migrate from your relational database. You can select all tables or exclude those that you don’t want to migrate.
Next, define your MongoDB schema. Relational Migrator gives you three options when creating mapping rules:
1. Start with Relational Migrator’s suggested mappings based on the relationships in your existing data. Selecting this option displays recommendations for top-level collections and embedded data.
OR
2. Start with a blank canvas, which allows you to create the new MongoDB schema manually.
OR
3. Use the default 1:1 schema where every table starts as a top-level collection.
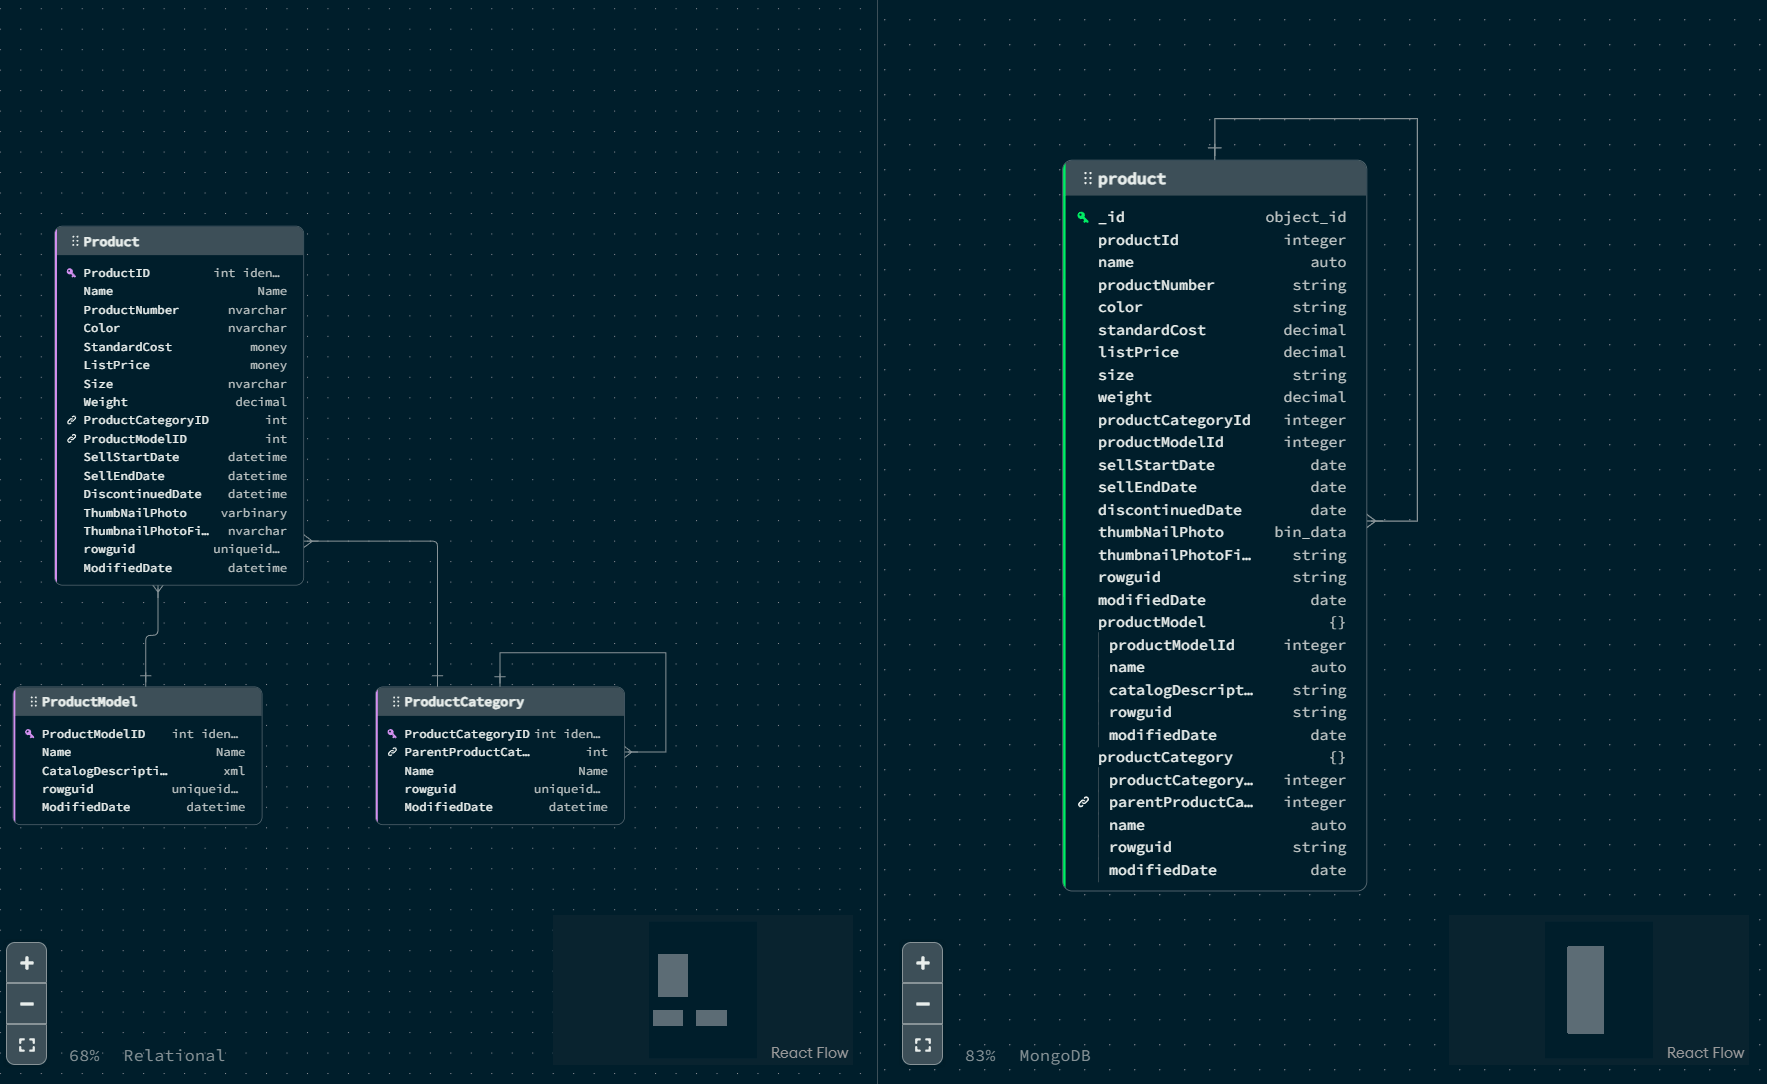
Customize your mapping rules
After importing your initial mapping into your project, you can completely customize your new MongoDB schema to suit your application needs. With the intuitive schema design visualizer, you’re able to design the schema for your application to take advantage of the document model.
Add or update mapping rules to create a data model that best matches your application needs. Some customization capabilities include:
- Adding your own MongoDB collections
- Adding embedded arrays within that collection
- Adding embedded documents within that array with complete flexibility over field selection for documents

Migrate your MySQL data to MongoDB collections
It’s time to begin the data migration process by exporting your MySQL data from relational tables and importing it into MongoDB collections based on the schema you established in the previous step.
Before you start, make sure you have the right MySQL configurations in place.
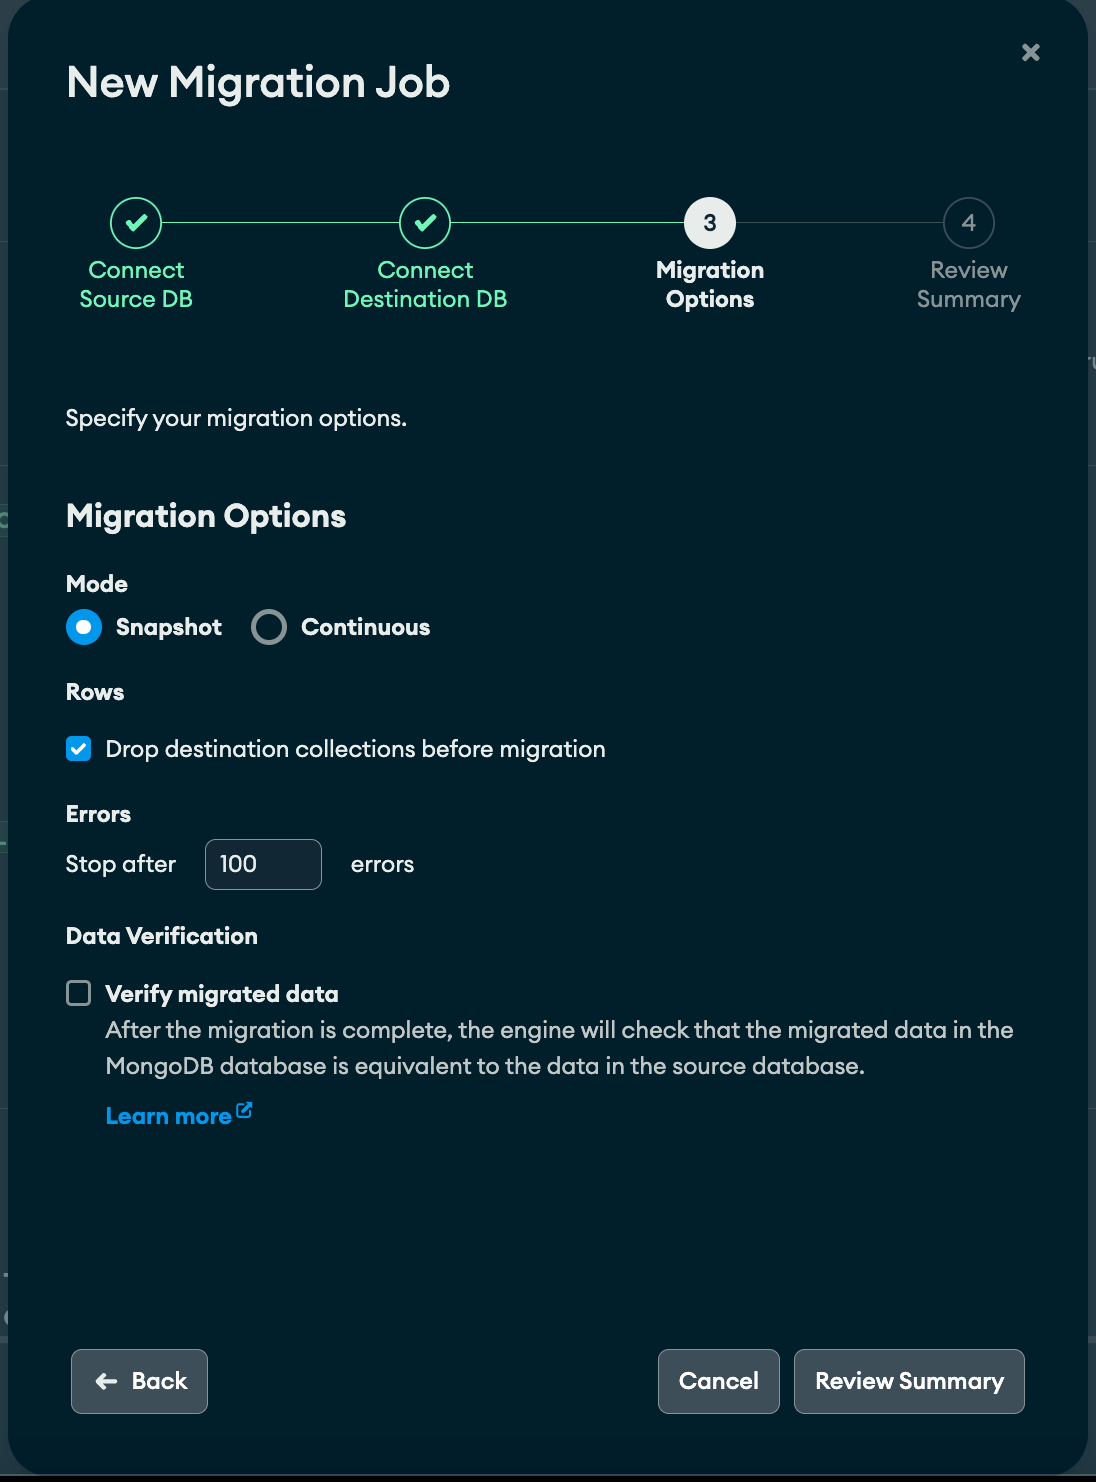
- To get started, go to the Data Migration tab and click on Create migration job.
- Enter your credentials and connect your source MySQL database.
- Enter your credentials and connect your destination MongoDB database.
- Relational Migrator offers two types of sync jobs, depending on whether you want any downtime.
Migrate with downtime
- Snapshot migration: A one-time migration that captures all data from the relational database at a specific point in time. This option requires downtime.
Migrate with zero downtime
- Continuous migration: Continuously synchronize data changes between the relational database and MongoDB using change data capture (CDC). This option is ideal for zero downtime.
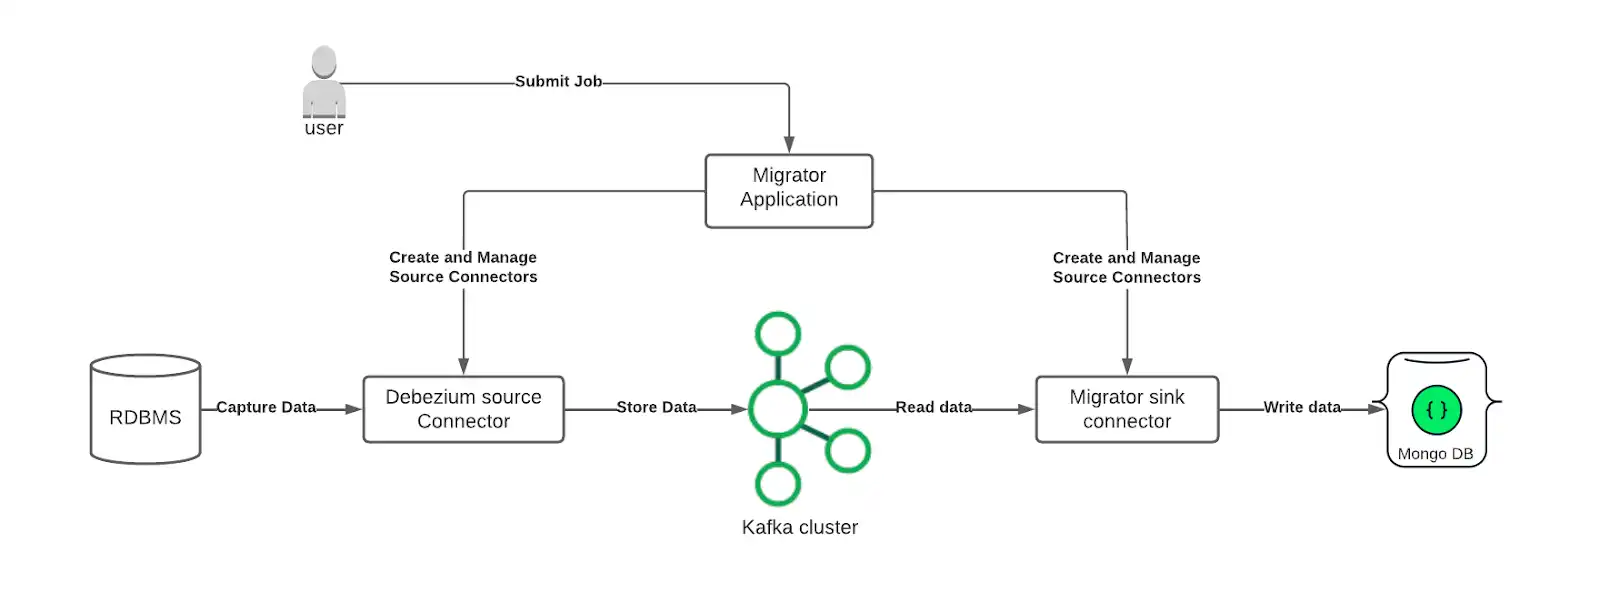
Use Kafka Connect with Relational Migrator for large and long-running jobs
We recommend using Relational Migrator with Kafka or Confluent Cloud for real-time, large-scale, extended migrations.
Relational Migrator uses Apache Kafka as a robust transport layer to migrate data from a source relational database to MongoDB. It can be used as a Kafka Connect plugin that improves the resilience and scalability of big data migration jobs. Kafka's built-in resilience ensures the migration job can recover and continue running if any component becomes temporarily unavailable.
Relational Migrator and Kafka Architecture
Don’t want to manage Kafka? Migrate your data with Confluent Cloud
You can also configure Relational Migrator with Kafka using Confluent Cloud. This gives your deployment the reliability of Kafka without requiring that you manage your own Kafka cluster.
Watch our tutorial, The Great Continuous Migration: CDC Jobs With Confluent Cloud and Relational Migrator, for an in-depth guide on how to conduct change data captures from your relational data from MySQL to MongoDB Atlas using Confluent Cloud and Relational Migrator.

Generate application code
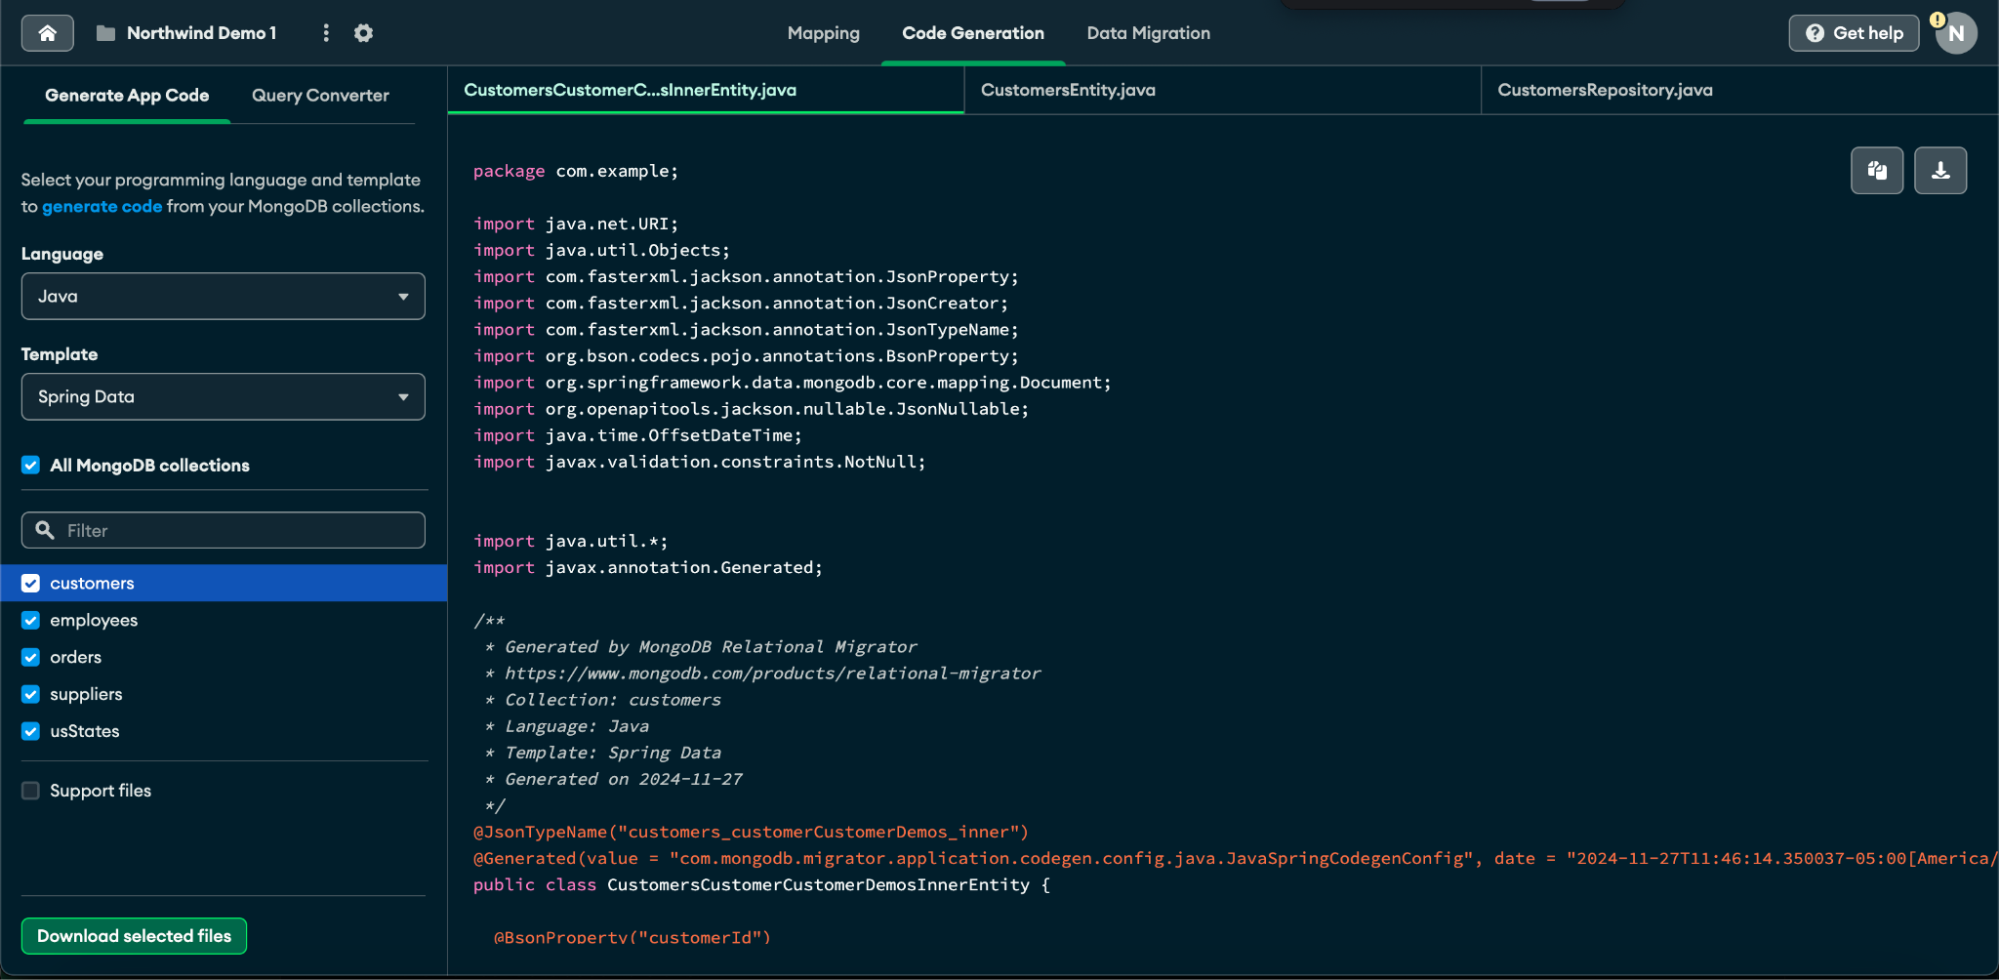
In a migration project from a relational database to MongoDB, you often need to update or rewrite portions of your application code to ensure compatibility with MongoDB's document model. The Generate App Code feature in Relational Migrator streamlines this process by analyzing your newly created MongoDB collections and automatically generating compatible application code based on the new MongoDB schema. This feature can significantly reduce the time and effort required to adapt your existing application to work with MongoDB. It provides language support for C#, Java, JavaScript and JSON.
Here is how to start:
- Navigate to the Code Generation screen, in the left Generate code pane.
- Select a Language.
- Select a Template.
- You can select All MongoDB collections, or individually select which individual collections you want to convert.
- (Optional) Enter a keyword in the Filter text box to filter the MongoDB collections.
- Click the Download Selected Files button. The selected files will download into a zip file in your Downloads folder. The zip file has a naming convention of PROJECTNAME-LANGUAGE-TEMPLATE.
If you need more help or information, refer to the documentation.
Convert SQL database objects
The Query Converter uses gen AI to convert SQL queries, views, and stored procedures using your preferred programming language to MongoDB syntax. It provides language support for C#, Java, and JavaScript.
The converted code takes into consideration the mapping rules and schema transformations defined in your project. You can also validate the converted SQL database objects using the Test Query feature to ensure the converted objects will work with MongoDB.
Here is how to start:
Before you can use the query converter, you must sign in to your Atlas account in Relational Migrator. For details, see Log In with Atlas.
- Navigate to the Code Generation tab, and click the Query Converter pane.
- Read the user agreement.
- Review telemetry preferences.
- Enable the query converter feature.
- Click Start Using Query Converter. The Query Converter pane is displayed.
Convert SQL queries
Open the SQL query converter view:
- If it is your first time using the query converter in your project, click Paste SQL Query.
- If you have previously converted SQL code in your project, click the + ADD button on the left-hand pane next to Queries.
- Enter your SQL query or copy your SQL query to your clipboard.
- Note: Queries copied into the SQL Query text field must be a SELECT query.
For example: SELECT ID, PRICE FROM inventory.
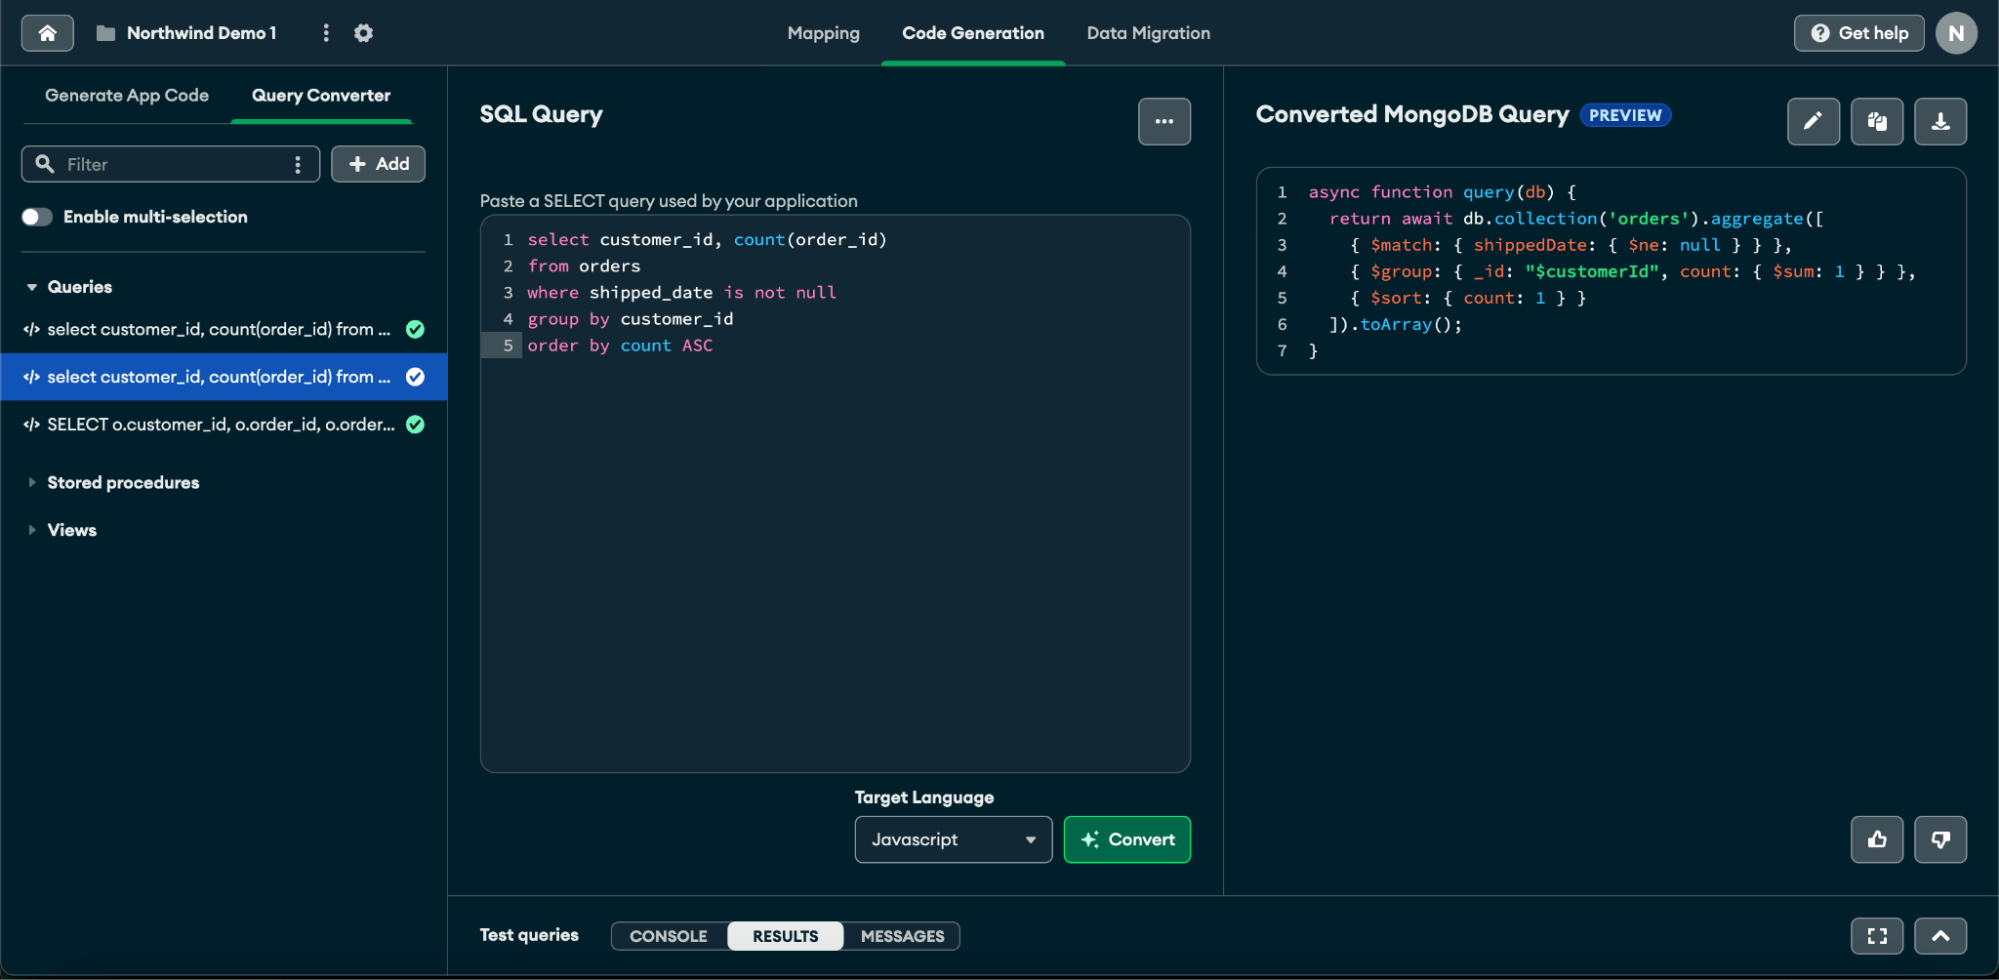
- Under the SQL Query header, paste your SQL query into the text box.
- Select your target language from the dropdown: Java, Javascript, or C#.
- Convert syntax: Click the Convert button. Wait for your SQL code to be converted. The converted MongoDB syntax code is displayed in the Converted MongoDB Query pane.
- Click the icon to copy the MongoDB syntax to your clipboard.
Refer to the Convert Queries documentation for more information.
Refer to the following documentation to convert stored views and procedures:
Test and compare converted queries
Use the Test Queries pane to test SQL queries, views, and stored procedures converted by Query Converter. This feature uses the project's source and destination database connections and allows you to run the original SQL and converted MongoDB code. The results from each query are displayed on the Test Queries pane, allowing for a side-by-side comparison. You can identify potential logic errors and edit the converted code before moving it to production.
Do the following before beginning
- To test converted queries in Relational Migrator, you must run the Query Runner Docker container. This container can be run locally or hosted remotely. Relational Migrator must have access to the Query Runner. For details, see Install Query Runner.
- Turn on Query Converter, see the Enable Query Converter for details.
- You must sign in to your Atlas account in Relational Migrator. For details, see Log In with Atlas.
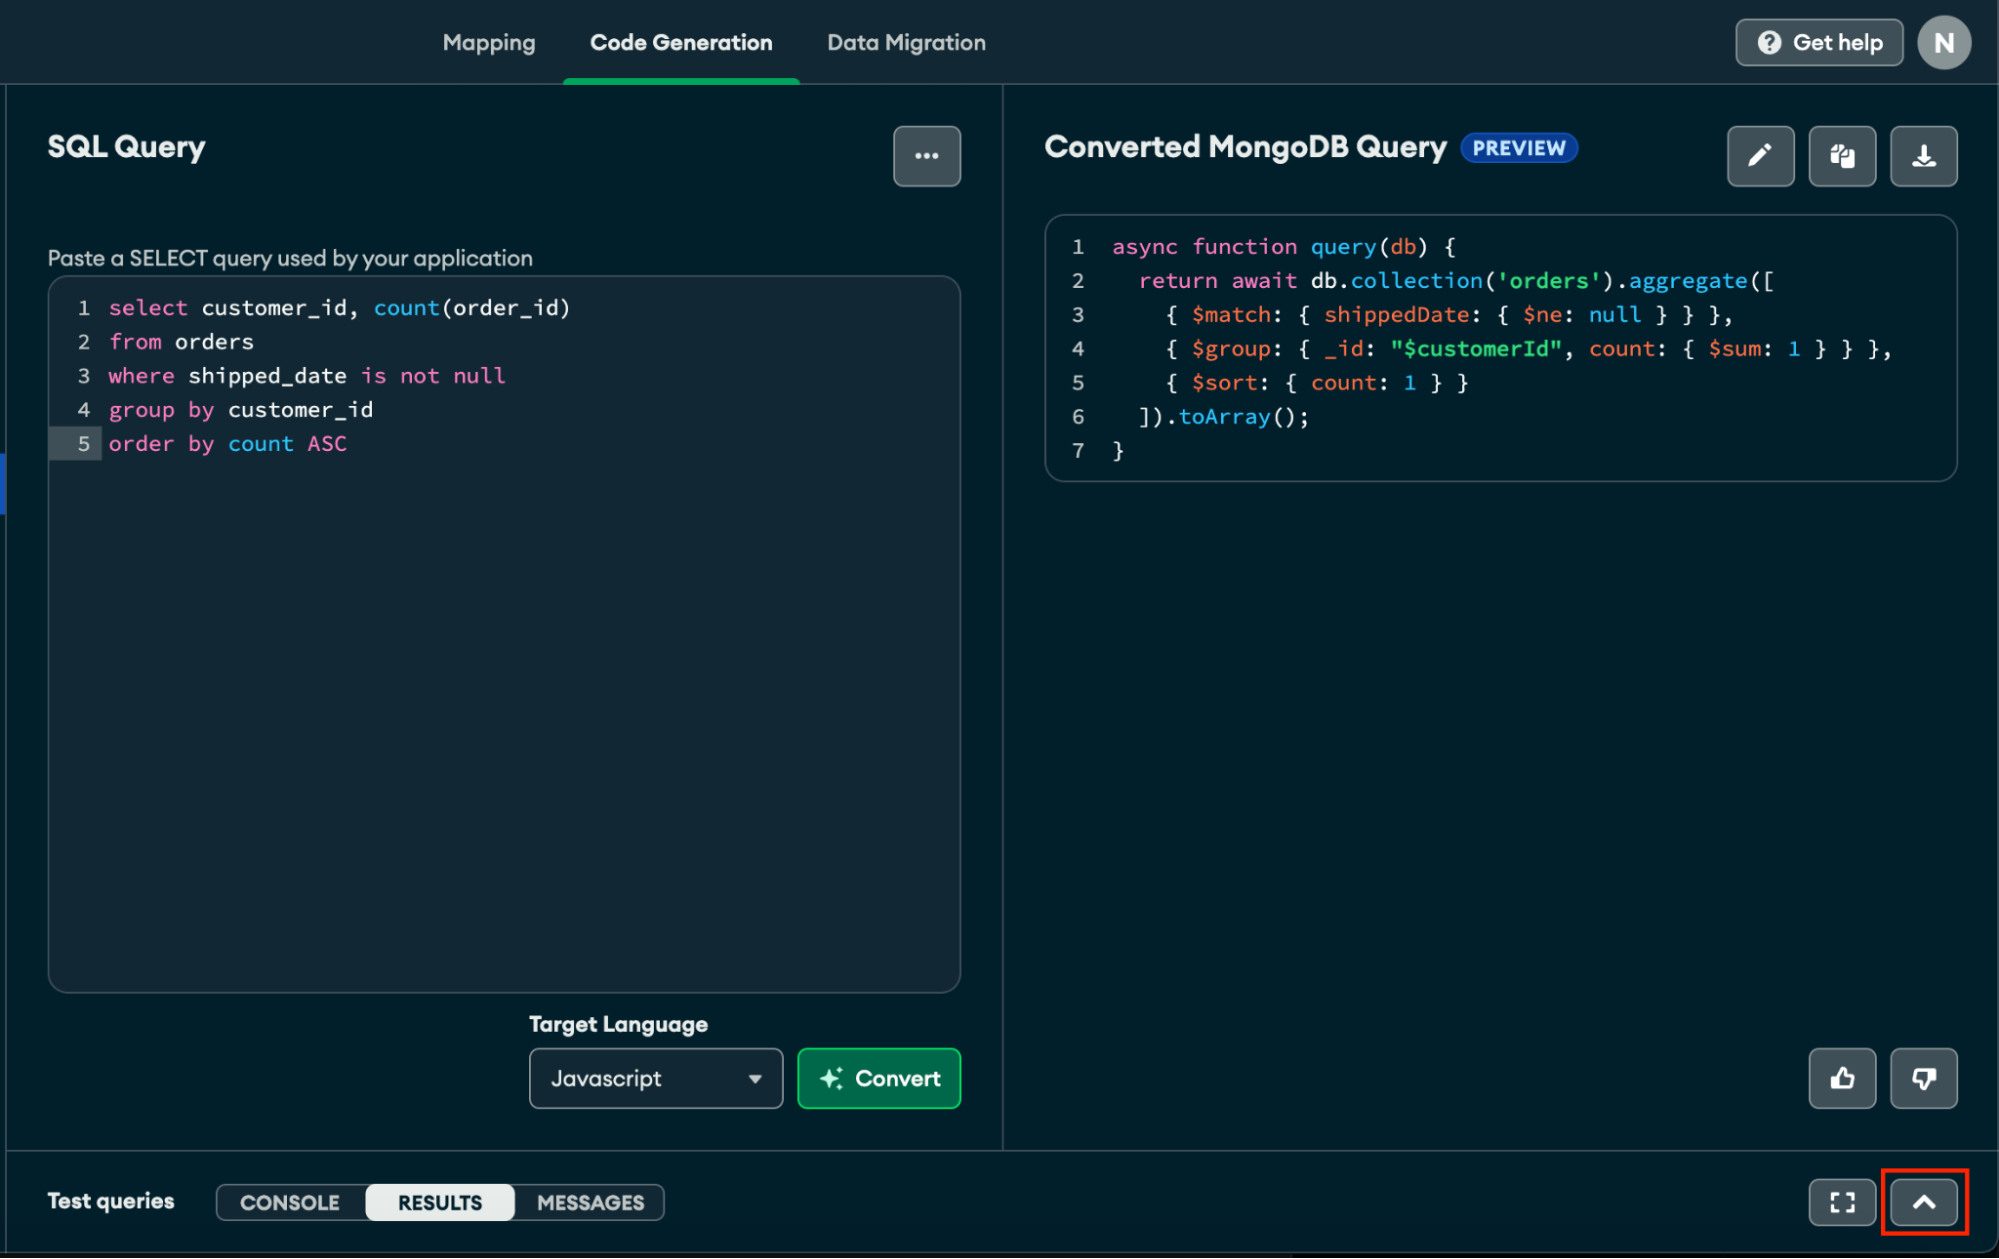
To test queries here is how to get started:
- Open the Test Queries pane on the bottom-right of the screen, click the ^ button.
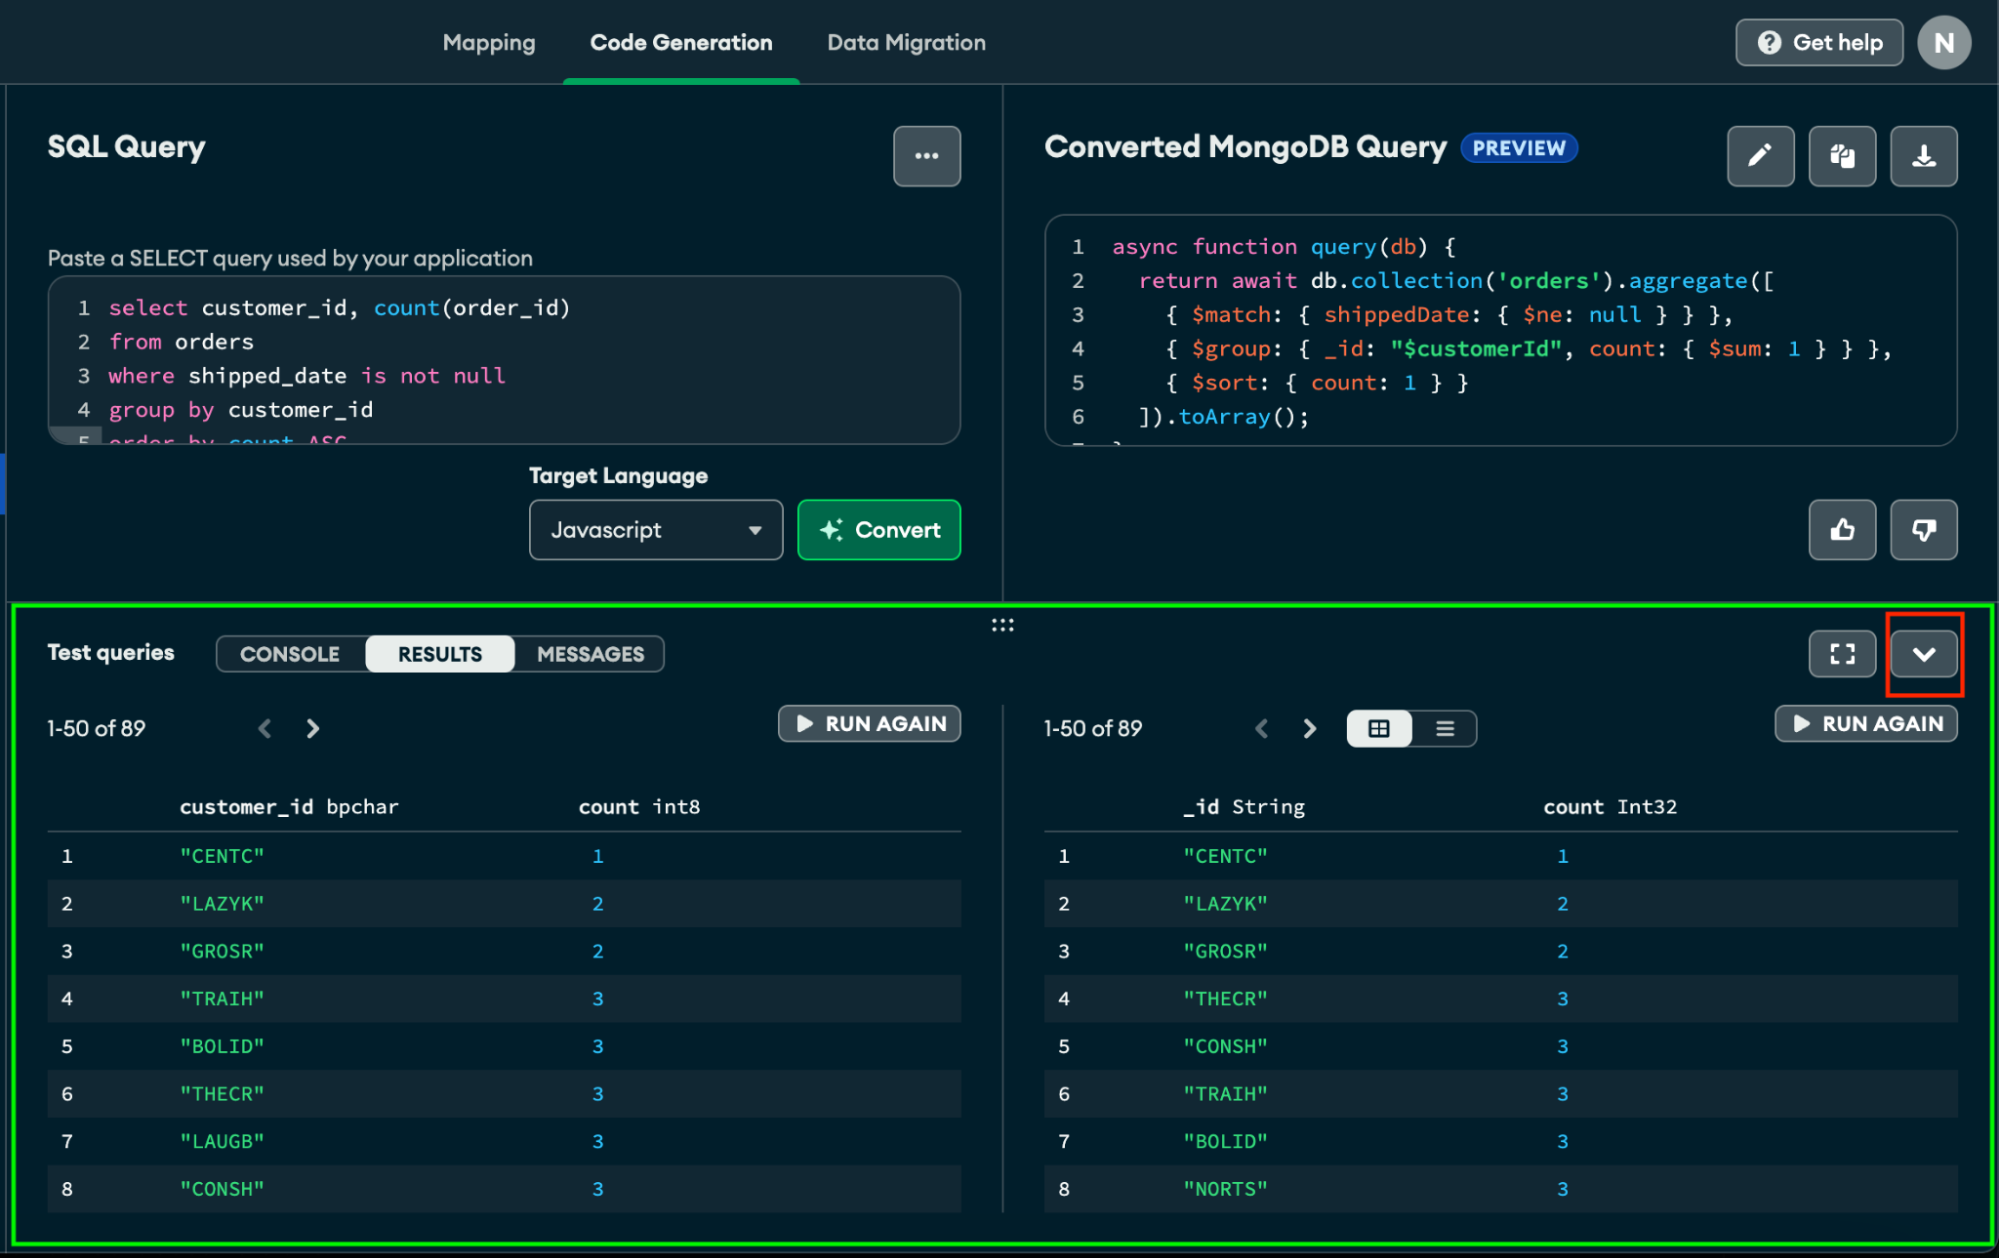
2. On the Test Queries pane, click the Run Source Query button.
a. Enter the connection details to your source database.
b. On the Connection Details form, click Run.
The data from the source database populates in the Results user interface. You can click the Messages pill to see execution statistics such as Execution Time, Row Count, error messages, and print statements.
3. On the Test Queries pane, click the Run Converted Query button.
a. Enter the connection details to your MongoDB database.
b. On the Connection Details form, click Run.
The data from the destination database populates on the right side of the Results user interface.
You can use the Results pane to compare the source and destination data and types. Refer to the Compare converted queries documentation for more details.
4. (Optional) Edit the converted query:
a. If the destination query needs to be changed, you can make code changes in the Converted MongoDB Query pane and run the updated query.
b. On the Converted MongoDB Query pane, click the ‘Edit pencil’ button.
c. Edit the code and click Save.
d. Click Run Converted Query.
Refer to the Test Queries documentation for more information.
Conclusion
In today's digital landscape, delivering exceptional customer experiences while driving revenue is paramount. Legacy relational databases like MySQL feature rigid schemas and lack the flexibility needed to innovate and build modern applications. MongoDB's modern data platform, with its flexible document model, offers the scalability and agility required to build responsive, data-intensive applications.
By simplifying the migration process from popular relational databases (including MySQL, SQL Server, Oracle, PostgreSQL, and more), the Relational Migrator significantly reduces the time, effort, and risk involved in data migration. This allows you to focus on what truly matters: modernizing applications, unlocking new capabilities, and driving innovation in an increasingly competitive digital world.