Overview
In this guide, you can learn how to create a Ruby web application that uses Ruby on Rails 8 as the web framework. Ruby on Rails is a full-stack web application framework for Ruby that follows the model-view-controller (MVC) architecture pattern for building applications.
The application in this tutorial consists of the following layers:
Database layer: MongoDB provides data storage and retrieval.
Application layer: Rails handles HTTP requests, routing, and logic processing.
Presentation layer: Emebdded Ruby templates and CSS render restaurant data on web pages.
Tip
To learn how to integrate Mongoid into an existing application, see the Add Mongoid to an Existing Application guide.
Why Use MongoDB with Ruby and Rails?
By integrating MongoDB with Ruby and Rails, you can use Mongoid's Object-Document Mapper (ODM) to interact with MongoDB's flexible document model. Mongoid replaces Rails' default Active Record ORM, and you can leverage MongoDB's schema flexibility while using Rails to easily control how your data is modeled and displayed.
Quick Start Tutorial
This tutorial shows you how to build a web application that uses Ruby and Rails. The application accesses sample restaurant data, queries the data, and displays the results on a locally hosted site. The tutorial also includes instructions for connecting to a MongoDB cluster hosted on MongoDB Atlas and accessing and displaying data from your database.
Tip
If you prefer to connect to MongoDB by using the Ruby driver without Mongoid, follow the Get Started with the Ruby Driver tutorial.
Set Up Your Project
Follow the steps in this section to install the project dependencies, create an Atlas cluster, and set up the application structure.
Verify the prerequisites.
Before you create the Quick Start application, install the following software in your development environment:
Prerequisite | Notes |
|---|---|
Use version 3.1 or later. | |
This is a package manager for Ruby. | |
Code editor | This tutorial uses Visual Studio Code with the Ruby extension, but you can use the editor of your choice. |
Terminal app and shell | For MacOS users, use Terminal or a similar app. For Windows users, use PowerShell. |
Create a MongoDB Atlas cluster.
MongoDB Atlas is a fully managed cloud database service that hosts your
MongoDB deployments. If you do not have a MongoDB deployment, you can create a MongoDB
cluster for free (no credit card required) by completing the
MongoDB Get Started
tutorial. The MongoDB Get Started tutorial also demonstrates how to load sample
datasets into your cluster, including the sample_restaurants database
that is used in this tutorial.
To connect to your MongoDB cluster, you must use a connection URI. To learn how to retrieve your connection URI, see the Add your connection string section of the MongoDB Get Started tutorial.
Important
Save your connection string in a secure location.
Specify the target database in your connection string.
When connecting to an Atlas cluster, you must specify the database that you want to interact with as the default database in your connection string. You must add the database name to your connection string after the hostname and before the connection options.
The following example specifies the sample_restaurants target database
in a sample connection string:
mongodb+srv://user0:pass123@mongo0.example.com/sample_restaurants?retryWrites=true&w=majority
Create a Rails app with default scaffolding.
Run the following commands to create a new Rails application directory with default scaffolding and enter the application:
rails new my-rails-app --skip-active-record cd my-rails-app
The --skip-active-record flag instructs Rails to not add
Active Record as a dependency. You don't need this
dependency because you will use Mongoid instead.
Configure the Back End
After setting up the project structure and dependencies, follow the steps in this section to connect to MongoDB and set up your data models.
Configure your MongoDB connection.
Navigate to the config/mongoid.yml file and replace its contents
with the following code:
development: clients: default: uri: <connection_URI>
Replace the <connection_URI> placeholder with the connection URI that you saved
in a previous step. Ensure that the URI
includes the sample_restaurants database name.
Create a data model.
Generate a Restaurant model with name, cuisine, and borough fields
by running the following command:
bin/rails g scaffold Restaurant name:string cuisine:string borough:string
The Restaurant model represents the restaurants collection in the sample_restaurants
database. The preceding command also creates the controller and view files for the Restaurant model.
You can find the directories that contain these files in the app directory of your
application.
Configure routes and add custom actions.
Navigate to the config/routes.rb file and replace its contents with the
following code:
Rails.application.routes.draw do resources :restaurants get "browse" => "restaurants#browse" # Defines the root path route ("/") root "restaurants#index" end
Then, add the following method to the app/controllers/restaurants_controller.rb
file:
# GET /browse def browse @restaurants = Restaurant .where(name: /Moon/i).and(borough: "Queens") end
This method queries for restaurants in Queens that have "Moon" in their name
by using a case-insensitive regular expression match.
Configure the Front End
After setting up the data layer, follow the steps in this section to create templates and styling for the user interface.
Update the main layout.
Navigate to the app/views/layouts/application.html.erb file and replace
its contents with the following code:
<!DOCTYPE html> <html> <head> <title><%= content_for(:title) || "Restaurant Directory" %></title> <meta name="viewport" content="width=device-width,initial-scale=1"> <%= csrf_meta_tags %> <%= csp_meta_tag %> <%= stylesheet_link_tag :app, "data-turbo-track": "reload" %> <%= javascript_importmap_tags %> </head> <body> <div class="container"> <nav class="navigation"> <%= link_to "All Restaurants", root_path, class: "nav-link" %> <%= link_to "Browse Filtered", browse_path, class: "nav-link" %> </nav> <%= yield %> </div> </body> </html>
This file is the main template wrapper for all pages in your application. It includes navigation links, page titles, and the necessary Rails helper tags for security and asset loading.
Create the restaurant list view.
Navigate to the app/views/restaurants/index.html.erb file and replace
its contents with the following code:
<% content_for :title, "Restaurant Directory" %> <header> <h1>Restaurant Directory</h1> </header> <div class="actions-header"> <h2>All Restaurants</h2> <%= link_to "New Restaurant", new_restaurant_path, class: "btn btn-success" %> </div> <div class="restaurants-grid"> <% @restaurants.each do |restaurant| %> <div class="restaurant-card"> <div class="restaurant-name"><%= restaurant.name %></div> <div class="restaurant-info"> <strong>Borough:</strong> <%= restaurant.borough %> </div> <div class="cuisine-tag"><%= restaurant.cuisine %></div> <div class="btn-group"> <%= link_to "View", restaurant, class: "btn" %> <%= link_to "Edit", edit_restaurant_path(restaurant), class: "btn btn-secondary" %> <%= link_to "Delete", restaurant_path(restaurant), method: :delete, confirm: "Are you sure?", class: "btn btn-danger" %> </div> </div> <% end %> </div>
This view file displays all restaurants in a grid layout and includes action buttons for viewing, editing, and deleting each restaurant.
Create the filtered view.
Create a new file named app/views/restaurants/browse.html.erb and paste
the following code:
<% content_for :title, "Browse Restaurants" %> <header> <h1>Browse Restaurants</h1> <div class="subtitle">Restaurants in Queens with "Moon" in the name</div> </header> <div class="actions-header"> <h2>Filtered Results</h2> <div class="controls"> <%= link_to "New Restaurant", new_restaurant_path, class: "btn btn-success" %> <%= link_to "All Restaurants", root_path, class: "btn" %> </div> </div> <div class="restaurants-grid"> <% @restaurants.each do |restaurant| %> <div class="restaurant-card"> <div class="restaurant-name"><%= restaurant.name %></div> <div class="restaurant-info"> <strong>Borough:</strong> <%= restaurant.borough %> </div> <div class="cuisine-tag"><%= restaurant.cuisine %></div> <div class="btn-group"> <%= link_to "View", restaurant, class: "btn" %> <%= link_to "Edit", edit_restaurant_path(restaurant), class: "btn btn-secondary" %> <%= link_to "Delete", restaurant_path(restaurant), method: :delete, confirm: "Are you sure?", class: "btn btn-danger" %> </div> </div> <% end %> </div>
This view file displays the filtered restaurant results, showing only restaurants
from the custom browse controller action.
Add CSS styling.
Add the following code to the app/assets/stylesheets/application.css
file:
* { margin: 0; padding: 0; box-sizing: border-box; } body { font-family: -apple-system, BlinkMacSystemFont, 'Segoe UI', Roboto, Oxygen, Ubuntu, Cantarell, sans-serif; line-height: 1.6; color: #333; background: rgb(198, 240, 209); min-height: 100vh; } .container { max-width: 1200px; margin: 0 auto; padding: 20px; } header { text-align: center; margin-bottom: 40px; color: rgb(0, 0, 0); } h1 { font-size: 3rem; margin-bottom: 10px; } .subtitle { font-size: 1.2rem; opacity: 0.9; } .controls { display: flex; justify-content: center; gap: 20px; margin-bottom: 30px; } .btn { background: white; color: #0d8958; border: none; padding: 12px 24px; border-radius: 25px; font-weight: 600; text-decoration: none; cursor: pointer; transition: all 0.3s ease; box-shadow: 0 4px 15px rgba(0,0,0,0.2); display: inline-block; } .btn:hover { transform: translateY(-2px); box-shadow: 0 6px 20px rgba(0,0,0,0.3); color: #0d8958; text-decoration: none; } .btn.btn-success { background: #0d8958; color: white; } .btn.btn-success:hover { background: #0a6b44; color: white; } .btn.btn-danger { background: #dc3545; color: white; } .btn.btn-danger:hover { background: #c82333; color: white; } .btn.btn-secondary { background: #6c757d; color: white; } .btn.btn-secondary:hover { background: #5a6268; color: white; } .restaurants-grid { display: grid; grid-template-columns: repeat(auto-fill, minmax(350px, 1fr)); gap: 20px; margin-top: 20px; } .restaurant-card { background: white; border-radius: 15px; padding: 20px; box-shadow: 0 8px 25px rgba(0,0,0,0.1); transition: transform 0.3s ease, box-shadow 0.3s ease; } .restaurant-card:hover { transform: translateY(-5px); box-shadow: 0 12px 35px rgba(0,0,0,0.15); } .restaurant-name { font-size: 1.4rem; font-weight: 700; color: #000000; margin-bottom: 10px; } .restaurant-info { margin-bottom: 8px; } .restaurant-info strong { color: #555; } .cuisine-tag { display: inline-block; background: #0d8958; color: white; padding: 4px 12px; border-radius: 15px; font-size: 0.85rem; font-weight: 600; margin-top: 10px; } .btn-group { display: flex; gap: 10px; margin-top: 15px; } .btn-group .btn { padding: 8px 16px; font-size: 0.9rem; } .notice { background: white; color: #0d8958; padding: 15px 20px; border-radius: 15px; margin-bottom: 20px; box-shadow: 0 4px 15px rgba(0,0,0,0.1); text-align: center; font-weight: 600; } .form-container { background: white; border-radius: 15px; padding: 30px; box-shadow: 0 8px 25px rgba(0,0,0,0.1); max-width: 600px; margin: 0 auto; } .form-group { margin-bottom: 20px; } .form-label { display: block; margin-bottom: 8px; font-weight: 600; color: #333; } .form-input { width: 100%; padding: 12px 16px; border: 2px solid #e9ecef; border-radius: 12px; font-size: 1rem; transition: border-color 0.3s ease; } .form-input:focus { outline: none; border-color: #0d8958; } .form-actions { display: flex; gap: 15px; justify-content: center; margin-top: 25px; } .page-header { text-align: center; margin-bottom: 30px; } .actions-header { display: flex; justify-content: space-between; align-items: center; margin-bottom: 30px; background: white; padding: 20px; border-radius: 15px; box-shadow: 0 4px 15px rgba(0,0,0,0.1); } .actions-header h1 { font-size: 2rem; color: #0d8958; margin: 0; } @media (max-width: 768px) { .container { padding: 10px; } h1 { font-size: 2rem; } .controls { flex-direction: column; align-items: center; } .restaurants-grid { grid-template-columns: 1fr; } .actions-header { flex-direction: column; gap: 15px; } .form-actions { flex-direction: column; } }
This CSS file adds styling to the site's grid layout.
Run Your Application
Finally, follow the steps in this section to run your web application and explore the restaurant data by using the browser interface.
Start the Rails application.
Navigate to your project directory and run the following command:
bin/rails s
If successful, the command output resembles the following example:
=> Booting Puma => Rails 8.0.1 application starting in development => Run `bin/rails server --help` for more startup options Puma starting in single mode... * Puma version: 6.4.3 (ruby 3.2.5-p208) ("The Eagle of Durango") * Min threads: 3 * Max threads: 3 * Environment: development * PID: 66973 * Listening on http://127.0.0.1:3000 * Listening on http://[::1]:3000 * Listening on http://127.0.2.2:3000 * Listening on http://127.0.2.3:3000 Use Ctrl-C to stop
Open the web application.
Open http://127.0.0.1:3000 in your web browser. The initial
landing page displays all restaurants in the sample_restaurants.restaurants
collection:


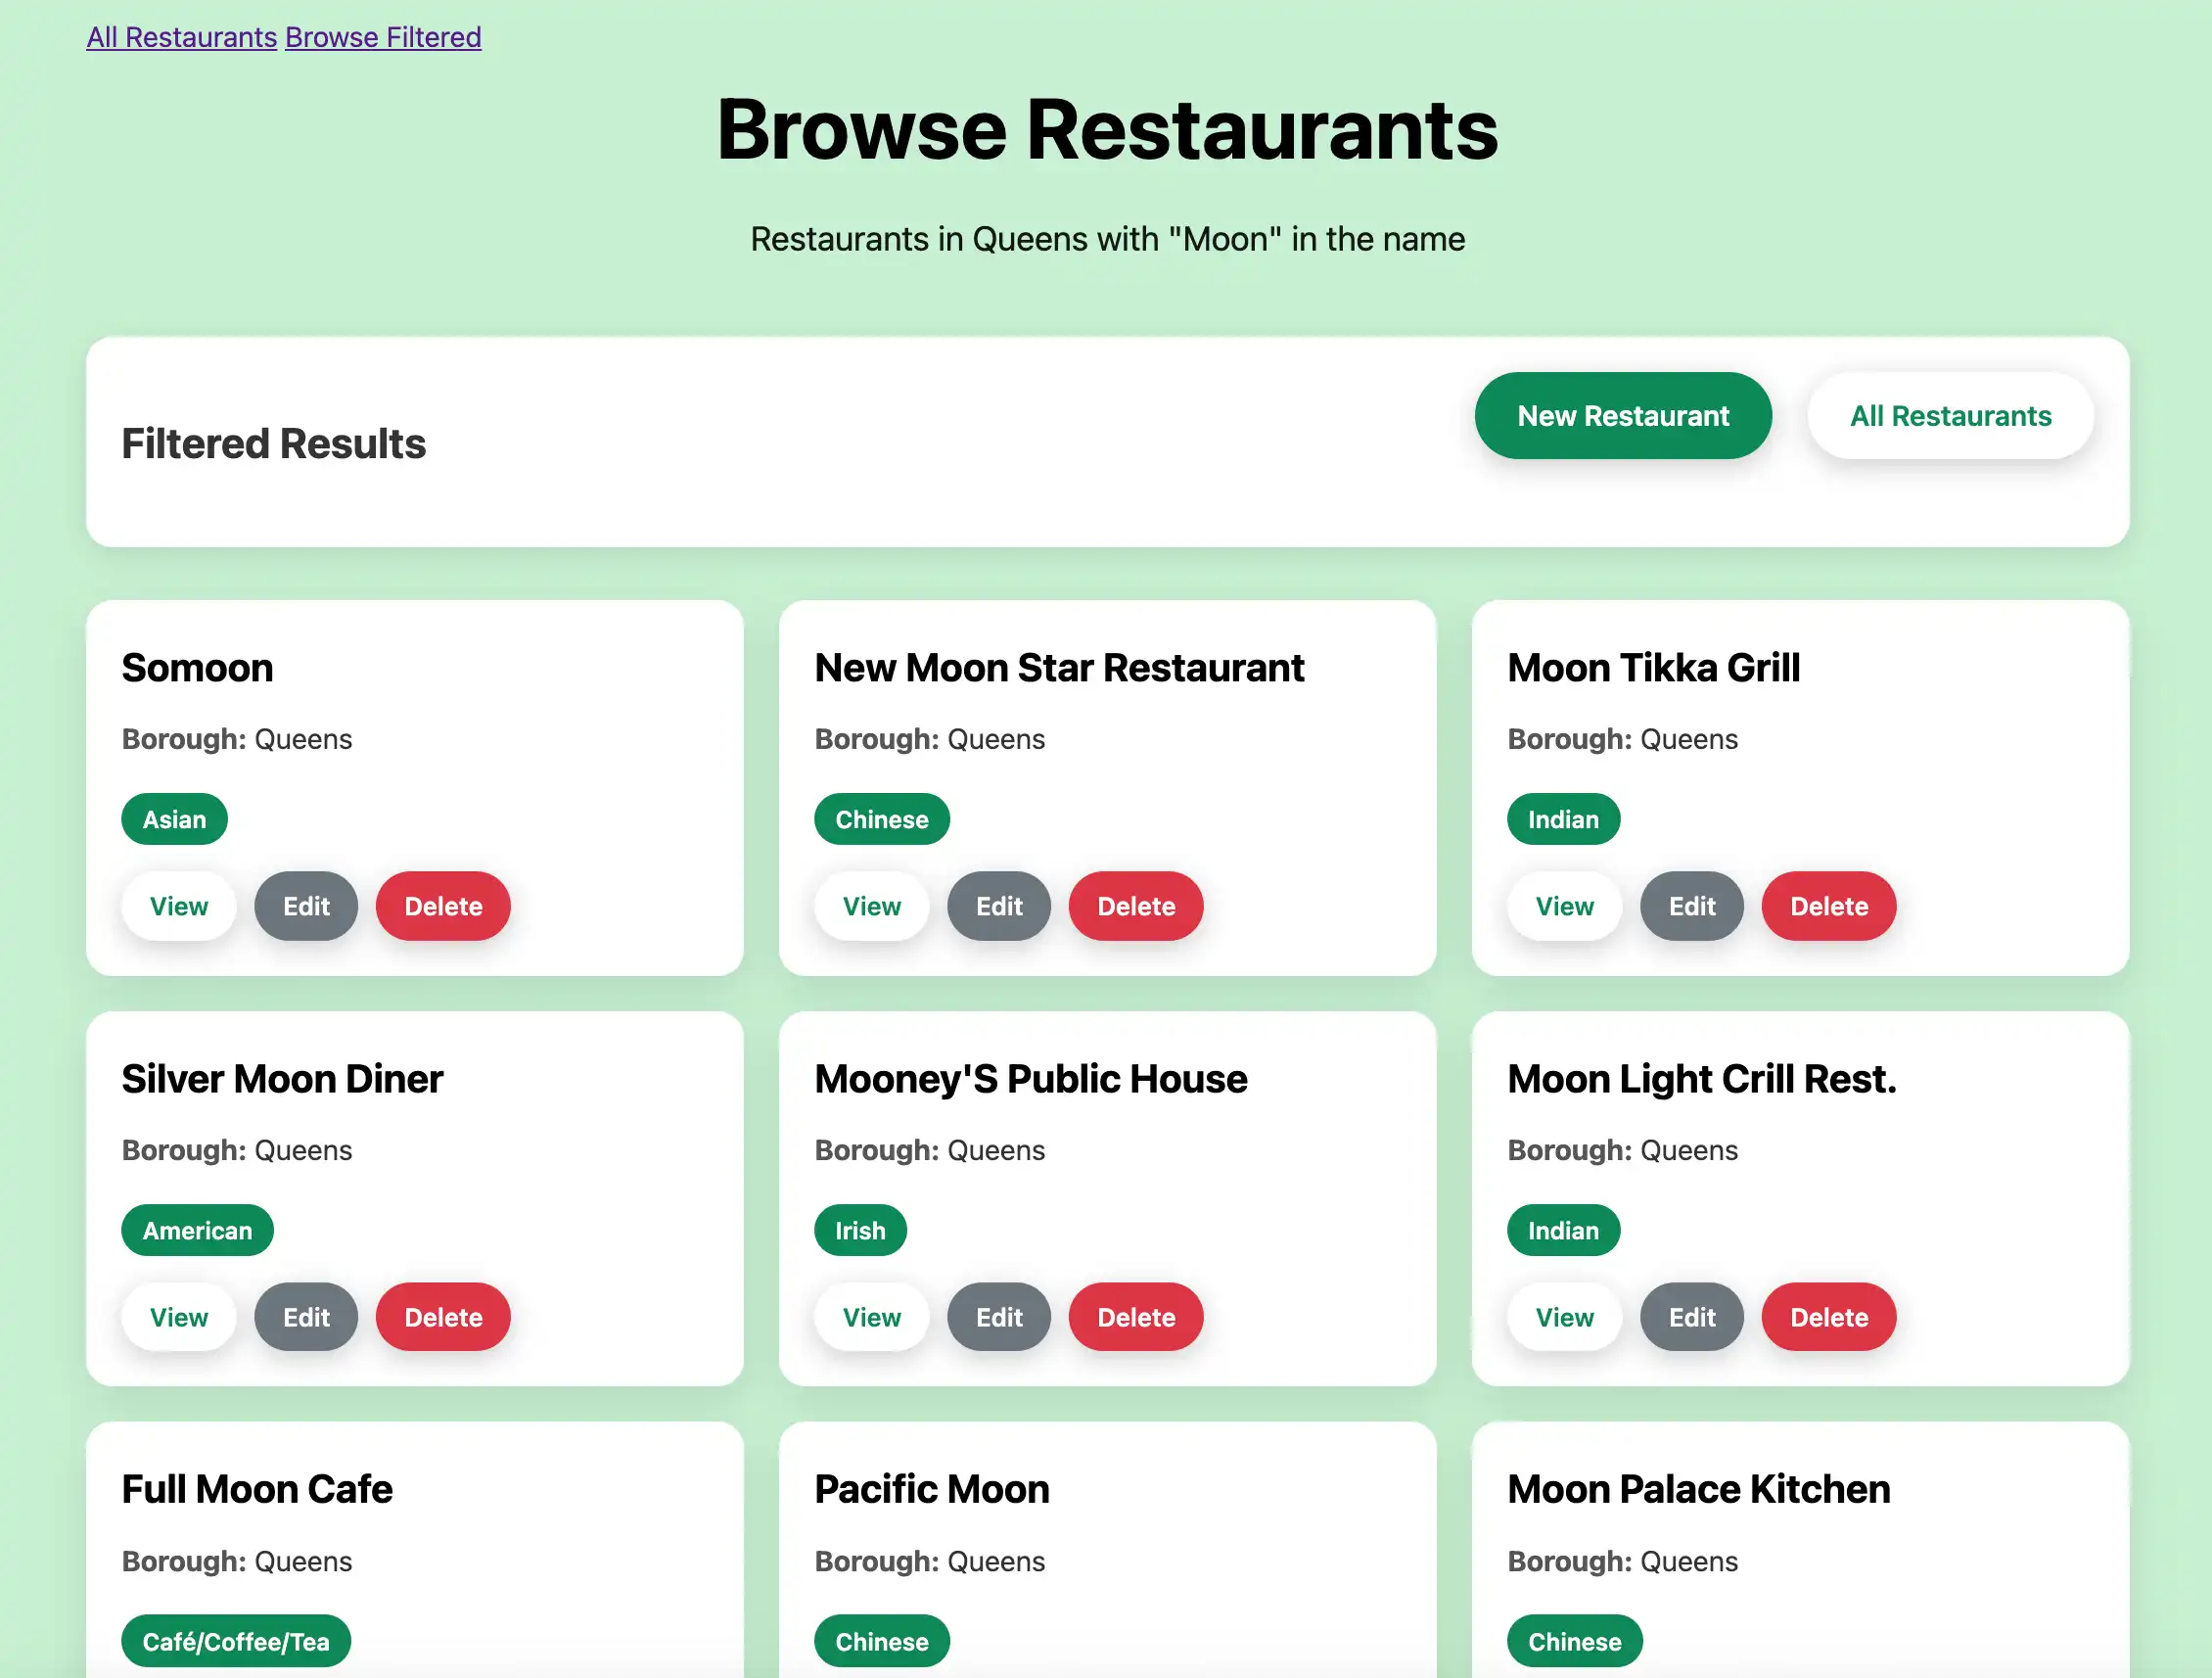
Then, click the Browse Filtered button to view restaurants in Queens that
have "Moon" in their name:

Explore CRUD functionality.
Rails automatically provides complete CRUD (Create, Read, Update, Delete) functionality for your restaurants. You can perform the following actions:
Create: Click New Restaurant to add a new restaurant to the
restaurantscollection.Read: Click View on any restaurant card to see detailed information.
Update: Click Edit on any restaurant card to modify the restaurant's information.
Delete: Click Delete on any restaurant card to remove it from the collection.
Congratulations on completing the Quick Start tutorial! After you complete these steps, you have a Ruby and Rails web application that connects to your MongoDB deployment, runs queries on sample restaurant data, and displays the results on a locally hosted web interface with full CRUD capabilities.
Additional Resources
To learn more about Ruby, Rails, Mongoid, and MongoDB, view the following resources:
Ruby on Rails documentation
Ruby language documentation
Tip
Other Framework Tutorials
If you prefer to use Sinatra as your web framework, see the Quick Start - Sinatra guide.