개요
MongoDB C 드라이버 는 MongoDB 에 연결하고 배포서버 에 저장된 데이터와 상호 작용 사용할 수 있는 C 라이브러리입니다. 이 가이드 C 운전자 사용하여 MongoDB Atlas 에서 호스팅되는 MongoDB cluster 에 연결하고 클러스터 의 데이터를 쿼리 애플리케이션 만드는 방법을 보여줍니다.
팁
MongoDB Atlas는 관리형 클라우드 데이터베이스 서비스로, MongoDB deployment를 호스팅합니다. 이 가이드의 단계에 따라 자체 무료(신용카드 필요 없음) MongoDB Atlas 배포서버를 생성할 수 있습니다.
이 가이드 에 따라 샘플 C 애플리케이션 MongoDB Atlas 배포서버 서버에 연결합니다. 다른 운전자 또는 프로그래밍 언어 사용하여 MongoDB 에 연결하려는 경우 공식 드라이버 목록을 참조하세요.
다운로드 및 설치
C 드라이버 다운로드
C 운전자 libbson 및 libmongoc라는 두 개의 라이브러리로 구성됩니다. 이 가이드 에서는 libbson와 함께 번들로 제공되는 libmongoc를 설치하는 방법을 학습 봅니다.
패키지 관리자를 사용하거나 소스에서 라이브러리를 설치하여 C 운전자 설치할 수 있습니다. 패키지 관리자를 사용하여 설치할 때 Linux 배포판은 서로 다른 버전의 운전자 설치합니다. 따라서 운전자 설치하기 전에 배포에 포함된 버전을 확인해야 합니다.
RHEL( RedHat Enterprise Linux ) 배포판의 경우 셸 에서 다음 명령을 실행 하여 버전을 확인할 수 있습니다.
sudo dnf info mongo-c-driver-devel
Debian 기반 배포에서는 셸 에서 다음 명령을 실행 하여 버전을 확인할 수 있습니다.
apt-cache policy libmongoc-dev
사용 가능한 드라이버 버전이 원하는 버전이 아닌 경우 소스에서 드라이버를 설치할 수 있습니다. 소스에서 운전자 설치하는 방법을 학습하려면 사용자 지정 설치: 소스에서 C 드라이버 라이브러리 빌드 가이드를 참조하세요.
패키지 관리자를 사용하여 운전자 설치하는 방법을 학습 운영 체제에 해당하는 탭 선택합니다.
RedHat Enterprise Linux 배포판
RHEL( RedHat Enterprise Linux ) 배포판, 버전 7 이상 또는 다음과 같은 RHEL 기반 배포판에 운전자 설치할 수 있습니다.
Fedora를 제외한 RHEL 배포에 운전자 설치하기 전에 먼저 EPEL(Enterprise Linux 용 추가 패키지) 리포지토리 활성화 해야 합니다. 다음 예시 와 같이 epel-release 패키지 설치하여 EPEL 리포지토리 활성화 할 수 있습니다.
yum install epel-release
그런 다음 yum를 사용하여 C 운전자 설치할 수 있습니다. 이렇게 하려면 셸 에서 다음 명령을 실행 .
yum install mongo-c-driver-devel
참고
개발자 패키지
앞의 코드 예시 C 운전자 사용하는 애플리케이션을 빌드 데 필요한 개발자 패키지를 설치합니다. 개발 파일 없이 라이브러리만 설치하려면 다음 명령을 실행 .
yum install mongo-c-driver
버전 8 이상인 RHEL 배포에 설치하는 경우 yum 대신 dnf 를 사용하여 앞의 코드 예제를 실행 것이 좋습니다.
Fedora
Fedora 또는 버전 이상의 엔터프라이즈 Linux 배포를 사용하는 경우 앞의 8 예시 에 표시된 것과 동일한 명령을 사용하고 yum 를 로 바꿔 운전자 설치할 수 dnf 있습니다.
다음 예시 Fedora 배포에 C 운전자 설치하는 방법을 보여줍니다.
dnf install mongo-c-driver-devel
Debian 기반 배포판
Ubuntu 및 Ubuntu 파생 제품을 포함한 Debian 기반 Linux 배포에서 운전자 라이브러리는 고급 패키징 도구(APT)를 통해 사용할 수 있습니다. 셸 에서 다음 명령을 실행 하여 APT로 운전자 설치할 수 있습니다.
apt install libmongoc-dev
앞의 코드 예시 C 운전자 사용하는 애플리케이션을 빌드 데 필요한 개발자 패키지를 설치합니다. 개발 파일 없이 라이브러리만 설치하려면 다음 명령을 실행 .
apt install libmongoc-1.0-0
Windows 환경의 경우 로컬 도구 체인과의 최대 호환성을 보장하기 위해 소스에서 C 운전자 라이브러리를 빌드하는 것이 좋습니다. vcpkg와 같은 소스 라이브러리 패키지 관리 도구를 사용하여 소스에서 빌드를 자동화할 수 있습니다.
팁
vcpkg를 시작하는 방법을 학습하려면 Microsoft 설명서에서 vcpkg 시작하기 가이드 를 참조하세요.
vcpkg 매니페스트 모드 에서 다음 예시 와 같이 운전자 라이브러리를 프로젝트의 vcpkg.json 매니페스트 파일 에 추가합니다.
{ // ... "dependencies": [ // ... "mongo-c-driver" ] }
vcpkg 통합을 사용하여 CMake 프로젝트 빌드 vcpkg.json 매니페스트 파일 있는 경우 vcpkg는 구성을 진행하기 전에 프로젝트의 종속성을 자동으로 설치합니다.
vcpkg 클래식 모드 사용하는 경우 셸 에서 다음 명령을 실행 하여 운전자 설치할 수 있습니다.
vcpkg install mongo-c-driver
운전자 설치하면 표준 CMake 구성 파일 과 생성된 IMPORTED 대상을 사용할 수 있습니다. 다음 예시 와 같이 CMakeLists.txt 파일 만들 수 있습니다.
find_package(mongoc-1.0 CONFIG REQUIRED) target_link_libraries(my-application PRIVATE $<IF:$<TARGET_EXISTS:mongo::mongoc_shared>,mongo::mongoc_shared,mongo::mongoc_static>)
참고
앞의 예시 에서 $<IF:$<TARGET_EXISTS...>:...> 생성기 표현식 사용하여 find_package() 명령에서 사용할 수 있는 형식에 따라 libmongoc 의 링크 유형을 전환할 수 있습니다. 는 동적 및libmongoc 정적 라이브러리 유형을 모두 사용하여 빌드를 지원하지만 vcpkg는 한 번에 하나의 유형만 설치합니다.
vcpkg 통합을 사용하여 CMake 프로젝트 구성하려면 셸 에서 다음 명령을 실행 하여 구성 명령에서 CMake 도구 체인 파일 설정하다 .
cmake -S . -B _build -D CMAKE_TOOLCHAIN_FILE=$VCPKG_ROOT/scripts/buildsystems/vcpkg.cmake
MacOS에서 Homebrew 패키지 관리자를 사용하여 C 운전자 다운로드 할 수 있습니다. 이렇게 하려면 셸 에서 다음 명령을 실행 .
brew install mongo-c-driver
이 단계를 완료하면 컴퓨터에 C 운전자 설치됩니다.
MongoDB Deployment 생성
MongoDB Atlas에 프리 티어 MongoDB 배포를 생성하여 데이터를 저장하고 관리할 수 있습니다. MongoDB Atlas는 클라우드에서 MongoDB database를 호스팅하고 관리합니다.
Atlas 에서 무료 MongoDB deployment 생성합니다.
MongoDB 시작하기 가이드 완료하여 새 Atlas 계정을 설정하다 하고 샘플 데이터를 새 무료 계층 MongoDB deployment 에 로드합니다.
이 단계를 완료하면 Atlas에 새로운 프리 티어 MongoDB 배포서버, 데이터베이스 사용자 자격 증명 및 샘플 데이터가 데이터베이스에 로드됩니다.
연결 문자열 만들기
연결 문자열이라고도 하는 연결 URI을 제공하여 MongoDB 배포서버에 연결할 수 있으며, 이 연결 문자열은 드라이버에 MongoDB 배포서버로 연결하는 방법과 연결된 동안 동작하는 방법을 지시합니다.
연결 문자열에는 배포서버의 호스트 이름 또는 IP 주소와 포트, 인증 메커니즘, 해당되는 경우 사용자 자격 증명, 연결 옵션 등이 포함됩니다.
Atlas 에서 호스팅되지 않는 인스턴스 또는 배포서버 에 연결하려면 연결 대상 선택 가이드 를 참조하세요.
MongoDB Atlas 연결 문자열 찾습니다.
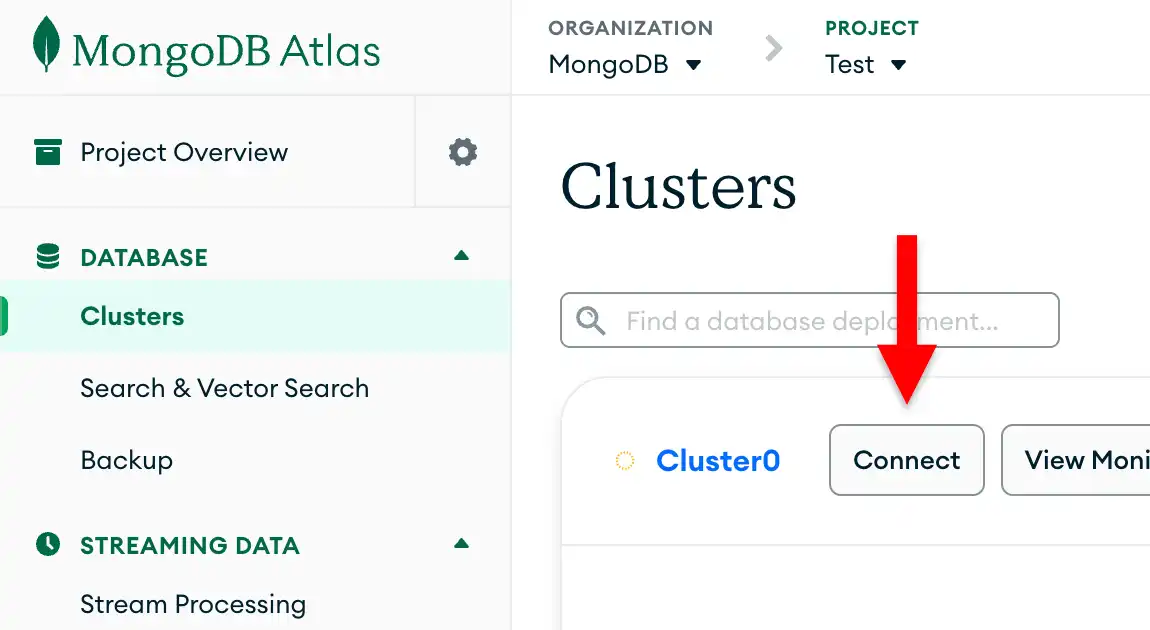
이전 단계에서 만든 배포서버에 대한 연결 문자열 조회 하려면 Atlas 계정에 로그인 하고 Database 섹션 아래의 Clusters 페이지로 이동합니다. 새 배포서버 의 Connect 버튼을 클릭합니다.

아직 데이터베이스 사용자를 구성하지 않은 경우 MongoDB 새 사용자를 생성하고 구성하라는 메시지를 표시합니다.
Connect to your application 섹션 아래의 Drivers 버튼을 클릭하고 Driver 선택 메뉴에서 "C"를 선택하고 Version 선택 메뉴에서 설치한 버전과 가장 일치하는 버전을 선택합니다.
연결 문자열 만 보려면 View full code sample 옵션의 선택을 취소합니다.

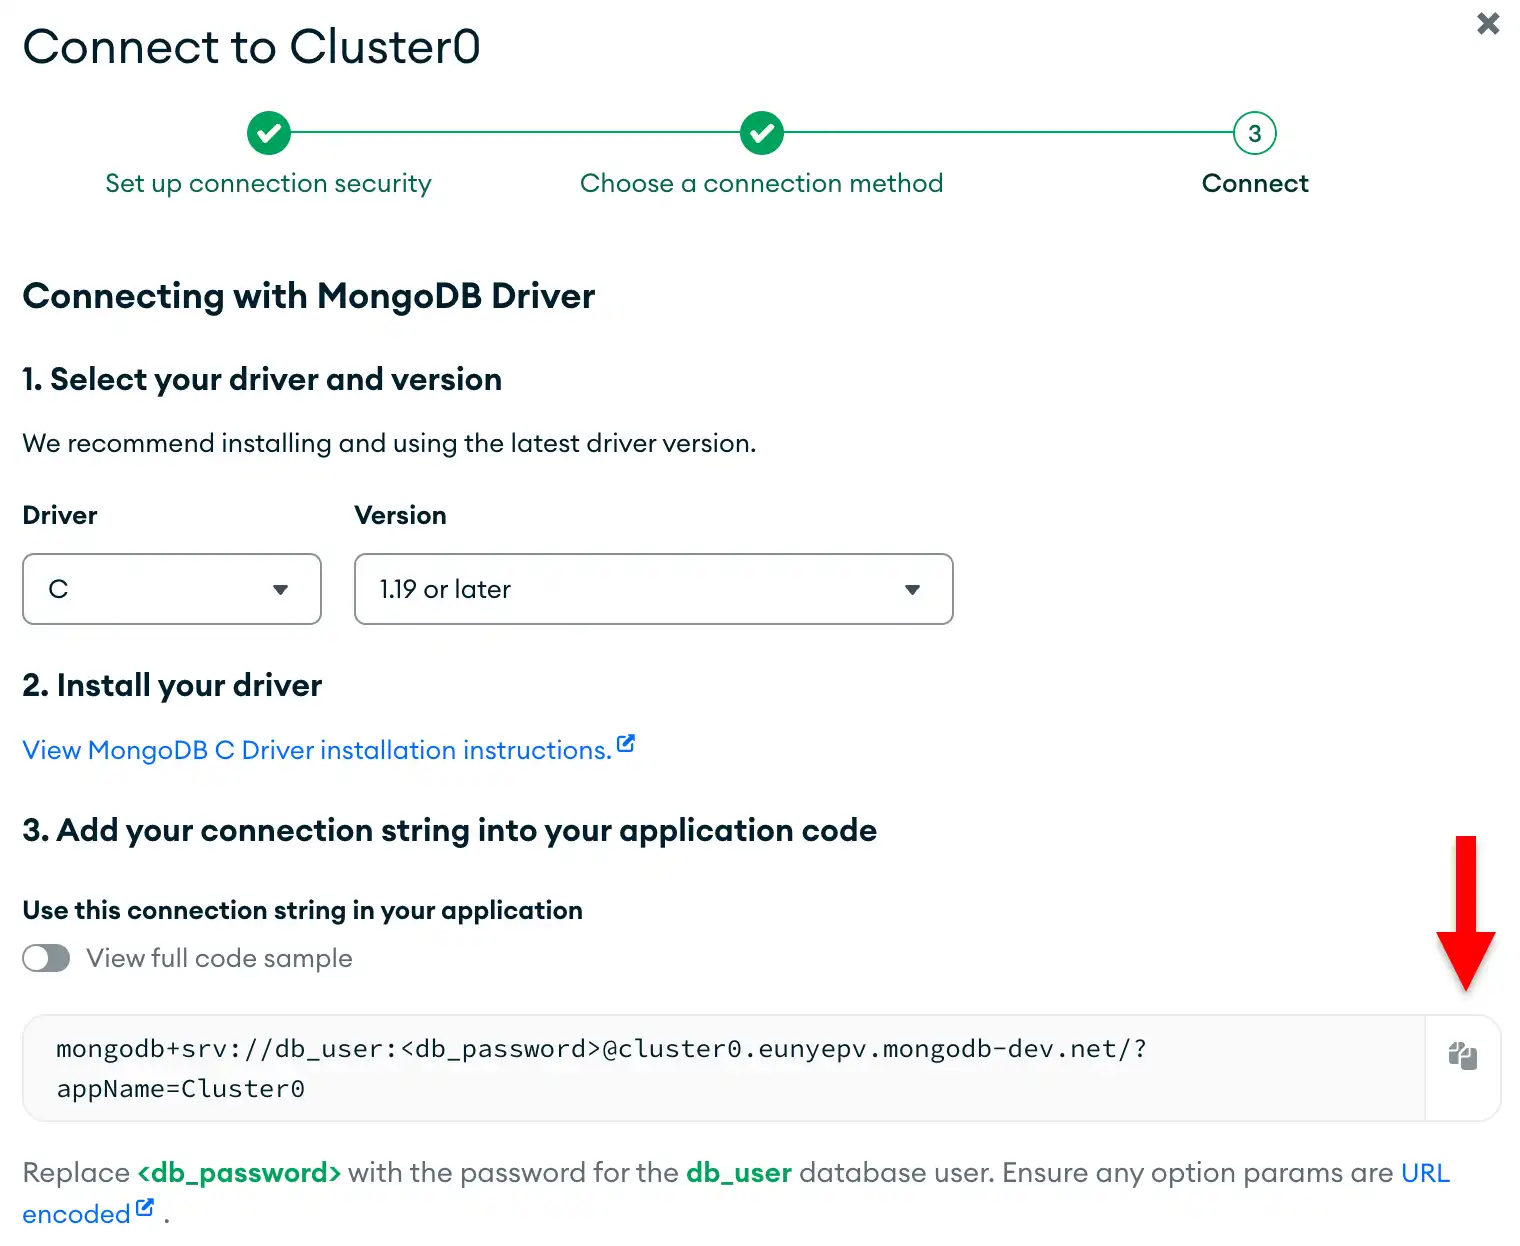
이 단계를 완료하면 클러스터 에 해당하는 연결 string Atlas 이 생성됩니다.
샘플 쿼리 실행
MongoDB deployment 에 연결하고 sample_mflix 데이터베이스 의 movies 컬렉션 에서 데이터를 검색하는 애플리케이션 만들 수 있습니다.
sample_mflix 데이터베이스에 대해 자세히 학습하려면 Atlas 설명서에서 샘플 Mflix 데이터 세트 를 참조하세요.
C 드라이버 애플리케이션 만듭니다.
다음 코드를 복사하여 sample_mflix 데이터베이스 의 movies 컬렉션 을 쿼리하는 quickstart.c 파일 에 붙여넣습니다.
int main(void) { const bson_t *doc; mongoc_init(); mongoc_client_t *client = mongoc_client_new("<connection string>"); mongoc_collection_t *collection = mongoc_client_get_collection(client, "sample_mflix", "movies"); // Specify the query filter bson_t *query = BCON_NEW("title", "The Shawshank Redemption"); mongoc_cursor_t *results = mongoc_collection_find_with_opts(collection, query, NULL, NULL); // Print the results while (mongoc_cursor_next(results, &doc)) { char* str = bson_as_canonical_extended_json(doc, NULL); printf("%s\n", str); bson_free(str); } bson_destroy(query); mongoc_cursor_destroy(results); mongoc_collection_destroy(collection); mongoc_client_destroy(client); mongoc_cleanup(); return EXIT_SUCCESS; }
연결 문자열 할당합니다.
<connection string> 자리 표시자를 이 가이드의 연결 문자열 만들기 단계에서 복사한 연결 문자열로 바꿉니다.
C 애플리케이션 실행합니다.
shell 에서 다음 명령을 실행 하여 이 애플리케이션 을 컴파일하고 실행 합니다.
gcc -o quickstartc quickstart.c $(pkg-config --libs --cflags libmongoc-1.0) ./quickstartc
명령줄 출력에는 검색된 영화 문서에 대한 세부 정보가 포함됩니다.
{ "_id" : { "$oid" : "..." }, "plot" : "Two imprisoned men bond over a number of years, finding solace and eventual redemption through acts of common decency.", ... "title" : "The Shawshank Redemption", ...
오류가 발생하거나 출력이 표시되지 않는 경우 quickstart.c 파일에 적절한 연결 문자열을 지정했는지, 그리고 샘플 데이터를 로드했는지 확인합니다.
이 단계를 완료한 후에는 드라이버를 사용하여 MongoDB deployment에 연결하고, 샘플 데이터에 대해 쿼리를 실행하고, 결과를 출력하는 등 정상적으로 작동하는 애플리케이션을 갖게 될 것입니다.
다음 단계
빠른 시작 튜토리얼을 완료하신 것을 축하드립니다!
참고
이 튜토리얼에서 문제가 실행 하면 MongoDB Stack Overflow 페이지 또는 MongoDB Reddit Community에서 도움을 요청하거나 이 페이지의 오른쪽 또는 오른쪽 하단에 있는 Rate this page 탭 사용하여 피드백 제출 .
이 튜토리얼에서는 MongoDB Atlas 에서 호스팅되는 MongoDB deployment 에 연결하고 쿼리 와 일치하는 문서 검색하는 C 애플리케이션 을 만들었습니다.
다음 리소스에서 C 운전자 에 대해 자세히 보기 .