개요
이 가이드 Actix Web과 MongoDB 사용하여 웹 애플리케이션 빌드 방법을 설명합니다. Actix는 Rust 위한 강력한 비동기 웹 프레임워크 로, 빠르고 안전한 HTTP 서비스를 쉽게 빌드 할 수 있습니다.
이 튜토리얼의 애플리케이션 다음과 같은 계층으로 구성되어 있습니다.
데이터베이스 계층: MongoDB ( MongoDB Atlas 에서 호스팅됨)는 데이터를 저장하고 조회합니다.
서버 계층: Actix Web은 프론트엔드를 MongoDB 데이터베이스에 연결하기 위한 HTTP 서버, 라우팅 및 API 엔드포인트를 제공합니다.
데이터 관리 계층: Rust의 유형 시스템과 비동기/await는 컴파일 타임을 보장 하여 안전한 데이터 처리를 제공합니다.
프레젠테이션 계층: Tailwind CSS로 스타일이 지정된 서버에서 렌더링된 HTML 페이지는 샘플 레스토랑 데이터를 테이블에 표시합니다.
다음과 같은 작은 애플리케이션 빌드 합니다.
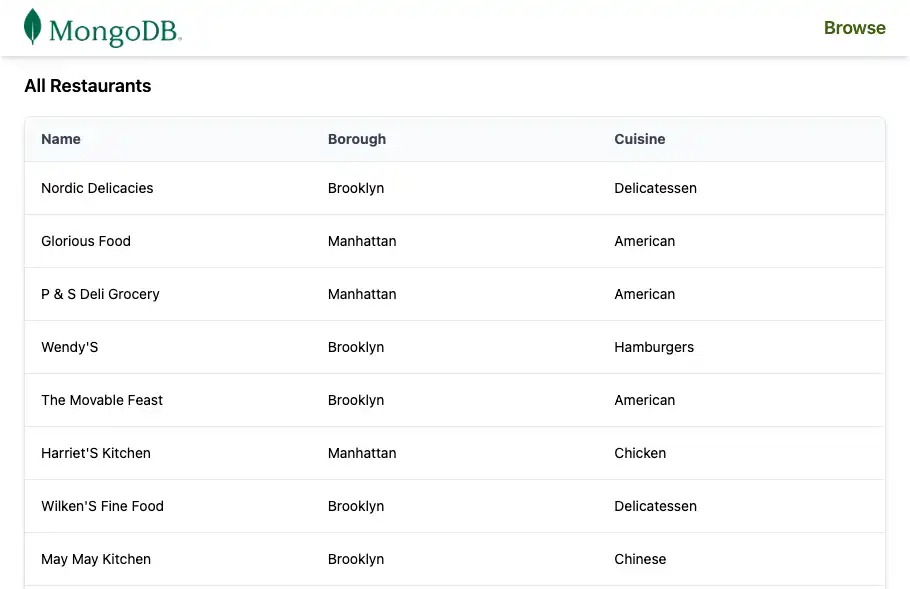
sample_restaurants데이터 세트가 포함된 MongoDB Atlas 클러스터에 연결합니다.모든 레스토랑을 나열하는
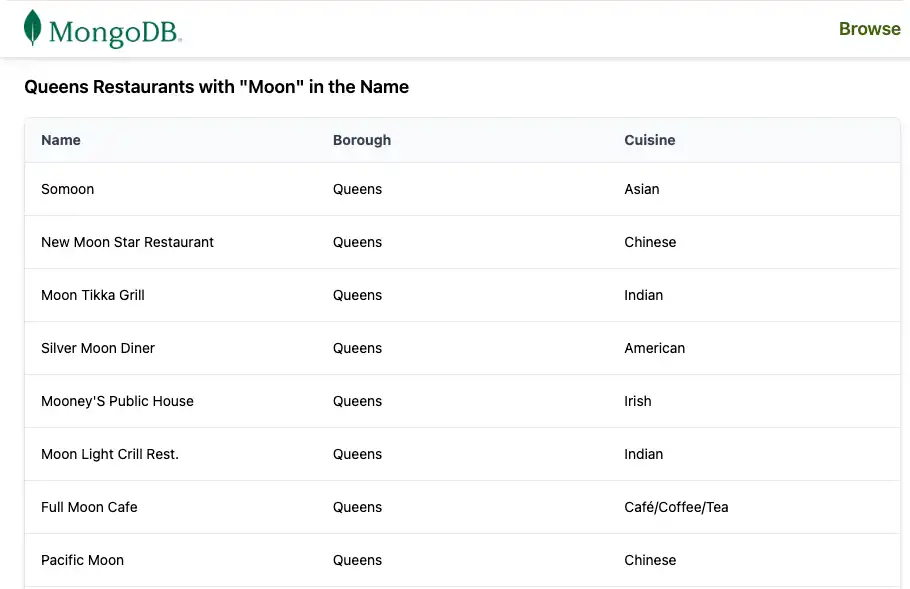
/restaurants엔드포인트를 노출합니다.이름에
"Moon"이(가) 포함된 퀸즈의 레스토랑을 나열하는/browse엔드포인트를 노출합니다.결과를 공유 탐색 표시줄이 있는 HTML 표로 렌더링합니다.
Actix 애플리케이션에서 MongoDB 사용하는 이유는 무엇인가요?
MongoDB의 유연한 문서 모델 데이터를 BSON/ JSON 과 유사한 문서로 저장합니다. 이는 복잡한 ORM 계층이나 스키마 마이그레이션 없이 데이터를 모델링하는 Rust 구조체와 함께 자연스럽게 작동합니다.
Actix Web과 비동기 MongoDB Rust 드라이버 결합하면 이 스택 다음을 제공합니다.
값비싼 마이그레이션 없이 진화할 수 있는 유연한 데이터 구조
높은 동시성 및 성능 API를 위한 비동기, 비차단 I/O
데이터베이스 계층부터 핸들러 및 모델에 이르기까지 강력한 유형 안전성
웹 뷰와의 간단한 통합(이 튜토리얼에서와 같이 HTML 템플릿 또는 수동 문자열 작성)
이 조합은 다음이 필요한 애플리케이션에 적합합니다.
시간이 지남에 따라 진화하는 스키마
높은 처리량 및 동시성
데이터 형태에 대한 강력한 컴파일 타임 보장
빠른 시작 튜토리얼
이 튜토리얼은 MongoDB 와 통합되는 Actix 웹 애플리케이션 빌드하는 과정을 안내합니다. 이 애플리케이션 MongoDB Atlas 클러스터 의 샘플 레스토랑 데이터에 액세스하여 브라우저에 결과를 표시합니다.
팁
Actix Web 없이 Rust 드라이버 사용하여 MongoDB 에 연결하려는 경우 Rust 드라이버 빠른 시작 가이드 참조하세요.
프로젝트 설정
이 섹션의 단계에 따라 필수 구성 요소를 설치하고, MongoDB Atlas cluster 만들고, Rust 프로젝트 를 스캐폴딩합니다.
전제 조건 확인
빠른 시작 애플리케이션 만들려면 다음 항목이 설치되어 있어야 합니다.
전제 조건 | 참고 사항 |
|---|---|
Rust | |
코드 편집기 | 이 튜토리얼에서는 Rust 확장과 함께 Visual Studio Code 를 사용하지만 원하는 편집기를 사용할 수 있습니다. |
터미널 | MacOS용 터미널 또는 유사한 앱 사용합니다. Windows 용 PowerShell을 사용합니다. |
MongoDB Atlas 클러스터 생성
MongoDB Atlas 는 MongoDB 배포를 호스팅하는 완전 관리형 클라우드 데이터베이스 서비스입니다. MongoDB deployment 없는 경우,MongoDB 시작하기 튜토리얼을 완료하여 무료로 MongoDB cluster 생성할 수 있습니다( 크레딧 카드 필요 없음). MongoDB 시작하기 튜토리얼에서는 sample_restaurants 이 튜토리얼에서 사용하는 데이터베이스 포함하여 샘플 데이터 세트를 클러스터 에 로드하는 방법도 보여줍니다.
중요
계속 진행하기 전에 sample_restaurants 데이터 세트가 클러스터 에 로드되어 있는지 확인하세요. sample_restaurants 데이터 세트가 누락되면 샘플 페이지에 빈 레스토랑 목록이 표시됩니다.
MongoDB 클러스터에 연결하려면 연결 URI를 사용합니다. 연결 URI를 조회 방법을 학습하려면 MongoDB 시작하기 튜토리얼의 연결 문자열 추가하기 섹션을 참조하세요.
팁
연결 URI를 안전한 위치 에 저장합니다. 나중에 .env 파일 에 추가합니다.
프로젝트 종속성 구성
Cargo.toml 를 열고 [dependencies] 섹션을 다음으로 바꿉니다.
[package] name = "actix_quickstart" version = "0.1.0" edition = "2024" [dependencies] actix-web = "4" actix-files = "0.6" actix-cors = "0.7" mongodb = "3.4.1" tokio = { version = "1", features = ["rt-multi-thread", "macros"] } serde = { version = "1.0", features = ["derive"] } serde_json = "1.0" dotenv = "0.15" futures = "0.3"
터미널에서 다음 명령을 실행 하여 새 종속성을 설치합니다.
cargo build
이러한 종속성은 다음을 제공합니다.
actix-web: HTTP 서버, 라우팅 및 요청/응답 유형입니다.mongodb: Rust 용 공식 비동기 MongoDB 드라이버.tokio: Actix Web 및 MongoDB 드라이버 에서 사용하는 비동기 런타임입니다.serde/serde_json: JSON 및 BSON 데이터에 대한 직렬화 및 역직렬화입니다.dotenv: 로컬 개발을 위해 .env 파일 에서 환경 변수를 로드합니다.futures: 비동기 스트림 작업을 위한 유틸리티( MongoDB 커서에 사용됨).
백엔드 구성
프로젝트 설정하다 한 후 이 섹션의 단계에 따라 환경 변수를 구성하고, MongoDB 연결을 설정하다 , 데이터 모델 정의하고, 데이터베이스 쿼리 서비스를 구현 .
데이터베이스 연결 모듈 만들기
src 디렉토리 에 db.rs 라는 새 파일 생성하여 MongoDB 연결을 관리 .
프로젝트 루트에서 다음 명령을 실행합니다.
touch src/db.rs
db.rs 를 열고 다음 코드를 추가하여 MongoDB 클라이언트 및 데이터베이스 연결을 설정하다 합니다.
use mongodb::{options::ClientOptions, Client, Database}; pub async fn init_db(mongo_uri: &str) -> Database { let mut client_options = ClientOptions::parse(mongo_uri) .await .expect("Failed to parse MongoDB connection string"); client_options.app_name = Some("actix_quickstart".to_string()); let client = Client::with_options(client_options) .expect("Failed to initialize MongoDB client"); client.database("sample_restaurants") }
이 모듈은 다음을 수행합니다.
환경에서 MongoDB 연결 문자열 구문 분석합니다.
더 쉽게 관찰할 수 있도록 드라이버의 app_name을 구성합니다.
클라이언트를 만들고
sample_restaurants데이터베이스 대한 데이터베이스 처리하다 반환합니다.
레스토랑 데이터 모델 정의
src 디렉토리 에 models.rs 라는 새 파일 만들어 레스토랑 데이터 모델 정의합니다.
프로젝트 루트에서 다음 명령을 실행합니다.
touch src/models.rs
models.rs 를 열고 다음 코드를 추가하여 레스토랑 구조체를 정의합니다.
use mongodb::bson::oid::ObjectId; use serde::{Deserialize, Serialize}; pub struct RestaurantRow{ pub name: Option<String>, pub borough: Option<String>, pub cuisine: Option<String>, pub id: Option<ObjectId>, }
이 구조체는 MongoDB 컬렉션 에 있는 레스토랑 문서 나타냅니다. Serde 주석을 사용하여 BSON 필드를 Rust 구조체 필드에 매핑합니다.
레스토랑 쿼리 서비스 만들기
MongoDB 쿼리 로직을 HTTP 핸들러에서 격리하는 서비스 모듈을 생성합니다.
프로젝트 루트에서 다음 명령을 실행합니다.
mkdir -p src/services touch src/services/restaurant_queries.rs
restaurant_queries.rs 를 열고 다음 코드를 추가합니다.
use futures::stream::TryStreamExt; use mongodb::{ bson::doc, Collection, }; use crate::models::RestaurantRow; pub async fn fetch_all(restaurants: &Collection<RestaurantRow>) -> Result<Vec<RestaurantRow>, mongodb::error::Error> { let cursor = restaurants .find(doc! {}) .projection(doc! { "name": 1, "borough": 1, "cuisine": 1, "_id": 1, }) .await?; cursor.try_collect().await } pub async fn fetch_by_borough( restaurants: &Collection<RestaurantRow>, borough: &str, name: &str, ) -> Result<Vec<RestaurantRow>, mongodb::error::Error> { let filter = doc! { "borough": borough, "name": { "$regex": name, "$options": "i" } }; let cursor = restaurants .find(filter) .projection(doc! { "name": 1, "borough": 1, "cuisine": 1, "_id": 1, }) .await?; cursor.try_collect().await }
이 파일 두 가지 비동기 함수가 포함되어 있습니다.
fetch_all(): 필드 프로젝션 있는 모든 레스토랑을 반환합니다.fetch_by_borough(): 자치구 및 대소문자를 구분하지 않는 이름 정규식으로 필터링한 레스토랑을 반환합니다.
두 함수 모두 Vec<RestaurantRow> 를 반환하므로 프레젠테이션 계층에서 원시 BSON 처리할 필요가 없습니다.
프런트 엔드 구성
이제 데이터베이스 및 서비스 계층이 준비되었으므로 다음과 같이 Actix Web을 구성합니다.
MongoDB 연결 초기화
공유 애플리케이션 상태 정의
/restaurants및/browse엔드포인트 노출Tailwind CSS로 HTML 페이지 렌더링
HTTP 경로 핸들러 만들기
Actix 웹 HTTP 경로 핸들러와 HTML 렌더링 로직을 포함하는 모듈을 생성합니다.
프로젝트 루트에서 다음 명령을 실행 .
touch src/pages.rs
pages.rs 를 열고 다음 코드를 추가합니다.
use actix_web::{get, web, HttpResponse, Responder}; use crate::{ AppState, models::RestaurantRow, services::restaurant_queries, }; // Test endpoint to fetch all restaurants async fn get_restaurants(data: web::Data<AppState>) -> impl Responder { let result = restaurant_queries::fetch_all(&data.restaurants).await; match result { Ok(rows) => { let html = render_table_page("All Restaurants", &rows); HttpResponse::Ok() .content_type("text/html; charset=utf-8") .body(html) } Err(e) => HttpResponse::InternalServerError().body(format!("DB error: {e}")), } } // Endpoint to fetch restaurants by borough. Queens is used as an example. async fn get_restaurants_by_borough(data: web::Data<AppState>) -> impl Responder { let borough = "Queens"; // For demonstration, we use a fixed borough. This could be made dynamic. let name = "Moon"; // For demonstration, we use a fixed name filter. This could be made dynamic. let result = restaurant_queries::fetch_by_borough(&data.restaurants, borough, name).await; match result { Ok(rows) => { let title = format!(r#"{} Restaurants with "{}" in the Name"#, borough, name); let html = render_table_page(&title, &rows); HttpResponse::Ok() .content_type("text/html; charset=utf-8") .body(html) } Err(e) => HttpResponse::InternalServerError().body(format!("DB error: {e}")), } } // HTML Renderer fn render_table_page(title: &str, rows: &[RestaurantRow]) -> String { let mut html = String::new(); html.push_str(r#" <!DOCTYPE html> <html lang="en"> <head> <meta charset="UTF-8"> <meta name="viewport" content="width=device-width, initial-scale=1.0"> <script src="https://cdn.tailwindcss.com"></script> <title>"#); html.push_str(title); html.push_str(r#"</title> </head> <body class="w-full"> "#); // Navigation Bar html.push_str(r#" <nav class="bg-white px-6 py-2 shadow-md w-full"> <div class="flex justify-between items-center"> <a href="/restaurants"> <img alt="MongoDB Logo" class="h-10 inline" src="https://d3cy9zhslanhfa.cloudfront.net/media/3800C044-6298-4575-A05D5C6B7623EE37/4B45D0EC-3482-4759-82DA37D8EA07D229/webimage-8A27671A-8A53-45DC-89D7BF8537F15A0D.png" /> </a> <a href="/browse" class="text-lime-800 text-lg font-semibold hover:text-lime-700"> Browse </a> </div> </nav> "#); // Page Title html.push_str(r#"<h2 class="text-lg font-semibold px-6 py-4">"#); html.push_str(title); html.push_str("</h2>"); // Table Wrapper html.push_str( r#"<div class="border border-gray-200 shadow-md rounded-lg overflow-hidden mx-6 mb-6"> <div class="relative w-full overflow-auto"> <table class="w-full caption-bottom text-sm"> <thead class="[&_tr]:border-b bg-gray-50"> <tr class="border-b transition-colors hover:bg-muted/50"> <th class="px-4 py-3 text-left text-sm font-bold text-gray-700 w-1/3"> Name </th> <th class="px-4 py-3 text-left text-sm font-bold text-gray-700 w-1/3"> Borough </th> <th class="px-4 py-3 text-left text-sm font-bold text-gray-700 w-1/3"> Cuisine </th> </tr> </thead> <tbody class="[&_tr:last_child]:border-0"> "#, ); // Table Rows for row in rows { html.push_str(r#"<tr class="border-b transition-colors hover:bg-gray-50">"#); html.push_str(r#"<td class="p-4 align-middle">"#); html.push_str(row.name.as_deref().unwrap_or("")); html.push_str("</td>"); html.push_str(r#"<td class="p-4 align-middle">"#); html.push_str(row.borough.as_deref().unwrap_or("")); html.push_str("</td>"); html.push_str(r#"<td class="p-4 align-middle">"#); html.push_str(row.cuisine.as_deref().unwrap_or("")); html.push_str("</td>"); html.push_str("</tr>"); } // Closing tags html.push_str(r#" </tbody> </table> </div> </div> "#); html.push_str("</body></html>"); html }
이 모듈은 다음을 수행합니다.
/restaurants및/browse엔드포인트를 정의합니다.데이터베이스 쿼리 서비스
fetch_all및fetch_by_borough를 호출합니다.Tailwind CSS와 재사용 가능한 탐색 모음을 사용하여 전체 HTML 페이지를 렌더링합니다.
기본 애플리케이션 파일 업데이트
main.rs 의 내용을 다음 코드로 바꿉니다.
mod db; mod models; mod services; mod pages; use actix_web::{get, web, App, HttpResponse, HttpServer, Responder}; use dotenv::dotenv; use mongodb::bson::doc; use mongodb::Collection; use std::env; use crate::models::RestaurantRow; // Shared state to hold the MongoDB collection #[derive(Clone)] struct AppState { restaurants: Collection<RestaurantRow>, } #[get("/health")] async fn health_check() -> impl Responder { HttpResponse::Ok().body("Healthy") } #[actix_web::main] async fn main() -> std::io::Result<()> { dotenv().ok(); let mongo_uri = env::var("MONGO_URI").expect("MONGO_URI must be set in .env file"); let port: u16 = env::var("PORT") .unwrap_or_else(|_| "5050".to_string()) .parse() .expect("PORT must be a valid u16 number"); print!("Starting server on port {port}...\n"); let db = db::init_db(&mongo_uri).await; let restaurants: Collection<RestaurantRow> = db.collection::<RestaurantRow>("restaurants"); // Extra ping to be sure connection is working let ping_result = db.run_command(doc! {"ping": 1},).await; print!("MongoDB ping result: {ping_result:?}\n"); let state = AppState {restaurants}; HttpServer::new(move || { App::new() .app_data(web::Data::new(state.clone())) .service(health_check) .service(pages::get_restaurants) .service(pages::get_restaurants_by_borough) }) .bind(("127.0.0.1", port))? .run() .await }
이 파일 다음과 같습니다.
앱 에서 사용되는 모듈(
db,models,services,pages)을 선언합니다.핸들러 간에 공유되는 레스토랑 컬렉션 보유하는
AppState구조체를 정의합니다./health엔드포인트를 구현합니다.환경에서
MONGO_URI및PORT를 읽습니다.MongoDB database 및
restaurants컬렉션 초기화합니다.MongoDB cluster 핑하여 연결을 확인합니다.
Actix 웹 HTTP 서버 시작하고 경로를 등록합니다.
/health/restaurants/browse
파일 구조 확인
애플리케이션 실행 전에 파일 트리가 다음과 유사하게 구성되어 있는지 확인하세요.
actix-quickstart ├── Cargo.toml <-- Project config + dependencies> ├── .env <-- Environment variables> └── src ├── main.rs <-- Application entry point> ├── db.rs <-- MongoDB connection module> ├── models.rs <-- RestaurantRow model + BSON mapping> ├── pages.rs <-- HTTP route handlers + HTML rendering> └── services ├── mod.rs <-- Service module exports> └── restaurant_queries.rs <-- MongoDB query services>
Rust 도구는 빌드 때 target/ 와(과) 같은 추가 파일을 생성합니다. 이러한 파일은 무시해도 됩니다.
애플리케이션 실행하기
나머지 단계에 따라 서버 시작하고 렌더링된 레스토랑 데이터를 확인합니다.

빠른 시작 튜토리얼을 완료하신 것을 축하드립니다!
이 단계를 완료하면 MongoDB 배포서버에 연결하고, 샘플 레스토랑 데이터에 대한 쿼리를 실행하고, 결과를 렌더링하는 Actix 웹 애플리케이션 갖게 됩니다.
추가 리소스
Actix Web, MongoDB 및 관련 도구에 대해 자세히 학습 다음을 참조하세요.
Actix 웹 문서