Overview
In this tutorial, you can learn how to use Spring Session MongoDB in a Spring Boot application. Spring Session MongoDB is an open source integration maintained by MongoDB that enables applications to store Spring Session data in MongoDB.
Follow this tutorial to connect a sample Spring Boot application to a MongoDB Atlas deployment for session storage.
Tip
This tutorial modifies the Spring Boot application created in the Spring Data Framework Integration tutorial. The steps on this page show how to update that application to use Spring Session MongoDB.
Set Up Your Project
Complete the following steps to set up your Spring Boot application and install Spring Session MongoDB in your development environment.
Verify the prerequisites.
Before you begin this tutorial, ensure that you install and set up the following prerequisites:
JDK version 17 or later
Integrated development environment (IDE), such as IntelliJ IDEA or Eclipse
Note
This tutorial shows how to install Spring Session MongoDB by using Maven in an IDE. If you do not use an IDE, visit Building Maven to learn how to set up your project.
Create a new Spring Boot project.
Complete the Spring Data Framework Integration tutorial to create a new Spring Boot application. You can also view and clone the application code by visiting the SpringDataMongoBulkInsert repository on GitHub.
After completing this prerequisite tutorial, you have a new application that uses Spring Data MongoDB to perform a bulk insert operation on a MongoDB collection.
Update your project dependencies.
In your pom.xml file, replace your spring-boot-starter-parent dependency
with the following code:
<parent> <groupId>org.springframework.boot</groupId> <artifactId>spring-boot-starter-parent</artifactId> <version>4.0.0</version> <relativePath/> <!-- Lookup parent from repository --> </parent>
This ensures that your application uses Spring Boot 4.0, which is compatible with Spring Session 4.0.
Then, add the following dependency to your file's dependencies list to use Spring Session MongoDB:
<dependency> <groupId>org.mongodb</groupId> <artifactId>mongodb-spring-session</artifactId> <version>4.0.0-rc0</version> </dependency>
After you configure your dependencies, ensure they are available to your project by running your dependency manager and refreshing the project in your IDE.
Connect to a MongoDB Deployment
Complete the following steps to connect to your MongoDB deployment by retrieving a connection URI, also called a connection string. The connection URI instructs the driver on how to connect to a MongoDB deployment and how to behave while connected.
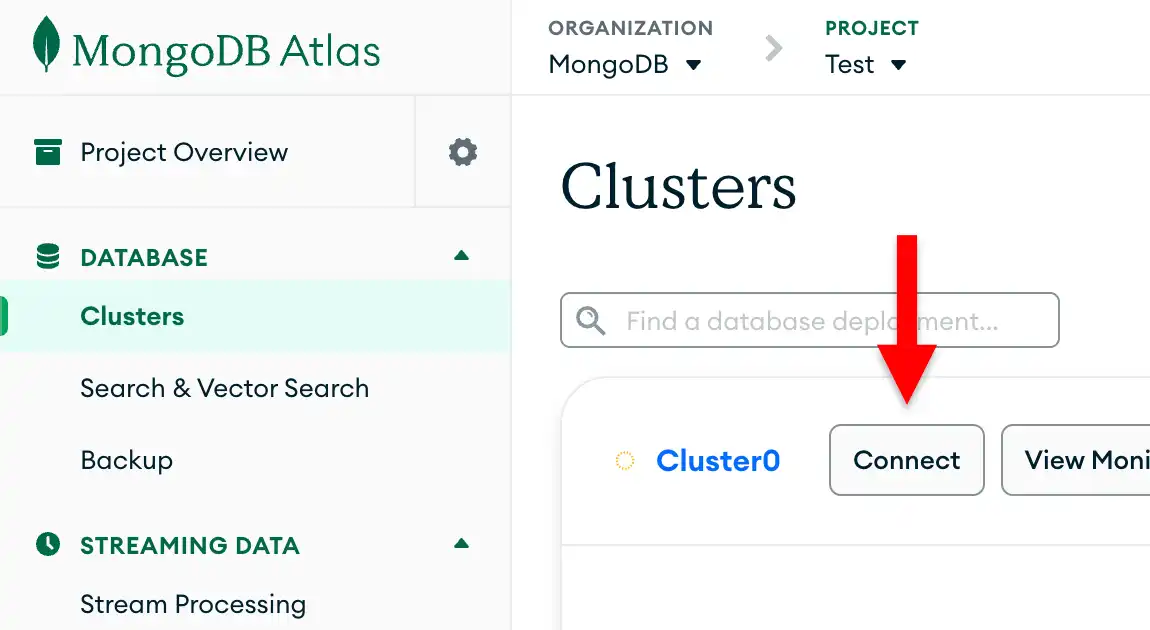
Find your MongoDB Atlas connection string.
To retrieve your connection string for your MongoDB deployment, log into your Atlas account and navigate to the Clusters page under the Database section. Click the Connect button for your new deployment.

If you do not already have a database user configured, MongoDB prompts you to create and configure a new user.
Click the Drivers button under Connect to your application and select "Java" from the Driver selection menu and the version that best matches the version you installed from the Version selection menu.
Ensure the View full code sample option is deselected to view only the connection string.

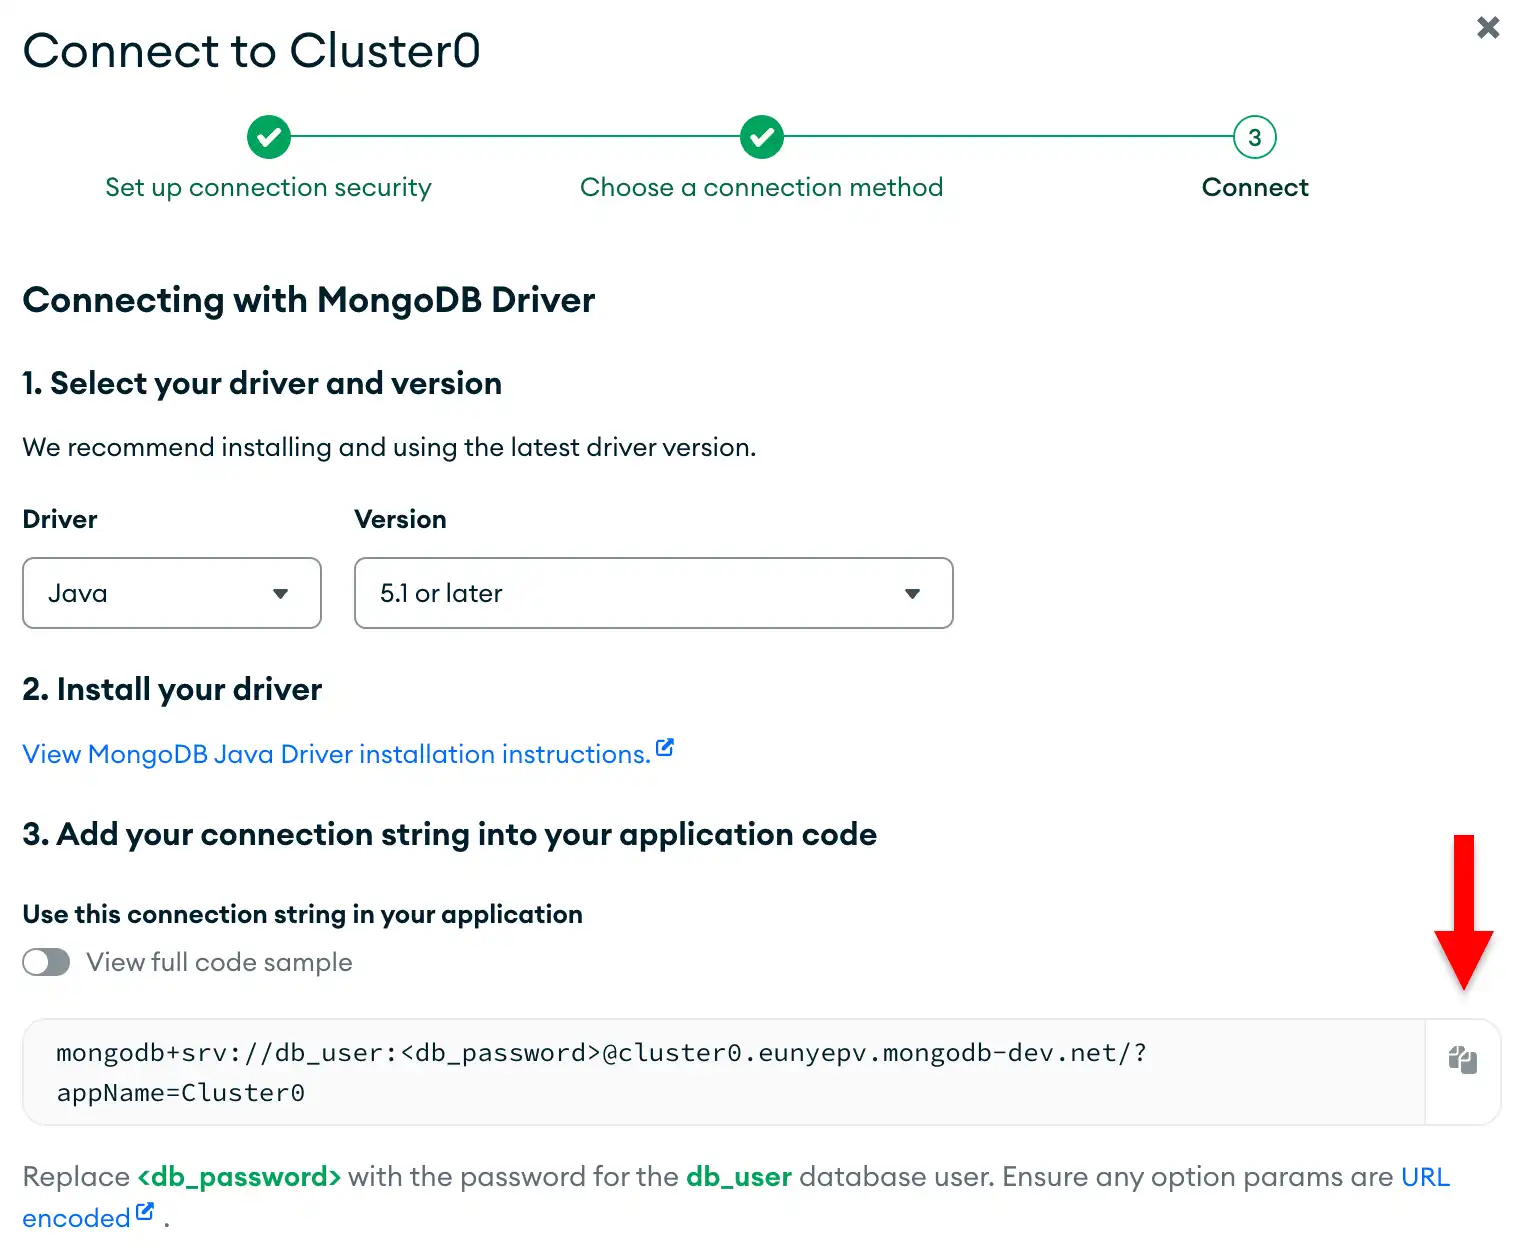
Update the password placeholder.
Paste this connection string into a file in your preferred text editor
and replace the <db_password> placeholder with your database user's
password. The connection string is already populated with your database
user's username.
Save this file to a safe location for use in an upcoming step.
Configure Spring Session MongoDB
After completing the Spring Data tutorial and accessing your connection URI, you can add Spring Session MongoDB to your application to enable session management.
Verify your MongoDB connection.
Navigate to your application.properties file in the src/main/resources
directory. Ensure that this file specifies your MongoDB database, connection
URI, and the number of documents to insert, as described in the Configure your MongoClient
section of the Spring Data tutorial. If configured correctly, your file contains
the following code:
mongodb.database=bulk mongodb.uri=<connection URI> documentCount=25000
Replace the <connection URI> placeholder with the connection URI
that you saved in the preceding section.
Create your Spring Session configuration class.
Create a new file named SessionConfig.java in your project's base package directory
and paste the following code:
package com.mongodb.examples.springdatabulkinsert; import org.mongodb.spring.session.config.annotation.web.http.EnableMongoHttpSession; import org.springframework.context.annotation.Configuration; public class SessionConfig { }
This configuration class enables MongoDB-backed HTTP session management for your Spring Boot application.
Add Session-Aware Web Endpoints
Next, add web endpoints that demonstrate session management when working with the product data from your Spring Data MongoDB application.
Create a web controller.
Create a file named ProductWebController.java
in your project's base package directory and paste the following code:
package com.mongodb.examples.springdatabulkinsert; import org.springframework.beans.factory.annotation.Autowired; import org.springframework.data.mongodb.core.MongoTemplate; import org.springframework.data.mongodb.core.query.Criteria; import org.springframework.data.mongodb.core.query.Query; import org.springframework.web.bind.annotation.GetMapping; import org.springframework.web.bind.annotation.RequestParam; import org.springframework.web.bind.annotation.RestController; import jakarta.servlet.http.HttpSession; import java.util.ArrayList; import java.util.List; import java.util.Map; public class ProductWebController { private MongoTemplate mongoTemplate; public Map<String, Object> searchProducts( String name, HttpSession session) { List<String> searchHistory = (List<String>) session.getAttribute("searchHistory"); if (searchHistory == null) { searchHistory = new ArrayList<>(); } // Defines the default search if no name is provided if (name == null || name.trim().isEmpty()) { name = "product"; } // Adds the current search to history searchHistory.add(name); session.setAttribute("searchHistory", searchHistory); // Queries the "name" field in the "products" collection Query query = new Query(Criteria.where("name").regex(name, "i")); List<Product> products = mongoTemplate.find(query, Product.class, "products"); return Map.of( "products", products, "sessionId", session.getId() ); } public Map<String, Object> getSearchHistory(HttpSession session) { // Retrieves the search history from the session List<String> searchHistory = (List<String>) session.getAttribute("searchHistory"); if (searchHistory == null) { searchHistory = new ArrayList<>(); } return Map.of( "searchHistory", searchHistory, "sessionId", session.getId(), "searchCount", searchHistory.size() ); } }
ProductWebController.java is a REST controller that demonstrates session
functionality by interacting with your existing product data. This file
defines the following web endpoints:
/products/search: Searches for products in thebulk.productscollection and stores each search term in the user's session/products/history: Retrieves search history data from the user session stored in MongoDB
Update your main application class.
Before testing the new web endpoints, update your main application
class to keep the application running and output information about the
endpoints. Replace the contents of SpringDataBulkInsertApplication.java
with the following code:
package com.mongodb.examples.springdatabulkinsert; import org.slf4j.Logger; import org.slf4j.LoggerFactory; import org.springframework.beans.factory.annotation.Autowired; import org.springframework.beans.factory.annotation.Value; import org.springframework.boot.CommandLineRunner; import org.springframework.boot.SpringApplication; import org.springframework.boot.autoconfigure.SpringBootApplication; public class SpringDataBulkInsertApplication implements CommandLineRunner { private int count; private static final Logger LOG = LoggerFactory .getLogger(SpringDataBulkInsertApplication.class); private ProductRepository repository; public static void main(String[] args) { SpringApplication.run(SpringDataBulkInsertApplication.class, args); } public void run(String... args) throws Exception { repository.bulkInsertProducts(count); LOG.info("Bulk insert completed. Web endpoints are now available."); LOG.info("You can visit these URLs:"); LOG.info(" http://localhost:8080/products/search?name=goose"); LOG.info(" http://localhost:8080/products/history"); } }
Run Your Application
Finally, follow the steps in this section to run your application and explore the session storage functionality.
Test the session functionality.
Open your web browser or use a tool like curl to test the following session-enabled endpoints:
Search for products: To query the documents inserted into the
bulk.productscollection, visithttp://localhost:8080/products/search?name=and append a product name to the URL. For example, you can search for documents that have anamevalue of"goose"by visiting http://localhost:8080/products/search?name=goose.The output contains your session ID and a list of documents that match your
namefield query, as shown in the following sample output:{ "sessionId": "...", "products": [ { "name": "goose", "qty": 788, "price": 9680, "available": "...", "unavailable": "...", "skuId": "276-68-7836" }, { "name": "goose", "qty": 984, "price": 2307, "available": "...", "unavailable": "...", "skuId": "068-88-9345" }, ... ] } View search history: To view your search history, visit http://localhost:8080/products/history.
The output contains your session ID, a list of product names you searched for, and the number of total searches, as shown in the following sample output:
{ "sessionId": "...", "searchHistory": [ "goose", "bear" ], "searchCount": 2 }
Restart your application.
If you stop your application and run it again, MongoDB persists your session data.
- Stop your application in your IDE or terminal. Then, restart it
- in your IDE, or run the following command in your terminal:
./mvnw spring-boot:run
If you visit the http://localhost:8080/products/history URL, you can see your previous search history despite the application reboot. This data is still available because it was stored in MongoDB rather than in memory.
Note
Session Timeout
Spring Session MongoDB's default session timeout is 30 minutes. If you restart your application after 30 minutes of inactivity, your session expires and MongoDB no longer stores previous session data.
Next Steps
Congratulations on completing the tutorial!
Note
If you run into issues in this tutorial, submit feedback by using the Rate this page tab on the right or bottom right side of this page.
You can find support for general questions by using the MongoDB Stack Overflow tag or the MongoDB Reddit community.
In this tutorial, you updated your Spring Data MongoDB application to use Spring Session MongoDB and store user sessions in the same MongoDB deployment that contains your product data. The application demonstrates session management working alongside bulk operations and data querying.
To continue developing your application, view the following resources: