Overview
Esta guía le muestra cómo integrar MongoDB Cifrado a nivel de campo del lado del cliente(CSFLE) con Spring Data MongoDB.
Nota
Si no has trabajado con CSFLE antes, consulta la guía de Tutoriales de CSFLE en el manual del servidor de MongoDB.
Si no ha trabajado con Spring Data MongoDB antes, consulte la documentación de Spring Data MongoDB.
Repositorio de GitHub
Para ver el código fuente de esta guía, consulte el repositorio mongodb-java-spring-boot-csfle en GitHub.
También puede recuperar el código fuente desde su repositorio de GitHub ejecutando el siguiente comando:
git clone git@github.com:mongodb-developer/mongodb-java-spring-boot-csfle.git
Requisitos previos
Antes de utilizar esta guía, realice los siguientes pasos:
Instala Java 17
Instale la Biblioteca compartida de cifrado automático de MongoDB v7.0.2 o posterior
Revisar el README.md para obtener información sobre cómo ejecutar el código de ejemplo.
También necesitas acceder a un clúster de MongoDB que ejecute MongoDB v7.0.2 o posterior.
Funcionalidades de ejemplo
Este ejemplo proporciona un código prediseñado para un entorno de producción e incluye las siguientes funcionalidades:
Múltiples colecciones cifradas
Generación automatizada de esquemas JSON
JSON schema del lado del servidor
Clústeres separados para claves de cifrado de datos (DEK) y colecciones cifradas.
Generación automatizada o recuperación de DEK
Extensión de evaluación de Spring Expression Language (SpEL)
Repositorios autoimplementados
OpenAPI 3.0.1 documentación
La plantilla sigue los principios SOLID para mejorar la legibilidad y reutilización del código. Para aprender más sobre SOLID, consulta SOLID en Wikipedia.
Diagramas de proyectos
El siguiente diagrama muestra los componentes necesarios para crear un sistema habilitado para CSFLE. MongoClient Que puede cifrar y descifrar campos automáticamente. Las flechas del diagrama muestran las dependencias y relaciones entre los componentes.

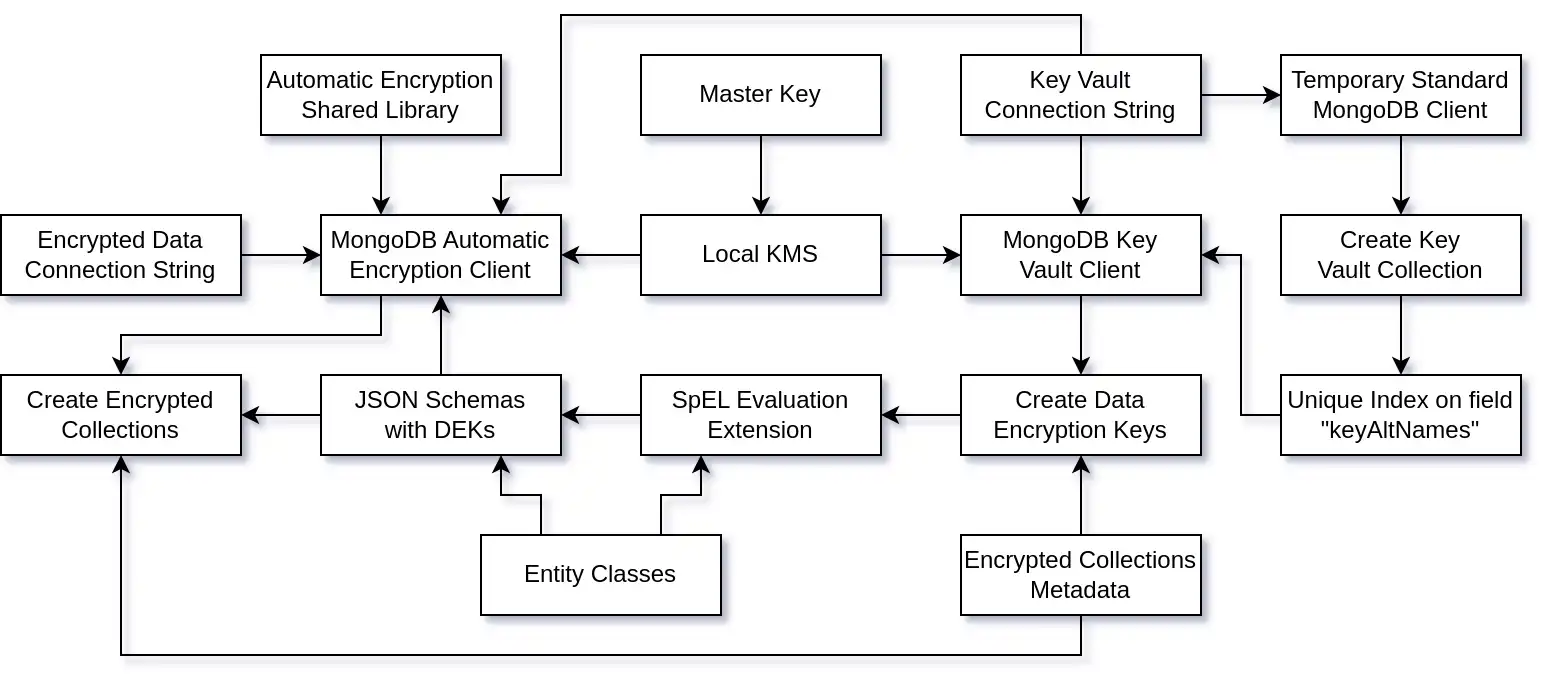
Las flechas en el diagrama muestran las dependencias y relaciones entre los componentes.
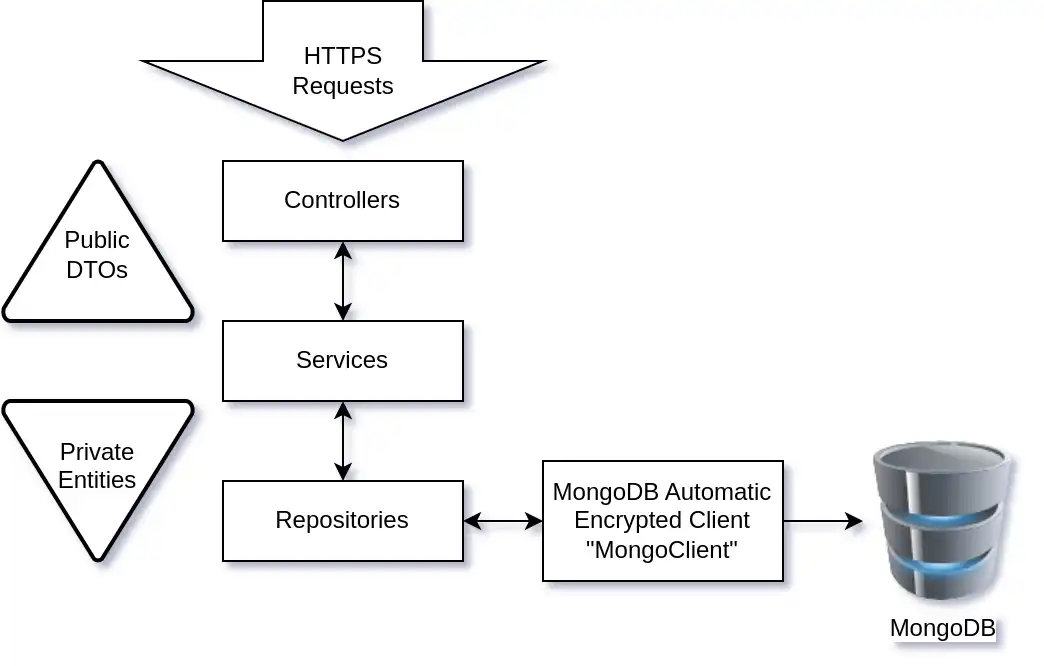
Una vez que la aplicación establece una conexión con MongoDB, utiliza una arquitectura de tres niveles para exponer una API REST y administrar la comunicación con la base de datos MongoDB, como se muestra en el siguiente diagrama:

Crea la Colección de Bóvedas de Llaves
Esta sección muestra cómo crear la Colección de Bóvedas de Llaves y su índice único.
Si se inicia a partir de un nuevo clúster de MongoDB, primero se debe crear la Colección de Bóvedas de Llaves y su índice único en el campo keyAltNames.
Configure el Key Vault y las DEK
La KeyVaultAndDekSetup clase crea la Colección de Bóvedas de Llaves y su índice único utilizando una conexión estándar a MongoDB. Luego, crea las DEKs necesarias para cifrar los documentos en cada colección cifrada.
El siguiente código muestra la clase KeyVaultAndDekSetup:
public class KeyVaultAndDekSetup { private static final Logger LOGGER = LoggerFactory.getLogger(KeyVaultAndDekSetup.class); private final KeyVaultService keyVaultService; private final DataEncryptionKeyService dataEncryptionKeyService; private String CONNECTION_STR; public KeyVaultAndDekSetup(KeyVaultService keyVaultService, DataEncryptionKeyService dataEncryptionKeyService) { this.keyVaultService = keyVaultService; this.dataEncryptionKeyService = dataEncryptionKeyService; } public void postConstruct() { LOGGER.info("=> Start Encryption Setup."); LOGGER.debug("=> MongoDB Connection String: {}", CONNECTION_STR); MongoClientSettings mcs = MongoClientSettings.builder() .applyConnectionString(new ConnectionString(CONNECTION_STR)) .build(); try (MongoClient client = MongoClients.create(mcs)) { LOGGER.info("=> Created the MongoClient instance for the encryption setup."); LOGGER.info("=> Creating the encryption key vault collection."); keyVaultService.setupKeyVaultCollection(client); LOGGER.info("=> Creating the Data Encryption Keys."); EncryptedCollectionsConfiguration.encryptedEntities.forEach(dataEncryptionKeyService::createOrRetrieveDEK); LOGGER.info("=> Encryption Setup completed."); } catch (Exception e) { LOGGER.error("=> Encryption Setup failed: {}", e.getMessage(), e); } } }
Importante
En producción, puedes crear la colección de almacenamiento de claves y su índice único en el campo keyAltNames manualmente. Después de crearlos, puede remover este código.
Este código utiliza una conexión MongoClient estándar (no habilitada para CSFLE) y temporal en un bloque trycon recursos para crear una colección y un índice en el clúster MongoDB.
Crea la Colección de Bóvedas de Llaves
La clase KeyVaultServiceImpl crea la colección de almacén de claves y el índice único keyAltNames.
El siguiente código muestra la clase KeyVaultServiceImpl:
public class KeyVaultServiceImpl implements KeyVaultService { private static final Logger LOGGER = LoggerFactory.getLogger(KeyVaultServiceImpl.class); private static final String INDEX_NAME = "uniqueKeyAltNames"; private String KEY_VAULT_DB; private String KEY_VAULT_COLL; public void setupKeyVaultCollection(MongoClient mongoClient) { LOGGER.info("=> Setup the key vault collection {}.{}", KEY_VAULT_DB, KEY_VAULT_COLL); MongoDatabase db = mongoClient.getDatabase(KEY_VAULT_DB); MongoCollection<Document> vault = db.getCollection(KEY_VAULT_COLL); boolean vaultExists = doesCollectionExist(db, KEY_VAULT_COLL); if (vaultExists) { LOGGER.info("=> Vault collection already exists."); if (!doesIndexExist(vault)) { LOGGER.info("=> Unique index created on the keyAltNames"); createKeyVaultIndex(vault); } } else { LOGGER.info("=> Creating a new vault collection & index on keyAltNames."); createKeyVaultIndex(vault); } } private void createKeyVaultIndex(MongoCollection<Document> vault) { Bson keyAltNamesExists = exists("keyAltNames"); IndexOptions indexOpts = new IndexOptions().name(INDEX_NAME) .partialFilterExpression(keyAltNamesExists) .unique(true); vault.createIndex(new BsonDocument("keyAltNames", new BsonInt32(1)), indexOpts); } private boolean doesCollectionExist(MongoDatabase db, String coll) { return db.listCollectionNames().into(new ArrayList<>()).stream().anyMatch(c -> c.equals(coll)); } private boolean doesIndexExist(MongoCollection<Document> coll) { return coll.listIndexes() .into(new ArrayList<>()) .stream() .map(i -> i.get("name")) .anyMatch(n -> n.equals(INDEX_NAME)); } }
Después de crear la Colección de Bóvedas de Llaves y el índice, puedes cerrar la conexión estándar de MongoDB.
Crear las llaves de cifrado de datos
Esta sección muestra cómo crear los DEK usando la conexión ClientEncryption.
Configura el cliente de Key Vault
La clase MongoDBKeyVaultClientConfiguration crea un bean ClientEncryption que el DataEncryptionKeyService utiliza para crear los DEK.
El siguiente código muestra la clase MongoDBKeyVaultClientConfiguration:
public class MongoDBKeyVaultClientConfiguration { private static final Logger LOGGER = LoggerFactory.getLogger(MongoDBKeyVaultClientConfiguration.class); private final KmsService kmsService; private String CONNECTION_STR; private String KEY_VAULT_DB; private String KEY_VAULT_COLL; private MongoNamespace KEY_VAULT_NS; public MongoDBKeyVaultClientConfiguration(KmsService kmsService) { this.kmsService = kmsService; } public void postConstructor() { this.KEY_VAULT_NS = new MongoNamespace(KEY_VAULT_DB, KEY_VAULT_COLL); } /** * MongoDB Encryption Client that can manage Data Encryption Keys (DEKs). * * @return ClientEncryption MongoDB connection that can create or delete DEKs. */ public ClientEncryption clientEncryption() { LOGGER.info("=> Creating the MongoDB Key Vault Client."); MongoClientSettings mcs = MongoClientSettings.builder() .applyConnectionString(new ConnectionString(CONNECTION_STR)) .build(); ClientEncryptionSettings ces = ClientEncryptionSettings.builder() .keyVaultMongoClientSettings(mcs) .keyVaultNamespace(KEY_VAULT_NS.getFullName()) .kmsProviders(kmsService.getKmsProviders()) .build(); return ClientEncryptions.create(ces); } }
Puedes crear un ClientEncryption bean mediante el Sistema de Gestión de Claves (KMS) y usarlo para generar las DEK. Necesitas una DEK por cada colección cifrada.
Implementar el servicio de clave de cifrado de datos
La clase DataEncryptionKeyServiceImpl crea y almacena los DEK. Cuando se evalúan las expresiones SpEL en las entidades para crear los esquemas JSON, se deben recuperar los DEKs.
El siguiente código muestra la clase DataEncryptionKeyServiceImpl:
public class DataEncryptionKeyServiceImpl implements DataEncryptionKeyService { private static final Logger LOGGER = LoggerFactory.getLogger(DataEncryptionKeyServiceImpl.class); private final ClientEncryption clientEncryption; private final Map<String, String> dataEncryptionKeysB64 = new HashMap<>(); private String KMS_PROVIDER; public DataEncryptionKeyServiceImpl(ClientEncryption clientEncryption) { this.clientEncryption = clientEncryption; } public Map<String, String> getDataEncryptionKeysB64() { LOGGER.info("=> Getting Data Encryption Keys Base64 Map."); LOGGER.info("=> Keys in DEK Map: {}", dataEncryptionKeysB64.entrySet()); return dataEncryptionKeysB64; } public String createOrRetrieveDEK(EncryptedEntity encryptedEntity) { Base64.Encoder b64Encoder = Base64.getEncoder(); String dekName = encryptedEntity.getDekName(); BsonDocument dek = clientEncryption.getKeyByAltName(dekName); BsonBinary dataKeyId; if (dek == null) { LOGGER.info("=> Creating Data Encryption Key: {}", dekName); DataKeyOptions dko = new DataKeyOptions().keyAltNames(of(dekName)); dataKeyId = clientEncryption.createDataKey(KMS_PROVIDER, dko); LOGGER.debug("=> DEK ID: {}", dataKeyId); } else { LOGGER.info("=> Existing Data Encryption Key: {}", dekName); dataKeyId = dek.get("_id").asBinary(); LOGGER.debug("=> DEK ID: {}", dataKeyId); } String dek64 = b64Encoder.encodeToString(dataKeyId.getData()); LOGGER.debug("=> Base64 DEK ID: {}", dek64); LOGGER.info("=> Adding Data Encryption Key to the Map with key: {}", encryptedEntity.getEntityClass().getSimpleName()); dataEncryptionKeysB64.put(encryptedEntity.getEntityClass().getSimpleName(), dek64); return dek64; } }
Nota
Debido a que los DEK se almacenan en un mapa, no es necesario recuperarlos nuevamente más tarde para los esquemas JSON.
Definir entidades
Spring Data MongoDB utiliza un modelo centrado en POJO para implementar los repositorios y mapear los documentos a las colecciones de MongoDB.
Crear la entidad Persona
El siguiente código muestra la clase PersonEntity:
public class PersonEntity { private ObjectId id; private String firstName; private String lastName; private String ssn; private String bloodType; public PersonEntity() { } public PersonEntity(ObjectId id, String firstName, String lastName, String ssn, String bloodType) { this.id = id; this.firstName = firstName; this.lastName = lastName; this.ssn = ssn; this.bloodType = bloodType; } public String toString() { return "PersonEntity{" + "id=" + id + ", firstName='" + firstName + '\'' + ", lastName='" + lastName + '\'' + ", ssn='" + ssn + '\'' + ", bloodType='" + bloodType + '\'' + '}'; } public ObjectId getId() { return id; } public void setId(ObjectId id) { this.id = id; } public String getFirstName() { return firstName; } public void setFirstName(String firstName) { this.firstName = firstName; } public String getLastName() { return lastName; } public void setLastName(String lastName) { this.lastName = lastName; } public String getSsn() { return ssn; } public void setSsn(String ssn) { this.ssn = ssn; } public String getBloodType() { return bloodType; } public void setBloodType(String bloodType) { this.bloodType = bloodType; } }
La clase anterior contiene toda la información necesaria para automatizar CSFLE. La clase utiliza la anotación @Encrypted de las siguientes maneras:
La anotación de clase
@Encryptedcontiene la expresión SpEL#{mongocrypt.keyId(#target)}. Esta expresión especifica elkeyIddel DEK que generaste o recuperaste en un paso anterior. CSFLE utiliza este DEK para el cifrado.La anotación
@Encrypteden el campossnespecifica que requiere un algoritmo determinista.La anotación
@Encrypteden el campobloodTypeespecifica que requiere un algoritmo aleatorio.
El JSON schema generado por Spring Data MongoDB para esta entidad es el siguiente:
{ "encryptMetadata": { "keyId": [ { "$binary": { "base64": "WyHXZ+53SSqCC/6WdCvp0w==", "subType": "04" } } ] }, "type": "object", "properties": { "ssn": { "encrypt": { "bsonType": "string", "algorithm": "AEAD_AES_256_CBC_HMAC_SHA_512-Deterministic" } }, "bloodType": { "encrypt": { "bsonType": "string", "algorithm": "AEAD_AES_256_CBC_HMAC_SHA_512-Random" } } } }
Configurar la evaluación SpEL
La clase EntitySpelEvaluationExtension permite la evaluación de la expresión de SpEL. El siguiente código muestra esta clase:
public class EntitySpelEvaluationExtension implements EvaluationContextExtension { private static final Logger LOGGER = LoggerFactory.getLogger(EntitySpelEvaluationExtension.class); private final DataEncryptionKeyService dataEncryptionKeyService; public EntitySpelEvaluationExtension(DataEncryptionKeyService dataEncryptionKeyService) { this.dataEncryptionKeyService = dataEncryptionKeyService; } public String getExtensionId() { return "mongocrypt"; } public Map<String, Function> getFunctions() { try { return Collections.singletonMap("keyId", new Function( EntitySpelEvaluationExtension.class.getMethod("computeKeyId", String.class), this)); } catch (NoSuchMethodException e) { throw new RuntimeException(e); } } public String computeKeyId(String target) { String dek = dataEncryptionKeyService.getDataEncryptionKeysB64().get(target); LOGGER.info("=> Computing dek for target {} => {}", target, dek); return dek; } }
Nota
Esta clase recupera los DEK y los coteja con el target. En este ejemplo, target es PersonEntity.
Genera esquemas JSON y configura MongoClient
Las siguientes secciones muestran cómo generar esquemas JSON en un proyecto Spring Data MongoDB.
Entender el proceso de generación de esquemas
Para generar los esquemas JSON, se necesitan las entidades MappingContext que se crean mediante la configuración automática de Spring Data. La configuración automática crea la conexión MongoClient y el MongoTemplate.
Sin embargo, para crear el MongoClient con el cifrado automático habilitado, necesita esquemas JSON.
La solución consiste en inyectar la creación del JSON Schema en el proceso de autoconfiguración instanciando el bean MongoClientSettingsBuilderCustomizer.
Configura el cliente seguro de MongoDB
El siguiente código muestra la clase MongoDBSecureClientConfiguration:
public class MongoDBSecureClientConfiguration { private static final Logger LOGGER = LoggerFactory.getLogger(MongoDBSecureClientConfiguration.class); private final KmsService kmsService; private final SchemaService schemaService; private String CRYPT_SHARED_LIB_PATH; private String CONNECTION_STR_DATA; private String CONNECTION_STR_VAULT; private String KEY_VAULT_DB; private String KEY_VAULT_COLL; private MongoNamespace KEY_VAULT_NS; public MongoDBSecureClientConfiguration(KmsService kmsService, SchemaService schemaService) { this.kmsService = kmsService; this.schemaService = schemaService; } public void postConstruct() { this.KEY_VAULT_NS = new MongoNamespace(KEY_VAULT_DB, KEY_VAULT_COLL); } public MongoClientSettings mongoClientSettings() { LOGGER.info("=> Creating the MongoClientSettings for the encrypted collections."); return MongoClientSettings.builder().applyConnectionString(new ConnectionString(CONNECTION_STR_DATA)).build(); } public MongoClientSettingsBuilderCustomizer customizer(MappingContext mappingContext) { LOGGER.info("=> Creating the MongoClientSettingsBuilderCustomizer."); return builder -> { MongoJsonSchemaCreator schemaCreator = MongoJsonSchemaCreator.create(mappingContext); Map<String, BsonDocument> schemaMap = schemaService.generateSchemasMap(schemaCreator) .entrySet() .stream() .collect(toMap(e -> e.getKey().getFullName(), Map.Entry::getValue)); Map<String, Object> extraOptions = Map.of("cryptSharedLibPath", CRYPT_SHARED_LIB_PATH, "cryptSharedLibRequired", true); MongoClientSettings mcs = MongoClientSettings.builder() .applyConnectionString( new ConnectionString(CONNECTION_STR_VAULT)) .build(); AutoEncryptionSettings oes = AutoEncryptionSettings.builder() .keyVaultMongoClientSettings(mcs) .keyVaultNamespace(KEY_VAULT_NS.getFullName()) .kmsProviders(kmsService.getKmsProviders()) .schemaMap(schemaMap) .extraOptions(extraOptions) .build(); builder.autoEncryptionSettings(oes); }; } }
Tip
Si desea utilizar diferentes políticas de retención de copias de seguridad para distintos clústeres, puede almacenar una DEK en cada clúster. Esto le permite borrar completamente una DEK de un clúster y todas las copias de seguridad, lo cual podría ser necesario para el cumplimiento legal.
Para obtener más información, consulta CSFLE con el Java Driver.
Implementa el servicio de esquemas
El siguiente código muestra la clase SchemaServiceImpl, que almacena los JSON esquemas generados en un mapa:
public class SchemaServiceImpl implements SchemaService { private static final Logger LOGGER = LoggerFactory.getLogger(SchemaServiceImpl.class); private Map<MongoNamespace, BsonDocument> schemasMap; public Map<MongoNamespace, BsonDocument> generateSchemasMap(MongoJsonSchemaCreator schemaCreator) { LOGGER.info("=> Generating schema map."); List<EncryptedEntity> encryptedEntities = EncryptedCollectionsConfiguration.encryptedEntities; return schemasMap = encryptedEntities.stream() .collect(toMap(EncryptedEntity::getNamespace, e -> generateSchema(schemaCreator, e.getEntityClass()))); } public Map<MongoNamespace, BsonDocument> getSchemasMap() { return schemasMap; } private BsonDocument generateSchema(MongoJsonSchemaCreator schemaCreator, Class<?> entityClass) { BsonDocument schema = schemaCreator.filter(MongoJsonSchemaCreator.encryptedOnly()) .createSchemaFor(entityClass) .schemaDocument() .toBsonDocument(); LOGGER.info("=> JSON Schema for {}:\n{}", entityClass.getSimpleName(), schema.toJson(JsonWriterSettings.builder().indent(true).build())); return schema; } }
La aplicación almacena sus esquemas JSON porque esta plantilla también implementa esquemas JSON del lado del servidor. Esta es una práctica recomendada para CSFLE.
Crear o actualizar colecciones cifradas
Comprender los Esquemas JSON del lado del servidor
Solo se requieren los esquemas JSON del lado del cliente para la biblioteca compartida de cifrado automático. Sin embargo, sin los esquemas JSON del lado del servidor, otro cliente mal configurado o un administrador conectado directamente al clúster podría insertar o actualizar documentos sin cifrar los campos.
Para evitar esto, puede utilizar el esquema JSON del lado del servidor para imponer un tipo de campo en un documento.
El esquema JSON cambia con las diferentes versiones de su aplicación, por lo que es necesario actualizarlo cada vez que reinicie su aplicación.
Implementar la configuración de colecciones cifradas
El siguiente código muestra la clase EncryptedCollectionsSetup:
public class EncryptedCollectionsSetup { private static final Logger LOGGER = LoggerFactory.getLogger(EncryptedCollectionsSetup.class); private final MongoClient mongoClient; private final SchemaService schemaService; public EncryptedCollectionsSetup(MongoClient mongoClient, SchemaService schemaService) { this.mongoClient = mongoClient; this.schemaService = schemaService; } public void postConstruct() { LOGGER.info("=> Setup the encrypted collections."); schemaService.getSchemasMap() .forEach((namespace, schema) -> createOrUpdateCollection(mongoClient, namespace, schema)); } private void createOrUpdateCollection(MongoClient mongoClient, MongoNamespace ns, BsonDocument schema) { MongoDatabase db = mongoClient.getDatabase(ns.getDatabaseName()); String collStr = ns.getCollectionName(); if (doesCollectionExist(db, ns)) { LOGGER.info("=> Updating {} collection's server side JSON Schema.", ns.getFullName()); db.runCommand(new Document("collMod", collStr).append("validator", jsonSchemaWrapper(schema))); } else { LOGGER.info("=> Creating encrypted collection {} with server side JSON Schema.", ns.getFullName()); db.createCollection(collStr, new CreateCollectionOptions().validationOptions( new ValidationOptions().validator(jsonSchemaWrapper(schema)))); } } public BsonDocument jsonSchemaWrapper(BsonDocument schema) { return new BsonDocument("$jsonSchema", schema); } private boolean doesCollectionExist(MongoDatabase db, MongoNamespace ns) { return db.listCollectionNames() .into(new ArrayList<>()) .stream() .anyMatch(c -> c.equals(ns.getCollectionName())); } }
Admitir varias entidades
La plantilla de esta guía puede admitir cualquier número de entidades.
Para agregar otro tipo de entidad, crea los componentes de la arquitectura de tres niveles, como se describe en los pasos anteriores. Luego, añade la entidad a la clase EncryptedCollectionsConfiguration, como se muestra en el siguiente ejemplo:
public class EncryptedCollectionsConfiguration { public static final List<EncryptedEntity> encryptedEntities = List.of( new EncryptedEntity("mydb", "persons", PersonEntity.class, "personDEK"), new EncryptedEntity("mydb", "companies", CompanyEntity.class, "companyDEK")); }
Como se ha agregado la @Encrypted(algorithm = "AEAD_AES_256_CBC_HMAC_SHA_512-Deterministic") anotación en los campos de la clase entidad, el framework utiliza el JSON Schema del servidor para generar automáticamente los DEK y crear la colección cifrada.
Consulta por un campo cifrado
Esta plantilla implementa el método findFirstBySsn(ssn). Puede usar este método para buscar el documento de una persona por su número de Seguro Social, incluso si este campo está cifrado.
Nota
Este método funciona únicamente porque se utiliza un algoritmo de cifrado determinista.
Implementar el repositorio de personas
El siguiente código muestra la interfaz PersonRepository:
public interface PersonRepository extends MongoRepository<PersonEntity, String> { PersonEntity findFirstBySsn(String ssn); }
Recursos adicionales
Si tienes preguntas, abre un issue en el repositorio de mongodb-java-spring-boot-csfle o haz una pregunta en el MongoDB Community Forum.
Para obtener más información sobre CSFLE, consulta los siguientes recursos:
CSFLE con el controlador Java (sin Spring Data)
Para aprender más sobre Spring Data MongoDB, consulta los siguientes recursos:
Puedes ver una versión de esta guía en formato de video en el canal de YouTube de MongoDB.