Overview
The .NET/C# Driver is a NuGet package that you can use to connect to and communicate with MongoDB. This guide shows you how to create an application that uses the .NET/C# Driver to connect to a MongoDB cluster hosted on MongoDB Atlas.
Tip
MongoDB Atlas is a fully managed cloud database service that hosts your MongoDB deployments. You can create your own free (no credit card required) MongoDB Atlas deployment by following the steps in this guide.
Follow this guide to connect a sample C# application to a MongoDB Atlas deployment. If you prefer to connect to MongoDB using a different driver or programming language, see our list of official drivers.
Download the .NET/C# Driver
After you complete these steps, you have a new .NET framework project and the .NET/C# Driver installed.
Deploy a MongoDB Atlas Cluster
You can create a free tier MongoDB deployment on MongoDB Atlas to store and manage your data. MongoDB Atlas hosts and manages your MongoDB database in the cloud.
Create a free MongoDB deployment on Atlas.
Complete the MongoDB Get Started guide to set up a new Atlas account and load sample data into a new free tier MongoDB deployment.
After you complete these steps, you have a new free tier MongoDB deployment on Atlas, database user credentials, and sample data loaded in your database.
Create a Connection String
You can connect to your MongoDB deployment by providing a connection URI, also called a connection string, which instructs the driver on how to connect to a MongoDB deployment and how to behave while connected.
The connection string includes the hostname or IP address and port of your deployment, the authentication mechanism, user credentials when applicable, and connection options.
Tip
To connect to a self-managed (non-Atlas) deployment, see Create a MongoClient.
Find your MongoDB Atlas connection string.
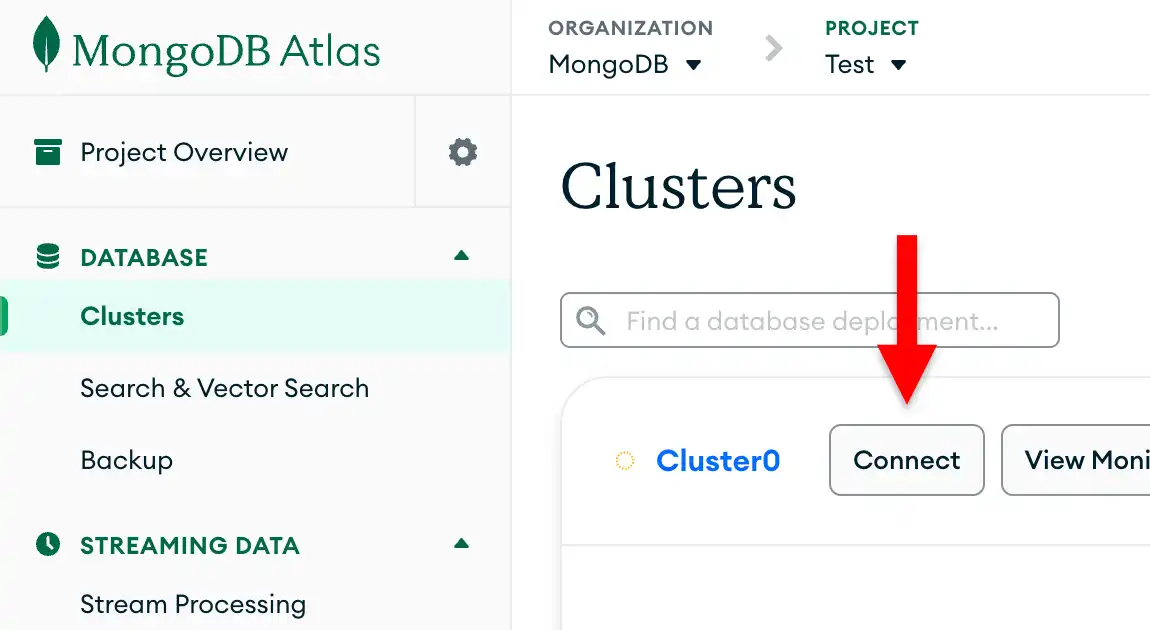
To retrieve your connection string for the deployment that you created in the previous step, log into your Atlas account and navigate to the Clusters page under the Database section. Click the Connect button for your new deployment.

If you do not already have a database user configured, MongoDB will prompt you to create and configure a new user.
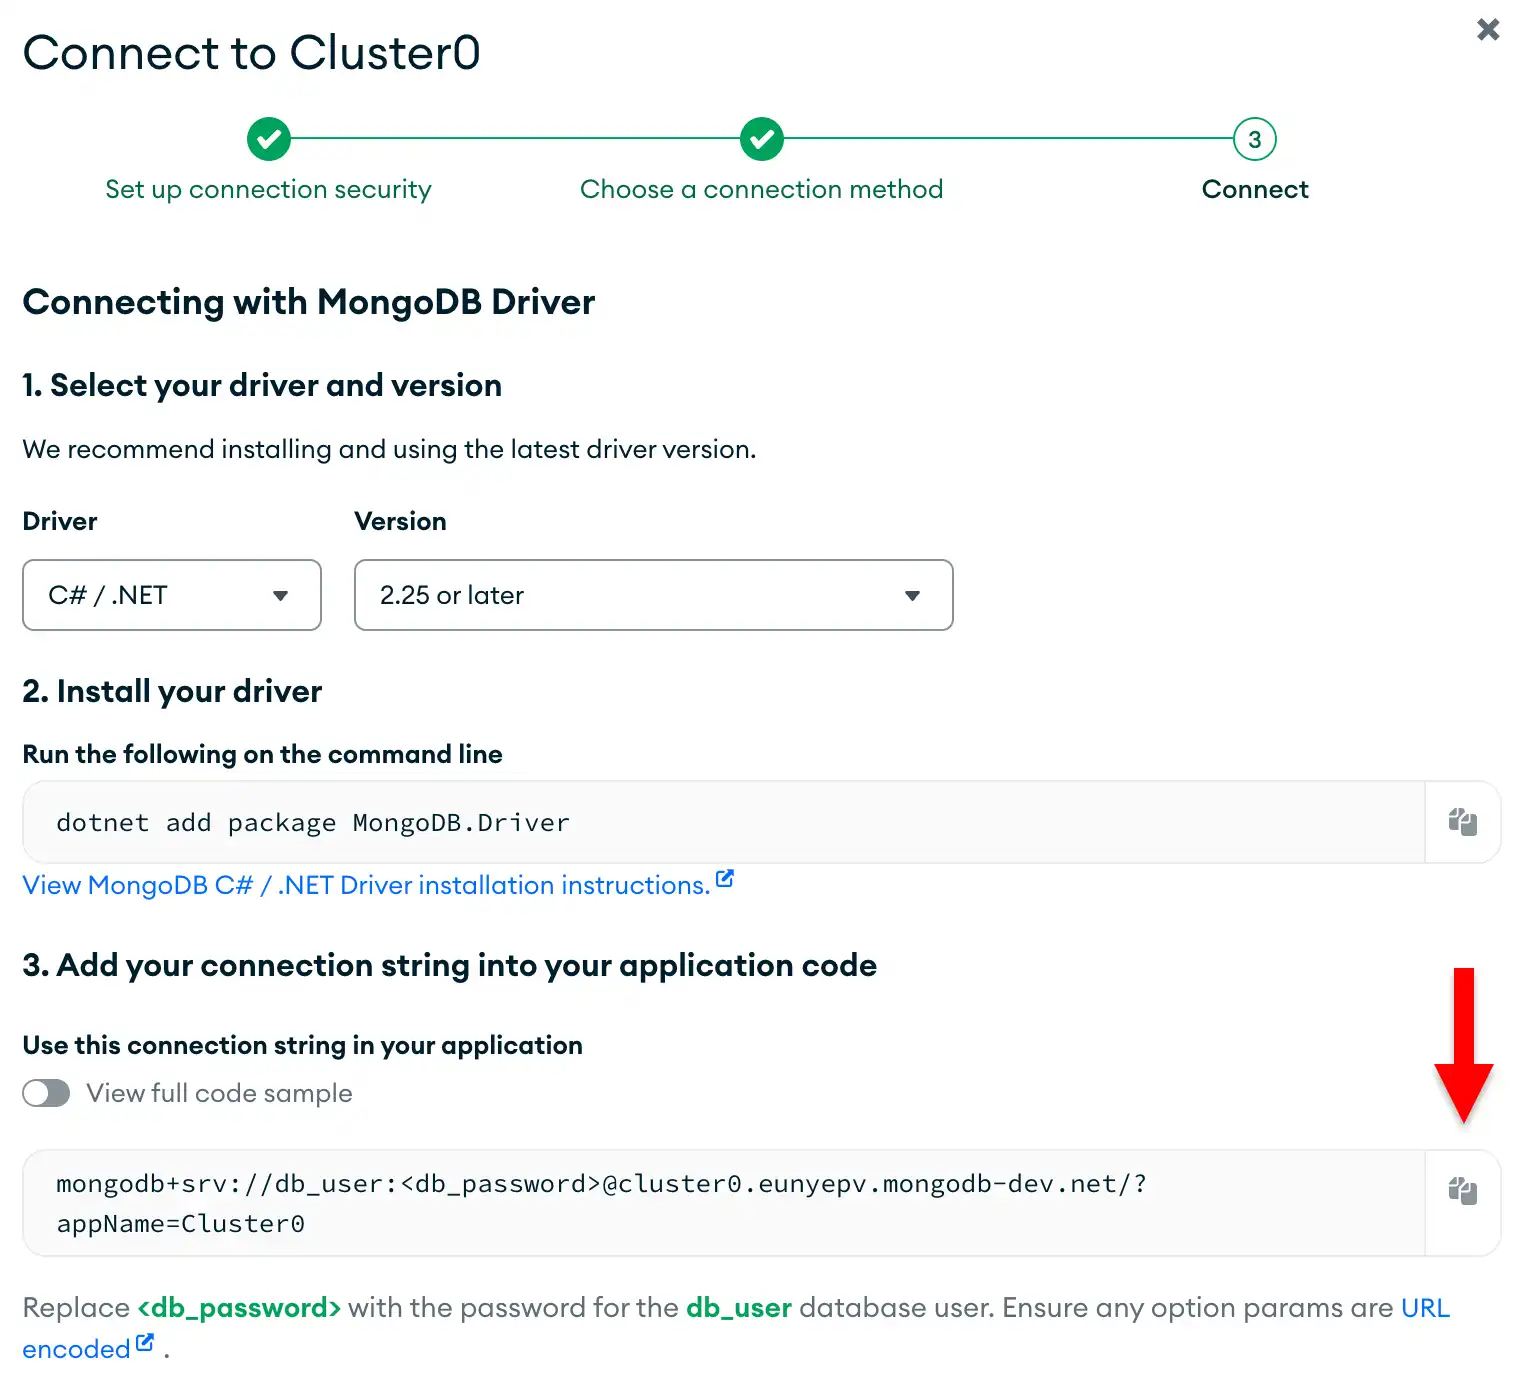
Click the Drivers button under the Connect to your application section and select "C# / .NET" from the Driver selection menu and the version that best matches the version you installed from the Version selection menu.
Ensure the View full code sample option is deselected to view only the connection string.

Update the password placeholder.
Paste this connection string into a file in your preferred text editor
and replace the <db_password> placeholder with your database user's
password. The connection string is already populated with your database
user's username.
Save this file to a safe location for use in the next step.
Set an environment variable.
In your shell, run the following code to save your MongoDB
connection string to an
environment variable. Replace <your MongoDB URI> with the connection
string that you saved to a file in the previous step.
export MONGODB_URI="<your MongoDB URI>"
Note
PowerShell
If you're using Microsoft PowerShell, run the following command instead:
set MONGODB_URI="<your MongoDB URI>"
Storing your credentials in an environment variable is safer than hardcoding them in your source code.
After completing these steps, you have a connection string that contains your database username and password.
Run a Sample Query
Create your .NET/C# application.
Copy and paste the following code into the Program.cs file in your application.
You can choose to query documents by using a BsonDocument or a Plain Old CLR Object
(POCO). Select the corresponding tab to see an example of each approach:
using MongoDB.Driver; using MongoDB.Bson; var connectionString = Environment.GetEnvironmentVariable("MONGODB_URI"); if (connectionString == null) { Console.WriteLine("You must set your 'MONGODB_URI' environment variable. To learn how to set it, see https://www.mongodb.com/docs/drivers/csharp/current/get-started/create-connection-string"); Environment.Exit(0); } var client = new MongoClient(connectionString); var collection = client.GetDatabase("sample_mflix").GetCollection<BsonDocument>("movies"); var filter = Builders<BsonDocument>.Filter.Eq("title", "Back to the Future"); var document = collection.Find(filter).First(); Console.WriteLine(document.ToJson(new JsonWriterSettings { Indent = true }));
using MongoDB.Bson; using MongoDB.Bson.Serialization.Attributes; using MongoDB.Driver; var connectionString = Environment.GetEnvironmentVariable("MONGODB_URI"); if (connectionString == null) { Console.WriteLine("You must set your 'MONGODB_URI' environment variable. To learn how to set it, see https://www.mongodb.com/docs/drivers/csharp/current/get-started/create-connection-string"); Environment.Exit(0); } var client = new MongoClient(connectionString); var collection = client.GetDatabase("sample_mflix").GetCollection<Movie>("movies"); var filter = Builders<Movie>.Filter.Eq(m => m.Title, "Back to the Future"); var movie = collection.Find(filter).First(); Console.WriteLine($"Title: {movie.Title}"); Console.WriteLine($"Plot: {movie.Plot}"); Console.WriteLine($"Genres: {string.Join(", ", movie.Genres)}"); [] public class Movie { [] public ObjectId Id { get; set; } [] public string Title { get; set; } [] public string Plot { get; set; } [] public List<string> Genres { get; set; } }
Tip
To learn more about using POCOs with the .NET/C# Driver, see the POCOs guide.
Run your application.
In your shell, run the following command to start this application:
dotnet run csharp-quickstart.csproj
The output includes details of the retrieved movie document. The following shows the output for each approach:
{ _id: ..., plot: 'A young man is accidentally sent 30 years into the past...', genres: [ 'Adventure', 'Comedy', 'Sci-Fi' ], ... title: 'Back to the Future', ... }
Title: Back to the Future Plot: A young man is accidentally sent 30 years into the past... Genres: Adventure, Comedy, Sci-Fi
Tip
If you encounter an error or see no output, ensure that you specified the proper connection string, and that you loaded the sample data.
After you complete these steps, you have a working application that uses the driver to connect to your MongoDB deployment, runs a query on the sample data, and prints out the result.
Next Steps
Congratulations on completing the tutorial!
In this tutorial, you created a C# application that connects to a MongoDB deployment hosted on MongoDB Atlas and retrieves a document that matches a query.
Learn more about the .NET/C# Driver from the following resources:
Learn how to insert documents in the Insert Documents section.
Learn how to find documents in the Create a Query Filter section.
Learn how to update documents in the Update One and Update Many sections.
Learn how to delete documents in the Delete Documents section.
Note
If you run into issues in this tutorial, ask for help in the MongoDB Stack Overflow page or in the MongoDB Reddit community, or submit feedback by using the Rate this page tab on the right or bottom right side of this page.