You can use MicroStrategy Desktop to analyze a MongoDB database through the MongoDB Connector for BI.
New in version 2.2.
Procedure
This tutorial is for version MicroStrategy Desktop version 10.11.
Prerequisites
Create a 64-bit system Data Source Name (DSN).
Install the MongoDB BI Connector ODBC Driver for Windows.
Make sure you have a running
mongosqldinstance. For instructions on starting and runningmongosqld, see Launch BI Connector.

Add a data source.
Click the plus icon next to the Data Sources text in the upper left corner of the window.
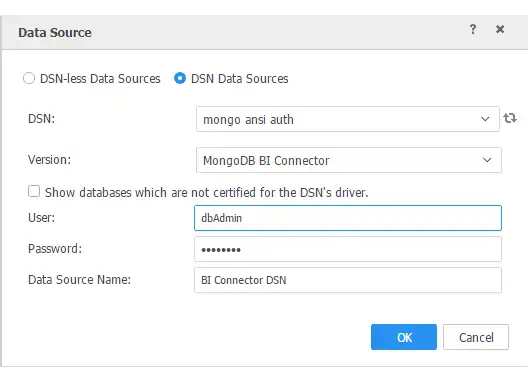
Select the DSN Data Sources radio button.
Select your DSN from the DSN dropdown menu.
Select MongoDB BI Connector from the Version dropdown menu.
Enter your
mongosqldusername and password.Note
If you are running
mongosqldwithout authentication enabled, you still need to enter something in the username and password fields. Any string will do.Give the data source a name.
![Screenshot of MicroStrategy DSN popup window]()
Click OK.
Click on your newly created data source in the Data Sources panel. Your MongoDB databases should appear in the center panel.
Select the database you'd like to work with. The database's collections should appear.
Drag the collections you'd like to work with to the right side panel.
Click the Finish button.

Build the visualization which suits your needs.
See the MicroStrategy documentation for more information about data visualizations.
Prerequisites
Download the MongoDB Authentication Plugin for JDBC. Save the
.jarfile in a folder calledjdbc.Download the MySQL Connector/J plugin. Save the
.jarfile in yourjdbcfolder.Make sure you have a running
mongosqldinstance. For instructions on starting and runningmongosqld, see Launch BI Connector.Important
Use the 5.x version of Connector/J. The 8.x version is not compatible.
Add a data source.
Click the plus icon next to the Data Sources text in the upper left corner of the window.
Check the checkbox marked "Show databases whose certified drivers were not found".
Select MySQL from the Databases dropdown menu.
Click the Add driver link and navigate to the
jdbcfolder where your.jarfiles are stored. Select the MySQL.jarfile.Enter your
mongosqldhost name and port number.Click the Show connection string link.
Check the checkbox marked "Edit connection string".
Use the following connection string. Replace the placeholder values with the correct values.
JDBC;DRIVER={com.mysql.jdbc.Driver};URL={jdbc:mysql://<hostname>:<port number>?useSSL=false&authenticationPlugins=org.mongodb.mongosql.auth.plugin.MongoSqlAuthenticationPlugin};MSTR_JDBC_JAR_FOLDER=<path-to-jar-files>; Enter your
mongosqldusername and password.Note
If you are running
mongosqldwithout authentication enabled, you still need to enter something in the username and password fields. Any string will do.Give the data source a name.
![Screenshot of MicroStrategy DSN popup window]()
Click OK.
Click on your newly created data source in the Data Sources panel. Your MongoDB databases should appear in the center panel.
Select the database you'd like to work with. The database's collections should appear.
Drag the collections you'd like to work with to the right side panel.
Click the Finish button.


Build the visualization which suits your needs.
See the MicroStrategy documentation for more information about data visualizations.