Overview
In this tutorial, you can learn how to create a RESTful API with endpoints that perform basic create, read, update, and delete (CRUD) operations across collections in a MongoDB Atlas cluster.
Prerequisites
Before you start this tutorial, perform the following actions:
Set up a MongoDB Atlas account and deploy and configure a cluster that is M0 or higher. To view instructions, see the MongoDB Get Started guide.
Install .NET 6.0 or later on your machine. To install .NET, visit the Microsoft .NET download page.
Note
Language Compatibility
This tutorial uses .NET Core 8.0, but you can use any version later than .NET 6.0.
Set Up Your Project
Run the following commands in your terminal to create a new .NET Core project that uses a web application template:
dotnet new webapi -o MongoExample cd MongoExample
To add the .NET/C# Driver to your project as a dependency, run the following command:
dotnet add package MongoDB.Driver
The preceding commands create a new web application project for .NET Core named MongoExample and install the latest .NET/C# Driver. The template project includes some boilerplate files that you modify to implement a RESTful API.
Design a Document Model and Database Service
In this section, you can create and configure your MongoDB service and define the data model for your RESTful API.
Create a MongoDB Service
Create the MongoDBSettings class
Your MongoDB service is responsible for establishing a connection and directly working with documents within MongoDB. In your project, create a folder named Models. In the Models folder, create a new file named MongoDBSettings.cs. In this file, add the following code:
namespace MongoExample.Models; public class MongoDBSettings { public string ConnectionURI { get; set; } = null!; public string DatabaseName { get; set; } = null!; public string CollectionName { get; set; } = null!; }
The preceding code defines a class named MongoDBSettings that contains information about your connection, the database name, and the collection name.
Update the appsettings.json file
You can find the data that is stored in the class fields defined in the MongoDBSettings class in the projects' appsettings.json file. Open this file and add the following configuration:
{ "Logging": { "LogLevel": { "Default": "Information", "Microsoft.AspNetCore": "Warning" } }, "AllowedHosts": "*", "MongoDB": { "ConnectionURI": "<Atlas connection string>", "DatabaseName": "sample_mflix", "CollectionName": "playlist" } }
This tutorial uses the sample_mflix database and the playlist collection. Replace the <Atlas connection string> placeholder with your MongoDB Atlas connection string. For more information on how to find your connection string, see the Connect to Your Cluster tutorial in the Atlas documentation.
Create the service
In your project, create a folder named Services. In the Services folder, create a new file named MongoDBService.cs and add the following code:
using MongoExample.Models; using Microsoft.Extensions.Options; using MongoDB.Driver; using MongoDB.Bson; namespace MongoExample.Services; public class MongoDBService { private readonly IMongoCollection<Playlist> _playlistCollection; public MongoDBService(IOptions<MongoDBSettings> mongoDBSettings) { MongoClient client = new MongoClient(mongoDBSettings.Value.ConnectionURI); IMongoDatabase database = client.GetDatabase(mongoDBSettings.Value.DatabaseName); _playlistCollection = database.GetCollection<Playlist>(mongoDBSettings.Value.CollectionName); } public async Task<List<Playlist>> GetAsync() { } public async Task CreateAsync(Playlist playlist) { } public async Task AddToPlaylistAsync(string id, string movieId) {} public async Task DeleteAsync(string id) { } }
The preceding code defines a class named MongoDBService that includes empty asynchronous functions. Throughout this tutorial, you add code to these functions as you create your endpoints. The settings you configured in the appsettings.json file are set to variables.
Connect the service to the application
Open the Program.cs file and add the following code to the top of the file:
using MongoExample.Models; using MongoExample.Services; var builder = WebApplication.CreateBuilder(args); builder.Services.Configure<MongoDBSettings>(builder.Configuration.GetSection("MongoDB")); builder.Services.AddSingleton<MongoDBService>();
In the preceding code, the GetSection() function pulls your settings from the MongoDB field in the appsettings.json file.
Tip
If the template code already has the builder variable, don't add it twice.
Create the document model
Now that the service is set up, you can create a data model for your collection.
In the Models folder, create a new file named Playlist.cs and add the following code:
using MongoDB.Bson; using MongoDB.Bson.Serialization.Attributes; using System.Text.Json.Serialization; namespace MongoExample.Models; public class Playlist { [] [] public string? Id { get; set; } public string username { get; set; } = null!; [] [] public List<string> movieIds { get; set; } = null!; }
In the preceding code, the Id field is serialized as an ObjectId in the _id field. The field is represented as a string in your application.
The movieIds field is serialized as items. When you send or receive JSON values, the field is also named items instead of movieIds.
If you plan to have your local class field match the document field directly, it isn't necessary to define custom mappings. For example, the username field in the preceding code has no custom mappings. It is called be username in C#, in JSON, and in MongoDB.
After this step, you have a MongoDB service and document model for your collection to work with .NET Core.
Build CRUD Endpoints
To create the CRUD endpoints for this application, you must update two different files within the project. In this section, you can learn how to define the endpoint within a controller and update the corresponding work within the service.
Note
Data Validation
In this example project, there is no data validation for the HTTP requests.
Build endpoints to interact with MongoDB
Create a controller
In your project, create a folder named Controllers. In the Controllers folder, create a new file named PlaylistController.cs and add the following code:
using System; using Microsoft.AspNetCore.Mvc; using MongoExample.Services; using MongoExample.Models; namespace MongoExample.Controllers; [] [] public class PlaylistController: Controller { private readonly MongoDBService _mongoDBService; public PlaylistController(MongoDBService mongoDBService) { _mongoDBService = mongoDBService; } [] public async Task<List<Playlist>> Get() {} [] public async Task<IActionResult> Post([FromBody] Playlist playlist) {} [] public async Task<IActionResult> AddToPlaylist(string id, [FromBody] string movieId) {} [] public async Task<IActionResult> Delete(string id) {} }
The PlaylistController class contains a constructor method that gains access to your singleton service class. Then, there is a series of endpoints for this controller.
Add data through the POST endpoint
Go to Services/MongoDBService.cs and update the CreateAsync function to use the following code:
public async Task CreateAsync(Playlist playlist) { await _playlistCollection.InsertOneAsync(playlist); return; }
The preceding code sets the _playlistCollection in the constructor method of the service. This lets your application use the InsertOneAsync method, which takes a passed Playlist variable and inserts it.
To complete the creation of the POST endpoint, go to the Controllers/PlaylistController.cs file and update the Post method to use the following code:
[] public async Task<IActionResult> Post([FromBody] Playlist playlist) { await _mongoDBService.CreateAsync(playlist); return CreatedAtAction(nameof(Get), new { id = playlist.Id }, playlist); }
When the POST endpoint executes, the application takes the Playlist object from the request, which .NET Core parses, and passes it to the CreateAsync function in the service. After the insert, the code returns information about the interaction.
Read data through the GET endpoint
Go to Services/MongoDBService.cs and update the GetAsync function to use the following code:
public async Task<List<Playlist>> GetAsync() { return await _playlistCollection.Find(new BsonDocument()).ToListAsync(); }
The Find operation in the preceding code returns all documents that exist in the collection.
To complete the creation of the GET endpoint, go to the Controllers/PlaylistController.cs file and update the Get method to use the following code:
[] public async Task<List<Playlist>> Get() { return await _mongoDBService.GetAsync(); }
Update data using the PUT endpoint
Go to Services/MongoDBService.cs and update the AddToPlaylistAsync function to use the following code:
public async Task AddToPlaylistAsync(string id, string movieId) { FilterDefinition<Playlist> filter = Builders<Playlist>.Filter.Eq("Id", id); UpdateDefinition<Playlist> update = Builders<Playlist>.Update.AddToSet<string>("movieIds", movieId); await _playlistCollection.UpdateOneAsync(filter, update); return; }
The preceding code sets up a match filter to determine which document or documents receive an update, in this case adding an item to your playlist. The code matches based on the Id field, which is unique. Then, the code defines the update criteria, which is an AddtoSet operation that only adds an item to the array if it doesn't already exist in the array.
The UpdateOneAsync methods only updates on document even if the match filter returns more than one match.
To complete the creation of the PUT endpoint, go to the Controllers/PlaylistController.cs file and update the AddToPlaylist function to use the following code:
[] public async Task<IActionResult> AddToPlaylist(string id, [FromBody] string movieId) { await _mongoDBService.AddToPlaylistAsync(id, movieId); return NoContent(); }
Delete data by using the DELETE endpoint
Go to Services/MongoDBService.cs and update the DeleteAsync function to use the following code:
public async Task DeleteAsync(string id) { FilterDefinition<Playlist> filter = Builders<Playlist>.Filter.Eq("Id", id); await _playlistCollection.DeleteOneAsync(filter); return; }
The preceding code deletes a single document based on the filter criteria, which matches the unique value of the Id field.
To complete the creation of the DELETE endpoint, go to the Controllers/PlaylistController.cs file and update the Delete function to use the following code:
[] public async Task<IActionResult> Delete(string id) { await _mongoDBService.DeleteAsync(id); return NoContent(); }
After this step, you have a complete set of CRUD endpoints for your RESTful API.
Test Your API Endpoints
With the endpoints created, you can test them using the Swagger UI that is included with the template .NET Core application. To do this, go to the Program.cs file and remove any code from the template project related to the WeatherForecast class. Update the file to include the following code:
// Adds services to the container to configure Swagger/OpenAPI builder.Services.AddEndpointsApiExplorer(); builder.Services.AddSwaggerGen(); var app = builder.Build(); // Configures the HTTP request pipeline if (app.Environment.IsDevelopment()) { app.UseSwagger(); app.UseSwaggerUI(); } app.UseHttpsRedirection(); // Maps the endpoints for the API app.MapGet("/api/playlists", async (MongoDBService mongoDBService) => { var playlists = await mongoDBService.GetAsync(); return playlists; }) .WithName("GetPlaylists") .WithOpenApi(); app.MapPost("/api/playlists", async (MongoDBService mongoDBService, Playlist newPlaylist) => { await mongoDBService.CreateAsync(newPlaylist); return Results.Created($"/playlists/{newPlaylist.Id}", newPlaylist); }) .WithName("CreatePlaylist") .WithOpenApi(); app.MapPut("/api/playlists/{id}", async (MongoDBService mongoDBService, string id, string movieId) => { await mongoDBService.AddToPlaylistAsync(id, movieId); return Results.NoContent(); }) .WithName("AddMovieToPlaylist") .WithOpenApi(); app.MapDelete("/playlists/{id}", async (MongoDBService mongoDBService, string id) => { await mongoDBService.DeleteAsync(id); return Results.NoContent(); }) .WithName("DeletePlaylist") .WithOpenApi(); app.Run();
You can replace any repetitive code from the project template with the preceding code.
Execute the following command to run your application:
dotnet run
After the application starts, open your browser and go to your configured localhost URL to access the Swagger UI, for example http://localhost:5000/swagger. The following image shows how the Swagger UI appears:
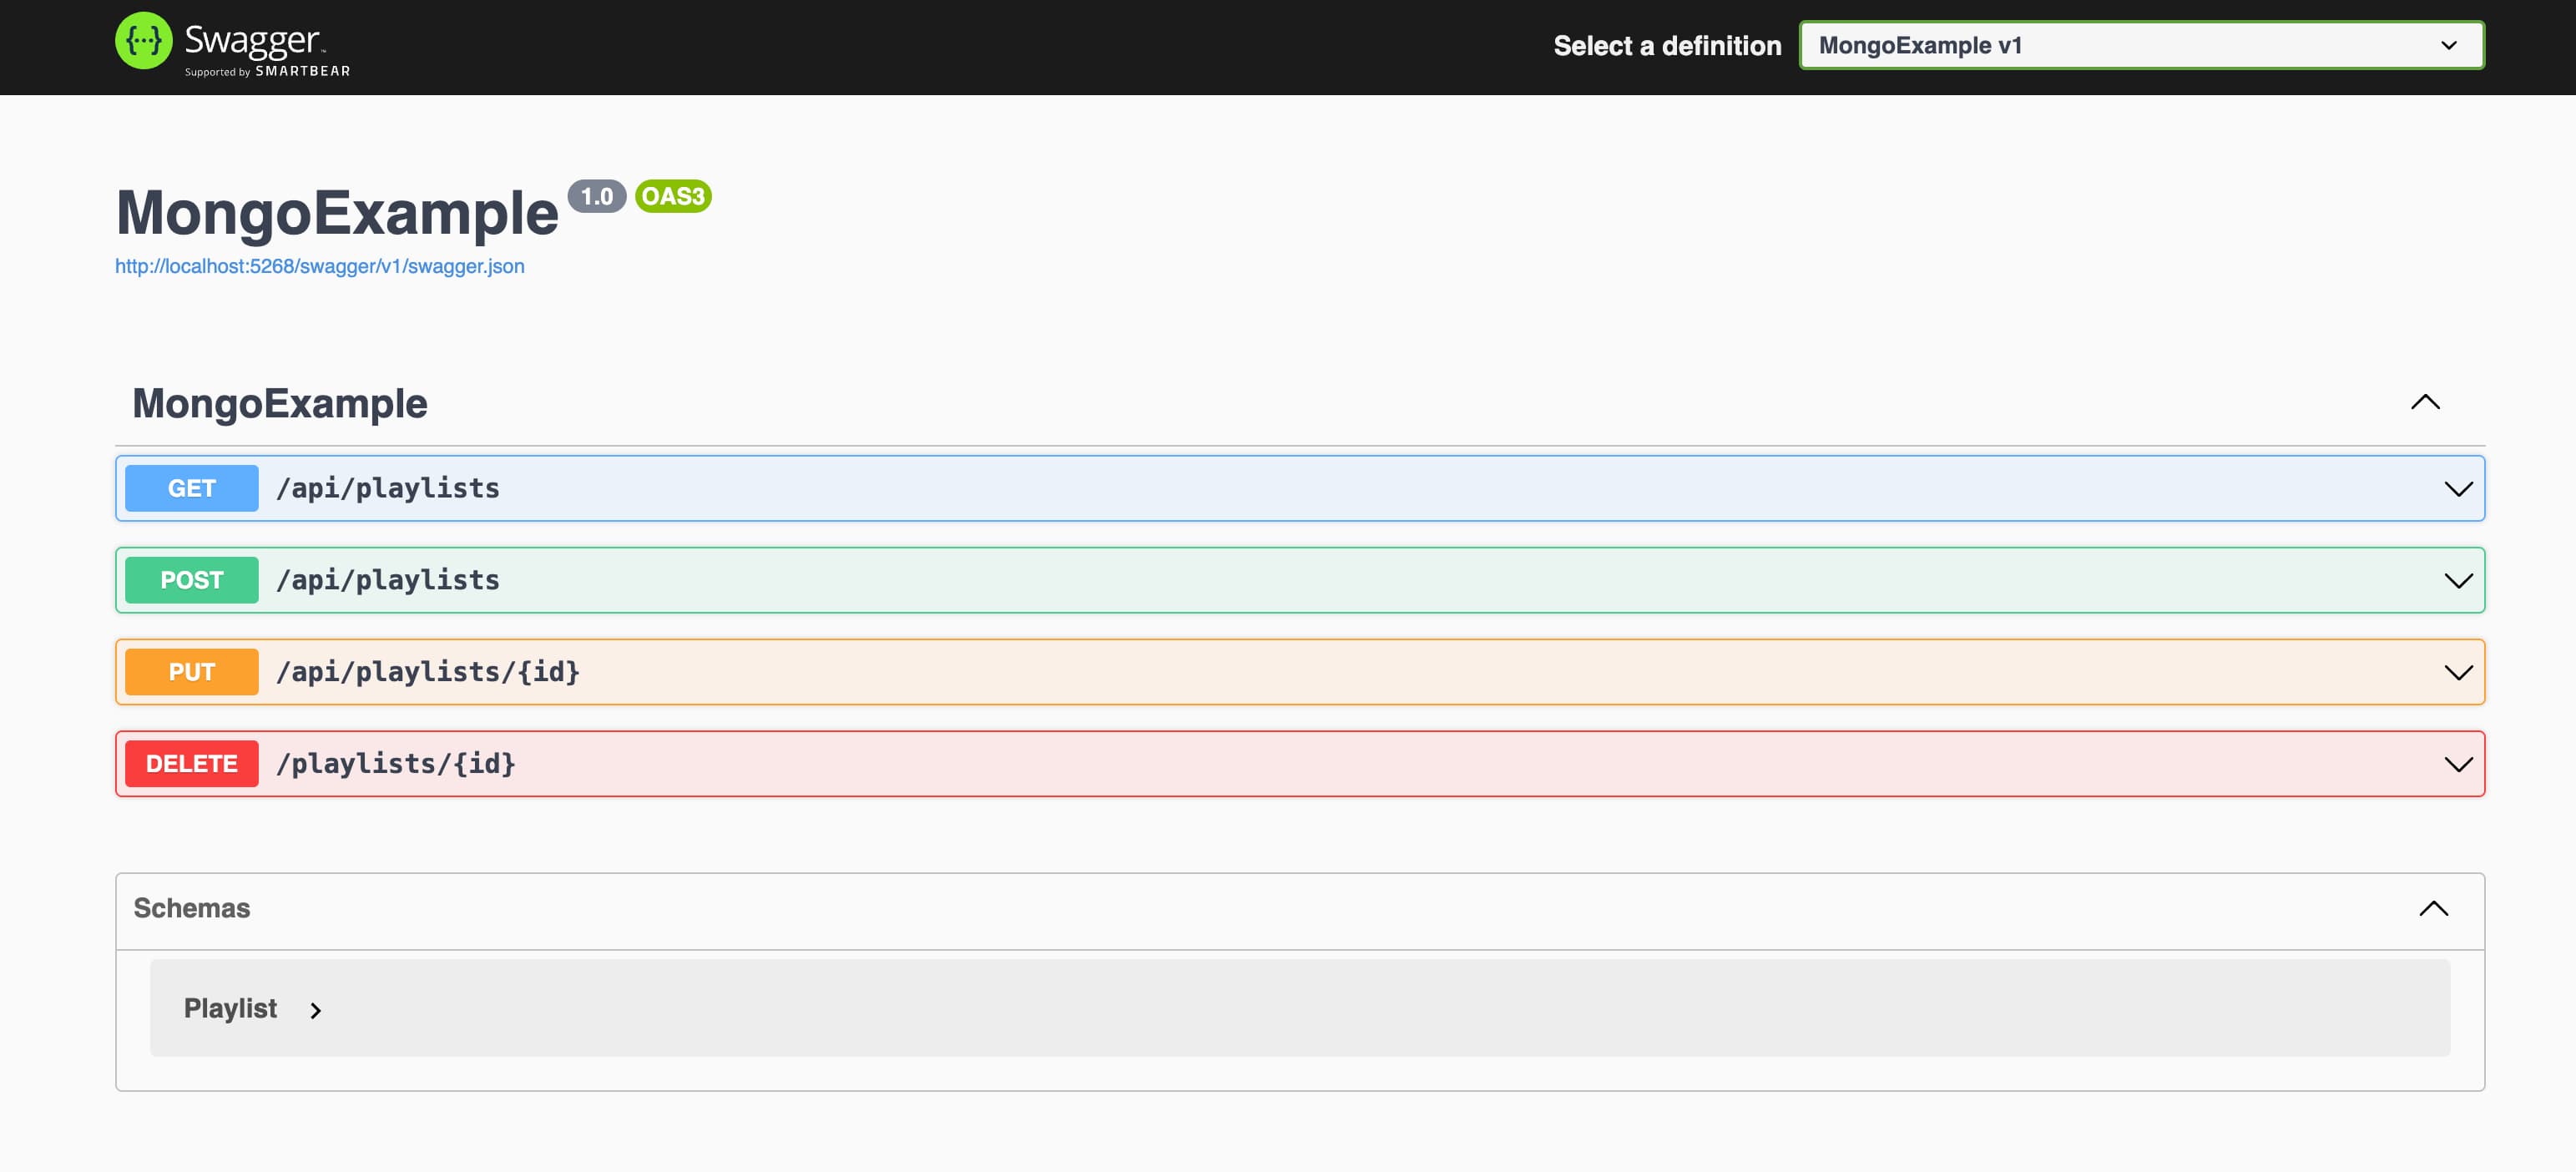
The Swagger UI for the RESTful API.
You can test the application by clicking the Try it out button on each endpoint. To get started, go to the /api/playlists POST endpoint to add some data to the database. Add the following sample data:
{ "username": "testuser", "items": [ "1234", "5678" ] }
Run this request to insert data into the database. You can then go to the GET endpoint to see the data you just inserted. You can also test the PUT and DELETE endpoints to update and delete data.
Next Steps
To learn more about the operations discussed in this tutorial, see the following guides: